$ vue --version
![]() If you have not installed it yet, type the command given below to install Vue.js globally on your Operating system:
$ npm install -g @vue/cli
If you have not installed it yet, type the command given below to install Vue.js globally on your Operating system:
$ npm install -g @vue/cli
![]() After successfully installing Vue.js globally on your Operating system, create the Vue project by typing the “vue create” command given below, followed by the project name:
$ vue create vue-project-name
After successfully installing Vue.js globally on your Operating system, create the Vue project by typing the “vue create” command given below, followed by the project name:
$ vue create vue-project-name
![]() It will ask you to either select the preset or select your own custom preset for the Vue project.
It will ask you to either select the preset or select your own custom preset for the Vue project.
![]() After configuring or selecting the default preset, the Vue project will be created in a while.
After configuring or selecting the default preset, the Vue project will be created in a while.
![]() After creating the Vue project, navigate to the newly created project’s directory using the “cd” command.
$ cd vueprojectname
After creating the Vue project, navigate to the newly created project’s directory using the “cd” command.
$ cd vueprojectname
![]() At this stage, you have successfully set up the Vue project.
At this stage, you have successfully set up the Vue project.
Install Bootstrap
Once your system is ready, and the Vue project is set up! You can install the “bootstrap-vue” using the Yarn or NPM.
If you want to install the simple “bootstrap” for styling purposes, you can type the command given below to install them.
For installing ‘bootstrap-vue’ and ‘bootstrap’ using the Yarn package manager, type the command given below:
$ yarn add bootstrap bootstrap-vue
OR
For installing ‘bootstrap-vue’ and ‘bootstrap’ using the NPM package manager, type the command given below:
$ npm install bootstrap bootstrap-vue --save
![]() Alright! Once the ‘bootstrap’ and ‘bootstrap-vue’ are installed, You have to enable them in the main.js file.
import BootstrapVue from 'bootstrap-vue/dist/bootstrap-vue.esm';
import 'bootstrap-vue/dist/bootstrap-vue.css';
import 'bootstrap/dist/css/bootstrap.css';
Vue.use(BootstrapVue);
Alright! Once the ‘bootstrap’ and ‘bootstrap-vue’ are installed, You have to enable them in the main.js file.
import BootstrapVue from 'bootstrap-vue/dist/bootstrap-vue.esm';
import 'bootstrap-vue/dist/bootstrap-vue.css';
import 'bootstrap/dist/css/bootstrap.css';
Vue.use(BootstrapVue);
![]() After enabling the “bootstrap” and “bootstrap-vue”, you can now use them in your Vue project.
After enabling the “bootstrap” and “bootstrap-vue”, you can now use them in your Vue project.
How to Use Bootstrap in Vue
To use Bootstrap with Vue, ‘bootstrap-vue’ provides various components to use as a Vue component.
For example, a button can be created using the ‘bootstrap-vue’ like this.
<b-button variant="success">Button</b-button>
For knowing about further components, feel free to visit the official documentation page of BootstrapVue.
This is how simple it is to install and start using bootstrap in a Vue project.
Conclusion
Bootstrap is a prevalent CSS front-end library used for building mobile-first and responsive web apps, and with the help of BootstrapVue, we can build such web applications using Vue.
In this post, we walk through the installation of BootstrapVue in a Vue.js project and also see how to enable it and use it.
With the combination of such two robust libraries, we can speed up the development process and beautify our web application to the highest limits.
Vue Watch to make Dynamic Interaction
Vue.js is a very impressive and reactive JavaScript’s front-end framework used to develop front-end websites quickly and easily.
This post will learn about the watch property that is one of the most fundamental concepts.
Vue.js provides a watch property to watch a variable, and on the change of that variable, it allows us to run a function so that we can make Dynamic Interaction.
Let’s try an example and have some dynamic interaction using the Vue Watch property.
Example
We will first try to change some variable at the click of a button, and then using the watch property, we will watch that variable and alter some other variable to make the dynamic changes on the web page.
First, assume we have two variables.data() {
return {
buttonBool: true,
color: "red"
}}
And we have bound the “buttonBool” variable with a button element in the template.
<template>
<div class="test">
<h1>This is a testing page</h1>
<button @click="buttonBool=!buttonBool">Click me!</button>
</div></template>
We want to change the background color of a, let’s say, a division at the click of the button.
So, first, create a div in the template.
<template>
<div class="test">
<h1>This is a testing page</h1>
<button @click="buttonBool=!buttonBool">Click me!</button>
<div></div>
</div></template>
Now, let’s first create a watch property and change the state of the “color” variable at the change of the “buttonBool” variable.
watch:{
buttonBool(){
this.color = !this.color;
}}
Alright! The last step left is to change the classes of the div on the change of color variable.
So, let’s do that by using the class binding feature of Vue.js.
<template>
<div class="test">
<h1>This is a testing page</h1>
<button @click="buttonBool=!buttonBool">Click me!</button>
<div :class="[color ? 'red' : 'green', 'box']"></div></div></template>
Here, I have just assigned the class “red” if the state of the “color” variable is true, else “green” if the state of the color variable is “false,” and the “box” class is assigned in any case.
The CSS for giving the width, height, and background color to the div is as follows.
<style scoped>
.box{
width: 100px;
height: 100px;
margin: 15px auto;}
.red{
background-color: red;}
.green{
background-color: green;}
</style>
Alright, after getting done with the coding stuff, my web page would be like this.
![]() Now, whenever I click the button, the background color of the box should get changed.
Now, whenever I click the button, the background color of the box should get changed.
![]() And you can witness in the gif above, the color of the div is changing at the click of the button.
That’s amazing, right!
So, this is how we can use the Vue Watch to make dynamic interaction on the webpage.
And you can witness in the gif above, the color of the div is changing at the click of the button.
That’s amazing, right!
So, this is how we can use the Vue Watch to make dynamic interaction on the webpage.
Conclusion
In this post, we have tried to change some variable’s state at the click or change of some other variable using the watch property of Vue.js.
We have also made some dynamic changes to the web page.
We have seen that at the click of the button, in the on-click attribute, we changed the variable’s state and shown that the watch property watched the variable and performed some action like changing some other variable’s state.
What is a Vue Directive, and how to use it?
A framework aims to provide such features that make the development process easier and faster for the developers.
Vue.js is such a feature-enriched JavaScript framework that provides many built-in functions and directives to quickly make the development process.
But, there must come some scenarios when you need some functionality that is not available by the framework, so you have to build your own.
In this post, we will learn and take a look at the built-in directives provided by the Vue.js framework, and we will also learn to create and use our own custom-made Vue directive.
Directive
Directives are attributes that you can link with the DOM elements, prefixed by the clause “v-” which helps to know the library that it is a special type of syntax used for performing some tasks.
Directives are usually used for direct manipulation of DOM.
Some of the most used and famous directives are “v-if”, “v-for”, and “v-show”.
The directives are used to apply effects on DOM elements but reactively.
Let’s understand it with an example:
“v-if” Directive
<p v-if= "showText"> You can view the text.</p>
In the above tag, the “v-if” is a directive that will delete or add the paragraph tag “<p>”, depends on the “showText” variable’s truthiness.
“v-show” Directive
Similarly, we have the “v-show” directive which can perform the same functionality described above:
<p v-show= "showText"> You can view the text.</p>
The subtle difference between “v-if” and “v-show” is that “v-if” does not render the element while loading the page if the bound variable is not true and it loads when the variable becomes true.
In contrast, “v-show” will render the element at the web page’s load time but hides it.
So, “v-if” is time effective at the page’s load time and time-consuming when the variable gets true.
It has to render the whole element while “v-show” is time effective upon the truthiness of the variable time-consuming at the load time of the web page.
Alright! Let’s have a look at a directive that takes the argument.
“v-bind” Directive
Another most widely used directive is “v-bind,” which is used for interacting and updating the HTML attributes.
For example, if we want to bind some variable to the “href” attribute of the <a> tag, we can bind the “href” attribute like this:
<a v-bind:href="url"></a>
“v-on” Directive
Just like the “v-bind” directive, Vue provides a “v-on” directive for binding the variable for listening to the events fired in the DOM.
For example, for listening to the Click event and binding some variable to it, the syntax would go like this:
<button v-on:click="buttonBool=!buttonBool">Click me!</button>
In the inverted commas, we can provide the expression as well as functions.
Conclusion
We have learned about the directives in Vue and see how to use the directives in Vue.js.
We have discussed some of the most used and basic built-in directives of Vue.js, which helps a lot and saves a huge amount of time in the development.
Vue Computed Deep Structures
When it comes to the computation of nested or deep data types like arrays or objects, Vue.js or any other programming language does not automatically detect the hierarchical change in the data.
However, we all know that Vue.js provides the watch and computed properties to perform some change variables.
But when it comes to nested data changes, Vue.js does not detect that.
This post will learn to perform some changes by watching the nested data of arrays or objects.
Before learning about watching nested data in Vue.js, let’s first understand how the watch property works?
Watch Property
The watch property is used to watch a variable and allows the user to perform some desired tasks on the variable’s change.
Example: Watch a Variable
For example, at the change of some variable, we want to console something.
The syntax for writing such code in Vue will go like this:
<template>
<div class="test">
<h1>This is a testing page</h1>
<button @click="boolVar=!boolVar">Click</button>
</div></template><script>
export default {
name: "Test",
data(){
return{
boolVar: true
}
},
watch:{
boolVar(){
console.log("Button clicked.")
}
}};</script>
After writing the above code, the web page would be like this.
![]() If we click on the button, the state of the “boolVar” should be altered due to the button’s on-click attribute, and the watch should automatically detect the change in “boolVar” and display the message string on the console.
If we click on the button, the state of the “boolVar” should be altered due to the button’s on-click attribute, and the watch should automatically detect the change in “boolVar” and display the message string on the console.
![]() It worked perfectly fine; the message “Button clicked” is displayed on the console.
But, the watcher fails to detect the change and does not get fired when it comes to watching the arrays or objects.
Let’s see a demonstration of that.
It worked perfectly fine; the message “Button clicked” is displayed on the console.
But, the watcher fails to detect the change and does not get fired when it comes to watching the arrays or objects.
Let’s see a demonstration of that.
Example: Watching an Object
Suppose we have an object in our component, and we want to display the change that happened in the object’s property.
In the example given below, I have created an object with the name of “objVar,” which contains two key-value pairs, “item” and “quantity”.
I have created a button where I am adding “1” to the template tag’s quantity.
Lastly, I am watching the “objVar” object in the watch property and displaying a console message.
<template>
<div class="test">
<h1>This is a testing page</h1>
<button @click="objVar.quantity=objVar.quantity+1">Click</button>
</div></template><script>
export default {
name: "Test",
data(){
return{
objVar: {
item: "Item1",
quantity: 1
}
}
},
watch:{
objVar(){
console.log("Button clicked & Quantity = " + this.objVar.quantity)
}
}};</script>
Now, this code is supposed to display the change in the quantity of the object.
But, when we execute the code and click the button on the web page:
![]() You can see in the above gif; nothing is happening in the console.
The reason behind this is that the watcher does not look deep into the values of the objects, and this is the real problem to which we are going to solve now.
Vue.js provides the deep property for watching deep down into the values of objects and arrays.
The syntax for using the deep property and watching the nested data is as follows:
<script>
export default {
name: "Test",
data(){
return{
objVar: {
item: "Item1",
quantity: 1
}
}
},
watch:{
objVar: {
deep: true,
handler(){
console.log("Button clicked & Quantity = " + this.objVar.quantity)
}
}
}};</script>
In this syntax, we have set the deep property to true and rearranged the handler() function.
Now, after changing the code, if we reload the web page and click on the button:
You can see in the above gif; nothing is happening in the console.
The reason behind this is that the watcher does not look deep into the values of the objects, and this is the real problem to which we are going to solve now.
Vue.js provides the deep property for watching deep down into the values of objects and arrays.
The syntax for using the deep property and watching the nested data is as follows:
<script>
export default {
name: "Test",
data(){
return{
objVar: {
item: "Item1",
quantity: 1
}
}
},
watch:{
objVar: {
deep: true,
handler(){
console.log("Button clicked & Quantity = " + this.objVar.quantity)
}
}
}};</script>
In this syntax, we have set the deep property to true and rearranged the handler() function.
Now, after changing the code, if we reload the web page and click on the button:
![]() Here you can see that the watcher is working and displaying the message in the console.
Here you can see that the watcher is working and displaying the message in the console.
Conclusion
After reading this post, watching and computing deep or nested data structures in Vue.js is not difficult anymore.
We have learned how to watch the change of a value in an object or array and execute some tasks with the help of the “deep” property of Vue.js.
Vue Computed Property not updating; Troubleshooting Steps
Vue.js is a very popular JavaScript library that is known for its reactivity, flexibility, and intuitive API.
However, reactivity and flexibility come with some drawbacks, leading to the developer’s performance or a headache.
The computed property is a very famous and most known feature of Vue.js, which is used to update some variable or perform some calculation depending upon some other variable’s updation.
This post will try to troubleshoot the problems that occurred when the computed property does not work or update what we want.
Let’s have a look at the scenarios, what might go wrong, and Vue Computed Property not updating.
Scenario # 1:
First of all, make sure you did not make any logical error like implementing the wrong logic.
To avoid the possible logical errors, check the following things:
Verify that variable names are correct.
You are taking care of the scopes of the variable using “this”.
Scenario # 2:
The second thing you might have mistaken in the computed property is that you are not caring about the Computed property’s side effects like editing some data inside a computed property or calling other functions.
For example, reversing the array within a computed property.
Suppose we have an array in our component.
data(){
return{
arrVar:[1,2,3]
}
},
In the computed property, we are reversing the array.
computed:{
arrayReverse(){
return this.arrVar.reverse();
}
}
But, when we run the project, it will show an error of ‘Unexpected side effect in “arrayReverse” computed property.’ because it will always do the same task again and again and reverse the original array every time.
So, try to avoid data manipulation in the computed property, and it will work perfectly fine for you.
Scenario # 3:
Another scenario could be that the computed property is stuck in an infinite loop, and it keeps on re-computing something.
Since computed property watches every variable included in the computed property and reacts or gets recomputed on the change of any variable involved in this property, if you change the state of any variable inside the computed property, the computed property detects the change.
It starts to re-compute itself, and it won’t be able to get out of this infinite loop.
These are some of the possible ways which could lead to the computed property not updating problem.
Conclusion
This post has gone through the most common scenarios the developers faced for Vue Computed property not updating and provided profound and to-the-point troubleshooting steps for each scenario.
If you still have not found your solution yet, feel free to ask your questions on the Vue community platforms and get your questions answered within no time.
Vue Computed with Parameter
The Computed property is usually used to compute data from some other data.
It is known for its reactivity because whenever a variable involved in some computed property gets changed, the whole property gets recomputed.This post will learn to pass the parameter to computed property and see how to use Vue computed with parameter.
Before getting started with passing parameters to the computed property, let’s first understand the computed properties by going through the example.
Examples
Suppose we have two variables named “firstName” and “lastName” in our Vue component:
//..
data(){
return{
firstName: "",
lastName: ""
}
},//..
Computed Property
We want to compute a “fullName” property that will combine the “firstName” and “lastName” and recompute the fullName whenever any of the two variables “firstName” and “lastName” gets changed.
So, the computed property for computing the full name would be like this:
//..
computed:{
fullName(){
return this.firstName + ' ' + this.lastName;
}
}//..
Now let’s create some input fields and bind the “firstName” and “lastName” variables to the input fields and also bind the “fullName” property in the ‘p’ tag to view the instant change on the change of the first anime of the last name.
The HTML part of this component will be like this:
![]() Alright! After having all this setup, let’s take a look at our webpage.
Alright! After having all this setup, let’s take a look at our webpage.
![]() If you have successfully written the correct code and run it, you should also have the two input fields on your web page.
Let’s try to type the first name and last name and see either the “fulName” property gets computed or not.
If you have successfully written the correct code and run it, you should also have the two input fields on your web page.
Let’s try to type the first name and last name and see either the “fulName” property gets computed or not.
![]() Here in the screenshot given above, you can witness the marvelous reactivity of Vue.js using the computed property.
You can also witness that it is not like watching a single variable and changing some other variable’s value.
Still, it is watching each variable included in the computed property and re-computing the “lastName”.
Let’s see how we can pass parameters to the computed property and use it.
Here in the screenshot given above, you can witness the marvelous reactivity of Vue.js using the computed property.
You can also witness that it is not like watching a single variable and changing some other variable’s value.
Still, it is watching each variable included in the computed property and re-computing the “lastName”.
Let’s see how we can pass parameters to the computed property and use it.
Pass parameters to the Computed Property
For passing the parameters to the computed property, we just pass the parameters as we do for the function.
For example, in the template, when we have bound the variable “lastName,” we want to pass some string, so the template part of our component would be like this:
![]() Now, in the computed property, the passed parameter can be utilized using the following syntax.
computed:{
fullName(){
return message1 => {
return `${message} ${this.firstName} ${this.lastName}`
}
}
}
This is how we can pass a parameter to the computed and get it in the property and use it.
If we again look at our web page and type the First name and last name, you can have the same functionality and reactivity, but this time, the parameter passed.
Now, in the computed property, the passed parameter can be utilized using the following syntax.
computed:{
fullName(){
return message1 => {
return `${message} ${this.firstName} ${this.lastName}`
}
}
}
This is how we can pass a parameter to the computed and get it in the property and use it.
If we again look at our web page and type the First name and last name, you can have the same functionality and reactivity, but this time, the parameter passed.
![]() This is how simple and easy it is to pass a computed property parameter and use it.
This is how simple and easy it is to pass a computed property parameter and use it.
Conclusion:
The computed property is a very powerful feature of Vue.js, and we have learned that it comes in handy when we have to change them when their dependencies get changed.
We have learned to pass the parameter and use it in the computed property.
How to Build A Simple Blog With Hexo Static Site Generator
In the modern age, websites are the building blocks of information.
From enterprise, eCommerce, social websites to simple blogs, websites allow people to share ideas and thoughts.
This tutorial will show you how you can set up a simple blog using a static site generator that is very fast and easy to use.
What Is An SSG?
SSG, or Static Site Generator, is a web application that converts the dynamic content on a webpage into static content usually stored locally.
Static site generators do not require databases and backends, thereby eliminating the need to learn how to code.
It mainly focuses on writing and presenting the content.
SSG vs.
CMS
The most popular way to create websites and manage content is using CMS or Content management systems such as WordPress, Drupal, Joomla, etc.
CMS systems work by creating and managing content directly using an interactive interface.
Since data in a CMS is retrieved from the database, CMSs are very slow as the content is fetched and served as dynamic content.
CMS systems are also prone to security vulnerabilities as they rely on external plugins written by other developers to increase functionality.
On the other hand, static site generators work by creating content offline mediums such as text editors and renders the final page view upon publication.
Since the content is locally-rendered, with no need for a database, the page renders faster, and load speeds are incredibly fast.
Static site generators are made of pre-compiled code that acts as an engine to render the published content.
How to Build a Static Blog With Hexo
One of the popular choices for building a static site is Hexo.
Hexo is a simple, fast, and powerful SSG application written in NodeJS.
Although there are other choices for building a static site, Hexo allows you to customize your site and integrate various tools.
Let us look at how we can set up a simple static site with Hexo.
Installing Hexo
Before we can build a site, we need to set up hexo requirements and install it.
For this, we require NodeJS and git.
Start by updating your system:
sudo apt-get updatesudo apt-get upgrade
Once you have your system up to date, install git
sudo apt-get install git
Next, install nodejs from nodesource using the command:
curl -sL https://deb.nodesource.com/setup_14.x | sudo -E bash -apt-get install -y nodejs
Once you have Nodejs installed, we can proceed to install hexo using the command:
npm install -g hexo-cli
Working with Hexo
Once you have installed hexo, you can create a site and publish content.
Let us look at how to work with Hexo.
Keep in mind that this is a quick, simple guide.
Refer to the documentation to learn more.
Creating a site
To create a new hexo site, use the command below:
hexo init HexoSitecd HexoSite
npm install
![]()
Understanding Hexo Directory structure
Once you initialize a new Hexo site, you will get a directory structure such as the one below:
-rw-r--r-- 1 cs cs 0 Feb 8 20:51 _config.landscape.yml-rw-r--r-- 1 cs cs 2439 Feb 8 20:51 _config.yml drwxr-xr-x 1 cs cs 4096 Feb 8 20:51 node_modules-rw-r--r-- 1 cs cs 615 Feb 8 20:51 package.json-rw-r--r-- 1 cs cs 56716 Feb 8 20:51 package-lock.json drwxr-xr-x 1 cs cs 4096 Feb 8 20:51 scaffolds drwxr-xr-x 1 cs cs 4096 Feb 8 20:51 source drwxr-xr-x 1 cs cs 4096 Feb 8 20:51 themes
The first file is the _config.yml contains all the settings for your site.
Ensure to modify it before deploying your site because it will contain default values.
The next file is the package.json file that contains the NodeJS application data and configurations.
Here, you will find installed packages and their versions.
You can learn more about the package.json from the resource page below:
https://docs.npmjs.com/cli/v6/configuring-npm/package-json
Creating a Blog
To create a simple blog in hexo, use the command:
hexo new blog “Hello World Blog”
Once created, you can file the markdown file under /source/_posts directory.
You will need to use Markdown markup language to write content.
Creating a new page
Creating a page in Hexo is simple; use the command:
hexo new page “Page-2”
The page source is located under /source/Page-2/index.md
Generating and Serving content
Once you publish your content on hexo, you will need to run the application to generate the static content.
Use the commands below:
$ hexo generate
INFO Validating config
INFO Start processing
INFO Files loaded in 966 ms
INFO Generated: archives/index.html
INFO Generated: Page-2/index.html
INFO Generated: archives/2021/index.html
INFO Generated: index.html
INFO Generated: archives/2021/02/index.html
INFO Generated: js/script.js
INFO Generated: fancybox/jquery.fancybox.min.css
INFO Generated: 2021/02/08/Hello-World-Post/index.html
INFO Generated: css/style.css
INFO Generated: 2021/02/08/hello-world/index.html
INFO Generated: css/fonts/FontAwesome.otf
INFO Generated: css/fonts/fontawesome-webfont.woff
INFO Generated: css/fonts/fontawesome-webfont.eot
INFO Generated: fancybox/jquery.fancybox.min.js
INFO Generated: css/fonts/fontawesome-webfont.woff2
INFO Generated: js/jquery-3.4.1.min.js
INFO Generated: css/fonts/fontawesome-webfont.ttf
INFO Generated: css/images/banner.jpg
INFO Generated: css/fonts/fontawesome-webfont.svg
INFO 19 files generated in 2.08 s
To serve the application, run the command:
$ hexo server INFO Validating config INFO Start processing INFO Hexo is running at http://localhost:4000 .
Press Ctrl+C to stop.
Conclusion
This quick and simple introduction has shown you how to use the Hexo static site.
If you need more information on how to work with Hexo, please refer to the main documentation provided below:
https://hexo.io/docs
How to Authorize Users Using Google OAuth in Node.js
Open Authorization, also known as OAuth, is a protocol used to authorize a user on your website using some third-party service like Google, Github, Facebook, etc.
The third-party service shares some data (name, email, profile picture, etc.) with your website and then authorizes the user on its behalf without managing the passwords and usernames for your website, and saving the users a lot of extra trouble.
How OAuth Works
When a user clicks on “Login with Google”, it takes the user to the Google OAuth consent page.
When the user agrees to the consent and authenticates his identity on Google, Google will contact your website as a third party service and authorize the user on its behalf and share some data with your website.
In this way, the user can be authorized without managing the credentials for your website separately.
Implementing Google OAuth using Node.js
Almost all the programming languages provide different libraries to implement google oauth to authorize users.
Node.js provides ‘passport’ and ‘passport-google-oauth20’ libraries to implement google oauth.
In this article, we will implement an oauth protocol to authorize users to use node.js.
Create a Project on Google
The first step to implement Google OAuth is to create a project on the google developer console for your website.
This project is used to get the API keys used to make requests to Google for open authentication.
Goto the following link and create your project:
https://console.developers.google.com
.
![]()
Configuring Google Project
After you create the project, go into the project and select “OAuth consent screen” from the left side menu.
![]() Click on the ‘create’ button and provide all the details of your project.
Click “Save and Continue” to move on.
Click on the ‘create’ button and provide all the details of your project.
Click “Save and Continue” to move on.
![]() Now provide the scope of your project.
Scopes are the types of permissions to access the user’s data from a google account.
You need to set up the permissions to get specific user data from your google account.
Click “Save and Continue.”
Now provide the scope of your project.
Scopes are the types of permissions to access the user’s data from a google account.
You need to set up the permissions to get specific user data from your google account.
Click “Save and Continue.”
![]() Now add the test users to the project if you want.
Test users are the only allowed users who can access your web application in Testing mode.
For now, we will not enter any test user and click “Save and Continue” to move on to the summary page of the project.
Now add the test users to the project if you want.
Test users are the only allowed users who can access your web application in Testing mode.
For now, we will not enter any test user and click “Save and Continue” to move on to the summary page of the project.
![]() Review your project on the summary page and save the configuration.
Now we will generate credentials for our project.
Select the ‘Credentials’ tab on the left side menu and click on the ‘Create credentials’ button on top to generate OAuth 2.0 Client IDs.
Review your project on the summary page and save the configuration.
Now we will generate credentials for our project.
Select the ‘Credentials’ tab on the left side menu and click on the ‘Create credentials’ button on top to generate OAuth 2.0 Client IDs.
![]() From the dropdown menu, select ‘OAuth client ID’ and specify the type of application as ‘Web application’ and your application’s name.
From the dropdown menu, select ‘OAuth client ID’ and specify the type of application as ‘Web application’ and your application’s name.
![]() On the same page, we have to provide two URIs, the ‘Authorized Javascript Origins’ and the ‘Authorized redirect URIs’.
The ‘Authorized javascript origins’ is the HTTP origin of your web application, and it can not have any path.
The ‘Authorized redirect URIs’ is the exact URI with a path where the user will be redirected after google authentication.
On the same page, we have to provide two URIs, the ‘Authorized Javascript Origins’ and the ‘Authorized redirect URIs’.
The ‘Authorized javascript origins’ is the HTTP origin of your web application, and it can not have any path.
The ‘Authorized redirect URIs’ is the exact URI with a path where the user will be redirected after google authentication.
![]() After entering all the required entries, click on ‘create’ to create OAuth credentials.
After entering all the required entries, click on ‘create’ to create OAuth credentials.
Initiating Node.js Project
So far, we have created a google project to authorize users for our application using google.
Now we are going to initiate the node.js project to implement oauth.
Create a directory named ‘auth’ and initiate the express project.
ubuntu@ubuntu:~$ mkdir authubuntu@ubuntu:~$ cd authubuntu@ubuntu:~$ npm init -y
Installing Required npm Packages
To implement Google OAuth using node.js, we need to install some npm packages.
We will use ‘passport’, ‘express’, ‘path’, and ‘passport-google-oauth20’.
Install these packages using npm.
ubuntu@ubuntu:~$ npm install express passport passport-google-oauth20 path
Writing Node.js Code
First of all, we will write two simple html web pages, the one with a button, and authorize the user when clicked on the button.
The second page will be authorized, and the user will be redirected to the authorized page after authorization.
Create a file ‘public/index.html’.
<html>
<head>
<title>OAuth</title>
</head>
<body>
<a href=”/google/auth”>Authorize Here</a>
</body></html>
Now create a file ‘public/success.html’ with the following content.
<html>
<head>
<title>OAuth</title>
</head>
<body>
<h1>Authorized</h1>
</body>
</html>
After creating web pages, now we will write code to authorize the users to use google oauth.
Create a file ‘index.js’.
// importing required packages
const express = require(‘express’);
const passport = require(‘passport’);
const path = require(‘path’);
const GoogleStrategy = require(‘passport-google-oauth20’).Strategy;
const app = express();// defining parameters// client id is the parameter that we will get from the google developer consoleCLIENT_ID=”xxxxxxx”;// client secret will also be taken from the google developer consoleCLIENT_SECRET=”xxxxx”;// user will be redirected to the CALLBACK_URL after authorizationCALLBACK_URL=”http://localhost:8000/authorized”;// port number must be the same as defined in the developer consolePORT=8000;// configuring passport middleware
app.use(passport.initialize());
app.use(passport.session());
passport.serializeUser( function(id, done) {
done(null, id);});
passport.deserializeUser( function(id, done) {
done(null, id);});// following middleware will run whenever passport.
Authenticate method is called and returns different parameters defined in the scope.
passport.use(new GoogleStrategy({
clientID: CLIENT_ID,
clientSecret: CLIENT_SECRET,
callbackURL: CALLBACK_URL
},
async function(accessToken, refreshToken, profile, email, cb) {
return cb(null, email.id);
}));// serving home page for the application
app.get(‘/’, (req, res) =>{
res.sendFile(path.join(__dirname + ‘/public/index.html’));});// serving success page for the application
app.get(‘/success’, (req, res) =>{
res.sendFile(path.join(__dirname + ‘/public/success.html’));});// user will be redirected to the google auth page whenever hits the ‘/google/auth’ route.
app.get(‘/google/auth’,
passport.authenticate(‘google’, {scope: [‘profile’, ‘email’]}));// authentication failure redirection is defined in the following route
app.get(‘/authorized’,
passport.authenticate(‘google’, {failureRedirect: ‘/’}),
(req, res) =>
{
res.redirect(‘/success’);
});// running server
app.listen(PORT, () =>{
console.log(“Server is running on Port ” + PORT)})
Testing Google OAuth
Now our application is ready, and we can test whether it authorizes the users using google oauth.
Go to the root directory and run the application.
ubuntu@ubuntu:~$ node index.js
Now enter the url of your application into the browser.
http://localhost:8000
It shows the home page with an anchor tag.
![]() When we click on the ‘Authorize Here’, it will redirect to the google oauth page.
When we click on the ‘Authorize Here’, it will redirect to the google oauth page.
![]() Your application name ‘Test’ is displayed on the Google authentication page.
When you authorize your account, it will take you to the authorized page.
Your application name ‘Test’ is displayed on the Google authentication page.
When you authorize your account, it will take you to the authorized page.
![]()
Conclusion
Managing usernames and passwords for different web applications is not a happy task for users.
Many users leave your web application without registering their account just because they do not want to manage credentials.
The authorization process on your web application or website can be simplified by using third-party services like Google, Facebook, etc.
These services authorize users on their behalf, and the user does not need to manage credentials separately.
In this article, we have implemented the google oauth protocol to authorize users to use Node.js.
Introduction to Making GraphQL APIs and Apps in Node.js
The communication and data transfer between the front end and backend of any application occurs through APIs (Application Programming Interface).
There are many different types of APIs used to communicate between the front and back-end applications like RESTful API, SOAP API, GraphQL API, etc.
The GraphQL API is a relatively new technology, and it is much faster than other types of APIs available.
Fetching data from the database using GraphQL api is much faster than the REST API.
While using GraphQL API, the client has control to fetch only the required data instead of getting all the details; that is why GraphQL API works faster than REST API.
Installing Packages
We will build a node.js application using GraphQL API, so we need to install node.js and npm for this before starting the project.
ubuntu@ubuntu:~$ sudo apt-get update -yubuntu@ubuntu:~$ sudo apt-get install nodejsubuntu@ubuntu:~$ sudo apt-get install npm
Setting up Project
We will use the ‘express’ framework from node.js to build our application.
Create a directory named ‘graphql’ and initiate the project.
ubuntu@ubuntu:~$ mkdir graphqlubuntu@ubuntu:~$ cd graphql/ubuntu@ubuntu:~$ npm init -y
![]()
MongoDB Setup
In our GraphQL project, we will use MongoDB as our database.
MongoDB is a schemaless database and stores data in the form of key pairs.
In order to install mongoDB, follow the given steps.
Import the public GPG key for MongoDB.
ubuntu@ubuntu:~$ wget -qO - https://www.mongodb.org/static/pgp/server-4.4.asc | sudo apt-key add -
![]() Create the list file for mongodb.
ubuntu@ubuntu:~$ echo "deb [ arch=amd64,arm64 ] https://repo.mongodb.org/apt/ubuntu bionic/mongodb-org/4.4 multiverse" | sudo tee /etc/apt/sources.list.d/mongodb-org-4.4.list
Create the list file for mongodb.
ubuntu@ubuntu:~$ echo "deb [ arch=amd64,arm64 ] https://repo.mongodb.org/apt/ubuntu bionic/mongodb-org/4.4 multiverse" | sudo tee /etc/apt/sources.list.d/mongodb-org-4.4.list
![]() Update local repositories.
ubuntu@ubuntu:~$ sudo apt-get update -y
Install mongodb package.
ubuntu@ubuntu:~$ sudo apt-get install -y mongodb-org
Start and enable mongod.service.
ubuntu@ubuntu:~$ sudo systemctl start mongod.serviceubuntu@ubuntu:~$ sudo systemctl enable mongod.service
Update local repositories.
ubuntu@ubuntu:~$ sudo apt-get update -y
Install mongodb package.
ubuntu@ubuntu:~$ sudo apt-get install -y mongodb-org
Start and enable mongod.service.
ubuntu@ubuntu:~$ sudo systemctl start mongod.serviceubuntu@ubuntu:~$ sudo systemctl enable mongod.service
![]()
Installing npm Modules
For our GraphQL application, we need to install some npm packages.
We will install cors, express, body-parser, mongoose, etc.
ubuntu@ubuntu:~$ cd graphql/ubuntu@ubuntu:~$ npm install cors express body-parser mongoose --save
To create a GraphQL api, we need to install an extra npm package named ‘apollo-server-express.’ This npm package is used to run graphQL server with all Node.js HTTP frameworks like ‘express.’
ubuntu@ubuntu:~$ npm install apollo-server-express --save
Defining MongoDB Schema
Now we have our environment set up for our GraphQL application in Node.js, and it is time to define a schema for our application.
Create a file ‘models/student.js’ in the project root directory.
// defining student schemaconst mongoose = require(‘mongoose’);const studentSchema = new mongoose.Schema({
name: {
type: String,
required: true
},
class: {
type: Number,
required: true
},
major: {
type: String,
required: true
}}, {
timestamps: true});const Student = mongoose.model(‘Student’, studentSchema);
module.exports = { Student, studentSchema }
In the above-defined schema, every student must have a name, class, and major.
Building GraphQL API
After creating the Student schema, we will now build GraphQL API.
Create a ‘schema.js’ to write GraphQL parameters.
There are two parameters, ‘types’ and ‘resolvers,’ used in GraphQL API.
In ‘types,’ we will specify our schema, the queries (e.g., Making GET requests), and mutations (e.g., Making UPDATE or DELETE requests) to the specified schema.
We will write the different methods defined in ‘types’ to link the queries and mutations with the database in ‘resolvers.’
// importing schema and moduleconst { gql } = require(‘apollo-server-express’);const Student = require(‘./models/student’).Student;// Defining Schema, Query, and Mutation Typeconst typeDefs = gql `
type Student {
id: ID!,
name: String!,
class: Int!,
major: String!
}
type Query {
getStudents: [Student],
getStudentById(id: ID!): Student
}
type Mutation {
addStudent( name: String!, class: Int!, major: String! ): Student
updateStudent( name: String!, class: Int!, major: String! ): Student
deleteStudent( id: ID! ): Student
}`// Defining Resolversconst resolvers = {
Query: {
getStudents: (parent, args) => {
return Student.find({});
},
getStudentById: (parent, args) => {
return Student.findById(args.id);
}
},
Mutation: {
addStudent: (parent, args) => {
let student = new Student({
name: args.name,
class: args.class,
major: args.major
});
return student.save();
},
updateStudent: (parent, args) => {
if(!args.id) return;
return Student.findOneAndUpdate({
_id: args.id
},
{
$set: {
name: args.name,
class: args.class,
major: args.major
}
},
{ new: true }, (err, Student) => {
if(err) {
console.log(err);
} else {};
})
}
}}
module.exports = {
typeDefs,
resolvers}
Creating GraphQL API Server
Now we are almost done creating the GraphQL Application.
The only step left is to create the server.
Create a file named ‘app.js’ to configure server parameters.
// importing required packagesconst express = require(‘express’);const mongoose = require(‘mongoose’);const bodyParser = require(‘body-parser’);const cors = require(‘cors’);const { ApolloServer } = require(‘apollo-server-express’);// importing schemaconst { typeDefs, resolvers }= require(‘./schema’);// connecting to MongoDBconst url = “mongodb://127.0.0.1:27017/students”;const connect = mongoose.connect(url, { useNewUrlParser: true });
connect.then((db) => {
console.log('Connection Successful');}, (err) => {
console.log(err);});// creating serverconst server = new ApolloServer({
typeDefs: typeDefs,
resolvers: resolvers});const app = express();
app.use(bodyParser.json());
app.use(‘*’, cors());
server.applyMiddleware({ app });
app.listen( 8000, () =>{
console.log('listening to 8000');})
Testing the GraphQL API
We have our graphQL server up and running on port 8000, and it is time to test the GraphQL API.
Open the GraphQL webpage in the browser by visiting the following url.
http://localhost:8000/graphql
And it will open the following webpage.
![]() Add the student to the database using graphQL API.
Add the student to the database using graphQL API.
![]() Similarly, add more students, and after adding the student, get all the students using GraphQL API.
Similarly, add more students, and after adding the student, get all the students using GraphQL API.
![]() Note the ID of any of the Students and get the specific student using its id.
Note the ID of any of the Students and get the specific student using its id.
![]()
Conclusion
Fetching data from the database using the standard REST API makes the query slow as sometimes we get more data than required.
Using GraphQL, we can fetch exactly the required data that makes the GraphQL API faster.
In this demo project, we only have a single schema, so we have created GraphQL API for that single schema.
Also, we have defined three to four methods for the schema.
You can create more than one query or mutations according to your application.
How to Deploy GraphQL Application Using Node.js on EC2 Server
GraphQL, also known as Graph Query Language, established and maintained by Facebook, is a query language used for APIs.
It is built using JavaScript, Scala, Java, and Ruby programming languages.
Its basic purpose is to ask for the data from server to client.GraphQL aggregates the data from different sources.
Aggregation is the process of filtering data on the server side and then sending the filtered data to the client.
Without aggregation, we send all the data to the client, and then the data is filtered at the client-side.
This makes the system slow, and we can improve the efficiency of an API by using GraphQL.
Here we will learn to deploy a simple GraphQL application using node.js on an EC2 server.
Installing Required Packages
The first step to deploy your graphQL application is to ready your server by installing the required packages.
Log in to the server using SSH.
ubuntu@ubuntu:~$ ssh ubuntu@IPAdress -i KeyPair.pem
NOTE: Make sure the security group of the instance is configured to allow connection from port 22 and the private key file has 400 permission.
Update Ubuntu repositories.
ubuntu@ubuntu:~$ sudo apt-get update -y
Now install node.js and npm on your ubuntu server.
ubuntu@ubuntu:~$ sudo apt-get install nodejs -yubuntu@ubuntu:~$ sudo apt-get install npm -y
Verify the installation by checking the version of node.js and npm.
ubuntu@ubuntu:~$ node -vubuntu@ubuntu:~$ npm -v
![]()
Move GraphQL Application to EC2 Server
The EC2 instance is ready to deploy graphQL applications in node.js.
Now we will move our code to the EC2 instance.
Two common ways to copy the code to the server are listed below and will be discussed here.
Copy code using scp command
Clone application code from Github, Gitlab, or Bitbucket
Copy Application Using scp Command
In order to copy your application to the EC2 server using the scp command, First of all, remove the ‘node_modules’ directory from your graphQL application.
This directory has all the npm packages required to run the application.
We will install these packages later before starting the graphQL application.
Now compress the project directory into a zip file.
After creating the zip file, we will move the project zip file to the server.
Linux and windows have different methods to create a zip file.
Windows
In windows, right-click on the application root directory and go to the ‘send to’ option.
It will open a submenu.
Click on the ‘Compressed (zipped) folder’ to create a zip file of the graphQL application.
Linux or Mac
In Linux or Mac OS, we will use the ‘zip’ command to create a zip file of the project.
ubuntu@ubuntu:~$ zip -r graphQL.zip graphQL
The above command will generate the graphQL.zip file of the graphQL directory.
Upload Application to the Server
Now we have a zip file of our application, and we can upload the zip file to the server by using the scp command.
ubuntu@ubuntu:~$ scp -i KeyPair.pem graphQL.zip ubuntu@IPAddress:~/
The above command will move the project zip file to the remote server’s home directory over the ssh connection.
Now on the remote server, unzip the project zip file.
ubuntu@ubuntu:~$ unzip graphQL.zip
Clone Application From Github, Bitbucket or Gitlab
The second method to copy application code to the server is using git.
Install git from the command line on the EC2 server.
ubuntu@ubuntu:~$ sudo apt install git
Check the git version to verify the installation.
ubuntu@ubuntu:~$ git --version
![]() If it does not give the version of git, then git is not installed.
Now clone the application from the github, gitlab, or bitbucket.
Here we will clone the application code from the github.
ubuntu@ubuntu:~$ git clone ttps://github.com/contentful/the-example-app.nodejs
Starting the GraphQL Application
Now we have our graphQL application on the remote server.
Go to the root directory of the graphQL application and install the required npm packages to run the graphQL application.
ubuntu@ubuntu:~$ cd graphQLubuntu@ubuntu:~$ sudo npm install
This command will analyze the package.json file in the project and install all the required npm packages.
After installing the required packages, now we will start the graphQL application.
ubuntu@ubuntu:~$ node app.js
If it does not give the version of git, then git is not installed.
Now clone the application from the github, gitlab, or bitbucket.
Here we will clone the application code from the github.
ubuntu@ubuntu:~$ git clone ttps://github.com/contentful/the-example-app.nodejs
Starting the GraphQL Application
Now we have our graphQL application on the remote server.
Go to the root directory of the graphQL application and install the required npm packages to run the graphQL application.
ubuntu@ubuntu:~$ cd graphQLubuntu@ubuntu:~$ sudo npm install
This command will analyze the package.json file in the project and install all the required npm packages.
After installing the required packages, now we will start the graphQL application.
ubuntu@ubuntu:~$ node app.js
Running Application as Daemon
When we run the application using the standard method as described above, it runs in the foreground, and the application stops when you close the terminal window.
We can run the application as a background process by appending the ampersand (&) sign to the command.
ubuntu@ubuntu:~$ node app.js &
The problem with this method is that when we modify our application code, the applied changes will not reflect automatically.
We will have to restart the application every time we modify the code to apply the changes.
In order to run the application in the background and to apply changes automatically, we will use an npm package named pm2.
Install pm2 on the server.
ubuntu@ubuntu:~$ sudo npm install -g pm2
Start the graphQL application using pm2.
ubuntu@ubuntu:~$ pm2 start app.js --name “graphQL” --watch
The ‘–name’ flag will name the background process, and we can start and stop the application using the name.
The ‘–watch’ flag will go on checking the application code to apply changes immediately.
You can learn more about pm2 by visiting the following link
https://pm2.keymetrics.io/
Querying GraphQL API from Browser
We can configure our graphQL application to make graphQL queries from the browser manually.
For this, we have to create a separate HTTP endpoint on which we will mount the graphQL API server.
And this HTTP endpoint will be used to make manual queries.
Following is the code to create the graphQL api server endpoint.
const express = require(‘express’);
const { graphqlHTTP } = require(‘express-graphql’);
const { buildSchema } = require(‘graphql’);
const graphQLSchema = buildSchema(`
type Query{
message: String
}`);
const func = {
message: () =>
{
return ‘you are using graphql api server’;
}};
const server = express();
server.use(‘/graphql’, graphqlHTTP({
schema: graphQLSchema,
rootValue: func,
graphiql: true}));
server.listen(3000);
Now, after running the server, we can access the graphQL api server on the following route.
http://localhost:3000/graphql
![]()
Querying GraphQL API Using CLI
In the previous section, we made graphQL queries from the browser using graphiql.
Now we are going to make graphQL queries using the command-line interface in ubuntu.
From the command line, to make an HTTP POST request, we will use the curl module.
ubuntu@ubuntu:~$ curl -X POST -H "Content-Type: application/json" -d '{"query": "{ message }"}' http://localhost:3000/graphql
![]()
Querying GraphQL API Programmatically
In order to make graphQL query programmatically, we will use the ‘node-fetch’ module in node.js.
Open node.js in the terminal.
ubuntu@ubuntu:~$ node
Now make the HTTP POST request to the server using the ‘node-fetch’ module.
![]() GraphQL is an efficient query language, and it can decrease the response time of a query made to the database.
The standard api calls to fetch data from the database involve many unuseful data in the response, and hence response time increases, which decreases the efficiency.
The query made to the databases using GraphQL returns only the useful data and hence decreases the response time.
In this article, we have deployed our graphQL application on an EC2 instance.
GraphQL is an efficient query language, and it can decrease the response time of a query made to the database.
The standard api calls to fetch data from the database involve many unuseful data in the response, and hence response time increases, which decreases the efficiency.
The query made to the databases using GraphQL returns only the useful data and hence decreases the response time.
In this article, we have deployed our graphQL application on an EC2 instance.
WebSocket Example Program
The WebSocket protocol allows for two-way communication to occur between a client and a server.
This process is similar to the way in which calls on your phone take place: first, you establish a connection, and then you can start communicating with one another.
The WebSocket protocol is used almost everywhere – from multiplayer browser games to chat applications.
This article shows you how to create a WebSocket protocol and use it to communicate with multiple users.
Prerequisites
Before moving on to the process of creating and using a WebSocket protocol, you first need to install a few things that are required for this process.
The first thing that you need to install is Node.js, a server-side platform that converts the JavaScript programming language into machine code that allows you to run JavaScript directly on your computer.
To install Node.js, Windows users can simply go to the official Node.js website and click on the green LTS button found in the center of the screen.
![]() For Linux and macOS users, click on the Downloads section in the sub-header of the website.
For Linux and macOS users, click on the Downloads section in the sub-header of the website.
![]() After opening the Downloads section, you will see installation files for all three major platforms.
Select a package that is supported by your system.
After opening the Downloads section, you will see installation files for all three major platforms.
Select a package that is supported by your system.
![]() Run the installer that comes with the downloaded files, and Node.js will be installed on your computer.
To check whether the program has been installed, open the terminal and issue the following command:
$ node -v
Run the installer that comes with the downloaded files, and Node.js will be installed on your computer.
To check whether the program has been installed, open the terminal and issue the following command:
$ node -v
![]() After installing Node.js, you now have access to various JavaScript modules, which will make your work more efficient in the long run.
Open the directory in which you want to create your client and server architecture, then open the terminal inside that directory and run the following command:
$ npm init -y
After installing Node.js, you now have access to various JavaScript modules, which will make your work more efficient in the long run.
Open the directory in which you want to create your client and server architecture, then open the terminal inside that directory and run the following command:
$ npm init -y
![]() This command is used to create the package.json file that allows you to set up and install different Node.js packages.
Install the WebSocket protocol package by issuing the following command in the terminal:
$ npm install ws
This command is used to create the package.json file that allows you to set up and install different Node.js packages.
Install the WebSocket protocol package by issuing the following command in the terminal:
$ npm install ws
![]() Create three files, called index.html, client.js, and server.js.
As indicated by the names, these JavaScript files are the client and server architecture of our WebSocket protocol.
Now, we can finally start writing the code of our client and server applications.
Create three files, called index.html, client.js, and server.js.
As indicated by the names, these JavaScript files are the client and server architecture of our WebSocket protocol.
Now, we can finally start writing the code of our client and server applications.
Creating a WebSocket Server
To create a WebSocket server, we will start by writing the code for the server.
Open the server.js file that you created inside your text editor or IDE in the previous section and enter the following lines inside the file.
const WebSocket = require('ws');const ws = new WebSocket.Server({ port: 8080 });
console.log("Server Started");
ws.on('connection', (wss) => {
console.log("A new Client Connected")
wss.send('Welcome to the Server!');
wss.on('message', (message) => {
console.log(`Server Received: ${message}`);
wss.send('Got your Message: ' + message);
});});
Now, we will explain what each line is doing in greater detail.
Code Explanation
As mentioned previously, there are some built-in modules available in Node.js that make your work much easier.
To import these modules, we will use the require keyword.
const WebSocket = require('ws');const ws = new WebSocket.Server({ port: 8080 });
console.log("Server Started");
The first line is used to import the Node.js WebSocket module.
Using this module, in the next line, we create our WebSocket server, which is listening on port 8080.
The console.log() line is simply there to let us know that the Server has started.
You will see this appear inside your terminal when you run the following command in the terminal:
$ node server
![]() In the next line, we are establishing a connection between the server and the client.
ws.on('connection', (wss) => {
console.log("A new Client Connected")});
After a connection has been established, the wss.send() line sends a message to the client.
In this case, the message is “Welcome to the Server.”
wss.send('Welcome to the Server!');
Finally, the wss.on (‘message’) is for the server to receive the message from the client.
For confirmation, the server sends this message back to the client in the last line.
wss.on('message', (message) => {
console.log(`Server Received: ${message}`);
wss.send('Got your Message: ' + message);
});
In the next line, we are establishing a connection between the server and the client.
ws.on('connection', (wss) => {
console.log("A new Client Connected")});
After a connection has been established, the wss.send() line sends a message to the client.
In this case, the message is “Welcome to the Server.”
wss.send('Welcome to the Server!');
Finally, the wss.on (‘message’) is for the server to receive the message from the client.
For confirmation, the server sends this message back to the client in the last line.
wss.on('message', (message) => {
console.log(`Server Received: ${message}`);
wss.send('Got your Message: ' + message);
});
Creating a WebSocket Client
For the client-side, we need both the index.html file and the client.js file.
Of course, you can simply add the content from the client.js file into your index.html file, but I prefer keeping them separate.
Let us first look at the client.js code.
Open the file and enter the following lines inside of the file:
const socket = new WebSocket('ws://localhost:8080');
socket.addEventListener('open', () => {
console.log('Connected to the Server!');});
socket.addEventListener('message', (msg) => {
console.log(`Client Received: ${msg.data}`);});const sendMsg = () => {
socket.send('Hows it going amigo!');}
Code Explanation
Like with the server.js, we will create a new WebSocket that is listening to port 8080, which can be seen in the localhost:8080 section of the code.
const socket = new WebSocket('ws://localhost:8080');
In the next line, addEventListener makes your client listen to any events that are currently happening.
In this case, it would be creating and starting the server.
Once the connection is established, the client outputs a message to the terminal.
socket.addEventListener('open', () => {
console.log('Connected to the Server!');});
Once again, the client listens to any events currently happening.
When the server sends a message, the client receives this and then displays the message in the terminal.
socket.addEventListener('message', (msg) => {
console.log(`Client Received: ${msg.data}`);});
The last few lines are simply a function where the client is sending a message to the server.
We will connect this to a button in our html file for a better understanding of how this is working.
const sendMsg = () => {
socket.send('Hows it going amigo!');}
Preparing an HTML File
Finally, open the index.html file and add a reference to your client.js file inside of it.
In my case, I will simply add the following lines of code:
<!DOCTYPE html><html lang="en"><head>
<meta charset="UTF-8">
<meta name="viewport" content="width=device-width, initial-scale=1.0">
<title>Client</title></head><body>
<button onClick="sendMsg()">Send Message to Server</button></body><script src="client.js"></script></html>
As you can see in the lines below, src (inside the script tag) refers to the client javascript file.
The sendMsg function, which was created in the client.js file, has also been connected to the button’s onClick function.
<button onClick="sendMsg()">Send Message to Server</button>
<script src="client.js"></script>
Putting Everything Together
You can now start testing your Client and Server Architecture.
First, open the terminal and run the following command to start your server:
$ node server
![]() After starting your server, open the directory in which your index.html file is present, and double-click on it to open it in your browser.
You will see the following message appear in the terminal stating that a client has connected:
After starting your server, open the directory in which your index.html file is present, and double-click on it to open it in your browser.
You will see the following message appear in the terminal stating that a client has connected:
![]() You can also check the messages sent from the server to the client by pressing the right-click button and then opening the Inspect window.
In this window, click the Console section, and you will be able to see the messages sent from the server.
You can also check the messages sent from the server to the client by pressing the right-click button and then opening the Inspect window.
In this window, click the Console section, and you will be able to see the messages sent from the server.
![]() Once you click on the button, both the server and client will be able to send and receive messages to and from each other.
Server:
Once you click on the button, both the server and client will be able to send and receive messages to and from each other.
Server:
![]() Client:
Client:
![]() Voilà, your WebSocket connection has been established!
Voilà, your WebSocket connection has been established!
Conclusion
The WebSocket protocol is an excellent way to establish communication between a client and a server.
This protocol is used in several fields, including multiplayer browser games, chat systems of various social media platforms, and even collaboration processes between coders.
Vue.js vs.
Django
When you are required to choose a library or framework for building web applications, there is no question that JavaScript libraries are preferred over any other library.
But that does not mean that other libraries are not good enough.
Vue.js and Django are both famous JavaScript web frameworks.
They are also both open-source tools.
Vue.js is famous for building clean, reusable, component-based web applications.
Django is a framework that is built on Python and is known for its rapid development and rational code design.
In this article, we will discover some of the basic and more technical differences between Vue.js and Django.
This includes the pros and cons of each framework, the companies that currently use these frameworks, integrated tools, and much more.
Difference between Vue.js and Django
Vue.js is a front-end JavaScript framework that generates pages on the client-side.
Because it renders pages on the client-side, Vue.js costs more initial load time, but it gives a better experience when it is necessary to navigate between pages.
While Django is a full-stack Python framework and it generates pages on the server-side.
Its server-side rendering helps in initially loading the page but while navigating we may have to face performance issues due to the network latency.
Pros of Vue.js
Vue.js is a simple, easy-to-use, and fantastic library for your needs.
You can learn it hands-on if you know Html, CSS, and JavaScript.
Vue.js is a framework with a fast learning curve signature.
The documentation written for Vue.js is also easy to understand and extremely detailed, as well.
The documentation is so well written that you should not feel confused, even when working with it all day.
All steps are explained clearly and the Vue.js documentation is one of the best guides available for any web framework.
Vue.js is a complete and functional JavaScript ecosystem, and it stands as one of the top front-end frameworks.
Pros of Django
Django is known for its rapid development, and it is an open-source tool.
This framework has a great community, as well.
Django is an elegant MVC Framework that helps you in writing beautiful code.
This framework is free to use, has great documentation, and is very easy to learn, as well.
It also provides great packages and libraries to help in development.
Cons of Vue.js
The community of Vue.js is smaller than the other two competitive frameworks, reactJS and Angular.
Vue.js does not support fragments, and it only supports multiple root nodes programmatically.
Another con of Vue.js is its YXML vs.
HTML markup.
Cons of Django
Django is an underpowered templating framework and has an underpowered ORM.
Its auto-reload restarts the whole server.
Django’s URL dispatcher ignores the HTTP method and has some coupling of internal subcomponents.
Having cons does not necessarily mean that a framework is bad.
Actually, every framework comes with the intention of fulfilling some particular need or providing some specific value.
It is a well-known fact that every framework has its own features and standards that differentiate it from other frameworks, and it is easy to prioritize one over another according to your needs.
Companies that Use Frameworks
Both of these frameworks are backed by good companies.
Vue.js is backed by a lot of big names, such as:
Alibaba
Xiaomi
Laracast
Trivago.com
Django is also backed by some big names, such as:
Pinterest
Instagram
Udemy
Robinhood
Conclusion
In this article, we reviewed both the Vue.js and Django frameworks and pointed out their differences.
We also discussed the pros and cons of each framework and mentioned the name of the companies backed by these frameworks.
Vue.js is becoming quite popular among JavaScript frameworks and front-end web development at an increasing pace, specifically in terms of single-page applications and user interfaces.
Meanwhile, Django will have its own recognition of being a full-stack and rapid development framework.
Vue.js Router
Vue.js is a reactive javascript framework, which is used to build UIs(User Interfaces) and SPAs(Single-page Applications) and developers love to code and feel freedom and comfort while developing applications in Vue.js.
For routing purposes, Vue.js does not provide the built-in routing feature.
But there is an official third party library with the name of Vue Router for providing this feature.
By using this feature we can navigate between the web pages but without reloading.
So, in this article, we are going to see how we can install and use Vue Router in Vue.js.
Installation
We can install the Vue router into an existing Vue.js project by running the following command in the terminal
npm install vue-router
After a successful installation, we need to import VueRouter in the main.js file in the src directory as well using the following syntax
import Vue from 'vue'import router from './router'
Vue.use(router)
After importing the router, you are good to go and use vue-router in your project.
But if you are installing Vue.js using Vue CLI.
You won’t need this extra installation step.
You can add a vue-router plugin during selecting a preset.
Usage
The usage of the vue-router is very simple and easy to use.
First, in the template or HTML
<template><div id="nav"><router-link to="/">Home</router-link> |<router-link to="/about">About</router-link></div><router-view /></template>
In this pretty simple and clear example of vue-router.
We have created simple navigation using router-link components and provide the link using the prop named ‘to’.
The router-link works the same as an anchor ‘a’ tag.
It is actually rendered as an ‘a’ tag by default.
In the router-view, we will have the relative component which matches the route.
In the javascript, we first have to register and import the components to define their routes.
We suppose that we have a component named Comp.vue in the views directory to which we will import in the router’s index.js file in the router directory and define it as a route.
To import a component, we use the following statement
import Comp from "../views/Comp.vue";
After importing, we have to define the route now and map it to the component.
Like this,
const routes = [{
path: "/",
name: "Comp",
component: Comp}];
We can give multiple routes too, separated by a comma.
Like this,
const routes = [{
path: "/",
name: "Comp",
component: Comp},{
path: "/comp2",
name: "Comp2",
component: Comp2}];
After defining the routes.
Pass routes array to the router instances.
So, let’s create the router instance as well
const router = createRouter({
routes // short for `routes: routes`});
In the end, in the main.js file.
We have to create the root instance and mount that as well and inject the routes in it so that the whole app becomes aware of the routes.
createApp(App)
.use(router)
.mount("#app");
By using this injection technique.
We can access the router in any component, using this.$router.
We can now programmatically push routes at the click of a button or anything you want, instead of using the router-link component.
For example,
methods: {
clickFunc() {this.$router.push('/about')}}
Wrapping up and summary
In this article, we have learned to install Vue Router using different ways and learned to use Vue router programmatically and in the Vue.js’s template.
We have also learned to set up the Vue Router in an existing project in a very easy and step by step detailed guide.
If you want to learn more about the Vue Router, kindly visit Vue Router: Official Docs.
Vue.js Emit Custom Events
Vue.js is a versatile and full-fledged framework for building huge web applications.
Any web application is divided into the Components.
For example, a simple website that includes a header, sidebar, and some other components.
In order to manage and handle this component-based approach, Vue.js offers the parent-child relationship between the components and if we want to send some data across components.
Vue.js offers props to send data from the parent to a child component but to send data from the child to the parent; we have to emit custom events.
In this article, we learn about firing and listening to custom events.First of all, let’s see how to fire a custom event in Vue.js and then how to listen to that event.
The syntax for firing an event in Vue.js is
this.$emit('eventName')
In this syntax, we need to be careful while giving a name to the event because using the same name; we will later listen to this event.
In order to listen to this event, we can listen to it as we listen to a click event in Vue.js.
For example
<myComponent @eventName="doSomething"></myComponent>
We can write any expression in the inverted commas as well as a function.
So let’s try an example to better understand it.
Example
Suppose we have a Component named “parentComponent,” which includes a child component in it with the name of “childComponent” to which we are passing a message using props.
<template><h1>Parent Component</h1><div><h2>Child Component</h2><ChildComponent msg="Hello Child" /></div></template><script>import ChildComponent from './components/ChildComponent.vue'export default {
name: 'ParentComponent',
components: {
ChildComponent}}</script>
In the child Component, we are getting props and showing the message in the ‘p’ tag.
<template><p>{{ msg }}</p></template><script>export default {
name: "ChildComponent",
props: {
msg: String}}</script>
Now after having these two components set up.
Let’s say hello back to our ParentComponent.
In order to say hello back, we will first create a button, and at the click of that button, we will call the “helloBack” function.
After creating the button, the child component’s HTML would be like this
<template><p>{{ message }}</p><button @click="helloBack">Send Hello Back</button></template>
Let’s create the “helloBackFunc” function in the methods object as well.
In which we will emit the “helloBackEvent” along with a “helloBackVar” variable that contains the string “Hello Parent”.
After creating a function, the javascript of the child component would be like this
<script>export default {
name: "ChildComponent",
props: {
msg: String},
data(){return{
helloBackVar: 'Hello Parent'}},
methods:{
helloBackFunc(){this.$emit('helloBackEvent', this.helloBackVar)}}}</script>
We are done with firing the event.
Now, let’s move to the parent component for listening to the event.
In the Parent component, we can simply listen to the event, just like we listen to the click event.
We will simply listen to the event in the ChildComponent’s tag and calls the “thanks()” function on it.
<ChildComponent @helloBackEvent="thanks($event)" msg="Hello Child" />
In the thanks function, we will assign the passed string to the variable named “thanksMessage”.
After creating the function and assigning the passed string to the variable, the javascript of the “parentComponent” would be like this
<script>import ChildComponent from './components/ChildComponent.vue'export default {
name: 'App',
components: {
ChildComponent},
data(){return{
thanksMessage: ''}},
methods: {
thanks(m){this.thanksMessage = m;}}}</script>
And bind the “thanksMessage” variable in the template somewhere to see either it works or not.
<template><h1>Parent Component</h1><p>{{ thanksMessage }}</p><div><h2>Child Component</h2><ChildComponent @helloBackEvent="thanks($event)" msg="Hello Child" /></div></template>
After creating and writing all this code, go to the web page and reload it to get the latest functionalities.
![]() We can see that the props are conveyed successfully to the child component.
Now, if we click the button, which is actually in the child component.
The thanks message should be displayed right after the parent Component Heading.
We can see that the props are conveyed successfully to the child component.
Now, if we click the button, which is actually in the child component.
The thanks message should be displayed right after the parent Component Heading.
![]() As you can see, it is displayed.
So, this is how we can emit or fire the custom events and listen to them in some other component in Vue.js.
As you can see, it is displayed.
So, this is how we can emit or fire the custom events and listen to them in some other component in Vue.js.
Summary
In this article, we have learned to emit custom events in the Vue.js.
This article contains a step by step proper example to understand it with a brief explanation along with it.
So, we hope this article helps in having better and clear concepts of emitting custom events in Vue.js.
For more such useful content, keep on visiting linuxhint.com
What is Vue.js, and Why is it Cool?
Vue.js is a progressive JavaScript framework, which is used to build UIs (User Interfaces) and SPAs (Single-page Applications).
This framework is famous for its fast-paced learning curve.
It is such an easy to learn and approachable library that with the knowledge of HTML, CSS, and JavaScript, we can start building web applications in Vue.js.
The fast learning curve is kind of a signature of this framework.
It is a versatile framework for our need as a library or a full-fledged framework for building huge web apps.
Evan You have created this framework.
The idea of Evan You behind this framework is to build the best framework by combining the best features from already existing Angular and react Frameworks.
Before building Vue.js, Evan You was working at Google.
Inc and worked on Angular based projects.
So, he came up with the idea of building his own framework.
He picked the best parts of Angular, like template syntax, easy to use, and picked the best parts of React as well, like two-way data binding, the concept of props, component-based approach, and combined them to make a new framework Vue.js better than both of them.
Competition
Every framework has its own features and characteristics, because of which they are known and get priority over any other framework.
Vue.js has a record of having the most stars at Github.com for the past 5 years.
Although the community of Vue.js is smaller than the react JS, Vue.js stars record is describing and telling about the fans of Vue.js.
Whoever uses it once, he/she falls in love with it.
Evolution and Growth
Vue was released way back in 2014.
Since then, it is continuously evolving.
At the beginning of 2018, Vue.js started beating Angular and becoming more famous in the market.
Later, in September 2018, Evan You decided to announce the release of Vue 3.0.
Vue.js is continuously evolving with the rapid growth in the usage and community of this framework.
The community will keep growing because it was built on the best features combination of Angular and React.
Here are some of the features that we find exciting and the root cause of its rapid growth and make it cool.
Learning Curve & Well written Documentation
Vue.js has one of the best-written Documentation that we have ever seen and suggested.
This Documentation takes us through an effortless and step by step guide that one doesn’t feel like hard learning or something different is happening.
The learning curve is effortless if we compare it with the react.JS and Angular.
Modular and reusable code
This component-based approach was basically inspired by and picked from the ReactJS.
We write code in the form of components to import that component and reuse it wherever we need it.
Vue.js offers a single-file component, which makes it a loosely coupled and reusable code.
Mobile Development
There is one underrated feature of Vue.js, which is its cross-platform mobile development.
Yes, just like react-native works for react.JS.
Vue.js has WEEX developed by Alibaba, Native Script, and Ionic to help in developing mobile UIs.
Native Script and WEEX claim that you just have to write the code once and then use/run it wherever you want.
Easy Development
Developers love to code or build applications in Vue.js.
They feel freedom and comfort while developing in an unopinionated environment.
Vue.js offers the best component-based approach like whatever a developer needs; he can find it in a single .vue file.
Developers feel so comfortable and at ease when they don’t have to worry about or take care of the extra structure of a component.
Ecosystem for Development
Vue.js has a very active and vibrant community, which is helping a lot in evolution and growth.
Vue.js provides a lot of different tools and libraries to facilitate the development process.
The community has some remarkable and note tools and libraries that a coder or developer demands.
For example,
Vue Router is used for any type of routing.
Vuex is used as a centralized store for state management.
Summary
Vue.js is an easy, fast-growing, and adaptable framework to implement in developing applications that anybody with the basic knowledge of web development can get started with because of its invisible learning curve and easy to understand Documentation.
Vue.js provides a full-fledged ecosystem, and it is counted in the top 3 JavaScript front-end frameworks.
Honestly, it is the best framework it can be.
It is backed by a lot of big names like Alibaba, Xiaomi, and Lara cast.
So, it is a must-try framework if you have not tasted it yet.
Vue.js Conditional Rendering
Vue.js is an easy to learn and approachable library that we can start building web applications in it with the basic knowledge of web development.
In Vue.js, developers love to code and feel freedom while developing applications.
In any dynamic web application, conditional rendering is a necessary part.
Vue.js provides different ways for conditional rendering, and we can use any of the following ways which suit our purpose:
v-show
v-if
v-else
In this article, we will try these directives provided by Vue.js for conditional rendering and understand them in a better way.
v-show
The v-show only hides the element by disabling its visibility.
It hides the element if the value of the passed expression or variable is not truthy.
For example:
<p v-show="isBool">This paragraph is not hidden</p><p v-show="!isBool">This paragraph is hidden</p>
v-if
On the other hand, v-if does not hide the element, but it also does not render anything until the value of the passed expression or variable becomes true.
For Example:
<!-- This div is conditionally rendering -->
<div v-if="isBool">
<p>This is a paragraph</p>
</div>
There is an additional feature in the v-if directive as compared to the v-show directive.
We can apply it to the template block as well if we do not want to render anything in between that block.
Either there is a child component in that or a lot of other elements.
For example:
<!-- This template is conditionally rendering -->
<template v-if="isBool">
<h1>This is a Heading</h1>
<p>This is a paragraph</p>
<!-- A child component -->
<Hello msg="Hello Vue" />
</template>
v-else
We can also use the v-else directive along with the v-if statement in order to conditionally render between any of the two blocks.
But, keeping in mind that the v-else block must have to appear right after the v-if block.
For example:
<p v-if="isVar == true">This paragraph will render if 'isVar' becomes true</p>
<p v-else>Else, this paragraph will get rendered.</p>
We can apply v-else on the template block as well.
<!-- This div is conditionally rendering -->
<div v-if="isVar == true">
<h1>This is a Heading</h1>
</div>
<!-- v-else on template block -->
<template v-else>
<p>This is a paragraph</p>
<!-- A child component -->
<Hello msg="Hello Vue" />
</template>
v-else-if
Just like v-else, we can also use the v-else-if directive along with the v-if directive.
For example:
<div v-if="type == 'car'">
<p>Car</p>
</div>
<div v-else-if="type == 'book'">
<p>Book</p>
</div>
<div v-else-if="type == 'animal'">
<p>Animal</p>
</div>
<div v-else>
<p>None of the ablove</p>
</div>
v-if vs.
v-show
The v-if and v-show kind of do the same task.
They both hide the elements in the DOM based on the truthy or falsy value of the passed expression, but with a subtle difference of hiding and not rendering elements.
If we compare the time and processing cost between these two.
The v-if costs more during runtime or toggling, while v-show costs more at the start of rendering.
So, it would be wise to use v-show when toggling is purpose.
Otherwise, v-if is preferred.
Wrapping up
In this article, we have learned how to conditionally render the DOM in Vue.js using v-if and v-else directives.
We have shown some examples and learned about the real difference between v-show and v-if directive.
If this article helps you to have a better understanding and concepts, keep on visiting linuxhint.com for such useful content.
Vue.js Change Style
Vue.js is used to build User Interfaces (UIs) and Single-Page Applications (SPAs).
It is easy to learn how to use Vue.js and the framework of freedom and comfort that is available while developing applications in this program because it has the best-combined features of Angular and ReactJS.
That is why it is known for its easy-to-use and clean coding.
Vue.js provides style binding that you can use to change the style dynamically.
You can bind a variable to the style attribute in any HTML tag and change the style when the bound variable is changed.
In this article, we will have a look at how to use style binding and change the styling of variables using vue.js.
Inline Style Binding
In vue.js, we can bind variables to style attributes using v-bind directives.
Object Syntax
Just like with inline CSS styling, we can also do inline styling in Vue.js using v-bind directive and curly braces object syntax.
You can bind any variable to the style attribute using the following script:
<p :style="{ color: colorVar, fontSize: fontSizeVar + 'px' }"></p>
And, in the script tag and data:
ata() {
return {
colorVar: 'red',
fontSize: 14
}}
We can also take the object down to the data and bind that object with the style attribute to make our HTML look cleaner as follows:
data() {
return {
styleObject: {
colorVar: 'red',
fontSize: 14
}
}}
Now, we will bind the “styleObject” variable to the style attribute as follows:
<p :style="styleObject"></p>
Array Syntax
Vue.js also provides the option to bind multiple variables in array syntax to the single HTML tag, as follows:
<p :style="[basicStyling, extraStyling]"></p>
Multiple Values
Similarly, we can also give multiple values using the array syntax to a CSS property within the inline binding, as follows:
<div :style="{ display: ['-webkit-box', '-ms-flexbox', 'flex'] }"></div>
These are some of the different ways that we can use for binding variables with the style attribute to dynamically change the styling of a webpage.
Summary
This article covered the syntax for binding inline styling.
You also learned about the object syntax and array syntax used to bind the values or variables to style attributes in vue.js.
If this article proved helpful in giving you a better understanding of vue.js, feel free to continue reading at linuxhint.com for more useful content.
Vue.js Click Events
Vue.js is a very powerful, easy to learn, and approachable library that with the knowledge of HTML, CSS, and Javascript, we can start building web applications in it.
Vue.js is built by combining the best features from already existing Angular and react Frameworks.
It is a progressive and reactive Javascript framework that is used to build UIs (User Interfaces) and SPAs (Single-page Applications), which is why the developers love to code and feel freedom and comfort while developing applications in Vue.js.If we take a look at the Event Listening and Handling in Vue.js., we will know that it provides a “v-on” directive to listen and handle events.
We can use the “v-on” directive to listen to the DOM and perform the required tasks.
It also provides many event handlers.
However, in this article, we will only learn and keep our focus on the click events.
So, let’s get started!
Just like Javascript’s onClick event, Vue.js provides v-on:click for listening events.
The syntax for v-on:click event would be like this:
<button v-on:click="functionName">Click</button>
Vue.js provides a shorthand “@” instead of using “v-on” as well.
<button @click="functionName">Click</button>
Vue.js doesn’t stop in just listening to the click event and calling the function.
It will also allow us to directly write any arithmetic operation or anything related to Javascript inside the quotation marks “ ”.
Just like this:
<button @click="num += 1">Add</button>
Vue.js provides us to call the method or function in an inline Javascript statement, as shown below:
<button @click="message('Hi')">Show</button>
Using Vue.js’s event handlers, we can access the DOM event as well, using inline statement, by passing the Vue.js’s especially provided “$event” variable into the method’s argument, just like the example below:
<button @click="message('Hi', $event)">Send</button>
Vue.js also provides us to call multiple functions or methods.
We can call more than one function and separate them by commas, like this example:
<button @click="first('Hello'), second('Hi', $event) ">Submit</button>
Vue.js provides event modifiers as well.
Event Modifiers
We often need to call modifiers along with the events.
So, Vue.js provides some of the following modifiers:
.stop
It will stop the click event’s transmission.
<a @click.stop="doThis"></a>
.prevent
It will prevent the page to reload or redirect.
<form @submit.prevent="onSubmit"></form>
.once
It will trigger the click event only once.
<a @click.once="doThis"></a>
.capture
It is mostly used to add the event listener.
<div @click.capture="doThis">...</div>
We can chain the modifiers as well.
However, keep in mind that the order of modifiers does matter, and it will affect the results.
<a @click.stop.prevent="doThat"></a>
Conclusion
In this article, we have covered the whole Click event handling concepts from noob to ninja level.
We have learned about the different syntaxes of writing click events and the different ways to use v-on:click directive provided by Vue.js for the ease of developers and different event modifiers.
For more useful content like this, related to Vue.js, keep on visiting linuxhint.com.
Vue.js Components
Vue.js is a progressive javascript framework, which is used to build UIs(User Interfaces) and SPAs(Single-page Applications).
We can start building web applications in Vue.js with the basic knowledge of HTML, CSS, and Javascript.
Vue.js is built by combining the best features from already existing Angular and react Frameworks.
Developers love to code and feel freedom and comfort while building applications in Vue.js.
This component-based approach was basically inspired by and picked from the ReactJS.
We write code in the form of components so that we can import that component and reuse it wherever we need it.
Vue.js offers a single-file component, which makes it a loosely coupled and reusable code.
Vue.js offers the best component-based approach, like whatever a developer needs; he can find it in a single .vue file.
Developers feel so comfortable and at ease when they don’t have to worry about or take care of the extra structure of a component.
In this article, we will have a look at the single-file component, which has a .vue extension.
So, let’s have a look at a very simple Vue component example and understand it.
<template>
<p>{{ message }} World</p></template><script>export default {
name: "hello",
data(){
return{
message: "Hello"
}
}}</script><style>
p {
font-size: 1em;
text-align: center;}</style>
This a very simple and basic example of a Vue component.
In which we can see that the code is divided into three layers.
This three-layer syntax is the best part of Vue.js.
It satisfies the separation of concern yet being in one single .vue file.
We have our template(HTML), logic, and styling inside a component.
Template
Script
Style
Template
In this template tag, we write our HTML code.
We can bind variables in this as well using the Vue.js data-binding syntax, and we can add some other functionalities in this as well using the Vue.js provided syntax for the respective functionalities.
Script
This is the section where we can write the logic of the component by following the syntaxes of Vue.js.
All the functionalities and logic of a component go here.
For example,
Importing other components and packages needed.
Variable declaration
Methods/Functions
Life cycle hooks
Computed properties and watchers
And so on…
Style
This is where we write the styling in CSS of the component, or we can use any preprocessor we want to use.
This is just a glimpse of a component in Vue.js.
Let’s take a look at the usage, organization, and data flow between components a little bit.
Import and Use Components
To use the component, we first have to import the component.
Otherwise, how can Vue.js know about it? We can simply import a component by adding an “Import” statement at the beginning of the script tag and declaring that component in the “components” object, using the following syntax.
<script>import Hello from './components/Hello.vue'export default {
name: 'App',
components: {
Hello
}}</script>
After importing the component successfully, we can use it in the template like this
<Hello msg="Hello Vue" />
This is how simply we can import and use a component in any other component.
Organizing Components
Just like any other application, the Components organization goes like a nested tree.
For example, a simple website that includes a header, sidebar, and some other components in a container.
The organization of the component would be like this.
![]() Image from Vue.js Official Docs
Image from Vue.js Official Docs
Data Flow between Components
There can be two types of data flow between components: Parent component to Child Component
We can send data from the parent component to the child component using props: Child Component to Parent Component
We can send data by emitting an event from the Child component and listen to it on the other end (Parent component).
Wrapping Up
In this article, we have gone through a whole journey of understanding a basic component in Vue.js to its usage, its hierarchy, its organization, and implementation of Importing, using, and know-how about communication between components.
This article covers a lot of scope of components, yet there is a lot of in-depth knowledge about components out there.
So, feel free to visit the Vue.js Official Docs for more information.
Vue.js Data Binding
Vue.js is such an easy to learn and approachable library.
So, with the knowledge of HTML, CSS, and Javascript, we can start building web applications in Vue.js.
Vue.js is built by combining the best features from an already existing Angular and react Frameworks.
Data binding is one of the most elegant features of Vue.js because it provides reactive/two-way data binding.
In Vue.js, we do not have to write a lot of lines to have two-way data binding, unlike other frameworks.
One-way data binding means that the variable is just bound to the DOM.
On the other hand, two-way means that the variable is also bound from the DOM.
When DOM gets changed, the variable also gets changed.
So, let’s take a look at both of the data bindings and see the right difference.
One-way Data Binding
If we want to bind any variable, we can simply use Vue.js’s double curly braces syntax or “Mustache” syntax to bind any variable from the relative component instance.
<p> {{ linuxhintText }} </p>
Or, if we want to bind any variable inside an HTML attribute, we can use the v-bind directive.
<div v-bind:class="container"></div>
Vue.js also provides the shorthand for binding variables in an HTML attribute.
Instead of writing v-bind:attribute-name, we can only use a colon “:” and attribute name.
<div :class="container"></div>
But these are just data bindings.
To demonstrate the two-way data binding, we can use the v-model directive provided by the Vue.js.
Two-Way/Reactive Data Binding
In order to demonstrate reactive data binding, we can use the v-model directive on an input form field.
It will internally emit an event and change the variable.
To which we can bind somewhere else in the template using Double curly braces or “Mustache” syntax.
<input v-model="linuxhintText" placeholder="Type something" /><p>You are typing: {{ linuxhintText }}</p></td>
Now, whenever we enter a character in the input form field, we can see that the variable is also updating simultaneously.
Wrapping up
In this article, we have learned how to bind variables in Vue.js using double curly braces or “Mustache” syntax.
We have also demonstrated the two way/reactive data binding in Vue.js using the v-model directive.
After reading this article, data binding is not a difficult task anymore for a beginner who has just got a start with Vue.js.
So, keep on learning the concepts of Vue.js with linuxhint.com.
Thank you!
Vue.js Watch Property
Vue.js is a very powerful and reactive Javascript framework, which is used to build Uis (User Interfaces) and SPAs (Single-page Applications).
It is built by combining the best features from already existing Angular and react Frameworks.
Developers also love to code or build applications in it.
Vue.js provides the watch property to observe and react to the variables or data change.
We can use the watch property to manipulate the DOM when the watched variable gets changed.
In this article, we are going to have a look at how we can use watch property, and perform the desired tasks on the change of variable.
So, let’s get started.
Watchers
A watcher in Vue.js acts like an event listener to a variable or property.
It is used to accomplish several tasks on the change of some specific property.
It comes in handy while doing asynchronous tasks.
Let’s demonstrate and understand the concept of the watcher by considering an example.
Example:
Suppose we are building an e-commerce website, in which we have a list of items, and we are building it cart or checkout component.
In that component, we need to calculate the amount of a single element concerning the number of items.
First, we are assuming some properties in the data.
data() {
return {
itemName: "Item 1",
itemQuantity: null,
itemPrice: 200,
totalPrice: 0
}},
In which we will watch the “itemQuantity” property and calculate the total price.
We will first do the data bindings in the template,
before writing the code for watching the variable and calculating the total price.
<template>
<h1>Watcher</h1>
<p>Item Name: {{ itemName }}</p>
<p>Item Price: {{ itemPrice }}</p>
<input type="number" v-model="itemQuantity" placeholder="quantity" />
<p>Total Price: {{ totalPrice }}</p></template>
After writing this code, we will have our web page like this:
![]() Now, we want to change the total price on the change of “itemQuantity” like whenever the user changes the quantity using the input field.
The Total Price should get changed.
For that purpose, we will have to watch the “itemQuantity” and calculate the total price whenever the “itemQuantity” property gets changed.
So, the watcher for the “itemQuantity” would be like this:
watch:{
itemQuantity(){
this.totalPrice = this.itemQuantity * this.itemPrice;
console.log(this.itemQuantity);
}}
Now, whenever the user changes the “itemQuantity”, the total price will be changed in a moment.
We don’t have to worry about anything, anymore.
The watch property will take care of this calculation now.
Let’s have a look at the web page:
Now, we want to change the total price on the change of “itemQuantity” like whenever the user changes the quantity using the input field.
The Total Price should get changed.
For that purpose, we will have to watch the “itemQuantity” and calculate the total price whenever the “itemQuantity” property gets changed.
So, the watcher for the “itemQuantity” would be like this:
watch:{
itemQuantity(){
this.totalPrice = this.itemQuantity * this.itemPrice;
console.log(this.itemQuantity);
}}
Now, whenever the user changes the “itemQuantity”, the total price will be changed in a moment.
We don’t have to worry about anything, anymore.
The watch property will take care of this calculation now.
Let’s have a look at the web page:
![]() And, let’s try to increase or change the quantity and see some results:
And, let’s try to increase or change the quantity and see some results:
![]() If we change the quantity, let’s say “4”, the total price would be “800”:
If we change the quantity, let’s say “4”, the total price would be “800”:
![]() Similarly, if we change the quantity to “7”, the total price would be “1400”:
Similarly, if we change the quantity to “7”, the total price would be “1400”:
![]() So, this is how the watch property works and helps in reactive development.
Reactivity is kind of a signature of Vue.js.
Also, the watch property comes in handy while performing asynchronous operations.
So, this is how the watch property works and helps in reactive development.
Reactivity is kind of a signature of Vue.js.
Also, the watch property comes in handy while performing asynchronous operations.
Conclusion
In this article, we have learned what is a watch property and how we can use it in Vue.js.
We have also tried a real-life example to understand its true implementation.
This helps a lot in saving time and speeding up the development process.
We hope that you found this article helpful and keep on visiting linuxhint.com for better understanding.
Setup Electron and Create Hello World Application in Linux
This article will cover a guide about installingElectronand creating a simple “Hello World” Electron application in Linux.
About Electron
Electron is an application development framework used for creating cross-platform desktop applications using web technologies in a standalone web browser.
It also provides operating system specific APIs and a robust packaging system for easier distribution of applications.
A typical Electron application requires three things to work: Node.js runtime, a standalone Chromium based browser that comes with Electron and OS specific APIs.
Install Node.js
You can install Node.js and “npm” package manager by running the following command in Ubuntu:
$ sudo apt install nodejs npm
You can install these packages in other Linux distributions from the package manager.
Alternatively, download official binaries available on Node.jswebsite.
Create a New Node.js Project
Once you have installed Node.js and “npm”, create a new project named “HelloWorld” by running the following commands in succession:
$ mkdir HelloWorld
$ cd HelloWorld
Next, fire up a terminal in the “HelloWorld” directory and run the command below to initialize a new package:
$ npm init
Go through the interactive wizard in the terminal and enter names and values as needed.
![]() Wait for the installation to finish.
You should now have a “package.json” file in “HelloWorld” directory.
Having a “package.json” file in your project directory makes it easier to configure project parameters and makes the project portable for easier shareability.
The “package.json” file should have an entry like this:
"main": "index.js"
“Index.js” is where all logic for your main program would be located.
You can create additional “.js”, “.html” and “.css” files according to your needs.
For the purpose of “HelloWorld” program explained in this guide, the command below will create three required files:
$ touch index.js index.html index.css
Wait for the installation to finish.
You should now have a “package.json” file in “HelloWorld” directory.
Having a “package.json” file in your project directory makes it easier to configure project parameters and makes the project portable for easier shareability.
The “package.json” file should have an entry like this:
"main": "index.js"
“Index.js” is where all logic for your main program would be located.
You can create additional “.js”, “.html” and “.css” files according to your needs.
For the purpose of “HelloWorld” program explained in this guide, the command below will create three required files:
$ touch index.js index.html index.css
Install Electron
You can install Electron in your project directory by running the command below:
$ npm install electron --save-dev
Wait for the installation to finish.
Electron will be now added to your project as a dependency and you should see a “node_modules” folder in your project directory.
Installing Electron as a per-project dependency is the recommended way of installing Electron according to the official Electron documentation.
However, if you want to install Electron globally on your system, you can use the command mentioned below:
$ npm install electron -g
Add the following line to “scripts” section in “package.json” file to finish Electron setup:
"start": "electron ."
Create Main Application
Open “index.js” file in text editor of your choice and add the following code to it:
const { app, BrowserWindow } = require('electron');function createWindow () {
const window = new BrowserWindow({
width: 1600,
height: 900,
webPreferences: {
nodeIntegration: true
}
});
window.loadFile('index.html');}
app.whenReady().then(createWindow);
Open “index.html” file in your favorite text editor, and put the following code in it:
<!DOCTYPE html><html><head><link rel="stylesheet" href="index.css"></head><body><p id=”hworld”>Hello World !!</p></body></html>
The javascript code is pretty self explanatory.
The first line imports necessary Electron modules needed for the app to work.
Next, you create a new window of the standalone browser that comes with Electron and load the “index.html” file in it.
The markup in the “index.html” file creates a new paragraph “Hello World !!” wrapped up in the “<p>” tag.
It also includes a reference link to the “index.css” stylesheet file used later in the article.
Run Your Electron Application
Run the command below to launch your Electron app:
$ npm start
If you have followed instructions correctly so far, you should get a new window similar to this:
![]() Open “index.css” file and add the code below to change the color of “Hello World !!” string.
#hworld {
color: red;}
Run the following command again to see CSS style applied to “Hello World !!” string.
$ npm start
Open “index.css” file and add the code below to change the color of “Hello World !!” string.
#hworld {
color: red;}
Run the following command again to see CSS style applied to “Hello World !!” string.
$ npm start
![]() You now have the bare minimum set of required files to run a basic Electron application.
You have “index.js” to write program logic, “index.html” for adding HTML markup and “index.css” for styling various elements.
You also have a “package.json” file and “node_modules” folder containing required dependencies and modules.
You now have the bare minimum set of required files to run a basic Electron application.
You have “index.js” to write program logic, “index.html” for adding HTML markup and “index.css” for styling various elements.
You also have a “package.json” file and “node_modules” folder containing required dependencies and modules.
Package Electron Application
You can use Electron Forge to package your application, as recommended by the official Electron documentation.
Run the command below to add Electron Forge to your project:
$ npx @electron-forge/cli@latest import
You should see some output like this:
Checking your system
Initializing Git Repository
Writing modified package.json file
Installing dependencies
Writing modified package.json file
Fixing .gitignore
We have ATTEMPTED to convert your app to be in a format that electron-forge understands.
Thanks for using "electron-forge"!!!
Review “package.json” file and edit or remove entries from “makers” sections according to your needs.
For instance, if you don’t want to build an “RPM” file, remove entry related to building of “RPM” packages.
Run the following command to build the application package:
$ npm run make
You should get some output similar to this:
> helloworld@1.0.0 make /home/nit/HelloWorld> electron-forge make
Checking your system
Resolving Forge Config
We need to package your application before we can make it
Preparing to Package Application for arch: x64
Preparing native dependencies
Packaging Application
Making for the following targets: deb
Making for target: deb - On platform: linux - For arch: x64
I edited the “package.json” file to build only the “DEB” package.
You can find built packages in the “out” folder located inside your project directory.
Conclusion
Electron is great for creating cross-platform applications based on a single codebase with minor OS specific changes.
It does have some issues of its own, most important of them is resource consumption.
Since everything is rendered in a standalone browser and a new browser window is launched with every Electron app, these applications can be resource intensive compared to other applications using native OS specific application development toolkits.
Vue.js Template Introduction
Vue.js, which is used to build user interfaces (UIs) and single-page applications (SPAs), combines many of the best features of the JavaScript frameworks Angular and React, and many developers like to use Vue.js because it provides a neutral environment.
Like HTML, Vue.js has a template syntax, and we can use template syntax to bind the DOM with the components data.
In this article, we will show you how to insert data into the template syntax and the ways to interpolate different types of data.
Text Interpolation
If we want to bind a variable from the relative component instance, we can use double curly braces, which is also referred to as “mustache” syntax.
<p> {{ linuxhintText }} </p>
Vue.js offers two-way binding, which means that, whenever the value of a variable is changed, the element will be rendered again.
However, if we do not want it to be updated, we can use the v-once directive.
<p v-once> {{ linuxhintText }} </p>
Raw HTML Interpolation
Vue.js does not allow for the data binding of plain text, but we can bind raw HTML text using the v-html directive.
In the example below, we have a variable in a component called rawHTML that contains some raw HTML text.
data() {
return {
msg: "Hello Vue",
rawHTML: "<p> Linuxhint is <b>Great</b> </p>"
}}
We can bind the rawHTML variable using v-html directive as follows.
<template>
<h1>{{ msg }}</h1>
<div v-html="rawHTML"></div></template>
The div tag will have a p tag inside it.
![]()
Attributes Interpolation
In the raw HTML interpolation, we did not use double curly braces to bind the variable.
Therefore, if we want to bind a variable inside the HTML attribute, we can use the v-bind directive.
<div v-bind:class="container"></div>
Expressions
Vue.js does not only provide features for binding a variable.
Vue.js can be used to write various types of expressions within double curly braces.
{{ count + 1 }}{{ check ? "true" : "False" }}{{ arr.sort().reverse() }}
Wrapping Up
In this article, we introduced Vue.js’s simple yet useful template syntax.
However, there is a lot more to learn about Vue.js.
You can visit the official website of Vue.js here, and you can keep learning about JavaScript with linuxhint.com.
Install Vue.js in Ubuntu 20.04
In this tutorial, we will provide an easy step-by-step process to help you get started with Vue.js.
Vue.js is a powerful, progressive, reactive JavaScript framework that is approachable and easy to learn.
It provides many different tools and libraries that facilitate the application development process.
If you have knowledge of HTML, CSS, and JavaScript, you can start building web applications with Vue.js in no time.
Installation
To integrate Vue.js into a project, you can use the CDN package, NPM, or CLI.
Using the CDN Package
If you want to start learning Vue.js, then it is best to use the CDN package.
You can simply add the following script tag in your project to get started.
<script src="https://unpkg.com/vue@next"></script></td>
However, this method is not recommended for production purposes because it can lead to issues with compatibility in the future.
Using NPM
For large-scale production applications, you should install Vue.js using NPM.
To use this method, you must have Node.js installed on your machine.
If you have not installed Node.js yet, you can find out how by reading our article How to Install Node.js and npm on Ubuntu 20.04 – Linux Hint.
If you have already installed Node.js, then you can install Vue.js by running the following NPM command in your terminal
# latest stable
$ npm install vue@next
![]()
Using CLI
Vue CLI is a complete package for Vue.js development.
CLI is installed globally using the NPM package manager.
Before installing Vue.js using the Vue CLI method, you must have some prior knowledge of Node.js and front-end build tools.
In addition, we can use either npm or the yarn package manager.
$ sudo yarn global add @vue/cli# OR
$ sudo npm install -g @vue/cli
![]() After installing the latest version of Vue.js using Vue CLI, you can easily upgrade your projects.
To check your version of Vue.js, you can run the following command
vue --version
After installing the latest version of Vue.js using Vue CLI, you can easily upgrade your projects.
To check your version of Vue.js, you can run the following command
vue --version
![]() If you want to upgrade to the latest stable version of Vue.js, you can use the following Vue CLI command.
$ sudo yarn global upgrade --latest @vue/cli# OR
$ sudo npm update -g @vue/cli
If you want to upgrade to the latest stable version of Vue.js, you can use the following Vue CLI command.
$ sudo yarn global upgrade --latest @vue/cli# OR
$ sudo npm update -g @vue/cli
Getting started with Vue.js
To get started with Vue.js, to create a project using Vue CLI using the following command.
vue create demo-app
After running this command, you will be asked to choose a preset.
![]() You can either go with the default or add custom features.
You can also use the GUI method to create a Vue project by using the following command.
vue ui
This command will open a window in the browser to help you create a project.
You can either go with the default or add custom features.
You can also use the GUI method to create a Vue project by using the following command.
vue ui
This command will open a window in the browser to help you create a project.
![]()
Summary
In this article, we showed you how to install Vue.js using three different methods.
After installing Vue.js, you can efficiently manage your web application.
If you want to start using Vue.js right away, you can use the CDN package method.
However, for production purposes, you should use either the NPM method or the CLI method.
To learn more about Vue.js, you can visit the official website here: Vue.js.
Javascript Form Validation
Form validation is the basic and most important part of the web development process.
Usually, form validation is done on the server-side.
Form validation helps in showing error messages to the user if there is any unnecessary or wrong data is provided, or a required field is left empty.
If the server finds any error, it throws back that error; then, we show the error message to the user.
But, we can use javascript at the front-end to validate the form data and show errors right away.
In this article, we will learn the basic form validation.
So, let’s get straight to the examples and see how can we do that.
Examples
First of all, we assume a form with the name of “testForm,” in which we have an input field with the label “User Name,” and an input type submits in our HTML file.
In the form tag, we have created an onsubmit event, in which we are making closure and returning a function validateFunc().
<form action="" method="get" name="testForm" onsubmit="return(validationFunc())">
<label for="name">User Name</label>
<input type="text" name="name"><br>
<input type="submit" value="Submit"></form>
In the script file, we will write the function definition of validateFunc(), which will get executed every time when the user hits the submit button.
In that function, we will validate the username input field.
We suppose that we want to validate either the username field is empty or not when the user hits the submit button.
So, to validate the username field.
We first assign a variable to the document.testForm, just to give a clean and understandable look to the code.
Then, in the function definition, we will write the code for validation.
We will write an if statement to check the empty form field.
If the username field is empty, we will show an alert box to show the error, focus on the username field again, and return false so that the form won’t get submitted.
Otherwise, if it passes the check and data get validated, we will return true to the function.
var theForm = document.testForm;// Form validation codefunction validationFunc() {if (theForm.name.value == "") {
alert( "name is empty" );
theForm.name.focus();
return false;}return (true);}
After writing all this code.
If we run the code and click on the submit button without writing anything in the form field.
As you can observe in the screenshot attached below, it throws an error in the alert box.
This is a very basic yet good example to get started with implementing the form validation.
For further implementation, like multiple form validations or you want to have a check on character length as well.
For that purpose, we first suppose two form fields in the form tag with the label of “email” and “password” in our HTML file.
<form action="" method="get" name="testForm" onsubmit="return(validationFunc())">
<label for="name">User Name</label>
<input type="text" name="name"><br>
<label for="email">Email</label>
<input type="email" name="email" id="><br>
<label for="password">Password</label>
<input type="password" name="password" id="><br><br>
<input type="submit" value="Submit"></form>
For validation, we will again put an if statement for validation of the email and password form fields in the function definition of the script file.
Suppose we want to apply multiple validations on the email field like the field should not be empty, and its length should not be less than 10 characters.
So, we can use OR “||” in the if statement.
If any of these errors occur, it will show an alert box with the error message that we want to show, focus on the email form field, and return false to the function.
Similarly, if we want to apply the character length check on the password field, we can do so.
var theForm = document.testForm;// Form validation codefunction validationFunc() {if (theForm.name.value == "") {
alert( "name is empty" );
theForm.name.focus();
return false;}if (theForm.email.value == "" || theForm.email.value.length < 10) {
alert( "Email is inappropriate" );
theForm.email.focus();
return false;}if (theForm.password.value.length < 6) {
alert( "Password must be 6 characters long" );
theForm.password.focus();
return false;}return (true);}
After writing all this code, reload the page to have updated code.
Now, either we leave an empty email field or write an email less than 10 characters.
In both cases, it will show an “Email is inappropriate” error.
So, this is how we can apply basic form validation.
We can also apply data validation on the client-side using Regex or by writing our own custom function.
Suppose we want to apply data validation on the email field.
The regex would be like this for validating an email.
if (/^[a-zA-Z0-9.!#$%&’*+/=?^_`{|}~-]+@[a-zA-Z0-9-]+(?:\.[a-zA-Z0-9-]+)*$/.test(theForm.email.value)) {
alert( "Email is inappropriate" );
theForm.email.focus() ;
return false;}
This was just a basic demonstration of data validation using regex.
But, the sky is open for you to fly.
Conclusion
This article covers the basic form validation.
We have also tried and have a sneak into the data validation using regex.
If you want to learn more about regex, we have a dedicated article related to regex on linuxhint.com.
For learning and understanding javascript’s concepts and more useful content like this, keep visiting linuxhint.com.
Thank you!
Javascript Try Catch
Javascript is a translative programming language.
Just like any other language, a developer or programmer often needs to care about error handling.
Mostly a programmer or developer needs to handle errors while accessing or assigning some data to the database.
So, error handling is an essential part of any programming project.
There are three types of errors in programming that a programmer or developer often has to face.
Syntax Error– An error in writing code against the syntax of programming language.
For example, missing a semi-colon or not following the convention of creating and calling the function.
Logical Error– An error in the logic building.
For example, implementing the wrong arithmetic operation, which results in the wrong output.
Runtime Error– Error occurred during the runtime.
Like, calling a function without declaring it.
The error that we get during the runtime is also known as anexception.
Exceptional handling is very important.
Because we can’t throw the errors and error codes right away.
We have to handle that.
So, In this article, we are going to have an understanding of how to handle exceptions using javascript’s try-catch block.
We will also learn how to throw a custom message against an error and how to use the “finally” block with a try-catch block.
Syntax
The syntax for using a try-catch block is very simple and easy to use.
We can simply use the try-catch block like this
try {
//code to try or test
throw //throw a custom error to catch} catch (error) {
// code after getting an error } finally {
// code which executes in any case}
In this syntax, we first write some lines of code in the “try” block to test.
If that code gets executed or passed the test successfully.
The “try” block won’t throw any error to the “catch” block and execute the “finally” block.
Otherwise, it will throw an error to the “catch” block where we can handle the exceptions according to the given error.
We can throw a custom error to the “catch” block as well using the “throw” keyword.
“Finally” block will get executed in any case.
Either the “try” block throws any or not.
Let’s try a couple of examples to have a better understanding.
Examples
First of all, to demonstrate the simple and basic working of the try-catch block.
We try to call a function without declaring it anywhere.
addition()
It will definitely throw an error in the console
![]() But, if we try to call it in a try block now
try {
addition()} catch (error) {}
It won’t show any error in the console anymore because we did not write any code in the catch block for error.
So, we can modify and console the error message in the catch block now.
try {
addition()} catch (error) {
console.log("Error Message => " + error)}
We can see our custom message in the console against the error.
But, if we try to call it in a try block now
try {
addition()} catch (error) {}
It won’t show any error in the console anymore because we did not write any code in the catch block for error.
So, we can modify and console the error message in the catch block now.
try {
addition()} catch (error) {
console.log("Error Message => " + error)}
We can see our custom message in the console against the error.
![]() So, this is the very basic usage of the try-catch block.
Now, let’s learn about throwing a custom error in the try block.
So, this is the very basic usage of the try-catch block.
Now, let’s learn about throwing a custom error in the try block.
Throw
Suppose we want to throw a different custom error on the base of different errors while trying.
We can throw a custom error, that “Function definition doesn’t exist.” Like this
try {
throw new Error ("Function definition doesn't exist")} catch (err) {
console.log("Error Message => " + err)}
![]() As you can see in the output, the error message is now changed to our custom error thrown.
As you can see in the output, the error message is now changed to our custom error thrown.
ProTip
Suppose we try to apply this try-catch on an asynchronous function.
It won’t work.
Because the engine would have moved to the next line, execute the final block, and the asynchronous function would get executed later.
For example, if we apply the setTimeout Function inside a try-catch block.
try {
setTimeout(() => {
addition();
}, 3000)} catch (err) {
console.log("Error Message => " + err)} finally{
console.log("reached 'finally' block")}
![]() You can observe that the “finally” block gets executed first, and the error is thrown later if we take a look at the error.
It is not the error from the catch block, but it is an original programming error, which means that the catch block doesn’t get executed because they try block didn’t find any error.
Alright! Now, if we want to make it work.
We have to apply the try-catch block inside the setTimeout function instead of outside.
So, the true way of implementing an asynchronous function with a try-catch block would be like this.
setTimeout(() => {
try {
addition();
} catch (err) {
console.log("Error Message => " + err)
} finally{
console.log("reached 'finally' block")
}}, 3000)
You can observe that the “finally” block gets executed first, and the error is thrown later if we take a look at the error.
It is not the error from the catch block, but it is an original programming error, which means that the catch block doesn’t get executed because they try block didn’t find any error.
Alright! Now, if we want to make it work.
We have to apply the try-catch block inside the setTimeout function instead of outside.
So, the true way of implementing an asynchronous function with a try-catch block would be like this.
setTimeout(() => {
try {
addition();
} catch (err) {
console.log("Error Message => " + err)
} finally{
console.log("reached 'finally' block")
}}, 3000)
![]() You can observe in the output that after the delay of 3 seconds because of the setTimeout function.
We have got the error message from the catch block first, and then the “finally” block gets executed.
You can observe in the output that after the delay of 3 seconds because of the setTimeout function.
We have got the error message from the catch block first, and then the “finally” block gets executed.
Conclusion
In this article, We have learned to implement the try-catch block step by step in such an easy and profound way that any beginner after reading this article would be able to apply it anywhere he needs.
So, keep on learning and getting experience with linuxhint.com.
Thank you!
Javascript Random Number
While developing a gaming website, we often need to generate random numbers.
In this article, we are going to know how we can get a random using the random method.
The random method helps in generating pseudo-random numbers, since, arithmetically, generating a true random number is impossible.
Syntax
We can get random numbers using Math.random() function, like this:
Math.random();
This function doesn’t take any arguments and will return the random float number between 0 and 1.
If we want to generate random numbers between any two numbers or up to a limit.
The syntax would be different for them.
For better understanding, let’s try a couple of examples.
Examples
Suppose, we want to generate a random number from 0 to 99.
The syntax for providing a limit or a range is:
Math.random() * 100
Keep in mind that 100 is a limit or range, not the number.
![]() You can see that it has generated a number from 0 to 99, but, it’s a float number.
So, if we want to have a whole number and not a float number, ,we can apply a Math.floor() method over Math.random() method, like this:
Math.floor(Math.random() * 100)
You can see that it has generated a number from 0 to 99, but, it’s a float number.
So, if we want to have a whole number and not a float number, ,we can apply a Math.floor() method over Math.random() method, like this:
Math.floor(Math.random() * 100)
![]() That looks great!
Now, what if we do not want to have numbers from 0 to 99 or onwards but from some other number, for example, 50 to 90.
First, let’s see how we can do that, and later we will see how it works.
Math.floor((Math.random() * 40) + 50)
In this syntax, 40 is the range or limit from 50 to onwards, 50 as the starting number.
That looks great!
Now, what if we do not want to have numbers from 0 to 99 or onwards but from some other number, for example, 50 to 90.
First, let’s see how we can do that, and later we will see how it works.
Math.floor((Math.random() * 40) + 50)
In this syntax, 40 is the range or limit from 50 to onwards, 50 as the starting number.
![]() In the end, if we want to build our custom random function to which we can provide two numbers (minimum and maximum) and get a random number between those two numbers.
The function would be like this:
function getRandomNum(sNum, lNum) {
return Math.floor((Math.random * (lNum - sNum)) + sNum)}
Keep in mind that the ending number or “lNum” will be excluded.
In case you want to include that as well add “1” in the range, like this:
function getRandomNum(sNum, lNum) {
return Math.floor((Math.random * (lNum - sNum + 1 )) + sNum)}
After writing this function.
Let’s call it and see the results.
getRandomNumber(20, 40);
In the end, if we want to build our custom random function to which we can provide two numbers (minimum and maximum) and get a random number between those two numbers.
The function would be like this:
function getRandomNum(sNum, lNum) {
return Math.floor((Math.random * (lNum - sNum)) + sNum)}
Keep in mind that the ending number or “lNum” will be excluded.
In case you want to include that as well add “1” in the range, like this:
function getRandomNum(sNum, lNum) {
return Math.floor((Math.random * (lNum - sNum + 1 )) + sNum)}
After writing this function.
Let’s call it and see the results.
getRandomNumber(20, 40);
![]()
![]()
![]() As you can see, we are getting random numbers from 20 to 40.
So, these are some of the different ways to generate pseudo-random numbers using the Math.random() method.
As you can see, we are getting random numbers from 20 to 40.
So, these are some of the different ways to generate pseudo-random numbers using the Math.random() method.
Conclusion
In this article, we have learned to get random numbers and tried several techniques to get the desired results.
We have also learned to make a custom function in which we can provide the range of numbers and get the random numbers between that ranges.
So, keep on learning Javascript with linuxhint.com to have a better grasp over it.
Thank you!
JavaScript onClick
Introduction
JavaScript is a well-known programming language.
It is used in more than 95% of the websites we interact with daily.
You may often see that on the click of a button, a whole page gets changed, a form field is opened, or a pop-up box appears.
From the perspective of a programmer/developer, how can we implement such functionality and handle the website’s interactions with users? When it comes to interaction, JavaScript provides built-in functions to control events on a site.
There are two types of events:
Event Listener – listens and waits for the event to get fired
Event Handler – executed when an event is getting fired
In this article, you will learn about the most used event handler of JavaScript, the onClick event.
There are other event handlers for hovering over an element or for keyboard key presses, but in this article, we will focus on the onClick event.
The onClick event is used to perform certain tasks at the click of a button or by interacting with an HTML element.
We will now show you an example to demonstrate how the onClick event works.
Example: Change Text Using onClick
In this example, we will change a selection of text on the click of a button using the onClick event.
First, we will make a paragraph tag and give it an ID “paragraph” to access it later.
We will create a button with the onClick event and call the function named “change.”
<p id="paragraph">Linuxhint</p><button onclick="change()">Change!</button>
In the script file, we will create a flag variable that will allow us to check the status of the text in our HTML paragraph tag.
Then, we will write a function defining the “change” function.
In the function definition, we will create an “if” statement, in which we will check the status using the flag variable.
We will also change the text and alter the flag.
It is a pretty simple piece of code!
var a = 1;
function change(){
if (a==1) {
document.getElementById("paragraph").innerHTML = "Linuxhint is awesome"
a = 0;
} else {
document.getElementById("paragraph").innerHTML = "Linuxhint"
a = 1;
}}
All right! After writing all this code, we will run the code, move to our browser, and click the newly created button.
After clicking the button, the text should be changed from “Linuxhint” to “Linuxhint is awesome.”
![]() We can apply the same technique anywhere to change the content of our website according to our needs.
We can use it in changing an image or performing any type of task that we can imagine with this tool.
We can apply the same technique anywhere to change the content of our website according to our needs.
We can use it in changing an image or performing any type of task that we can imagine with this tool.
Conclusion
This article explains how to use the onClick event.
In this article, you learned the concept of the onClick function in a practical way.
The usage of the onClick event is so simple, even a beginner can start working with this function.
You may continue learning, working, and gaining more experience at linuxhint.com to have a better grasp of this programming language.
Thank you so much!
JavaScript Cookie
JavaScript is the language behind almost every website you will use.
JavaScript is the language of the online world and is used in online communication, as well.
The concept and need for cookies arose when developers wanted to store user information in the browser to avoid overloaded communication over a stateless HTTP server.
A cookie is like a file containing some data that is stored on the user’s machine.
The information stays on the computer, even if the user closes the website or closes the browser.
This article provides an overview of the use of cookies.
Syntax
The syntax for creating and saving cookie is as follows:
document.cookie = "cookieName=cookieValue"
The cookie saves the data in key-value pairs.
Creating a Cookie
You can create a cookie by assigning a string to the document.cookie, for example, userName.
document.cookie="userName=John"
Getting a Cookie
Now, if we want to have a look at the Cookie, we can get the cookie by assigning document.cookie to a variable and then console it.
var cookieStat = document.cookie;
console.log(cookie.Stat);
Setting/Updating a Cookie
We can update a cookie as well using the same syntax we used for creating a cookie.
To add the expiry date in the cookie, for example, we will use the following technique:
var expiryDate = new Date();
expiryDate.setDate(expiryDate.getDate() + 1)
expiryDate.toUTCString()
document.cookie = "userName=John"
document.cookie = "expires=" + expiryDate.toUTCString()
After updating, take a look at the cookie:
console.log(document.cookie)
You can see that cookie is updated.
![]()
Deleting a Cookie
There is no built-in method or object for deleting a cookie in Python, but a cookie is deleted when it expires.
By assigning a past date to a cookie, you can delete it.
var expiryDate = new Date();
expiryDate.setDate(expiryDate.getDate() - 1)
expiryDate.toUTCString()
document.cookie = "userName=John"
document.cookie = "expires=" + expiryDate.toUTCString()
After assigning a past date, the cookie will no longer work and will self-delete by expiring.
Conclusion
So, this is how you can create a cookie, set or update a cookie, and delete a cookie.
In this article, you learned about cookie usage, including how cookies can help you in development and save necessary user data.
You can continue to learn more about JavaScript at linuxhint.com.
Thank you!
Javascript Refresh Page
Javascript is a widely-used programming language due to the expansion of the internet and the web.
In the modern world of the web, we can do almost every task in one single browser, and Javascript is used in every single website we see in our daily routine life.
Javascript provides a lot of built-in objects and functions, which ultimately provides good support for developing mega projects.
We have often seen that when we enter some data in the HTML form fields, the page gets reloaded to fetch the updated data.
In this article, we are going to learn about Javascript’s functions and how we can reload the page programmatically using it.
There are actually around 535 ways to reload a page.
Yes, 535 ways.
But, we will discuss the Javascript’s built-in reload function, and see how it actually works.
So, let’s get started!
Javascript’s built-in reload function is used to reload/refresh the current web page or specific area.
Syntax
The syntax for the reload function is:
location.reload();
This function doesn’t return any parameters.
But we can pass true or false.
In the case of true, the web page must have to be reloaded from the webserver.
Otherwise, for false, the web page is supposed to be reloaded from the cache of the web browser.
Let’s take a look at the examples and learn in a better way.
Examples
First, if we simply call the function.
It will definitely reload the page.
location.reload()
And if we pass true, it will reload the page from the webserver.
location.reload(true);
And if we pass false, it will reload the web page from the browser’s cache.
location.reload(false);
We can also reload the page using a function and the onclick event of a button.
First, create a button with the onclick event in the HTML file.
<button>Reload!</button>
And in the script file, the function should be like this.
function reloadPage(){
location.reload();}
So, this is a piece of very basic and still very profound knowledge about Javascript’s reloaded function.
Conclusion
In this article, we have learned about Javascript’s built-in reload function for reloading/refreshing the web page.
This video contains a detailed yet very simple and easy to understand the concept of Javascript’s built-in reload function.
So, keep on learning, working, and getting experience with linuxhint.com to have a better grasp over it.
Thank you so much.
Javascript Get URL
Being a javascript developer, we often need to get the URL of the current page to do some tasks according to our needs.
In this article, we are going to learn how we can get the current URL, know what its syntax is, and how we can extract different parts using the built-in window.location object.
The simplest and most straight forward way of getting the URL of the current page is shown below:
window.location.href
But, if we take a sneak peek into the window.location in the developer’s console, it is shown below:
![]() We can observe what it has for us.
We could receive a good amount of information from the Window.location object.
For example:
We can observe what it has for us.
We could receive a good amount of information from the Window.location object.
For example:
Examples
If we want to get the protocol only, like HTTP or HTTPS, from the whole URL, we can get that using the very simple window.location.protocol, like the picture below:
window.location.protocol
![]() And if we want to get the hostname from the URL, we can simply get that using the window.loation.host.
window.location.host
And if we want to get the hostname from the URL, we can simply get that using the window.loation.host.
window.location.host
![]() And similarly, if we want to get the pathname only, we can get that using window.location.pathname.
window.location.pathname
And similarly, if we want to get the pathname only, we can get that using window.location.pathname.
window.location.pathname
![]() For getting the search query, we can use window.location.search.
window.location.search
For getting the search query, we can use window.location.search.
window.location.search
![]() So, these are basically some of the ways to get the current URL and extract some specific parts from it according to our requirements.
Moreover, window.location has a lot of other options for us.
So, these are basically some of the ways to get the current URL and extract some specific parts from it according to our requirements.
Moreover, window.location has a lot of other options for us.
Conclusion
In this article, we have learned about the window.location object, how we can use it to get the current URL, and extract some specific parts from that.
So, keep on learning, working, and getting experience with linuxhint.com to have a better grasp over it.
Thank you so much.
Javascript Print Page
Javascript is a scripting or programming language, which is most commonly used nowadays in the web industry.
It provides a lot of built-in objects, functions, and methods to perform several tasks.
In this article, we are going to have a look at one of them which is used to print the web page.
So, let us get started!
You must have encountered some websites that provide a button to print the whole web page, or you must have felt the need to print a web page but there is no print button there.
Javascript’s built-in object window provides us a method named print().
We can use window.print() function to fulfill this requirement.
Syntax
The syntax of the print function is:
window.print();
This simple syntax neither gets any parameters nor returns anything.
It simply fires the print window.
We simply have to make a button in our HTML, and on the on-click event of that button we can directly call the window.print() function.
<button onclick="window.print()">Print</button>
Then, on the web page, if we click the button, it will open up a window or dialog box, which we usually see while printing any document.
![]() Be careful that it will print everything on the webpage.
Either that web page includes images or advertisements.
Be careful that it will print everything on the webpage.
Either that web page includes images or advertisements.
Conclusion
In this article, we have learned how we can print the whole web page, and the benefits and consequences of doing that.
This article explains the need and the usage of javascript’s built-in window.print() function.
So, keep on learning javascript’s concepts with linuxhint.com.
Javascript Alert
Javascript is the most known language of the web.
Javascript is widely used in front-end development as well as in the back-end.
Javascript provides a lot of built-in functions to help in development.
In this article, we are going to learn one of the javascript’s built-in alert() method, which is used to show pop-ups over the screen to either display a message or show a warning.
The alert box is different from any other message or text on the screen.
It is a pop-up that contains a message/text with an “OK” button.
The user won’t be able to do any task while an alert box is over the screen, and he/she clicks the “OK” button.
So, it is not recommended, if not needed.
So, let’s have a look at what is an alert box and what are the different ways to use it.
The alert() is basically a method, which is used to show a pop-up box over the web page.
Syntax
There are two different syntaxes for showing the alert box.
One of them is using the window’s object.
window.alert("Alert box from the linuxhint");
But, we can use the alert() method without the window’s object as well.
alert("Alert box from the linuxhint");
So, let’s try both of the syntaxes.
Examples
First, let’s try with the window’s object.
window.alert("Alert box from the linuxhint");
And now, without the window’s object.
alert("Alert box from the linuxhint");
![]() You will witness that there is no difference in both of them.
The alert method doesn’t only take the string to show the message.
We can provide variable as well, and it worked perfectly fine,
var alertMessage = 'Alert Box using variable';
alert(alertMessage);
as you can see in the screenshot below that the message is displayed.
You will witness that there is no difference in both of them.
The alert method doesn’t only take the string to show the message.
We can provide variable as well, and it worked perfectly fine,
var alertMessage = 'Alert Box using variable';
alert(alertMessage);
as you can see in the screenshot below that the message is displayed.
![]() We have learned about providing a variable as well.
What if we want to show the pop-up alert box on the screen at the click of a button? For example, we have got some information from the user, and after successfully saving the user’s data on the server, we want to show a confirmation message that says “Added successfully”.
So, we can simply show an alert box like this.
<button onclick="alert(Added successfully)">Show Alert!</button>
We have learned about providing a variable as well.
What if we want to show the pop-up alert box on the screen at the click of a button? For example, we have got some information from the user, and after successfully saving the user’s data on the server, we want to show a confirmation message that says “Added successfully”.
So, we can simply show an alert box like this.
<button onclick="alert(Added successfully)">Show Alert!</button>
![]() Or, if we are getting a confirmation message from the server, and we want to show the message on the base of the message we got.
We can call the function on the button’s onclick method
<button onclick="alertFunc()">Show Alert!</button>
Then, later in the script, we can write the function in which we can show the alert message.
function alertFunc() {
var alertMessage = 'Alert Box using function';
alert(alertMessage);}
Or, if we are getting a confirmation message from the server, and we want to show the message on the base of the message we got.
We can call the function on the button’s onclick method
<button onclick="alertFunc()">Show Alert!</button>
Then, later in the script, we can write the function in which we can show the alert message.
function alertFunc() {
var alertMessage = 'Alert Box using function';
alert(alertMessage);}
![]() So, these are some of the different methods of using the alert() method.
So, these are some of the different methods of using the alert() method.
Conclusion
In this article, we have learned about the javascript’s built-in alert method to show pop-up over the browser’s window.
This article has explained the use of the alert method in a very easy, profound, and effective way that any beginner can understand and use.
So, keep on learning, working, and getting experience with linuxhint.com to have a better grasp over it.
Thank you so much!
Javascript Map
In this article, we are going to learn one of the most widely used methods for the array, which is the map() method.
The map method helps in mapping arrays according to our requirements.
Let’s see, what is a map() method? What is the syntax for mapping arrays using the map() method?
The array’s map method is used to construct a new mapped array based on the return value of the callback function for each element.
var mappedArray = array.map(callbackFunction, thisValue)
The callback is the function that will be called every time for a single element and return a value that will be stored in a new array.
The syntax for the callback function is
function(value, [index[, array]])
value is a necessary argument, which is actually a single element of the array.
The index is an optional argument that will be used as the index of each element in the callback function.
The array is an optional argument as well.
We can pass this argument if we want to use the array in the callback function.
thisValue is the value we want to pass, which will be used as a “this” in the callback function.
Otherwise, “undefined” will be passed.
Javascript provides the for…in loop and foreach loop for iterating through elements and manipulating arrays.
But, why do we need a map method aside from that? There are two major reasons for that.
One is the separation of concern and the second is the easy syntax for doing such tasks.
So, let’s try some different examples to demonstrate the purpose and right use of it.
Examples
First of all, we are going to have a simple demonstration in which we have a simple array of numbers on which we will try to perform any simple arithmetic operation over every single element.
var arr = [4, 8, 16, 64, 49];
Now, before applying the map method over this array.
We will first write a callback function to which we can call in our map function in which, let’s say we want to multiply each element with 10 and have a new array.
function multiply(element){
var newElement = element * 10;
return newElement;}
Everything is set up to apply the map method over the array and have the results required.
var newArr = arr.map(multiply);
Now, if we have a look at the “newArr”,
console.log(newArr);
We can see the latest mapped array in the output as per our requirement.
![]() Keep this in mind that the length of the new mapped array will definitely be equal to the original array.
There is a shorter way of doing the same task using the arrow or anonymous function within a map method.
So, we can write a callback function within a map method like this
var newArr = arr.map((element) => {
return element * 10})
Or, if we want to be a pro and make it more concise.
We can do this
var newArr = arr.map(e => e * 10)
Alright! So, this was the very basic demonstration of the map method and different ways to write the call back function.
But, this function comes more in handy, when we are playing with an array of objects.
That’s where it’s true implementation happens.
Keep this in mind that the length of the new mapped array will definitely be equal to the original array.
There is a shorter way of doing the same task using the arrow or anonymous function within a map method.
So, we can write a callback function within a map method like this
var newArr = arr.map((element) => {
return element * 10})
Or, if we want to be a pro and make it more concise.
We can do this
var newArr = arr.map(e => e * 10)
Alright! So, this was the very basic demonstration of the map method and different ways to write the call back function.
But, this function comes more in handy, when we are playing with an array of objects.
That’s where it’s true implementation happens.
Using Map with an Array of objects
In this example, we suppose an array of objects in which each object contains the information of a player.
Player’s name and his ID.
var arr = [
{ id: 12, name: "James"},
{ id: 36, name: "Morgan"},
{ id: 66, name: "Jordan"}];
Now, let’s say we want to extract the IDs from each object and have a new array of IDs.
But, in order to understand, how the map method is different and helps better than the foreach loop.
We will try both of these(map method and foreach loop) to do the same task and learn the difference.
So, first, we will try to extract IDs using the foreach loop and then using the map method.
var extractedIDs = [];
arr.forEach((element) => {
return extractedIDs.push(element.id);})
Now, if we have a look at the extracted IDs.
console.log(extractedIDs);
![]() We have got them separated in an array.
But, now let’s demonstrate the same output using the map method.
var extractedIDs = arr.map((element) => {
return element.id;})
console.log(extractedIDs);
We have got them separated in an array.
But, now let’s demonstrate the same output using the map method.
var extractedIDs = arr.map((element) => {
return element.id;})
console.log(extractedIDs);
![]() By looking at the difference in code and the same output, we can realize the true difference between the two(foreach and map) methods.
The syntax and separation of concern.
Similarly, we can perform a lot of other operations.
If we have to play and get some data from the array of objects.
We suppose an array of objects in which each object contains two properties: first name and last name.
var arr = [
{ firstName: "John", lastName: "Doe"},
{ firstName: "Morgan", lastName: "Freeman"},
{ firstName: "Jordan", lastName: "Peterson"}];
Now, we want to have an array that contains the full names.
So, we will write a map function like this to fulfill our purpose
var fullName = arr.map((person) => {
return person.firstName + ' ' + person.lastName})
console.log(fullName);
By looking at the difference in code and the same output, we can realize the true difference between the two(foreach and map) methods.
The syntax and separation of concern.
Similarly, we can perform a lot of other operations.
If we have to play and get some data from the array of objects.
We suppose an array of objects in which each object contains two properties: first name and last name.
var arr = [
{ firstName: "John", lastName: "Doe"},
{ firstName: "Morgan", lastName: "Freeman"},
{ firstName: "Jordan", lastName: "Peterson"}];
Now, we want to have an array that contains the full names.
So, we will write a map function like this to fulfill our purpose
var fullName = arr.map((person) => {
return person.firstName + ' ' + person.lastName})
console.log(fullName);
![]() As you can see, we have got a separate array with full names.
That’s great.
So, these are some of the basic and different ways of how a map function can be used to fulfill our development requirements and helps in every javascript developer’s life.
As you can see, we have got a separate array with full names.
That’s great.
So, these are some of the basic and different ways of how a map function can be used to fulfill our development requirements and helps in every javascript developer’s life.
Conclusion
In this article, we have learned about javascript’s most used map() method for arrays and we have learned some of the different ways to use the map method.
This article explains the concept of the map method in such an easy and profound way that any beginner coder can understand it and utilize it to his needs.
So, keep on learning, working, and getting experience with linuxhint.com to have a better grasp over it.
Thank you so much!
Javascript Sort
As we have to manage arrays in almost all programming languages, JavaScript is no different.
Arrays are usually used to store data like strings, numbers, objects, and undefined.
With the exponential growth of online data, we frequently need to manage and sort the data.
Sorting is kind of a massive experience in almost every programming language.
It takes a lot of effort, machine power, and calculations to do the right sorting.
With the expansion of data, we need to sort and structure the data in a beautiful way.
Javascript provides a built-in array mutator method sort() for sorting arrays.
In this article, we will have a look at Javascript’s built-in sort() method and learn what the Javascript sort method is, as well as how we can use it for our purpose to sort elements in an array.
Let’s go ahead and start working!
The sort method is used to arrange different elements in an array in a specific order.
Syntax
The general syntax for the sort method is:
array.sort();
This method returns the sorted array in ascending order by default.
We would discuss a couple of examples to understand the sort method.
Examples
We suppose an array of string in which we have some different names of Linux operating systems.
let arr = ["Ubuntu", "Fedora", "CentOS", "Debian", "Kali Linux"]
Now, if we apply the sort method over this array:
arr.sort();
It will definitely sort the array in alphabetical order.
We can see the output in the screenshot below.
But, if we want to get the string in reverse/descending order.
We can apply a Javascript’s built-in reverse function over the sorted array like this:
var sortedArray = arr.sort();
sortedArray.reverse();
The shorter way to do the reverse is:
arr.sort().reverse();
Alright! It worked fine for the string.
Let’s try if it works for the numbers as well.
So, we first suppose an array of numbers.
let arr = [14,8,33,27,6]
Then apply the sort method over the array of numbers.
arr.sort();
It seems like it didn’t work well as it did for the string.
Because the sort method first converts the numbers into the strings and then sorts on the base of Unicode.
Although, “8” comes before “14” in numerical order.
But, in UTF-16 code units order, “14” comes before “8”.
The good thing, we got the solution for this.
CompareFunction
Here comes the concept of compare function that comes in handy in helping sort the numbers.
We can use a compare function to the sort method as a callback function, which takes two elements.
It then sorts them according to our requirement in the compare function and returns them to the sort method, continuously doing this until it reaches the end of the array.
The syntax for the sort method with the compareFunction would be like this:
array.sort(compareFunction);
Now, if we take a look at the technical details of the compareFunction, that is how it actually works.
If we do not provide a compareFunction to the sort method, it will sort according to the UTF-16 code unit orders.
If we utilize the compareFunction, all elements would be sorted in accordance with the return value of compareFunction.
So, if we want to write a compare function for the numbers.
That would be just like this:
function (a, b) { return a - b }
CompareFunction takes two values at a time and returns three types of values.
True or “1”, if the first value comes before the second value or the first value is greater than the second value:
False or “-1”, if the first value comes after the second value or the first value is greater than the second value.
And “0”, if two values are equal.
Now, if we try to apply it to sort the array of numbers.
We can apply it like this:
arr.sort(function (a ,b){ return a - b })
As you can see in the output, array having numbers have been sorted decently.
The shorter way of doing the same task will be like this:
arr.sort((a, b) => a - b)
But, this works only for the comparison of the numbers.
We can also use the sort method to sort the array of objects depending on the values of the object, which we want to sort the array of objects.
If suppose we would want to sort on the base of the number of users an array of objects in which every object includes the Linux Operating Systems and the number of their users, then we will be using the following:
arr = [
{name:"Ubuntu", users:3000}
{name:"Fedora", users:1500}
{name:"CentOS", users:2000}
{name:"Debian", users:5000}
{name:"Kali Linux", users:4000}]
So, in order to sort on the base of users.
The sort function would be like this:
arr.sort(() => { return a.users - b.users })
So, these are the different ways of using the sort method to sort the arrays of any type.
Conclusion
In this article, we have learned how we can sort an array of different types using Javascript’s built-in sort function.
This article explains the concept of the sort function from novice to intermediate level in a very easy, profound, and effective way.
So, keep on learning, working, and getting experience with linuxhint.com to have a better grasp over it.
Thank you so much.
Applying JavaScript’s setTimeout Method
With the evolution of the internet, JavaScript has grown in popularity as a programming language due to its many useful methods.
For example, many websites use JavaScript’s built-in setTimeout method to delay tasks.
The setTimeout method has many use cases, and it can be used for animations, notifications, and functional execution delays.Because JavaScript is a single-threaded, translative language, we can perform only one task at a time.
However, by using call stacks, we can delay the execution of code using the setTimeout method.
In this article, we are going to introduce the setTimeout method and discuss how we can use it to improve our code.
The setTimeout method is a built-in method that takes a callback function as an argument and executes it after a given amount of time.
The syntax for the setTimeout method is as follows:
setTimeout(callbackFunction, delay, arguments...)
The callbackFunction is the function we want to execute after a given amount of time; the delay is the time in milliseconds after which we want to execute the callback function; and the arguments are other parameters we want to pass to the callback function.
Now, we will apply the setTimeout method.
First, we define a function called linuxhintFunc that prints the string “Hello from Linuxhint.”
function linuxhintFunc() {
console.log("Hello from Linuxhint.");}
Next, we call linuxhintFunc in setTimeout and provide a time delay of 2000 ms (2 s).
setTimeout(linuxhintFunc, 2000)
![]() Once the web page is loaded, there is a delay of 2 s before the function is called.
We can perform the same task using the arrow function or an anonymous function.
setTimeout(() => {
console.log("Hello from the Linuxhint");}, 2000)
Once the web page is loaded, there is a delay of 2 s before the function is called.
We can perform the same task using the arrow function or an anonymous function.
setTimeout(() => {
console.log("Hello from the Linuxhint");}, 2000)
![]() Again, there is a delay of 2 s.
Note: The setTimeout method is an asynchronous method, which means that, although JavaScript is a single-threaded language, this function runs on a different thread.
The setTimeout method places the function in the queue of the call stack and waits until the call stack is free.
If we try to print a message or run a function in setTimeout without a delay, then this action would be jump to the front of the queue first and run when the setTimeout method is executed.
console.log("Hello from the Linuxhint-1")
setTimeout(() => {
console.log("Hello from the Linuxhint-2")}, 0)
console.log("Hello from the Linuxhint-3")
Again, there is a delay of 2 s.
Note: The setTimeout method is an asynchronous method, which means that, although JavaScript is a single-threaded language, this function runs on a different thread.
The setTimeout method places the function in the queue of the call stack and waits until the call stack is free.
If we try to print a message or run a function in setTimeout without a delay, then this action would be jump to the front of the queue first and run when the setTimeout method is executed.
console.log("Hello from the Linuxhint-1")
setTimeout(() => {
console.log("Hello from the Linuxhint-2")}, 0)
console.log("Hello from the Linuxhint-3")
![]() Looking at the output, the order of the output is not the same as that of the input.
Therefore, the setTimeout function can delay the execution of code.
Looking at the output, the order of the output is not the same as that of the input.
Therefore, the setTimeout function can delay the execution of code.
Conclusion
This article introduces JavaScript’s built-in setTimeout method and discussed how we can use it.
We hope that you learned something from this article and that you continue learning about JavaScript with linuxhint.com.
How to Get Current Date & Time?
Javascript has become a massively used programming language due to the expansion of the internet and the web at an unbelievable pace.
In the modern world of the web, we can do almost every task in one single browser, and Javascript is used in every single website we see in our daily routine life.
We frequently used to see the date and time at almost every website.
In this article, we are going to have a look at how we can get the current time and what are the different ways to get the date and time according to our requirement.
Javascript provides a built-in object Date, which helps in managing all the date and time.
Later, we can extract whatever we want according to our needs using different built-in methods.
So, let’s just straight jump into the process and learn the different techniques to extract the current date and time.
First of all, we will create a new object of Date() and declare a variable named “current” and assign the new Object of Date() to a “current” variable.
var current = new Date();
After assigning, let’s have a look at the object Date what does it have for us.
console.log(current)
![]() Alright! It looks pretty cool in a good format.
But, how about if we want to get only the year from the entire date? We can use the built-in function getFullYear() for getting the year only.
current.getFullYear();
Alright! It looks pretty cool in a good format.
But, how about if we want to get only the year from the entire date? We can use the built-in function getFullYear() for getting the year only.
current.getFullYear();
![]() Similarly, if we want to extract only the year, we can use the built-in function getMonths() for getting the month only.
current.getMonth();
Similarly, if we want to extract only the year, we can use the built-in function getMonths() for getting the month only.
current.getMonth();
![]() There seems like an issue.
This is not the 8th month(August)! As we can see in the above complete output for the new Date object.
This is September.
Well, this is because of the digital(0-11).
So, we have to add “1” to it for getting the right month every time.
current.getMonth() + 1;
There seems like an issue.
This is not the 8th month(August)! As we can see in the above complete output for the new Date object.
This is September.
Well, this is because of the digital(0-11).
So, we have to add “1” to it for getting the right month every time.
current.getMonth() + 1;
![]() This is fine now.
Just like for the year, we can do the same for the date.
For example, to extract or get only the date, we can use the built-in function getDate().
current.getDate();
This is fine now.
Just like for the year, we can do the same for the date.
For example, to extract or get only the date, we can use the built-in function getDate().
current.getDate();
![]() Just like a date, we have built-in functions for extracting the desired piece of time.
For example, if we want to get or extract the hours only, from the whole current time, we can use the built-in function getHours().
current.getHours();
Just like a date, we have built-in functions for extracting the desired piece of time.
For example, if we want to get or extract the hours only, from the whole current time, we can use the built-in function getHours().
current.getHours();
![]() The same goes for the minutes.
To extract minutes only, we can use getMinutes().
current.getMinutes();
The same goes for the minutes.
To extract minutes only, we can use getMinutes().
current.getMinutes();
![]() To extract seconds only, we can use getSeconds().
current.getSeconds();
To extract seconds only, we can use getSeconds().
current.getSeconds();
![]()
Advanced built-in functions
Here we have some advanced built-in functions to get the date and time in a pretty clean and good formatted string.
For example, in order to get only the time, not the date, in the form of string we can use the built-in function toLocaleTimeString() to our purpose.
current.toLocaleTimeString(); // "2:42:07 PM"
![]() And, if we want to extract only the time in the form of string.
We can use the built-in function toLocaleDateString().
current.toLocaleDateString(); // "9/29/2020"
And, if we want to extract only the time in the form of string.
We can use the built-in function toLocaleDateString().
current.toLocaleDateString(); // "9/29/2020"
![]() And, if we want to extract both the date and time in a single string, we can use the built-in function toLocaleString().
current.toLocaleString(); // "9/29/2020, 2:42:07 PM"
And, if we want to extract both the date and time in a single string, we can use the built-in function toLocaleString().
current.toLocaleString(); // "9/29/2020, 2:42:07 PM"
![]() So, this is how we can get the date and time using the built-in date object and extract the required months, years, or minutes using different methods.
So, this is how we can get the date and time using the built-in date object and extract the required months, years, or minutes using different methods.
Conclusion
This article explains how we can get the current date and time and how we can use it to our needs in a very easy, profound, and effective way that any beginner can understand and use.
So, keep on learning, working, and getting experience with linuxhint.com to have a better grasp over it.
Thank you so much!
Javascript Confirm Method
Javascript is the most known language of the web.
Javascript is widely used in front-end development as well as in the back-end.
Javascript provides a lot of built-in objects, functions, and methods to help in web development.
In this article, we are going to learn one of the javascript’s built-in confirm() method, which is used to show pop-ups over the screen and get the user’s response.
The confirm box is a bit different if we try to compare it with the alert box.
It is a pop-up that contains a message/text with two buttons, “OK” and “Cancel”.
The user won’t be able to do any task while a confirm box is over the screen, and he/she clicks the “OK” or “Cancel” button.
This is the reason behind not recommending it’s often used.
So, let’s have a look at what is a confirm box and what are the different ways to use it.
The confirm() is basically a method, which is used to show a pop-up box over the web page, and it contains a message or text and two buttons, “OK” & “Cancel”.
On the click of the “OK” button, the confirm method returns “true”.
Similarly, on the click of the “Cancel” button, it returns false.
Syntax
There are two different syntaxes for showing the confirm box.
One of them is using the window’s object
window.confirm(message);
But, we can use the confirm() method without the window’s object as well.
confirm(message);
In this syntax, the message can be any string or a variable that can include a message.
So, let’s try both of the syntaxes.
Examples
First, let’s try with the window’s object
window.confirm("Confirm message from Linuxhint");
And now without window’s object
confirm("Confirm message from Linuxhint");
You will witness that there is no difference in both of them.
![]() The confirm method doesn’t only take the string to show the message.
We can provide variable as well, and it worked perfectly fine.
var confirmMessage = Confirm Message using variable';
confirm(confirmMessage);
As you can see in the screenshot below that the message is displayed.
The confirm method doesn’t only take the string to show the message.
We can provide variable as well, and it worked perfectly fine.
var confirmMessage = Confirm Message using variable';
confirm(confirmMessage);
As you can see in the screenshot below that the message is displayed.
![]() We have learned about providing a variable as well.
What if we want to show the pop-up alert box on the screen at the click of a button.
For example, we have got some information from the user, and after successfully saving the user’s data on the server, we want to show a confirmation message that “Confirmed”.
So, we can simply show a confirmation box like this.
<button>Show Confirm Box!</button>
We have learned about providing a variable as well.
What if we want to show the pop-up alert box on the screen at the click of a button.
For example, we have got some information from the user, and after successfully saving the user’s data on the server, we want to show a confirmation message that “Confirmed”.
So, we can simply show a confirmation box like this.
<button>Show Confirm Box!</button>
![]() Or if we are getting a confirmation message from the server, and we want to show the message on the base of the message we got.
We can call the function on the button’s onClick method.
<button>Show Confirm Box!</button>
And later in the script, we can write the function in which we can show the confirmation message.
function confirmFunc() {
var confirmMessage = 'Confirm Box using function';
confirm(confirmMessage);}
Or if we are getting a confirmation message from the server, and we want to show the message on the base of the message we got.
We can call the function on the button’s onClick method.
<button>Show Confirm Box!</button>
And later in the script, we can write the function in which we can show the confirmation message.
function confirmFunc() {
var confirmMessage = 'Confirm Box using function';
confirm(confirmMessage);}
![]() So, these are some of the different methods of using the confirm() method.
So, these are some of the different methods of using the confirm() method.
Conclusion
In this article, we have learned about the javascript’s built-in confirm method to show pop-up over the browser’s window.
This article has explained the use of the confirm method in a very easy, profound, and effective way that any beginner can understand it and use it.
So, keep on learning, working, and getting experience with linuxhint.com to have a better grasp over it.
Thank you so much.
Applying JavaScript’s Splice Function
JavaScript is a lightweight programming language, and as with any programming language, when developing JavaScript programs, we often need to work with arrays to store data.
In this article, we will introduce JavaScript’s built-in splice function and discuss how we can use it to manipulate an array.
As data are generated, the structures used for storage must be updated.
For this reason, a programmer must often add elements to or remove elements from an array.
The splice function is used to add elements to or remove elements from an array at a given index, and it returns the elements removed from the array.
The syntax for the splice function is as follows:
array.splice(index, removeCount, items...)
Here, index is the position at which we want to add or remove elements, removeCount, which is an optional argument, is the number of elements that we want to remove, and items, which is also optional, contains the elements we want to add.
Now, we will go over a few examples to show how the splice function is implemented.
First, suppose we have an array that consists of five elements.
let arr = [10,20,30,40,50]
To remove the elements 20 and 30 (at position 1 and position 2 in the array, respectively) from the array, we simply call the splice function and tell it to start from the first index and remove 2 elements.
arr.splice(1,2);
![]() The values 20 and 30 are returned as the output.
Next, we can look at the original array with the following command:
console.log(arr);
The values 20 and 30 are returned as the output.
Next, we can look at the original array with the following command:
console.log(arr);
![]() The two elements returned in the output are no longer in the array.
Next, we will add elements to the array using the splice function.
Because we will not remove elements from the array, we can provide a value of zero for removeCount and then provide the elements we want to add.
arr.splice(2, 0, 30, 35);
The two elements returned in the output are no longer in the array.
Next, we will add elements to the array using the splice function.
Because we will not remove elements from the array, we can provide a value of zero for removeCount and then provide the elements we want to add.
arr.splice(2, 0, 30, 35);
![]() The above command returns an empty array because no elements were removed.
However, if we look at the original array, we can see that it has been updated.
console.log(arr);
The values 30 and 35 were successfully added at the second index.
Finally, if we want to remove elements and add elements, we can provide values for both removeCount and items.
arr.splice(1, 2, 15, 20, 25);
The above command has returned the two elements that were removed, and if we print the original array to the console, we can see that 20 and 30 are no longer in the array and that 15, 20 and 25 have been added.
console.log(arr);
The above command returns an empty array because no elements were removed.
However, if we look at the original array, we can see that it has been updated.
console.log(arr);
The values 30 and 35 were successfully added at the second index.
Finally, if we want to remove elements and add elements, we can provide values for both removeCount and items.
arr.splice(1, 2, 15, 20, 25);
The above command has returned the two elements that were removed, and if we print the original array to the console, we can see that 20 and 30 are no longer in the array and that 15, 20 and 25 have been added.
console.log(arr);
![]()
Conclusion
In this article, we discussed several ways to use the splice function to update arrays.
We hope you found this article useful and continue to learn JavaScript with linuxhint.com.
Javascript Trim String
Javascript is a scripting or programming language, which is used both on the client-side and back-end of the web.
Just like any other language, strings are an important type of the variables, and we often need to manipulate or alter strings as per our needs.
While getting data from the user in the form fields, a programmer has to take care of a lot of things.
In this article, we will have a look at javascript’s trim() function.
We will learn how this function helps in beautifying the strings and how can we get rid of extra spaces.
So, let’s take a look at what is a string and how we can trim the strings.
The string is a simple text or characters which can include the alphabets, numbers, or symbols.
Javascript’s trim() method trims the extra white space from both sides of the strings.
Extra white space can be space or tab, etc.
Syntax
Syntax for the trim() method is as follows:
string.trim();
In javascript’s trim string method, we simply call the function over a string, and it trims the string into a clean, space free string.
This function doesn’t take any arguments.
Let’s try some examples and understand it.
Examples
First, we suppose a string and add some extra white space around the string.
let str = " Linuxhint! "
Now, to get rid of the extra white spaces from both sides, we try to apply the trim() method over that string and see how it works.
str.trim();
![]() We can see in the output that the string is trimmed and there is no extra whitespace left around the string as we desired it to happen.
Now, a question arises: what if we want to trim the string from only the left side or the start of the string and vice versa.
There is a built-in function for that as well.
There are two different trimStart() and trimLeft() functions, but these both do the same task.
So, if we want to trim the string from the left side only and want to keep the whitespaces on the right side.
We can use the trimStart() or trimtrimLeft() function.
str.trimStart();
We can see in the output that the string is trimmed and there is no extra whitespace left around the string as we desired it to happen.
Now, a question arises: what if we want to trim the string from only the left side or the start of the string and vice versa.
There is a built-in function for that as well.
There are two different trimStart() and trimLeft() functions, but these both do the same task.
So, if we want to trim the string from the left side only and want to keep the whitespaces on the right side.
We can use the trimStart() or trimtrimLeft() function.
str.trimStart();
![]() str.trimLeft();
str.trimLeft();
![]() As you can see that both functions do the same task and trim the strings from the left side only.
Similarly, if we want to trim the string from the last or the right side only.
We can use any of the trimEnd() or trimRight() functions.
str.trimEnd();
As you can see that both functions do the same task and trim the strings from the left side only.
Similarly, if we want to trim the string from the last or the right side only.
We can use any of the trimEnd() or trimRight() functions.
str.trimEnd();
![]() str.trimRight();
str.trimRight();
![]() It is observed that the string is trimmed only from the right side, as we expected.
So, this is how the javascript’s built-in functions trim(), trimStart(), trimLeft(), trimEnd() and trimRight() works and helps us in getting rid of the extra whitespace around the string.
It is observed that the string is trimmed only from the right side, as we expected.
So, this is how the javascript’s built-in functions trim(), trimStart(), trimLeft(), trimEnd() and trimRight() works and helps us in getting rid of the extra whitespace around the string.
Conclusion
In this article, we have learned about javascript’s built-in string trim() function and see it’s various implementations.
We have also learned about the trimStart() and trimEnd() functions.
This article includes profound and explained in-depth knowledge, the need, and the usage of the javascript’s string trim function.
So, keep on learning javascript with linuxhint.com.
JavaScript Sleep Function
Javascript is the language of freedom yet is a function-oriented language at the same time.
Unlike other languages, javascript does not provide a built-in sleep() function.
You can either build a custom sleep() function using the built-in setTimeout() function, or the latest ECMAScript promises an async-await function.
This article shows you how to stop or pause the execution of the sleep function for a desired amount of time using promises or async-await functions.
Before Starting
Before you start to build a sleep function, you need to understand that the setTimeout() function does not work if you expect it to stop the execution.
Many programmers and developers try to use the function with loops but fail because the setTimeout() function is used to wait for some given amount of time and then runs the given function.
You can, however, use the setTimeout() function to build a sleep function using promise if your purpose is to stop the execution for a desired amount of time.
Using the Sleep Function
So, we will make a custom sleep function in which the function will get time in milliseconds as an argument and return a promise.
The promise will include a setTimeout() function, which will pass the resolver as a function and time in milliseconds to the setTimeout() function.
So, in the end, the sleep function should look like this:
function sleep(ms){
return new Promise( resolver => setTimeout(resolver, ms));};
And now, wherever you want to use this sleep function, you can easily use it.
Now, we will use this sleep function in a couple of examples to show you how to use it in practice.
First, we will try to console some text and call the sleep function.
Since the sleep function is returning a promise, we put a then function after it, in which we will console some text and pass the argument ‘5000’ to the sleep function.
After running the program, you will see in the console that it will sleep for 5 seconds.
console.log("Sleep function will wait for 10 seconds and then it will print 'Done'");
sleep(5000).then(()=>{
console.log("Done");})
![]() You can witness the delay of 5 seconds to get to the “Done” status in the console.
Suppose we want to perform an animation after every 2 seconds.
To do so, we will simply write an asynchronous animation function, in which we will animate something, stop the execution for 2 seconds using sleep, and then repeat this process using a for loop for 10 times.
async function animation(ms){
console.log("starting...");
for (let i = 0; i < 10; i++) {
console.log("animation after 2 seconds...")
await sleep(ms)}
console.log("This is the end.");}
After writing the asynchronous animation function, we can now call the animation function.
animation(2000);
After running the code, you will see in the console that the text “animation after 2 seconds” is repeating every two seconds.
You can witness the delay of 5 seconds to get to the “Done” status in the console.
Suppose we want to perform an animation after every 2 seconds.
To do so, we will simply write an asynchronous animation function, in which we will animate something, stop the execution for 2 seconds using sleep, and then repeat this process using a for loop for 10 times.
async function animation(ms){
console.log("starting...");
for (let i = 0; i < 10; i++) {
console.log("animation after 2 seconds...")
await sleep(ms)}
console.log("This is the end.");}
After writing the asynchronous animation function, we can now call the animation function.
animation(2000);
After running the code, you will see in the console that the text “animation after 2 seconds” is repeating every two seconds.
![]()
Conclusion
This article showed you how to make a custom sleep function, alongside multiple demonstrations.
I hope this article has helped you to better understand the usage of sleep function.
You can learn more about Javascript at linuxhint.com.
Javascript Redirect
Javascript is a web-oriented programming language.
When using the web, you will often need to navigate through pages.
When you click on any button, submit a form, or log in to any website, you get redirected to a different new page.
Page redirection is an essential part of any website, but it is not only restricted to page navigation on a website.
There can be multiple reasons to redirect the page, for example:
The old domain name is changed to a new domain
Submission and Authorization of a form
On the base of the browser or language of the user
Redirect from HTTP to HTTPS
This article explains a few different ways to redirect a page.
Syntax
The syntax for navigating to a page using javascript is as follows:
window.location.href = "url"
In this method, you simply provide the URL to which you want to redirect the user.
The syntax for another method of redirecting a user to a new URL is as follows:
window.location.replace("url") // or
window.location.assign("url")
In this functional syntax, you provide the URL to which you want to redirect, and whenever this function is called, you will be redirected to that specific URL.
Here, “replace” and “assign” do the same task but with a subtle difference.
They both redirect to a new URL, but “replace” does not take the record of history and the user cannot go back to the old URL or previous page.
Meanwhile, “assign” keeps the history record and allows the user to go back to the previous page.
We will now look at some examples of both syntaxes.
Examples
First, we will create an on-click function on a button.
<button onclick="redirectFunction()">Linuxhint</button>
This function will redirect the user to the website “https://www.linuxhint.com.”
function redirectFunction() {
window.location.href = "https://www.linuxhint.com"}
Now, if the user clicks on the button, they will be redirected to linuxhint.com
![]() In this next example, say, you want to redirect the user from an old domain to the new domain.
For testing purposes, suppose the current address is the localhost, but whenever the user enters the URL of the localhost, the user gets redirected from the localhost to the new URL, which is linuxhint.com in this example.
This is easier to do than you may think.
To do this, simply use the syntax of the second redirect method:
window.location.replace("https://www.linuxhint.com")
Now, if the user enters the localhost URL, they will be redirected to linuxhint.com.
But, if you look at the top-left button of the browser for going back to the previous page:
In this next example, say, you want to redirect the user from an old domain to the new domain.
For testing purposes, suppose the current address is the localhost, but whenever the user enters the URL of the localhost, the user gets redirected from the localhost to the new URL, which is linuxhint.com in this example.
This is easier to do than you may think.
To do this, simply use the syntax of the second redirect method:
window.location.replace("https://www.linuxhint.com")
Now, if the user enters the localhost URL, they will be redirected to linuxhint.com.
But, if you look at the top-left button of the browser for going back to the previous page:
![]() the button is dulled and the browser is not allowing us to go back to the previous page.
However, if you want to keep this option for the user, you can use “assign” instead of “replace.”
window.location.assign("https://www.linuxhint.com")
And now, if you look at the top-left button of the browser for going back to the previous page:
the button is dulled and the browser is not allowing us to go back to the previous page.
However, if you want to keep this option for the user, you can use “assign” instead of “replace.”
window.location.assign("https://www.linuxhint.com")
And now, if you look at the top-left button of the browser for going back to the previous page:
![]() The button is not dulled.
You can go back to the previous page.
It is recommended to use “replace” instead of “assign,” here, because the purpose of redirecting to a new URL is that the old URL is not working or not available anymore.
The button is not dulled.
You can go back to the previous page.
It is recommended to use “replace” instead of “assign,” here, because the purpose of redirecting to a new URL is that the old URL is not working or not available anymore.
Conclusion
This article explained a few different methods of redirection, along with real-life examples using these methods.
In this article, you have learned how to navigate to a new page and how to redirect from the old URL to a new URL.
You can learn more about javascript at linuxhint.com.
Joining Arrays
In JavaScript, as in many other scripting and programming languages, we often need to use arrays.
Furthermore, it is often useful to combine the elements of an array into a single string.
In PHP, for example, the implode function is used to join the elements of an array.
In this context, “implode” can be viewed as a synonym for “join”., however, there is no “implode” function; instead, there is a built-in “join” function that performs the same task.
In this article, we are going to examine JavaScript’s join function in some detail.
Syntax
The join function concatenates the elements of an array into a single string.
The syntax for the join function is as follows:
array.join(separator)
Here, separator is the string or string used to separate elements of the array; it can be any character or string, such as the space character (i.e., “ ”) or a string like “xyz”, but a comma is used as the default.
Examples
Now, let’s look at some examples.
First, we declare an array of letters.
let arr = ["a", "b", "c", "d", "f"]
We can call the join function for this array without providing a separator as follows, which will return the all characters from the array separated by commas:
![]() Now, let’s see what will happen if we provide the space character as a separator:
Now, let’s see what will happen if we provide the space character as a separator:
![]() Here, in the string returned, the array elements are separated by the space character instead of a comma.
We can provide any character or string as a separator.
If we want to put “ and ” between the array’s elements, we can do that as follows:
Here, in the string returned, the array elements are separated by the space character instead of a comma.
We can provide any character or string as a separator.
If we want to put “ and ” between the array’s elements, we can do that as follows:
![]() Here, every alphabet is separated by the “ and ”, which might be very useful for certain applications.
Any string can be provided as a separator for joining an array’s elements in the same way.
Here, every alphabet is separated by the “ and ”, which might be very useful for certain applications.
Any string can be provided as a separator for joining an array’s elements in the same way.
Conclusion
This article explains JavaScript’s join function and provides some useful examples.
We can provide any string we want as a separator to join an array’s elements.
We hope you found this article useful and continue using linuxhint.com to learn about JavaScript.
Global Variables
JavaScript is a versatile yet functional language.
Variables, which are key to any programming language, can be used to store values that can be accessed at any time.
However, when using functions, there are certain factors related to the scope of the function that limit our ability to access a variable.
We cannot access a variable if it is outside the scope of the function, and so the variables we want to use must have the proper scope upon declaration.
To avoid issues related to scope, it is important to understand global variables.
Therefore, in this article, we are going to discuss global variables and scope.
The scope of a function can be considered as a boundary within which the function can be accessed.
However, while a function does not know what is happening beyond the curly brackets that define it, a global variable can be accessed from anywhere in the program.
Syntax
The syntax used to create a global variable, shown below, is no different than that used to create other variables.
var variableName = value
However, the location of this declaration is very important.
We will explore this concept more fully by considering some examples.
Example
First, let’s create a function called subtraction.
function subtraction(a,b) {
var subNum = 23;}
In this function, we initialized a variable and assigned it a value.
Now, we can try to access the variable in another function, i.e., division, and call that function.
function division(a,b) {
console.log(subNum);}
division();
However, we get the following reference error because the variable subName is not defined within the correct scope.
![]() This error will occur any time we try to access subNum outside the function in which it is defined.
For example:
function subtraction(a,b) {
var subNum = 23;};
console.log(subNum);
This error will occur any time we try to access subNum outside the function in which it is defined.
For example:
function subtraction(a,b) {
var subNum = 23;};
console.log(subNum);
![]() Here, we still cannot access the variable because it is restricted to the subtraction function.
However, let’s see what happens if we create the variable outside the function—for example, at the beginning of the script:
var globalVar = 11;
Now, let’s try to access it:
console.log(globalVar);
As shown below, we no longer get a reference error.
Here, we still cannot access the variable because it is restricted to the subtraction function.
However, let’s see what happens if we create the variable outside the function—for example, at the beginning of the script:
var globalVar = 11;
Now, let’s try to access it:
console.log(globalVar);
As shown below, we no longer get a reference error.
![]() Furthermore, globalVar should be accessible from any function.
function division(a,b) {
console.log(globalVar);}
division();
As you can see below, globalVar is still accessible.
Furthermore, globalVar should be accessible from any function.
function division(a,b) {
console.log(globalVar);}
division();
As you can see below, globalVar is still accessible.
![]()
Conclusion
In this article, we explained scope and global variables by using simple examples.
We hope you continue learning JavaScript with linuxhint.com.
The Javascript for…in Loop
Javascript is one of the most popular programming languages in the world.
In any programming language, loops have an essential value.
Like many other languages, Javascript provides different loop syntax formats, as well.
This article discusses an important Javascript topic known as the for…in loop.
Sometimes, we may have to iterate through every single element of an object/array.
But, we do not usually know the length of that particular object/array.
The for…in loop even comes in handy when working with JSON.
In this article, we will take a look at the for…in loop, its syntax, and some examples using this loop.
Javascript’s for…in loop iterates through each property of the object.
Syntax
The syntax of the for…in loop is as follows:
for (const key in object) {
// body of the for...in loop}
where,
The key is the variable used in each iteration.
The object is the required object from which to iterate the loop.
Next, we will go over some examples to reinforce the concept and show you how the process works.
Examples
First, we see the simplest implementation of the for…in loop.
In this example, we will first assume an object:
let obj = {
firstName: "John",
lastName: "Doe"}
And then, we will iterate through the object and console each property using the for…in loop.
for (const name in obj) {
console.log(name + " = " + obj[name]);}
![]() As you can see, the for…in loop has iterated through each property of the obj object and printed each property in the console, as we desired.
Javascript also provides the built-in hasOwnProperty() function.
We can perform the hasOwnProperty() check before performing any task in the for…in loop, like this:
for (const name in obj) {
if (obj.hasOwnProperty(name)) {
console.log(name + " = " + obj[name]);
}}
This function comes in handy when you need to use JSON or for debugging purposes.
When you do not know whether the key holds certain properties, you can also use the for…in syntax for the arrays, as well as for the strings.
let arr = [23,24,25]for (const value in arr) {
console.log(value + " = " + arr[value]);}
As you can see, the for…in loop has iterated through each property of the obj object and printed each property in the console, as we desired.
Javascript also provides the built-in hasOwnProperty() function.
We can perform the hasOwnProperty() check before performing any task in the for…in loop, like this:
for (const name in obj) {
if (obj.hasOwnProperty(name)) {
console.log(name + " = " + obj[name]);
}}
This function comes in handy when you need to use JSON or for debugging purposes.
When you do not know whether the key holds certain properties, you can also use the for…in syntax for the arrays, as well as for the strings.
let arr = [23,24,25]for (const value in arr) {
console.log(value + " = " + arr[value]);}
![]() Similarly, you can apply this syntax to the strings, as well.
let str = "Linuxhint"for (const char in str) {
console.log(char + " = " + str[char]);}
Similarly, you can apply this syntax to the strings, as well.
let str = "Linuxhint"for (const char in str) {
console.log(char + " = " + str[char]);}
![]() But, it is not recommended to use the for…in loop for arrays and strings because there are dedicated loops and functions for arrays and strings.
Like, for…of or Array.protptype.forEach() is for the arrays for doing the same tasks in better ways.
But, it is not recommended to use the for…in loop for arrays and strings because there are dedicated loops and functions for arrays and strings.
Like, for…of or Array.protptype.forEach() is for the arrays for doing the same tasks in better ways.
Conclusion
In this article, you learned how the for…in loop works and how it helps with JSON and debugging.
You also learned how to use the for…in loop with arrays and strings, although this loop is dedicated to and recommended for objects.
But, I hope this article proved helpful to your understanding of the for…in loop and its various implementations.
To learn more about Javascript, you can find more articles at linuxhint.com.
Javascript Regular Expression
Many programmers are familiar with the notion that the regular expression is a useful yet underrated concept.
But, they do not know very well how to use regular expressions efficiently.
Regular expressions are used in not only Javascript but almost all other programming languages.
In this article, you will learn about regular expressions step by step.
It should be easy for programmers of any level to understand the concepts covered in this article.
A Regular Expression is an object in which patterns are given to match with the desired string.
Syntax
The syntax for a regular expression is very simple, and can be written as follows:
/pattern/flags
A pattern is a string in which you provide a pattern to match another string.Flags are optional attributes that serve varied purposes.
For example, the flag “g” stands for “global,” among many others.
The scope of regular expressions is very broad.
We will show you the basic ones that are most necessary for programming through a step-by-step explanation and some real-life examples.
There are a lot of methods in which you may need to use regular expressions, for example,’s search(), replace(), match(), and split() methods.
We will start with a simple string search without using the regular expression, and later, we will show you how to perform the same search using regular expressions.
Examples
We will first suppose the string:
let str = "Linuxhint is great.
linuxhint is working great and performing 100%."
We have repeated the same word “great” and “linuxhint” in the phrase.
The purpose of this weird string will become obvious in a moment.
Alright! Now, we will simply write the Javascript search string method to search for the term “work”
str.search("work");
![]() As you can see, it shows the index from where the given substring “work” began.
Now, we will move on and try doing the same thing with the regex syntax.
As you can see, it shows the index from where the given substring “work” began.
Now, we will move on and try doing the same thing with the regex syntax.
Step 1: Search and Replace a Substring
You can search for a matching string using a regular expression by simply placing the substring between the two slashes in the expression.
str.search(/work/);
![]() As you can see, it has also given us the same output.
Alright! Now, we will see what we can do with the regular expression.
Let us try to replace the word “great” with, say, “awesome” using the replace() method.
str.replace("great", "awesome");
As you can see, it has also given us the same output.
Alright! Now, we will see what we can do with the regular expression.
Let us try to replace the word “great” with, say, “awesome” using the replace() method.
str.replace("great", "awesome");
![]() Here, you can see the problem: the first occurrence of “great” has been replaced, but the second one has not.
In the first step, you simply learned how to search for a string using a regular expression.
Now, we will move towards the next step and learn about the concept of flags.
Here, you can see the problem: the first occurrence of “great” has been replaced, but the second one has not.
In the first step, you simply learned how to search for a string using a regular expression.
Now, we will move towards the next step and learn about the concept of flags.
Step 2: Flags
In this step, you will learn more about the concept and purpose of flags in regular expressions.
We will use Javascript’s replace method to explain this idea.
If you want to replace all the occurrences of “great,” you can use the regular expression with the ‘g’ flag, which is short for global.
str.replace(/great/g, "awesome");
![]() Perfect, all the occurrences of “great” are now changed.
But, you may face a problem if you try to change all the occurrences of “linuxhint” to, say, “our website” using the same technique.
We will try to do that first, then we will see how can we resolve this issue.
str.replace(/linuxhint/g, "our website");
Perfect, all the occurrences of “great” are now changed.
But, you may face a problem if you try to change all the occurrences of “linuxhint” to, say, “our website” using the same technique.
We will try to do that first, then we will see how can we resolve this issue.
str.replace(/linuxhint/g, "our website");
![]() Although we have provided the global flag with the regular expression, the first occurrence does not change.
This is because of case-sensitivity.
So, we will also need to provide the case-insensitivity flag ‘i,’ in this case.
You can do this simply by adding the ‘i’ flag along with the ‘g’ flag.
str.replace(/linuxhint/gi, "our website");
Although we have provided the global flag with the regular expression, the first occurrence does not change.
This is because of case-sensitivity.
So, we will also need to provide the case-insensitivity flag ‘i,’ in this case.
You can do this simply by adding the ‘i’ flag along with the ‘g’ flag.
str.replace(/linuxhint/gi, "our website");
![]() Great.
As you can see, all occurrences of the term “linuxhint” have been changed to the term “our website,” regardless of the case-sensitivity.
Similarly, you can use regular expressions’s split() function.
str.split(/linuxhint/gi);
Great.
As you can see, all occurrences of the term “linuxhint” have been changed to the term “our website,” regardless of the case-sensitivity.
Similarly, you can use regular expressions’s split() function.
str.split(/linuxhint/gi);
![]() Alright! The function worked fine.
The split() method has returned the array of substrings, based on the “linuxhint” term.
But, if you want to include the separators, as well, in the array of the substring, you will have to play with the patterns.
So, in this step, we have learned about the flags and how they help us.
There are more flags available.
For example, “m” is for multiline matching, “s” is for dot all, etc.
Now, we will move on to the concept of patterns and learn how to use these items.
Alright! The function worked fine.
The split() method has returned the array of substrings, based on the “linuxhint” term.
But, if you want to include the separators, as well, in the array of the substring, you will have to play with the patterns.
So, in this step, we have learned about the flags and how they help us.
There are more flags available.
For example, “m” is for multiline matching, “s” is for dot all, etc.
Now, we will move on to the concept of patterns and learn how to use these items.
Step 3: Patterns
In this step, you will learn how to utilize the patterns and related options.
To include the separators in the array of the substring, simply add parentheses around the pattern, as can be seen in the following image:
str.split(/(linuxhint)/gi);
![]() Perfect! As you can see, the separators are also included in the array of substrings.
To split the base of two separators, you can give multiple substrings in a regular expression using the OR “|” operator.
str.split(/linuxhint|great/gi);
Perfect! As you can see, the separators are also included in the array of substrings.
To split the base of two separators, you can give multiple substrings in a regular expression using the OR “|” operator.
str.split(/linuxhint|great/gi);
![]() All right! The operator worked great, as we expect it to split.
All right! The operator worked great, as we expect it to split.
Backslash
Now, to split between the base of the space “ “ or the dot “.” meaning to add special characters in the regular expression, add a backslash “\” before any special characters.
str.split(/\ |\./gi);
![]() Okay, so far, so good.
For example, say, you want to change the dots into commas in the following expression:
str.replace(/\./g, ",");
Okay, so far, so good.
For example, say, you want to change the dots into commas in the following expression:
str.replace(/\./g, ",");
![]() It worked!
Backslashes are also used for another purpose.
To search any word, digit, or space, you can use \w, \d, and \s, respectively.
For example, to replace spaces with dashes, the following expression is used:
str.replace(/\s/g, "-");
It worked!
Backslashes are also used for another purpose.
To search any word, digit, or space, you can use \w, \d, and \s, respectively.
For example, to replace spaces with dashes, the following expression is used:
str.replace(/\s/g, "-");
![]() Awesome! You can really see the potential in regular expressions, now.
Awesome! You can really see the potential in regular expressions, now.
Square Brackets [ ]
If you want to replace multiple characters in a string, you can provide all of them in a single square bracket, and they will be replaced by the given substring.
For example, if you want to replace three letters in a string and you do not want to put a lot of OR “|” operators in the regular expression, you can use square bracket syntax, in which you can give multiple letters, like this:
str.replace(/[nia]/g, "u");
![]() You can even give a range of letters, like this:
str.replace(/[g-l]/g, "u");
You can even give a range of letters, like this:
str.replace(/[g-l]/g, "u");
![]() Or, a range of numbers:
str.replace(/[0-5]/g, "9");
Or, a range of numbers:
str.replace(/[0-5]/g, "9");
![]() And, if you want to exclude the provided characters in the square brackets, you can use the caret character, like this:
str.replace(/[^g-l]/g, "t");
And, if you want to exclude the provided characters in the square brackets, you can use the caret character, like this:
str.replace(/[^g-l]/g, "t");
![]() This comes in handy when getting data from users and testing and validating that data, especially in email, phone, or date validation.
This comes in handy when getting data from users and testing and validating that data, especially in email, phone, or date validation.
Conclusion
This article has just scratched the surface of the Javascript regular expression.
It covers the concepts only from the beginner to the intermediate level.
There is a lot more to learn about the regular expression, and you can use this expression to do a lot of things that you may have not even thought of.
To keep on learning, working, and getting more experience, check out more articles on this topic at linuxhint.com.
Javascript String Length
Javascript is a scripting or programming language that is quickly becoming one of the most widely used programming languages in the world.
Strings are a crucial part of all programming languages.
Programmers often need to use strings to manipulate or manage data.
Javascript’s built-in functions or properties for manipulating strings can come in handy.
For example, if you are getting some user data in form fields in HTML and you want to restrict the length of a string while showing some data on a webpage, Javascript’s built-in string length property can help you in this case.
This article shows you what the string length property is and how you can use it in a few different scenarios.
The string length property fetches all the characters included within a string.
Syntax
The syntax for the string length is as follows:
string.length
![]() This property simply gives back the total characters available in the string at run time.
Let us try out a couple of examples that use the string length property.
This property simply gives back the total characters available in the string at run time.
Let us try out a couple of examples that use the string length property.
Examples
First, you will see the basic implementation of this property.
Later, you will see its application.
Suppose you have the following string:
let str = "Linuxhint is great."
If you want to know the number of characters in this string, simply apply the string length property as follows:
str.length
As you can see, this simply returns the length of the specified string.
You can use this property in multiple places.
For example, say you are doing a check-in on an “IF” statement, like the one below:
if (str.length <= 20) {
console.log("It's a short string");} else {
console.log("It's a long string");}
![]() And, as you can see in the console output, the statement “It’s a short string” is printed.
That is great.
You can use this in the conditional statement of the for loop, as well.
If you want to iterate from each of the characters in a string and convert every letter into a lower-case letter, but you are not yet aware of how many characters the string has, then you can simply give the str.length property as a conditional statement.
for (let i = 0; i < str.length; i++) {
console.log(str[i].toUpperCase());}
And, as you can see in the console output, the statement “It’s a short string” is printed.
That is great.
You can use this in the conditional statement of the for loop, as well.
If you want to iterate from each of the characters in a string and convert every letter into a lower-case letter, but you are not yet aware of how many characters the string has, then you can simply give the str.length property as a conditional statement.
for (let i = 0; i < str.length; i++) {
console.log(str[i].toUpperCase());}
![]() As you can see in the output console, every character is shown in the console separately and converted into uppercase letters, as well.
So, this is how you can apply it to a lot of different scenarios according to your needs.
As you can see in the output console, every character is shown in the console separately and converted into uppercase letters, as well.
So, this is how you can apply it to a lot of different scenarios according to your needs.
Interesting Fact
Here is an interesting fact for you guys.
Let us now try to dodge the string length property by assigning it a numeric value.
You will see that it will either print the assigned value or the real length of the string.
So, first, assign it a value
str.length = 10;
And now, we will try to console the length of the string.
console.log(str.length);
![]() And, as you can see, it does not show the assigned value.
It shows that the length of the string or the number of characters in the string are being calculated at run time, and then it displays the output.
And, as you can see, it does not show the assigned value.
It shows that the length of the string or the number of characters in the string are being calculated at run time, and then it displays the output.
Conclusion
In this article, you learned what the string length property is and you have seen its applications in a few different examples.
I hope this article proved helpful in understanding the string length property and its implementations.
You can read on to learn more about Javascript at linuxhint.com.
Javascript toLowerCase Function
Javascript is a popular scripting or programming language.
Programmers often use Javascript to manipulate or manage data.
For example, say, you are getting some data from a user in the fields of an HTML form.
While getting the data from the user, you cannot control what the user is typing.
But, you also need to show the data in a good format.
Users may input capital letters where they are not needed or vice versa.
While saving data to the database or showing data to a web page, as a programmer, it is necessary to take care of this function.
For this purpose, we have Javascript’s built-in function toLowerCase() for converting a string to lower-case letters.
Syntax
The syntax for Javascript’s toLowercase() function is as follows:
string.toLowerCase();
The toLowerCase() function converts all the alphabets in a string into lower-case letters.
This function does not change the original value of the variable.
Instead, the function creates a new string for the instance.
In this way, the function does not take any arguments, although the parentheses “()” are used for taking arguments.
But, with the toLowercase() function, you follow the same conventions of a function.
Let us now look at some examples.
Examples
Suppose there is a string that includes some uppercase and lowercase letters, such as the following string:
let str = "Welcome to thE LinuxHint."
![]() But, we need to convert the string entirely into lower-case letters.
So, we will simply apply the following:
str.toLowerCase();
But, we need to convert the string entirely into lower-case letters.
So, we will simply apply the following:
str.toLowerCase();
![]() As you can see, the string has been converted to a formatted string.
All the letters are now in lower-case format.
It is as simple as that.
This function is for the string.
But, this is not only restricted/limited here.
We can apply the function to an array of strings and even to an array of objects containing strings, as well.
Let us take a look:
First, we will write down the array of strings, as follows:
let arr = ["Hi", "LinuxHint", "GREAT"]
As you can see, the string has been converted to a formatted string.
All the letters are now in lower-case format.
It is as simple as that.
This function is for the string.
But, this is not only restricted/limited here.
We can apply the function to an array of strings and even to an array of objects containing strings, as well.
Let us take a look:
First, we will write down the array of strings, as follows:
let arr = ["Hi", "LinuxHint", "GREAT"]
![]() Now, to change the term “GREAT” to all lowercase letters, we will apply the following:
arr[2].toLowerCase();
where ‘2’ is the index of “GREAT”.
Now, to change the term “GREAT” to all lowercase letters, we will apply the following:
arr[2].toLowerCase();
where ‘2’ is the index of “GREAT”.
![]() As you can see, now, the term “GREAT” has been converted into lower-case letters.
We did something similar for two other strings: [0] for the term “Hi” and [1] for the term “LinuxHint.”
Let us now see how we can apply this function to an array of objects in which the objects contain the string, as follows:
let arr = [{"name":"John"},{"name":"BOB"},{"name":"Ivan"}]
As you can see, now, the term “GREAT” has been converted into lower-case letters.
We did something similar for two other strings: [0] for the term “Hi” and [1] for the term “LinuxHint.”
Let us now see how we can apply this function to an array of objects in which the objects contain the string, as follows:
let arr = [{"name":"John"},{"name":"BOB"},{"name":"Ivan"}]
![]() To convert the term “BOB” to all lower-case letters, we will change it as follows:
arr[1].name.toLowerCase();
To convert the term “BOB” to all lower-case letters, we will change it as follows:
arr[1].name.toLowerCase();
![]() Awesome.
As you can see, we can do a lot with Javascript’s toLowerCase() function.
Awesome.
As you can see, we can do a lot with Javascript’s toLowerCase() function.
Conclusion
In this article, we showed you how to convert string characters to lower-case.
We also showed you how to apply the same function to an array of strings and an array of objects containing strings.
I hope that this article proved beneficial for converting an informal string into a cleaner and more formal-looking lowercase string.
You can learn more about Javascript at linuxhint.com.
Javascript split
Javascript is a scripting or programming language of the web.
Strings are an important part of the variables in any programming language.
We often need to manipulate string according to our needs.
In this article, we will talk about the javascript’s split string method which is used to split the string according to our needs.
So, let’s take a look at what is a string and what does split string method do.
The string is just a simple text or characters which can include the alphabets, numbers, or symbols.
Javascript’s split() method is called upon when it is required to split the string into the array of substrings in accordance to the separator that you provide.
Syntax
Let’s have a look at the syntax of the split method.
string.split([seperator][, limit]);
Here, the separator could be a single character using which you would like to split the string.
And the limit is the limit of splits.
When the number of substrings becomes equal to the limit, the split() method stops.
Let’s dive in and get a couple of examples done for the understanding of the split() function.
Examples
We suppose a string “Linuxhint is great and working hard to grow.”.
Now, let’s try to split the string into arrays of string using the split() method.
By providing the “ ” space character as a separator.
But, without providing the limit.
Later, we will do it with the limit.
linux.split(" ");
![]() As you can see that the split() method has returned the array of substrings, based on the “ ” space.
Now, let’s see what happened if we provide a limit as well.
linux.split(" ", 3)
As you can see that the split() method has returned the array of substrings, based on the “ ” space.
Now, let’s see what happened if we provide a limit as well.
linux.split(" ", 3)
![]() As you can see that the split() function stopped splitting the string, and it would stop splitting the string when the count is equivalent to the number of substrings.
Now, let’s see if we don’t provide a separator just an empty string, and calls the split() function.
linux.split("");
As you can see that the split() function stopped splitting the string, and it would stop splitting the string when the count is equivalent to the number of substrings.
Now, let’s see if we don’t provide a separator just an empty string, and calls the split() function.
linux.split("");
![]() As you can see that the function has split and returned the array of each character separated.
Now, let’s see if we don’t provide both of the arguments and just calls the split() function.
linux.split();
As you can see that the function has split and returned the array of each character separated.
Now, let’s see if we don’t provide both of the arguments and just calls the split() function.
linux.split();
![]() Great, the split() function has returned an array with a single substring in it that is the whole string
Great, the split() function has returned an array with a single substring in it that is the whole string
Pro tip
What if we want to split the string on the base of two separators or we want separators as well in the output array of substring? Luckily, there is a solution as well, We can provide regular expressions as a separator as well.
So, let’s see how can we split the string with two separators.
Space “ “ character and “i” character
linux.split(/\ |i/);
![]() Alright! It worked great.
As we expect it to split.
Now, what if we want to include the separators as well in the array of the substring.
We will simply add parenthesis() around the regular expression.
linux.split(/(\ |i)/);
Alright! It worked great.
As we expect it to split.
Now, what if we want to include the separators as well in the array of the substring.
We will simply add parenthesis() around the regular expression.
linux.split(/(\ |i)/);
![]() Perfect, as you can see that the separators are also included in the array of substrings.
Perfect, as you can see that the separators are also included in the array of substrings.
Conclusion
In this article, we have seen that how can we split a string on the base of a separator provided and how can we apply the limit to the split() function.
We came across how we could provide regular expressions in compliance with our needs and requirements.
So, have a happy and the best learning of javascript with linuxhint.com.
Javascript replace
Javascript is a scripting or programming language of the web.
Strings are an important part of the variables in any programming language.
We often need to manipulate or extract some specific string according to our needs.
You must have seen it often at a lot of websites that on a click of a button or something the text got changed.
How can we find and replace some specific words in a long paragraph? Do we have to change all the code? Of course not, we have a replace() method to replace the substring with a new provided string.
So, let’s take a look at what is a string and how can we replace a substring with another string.
The string is a simple text or characters which can include the alphabets, numbers, or symbols.
Javascript’s replace() method finds the provided substring and change/replace that substring with a new provided string.
Syntax
Syntax for the replace() method is
string.replace(substring, newstring);
substring can be any value from the string to which we want to replace
newstring is the value that replaces the substring(first parameter).
Examples
Now, if we take a look at some examples.
We suppose a string “Linuxhint is great and linuxhint is working great.”.
In this string, I have repeated the same word “great” and “linuxhint” intentionally.
The purpose of this will be right in front of you in a moment.
Now, let’s try to replace the word “great” with let’s say “awesome” using the replace() method.
linux.replace("great", "awesome");
![]() Here you can see the problem that the first occurrence of “great” gets replaced.
But, the second one doesn’t.
So, here comes the concept of the regular expression.
We can also give the regular expression instead of the substring to the replace() method.
So let’s modify the syntax a little bit that we can give regular expression as well.
string.replace(substring|regex, newstring);
regex is a regular expression object.
The matches will be replaced by the newstring.
If we want to replace every single occurrence of the word “great” then we shall pass the regular expression with a ‘g’ flag, which is a short form for global.
Take a look below to get an idea about what exactly I mean.
linux.replace(/great/g, "awesome");
Here you can see the problem that the first occurrence of “great” gets replaced.
But, the second one doesn’t.
So, here comes the concept of the regular expression.
We can also give the regular expression instead of the substring to the replace() method.
So let’s modify the syntax a little bit that we can give regular expression as well.
string.replace(substring|regex, newstring);
regex is a regular expression object.
The matches will be replaced by the newstring.
If we want to replace every single occurrence of the word “great” then we shall pass the regular expression with a ‘g’ flag, which is a short form for global.
Take a look below to get an idea about what exactly I mean.
linux.replace(/great/g, "awesome");
![]() Perfect, all the occurrences of “great” are changed.
But, now we may face a problem if we try to change all the occurrences of “linuxhint” to let’s say “our website” using the same technique.
Let’s try to do that first, then we will see how can we resolve that.
linux.replace(/linuxhint/g, "our website");
Perfect, all the occurrences of “great” are changed.
But, now we may face a problem if we try to change all the occurrences of “linuxhint” to let’s say “our website” using the same technique.
Let’s try to do that first, then we will see how can we resolve that.
linux.replace(/linuxhint/g, "our website");
![]() As you can see that.
Although we have provided the global flag with the regular expression.
But, the first occurrence doesn’t get changed.
This is because of case-sensitivity.
So, we need to provide a case-insensitivity flag ‘i’.
We can do that by simply adding the ‘i’ flag along with the ‘g’ flag.
Like,
linux.replace(/linuxhint/gi, "our website");
As you can see that.
Although we have provided the global flag with the regular expression.
But, the first occurrence doesn’t get changed.
This is because of case-sensitivity.
So, we need to provide a case-insensitivity flag ‘i’.
We can do that by simply adding the ‘i’ flag along with the ‘g’ flag.
Like,
linux.replace(/linuxhint/gi, "our website");
![]() Great.
As you can see that all the occurrences of “linuxhint” are changed regardless of the case-sensitivity.
Great.
As you can see that all the occurrences of “linuxhint” are changed regardless of the case-sensitivity.
Pro tip
We have two protips for you.
One is that we can give multiple substrings in a regular expression as well using the OR “|” operator.
The second one is that we can also provide a function instead of the newstring.
So, the final syntax that you should take with you is
string.replace(substring|regex, newstring|function);
Let’s have a look at an example.
To understand how it works.
In this example, we will change/replace both “great” & “linuxhint” using a single replace method and later we will provide some tasks to do in a function, in which we will change the matches to the uppercase.
linux.replace(/great|linuxhint/gi, (m)=>{return m.toUpperCase()});
![]() Alright! As you can see that both of the words “great” & “linuxhint” are converted into the uppercase letters, successfully.
Alright! As you can see that both of the words “great” & “linuxhint” are converted into the uppercase letters, successfully.
Conclusion
In this article, we have learned that how can we use the replace() method to replace the substring and how can we use the regular expression to give multiple values along with the global and case insensitive flag.
I hope this article has helped you to thoroughly understand the replace() method.
So, keep on learning javascript with linuxhint.com.
Javascript String to Int
Javascript is a language of the web and managing data is an important aspect of any programming language.
We often need to manipulate or manage variables according to our needs.
Sometimes we need to perform arithmetic operations so, we can’t do that with strings.
We need integers to do that.
Since Javascript is a language of the web now.
Speed optimization has become very important in this era.
We have to think and manage every single byte if we can.
We must know and care about memory because the strings take more memory than integers.
We need to keep things very simple.
But, what if we have to perform some arithmetic operations.
If, variables are in string type.
Do we have to reinitialize the variable with integer type? Of course not! It will even take more memory.
But, what if we have a function that will convert or parse the string into the integer and we can perform our tasks.
So, in this article, we are gonna see that how can we convert or parse a string into the integer using the parseInt() function.
The parseInt() is a function to which we can pass a string as an argument and it will return us an integer if it exists.
This function returns NaN(Not a Number).
If, no number found in that string.
This function also returns NaN if there exists any character before the number.
Syntax
Let’s take a look at the syntax of the parseInt() function.
parseInt(value [, base]);
Here,
Value is the string that we want to parse into the integer.
And the base is the base number of the provided string to which we want to convert into a decimal number.
It is an optional value.
Let’s have look at a couple of examples to understand more clearly.
Examples
parseInt("34"); // 34</td>
![]() Now, let’s try to give a float number.
parseInt("34.53"); // 34
Now, let’s try to give a float number.
parseInt("34.53"); // 34
![]() As you can see.
It only prints the 34.
Let’s try to put a space before or after the number.
parseInt(" 34 "); // 34
As you can see.
It only prints the 34.
Let’s try to put a space before or after the number.
parseInt(" 34 "); // 34
![]() It worked fine.
But, if we put any character before the number.
parseInt("the 34"); // NaN
It worked fine.
But, if we put any character before the number.
parseInt("the 34"); // NaN
![]() It prints NaN(Not a Number).
The same applies to the empty string.
It prints NaN(Not a Number).
The same applies to the empty string.
Pro tip
Now, what if we try to give the base number along with the value.
Like, the base of the binary number system is 2.
parseInt("34", 2); // NaN
![]() Ok, since 3 and 4 are not the numbers of a binary number system.
It prints NaN.
Now if we provide it a true binary number.
It should print the decimal number against that binary number.
parseInt("10011011", 2); // 155
Ok, since 3 and 4 are not the numbers of a binary number system.
It prints NaN.
Now if we provide it a true binary number.
It should print the decimal number against that binary number.
parseInt("10011011", 2); // 155
![]() Here comes an interesting thing about this function.
Like, if we keep on providing the binary number 0’s and 1’s.
It will keep on converting that number into the decimal number system.
But, when we start to give a non-binary number system.
It will stop right there and won’t convert any further.
But, until we keep on giving the binary numbers.
It keeps on converting.
parseInt("100110113432", 2); //155
Here comes an interesting thing about this function.
Like, if we keep on providing the binary number 0’s and 1’s.
It will keep on converting that number into the decimal number system.
But, when we start to give a non-binary number system.
It will stop right there and won’t convert any further.
But, until we keep on giving the binary numbers.
It keeps on converting.
parseInt("100110113432", 2); //155
![]() Alright! We can also do the same tasks with the Octal number system and Hexadecimal number system using the parseInt() function.
Alright! We can also do the same tasks with the Octal number system and Hexadecimal number system using the parseInt() function.
Conclusion
In this article, we have learned that how can we use the parseInt() function to convert the string into an integer.
We have also learned about some exceptional cases of the parseInt() function and how does it help in converting the number systems as well.
I hope this article was beneficial and helpful for understanding the conversion of strings into integers.
So, keep on learning javascript with linuxhint.com.
Javascript Substring
Javascript is a scripting or programming language of the web.
Strings are an important part of the variables in any programming language.
We often need to manipulate or extract some specific string according to our needs or somewhere we don’t have to show all the text.
You must have seen some data (if we specifically talk about strings) on the web that are not fully shown on the screen.
How did that happen? How can we get some specific part of a string? So, let’s take a look at what is a string and how we can take a substring of that string.
String & substring
A string is simply a text or characters which can include alphabets, numbers, or symbols.
A substring, as it’s in its name.
A subpart of a String.
![]() If we talk about string.
Javascript has some built-in functions for manipulating string.
One of them is substring() a function that serves our purpose.
If we want to extract some specific parts from a string.
We can use substring() function.
If we talk about string.
Javascript has some built-in functions for manipulating string.
One of them is substring() a function that serves our purpose.
If we want to extract some specific parts from a string.
We can use substring() function.
Syntax:
The syntax for the substring() function is
string.substring(startIndex, endIndex);
startIndex is the index from where you want to start the string.
endIndex is the index where you want to end the string.
Examples:
If we suppose a string, like “linuxhint”.
We want to just get the “Linux” from the “linuxhint”.
So, we will do that using substring() function like this
name.substring(0, 5); // “linux”
![]() Now, if you notice that it doesn’t include the 5th index element.
But, it picked the 0th index element.
Which implies that startIndex gets included.
While endIndex doesn’t get included.
Now, if you notice that it doesn’t include the 5th index element.
But, it picked the 0th index element.
Which implies that startIndex gets included.
While endIndex doesn’t get included.
![]() So, now if we want to pick the “hint” from “linuxhint”.
Although there are only “0” to “8” indexes.
But, we will give “9” as a value to the endIndex.
name.substring(5, 9); // “hint”
So, now if we want to pick the “hint” from “linuxhint”.
Although there are only “0” to “8” indexes.
But, we will give “9” as a value to the endIndex.
name.substring(5, 9); // “hint”
![]() We can give it only one value as well.
name.substring(5); // “hint”
We can give it only one value as well.
name.substring(5); // “hint”
![]() It will start from that index and continues until the end of the string.
Alright! Now, we have seen the syntax and how does it work.
Let’s see some of its exceptional cases.
It will start from that index and continues until the end of the string.
Alright! Now, we have seen the syntax and how does it work.
Let’s see some of its exceptional cases.
Exceptional Cases
Let’s try to give a startIndex greater than the endIndex and some negative values to see how does it respond.
startIndex > endIndex
If we give it a startIndex greater than the endIndex.
name.substring(5, 2); // “nux”
![]() It has swapped both values and printed the string from the 2nd index to the 5th index.
So, if we write either name.substring(5, 2) or name.substring(2, 5).
//both will print the same output
name.substring(5, 2); // “nux”
name.substring(2, 5); // “nux”</td>
It will print out the same output.
It has swapped both values and printed the string from the 2nd index to the 5th index.
So, if we write either name.substring(5, 2) or name.substring(2, 5).
//both will print the same output
name.substring(5, 2); // “nux”
name.substring(2, 5); // “nux”</td>
It will print out the same output.
Negative values
substring() function doesn’t take negative values.
If we give it a negative value.
Since there is no negative index.
It takes it as a “0”.
Either we give a negative value to the startIndex or the endIndex.
This function considers it a “0”.
name.substring(-5, 2); // “li”
![]() If we give a negative value to the endIndex.
The function will swap the values.
Because negative value will be converted to “0” and “0” will be the lowest value.
name.substring(5, -2); // “linux”
If we give a negative value to the endIndex.
The function will swap the values.
Because negative value will be converted to “0” and “0” will be the lowest value.
name.substring(5, -2); // “linux”
![]() And, if we give a negative value to both of the indexes.
The function will print an “” empty string.
name.substring(-5, -2); // “”
And, if we give a negative value to both of the indexes.
The function will print an “” empty string.
name.substring(-5, -2); // “”
![]()
Pro tip
By the way, here is a pro tip.
We can use string.length function within a substring() function.
name.substring(5, name.length); // “hint”
![]() Or we can give it a string.length – [value], like
name.substring(5, name.length - 1); // “hin”
Or we can give it a string.length – [value], like
name.substring(5, name.length - 1); // “hin”
![]()
Conclusion
So, after reading this article, you should have a profound knowledge of the substring() function.
Because you have learned all about the substring() function.
All of its exceptional cases and how can we manipulate the string according to our needs.
So, have fun with the strings.
Connecting MySQL with NodeJS
MySQL server is a very popular database server and it is supported by mostly used programming languages, such as PHP, Python, Perl, Java, C#, etc.
It is an open-source application, so anyone can download this application for storing, retrieving, updating and deleting data by using database queries.
You will require the server and client packages to be installed in your system to perform different types of database operations in the database server.
MySQL server is now becoming popular for Node developers also.
Node developers start using MySQL server with MongoDB for some special features of the MySQL server.
How you can make a connection with MySQL server using the node-mysql client is shown in this tutorial.
Prerequisite:
Before starting this tutorial you have to confirm that MySQL server and client packages are installed and working properly in your system.
If you install the MySQL server for the first time then the password of root user is empty by default.
But you have to set the password for the root user to make a connection with MySQL server using the node-mysql client.
You can check this tutorial to know how to change the root password of the MySQL server.
Run the following commands to work as a root user and connect with MySQL server by using MySQL client.
$ sudo -i
$ mysql -u root -p
Enter the root password and run the following SQL commands to create a new database, create a table on that database and insert some records in that table.
The following command will create a database named mydb.
CREATE DATABASE mydb;
The following command to select the database for doing database operations.
use mydb;
The following command will create a table named book in the database mydb.
CREATE TABLE book (
id INT(6) UNSIGNED AUTO_INCREMENT PRIMARY KEY,
title VARCHAR(50) NOT NULL,
author VARCHAR(50) NOT NULL,
price int(5));
The following command will insert four records into book table.
INSERT INTO book values
(NULL,'Learning PHP and MySQL', 'Robin Nixon', 45),
(NULL,'Learning JQuery', 'Jonathan', 35),
(NULL,'Angular in Action', 'Jeremy', 50),
(NULL,'Mastering Laravel', 'Christopher', 55);
Install mysql client for nodejs:
Run the following command to check nodejs is installed in the system before running the command of installing mysql client of nodejs.
It will show the installed version of nodejs.
$ node -v
If it not installed then you have to install it by running the following command.
$ sudo apt-get install nodejs
You will require another package named npm to be installed in the system to install mysql client for nodejs.
If it is not installed before run the following command to install npm.
$ sudo apt-get install npm
Now, run the following command to update the system.
$ sudo apt-get update
The following command will install mysql module for nodejs that will work as mysql client.
$ npm install mysql
Simple MySQL connection using NodeJS:
Create a JS file named connection1.js with the following script to make a connection with the previously created database named mydb and read data from book table.
mysql module is imported and used for creating a simple connection with the MySQL server.
Next, a query will be executed to read all records from book table, if the database is connected properly.
If the query executed properly then all records of book table will be printed in the terminal and the database connection will be closed.
connection1.js
// Import mysql module
let mysql = require('mysql');// Setup database connection parameter
let connection = mysql.createConnection({
host: 'localhost',
user: 'root',
password: '1234',
database: 'mydb'});// Connect with the database
connection.connect(function(e) {if (e) {// Show error messaage on failurereturn console.error('error: ' + e.message);}// Show success message if connected
console.log('\nConnected to the MySQL server...\n');});// Set the query message
$query = 'SELECT * from book';// Execute the database query
connection.query($query, function(e, rows) {if(e){// Show the error message
console.log("Error ocurred in executing the query.");return;}/* Display the formatted data retrieved from 'book' table
using for loop */
console.log("The records of book table:\n");
console.log("Title\t\t\t\t Author\t\tprice\n");for(let row of rows) {
console.log(row['title'],"\t\t",row['author'],"\t","$",row['price']);}});// Close the database connection
connection.end(function(){
console.log('\nConnection closed.\n');});
Output:
Run the following command to execute the script.
$ node connection1.js
The following output will appear after running the script.
![]()
Pooled MySQL connection using NodeJS:
Making a simple MySQL connection with NodeJS using mysql module is shown in the previous example.
But many users can connect with the database server at a time through the application when the application is created with MySQL database for production purposes.
You will require the express module to handle concurrent database users and support multiple database connections.
Run the following command to install the express module.
$ npm install express
Create a JS file named connection2.js with the following script.
If you connect with MySQL with the following script then 10 concurrent users will be able to make a connection with the database server and retrieve data from the table based on the query.
It will make a connection at the port 5000.
connection2.js
// Import mysql modulevar mysql = require('mysql');// Import express modulevar express = require("express");// Define object of express modulevar app = express();// Make database connection to handle 10 concurrent usersvar pool = mysql.createPool({
connectionLimit :10,
host : 'localhost',
user : 'root',
password : '1234',
database : 'mydb',
debug : true});/* Make pooled connection with a database and read specific records from a table of that
database */function handle_database(request,response) {// Make connection
pool.getConnection(function(e,connection){if (e) {
//Send error message for unsuccessful connection and terminate
response.json({"code" : 300, "status" : "Database connection errror"});
return;}// Display success message in the terminal
console.log('Database connected');// Read particular records from book table
connection.query("SELECT * from book where title like '%PHP%' or title like
'%Laravel%'",function(e,rows){ connection.release();if(!e) {
// Return the resultset of the query if it is successfully executed
response.json(rows);}});// Check the connection error occurs or not
connection.on('error', function(e) {
response.json({"code" : 300, "status" : "Database connection errror"});return;});});}// Call the function for making connections
app.get("/",function(request,response){-
handle_database(request,response);});// Listen the connection request on port 5000
app.listen(5000);
Output:
Run the script from the terminal like the previous example.
It will wait for the connection request after running the script.
$ node connection2.js
![]() Now, open any browser and go to the following URL to send a connection request.
http://localhost:5000
The following output will appear as a response after executing the query.
Now, open any browser and go to the following URL to send a connection request.
http://localhost:5000
The following output will appear as a response after executing the query.
![]() If you open the terminal now then you will see the following output.
If you open the terminal now then you will see the following output.
![]() Ten connection requests can be sent at a time from 10 browsers in the way mentioned above.
Ten connection requests can be sent at a time from 10 browsers in the way mentioned above.
Conclusion:
The most simple ways to work with MySQL and NodeJS are shown by two examples in this tutorial.
If you are a new Node developer and want to work with MySQL database then I hope you will be able to do your task after reading this tutorial.
Simple NodeJS Application
In the last couple of years, the world has undergone some fascinating technological changes.
Each day, something new is developed that offers an improvement over its predecessor and gives us access to a whole new dimension.
One certain region that has seen a significant improvement in its features and popularity is the web development sector, particularly NodeJS, which has become many developers’ first choice for back-end development.
What actually is NodeJS?
NodeJS is an open-source JavaScript platform used for developing and executing back-end services called APIs (Advanced Programming Interfaces).
These are the services that power up the client applications such as web apps that run on the browser and mobile applications.
NodeJS is important because these client applications are just a surface for users to see and interact with.
In addition to this, they need to talk to some service on the server or in the cloud for the storage of data, sending emails or pushing notifications.
This is where NodeJS comes into the picture which allows users to create server-based applications and produce real time back-end services that can be used to power up client applications.
Being highly scalable and superfast, NodeJS is a great choice for development and hence today we’ll be looking at how to make a simple NodeJS application.
Step 1: Installing NodeJS
Before moving on the development phase, let us first see how to install NodeJS on our Linux based desktops.
There are actually multiple ways to install NodeJS on a Linux based computer.
We, however, will only be looking at two methods of installing NodeJS.
Step 1(a): Installing NodeJS using NVM
In this method, we will be using the Node Version Manager (NVM) to install NodeJS.
A huge benefit of using this is that there are no permission issues for using NodeJS.
First of all, we have to install nvm which can be done by the following command:
$ wget -qO- https://raw.githubusercontent.com/nvm-sh/nvm/v0.35.1/install.sh | bash
![]() This command adds nvm to your path profile and extracts all the nvm data in the directory
This command adds nvm to your path profile and extracts all the nvm data in the directory ~/.
nvm
To check whether nvm has been installed correctly, restart the terminal and run:
$ command -v nvm
![]() If you see nvm as the output, then it has been successfully installed.
Now we’ll be installing NodeJS and npm which is basically an ecosystem of NodeJS libraries.
To do this, simply run the following command that will install the most recent version of NodeJS:
$ nvm install node
You can also install any specific version of NodeJS that you want to install.
For this tutorial, we’ll be installing the version 12 of NodeJS.
$ nvm install v12.16.1
If you see nvm as the output, then it has been successfully installed.
Now we’ll be installing NodeJS and npm which is basically an ecosystem of NodeJS libraries.
To do this, simply run the following command that will install the most recent version of NodeJS:
$ nvm install node
You can also install any specific version of NodeJS that you want to install.
For this tutorial, we’ll be installing the version 12 of NodeJS.
$ nvm install v12.16.1
![]() Once installed, you can check your NodeJS and npm installed versions by running the following commands:
$ node -v
$ npm -v
Once installed, you can check your NodeJS and npm installed versions by running the following commands:
$ node -v
$ npm -v
![]()
Step 1(b): Installing NodeJS using Ubuntu official repository
One huge advantage of installing NodeJS in this way is that Ubuntu has a stable version of NodeJS in its official repository.
First of all, the following command will be run to update our system’s apt cache and packages to the latest versions so that no issues arise during installation:
$ sudo apt-get update
Next, we will be installing NodeJS with the following command:
$ sudo apt install nodejs
Once installed, you can check your NodeJS installed version by running the following command:
$ node -v
![]() In this method, we also have to install npm, the ecosystem of NodeJS libraries.
This can be done by inputting the following command into the terminal:
$ sudo apt install npm
Similarly, you can check your npm installed version by running the following command:
$ npm -v
In this method, we also have to install npm, the ecosystem of NodeJS libraries.
This can be done by inputting the following command into the terminal:
$ sudo apt install npm
Similarly, you can check your npm installed version by running the following command:
$ npm -v
![]()
Step 2: Coding a NodeJS Application
For this tutorial, we’ll be creating a simple HTTP Server which will listen to the client on port number 8080 and output Hello World as a response to the client.
The following is the complete code:
let http = require('http')
server = http.createServer(function(request, response) {
response.write('Hello World')
response.end()})
server.listen(8080)
console.log ("Server Running")
Let us now look at each line of code to understand what is actually happening here.
Code Explanation:
In Node JS, there are some built in modules available.
These are functions that have already been defined in NodeJS and provide certain functionality in our applications.
These modules can be imported using the require keyword.
let http = require('http')
In the first line of our code, we are importing the HTTP built in module of NodeJS.
The HTTP module is used here so that we can create a server in our application that can listen for HTTP requests on a given port.
server = http.createServer(function(request, response)
Over here, we use a method of the HTTP module called createServer which, as the name says, creates a server instance.
In this, we pass a function through here which takes up two parameters – a request object and a response object.
Now whenever a request is made to our server, this function will be called.
The response object comes loaded with details about the request that has been made and the response object is something that we can use to send a response back to the client.
![]() response.write('Hello World')
response.end()
Over here, response.write is used to write a response to the client.
This is how things can be printed on the browser.
In this case, this will allow us to print Hello World on the browser.
The response.end() lets the browser know that the request has ended and sends the response to the browser.
server.listen(8080)
console.log ("Server Running")
The server.listen function is used here by our server to listen to the client on port number 8080.
It is important to note that any port that is available can be used here.
The last line console.log is used to print anything on the terminal.
In this case, we are printing Server Running so that we know the server has started.
response.write('Hello World')
response.end()
Over here, response.write is used to write a response to the client.
This is how things can be printed on the browser.
In this case, this will allow us to print Hello World on the browser.
The response.end() lets the browser know that the request has ended and sends the response to the browser.
server.listen(8080)
console.log ("Server Running")
The server.listen function is used here by our server to listen to the client on port number 8080.
It is important to note that any port that is available can be used here.
The last line console.log is used to print anything on the terminal.
In this case, we are printing Server Running so that we know the server has started.
Step 3: Running and Testing our NodeJS Application
Now that we have our code written and understand what is happening in it, let us now run it and test whether it is working or not.
To do this, open the directory, where you have saved your file containing the above NodeJS code and along with this, also open the terminal.
In order to run a NodeJS file, simply type in the following command in the terminal:
$ node filename.js
filename here refers to the name of your file.
In my case, I’ve stored my code in a file called sample.js.
See below:
$ node sample.js
![]() Now our server seems to be running.
Let us now check to see if our response has been sent to the client.
To do this, open your browser and enter localhost: port.
In my case, I’ll be running the command: localhost:8080.
See the image below for better understanding:
Now our server seems to be running.
Let us now check to see if our response has been sent to the client.
To do this, open your browser and enter localhost: port.
In my case, I’ll be running the command: localhost:8080.
See the image below for better understanding:
![]() We can clearly see our output Hello World displayed on the page.
Voila, we were successful in creating a simple NodeJS Server.
We can clearly see our output Hello World displayed on the page.
Voila, we were successful in creating a simple NodeJS Server.
Why use NodeJS over its Alternatives?
In today’s world, JavaScript has completely changed the face of web development.
This has thus led to NodeJS becoming a popular choice for back-end development.
Along with using JavaScript as its core, NodeJS is highly fast, extremely flexible and great for prototyping and agile development.
Moreover, using NPM (Node Package Manager) as its ecosystem which is the largest ecosystem available for open-source libraries, it grants multiple tools and modules to developers which further increases its demand.
All these reasons make it a great choice for web development.
How to install the latest Node.js on Linux?
Node.js is a runtime JavaScript environment that is used on the server-side.
Node.js is a full-stack software building solution but is mostly used at the back end to build the applications.
Node.js uses the NPM package manager as a default package manager, which is known as the most used software registry.
There are several methods to install Node.js on Ubuntu 20.04 LTS, but here, we will learn the two most efficient and easiest methods to install it.
Using APT package repository
Using the APT package repository through NodeSource PPA
Let’s get started with the easiest one.
Install Node.js on Ubuntu 20.04 using APT
Installing any software through the APT package repository is the easiest way to install the software on Ubuntu.
First, update the system’s package repository.
$ sudo apt update
![]() Then, install the Node.js using the simple apt install command with the sudo privileges.
$ sudo apt install nodejs -y
Then, install the Node.js using the simple apt install command with the sudo privileges.
$ sudo apt install nodejs -y
![]() In this command, the “-y” flag is added to automatically answer “yes” if any prompt occurs.
After installing the Nodejs, if you want to install NPM as well, run the command.
$ sudo apt install npm -y
In this command, the “-y” flag is added to automatically answer “yes” if any prompt occurs.
After installing the Nodejs, if you want to install NPM as well, run the command.
$ sudo apt install npm -y
![]() After a while, NPM will be installed as well.
The above two commands will install all the other tools required for compilation.
To verify and check the versions of the Node.js and NPM, execute the following two commands.
$ nodejs --version
After a while, NPM will be installed as well.
The above two commands will install all the other tools required for compilation.
To verify and check the versions of the Node.js and NPM, execute the following two commands.
$ nodejs --version
![]() $ npm --version
$ npm --version
![]() As you can see, version 10.19.0 of Node.js and version 6.14.4 of NPM is installed.
As you can see, version 10.19.0 of Node.js and version 6.14.4 of NPM is installed.
Install Node.js on Ubuntu 20.04 through NodeSource PPA
In case you want to install some specific or older version of Node.js, it is better recommended that you use the official Private Package Archive(PPA) managed by the NodeSource.
At the date of writing this post, NodeSource has the following Node.js versions available:
Node.js v15.x
Node.js v14.x
Node.js v12.x
Node.js v10.x
Furthermore, you can check the version provided by the NodeSource by visiting their Github page (GitHub – nodesource/distributions: NodeSource Node.js Binary Distributions).
For example, to install the Node.js v15.x, you first need to have the curl installed on your system.
To install curl, perform the following.
$ sudo apt install curl -y
![]() After installing the curl, execute the following command to run Nodesource’s installation script using the curl command.
$ curl -sL https://deb.nodesource.com/setup_15.x | sudo -E bash -
After installing the curl, execute the following command to run Nodesource’s installation script using the curl command.
$ curl -sL https://deb.nodesource.com/setup_15.x | sudo -E bash -
![]() Once the NodeSource’s PPA is configured for Node.js on your system, now install the Node.js by typing the following command.
$ sudo apt install nodejs -y
Once the NodeSource’s PPA is configured for Node.js on your system, now install the Node.js by typing the following command.
$ sudo apt install nodejs -y
![]() Let’s verify the versions of Node.js and NPM by typing the commands.
$ node --version
$ npm --version
Let’s verify the versions of Node.js and NPM by typing the commands.
$ node --version
$ npm --version
![]() You can witness that the required versions are installed successfully.
You can witness that the required versions are installed successfully.
Wrap up
These are the two different methods to install Node.js on Ubuntu 20.04 LTS.
You can either install it via the APT package repository, which is the easiest way, or go with your desired version with the official PPA introduced by NodeSource.
Installing Node.js on CentOS 8
In this article, I am going to show you how to install Node.js on CentOS 8.
So, let’s get started.
Installing Node.js using Package Manager:
Node.js is available in the official package repository of CentOS 8.
So, you can easily install it on CentOS 8 using DNF or YUM package manager.
First, update the CentOS 8 package repository cache with the following command:
$ sudo dnf makecache
![]() The CentOS 8 package repository cache should be updated.
The CentOS 8 package repository cache should be updated.
![]() Now, to install Node.js and NPM package manager on CentOS 8 from the official package repository of CentOS 8, run the following command:
$ sudo dnf install nodejs npm
Now, to install Node.js and NPM package manager on CentOS 8 from the official package repository of CentOS 8, run the following command:
$ sudo dnf install nodejs npm
![]() Now, to confirm the installation, press Y and then press <Enter>.
Now, to confirm the installation, press Y and then press <Enter>.
![]() Node.js and NPM should be installed.
Node.js and NPM should be installed.
![]() Once Node.js and NPM is installed, check whether Node.js is working correctly as follows:
$ node --version
As you can see, Node.js v10.16.3 is installed.
Once Node.js and NPM is installed, check whether Node.js is working correctly as follows:
$ node --version
As you can see, Node.js v10.16.3 is installed.
![]() Also, check whether NPM is working correctly as follows:
$ npm --version
As you can see, NPM v6.9.0 is installed.
Also, check whether NPM is working correctly as follows:
$ npm --version
As you can see, NPM v6.9.0 is installed.
![]() The same way, check whether NPX is working as follows:
$ npx --version
As you can see, NPX v6.9.0 is installed.
The same way, check whether NPX is working as follows:
$ npx --version
As you can see, NPX v6.9.0 is installed.
![]()
Installing Node.js Manually from the Official Website of Node.js:
The version of Node.js and NPM in the official package repository of CentOS 8 is old.
At the time of this writing, the latest LTS version of Node.js is v12.13.0 and the latest version of Node.js is v13.0.1.
If you want to install the latest LTS version of Node.js or the latest version of Node.js on CentOS 8, you will have to download Node.js from the official website of Node.js and manually install it on CentOS 8.
First, visit the official website of Node.js.
Once the page loads, click on the LTS version button if you want to install the latest LTS version of Node.js.
Otherwise, click on the Current version button if you want to try out the latest version of Node.js.
![]() Your browser should prompt you to save the file.
Select, Save File and click on OK.
Your browser should prompt you to save the file.
Select, Save File and click on OK.
![]() Your browser should start downloading the Node.js archive.
It may take a while to complete.
Your browser should start downloading the Node.js archive.
It may take a while to complete.
![]() If you’re using a headless version of CentOS 8, then visit the official website of Node.js from any browser.
Once the page loads, right click (right mouse click) on the download button and copy the download link.
If you’re using a headless version of CentOS 8, then visit the official website of Node.js from any browser.
Once the page loads, right click (right mouse click) on the download button and copy the download link.
![]() Now, SSH into your CentOS 8 machine and use wget to download the Node.js archive file using the link that you’ve copied earlier as follows:
$ wget https://nodejs.org/dist/v12.13.0/node-v12.13.0-linux-x64.tar.xz
Now, SSH into your CentOS 8 machine and use wget to download the Node.js archive file using the link that you’ve copied earlier as follows:
$ wget https://nodejs.org/dist/v12.13.0/node-v12.13.0-linux-x64.tar.xz
![]() Once Node.js archive file is downloaded, navigate to the directory where the archive file is downloaded (usually ~/Downloads) as follows:
$ cd ~/Downloads
Once Node.js archive file is downloaded, navigate to the directory where the archive file is downloaded (usually ~/Downloads) as follows:
$ cd ~/Downloads
![]() The Node.js archive file should be there.
$ ls -lh
The Node.js archive file should be there.
$ ls -lh
![]() Now, you have to extract the Node.js archive file.
I will extract it in the /opt directory.
If you want, you can extract it to some other directory.
Just replace /opt with the directory path where you want to extract the Node.js archive file.
To extract the Node.js archive file in the /opt directory, run the following command:
$ sudo tar xvJf node-v12.13.0-linux-x64.tar.xz -C /opt
Now, you have to extract the Node.js archive file.
I will extract it in the /opt directory.
If you want, you can extract it to some other directory.
Just replace /opt with the directory path where you want to extract the Node.js archive file.
To extract the Node.js archive file in the /opt directory, run the following command:
$ sudo tar xvJf node-v12.13.0-linux-x64.tar.xz -C /opt
![]() Node.js archive file should be extracted in the /opt directory.
Node.js archive file should be extracted in the /opt directory.
![]() Once the Node.js archive file is extracted, a new directory (node-v12.13.0-linux-x64 in my case) should be created in the directory where you extracted it.
$ ls /opt
Once the Node.js archive file is extracted, a new directory (node-v12.13.0-linux-x64 in my case) should be created in the directory where you extracted it.
$ ls /opt
![]() Now, you have to add the path of Node.js to the PATH environment variable in order to access Node.js, NPM and NPX binaries easily.
You can create a shell script in the /etc/profile.d/ directory which will automatically update the PATH environment variable every time your CentOS 8 machine boots.
To create a new shell script /etc/profile.d/node-v12.sh, run the following command:
$ sudo vi /etc/profile.d/node-v12.sh
Now, you have to add the path of Node.js to the PATH environment variable in order to access Node.js, NPM and NPX binaries easily.
You can create a shell script in the /etc/profile.d/ directory which will automatically update the PATH environment variable every time your CentOS 8 machine boots.
To create a new shell script /etc/profile.d/node-v12.sh, run the following command:
$ sudo vi /etc/profile.d/node-v12.sh
![]() Now, press I to switch to the Vi INSERT mode and type in the following lines of codes in the node-v12.sh file.
export NODE_VERSION=v12.13.0export NODE_DISTRO=linux-x64export NODE_HOME="/opt/node-${NODE_VERSION}-${NODE_DISTRO}"export PATH="$PATH:${NODE_HOME}/bin"
NOTE: By the time you read this article, new versions of Node.js may be released.
So, make sure to change NODE_VERSION from v12.13.0 to the version of Node.js you’re trying to install.
If you’re extracting the Node.js archive file to some other directory than /opt, then change /opt to the directory you’re extracting the Node.js archive file.
The final shell script file should look as follows.
To save the file node-v12.sh, press <Esc> to switch to Vi COMMAND mode, type in :wq! and then press <Enter>.
Now, press I to switch to the Vi INSERT mode and type in the following lines of codes in the node-v12.sh file.
export NODE_VERSION=v12.13.0export NODE_DISTRO=linux-x64export NODE_HOME="/opt/node-${NODE_VERSION}-${NODE_DISTRO}"export PATH="$PATH:${NODE_HOME}/bin"
NOTE: By the time you read this article, new versions of Node.js may be released.
So, make sure to change NODE_VERSION from v12.13.0 to the version of Node.js you’re trying to install.
If you’re extracting the Node.js archive file to some other directory than /opt, then change /opt to the directory you’re extracting the Node.js archive file.
The final shell script file should look as follows.
To save the file node-v12.sh, press <Esc> to switch to Vi COMMAND mode, type in :wq! and then press <Enter>.
![]() Now, reboot your CentOS 8 machine with the following command:
$ sudo reboot
Now, reboot your CentOS 8 machine with the following command:
$ sudo reboot
![]() Once your CentOS 8 machine boots, verify whether the shell script set all the Node.js environment variables correctly with the following command:
$ env | grep NODE
As you can see, the Node.js environment variables are correctly set.
Once your CentOS 8 machine boots, verify whether the shell script set all the Node.js environment variables correctly with the following command:
$ env | grep NODE
As you can see, the Node.js environment variables are correctly set.
![]() Now, check whether the PATH environment variable is updated correctly with the following command:
$ echo $PATH
As you can see, the Node.js binary path is in the PATH environment variable.
Great!
Now, check whether the PATH environment variable is updated correctly with the following command:
$ echo $PATH
As you can see, the Node.js binary path is in the PATH environment variable.
Great!
![]() Now, check whether Node.js is working correctly with the following command:
$ node --version
As you can see, the version of Node.js installed is v12.13.0.
So, it’s working
Now, check whether Node.js is working correctly with the following command:
$ node --version
As you can see, the version of Node.js installed is v12.13.0.
So, it’s working
![]() Also, check whether NPM is working correctly with the following command:
$ npm --version
As you can see, the version of NPM installed is 6.12.0.
It’s working as well.
Also, check whether NPM is working correctly with the following command:
$ npm --version
As you can see, the version of NPM installed is 6.12.0.
It’s working as well.
![]() Lastly, check whether NPX is working correctly with the following command:
$ npx --version
As you can see, the version of NPX installed is 6.12.0.
It’s also working.
Lastly, check whether NPX is working correctly with the following command:
$ npx --version
As you can see, the version of NPX installed is 6.12.0.
It’s also working.
![]() So, that’s how you install Node.js on CentOS 8.
Thanks for reading this article.
So, that’s how you install Node.js on CentOS 8.
Thanks for reading this article.
Installing Node.js using Package Manager:
Installing Node.js on Debian 10
Node.js is a server side JavaScript runtime.
Node.js is open source and cross platform.
Node.js runs on Linux, Windows and macOS.
It is mainly used to develop software APIs and networking applications.
In this article, I am going to show you how to install Node.js on Debian 10 and how to run a simple Node.js program on Debian 10.
So, let’s get started.
Installing Node.js 10 LTS:
Node.js 10.x is the latest LTS version of Node.js at the time of this writing.
Luckily, it is available in the official package repository of Debian 10.
So, you can easily install it using the APT package manager on your Debian 10 machine.
First, update the APT package repository cache with the following command:
$ sudo apt update
![]() The APT package repository cache should be updated.
The APT package repository cache should be updated.
![]() Now, install Node.js from the official Debian 10 package repository with the following command:
$ sudo apt install nodejs
Now, install Node.js from the official Debian 10 package repository with the following command:
$ sudo apt install nodejs
![]() Now, to confirm the installation, press Y and then press <Enter>.
Now, to confirm the installation, press Y and then press <Enter>.
![]() The APT package manager will download and install all the required packages.
The APT package manager will download and install all the required packages.
![]() Node.js 10.x should be installed.
Node.js 10.x should be installed.
![]() As you can see, the Node.js version installed from the official package repository is v10.15.2.
$ node --version
As you can see, the Node.js version installed from the official package repository is v10.15.2.
$ node --version
![]() Node.js has its own package repository to help you out in your work.
Luckily, Debian 10 packages a lot of common and stable Node.js packages.
You can easily download them from the official package repository of Debian 10.
The Node.js Debian 10 package names start with node-*
For example, I searched for express.js Node.js package on the official Debian 10 package repository.
As you can see, the package exists.
The express-generator package exists as well.
The package names are node-express and node-express-generator in Debian 10.
You can easily use the APT package manager to install these packages and use them in Node.js 10.
Node.js has its own package repository to help you out in your work.
Luckily, Debian 10 packages a lot of common and stable Node.js packages.
You can easily download them from the official package repository of Debian 10.
The Node.js Debian 10 package names start with node-*
For example, I searched for express.js Node.js package on the official Debian 10 package repository.
As you can see, the package exists.
The express-generator package exists as well.
The package names are node-express and node-express-generator in Debian 10.
You can easily use the APT package manager to install these packages and use them in Node.js 10.
![]() I also searched for the Node.js package bluebird.
It exists as well.
I also searched for the Node.js package bluebird.
It exists as well.
![]() If you rather want to install Node.js packages using NPM, then you have to install NPM from the official package repository of Debian 10 with the following command:
$ sudo apt install npm
If you rather want to install Node.js packages using NPM, then you have to install NPM from the official package repository of Debian 10 with the following command:
$ sudo apt install npm
![]() Now, confirm the installation by press Y followed by <Enter>.
Now, confirm the installation by press Y followed by <Enter>.
![]() The APT package manager will download and install all the required packages.
The APT package manager will download and install all the required packages.
![]() At this point, NPM should be installed.
At this point, NPM should be installed.
![]() As you can see, the NPM version installed from the Debian 10 package repository is 5.8.0.
As you can see, the NPM version installed from the Debian 10 package repository is 5.8.0.
![]() The Node.js packages that are in the Debian 10 package repository are very stable and well tested.
You can use them if you want.
The Node.js packages that are in the Debian 10 package repository are very stable and well tested.
You can use them if you want.
Installing Node.js 12:
At the time of this writing, the latest version of Node.js is version 12.x.
But, it is not available in the official package repository of Debian 10.
You have to install it manually from the official package repository of Node.js.
Before you install Node.js 12.x, you have to install some dependency packages from the Debian 10 package repository.
First, update the APT package repository cache with the following command:
$ sudo apt update
![]() The APT package repository should be updated.
The APT package repository should be updated.
![]() Now, install the dependency packages build-essential and curl with the following command:
$ sudo apt install build-essential curl
Now, install the dependency packages build-essential and curl with the following command:
$ sudo apt install build-essential curl
![]() Now, press Y and then press <Enter> to confirm the installation.
Now, press Y and then press <Enter> to confirm the installation.
![]() The dependency packages should be installed.
The dependency packages should be installed.
![]() Now, add the official Node.js 12.x package repository with the following command:
$ curl -sL https://deb.nodesource.com/setup_12.x</a> | sudo bash -
Now, add the official Node.js 12.x package repository with the following command:
$ curl -sL https://deb.nodesource.com/setup_12.x</a> | sudo bash -
![]() The Node.js 12.x package repository should be added and the APT package repository cache should be updated.
The Node.js 12.x package repository should be added and the APT package repository cache should be updated.
![]() Now, install Node.js 12.x with the following command:
$ sudo apt install nodejs
Now, install Node.js 12.x with the following command:
$ sudo apt install nodejs
![]() The APT package manager should download and install all the required packages.
The APT package manager should download and install all the required packages.
![]() Node.js 12.x should be installed.
Node.js 12.x should be installed.
![]() As you can see, I am running Node.js 12.7.0.
$ node --version
As you can see, I am running Node.js 12.7.0.
$ node --version
![]() Node.js installed from the official Node.js package repository installs NPM by default.
As you can see, I am running NPM 6.10.0.
Node.js installed from the official Node.js package repository installs NPM by default.
As you can see, I am running NPM 6.10.0.
![]()
Writing Your First Node.js Program:
In this section, I am going to show you how to write your first Node.js program.
First, create a project directory (let’s call it ~/hello-node) as follows:
$ mkdir ~/hello-node
![]() Now, navigate to the project directory ~/hello-node as follows:
$ cd ~/hello-node
Now, create a new file welcome.js in the project directory ~/hello-node and type in the following lines of code in the welcome.js file.
let http = require('http');
const PORT = 8080;
let server = http.createServer((req, res, next) => {
res.writeHead(200, {'Content-Type': 'text/html'});
res.end('<h1>Welcome to LinuxHint!</h1>');});
server.listen(PORT, () => {
console.log("Visit http://localhost:" + PORT + " from your web browser.");});
The final welcome.js program looks as follows:
Now, navigate to the project directory ~/hello-node as follows:
$ cd ~/hello-node
Now, create a new file welcome.js in the project directory ~/hello-node and type in the following lines of code in the welcome.js file.
let http = require('http');
const PORT = 8080;
let server = http.createServer((req, res, next) => {
res.writeHead(200, {'Content-Type': 'text/html'});
res.end('<h1>Welcome to LinuxHint!</h1>');});
server.listen(PORT, () => {
console.log("Visit http://localhost:" + PORT + " from your web browser.");});
The final welcome.js program looks as follows:
![]() Now, to run the Node.js program welcome.js, run the following command:
$ node welcome.js
Now, to run the Node.js program welcome.js, run the following command:
$ node welcome.js
![]() As you can see, the welcome.js program is running.
As you can see, the welcome.js program is running.
![]() Now, visit http://localhost:8080 from your web browser and you should see a welcome message as shown in the screenshot below.
Now, visit http://localhost:8080 from your web browser and you should see a welcome message as shown in the screenshot below.
![]() So, that’s how you install Node.js on Debian 10 and run your first Node.js program.
Thanks for reading this article.
So, that’s how you install Node.js on Debian 10 and run your first Node.js program.
Thanks for reading this article.
Recognizing a face using JavaScript
What are the options? Many solutions exist for Machine Learning.
When you look around for ways to identify faces, you come up with a host of solutions.
Many are generic, some are interfaces to existing frameworks.
For JavaScript, you have a few popular ones to choose from.
You may even be confused by the array of solutions.
Even for face recognition you have several options.
Many, most actually, are for Python but you can also find a few.
Frameworks that are aimed specifically at face recognition are face,js and face-recognition.js.
The latter is considered obsolete though.
The smallest, in terms of code, is pico.js With about 200 lines of code it can detect your own face using your webcam.
The Pico code comes with a trained set already, which means that it will not improve while you are using it.
For the curious, the pre-trained classification cascades are available on their GitHub repository.
If you do want to train it yourself, there is a learn function you can use.
This is a C program available on GitHub.
This is a long process to complete making it an interesting exercise rather than something useful.
One of the more interesting API’s is face-api.js, this one uses TensorFlow.js for the machine learning part.
How does it work?
The simplest example of machine Learning is a pair of parameters such as the petals of the iris flower.
This is the most common initial data set when you want to start learning Machine Learning.
The data can be summarised in simple tables.
| Sepal length |
Sepal width |
Petal length |
Petal width |
Class |
| 5.1 |
3.5 |
1.4 |
0.2 |
Iris Setosa |
| 4.9 |
3.0 |
1.4 |
0.2 |
Iris Setosa |
| 7.0 |
3.2 |
4.7 |
1.4 |
Iris Versicolor |
| 6.4 |
3.2 |
4.5 |
1.5 |
Iris-versicolor |
| 6.9 |
3.1 |
4.9 |
1.5 |
Iris-versicolor |
| 6.3 |
3.3 |
6.0 |
2.5 |
Iris-virginica |
| 5.8 |
2.7 |
5.1 |
1.9 |
Iris-virginica |
|
|
|
|
|
As you can see from the table, it is now possible to find the sizes which best match a certain flower.
This is not an absolute truth but it can get very accurate with enough data points.
The question now becomes: How do you represent an image as a long list of values? Or a face for that matter? Well, the short story is that you convert the picture to the value of the intensity of each pixel.
Starting from there, you can decide where lines and or points go that depict a face.
What a face actually is has been determined by a pre-trained model.
If you apply that to a number of pictures of the person you are trying to detect, then a table similar to the Iris one above can be used for determining which face it is.
How it actually works is a bit more complex than that.
For you to create your own solution, you need to use a library made for it.
Fortunately, there are many free and open source solutions available.
What are the options?
There are many libraries for using JavaScript, one is face-api.js.
The others may more capable choices but this one has a very simple demo page.
You can download the demo page from GitHub.
The page contains the library and the demo pages.
If you want to start at a deeper level, you can check out TensorFlow and dlib.
Face-api uses TensorFlow as a machine Learning library.
Once you have everything downloaded from GitHub, you can use the examples library to explore different methods for face-recognition.
What are the use cases?
In industry, face recognition is used for access control, attendance checks and other security related case.
In social media networks, your face can be tagged so that you can search for your face rather than your name.
For your own system, you can use it for access to your computer and even control some of your applications.
What are we developing?
We are making a simple system to detect a face.
To detect a face, you need to have the software, images and a trained model.
You can train the model yourself and you should but for your specific task, you can also re-train an existing model.
In this example, the model is pre-trained and downloaded.
For the code to work, you need to collect the sample.
In this case we use a webcam, simple enough with HTML5.
To do this, add a video tag in the html code.
<video id = "videoID" autoplay muted></video>
Simple right? but wait you need to call this from your JavaScript also.
const video = document.getElementById('videoID')
Now you can use the constant to get your stream into the JavaScript code.
Create a startVideo function.
function startVideo() {
navigator.mediaDevices.getUserMedia({ video: {} },
stream => video.srcObject = stream,
err => console.error(err))}
This is a general function that does not call the videoID, you need to set a function that calls the incoming stream.
A way to catch the stream is to use Promise functions.
Promise.all([
faceapi.nets.tinyFaceDetector.loadFromUri('/models'),
faceapi.nets.faceLandmark68Net.loadFromUri('/models'),
faceapi.nets.faceRecognitionNet.loadFromUri('/models'),
faceapi.nets.faceExpressionNet.loadFromUri('/models')]).then(startVideo);
The Promise statement above will now run the startVideo function when the stream is available.
Finally, the video event listener below will run the functions available from the face API.
video.addEventListener('play', () => {const canvas = faceapi.createCanvasFromMedia(video);
document.body.append(canvas);const displaySize = { width: video.width, height: video.height };
faceapi.matchDimensions(canvas, displaySize);
setInterval(async () => {const detections = await faceapi.detectAllFaces(video, new
faceapi.TinyFaceDetectorOptions()).withFaceLandmarks().withFaceExpressions();const resizedDetections = faceapi.resizeResults(detections, displaySize);
canvas.getContext('2d').clearRect(0, 0, canvas.width, canvas.height);
faceapi.draw.drawDetections(canvas, resizedDetections);
faceapi.draw.drawFaceLandmarks(canvas, resizedDetections);
faceapi.draw.drawFaceExpressions(canvas, resizedDetections);}, 100);});
What do you need in your development environment?
Since we are using JavaScript, we need nodejs, node and npm (or similar).
your best tactic here is to create your development directory and then clone the repository from GitHub.
The examples are in the examples directory so move there.
$ cd examples/example-browser/
Inside the directory you need to install the packages using npm.
$ npm install
Since you are in the directory where you downloaded face-api.js, npm will find what you need to download.
Next you can start the demo and open it in your browser.
$ npm start
The last line in the output shows the port you need to use in your browser.
These examples are usually of the cast of Big Bang Theory but you can load in your own pictures and even use the webcam to determine your age.
These demos are fun to play with but the real value is that the code is available to study.
In the files, the JavaScript are separated in a separate directory to make it easy to use.
For your pages to work you need to load in the API and all scripts you are going to use.
Conclusion
This is a very short example of how to use existing API’s to detect faces and recognise them.
The really fascinating part is to find useful applications for the technology.
What will you use it for? Access to your own machine or just some specific data or application?
Setting Up Node.js Development Environment
You can always install Node.js on your computer and run Node.js applications there.
But, there are situations where you will want to use Docker to do your Node.js development.
For example, let’s say, you don’t want to install Node.js on your computer and still want to develop Node.js applications or test an existing one.
In that case, you can simply use a Node.js Docker container.
Another example is where you need to test your Node.js application on different versions of Node.js.
In that case, you can use different Node.js Docker containers with different version of Node.js installed to test your application.
In this article, I will show you how to set up Node.js development environment using Docker.
So, let’s get started.
Setting Up Project Directory:
In this section, I will clone one of my Node.js API app from GitHub to my ~/Projects/ directory just for testing Docker Node.js development environment I am about to show you how to setup.
This is not required.
You can always use your own Node.js app if you want.
First, I am going to navigate to my ~/Projects/ directory as follows:
$ cd ~/Projects/
![]() Now, I am going to clone my shovon8/angular-hero-api GitHub repository as follows:
$ git clone https://github.com/shovon8/angular-hero-api
Now, I am going to clone my shovon8/angular-hero-api GitHub repository as follows:
$ git clone https://github.com/shovon8/angular-hero-api
![]() The project files will be in the angular-hero-api/ directory as you can see in the screenshot below.
The project files will be in the angular-hero-api/ directory as you can see in the screenshot below.
![]()
Node.js Docker Images:
There are official container images for different version of Node.js built on top of different Linux distribution on DockerHub.
Visit https://hub.docker.com/_/node/ from your favorite browser to find the Node.js image you need.
As you can see, the tag name for all the Node.js images are listed in the DockerHub page of Node.js.
You can either use Debian Jessie/Stretch, Alpine, ChakraCore Linux distribution based images for different versions of Node.js.
![]() Usually, you don’t have to know much to use a Node.js Docker image.
If you want to use Node.js version 12, then all you have to do is write node:12 when you make a container.
For Node.js 10, it is node:10.
For Node.js 8, it is node:8.
It’s that simple.
Usually, you don’t have to know much to use a Node.js Docker image.
If you want to use Node.js version 12, then all you have to do is write node:12 when you make a container.
For Node.js 10, it is node:10.
For Node.js 8, it is node:8.
It’s that simple.
Configuring the Node.js Development Environment:
In this section, I am going to configure Linux command aliases for my Node.js API app.
That way, I can easily use any version of Node.js I want to run my app.
In each of my Node.js project directory, I will create a new file source.
In that file, I will keep the command aliases like node12 for Node.js 12 runtime, node10 for Node.js 10 runtime, node8 for Node.js 8 runtime running on Docker.
You can reuse the same source file with slight modification on your other Node.js projects as well.
First, navigate to your project directory as follows:
$ cd angular-hero-api/
![]() Now, create a source file with the following command:
$ nano source
Now, create a source file with the following command:
$ nano source
![]() Now, type in the following lines in the source file.
alias node12='docker run -it --rm --name hero-api -p 4242:4242 -v
"$PWD:/usr/src/app" -w /usr/src/app node:12'alias node10='docker run -it --rm --name hero-api -p 4242:4242 -v
"$PWD:/usr/src/app" -w /usr/src/app node:10'alias node8='docker run -it --rm --name hero-api -p 4242:4242 -v
"$PWD:/usr/src/app" -w /usr/src/app node:8'
Here, -it means, run the container in interactive mode.
–rm means remove the container automatically when it’s no longer needed.
–name hero-api defines a name for the container.
-p 4242:4242 means the container port 4242 is forwarded to the destination port (on your computer) 4242.
The format of this option is -p destination:source.
Remember, the first port before the colon (:) is the destination port.
If you want to access your application on some other port than 4242 on your computer, then you have to change the destination port.
If your applications run on some other port than 4242.
Then you have to change the source port.
NOTE: As I will only be using one of the containers at any one time, the name and destination port can be the same.
If you wish to run or test your Node.js application on multiple Node.js version at the same time, then make sure the name and destination port is different for each of the containers in the source file.
Once you’re done, save the file by pressing <Ctrl> + x followed by y and <Enter>.
Now, type in the following lines in the source file.
alias node12='docker run -it --rm --name hero-api -p 4242:4242 -v
"$PWD:/usr/src/app" -w /usr/src/app node:12'alias node10='docker run -it --rm --name hero-api -p 4242:4242 -v
"$PWD:/usr/src/app" -w /usr/src/app node:10'alias node8='docker run -it --rm --name hero-api -p 4242:4242 -v
"$PWD:/usr/src/app" -w /usr/src/app node:8'
Here, -it means, run the container in interactive mode.
–rm means remove the container automatically when it’s no longer needed.
–name hero-api defines a name for the container.
-p 4242:4242 means the container port 4242 is forwarded to the destination port (on your computer) 4242.
The format of this option is -p destination:source.
Remember, the first port before the colon (:) is the destination port.
If you want to access your application on some other port than 4242 on your computer, then you have to change the destination port.
If your applications run on some other port than 4242.
Then you have to change the source port.
NOTE: As I will only be using one of the containers at any one time, the name and destination port can be the same.
If you wish to run or test your Node.js application on multiple Node.js version at the same time, then make sure the name and destination port is different for each of the containers in the source file.
Once you’re done, save the file by pressing <Ctrl> + x followed by y and <Enter>.
![]() Now, enable the aliases with the following command:
$ source source
Now, enable the aliases with the following command:
$ source source
![]() Now, you can run any version of node runtime whenever you need with node12, node10, node8 commands as you can see in the screenshot below.
Now, you can run any version of node runtime whenever you need with node12, node10, node8 commands as you can see in the screenshot below.
![]()
Running Hero API Node.js App:
Now, let’s see how to run the angular-hero-api app from my GitHub repository with this setup.
I am going to use Node.js 12 runtime first, then go for Node.js 10 and Node.js 8 runtime to show you that it works in each of the versions.
The API app does not have any node modules installed.
So, you have to install all the required node modules with npm install command as follows:
$ node12 npm install
![]() The node modules are installed as you can see in the screenshot below.
The node modules are installed as you can see in the screenshot below.
![]() Now, run the Node.js API app as follows:
$ node12 npm run test
Now, run the Node.js API app as follows:
$ node12 npm run test
![]() As you can see, the API server is running on port 4242 on the container.
I also forwarded the port to 4242 on my computer.
So, I should be able to access it on port 4242.
As you can see, the API server is running on port 4242 on the container.
I also forwarded the port to 4242 on my computer.
So, I should be able to access it on port 4242.
![]() Yes, I can access it.
It’s working as expected.
Yes, I can access it.
It’s working as expected.
![]() Now, stop the container by pressing <Ctrl> + c.
Let’s try to run the API app with Node.js version 10.
$ node10 npm run test
As you can see, it’s running.
Now, stop the container by pressing <Ctrl> + c.
Let’s try to run the API app with Node.js version 10.
$ node10 npm run test
As you can see, it’s running.
![]() It works for Node.js 10 as well.
It works for Node.js 10 as well.
![]() Finally, let’s try for Node.js version 8.
$ node8 npm run test
The API app is running on Node.js 8 runtime as well.
Finally, let’s try for Node.js version 8.
$ node8 npm run test
The API app is running on Node.js 8 runtime as well.
![]() Perfect! It works correctly.
Perfect! It works correctly.
![]() So, that’s how you set up Node.js development environment using Docker.
Thanks for reading this article.
So, that’s how you set up Node.js development environment using Docker.
Thanks for reading this article.
NodeJS with Redis
Redis is widely used as a caching server.
At times, Redis is used as a database as well.
It stores the data in a computer’s memory (RAM) directly.
The advantage is that it can access the data very fast.
The disadvantage is that the data it stores is temporary.
If you reboot your computer, then all the data will be gone.
In this article, I will show you how to use Redis with Node.js.
I will be using Node.js 10.x on Debian 9 Stretch in this article.
But any modern version of Node.js should work.
So, let’s get started.
To get started you must have the following requirements:
js and NPM installed on your computer.
Redis installed on your computer.
You should be able to find articles on installing Node.js and NPM on your desired Linux distribution on LinuxHint.com.
I’ve written a dedicated article on installing Redis on Ubuntu/Debian.
Starting Redis:
You can check whether redis service is running with the following command:
$ sudo systemctl status redis
As you can see, redis service is running.
![]() If redis service is not running in your case, start it with the following command:
$ sudo systemctl start redis
If redis service is not running in your case, start it with the following command:
$ sudo systemctl start redis
Initializing the Project Directory:
First, create a project directory (let’s call it node-redis) with the following command:
$ mkdir ~/node-redis
![]() Now navigate to the project directory ~/node-redis
$ cd ~/node-redis
Now navigate to the project directory ~/node-redis
$ cd ~/node-redis
![]() Now create a package.json file:
$ npm init -y
Now create a package.json file:
$ npm init -y
![]()
Installing Redis Node.js Module:
There are many Redis clients for Node.js.
The official website of Redis recommends redis.
You can easily install the redis Node.js module using NPM (Node Package Manager).
To install redis Node.js module, run the following NPM command:
$ npm install redis --save
redis Node.js module should be installed.
![]()
Connecting to Redis using Node.js:
In this section, I am going to show you how to connect to Redis data store using Node.js.
First, create a new file connect.js in your project directory and type in the following commands in it:
![]() Here, line 1 imports the redis module.
Line 2 creates a Redis client.
As I am running Redis on the same computer as the Node.js programs are running, I didn’t have to specify the hostname or IP address and port where the Redis server is running.
If you’re running Redis server on a different computer or server, then you will have to specify it here.
For example, let’s say, your Redis server is running on port 6379 on a computer which has the IP address 192.168.10.87, then you would write line 2 as:
let client = redis.createClient(6379, '192.168.10.87');
Line 4-6 is used to print a message to the console if we can connect to the Redis server.
Line 9-10 is used to print a message to the console if we are unable to connect to the Redis server.
Now, run the connect.js Node.js script as follows:
$ node connect.js
As you can see, I am connected to the Redis server.
Here, line 1 imports the redis module.
Line 2 creates a Redis client.
As I am running Redis on the same computer as the Node.js programs are running, I didn’t have to specify the hostname or IP address and port where the Redis server is running.
If you’re running Redis server on a different computer or server, then you will have to specify it here.
For example, let’s say, your Redis server is running on port 6379 on a computer which has the IP address 192.168.10.87, then you would write line 2 as:
let client = redis.createClient(6379, '192.168.10.87');
Line 4-6 is used to print a message to the console if we can connect to the Redis server.
Line 9-10 is used to print a message to the console if we are unable to connect to the Redis server.
Now, run the connect.js Node.js script as follows:
$ node connect.js
As you can see, I am connected to the Redis server.
![]()
Storing Data in Redis Using Node.js:
In this section, I will show you how to store data (key-value pairs) in Redis data store with Node.js
First, create set1.js file in your project directory and type in the following lines in it:
![]() Here, line 1 and 2 are the same as in connect.js.
On line 4, I set the callback function of the connect event to storeData.
So, when our Redis client is connected to the Redis server, the function storeData is called.
On line 6-10, the callback function storeData is defined.
On line 7 and 8, I used set(key, value) method of RedisClient object to set the key name and country to value Mary Smith and USA respectively.
Now, run set1.js as follows:
$ node set1.js
As you can see, the key-value pairs are set.
Here, line 1 and 2 are the same as in connect.js.
On line 4, I set the callback function of the connect event to storeData.
So, when our Redis client is connected to the Redis server, the function storeData is called.
On line 6-10, the callback function storeData is defined.
On line 7 and 8, I used set(key, value) method of RedisClient object to set the key name and country to value Mary Smith and USA respectively.
Now, run set1.js as follows:
$ node set1.js
As you can see, the key-value pairs are set.
![]()
Retrieving Data from Redis Using Node.js
In this section, I will show you how to retrieve data from Redis data store using Node.js.
First, create a new file get1.js in your project directory and type in the following lines:
![]() Here, on line 4, getData function is set as a callback function for the connect event of RedisClient.
On line 6-9, the getData function is defined.
On line 7, I called the get(key, callback) method of RedisClient object.
name here is the key of the value you want to retrieve.
get() method calls the printValue callback function before it finishes running.
On line 11-18, the error first style callback function printValue() is defined.
It accepts 2 arguments, error and result.
If any error occurs, then it’s printed on the console and the function exits.
If there’s no error, then the value for the certain key is printed on the console.
On line 8, the same thing happens.
Now, run get1.js as follows:
$ node get1.js
As you can see, the values for the keys name and country is retrieved from the Redis data store.
Here, on line 4, getData function is set as a callback function for the connect event of RedisClient.
On line 6-9, the getData function is defined.
On line 7, I called the get(key, callback) method of RedisClient object.
name here is the key of the value you want to retrieve.
get() method calls the printValue callback function before it finishes running.
On line 11-18, the error first style callback function printValue() is defined.
It accepts 2 arguments, error and result.
If any error occurs, then it’s printed on the console and the function exits.
If there’s no error, then the value for the certain key is printed on the console.
On line 8, the same thing happens.
Now, run get1.js as follows:
$ node get1.js
As you can see, the values for the keys name and country is retrieved from the Redis data store.
![]()
Storing Objects in Redis with Node.js:
You can store JavaScript objects in Redis data store.
First, create a new file set2.js in your project directory and type in the following lines in it.
![]() Here, everything is the same as in set1.js file that I already explained earlier.
The only difference is, I used client.hmset(key, object) method of RedisClient object in setData() callback function.
In line 7-10, I used client.hmset() method to store a JavaScript object in the Redis data store against the key C011.
Now run set2.js Node.js script as follows:
$ node set2.js
As you can see, the object is stored.
Here, everything is the same as in set1.js file that I already explained earlier.
The only difference is, I used client.hmset(key, object) method of RedisClient object in setData() callback function.
In line 7-10, I used client.hmset() method to store a JavaScript object in the Redis data store against the key C011.
Now run set2.js Node.js script as follows:
$ node set2.js
As you can see, the object is stored.
![]()
Retrieving Objects from Redis with Node.js:
In this section, I am going to show you how to retrieve objects from Redis data store.
Fist, create a new file get2.js in your project directory and type in the following lines in it.
![]() Here, everything is the same as in get1.js script I explained earlier.
You can retrieve a JavaScript object very easily with client.hgetall(key, callback) method of RedisClient as in line 7-9.
Now run get2.js Node.js script as follows:
$ node get2.js
As you can see, the JavaScript object is retrieved from the Redis data store.
Here, everything is the same as in get1.js script I explained earlier.
You can retrieve a JavaScript object very easily with client.hgetall(key, callback) method of RedisClient as in line 7-9.
Now run get2.js Node.js script as follows:
$ node get2.js
As you can see, the JavaScript object is retrieved from the Redis data store.
![]() I showed you how to setup Redis with Node.js in this article.
Now you should be able to read the redis Node.js module documentation at http://redis.js.org and learn more about it.
Thanks for reading this article.
I showed you how to setup Redis with Node.js in this article.
Now you should be able to read the redis Node.js module documentation at http://redis.js.org and learn more about it.
Thanks for reading this article.
Node.js Send E-Mail with Attachment
Node.js is the server side JavaScript engine that is loved by web developers and system administrators all over the world.
Node.js has a rich set of modules that you can install using Node Package Manager (NPM) and use to do almost any task.
There are many Node.js modules for sending E-Mails using Node.js such as Nodemailer, emailjs, express-mailer etc.
In this article, I will show you how to send E-Mail and also how to send E-Mail with attachment with Nodemailer Node.js module.
Let’s get started.
Requirements:
To follow this article, you should have:
Basic understanding of Node.js and JavaScript.
js 6.x or later installed on your computer.
NPM installed on your computer.
An E-Mail account such as GMail.
A Text Editor for writing Node.js codes.
You should be able to find dedicated articles on each of these topics on linuxhint.com.
Be sure to check them for more information.
Creating Project Directory:
It’s always best to create a new directory for every Node.js app you write.
Because by default, Node.js modules are installed in node_modules/ directory inside your current working directory.
That way, modules are separate for each app you write and you can use different version of the same module in different app.
This is a lot flexible than installing modules globally.
Create a project directory (let’s call it node-mail) with the following command:
$ mkdir node-mail
Now navigate to the project directory with the following command:
$ cd node-mail
![]() Now create a package.json file with the following command:
$ npm init -y
As you can see, a basic package.json file is created.
Now create a package.json file with the following command:
$ npm init -y
As you can see, a basic package.json file is created.
![]()
Installing Nodemailer:
In this section, I am going to show you how to install Nodemailer Node.js module using NPM.
First, make sure Node.js is installed and working correctly with the following command:
$ node --version
As you can see, Node.js 10.11.0 is installed and working correctly in my computer.
The version on your computer may be different.
It’s alright but it should be version 6.x or later.
Otherwise Nodemailer won’t work.
![]() Now, make sure NPM is installed and working correctly with the following command:
$ npm ---version
As you can see, NPM 6.4.1 is installed and working correctly in my computer.
The version on your computer may be different.
It’s alright.
Now, make sure NPM is installed and working correctly with the following command:
$ npm ---version
As you can see, NPM 6.4.1 is installed and working correctly in my computer.
The version on your computer may be different.
It’s alright.
![]() You need internet connectivity in order to install Nodemailer using NPM.
So make sure you’re connected to the internet.
Now, install Nodemailer Node.js module using NPM with the following command:
$ npm install nodemailer --save
You need internet connectivity in order to install Nodemailer using NPM.
So make sure you’re connected to the internet.
Now, install Nodemailer Node.js module using NPM with the following command:
$ npm install nodemailer --save
![]() Nodemailer is installed.
Nodemailer is installed.
![]()
Sending E-Mail with Nodemailer:
In this section, I will show you how to send E-Mail from your gmail account with Nodemailer.
First, create a new file (let’s call it sendmail.js) in your project directory with the following command:
$ touch sendmail.js
Now type in the following lines of code in sendmail.js file and save it.
![]() Here, on line 1, I imported Nodemailer.
On line 3, I set my email to myEmail variable.
This is the email from which I will send an email to other email accounts.
Make sure you change it to your email address.
On line 5-11, a transport object is created.
It is required to send an email using Nodemailer.
The purpose of the transport object is to verify the sender information.
You only need to do it once.
Once the sender information is verified, a transport object should be created.
On line 6, I set service to gmail as I am using a GMail account to send emails.
The supported services are DynectEmail, Gmail, hot.ee, Hotmail, iCloud, mail.ee, Mail.Ru, Mailgun, Mailjet, Mandrill, Postmark, QQ, QQex, SendGrid, SES, Yahoo, yandex, Zoho.
The service name is case insensitive.
So you can put gmail or GMAIL or Gmail there.
It’s all the same.
Make sure you set the correct service name.
NOTE: You can use your own email server as well.
To do that, you have to create a custom Nodemailer Transport object.
To learn more about it, visit the official documentation of Nodemailer at https://nodemailer.com/smtp/
On line 9, I put the password of my gmail account that I am using to send emails from.
Make sure you change it to yours.
On line 14-19, I created a message object.
In this object, from is set to the email address of the sender, to is the email address of the receiver.
subject is the subject of the email and text is the content of the email.
On line 22, I used the transport.sendMail() method to send email using Nodemailer.
The first argument of the sendMail() method is the message object defined on line 14-19.
The second argument is a callback function.
The callback function simply checks for errors and prints a message to the console depending on whether the email was sent or not.
Now run the sendmail.js script as follows:
$ node sendmail.js
As you can see, the email was sent.
Here, on line 1, I imported Nodemailer.
On line 3, I set my email to myEmail variable.
This is the email from which I will send an email to other email accounts.
Make sure you change it to your email address.
On line 5-11, a transport object is created.
It is required to send an email using Nodemailer.
The purpose of the transport object is to verify the sender information.
You only need to do it once.
Once the sender information is verified, a transport object should be created.
On line 6, I set service to gmail as I am using a GMail account to send emails.
The supported services are DynectEmail, Gmail, hot.ee, Hotmail, iCloud, mail.ee, Mail.Ru, Mailgun, Mailjet, Mandrill, Postmark, QQ, QQex, SendGrid, SES, Yahoo, yandex, Zoho.
The service name is case insensitive.
So you can put gmail or GMAIL or Gmail there.
It’s all the same.
Make sure you set the correct service name.
NOTE: You can use your own email server as well.
To do that, you have to create a custom Nodemailer Transport object.
To learn more about it, visit the official documentation of Nodemailer at https://nodemailer.com/smtp/
On line 9, I put the password of my gmail account that I am using to send emails from.
Make sure you change it to yours.
On line 14-19, I created a message object.
In this object, from is set to the email address of the sender, to is the email address of the receiver.
subject is the subject of the email and text is the content of the email.
On line 22, I used the transport.sendMail() method to send email using Nodemailer.
The first argument of the sendMail() method is the message object defined on line 14-19.
The second argument is a callback function.
The callback function simply checks for errors and prints a message to the console depending on whether the email was sent or not.
Now run the sendmail.js script as follows:
$ node sendmail.js
As you can see, the email was sent.
![]() I checked my Gmail, and voila! I received the email just fine.
I checked my Gmail, and voila! I received the email just fine.
![]()
Sending E-Mail with Attachment Using Nodemailer:
Now that you know how to send email using Nodemailer, sending email with attachment is a piece of cake!
To send email with attachment, all you need to do is modify the message object on line 14-19 and the rest of the code should be the same.
Change the message object as follows as save the file.
![]() Here, attachments is an array objects.
Each object defines an attachment file.
So you can send multiple files at once.
On line 20-22, I set the relative path to a file hello.txt to the path property of the object.
Now run the sendmail.js script again.
$ node sendmail.js
As you can see, the email was sent.
Here, attachments is an array objects.
Each object defines an attachment file.
So you can send multiple files at once.
On line 20-22, I set the relative path to a file hello.txt to the path property of the object.
Now run the sendmail.js script again.
$ node sendmail.js
As you can see, the email was sent.
![]() As you can see, I received the message along with the attachment hello.txt.
As you can see, I received the message along with the attachment hello.txt.
![]() You can also set custom name to your attachment file.
For that, you have to change the attachment object as follows:
You can also set custom name to your attachment file.
For that, you have to change the attachment object as follows:
![]() To send multiple attachments, create multiple attachment objects as follows:
To send multiple attachments, create multiple attachment objects as follows:
![]() That’s how you send email with attachment using Nodemailer in Node.js.
Thanks for reading this article.
That’s how you send email with attachment using Nodemailer in Node.js.
Thanks for reading this article.
NodeJS Debugger Tutorial
No matter how good you are at programming NodeJS, there will always be things happening that you don’t want.
So debugging a NodeJS app is very important to find and fix the problems and get the app running as soon as possible.
NodeJS has powerful debugging features build in, which is really helpful.
You can use the NodeJS debugger from the command line very easily.
In this article, I will show you how to use the NodeJS debugger.
I am using NodeJS 8 on Debian 9 Stretch for the demonstration.
But everything shown in this article should work on any latest NodeJS version on any Linux distributions, Mac OS and Windows.
So Let’s get started.
Installing NodeJS:
NodeJS may not be installed on your computer by default.
But it is freely available to download and install.
Just go to the official website of NodeJS at https://nodejs.org/en/ and download NodeJS for your operating system.
It is available for Mac OS, Linux and Windows.
So no matter what operating system you have, you should be able to install it.
Setting Up the Test Program:
The NodeJS program I used in this article is given below:
![]() This is a simple NodeJS program that adds 2 numbers.
You can run the NodeJS script app.js with the following command:
$ node app.js
This is a simple NodeJS program that adds 2 numbers.
You can run the NodeJS script app.js with the following command:
$ node app.js
![]() In the next section, I will show you how to use the NodeJS debugger.
In the next section, I will show you how to use the NodeJS debugger.
Starting NodeJS Debugger:
To debug the NodeJS script app.js, you have to run the script app.js with the NodeJS debugger.
You can start the NodeJS debugger for app.js the following command:
$ node inspect app.js
![]() NOTE: On older version of NodeJS, you run node debug app.js instead to start the NodeJS debugger.
NodeJS debugger should start as you can see in the screenshot below.
NOTE: On older version of NodeJS, you run node debug app.js instead to start the NodeJS debugger.
NodeJS debugger should start as you can see in the screenshot below.
![]() Now you can run many commands here to debug the NodeJS script app.js.
Now you can run many commands here to debug the NodeJS script app.js.
Getting Help with NodeJS Debugger:
You can run the following command to get a list of commands and functions that you can use to debug a NodeJS script in the NodeJS debugger:
debug> help
![]() As you can see, all the commands and functions with short description of what they do are listed.
When you are having a hard time remembering what commands or functions to run, this is a good place to get some help.
As you can see, all the commands and functions with short description of what they do are listed.
When you are having a hard time remembering what commands or functions to run, this is a good place to get some help.
![]()
Auto Completion on NodeJS Debugger:
You can partially type in a command or function and press <Tab> to get auto completion.
Before pressing <Tab>:
![]() After pressing <Tab>.
As you can see, the function is auto completed.
After pressing <Tab>.
As you can see, the function is auto completed.
![]() In the next sections, I will show you how to do different debugging task with NodeJS debugger.
In the next sections, I will show you how to do different debugging task with NodeJS debugger.
Setting Breakpoints with NodeJS Debugger:
A NodeJS script has many numbered lines when viewed in a programming text editor.
You can set breakpoints on any of these lines.
Let’s say you set a breakpoint on line 3, and start the NodeJS script.
Then the NodeJS debugger would run line 1 and 2 and stop at line 3.
Then you can check whether the results up until this point is correct and continue the program as usual.
You can set as many breakpoints as you need.
To set a breakpoint, you run the setBreakpoint() function.
The function accepts an integer parameter as line number to which you want to set a breakpoint.
setBreakpoint(int lineNumber)
To set a breakpoint on line 3,
![]() Run the following command:
debug> setBreakpoint(3)
Run the following command:
debug> setBreakpoint(3)
![]() As you can see, a breakpoint is set on line 3, which is marked by an arrow (>).
As you can see, a breakpoint is set on line 3, which is marked by an arrow (>).
![]() Now let’s set a breakpoint on line 22 as well:
Now let’s set a breakpoint on line 22 as well:
![]() debug> setBreakpoint(22)
As you can see, a breakpoint is set on line 22 as well, just before the first addNumber() function is executed.
debug> setBreakpoint(22)
As you can see, a breakpoint is set on line 22 as well, just before the first addNumber() function is executed.
![]()
Removing or Clearing Breakpoints with NodeJS Debugger:
To remove a breakpoint, just run the clearBreakpoint() function.
clearBreakpoint(int lineNumber)
Pass in the line number at which you have a breakpoint set as an argument to the function clearBreakpoint(), the breakpoint should be removed or cleared.
Listing All the Breakpoints with NodeJS Debugger:
You can list all the breakpoints you have already set with the NodeJS debugger with the following command:
debug> breakpoints
As you can see, I have breakpoints set on line 3 and line 22.
![]()
Using REPL in NodeJS Debugger:
The full form of REPL is Read–Eval–Print Loop.
You can use REPL in NodeJS debugger to check the contents of variables and functions and many more.
It is really useful.
To start REPL, run the following command:
debug> repl
As you can see, REPL has started.
![]() Now you can press <Tab> twice to see what variables and functions are available at the moment in your NodeJS script.
Now you can press <Tab> twice to see what variables and functions are available at the moment in your NodeJS script.
![]() You can also print the content of any variable you wish.
Just type in the name of the variable and press <Enter>.
You can also print the content of any variable you wish.
Just type in the name of the variable and press <Enter>.
![]() You can also check functions as well.
You can also check functions as well.
![]() To exit REPL, press <Ctrl> + c.
You should be back to the debugger.
To exit REPL, press <Ctrl> + c.
You should be back to the debugger.
![]()
Using the cont Command in NodeJS Debugger:
Now that you have all the breakpoints set, you can run the cont command or c command to continue running the lines till the first breakpoint.
debug> c
![]() Now I can check the value of x and y from REPL and as you can see it is correct.
Now I can check the value of x and y from REPL and as you can see it is correct.
![]() To go to the next breakpoint, you can run c command again.
To go to the next breakpoint, you can run c command again.
![]() The variables are printed with REPL.
The variables are printed with REPL.
![]() Running the c command again completes the program as there are no more breakpoints.
Running the c command again completes the program as there are no more breakpoints.
![]()
Resetting Program Execution:
If you want to start executing lines from the beginning of your NodeJS script, you have to reset the debugger.
You can reset the debugger with the following command:
$ r
![]()
Debugging NodeJS Script Line By Line:
You can use the next or n command to run a NodeJS script line by line.
At first, I have no value set for x and y.
![]() I executed 1 line:
debug> n
Now x is set to 5 and y is still undefined.
I executed 1 line:
debug> n
Now x is set to 5 and y is still undefined.
![]() You can move line by line and keep debugging your NodeJS script like this.
Though there are many things I could not cover, but this is the basics of using the NodeJS debugger to debug a NodeJS app.
Now it should be easy to learn more about NodeJS debugger with the help command.
You can move line by line and keep debugging your NodeJS script like this.
Though there are many things I could not cover, but this is the basics of using the NodeJS debugger to debug a NodeJS app.
Now it should be easy to learn more about NodeJS debugger with the help command.
How to Install and Configure NodeJS on CentOS 7
JavaScript is the programming language of the Web.
It is mainly used in Web browser to make your website interactive.
But a web browser is not the only place JavaScript is used these days.
JavaScript can be used just like any other interpreted programming languages such as Python, Ruby etc.
NodeJS made it possible.
NodeJS is basically JavaScript on the server.In this article, I will show you how to install and configure NodeJS on CentOS 7.
Let’s get started.
Installing Build Tools for Native Addons:
All the NodeJS modules are written.
At times that has performance issues as JavaScript is not as fast as a compiled language such as C and C++.
To solve this problem, NodeJS has native addons.
How that work is, NodeJS relies on Chrome V8 JavaScript engine, which is written in C++.
So NodeJS adds an additional layer to compile JavaScript code to native binary code.
This improves performance drastically.
NodeJS codes runs almost as fast as C and C++ compiled code if the NodeJS module that you’re using is written using the Native Addons NodeJS API.
The NodeJS native addons needs a C++ build tool installed on your computer as the modules are built while you install them using Node Package Manager.
I will show you how to install build tools here.
First update the YUM package repository cache with the following command:
$ sudo yum makecache
![]() The YUM package repository cache should be updated.
The YUM package repository cache should be updated.
![]() Now install build tools on your CentOS 7 machine with the following command:
$ sudo yum install gcc-c++ make
Now install build tools on your CentOS 7 machine with the following command:
$ sudo yum install gcc-c++ make
![]() Now press y and then press <Enter>.
Now press y and then press <Enter>.
![]() The build tools should be installed.
The build tools should be installed.
![]()
Adding NodeJS Package Repository on CentOS 7:
At the time of this writing, you can install either NodeJS 8.x or NodeJS 10.x.
NodeJS 8 is the LTS release and NodeJS 10 is latest release.
Both of these versions are available to install on CentOS 7.
Add the package repository of either NodeJS 8.x or NodeJS 10.x depending on your need.
For NodeJS 8.x:
Run the following command to add the package repository of NodeJS 8.x on your CentOS 7 machine:
$ curl --silent --location https://rpm.nodesource.com/setup_8.x | sudo bash -
![]() For NodeJS 10.x:
Run the following command to add the package repository of NodeJS 10.x on your CentOS 7 machine:
$ curl --silent --location https://rpm.nodesource.com/setup_10.x | sudo bash -
For NodeJS 10.x:
Run the following command to add the package repository of NodeJS 10.x on your CentOS 7 machine:
$ curl --silent --location https://rpm.nodesource.com/setup_10.x | sudo bash -
![]() I went for the LTS release of NodeJS, which is version 8.x.
As you can see, the package repository is added.
I went for the LTS release of NodeJS, which is version 8.x.
As you can see, the package repository is added.
![]()
Installing NodeJS:
Now you can install NodeJS on your CentOS 7 machine with the following command:
$ sudo yum install nodejs
![]() Now press y and then press <Enter> to continue.
Now press y and then press <Enter> to continue.
![]() Now press y and then press <Enter> to accept the GPG key.
Now press y and then press <Enter> to accept the GPG key.
![]() NodeJS should be installed.
NodeJS should be installed.
![]() Now run the following command to verify whether NodeJS is working:
$ node --version
As you can see, NodeJS is working properly.
Now run the following command to verify whether NodeJS is working:
$ node --version
As you can see, NodeJS is working properly.
![]() Now run the following command to see whether Node Package Manager (NPM) is working:
$ npm --version
As you can see, NPM is working correctly as well.
Now run the following command to see whether Node Package Manager (NPM) is working:
$ npm --version
As you can see, NPM is working correctly as well.
![]()
Using NodeJS:
Now that you have NodeJS installed, I am going to show you the basics of NodeJS.
First create a project directory with the following command:
$ mkdir hello-world
![]() Now navigate to the project directory:
$ cd hello-world/
Now navigate to the project directory:
$ cd hello-world/
![]() Inside hello-world/ directory, initialize a Node package.json file with the following command:
$ npm init -y
As you can see a package.json file is generated.
The contents of the file are also printed on the terminal.
It is a JSON file.
Here, name is the application name, version is the application version, description is a short description about your application, main is the name of a NodeJS script in your project directory that is used to start your application.
By default, it is index.js, but you can change it.
scripts is an object that holds command aliases.
I am going to leave the defaults for now.
Inside hello-world/ directory, initialize a Node package.json file with the following command:
$ npm init -y
As you can see a package.json file is generated.
The contents of the file are also printed on the terminal.
It is a JSON file.
Here, name is the application name, version is the application version, description is a short description about your application, main is the name of a NodeJS script in your project directory that is used to start your application.
By default, it is index.js, but you can change it.
scripts is an object that holds command aliases.
I am going to leave the defaults for now.
![]() Now install Express.js NodeJS package with NPM with the following command:
$ sudo npm install express --save
Now install Express.js NodeJS package with NPM with the following command:
$ sudo npm install express --save
![]() Express should be installed.
Express should be installed.
![]() All the modules are kept in the node_modules/ directory in your project directory.
All the modules are kept in the node_modules/ directory in your project directory.
![]() Now create a index.js file and type in the following codes:
let express = require('express');
let app = express();
app.get('/', (req, res) => {
res.end('<h1>Welcome to LinuxHint</h1>');});
app.listen(8080, () => {
console.log('App is running on http://localhost:8080');});
Now create a index.js file and type in the following codes:
let express = require('express');
let app = express();
app.get('/', (req, res) => {
res.end('<h1>Welcome to LinuxHint</h1>');});
app.listen(8080, () => {
console.log('App is running on http://localhost:8080');});
![]() Now run the following command to start the app:
$ node index.js
The app should start.
Now run the following command to start the app:
$ node index.js
The app should start.
![]() Now from your web browser, go to http://localhost:8080 and you should see the following output.
The NodeJS app is working correctly.
Now from your web browser, go to http://localhost:8080 and you should see the following output.
The NodeJS app is working correctly.
![]() Now to stop the app, press <Ctrl> + c on the terminal.
Now to stop the app, press <Ctrl> + c on the terminal.
![]() Now if you visit http://localhost:8080 from the web browser, you should see an error.
Now if you visit http://localhost:8080 from the web browser, you should see an error.
![]() That’s how you install and configure NodeJS on CentOS 7.
That’s how you install and configure NodeJS on CentOS 7.
How to Install and Use NPM on Debian 9 Stretch
NPM or Node Package Manager is the same thing as APT to Debian.
It is used to install, remove, update NodeJS packages.
In this article, I will show you how to install and use NPM on Debian 9 Stretch.
Installing NodeJS and NPM
The version of NodeJS available in the official Debian 9 Stretch package repository is 4.x, which is very old.
The official package repository of Debian 9 Stretch does not have NPM.
In this section, I will install the latest stable version of NodeJS and NPM which is at the time of this writing 8.11.1.
First update the apt package repository cache with the following command:
$ sudo apt-get update
![]() Now install CURL with the following command:
$ sudo apt-get install curl
Now install CURL with the following command:
$ sudo apt-get install curl
![]() Press y and then press <Enter> to continue.
Press y and then press <Enter> to continue.
![]() CURL should be installed.
CURL should be installed.
![]() Now add the package repository of NodeJS 8.x with the following command:
$ curl -sL https://deb.nodesource.com/setup_8.x | sudo -E bash -
Now add the package repository of NodeJS 8.x with the following command:
$ curl -sL https://deb.nodesource.com/setup_8.x | sudo -E bash -
![]() The NodeJS 8.x package repository should be added as you can see from the screenshot below.
The NodeJS 8.x package repository should be added as you can see from the screenshot below.
![]() Now you can install NodeJS and NPM all together along with the development tools for building native NodeJS modules with the following command:
$ sudo apt-get install build-essential nodejs
Now you can install NodeJS and NPM all together along with the development tools for building native NodeJS modules with the following command:
$ sudo apt-get install build-essential nodejs
![]() Now press y and then press <Enter> to continue.
Now press y and then press <Enter> to continue.
![]() NodeJS, NPM and the required build tools for compiling NodeJS native modules are installed.
NodeJS, NPM and the required build tools for compiling NodeJS native modules are installed.
![]() Now check whether NodeJS is working with the following command:
$ node --version
As you can see, NodeJS 8.11.1 is installed and working correctly.
Now check whether NodeJS is working with the following command:
$ node --version
As you can see, NodeJS 8.11.1 is installed and working correctly.
![]() Now check whether NPM is working with the following command:
$ npm --version
As you can see NPM is installed correctly as well.
Now check whether NPM is working with the following command:
$ npm --version
As you can see NPM is installed correctly as well.
![]()
Using NPM
In this section, I will show you how to use NPM to manager NodeJS modules or packages.
Before that, let’s talk about global packages and local packages.
If you install a NodeJS package globally, then it should be saved somewhere /usr/lib/node_modules directory and you can access it from any NodeJS project.
If you install a NodeJS package locally, then a directory node_modules/ should be created on your project directory and the package should be saved in node_modules/ directory relative to your project directory.
It can only be accessed from that project.
That’s all you need to know for now.
Let’s continue.
Creating a package.json Configuration File with NPM:
Every NodeJS project has a package.json file in its project’s root directory.
This file holds information about your project, such as the name of the project, the version of the project, the dependencies or other NodeJS packages your project depends on and many more.
You can manually create a package.json file and put all these information or you can use NPM to create it for you.
First create a new directory node-project (you can name is whatever you want) for your NodeJS project with the following command:
$ mkdir node-project
![]() Now navigate to your project directory with the following command:
$ cd node-project
Now navigate to your project directory with the following command:
$ cd node-project
![]() Now to create a package.json file with NPM, run the following command:
$ npm init
Now to create a package.json file with NPM, run the following command:
$ npm init
![]() Fill in the details and press <Enter> to move forward.
Fill in the details and press <Enter> to move forward.
![]() In the end, type in yes and press <Enter>.
In the end, type in yes and press <Enter>.
![]() As you can see, a package.json file is created.
As you can see, a package.json file is created.
![]() This is the contents of the package.json file:
This is the contents of the package.json file:
![]()
Installing a NodeJS Package Locally with NPM:
If you know the name of the package, then you can easily install it using NPM.
For example, if you want to install express NodeJS package, which is Express web framework, run the following command from your project directory:
$ npm install express --save
![]() express NodeJS package should be installed.
express NodeJS package should be installed.
![]()
Installing a NodeJS Package Globally with NPM:
You can install a NodeJS package globally from any directory.
For example, if you want to install express NodeJS package globally, run the following command:
$ sudo npm -g install express
![]() It should be installed globally.
It should be installed globally.
![]()
Removing a NodeJS Package Locally with NPM:
If you want to remove a NodeJS package, let’s say express, from your project directory, run the following command from your project directory:
$ npm uninstall express --save
![]() The express NodeJS package is removed.
The express NodeJS package is removed.
![]()
Removing a NodeJS Package Globally with NPM:
To remove a NodeJS package, let’s say express, globally, run the following command:
$ sudo npm -g uninstall express
![]() It should be removed.
It should be removed.
![]()
Searching for NodeJS Packages:
Well, now you know how to install and remove NodeJS packages with NPM.
Now the question is, how do I know what I can install with NPM? What packages are available?
Well, you can search for packages in the NPM’s official website at https://www.npmjs.com/ or you can use NPM command line utility.
To search for NodeJS packages from your web browser, go to https://www.npmjs.com/ and search for what you’re looking for.
Type in the keywords as marked in the screenshot below, and press <Enter>.
![]() You should see a lot of packages as you can see in the marked section of the screenshot below.
You can click on any one of them to see more information about that package.
You should see a lot of packages as you can see in the marked section of the screenshot below.
You can click on any one of them to see more information about that package.
![]() You can also run the following command to search for NPM packages:
$ npm search "Web framework"
You can also run the following command to search for NPM packages:
$ npm search "Web framework"
![]() As you can see, the same list is displayed.
You can pick up the package name from the first column as marked in the screenshot below, and install what you need using NPM.
As you can see, the same list is displayed.
You can pick up the package name from the first column as marked in the screenshot below, and install what you need using NPM.
![]() So that’s how you install and use NPM on Debian 9 Stretch.
Thanks for reading this article.
So that’s how you install and use NPM on Debian 9 Stretch.
Thanks for reading this article.
Creating Charts using JavaScript and PHP
Web based chart can be created by using any client-side library or server-side library based on static or dynamic data.
If you want to create animated charts and want to download the chart faster then it is better to use a client-side chart library.
Many client-side libraries are available to create charts for web pages.
One of the popular client-side libraries is CanvasJS which can be used to create web based charts by using fixed data or retrieving data from any database.
CanvasJS is used with PHP in this tutorial for creating web based charts.
This library supports various types of charts, such as bar chart, column chart, dynamic column chart, line chart, pie chart, pyramid chart, doughnut chart, bubble chart etc.
Some of them are shown here by using sample data.
Before starting this tutorial, you must ensure that your web server and PHP are installed properly and working.
Download CanvasJS
It is available in free and commercial version.
You can download and use the free version of this library for testing purposes.
Go to the following URL and click on Download link to download CanvasJS library.
Unzip the file and store the folder in web server after download to use it.
https://canvasjs.com
![]() <?php
$profitdata = array(
array("x"=> 2013, "y"=> 440000),
array("x"=> 2014, "y"=> 270000),
array("x"=> 2015, "y"=> 210000, "indexLabel"=> "Lowest"),
array("x"=> 2016, "y"=> 600000),
array("x"=> 2017, "y"=> 630000, "indexLabel"=> "Highest"),
array("x"=> 2018, "y"=> 560000) );
?>
<html><head><script src="http://localhost/canvasjs/canvasjs.min.js"></script><script>
window.onload = function () {
var chart = new CanvasJS.Chart("displaychart", {//Enable animation
animationEnabled: true,
//To save the chart as image
exportEnabled: true,
//The others values of theme are "light1", "light2", "dark1"
theme: "dark2",
title:{
text: "Yearly Profits"},
data: [{//Change type to bar, line, pie etc.
to change the display
type: "column",
indexLabelFontColor: "#5A3457",
indexLabelPlacement: "outside",//Read data from PHP array in JSON format
dataPoints: <?php echo json_encode($profitdata, JSON_NUMERIC_CHECK); ?>}]});
chart.render();
}</script></head><body><center><h3>Column Chart Example </h3><div id="displaychart" style="height: 70%; width: 40%; align:center;"></div></center></body></html>
Output:
The following output will be generated if you run the file from any web server.
“Trial Version“ and “CanvasJS.com” watermarks will be shown for free version.
<?php
$profitdata = array(
array("x"=> 2013, "y"=> 440000),
array("x"=> 2014, "y"=> 270000),
array("x"=> 2015, "y"=> 210000, "indexLabel"=> "Lowest"),
array("x"=> 2016, "y"=> 600000),
array("x"=> 2017, "y"=> 630000, "indexLabel"=> "Highest"),
array("x"=> 2018, "y"=> 560000) );
?>
<html><head><script src="http://localhost/canvasjs/canvasjs.min.js"></script><script>
window.onload = function () {
var chart = new CanvasJS.Chart("displaychart", {//Enable animation
animationEnabled: true,
//To save the chart as image
exportEnabled: true,
//The others values of theme are "light1", "light2", "dark1"
theme: "dark2",
title:{
text: "Yearly Profits"},
data: [{//Change type to bar, line, pie etc.
to change the display
type: "column",
indexLabelFontColor: "#5A3457",
indexLabelPlacement: "outside",//Read data from PHP array in JSON format
dataPoints: <?php echo json_encode($profitdata, JSON_NUMERIC_CHECK); ?>}]});
chart.render();
}</script></head><body><center><h3>Column Chart Example </h3><div id="displaychart" style="height: 70%; width: 40%; align:center;"></div></center></body></html>
Output:
The following output will be generated if you run the file from any web server.
“Trial Version“ and “CanvasJS.com” watermarks will be shown for free version.
![]() When you click on “More Options” button from top right corner then three options will be shown.
You can print the chart or save the chart as JPG or PNG image format.
If you click on “Save as PNG” option then the following dialog box will appear.
When you click on “More Options” button from top right corner then three options will be shown.
You can print the chart or save the chart as JPG or PNG image format.
If you click on “Save as PNG” option then the following dialog box will appear.
![]() The default image file name is Chart.png. You can remove the watermarks from the image by using any photo editing software easily.
The default image file name is Chart.png. You can remove the watermarks from the image by using any photo editing software easily.
![]()
Pie Chart:
The following example shows the popularity of different Linux distributions using pie chart.
Write the following code in a file named pie-chart.php and store the file in var/www/html/jschart folder.
<?php
$popularity = array(
array("os"=> "Arch Linux", "y"=> 40),
array("os"=> "CentOS", "y"=> 25),
array("os"=> "Debian", "y"=> 12),
array("os"=> "Fedora", "y"=> 10),
array("os"=> "Gentoo", "y"=> 8),
array("os"=> "Lindows", "y"=> 5));
?>
<html><head><script src="http://localhost/canvasjs/canvasjs.min.js"></script><script>
window.onload = function () {
var chart = new CanvasJS.Chart("displaychart", {//Enable animation
animationEnabled: true,//To save the chart as image
exportEnabled: true,//The others values of theme are "light1","dark1", "dark2"
theme: "dark1",
title:{
text: "Popularity of Linux Distributions"},
data: [{//Change type to bar, line, column etc.
to change the display
type: "pie",//Set font color for the label
indexLabelFontColor: "yellow",//format the percentage values
yValueFormatString: "##0.00'%'",//Set angle for pie
startAngle: 240,
indexLabel: "{os} {y}",//Read data from PHP array in JSON format
dataPoints: <?php echo json_encode($popularity, JSON_NUMERIC_CHECK); ?>}]});
chart.render();
}</script></head><body><center><h3>Pie Chart Example </h3><div id="displaychart" style="height: 70%; width: 40%;"></div></center></body></html>
Output:
The following output will display if you run the file from web server.
You can create image file of the chart by the step which is shown in the previous example.
![]()
Dynamic Column Chart:
You can create nice looking dynamic chart by using this library.
Suppose, you want to create live chart of stock market where stock price increases or decreases continuously.
Write the following code in a file named dynamic-chart.php and store the file in var/www/html/jschart folder.
<?php
$stockdata = array(
array("stock"=> "MSFT", "y"=> 92.67),
array("stock"=> "LOW", "y"=> 88.89),
array("stock"=> "INTC", "y"=> 52.15),
array("stock"=> "ADI", "y"=> 91.78),
array("stock"=> "ADBE", "y"=> 224.80),
array("stock"=> "ABBV", "y"=> 94.30),
array("stock"=> "AMD", "y"=> 10.27)
);
?>
<html><head><script src="http://localhost/canvasjs/canvasjs.min.js"></script><script>
window.onload = function () {
var chart = new CanvasJS.Chart("displaychart", {//Enable animation
animationEnabled: true,//To save the chart as image
exportEnabled: true,//The others values of theme are "light1","dark1", "dark2"
theme: "dark1",
title:{
text: "Stock Market Values"},
data: [{//Change type to bar, line, column etc.
to change the display
type: "column",//Set font color for the label
indexLabelFontColor: "red",//format the percentage values
yValueFormatString: "##0.00'%'",
indexLabel: "{y}",//Read data from PHP array in JSON format
dataPoints: <?php echo json_encode($stockdata, JSON_NUMERIC_CHECK); ?>}]});
//Read stock names
var stdata = chart.options.data[0].dataPoints;
var st = new Array();for (var i = 0; i < stdata.length; i++) {
st[i]= stdata[i].stock;}
function updateChart() {
var stockColor, deltaY, yVal, xVal;
var dps = chart.options.data[0].dataPoints;for (var i = 0; i < dps.length; i++) {
deltaY = Math.round(2 + Math.random() *(-2-2));
yVal = deltaY + dps[i].y > 0 ? dps[i].y + deltaY : 0;
xVal = dps[i].stock;
stockColor = yVal > 200 ? "#FF2500" : yVal >= 170 ? "#FF6000" : yVal < 170 ? "#6B8E23 ":null;
dps[i] = {label: st[i], y: yVal, color: stockColor};}
chart.options.data[0].dataPoints = dps;
chart.render();};
updateChart();
setInterval(function() {updateChart()}, 500);}</script></head><body><center><h3>Dynamic Chart Example </h3><div id="displaychart" style="height: 70%; width: 40%;"></div></center></body></html>
Output:
The following output will display if you run the file from web server.
You can create image file of the chart by similar way which is shown in the first example.
![]() By following above steps, you can easily create necessary web based animated charts using this useful JavaScript library.
By following above steps, you can easily create necessary web based animated charts using this useful JavaScript library.
Creating Charts using JavaScript and PHP
Node Package Manager, or npm, gets installed along with Node.js and you can use it to import software packages built on top of Node.js.
If you are not familiar with the idea of nodejs, it is based off of Google Chrome’s JavaScript engine and can be used for server side scripting using JavaScript.
It brings JavaScript (which traditionally runs on the client e.g a web browser) at the same footing as any other server side language like .NET or php.
Because the language is already very popular and easy to use.
There are now a myriad of applications built on top of the Node.js to the point that it almost has its own ecosystem of applications and frameworks to build applications each bundled as its own package.
The problem with that arises when developers start to improve upon their packages and releases new version.
Like most package managers, npm installs the most recent (stable) release of a package.
So if you install a particular version of Express for your web application and a few years later after a new version of Express, chances are somethings in your app might break in a direct or indirect way.
To circumvent this issue, it is handy to use npm in a way that makes use of version numbers to keep track of packages.
Installing Node.js and npm
If you don’t already have Node.js installed in your system it is a good idea to start with the official LTS release.
The official repository of Ubuntu 16.04 is a bit behind from the latest stable release and we would thus add the Node.js official repo as a PPA.
$curl -sL https://deb.nodesource.com/setup_8.x | sudo -E bash -
The above command fetches a shell script from deb.nodesource.com and runs it via bash.
The script automatically adds the public keys of the repo and updates the source lists for apt package manager.
After this installing Node.js and npm is as easy as running:
$apt install nodejs
Now before we get started with installing and updating various packages, let’s make sure that the version of npm and Node.js is what we desire them to be.
$nodejs --version
$npm --version
![]() The version of npm is not the latest stable release (although we made sure that Node.js is the LTS version)
To update npm itself you can run the command:
$sudo npm install npm@latest -g
Where the -g flag makes sure that the package is installed globally, that is, for all the users.
You can only do this if you are the root user or have root previleges of the system.
After which you can see that the version number for npm has changed.
The version of npm is not the latest stable release (although we made sure that Node.js is the LTS version)
To update npm itself you can run the command:
$sudo npm install npm@latest -g
Where the -g flag makes sure that the package is installed globally, that is, for all the users.
You can only do this if you are the root user or have root previleges of the system.
After which you can see that the version number for npm has changed.
![]() If you would like to go back you can enter the previous version number in a similar fashion.
For example:
$sudo npm install npm@5.6.0 -g
If you would like to go back you can enter the previous version number in a similar fashion.
For example:
$sudo npm install npm@5.6.0 -g
Installing and updating local packages
npm offers 2 different methods for installing packages.
First is locally to be used in, say, another software that you are trying to build and the second method for installing it is to do it across the system for all users.
This is great if you are trying to install a system utility, say with a CLI interface, to be used as a basic command or a standalone software.
The local packages are directory specific.
For example, if you are building a Node.js app first make project folder or directory:
$mkdir myapp$cd myapp
Now, from inside the directory you can run an npm init command and enter appropriate values for the name, description, git repository and other relevant fields which are the metadata of the package.
Now if you install a package, such as lodash by running the following command in the directory:
$npm install lodash
npm automatically gets the latest stable release of the said package and installs it for you.
If you want to check the version number then, enter the command:
$npm list
![]() If a new version of lodash comes along and you wish to upgrade then, in the same directory, run:
$npm update
If a new version of lodash comes along and you wish to upgrade then, in the same directory, run:
$npm update
![]() Now you can see that the version number is greater than what it was before.
If something is wrong with the new version and you are facing issues, then you can always go back to previous state by simply running.
$npm install lodash@4.17.0
Of course, that would require keeping track of the previous version number.
Performing a git commit before any of the npm update actions is advisable for this reason.
Now you can see that the version number is greater than what it was before.
If something is wrong with the new version and you are facing issues, then you can always go back to previous state by simply running.
$npm install lodash@4.17.0
Of course, that would require keeping track of the previous version number.
Performing a git commit before any of the npm update actions is advisable for this reason.
Installing and updating global packages
Installing packages globally is actually much simpler since these are usually standalone utility.
A great example of such a package is gtop which is similar to the top utility in Linux.
It shows all the resource utilization in a clean and elegant way.
To install a package globally, either be the root user or prefix your command with sudo if you are a user with root previleges.
$sudo npm install gtop -g
Now, like any command utility, you can call upon gtop by running:
$gtop
![]() To exit simple hit q and you will fall back to the terminal.
Because there are too many dependencies for gtop simply running npm list -g won’t help us know the verison of gtop.
So we can try this instead:
$npm list gtop -g
To exit simple hit q and you will fall back to the terminal.
Because there are too many dependencies for gtop simply running npm list -g won’t help us know the verison of gtop.
So we can try this instead:
$npm list gtop -g
![]() If you want to update the package,then simply run:
$sudo npm update gtop -g
And you are done!
If you want to update the package,then simply run:
$sudo npm update gtop -g
And you are done!
![]()
Conclusion
So that’s basic package management if you want to use npm packages for your new software project or as a standalone system utility.
If you wish to explore npm packages you can always do so by going to their official website.
Using PostgreSQL from Node.js
PostgreSQL is a very popular open source database.
It is widely used for almost all types of applications.
Node.js has very good modules to work with PostgreSQL database.
In this article, I am going to show you how to connect to a PostgreSQL database from Node.js.
I will use a Node.js module called ‘node-postgres’ to integrate Node.js and PostgreSQL.
Let’s get started.
Pre-requisites:
First you have to make sure that Node.js, NPM and PostgreSQL are installed and running.
You can install and configure PostgreSQL from How to Install PostgreSQL on Ubuntu Linux: The Easy Way and Node.js and NPM from How to install NPM if you don’t have them installed already.
Now check whether Node.js is working with the following command:
$ node --version
![]() Now check whether NPM is working with the following command:
$ npm --version
Now check whether NPM is working with the following command:
$ npm --version
![]() Now check whether PostgreSQL is working with the following command:
Now check whether PostgreSQL is working with the following command:
![]() Now create a directory ‘postgre-node’.
Now create a directory ‘postgre-node’.
![]() Then navigate to the directory you just created with the following command:
$ cd Documents/postgre-node
Then navigate to the directory you just created with the following command:
$ cd Documents/postgre-node
![]() Then you should run the following command to create a ‘package.json’ file.
$ npm init -y
Then you should run the following command to create a ‘package.json’ file.
$ npm init -y
![]() You can see from the screenshot below that a ‘package.json’ file is created.
You can see from the screenshot below that a ‘package.json’ file is created.
![]() Now install ‘node-postgres’ Node.js module using NPM with the following command.
If you remember, ‘node-postgres’ is a PostgreSQL Client for Node.js.
$ npm install --save pg
Now install ‘node-postgres’ Node.js module using NPM with the following command.
If you remember, ‘node-postgres’ is a PostgreSQL Client for Node.js.
$ npm install --save pg
![]() ‘node-postgres’ should be installed.
‘node-postgres’ should be installed.
![]()
Using ‘node-postgres’ PostgreSQL Node.js Client:
Now inside the directory ‘postgres-node’, create a new file ‘index.js’ and write the following codes as shown in the screenshot below.
const pg = require(‘pg’);
const pool = new pg.Pool({
user: ‘sysadmin’,
host: ‘127.0.0.1’,
database: ‘mywebstore’,
password: ‘123’,
port: ‘5432’});
pool.query(“SELECT NOW()”, (err, res) => {
console.log(err, res);
pool.end();
});
Here const pg = require(‘pg’) imports ‘node-postgres’ Node.js module.
Then I created a Pool using pg.Pool with PostgreSQL login credentials.
I didn’t change anything from the article for setting up PostgreSQL in the “Pre-requisites” section.
You may take a look at it again.
I simply retrieved the current date and time using the PostgreSQL NOW() function using pool.query()method of ‘node-postgres’.
I ran SQL statements “SELECT NOW()”.
![]() Now if I save the ‘index.js’ file and run the Node.js source file with the following command:
$ node index.js
You should see current TIMESTAMP on the output as shown in the screenshot below.
Now if I save the ‘index.js’ file and run the Node.js source file with the following command:
$ node index.js
You should see current TIMESTAMP on the output as shown in the screenshot below.
![]()
Creating a Table:
Now I am going to create a new Table ‘users’ using the following query:
# CREATE TABLE users(id SERIAL PRIMARY KEY, firstName VARCHAR(40) NOT NULL,
lastName VARCHAR(40) NOT NULL)
The ‘users’ table has 3 fields, id, firstName and lastName.
id is an integer and firstName and lastName fields are strings.
The source code is given on the screenshot given below.
const pg = require(‘pg’);
const pool = new pg.Pool({
user: ‘sysadmin’,
host: ‘127.0.0.1’,
database: ‘mywebstore’,
password: ‘123’,
port: ‘5432’});
pool.query(“CREATE TABLE users(id SERIAL PRIMARY KEY, firstname VARCHAR(40) NOT NULL,
lastName VARCHAR(40) NOT NULL)”, (err, res) => {
console.log(err, res);
pool.end();
});
![]() Now if I run the code, you should see the following output.
Now if I run the code, you should see the following output.
![]() Now let’s login to the ‘mywebstore’ datastore as ‘sysadmin’ user with the following command:
$ psql -U sysadmin -h127.0.0.1 mywebstore
Now let’s login to the ‘mywebstore’ datastore as ‘sysadmin’ user with the following command:
$ psql -U sysadmin -h127.0.0.1 mywebstore
![]() It should ask you for the ‘mywebstore’ datastore’s password.
Type in the password and press <Enter>
It should ask you for the ‘mywebstore’ datastore’s password.
Type in the password and press <Enter>
![]() You should be logged into the PostgreSQL console as shown in the screen below.
You should be logged into the PostgreSQL console as shown in the screen below.
![]() Now run the following command to see all the tables:
mywebstore=> \dt
You should see ‘users’ table as shown in the screenshot.
Now run the following command to see all the tables:
mywebstore=> \dt
You should see ‘users’ table as shown in the screenshot.
![]() You can run the following command to quit PostgreSQL command line interface:
mywebstore=> \q
You can run the following command to quit PostgreSQL command line interface:
mywebstore=> \q
![]()
Inserting into Table:
Now you can insert into the ‘users’ table with the following command:
# INSERT INTO users(id, firstName, lastName) VALUES(1, ‘Shahriar’, ‘Shovon’)
The source code is given in the screenshot below.
![]() Now if you run the source code, you should see the following output.
Now if you run the source code, you should see the following output.
![]() Now you can login to the PostgreSQL command line interface with the following command like before:
$ psql -U sysadmin -h127.0.0.1 mywebstore
Now you can login to the PostgreSQL command line interface with the following command like before:
$ psql -U sysadmin -h127.0.0.1 mywebstore
![]() Run the following SQL query:
$ SELECT * FROM users;
Run the following SQL query:
$ SELECT * FROM users;
![]() You should see the data you inserted as shown in the screenshot below.
You should see the data you inserted as shown in the screenshot below.
![]()
Retrieving Data from PostgreSQL:
You simply execute the following SQL statement to retrieve the data:
# SELECT * FROM users;
The other steps are similar.
So I am not going to explain them again as it is out of scope of this article.
![]()
Updating data:
To update an existing row of PostgreSQL’s users table, run the following SQL query:
# UPDATE users SET firstName=’Shovon’, lastName=’Shahriar’ WHERE id=1
Here ‘id’ is the primary key which is unique to each column of the users table.
![]() After you run this code,
After you run this code, firstName and lastName should be updated as shown in the screenshot below.
![]()
Deleting a Column from PostgreSQL:
You can run the following SQL statement to delete a column from the PostgreSQL.
# DELETE FROM users WHERE id=1
Here id is the primary key of the users table.
![]()
![]()
![]() Once you login to the PostgreSQL command line interface, you should not find the row you just deleted.
In this case, I have an empty table.
Because I had only 1 row in the users table.
Once you login to the PostgreSQL command line interface, you should not find the row you just deleted.
In this case, I have an empty table.
Because I had only 1 row in the users table.
![]() That’s how you perform CRUD operation with PostgreSQL using Node.js, and thanks for reading this article.
That’s how you perform CRUD operation with PostgreSQL using Node.js, and thanks for reading this article.
Get started with NodeJS on Ubuntu
NodeJS is an open-source server side framework built on JavaScript under MIT (Massachusetts Institute of Technology) license.
It is mainly used for asynchronous programming and it is a very light weight framework that makes it faster than other frameworks.
It is also supported by most of the popular operating systems.
Different types of applications like web application, command line application, RESTful API etc.
can be developed with this framework.
How you can easily install and use this framework on Ubuntu are shown in this article.
NodeJS Installation Steps
1.Press Ctrl+Alt+T to open the terminal and run the following command to install NodeJS
$ sudo apt-get install -y nodejs
![]() After completing the installation process, type the following command to check the version of the installed framework.
$ nodejs -v
After completing the installation process, type the following command to check the version of the installed framework.
$ nodejs -v
![]() 2.To install necessary modules and packages you will need to install NodeJS package manager called npm.
Run the following commands to install the npm.
$ sudo npm install npm –global
2.To install necessary modules and packages you will need to install NodeJS package manager called npm.
Run the following commands to install the npm.
$ sudo npm install npm –global
![]() Check the version of npm.
$ npm -v
Check the version of npm.
$ npm -v
![]() Now, NodeJS is ready to use for developing any application.
How you can apply NodeJS as a beginner is shown in the next part of this article.
Now, NodeJS is ready to use for developing any application.
How you can apply NodeJS as a beginner is shown in the next part of this article.
Using NodeJS
You can use NodeJS for various types of application development.
As a beginner, how you can create a simple console application and a web server are shown in this part.
Creating Console application
Run the following commands to create a directory named nodejsapp for keeping your code organized, go to the newly created directory and open the nano editor for creating a JavaScript file named firstapp.js.
$ mkdir nodejsapp
$ cd nodejsapp
$ nano firstapp.js
![]() Write the following code in the file to print a output in the console.
Press Ctrl+x and then y to save the file and exit from the editor.
console.log('First NodeJS Application');
Write the following code in the file to print a output in the console.
Press Ctrl+x and then y to save the file and exit from the editor.
console.log('First NodeJS Application');
![]() Run the following command to execute the code of the firstapp.js file.
$ nodejs firstapp.js
Run the following command to execute the code of the firstapp.js file.
$ nodejs firstapp.js
![]() if you get any permission problem to execute the script then you have to run the following command for setting execution permission of firstapp.js file and again run the above command.
$ chmod +x firstapp.js
if you get any permission problem to execute the script then you have to run the following command for setting execution permission of firstapp.js file and again run the above command.
$ chmod +x firstapp.js
Creating Local Web Server
JavaScript is a popular client side scripting language which doesn’t require any web server to run.
Web server is required to run any server side scripting language like php, asp etc.
and you need to install a particular web server to run server side scripts.
Using NodeJS framework, you can easily implement a local web server which can be used to run server side script.
Open nano editor to create a new JavaScript file named server.js that will be used to create a local web server.
$ nano server.js
![]() Add the following code in the file to create the server connection on port number 6060.
According to this code, NodeJS will listen for server connection at localhost:6060 and if the connection can be established successfully then 200 code will be generated and ‘NodeJS App’ will be shown as output.
var http = require('http');
var server = http.createServer(function(request response) {
resquest.writeHead(200,{'Content-Type': 'text/plain'});
response.end('NodeJS App');});
server.listen(6060);
console.log('Server is running at http://localhost:6060/');
Add the following code in the file to create the server connection on port number 6060.
According to this code, NodeJS will listen for server connection at localhost:6060 and if the connection can be established successfully then 200 code will be generated and ‘NodeJS App’ will be shown as output.
var http = require('http');
var server = http.createServer(function(request response) {
resquest.writeHead(200,{'Content-Type': 'text/plain'});
response.end('NodeJS App');});
server.listen(6060);
console.log('Server is running at http://localhost:6060/');
![]() Save the file by pressing Ctrl+x and y.
Now, execute the following command to run the web server.
If the code executes properly then the message ‘Server is running at http://localhost:6060’ will be displayed in the console.
$ nodejs server.js
Save the file by pressing Ctrl+x and y.
Now, execute the following command to run the web server.
If the code executes properly then the message ‘Server is running at http://localhost:6060’ will be displayed in the console.
$ nodejs server.js
![]() Open any browser to check the web server code is working properly or not.
The script will return ‘NodeJS App’as content in the browser if the above code executes properly.
Type the following URL in the address bar for checking.
http://localhost:6060
Open any browser to check the web server code is working properly or not.
The script will return ‘NodeJS App’as content in the browser if the above code executes properly.
Type the following URL in the address bar for checking.
http://localhost:6060
![]() In the above example, a simple static text is displayed in the browser which is added as the content with response.
But generally, any index file displays when the base URL executes.
So, how you can attach any html file in the server connection script is shown in the next part.
At first, create a very simple html file named index.html using Text Editor with the following code and save it in the nodejsapp directory which is created previously.
<html><body>
<center>
<h2>Testing NodeJS Application </h2>
<p> This is my first web application using NodeJS </p>
</center></body></html>
In the above example, a simple static text is displayed in the browser which is added as the content with response.
But generally, any index file displays when the base URL executes.
So, how you can attach any html file in the server connection script is shown in the next part.
At first, create a very simple html file named index.html using Text Editor with the following code and save it in the nodejsapp directory which is created previously.
<html><body>
<center>
<h2>Testing NodeJS Application </h2>
<p> This is my first web application using NodeJS </p>
</center></body></html>
![]() Now, create another JavaScript file named server2.js with the following code to view index.html file, after creating web server connection.
Here, fs module is used to read the index.html file.
Three types of outputs can be generated based on the code.
If the connection establishes properly and index.html file exists then it will load the content of index.html file in the browser.
If the connection establishes but index.html file does not exist on the current location then ‘Page is not found’ message will print.
If the connection establishes and index.html file also exists but requested url is not correct then ‘Default content’ text will display as by default content.
Port number 5000 is set as listening port here.
So when web server connection establishes successfully then the message ‘Server is listening on 5000’ will show in the console.
var http = require('http');
var fs = require('fs');
var server = http.createServer(function (request, response) {
if (request.url === "/") {
fs.readFile("index.html", function (error, pgResp) {
if (error) {
response.writeHead(404);
response.write('Page is not found');
} else {
response.writeHead(200, { 'Content-Type': 'text/html' });
response.write(pgResp);
}
response.end();
});
} else {
response.writeHead(200, { 'Content-Type': 'text/html' });
response.write('<h1>Default Content</h1>');
response.end();
}});
server.listen(5000);
console.log('Server is listening on 5000');
Now, create another JavaScript file named server2.js with the following code to view index.html file, after creating web server connection.
Here, fs module is used to read the index.html file.
Three types of outputs can be generated based on the code.
If the connection establishes properly and index.html file exists then it will load the content of index.html file in the browser.
If the connection establishes but index.html file does not exist on the current location then ‘Page is not found’ message will print.
If the connection establishes and index.html file also exists but requested url is not correct then ‘Default content’ text will display as by default content.
Port number 5000 is set as listening port here.
So when web server connection establishes successfully then the message ‘Server is listening on 5000’ will show in the console.
var http = require('http');
var fs = require('fs');
var server = http.createServer(function (request, response) {
if (request.url === "/") {
fs.readFile("index.html", function (error, pgResp) {
if (error) {
response.writeHead(404);
response.write('Page is not found');
} else {
response.writeHead(200, { 'Content-Type': 'text/html' });
response.write(pgResp);
}
response.end();
});
} else {
response.writeHead(200, { 'Content-Type': 'text/html' });
response.write('<h1>Default Content</h1>');
response.end();
}});
server.listen(5000);
console.log('Server is listening on 5000');
![]() Save the file and exit from the editor.
Run the server by executing the following command.
$ nodejs server2.js
Save the file and exit from the editor.
Run the server by executing the following command.
$ nodejs server2.js
![]() Type the following URL to view the content of index.html file in the browser.
http://localhost:5000
Type the following URL to view the content of index.html file in the browser.
http://localhost:5000
![]() Now, insert an invalid URL in the browser and check the output.
http://localhost:5000/test
Now, insert an invalid URL in the browser and check the output.
http://localhost:5000/test
![]() Now modify server2.js file and set the file name as index2.html that does not exit and restart the server.
Type the base URL again to check the output.
Now modify server2.js file and set the file name as index2.html that does not exit and restart the server.
Type the base URL again to check the output.
![]() NodeJS is a demanding framework and you can perform many tasks using it.
NodeJS is a demanding framework and you can perform many tasks using it.
|

 After clicking ok the page will load..

 After resizing

 After scrolling.

 After selecting.


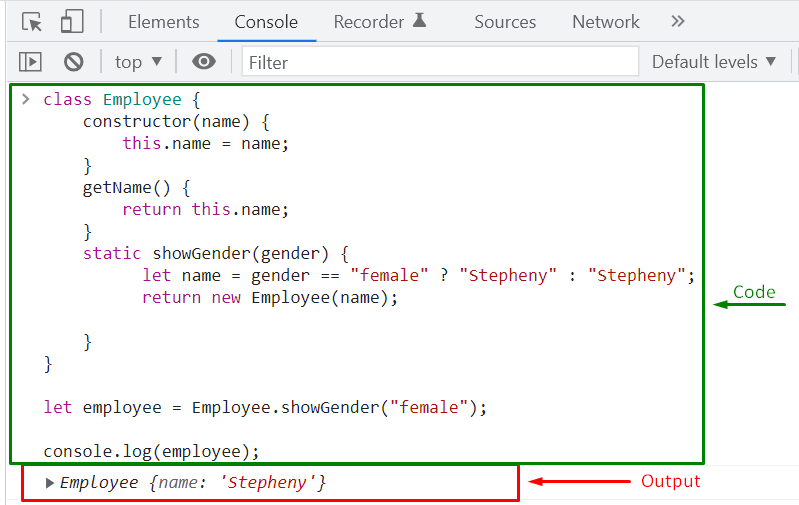 We have already mentioned, you have to invoke the static method with the class object, not with the class instance.
For instance, we have created an “employee1” instance of the Employee class.
Now, when we invoke our showGender() static method with the “employee1” instance, it will give us an error:
let employee1 = new Employee('Jack Smith');
let info = employee1.showGender("male");
As you can see, we cannot access the static method showGender() with the “employee1” instance, which is why we are getting the following error:
We have already mentioned, you have to invoke the static method with the class object, not with the class instance.
For instance, we have created an “employee1” instance of the Employee class.
Now, when we invoke our showGender() static method with the “employee1” instance, it will give us an error:
let employee1 = new Employee('Jack Smith');
let info = employee1.showGender("male");
As you can see, we cannot access the static method showGender() with the “employee1” instance, which is why we are getting the following error:

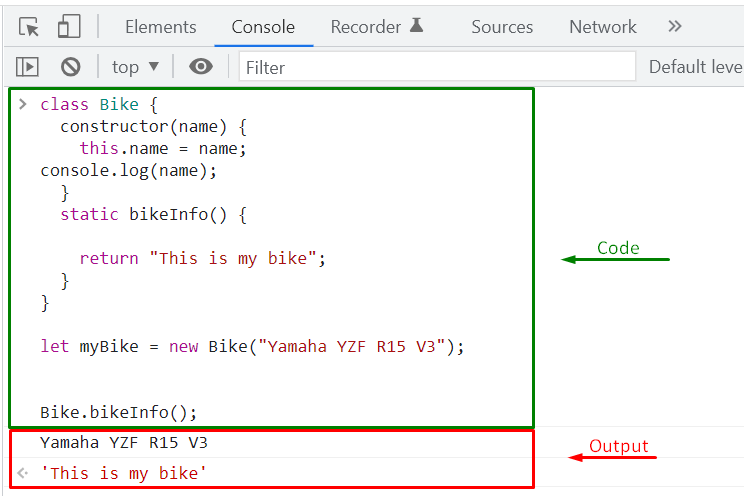 Whereas invoking the static bikeInfo() method with the created Bike class instance will display an error:
myBike.bikeInfo();
Whereas invoking the static bikeInfo() method with the created Bike class instance will display an error:
myBike.bikeInfo();
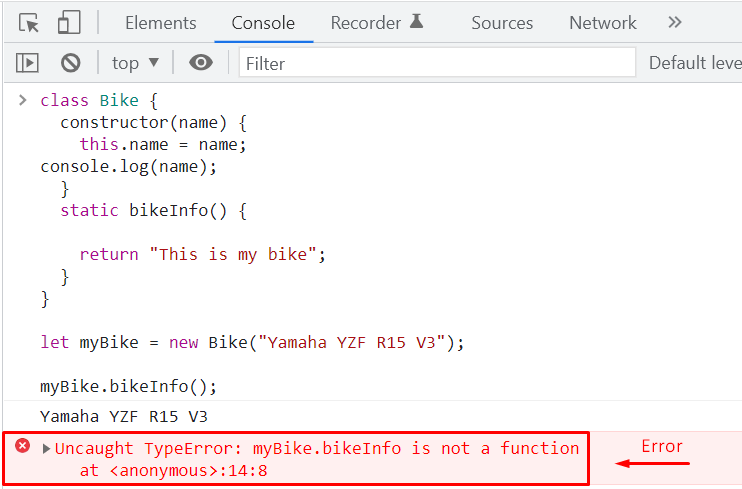 To utilize the created instance of the Bike class inside the “bikeInfo()” static method, we can pass “myBike” as a parameter to it.
Look at the below-given program for the illustration:
class Bike {
constructor(name) {this.name = name;}static bikeInfo(x) {return "This is my Bike: " + x.name;}}
After defining the parameterized static method, we will create a “myBike” instance of the Bike class:
let myBike = new Bike("Yamaha YZF R15 V3");
Next, we will invoke the “bikeInfo” static method while passing “myBike” instance as an argument:
Bike.bikeInfo(myBike);
The output will display “This is my Bike:” string with the bike “name” of our “myBike” instance:
To utilize the created instance of the Bike class inside the “bikeInfo()” static method, we can pass “myBike” as a parameter to it.
Look at the below-given program for the illustration:
class Bike {
constructor(name) {this.name = name;}static bikeInfo(x) {return "This is my Bike: " + x.name;}}
After defining the parameterized static method, we will create a “myBike” instance of the Bike class:
let myBike = new Bike("Yamaha YZF R15 V3");
Next, we will invoke the “bikeInfo” static method while passing “myBike” instance as an argument:
Bike.bikeInfo(myBike);
The output will display “This is my Bike:” string with the bike “name” of our “myBike” instance:
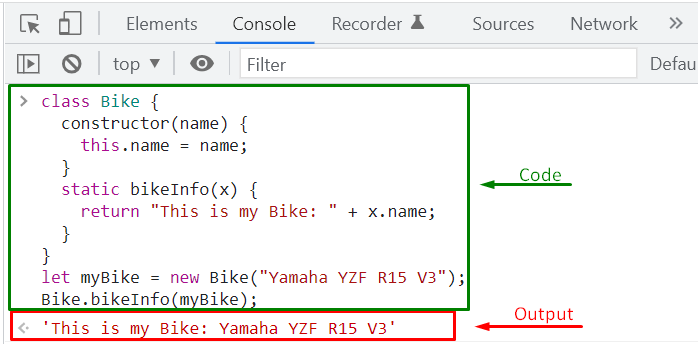
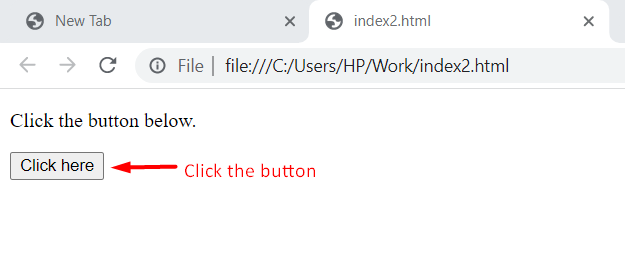 After the button is clicked, the message will appear.
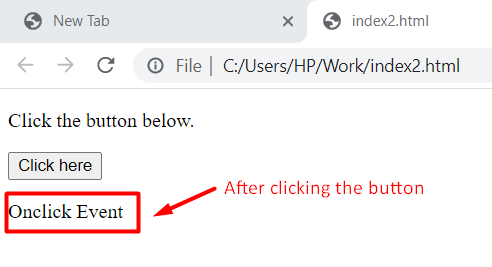
 Now when you will right-click the text, the dialog box will appear.
 After clicking OK, the context menu will open.

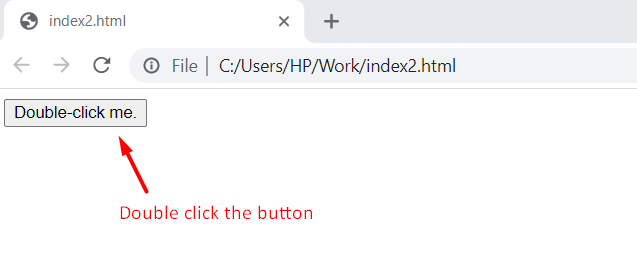 After double clicking the button.
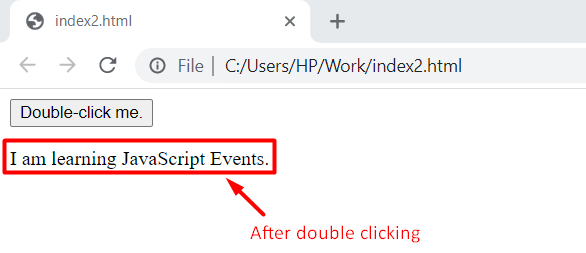
 After right-clicking the mouse while the cursor stays on the button.
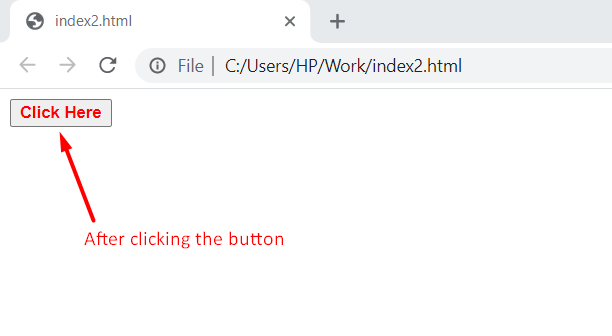
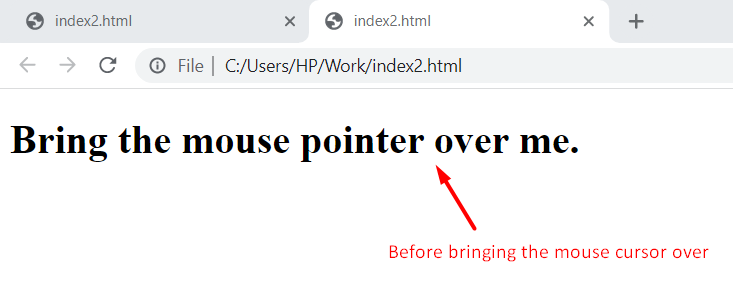 After bringing the mouse cursor over the text.

 The color will change when mouse pointer moves away.
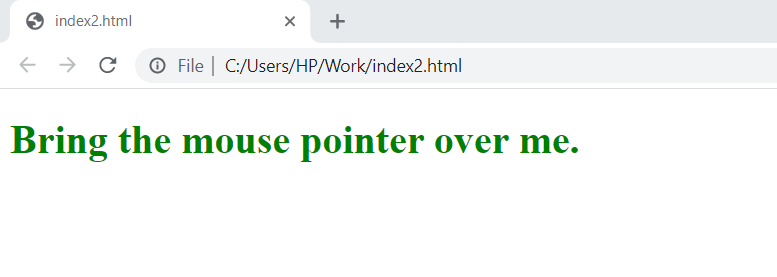
 After.
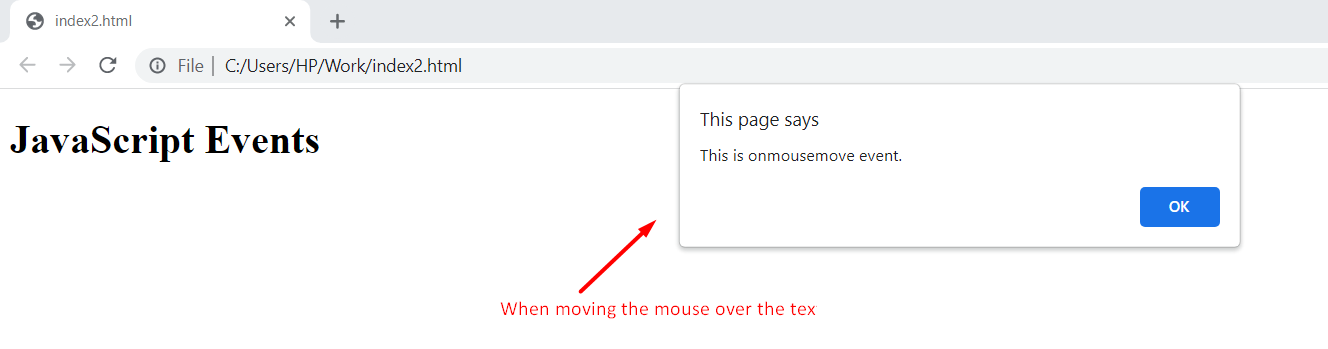
 After
After

 After
After

 After releasing the button while keep the mouse pointer on it.
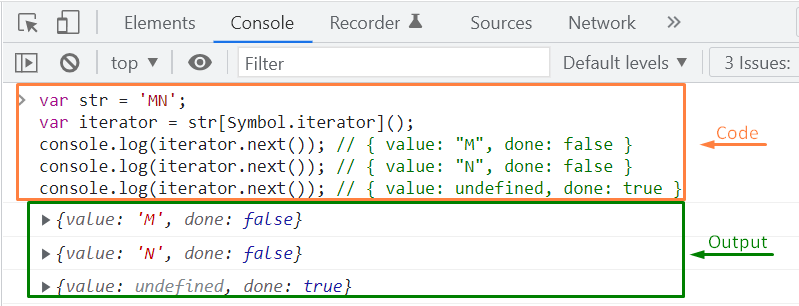
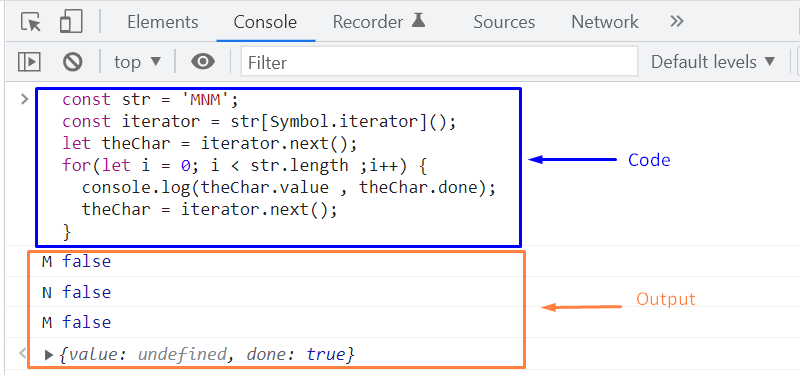
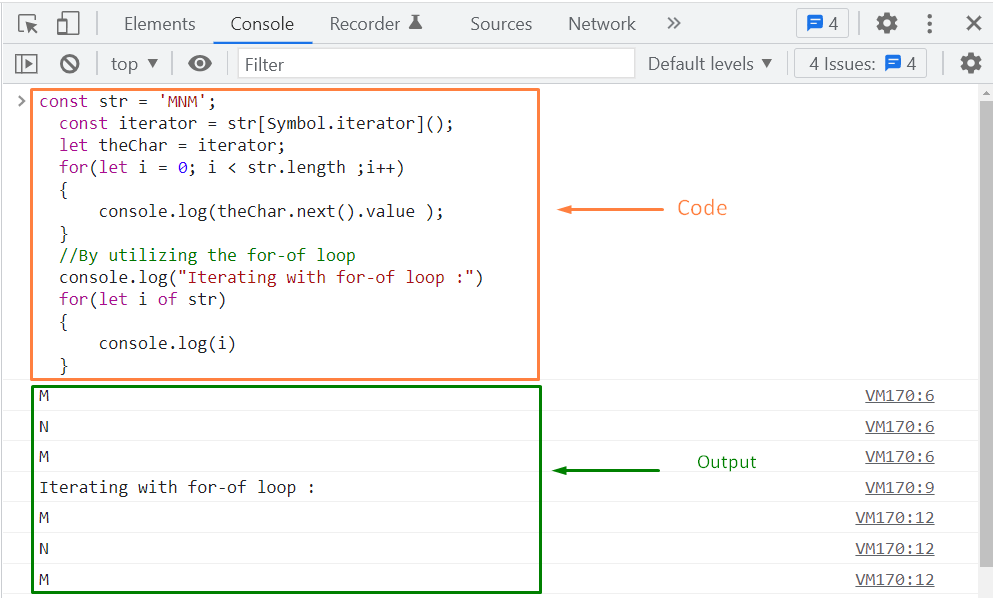
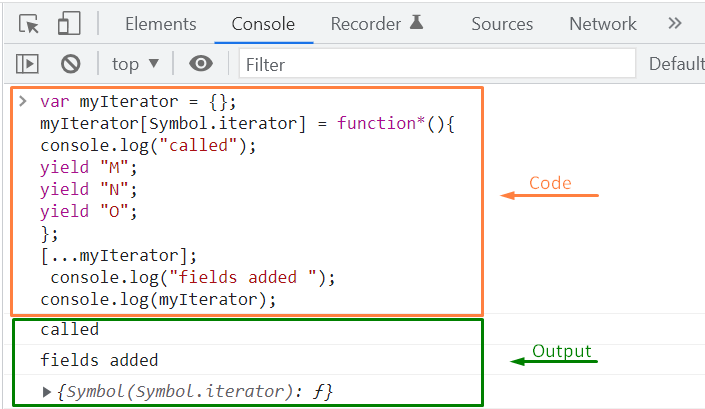
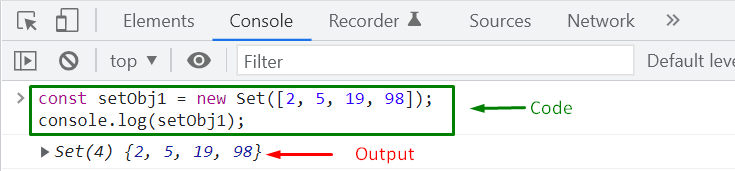 You can also create an empty Set object in the following way:
const setObj2 = new Set();
console.log(setObj2);
The output will declare that “setObj2” is an empty Set object with size “0”:
You can also create an empty Set object in the following way:
const setObj2 = new Set();
console.log(setObj2);
The output will declare that “setObj2” is an empty Set object with size “0”:
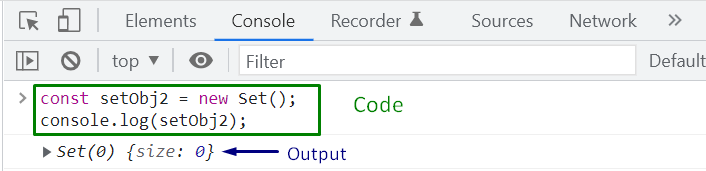 As we have already mentioned, Set comprises unique values.
So, when adding repeated values or elements, remember that the Set object will remove the duplicated entries and return the unique set of values.
We will create a new Set object: “setObj3” and specify repeated elements values in the constructor.
After that, we will call the “console.log()” function to check the elements stored in the setObj3:
const setObj3 = new Set([4, 7, 9, 2, 1, 4, 7, 1]);
console.log(setObj3);
You can see from the output that setObj3 comprises only unique values:
As we have already mentioned, Set comprises unique values.
So, when adding repeated values or elements, remember that the Set object will remove the duplicated entries and return the unique set of values.
We will create a new Set object: “setObj3” and specify repeated elements values in the constructor.
After that, we will call the “console.log()” function to check the elements stored in the setObj3:
const setObj3 = new Set([4, 7, 9, 2, 1, 4, 7, 1]);
console.log(setObj3);
You can see from the output that setObj3 comprises only unique values:
 At this point, you must be wondering that what if I want to create a Set that will have mixed data types? Yes, you can also store elements having different data types in your Set object.
For instance, we want to add a string, some numeric values, and an array as our Set elements.
So, we will pass the desired values such as “linuxhint” string with the quotation marks, then “2” and “4” numeric values, and lastly an array “[66,99,100]” enclosed in “[ ]” brackets, all together in the Set constructor:
const setObj4 = new Set(["linuxhint", 2, 4, [66, 99, 100]]);
console.log(setObj4);
After executing the above-given code, a mixed date type Set Object “setObj4” will be created successfully:
At this point, you must be wondering that what if I want to create a Set that will have mixed data types? Yes, you can also store elements having different data types in your Set object.
For instance, we want to add a string, some numeric values, and an array as our Set elements.
So, we will pass the desired values such as “linuxhint” string with the quotation marks, then “2” and “4” numeric values, and lastly an array “[66,99,100]” enclosed in “[ ]” brackets, all together in the Set constructor:
const setObj4 = new Set(["linuxhint", 2, 4, [66, 99, 100]]);
console.log(setObj4);
After executing the above-given code, a mixed date type Set Object “setObj4” will be created successfully:


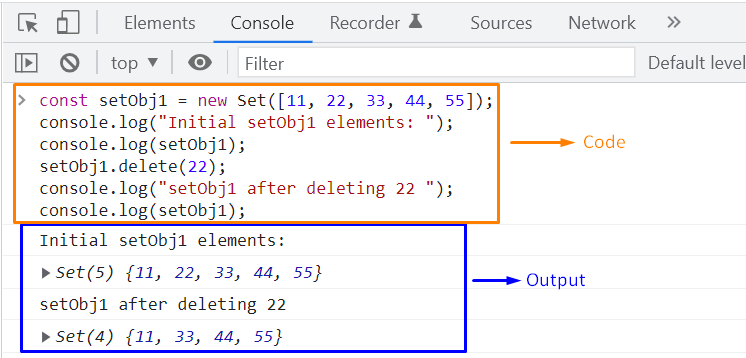

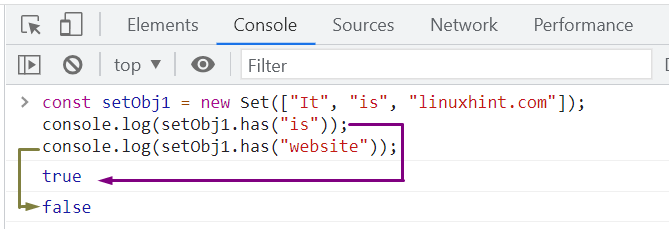
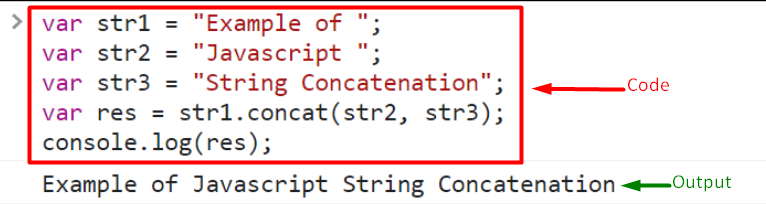
 Not even this, you can also concatenate strings by using shorthand += operator.
let str = 'Best';
str += ' ';
str += 'Friends';//Output: Best Friends
Output
Not even this, you can also concatenate strings by using shorthand += operator.
let str = 'Best';
str += ' ';
str += 'Friends';//Output: Best Friends
Output

 Another example of the template literal for string concatenation is given below, where we are merging three strings using template literals:
let str1 = 'String Concatenation';
let str2 = 'Example in';
let str3 = 'JavaScript';
let strJoined = `${str1} ${str2} ${str3}`;
console.log(strJoined);//Output: String Concatenation Example
Another example of the template literal for string concatenation is given below, where we are merging three strings using template literals:
let str1 = 'String Concatenation';
let str2 = 'Example in';
let str3 = 'JavaScript';
let strJoined = `${str1} ${str2} ${str3}`;
console.log(strJoined);//Output: String Concatenation Example
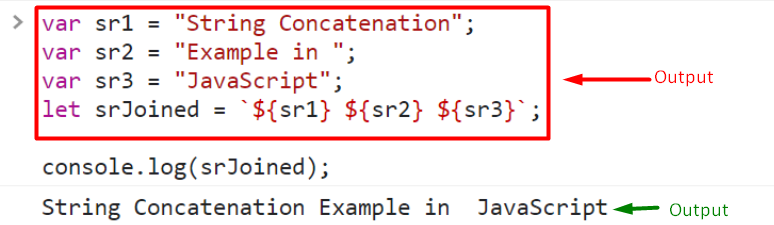 THis is how you can concatenate strings using template literals.
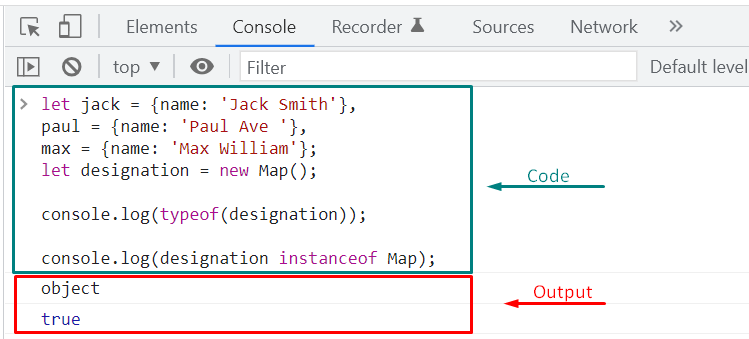
 As the set() map method is chainable, we will utilize it to assign multiple designations at once:
designation.set(paul, 'admin')
.set(max, 'subscriber');
We have successfully input three entries for “jack”, “paul” and “max” with their related designation or post:
As the set() map method is chainable, we will utilize it to assign multiple designations at once:
designation.set(paul, 'admin')
.set(max, 'subscriber');
We have successfully input three entries for “jack”, “paul” and “max” with their related designation or post:

 We will now view the designation of “paul” and “max” by executing the following lines of the code:
console.log(designation.get(paul));
console.log(designation.get(max));
The output shows that Paul’s designation is “admin” and the designation of Max is “subscriber”:
We will now view the designation of “paul” and “max” by executing the following lines of the code:
console.log(designation.get(paul));
console.log(designation.get(max));
The output shows that Paul’s designation is “admin” and the designation of Max is “subscriber”:

 If you search for a key that is not present in the designation map object, the has() method will return “false” as its value:
designation.has(john);
If you search for a key that is not present in the designation map object, the has() method will return “false” as its value:
designation.has(john);


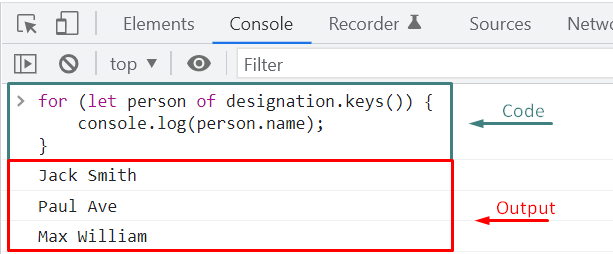


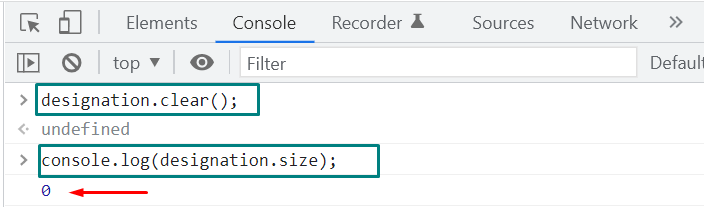
 All of the functions, variables, and arguments defined in the outer function are accessible to the created nested function.
This ability is known as “Lexical scope”, where the inner function can access the scope of the parent or outer function.
We will not pass any arguments to our showMessage() inner function in the below-given example.
What we will do is to utilize the arguments “x” and “y” of our “addNumber()” outer function and the “sum” variable:
function addNumber(x,y){
function showMessage()
{
console.log(`sum of %d + %d is %d`,x ,y,sum);
}
let sum=x+y;
showMessage()}
Now, we will invoke the outer function “AddNumber()” and pass the “4” and “6” as arguments:
addNumber(4,6)
Have a look at the below-given output, which signifies that we have successfully accessed the “sum” variable, “x”, and “y” argument of the addNumber outer function in the showMessage() function:
All of the functions, variables, and arguments defined in the outer function are accessible to the created nested function.
This ability is known as “Lexical scope”, where the inner function can access the scope of the parent or outer function.
We will not pass any arguments to our showMessage() inner function in the below-given example.
What we will do is to utilize the arguments “x” and “y” of our “addNumber()” outer function and the “sum” variable:
function addNumber(x,y){
function showMessage()
{
console.log(`sum of %d + %d is %d`,x ,y,sum);
}
let sum=x+y;
showMessage()}
Now, we will invoke the outer function “AddNumber()” and pass the “4” and “6” as arguments:
addNumber(4,6)
Have a look at the below-given output, which signifies that we have successfully accessed the “sum” variable, “x”, and “y” argument of the addNumber outer function in the showMessage() function:
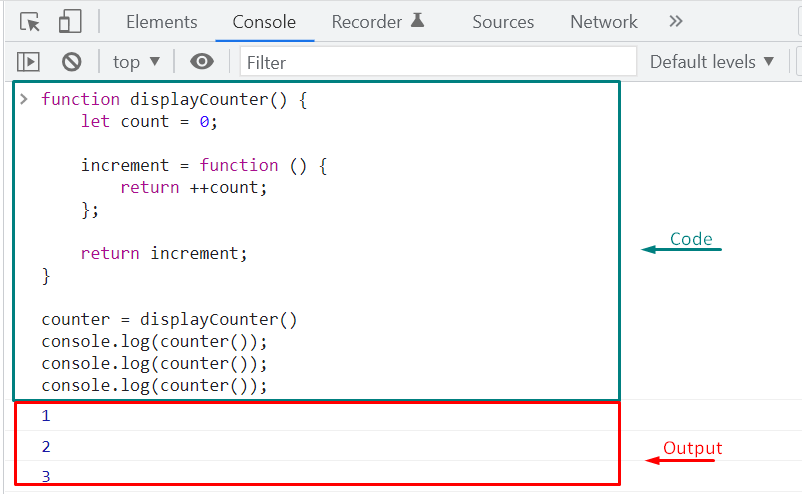
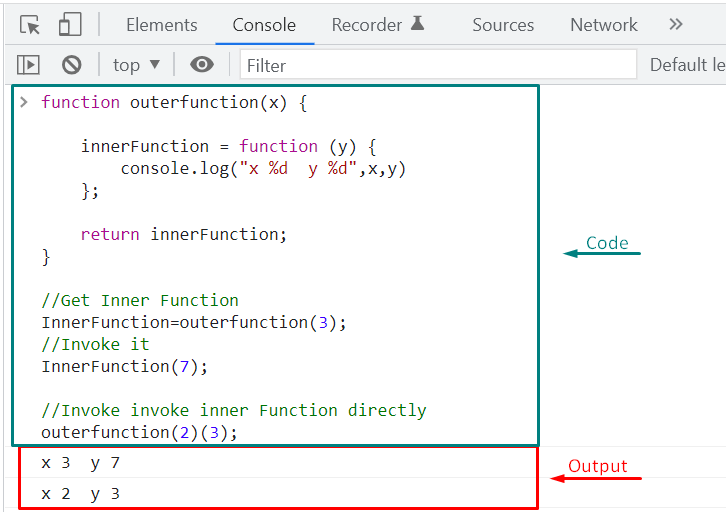
 Invoking the displayFunc() function or invoking the call() method for the displayFunc() function will show the same output:
displayFunc.call();
Invoking the displayFunc() function or invoking the call() method for the displayFunc() function will show the same output:
displayFunc.call();
 Inside a function, “this” value is set to the global object by default, which is “global” on node.js and “window” on web browsers.
Executing the below-given function will help you understand this concept:
function displayFunc() {
console.log(this);}
Upon calling the displayFunc(), the value of “this” which is set to the “window” object, will be returned:
displayFunc();
Inside a function, “this” value is set to the global object by default, which is “global” on node.js and “window” on web browsers.
Executing the below-given function will help you understand this concept:
function displayFunc() {
console.log(this);}
Upon calling the displayFunc(), the value of “this” which is set to the “window” object, will be returned:
displayFunc();


 In the other case, you can also invoke the “welcome()” function with the “call()” method while passing the “message” object as the value of “this”:
welcome.call(message,'Mark');
Upon doing so, you will see a string “Hi Mark” as output:
In the other case, you can also invoke the “welcome()” function with the “call()” method while passing the “message” object as the value of “this”:
welcome.call(message,'Mark');
Upon doing so, you will see a string “Hi Mark” as output:

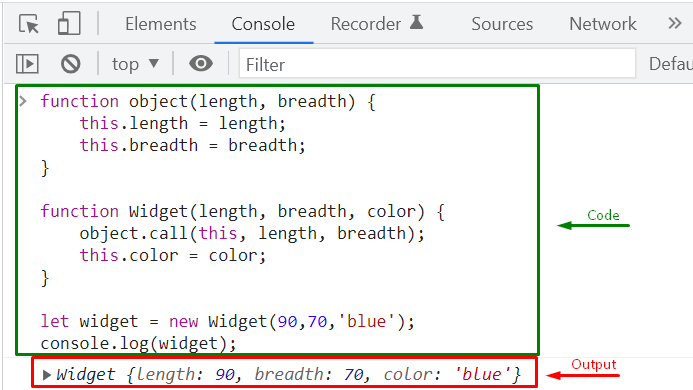

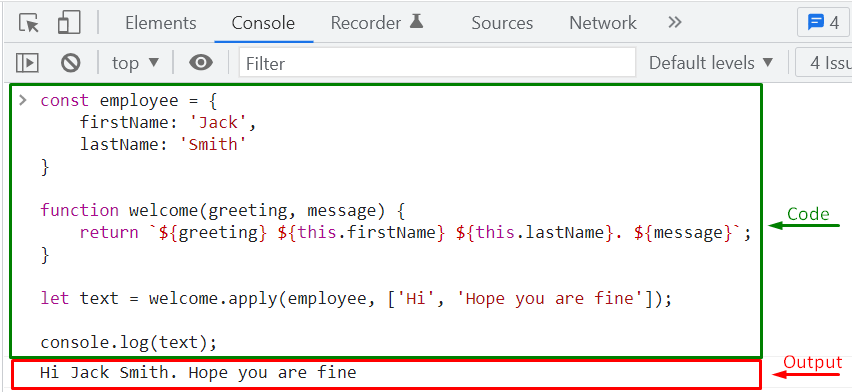 In case of using the call() method, you have to pass all the required arguments separately:
let text = welcome.call(employee, 'Hi', 'Hope you are fine');
console.log(text);
In case of using the call() method, you have to pass all the required arguments separately:
let text = welcome.call(employee, 'Hi', 'Hope you are fine');
console.log(text);


 Because the HTML page is the default global object, the “multiplyFunc()” functionbelongs to the HTML page.
The browser window is the page object in a browser.
So, the function “multiplyFunc()” will automatically be converted to a window function.
The previously given multiplyFunc() function and the window.multipleFunc() will show you the same output:
function multiplyFunc(x, y) {
return x * y;}
window.multiplyFunc(2, 6);
As you can see that after calling the window.multiplyFunc() and passing “2” and “6” as arguments, the function has returned “12” as output:
Because the HTML page is the default global object, the “multiplyFunc()” functionbelongs to the HTML page.
The browser window is the page object in a browser.
So, the function “multiplyFunc()” will automatically be converted to a window function.
The previously given multiplyFunc() function and the window.multipleFunc() will show you the same output:
function multiplyFunc(x, y) {
return x * y;}
window.multiplyFunc(2, 6);
As you can see that after calling the window.multiplyFunc() and passing “2” and “6” as arguments, the function has returned “12” as output:

 Now, we will change the function body to “return this” so that it outputs the owner object:
const employee = {
firstName:"Jack",
lastName: "Smith",
fullName: function () {
return this; }}
Invoke the fullName() function as an “employee” object method in the following way:
employee.fullName();
The output will let you know about the employee object properties such as firstName, lastName, and their values.
Note that for fullName object property value, “f” is returned, which indicates that fullName is a function:
Now, we will change the function body to “return this” so that it outputs the owner object:
const employee = {
firstName:"Jack",
lastName: "Smith",
fullName: function () {
return this; }}
Invoke the fullName() function as an “employee” object method in the following way:
employee.fullName();
The output will let you know about the employee object properties such as firstName, lastName, and their values.
Note that for fullName object property value, “f” is returned, which indicates that fullName is a function:
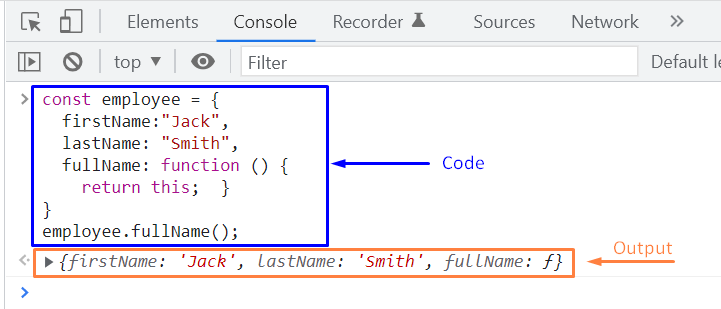
 As you can verify by looking at the output screenshot attached above that we have got our desired substring from the original string.
 The screenshot above shows the relevant code along with the output.
 Now we will discuss the next string extraction method.
 A few things that should be kept in mind while using the substring( ) method are as follows:
 Now we want to change this dog image to a cat image.
We use the following code.
<script>
document.getElementById("image1").src="snow.jpeg";
</script>
The full example with output is shown below.
<!DOCTYPE html>
<html>
<body>
<img id= "image1" src= "nature.jpg">
<script>
document.getElementById("image1").src="snow.jpg";
</script>
<p>The nature image is changed to snow image</p>
</body>
</html>
Now we want to change this dog image to a cat image.
We use the following code.
<script>
document.getElementById("image1").src="snow.jpeg";
</script>
The full example with output is shown below.
<!DOCTYPE html>
<html>
<body>
<img id= "image1" src= "nature.jpg">
<script>
document.getElementById("image1").src="snow.jpg";
</script>
<p>The nature image is changed to snow image</p>
</body>
</html>

 After changing the color.
 Example 2Suppose, you want to change the color as well as the font-family of <h1> element using its id.
<!DOCTYPE html><html><body>
<h1 id="head1">Learning HTML DOM</h1>
<h1 id="head2">Learning HTML DOM</h1>
<script>
document.getElementById("head2").style.color = "blue";
document.getElementById("head2").style.fontFamily = "Arial";
</script></body></html>
In the above example, we first simply defined two <h1> elements and assigned them a unique id.
<h1 id="head1">Learning HTML DOM</h1>
<h1 id="head2">Learning HTML DOM</h1>
We then changed the color and the font family of <h1> element with id=”head2″.
In the following piece of code where we’re simply getting our desired element by its id and changing its color to blue and font family to arial.
GeSHi Error: GeSHi could not find the language jacascript (using path /home/nginx/domains/linuxhint.com/public/wp-content/plugins/codecolorer/lib/geshi/) (code 2)
Here is how it looked before changing the color and the font family.
Example 2Suppose, you want to change the color as well as the font-family of <h1> element using its id.
<!DOCTYPE html><html><body>
<h1 id="head1">Learning HTML DOM</h1>
<h1 id="head2">Learning HTML DOM</h1>
<script>
document.getElementById("head2").style.color = "blue";
document.getElementById("head2").style.fontFamily = "Arial";
</script></body></html>
In the above example, we first simply defined two <h1> elements and assigned them a unique id.
<h1 id="head1">Learning HTML DOM</h1>
<h1 id="head2">Learning HTML DOM</h1>
We then changed the color and the font family of <h1> element with id=”head2″.
In the following piece of code where we’re simply getting our desired element by its id and changing its color to blue and font family to arial.
GeSHi Error: GeSHi could not find the language jacascript (using path /home/nginx/domains/linuxhint.com/public/wp-content/plugins/codecolorer/lib/geshi/) (code 2)
Here is how it looked before changing the color and the font family.
 After changing the color and font family it looks like this.
 After executing the provided JavaScript program, you will be asked to wait for “7 seconds”:
 After 7 seconds, the string “Asynchronous Execution” will be shown as output:

 Execution of the above-given code will show you the following output:
 Now, on purpose, we will change the value of variable “a” to check if the callback for the failure of the promise is working or not:
 As you can see, the callback for the failure is displaying “Error Encountered” string according to our JavaScript program coding:

 Here is the output we got from executing the above-given example:

 The “extends” keyword is used to establish the class inheritance between parent and child class, and the “super” keyword is utilized to access the methods and properties of the parent class.
 As super() initializes the “this” object, you must invoke it first before accessing it.
However, if you try to access “this” before executing super(), it will give you an error.
For instance, to initialize the “age” property of the “Employee” class in its constructor, we will call the “super()” first and then access the “this” object:
class Employee extends Person {
constructor(name, age) {super(name);this.age = age;}
display() {
console.log("I am an Employee");}
getAge() {return this.age;}}
Now, at the time of creating the “employee1” object of the “Employee” class, we will pass “Jack” as name and “29” as age argument to the constructor:
let employee1 = new Employee('Jack', 29);
Then, after initialization, we will invoke the “getAge()” method of our Employee class to view the age property value:
console.log(employee1.getAge());
Check out the output of the above-given example:
As super() initializes the “this” object, you must invoke it first before accessing it.
However, if you try to access “this” before executing super(), it will give you an error.
For instance, to initialize the “age” property of the “Employee” class in its constructor, we will call the “super()” first and then access the “this” object:
class Employee extends Person {
constructor(name, age) {super(name);this.age = age;}
display() {
console.log("I am an Employee");}
getAge() {return this.age;}}
Now, at the time of creating the “employee1” object of the “Employee” class, we will pass “Jack” as name and “29” as age argument to the constructor:
let employee1 = new Employee('Jack', 29);
Then, after initialization, we will invoke the “getAge()” method of our Employee class to view the age property value:
console.log(employee1.getAge());
Check out the output of the above-given example:

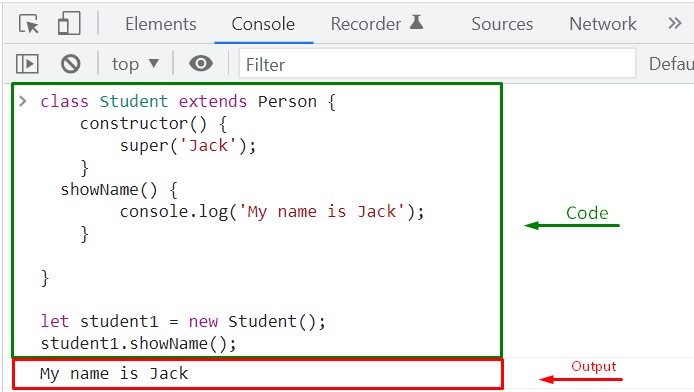 If you want to invoke the parent class method having the same name, in the child class, you have to write out “super.methodName(arguments)”.
For instance, we will call the “showName()” method of the “Person” (parent) class by adding the line “super.showName()” in our child class showName() method:
showName() {
super.showName();
console.log('child function');
}
Now, when the child class object invokes the “showName()”, it will go through the body of the child class showName() method, then call the parent class showName() method.
After completing the execution of the parent class showName() method, the control will be moved back to the showName() method of the child class:
let student1 = new Student();
student1.showName();
In the following image, you can see the output of the “showName()” method:
If you want to invoke the parent class method having the same name, in the child class, you have to write out “super.methodName(arguments)”.
For instance, we will call the “showName()” method of the “Person” (parent) class by adding the line “super.showName()” in our child class showName() method:
showName() {
super.showName();
console.log('child function');
}
Now, when the child class object invokes the “showName()”, it will go through the body of the child class showName() method, then call the parent class showName() method.
After completing the execution of the parent class showName() method, the control will be moved back to the showName() method of the child class:
let student1 = new Student();
student1.showName();
In the following image, you can see the output of the “showName()” method:
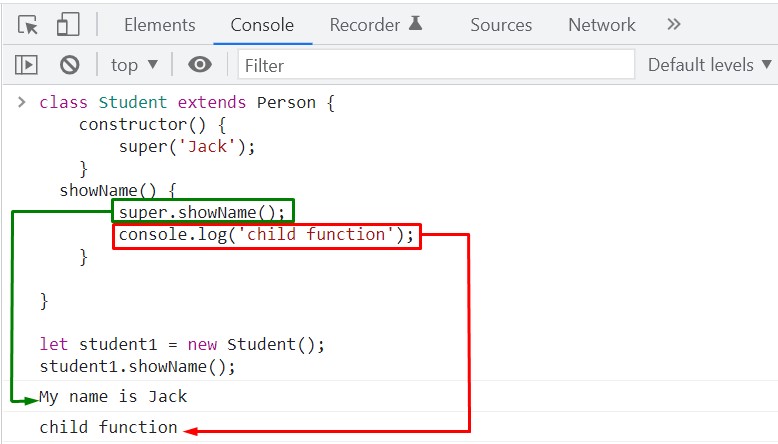
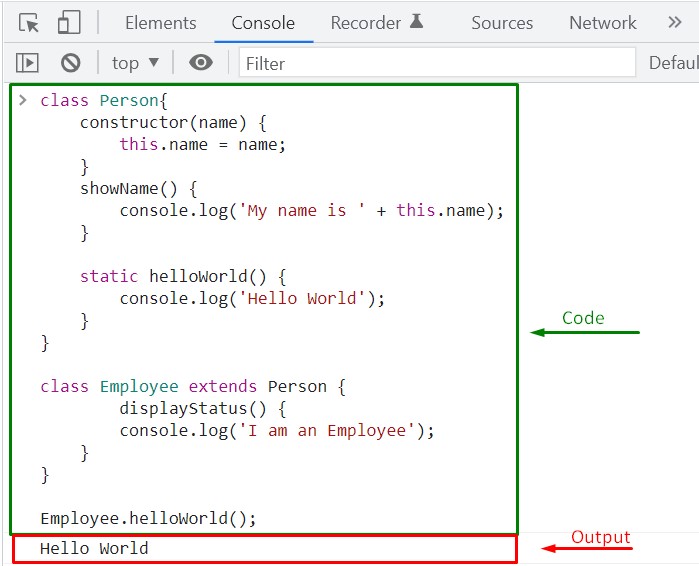
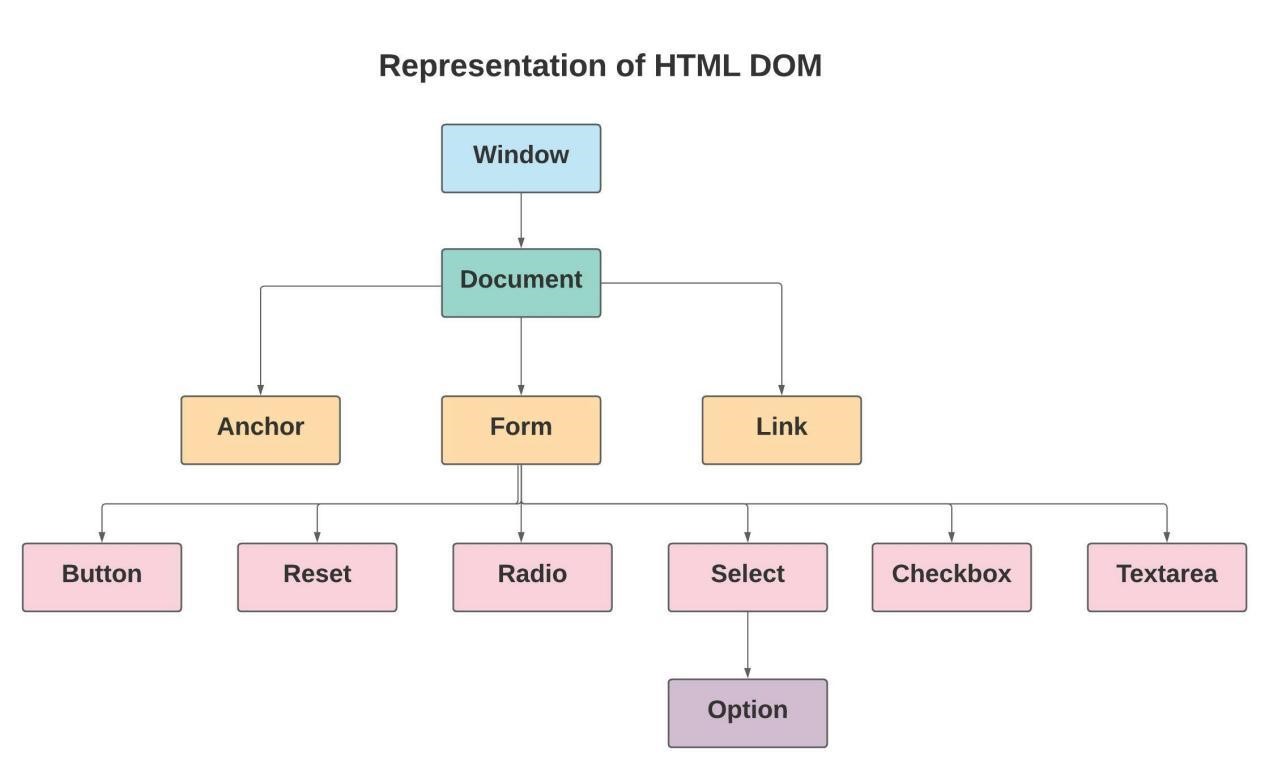 Window Object: You will always see the “Window Object” at the top of the DOM hierarchy.
Document Object: When you load an HTML document in a browser, it is converted into a document object.
Anchor Object: href tags are utilized for representing the Anchor Objects.
Form Object: form tags are utilized for representing the Form Objects.
Link Object: link tags are utilized for representing the Link Objects.
Form Control Elements: Forms can also have other control elements such as Buttons, Reset, radio buttons, Textarea, Checkboxes.
Window Object: You will always see the “Window Object” at the top of the DOM hierarchy.
Document Object: When you load an HTML document in a browser, it is converted into a document object.
Anchor Object: href tags are utilized for representing the Anchor Objects.
Form Object: form tags are utilized for representing the Form Objects.
Link Object: link tags are utilized for representing the Link Objects.
Form Control Elements: Forms can also have other control elements such as Buttons, Reset, radio buttons, Textarea, Checkboxes.
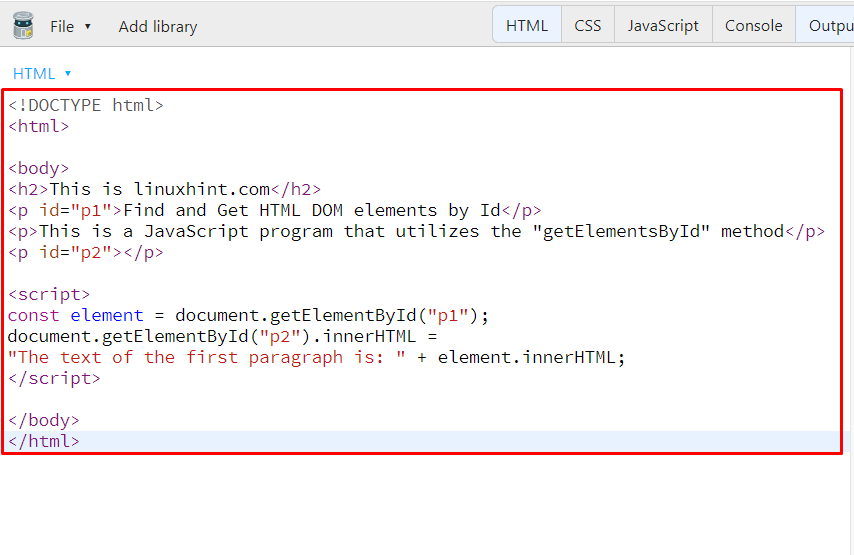 Execution of the above-given JavaScript program will show the following output:


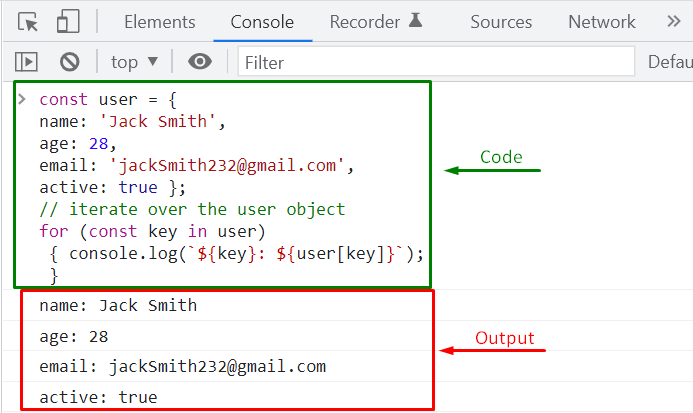
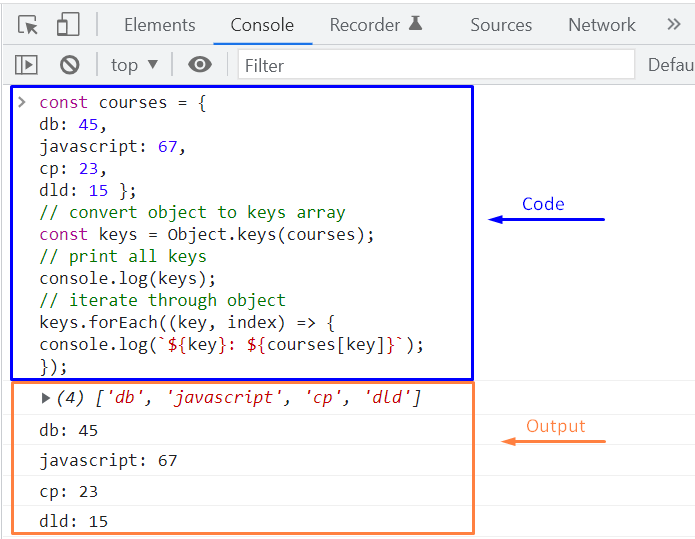
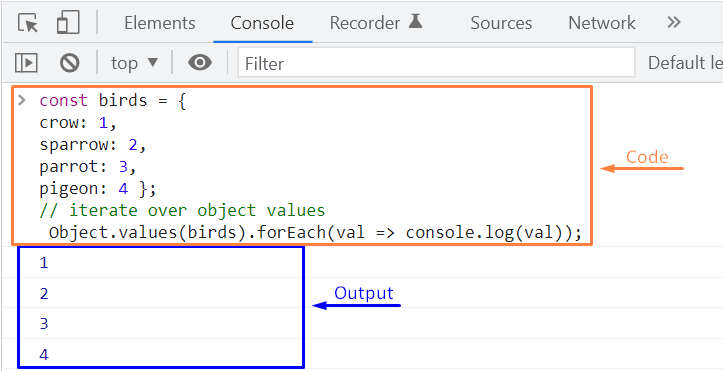
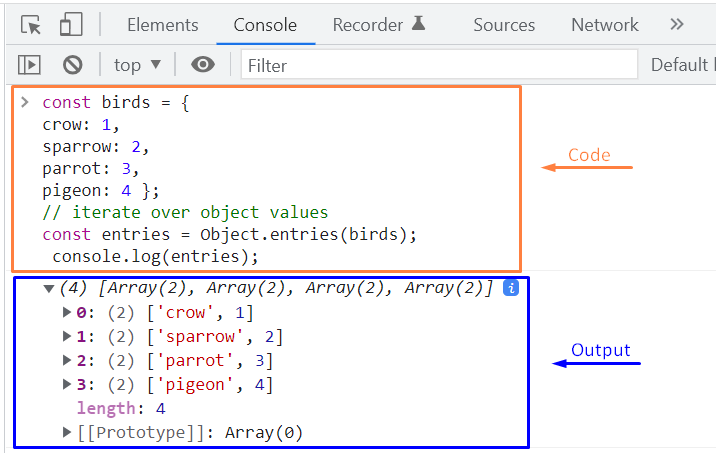 To iterate through the array, which is returned by the JavaScript Object.entries() method, you can also use the “forEach()” method or the “for..of” loop.
To use the for..of the loop, you have to write out the following code after creating the required birds object:
for (const [key, value] of Object.entries(birds)) {
console.log(`${key}: ${value}`);}
With the help of the “for..of” loop, we have successfully iterated over the “birds” object, which can be seen in the output:
To iterate through the array, which is returned by the JavaScript Object.entries() method, you can also use the “forEach()” method or the “for..of” loop.
To use the for..of the loop, you have to write out the following code after creating the required birds object:
for (const [key, value] of Object.entries(birds)) {
console.log(`${key}: ${value}`);}
With the help of the “for..of” loop, we have successfully iterated over the “birds” object, which can be seen in the output:
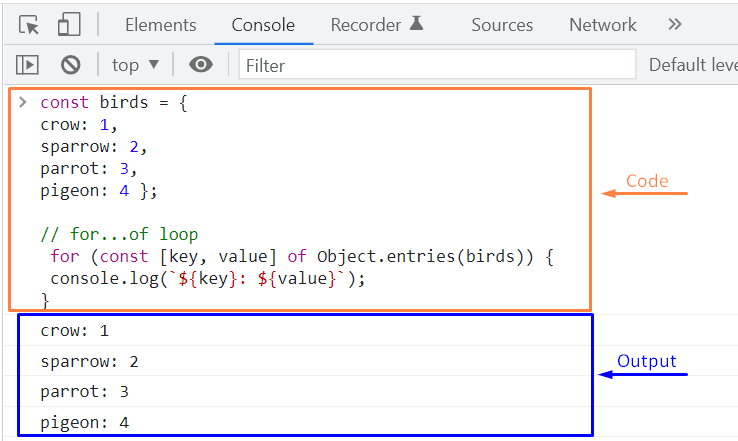 In this case, if you want to utilize the “forEach()” method for the same purpose, then invoke the Object.entries() method while passing the created object as an argument and then call the “forEach()” method.
The forEach() method will return the object properties or keys and their respective values:
// forEach() methodObject.entries(birds).forEach(([key, value]) => {
console.log(`${key}: ${value}`)});
In this case, if you want to utilize the “forEach()” method for the same purpose, then invoke the Object.entries() method while passing the created object as an argument and then call the “forEach()” method.
The forEach() method will return the object properties or keys and their respective values:
// forEach() methodObject.entries(birds).forEach(([key, value]) => {
console.log(`${key}: ${value}`)});
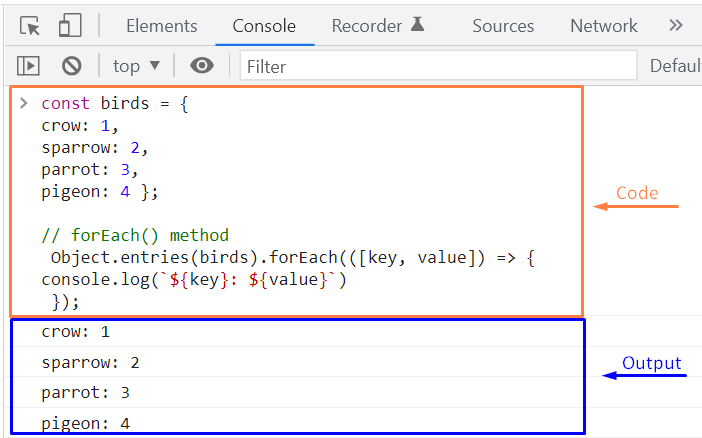
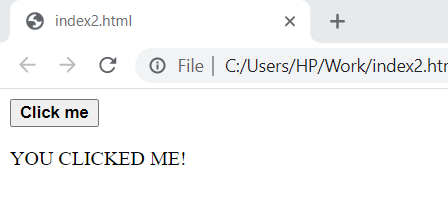
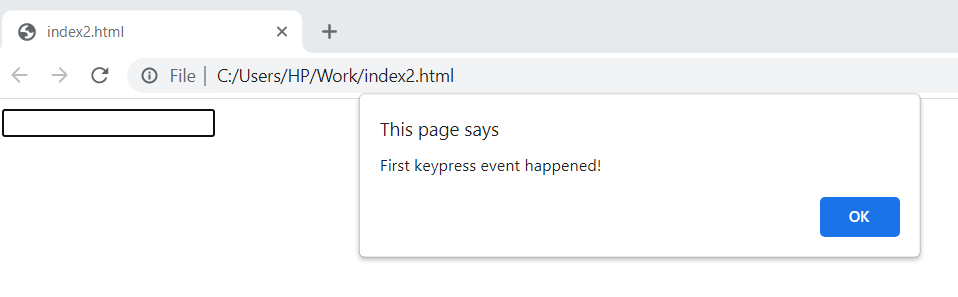 After you click OK in the dialogue box, second keypress will happen.
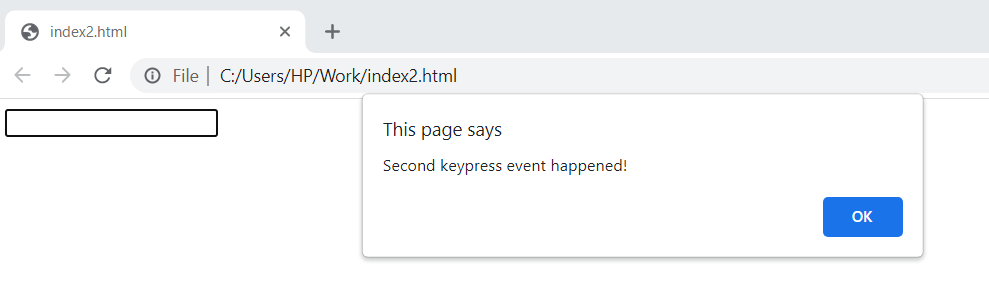 2.Event handlers can be added to DOM objects as well.
3.Event handlers dedicate the behaviour of events on how these react on bubbling.
4.To increase the readability, JavaScript splits up from HTML markup when addEventListener() method is used.
5.While using the addEventListener() method, you can also use event bubbling or event capturing but it is totally optional.
In event bubbling the event of inner most element is operated first and the event of outer most element later.
However, in event capturing the event of the outer most element is operated first and the event of inner most element later.
Syntax for using event bubbling and event capturing is as follows.
element.addEventListener(event, function, useCapture);
Note: In the above syntax, by default the parameter value is false that means event bubbling will occur but if you pass the parameter value as true then event capturing will happen.
2.Event handlers can be added to DOM objects as well.
3.Event handlers dedicate the behaviour of events on how these react on bubbling.
4.To increase the readability, JavaScript splits up from HTML markup when addEventListener() method is used.
5.While using the addEventListener() method, you can also use event bubbling or event capturing but it is totally optional.
In event bubbling the event of inner most element is operated first and the event of outer most element later.
However, in event capturing the event of the outer most element is operated first and the event of inner most element later.
Syntax for using event bubbling and event capturing is as follows.
element.addEventListener(event, function, useCapture);
Note: In the above syntax, by default the parameter value is false that means event bubbling will occur but if you pass the parameter value as true then event capturing will happen.
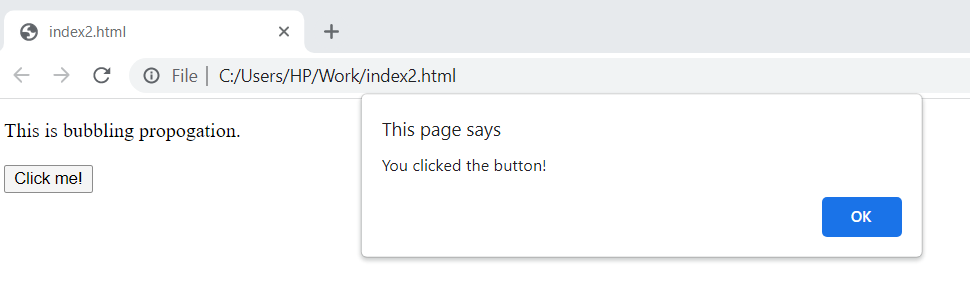 Now when you will click OK, bubbling propagation will perform click event on the paragraph.
 Using the same example, if you pass the parameter value as true then capturing propagation will happen.
<!DOCTYPE html><html><body><p id="para1">This is bubbling propagation.<br><br><button id="button1">Click me!</button></p><script>
document.getElementById("button1").addEventListener("click", function() {
alert("You clicked the button!");}, true);
document.getElementById("para1").addEventListener("click", function() {
alert("You clicked the paragraph!");}, true);</script></body></html>
If you click the child element (button) first then capturing propagation will operate click event on paragraph (outer-most element) first and button (inner-most element) later.
We have shown the output below.
Using the same example, if you pass the parameter value as true then capturing propagation will happen.
<!DOCTYPE html><html><body><p id="para1">This is bubbling propagation.<br><br><button id="button1">Click me!</button></p><script>
document.getElementById("button1").addEventListener("click", function() {
alert("You clicked the button!");}, true);
document.getElementById("para1").addEventListener("click", function() {
alert("You clicked the paragraph!");}, true);</script></body></html>
If you click the child element (button) first then capturing propagation will operate click event on paragraph (outer-most element) first and button (inner-most element) later.
We have shown the output below.
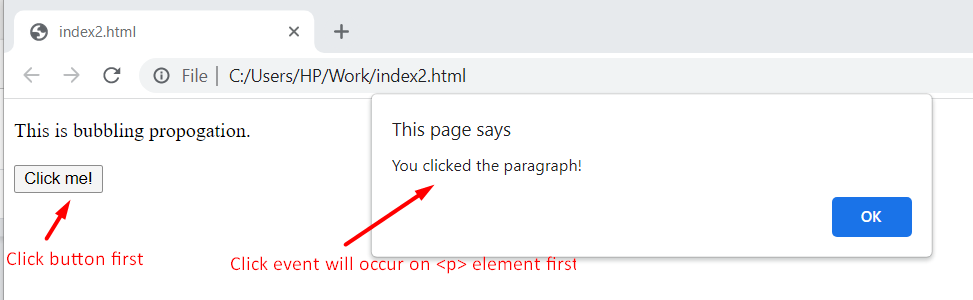 After clicking OK, click event will happen on the <button> element.
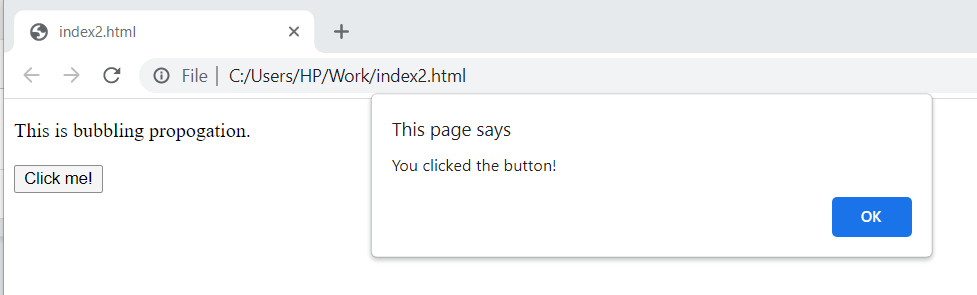 6.It is also possible to remove an event handler using the removeEventListener() method.
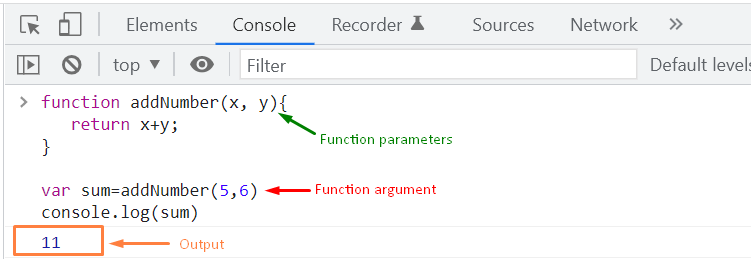
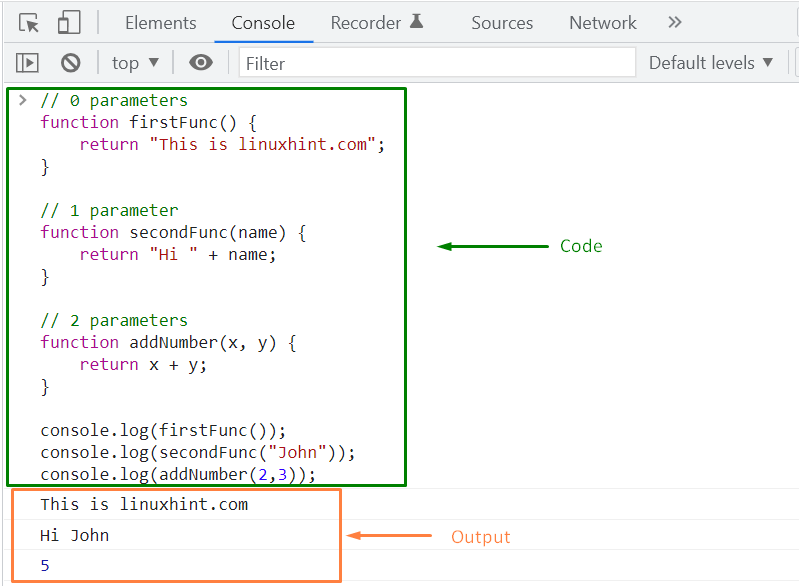
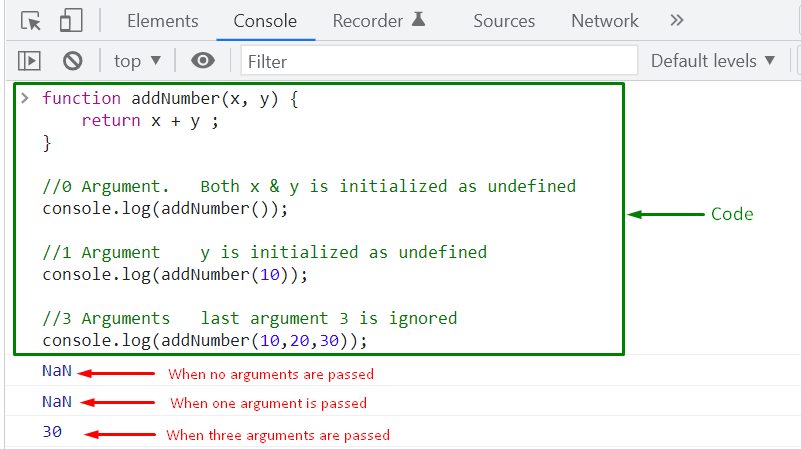
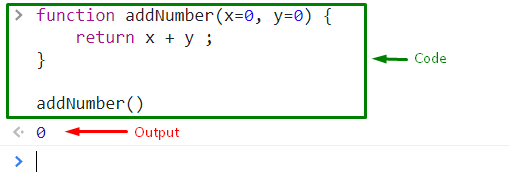

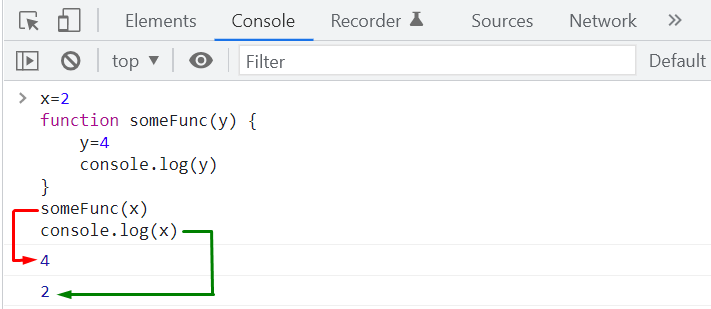 Now, let’s move to the pass-by-reference concept.
For this purpose, firstly, we will create an “employee” object, as an object is considered a reference type:
let employee = {
firstName: 'John',
lastName: 'Smith'};
When we call the “doSomething(employee)” function, a new variable “obj” will be created, which will get the content from the “employee” object.
Both “employee” and “obj” variables refer to the same object.
However, in such a case, when you make any changes in “obj”, it will also affect “employee”, as both are pointing or referring to the same object:
function doSomething(obj) {
obj.firstName = 'Peter';}
doSomething(employee);
console.log(employee.firstName);
From the output, you can see that the “firstName” is changed to “Peter”:
Now, let’s move to the pass-by-reference concept.
For this purpose, firstly, we will create an “employee” object, as an object is considered a reference type:
let employee = {
firstName: 'John',
lastName: 'Smith'};
When we call the “doSomething(employee)” function, a new variable “obj” will be created, which will get the content from the “employee” object.
Both “employee” and “obj” variables refer to the same object.
However, in such a case, when you make any changes in “obj”, it will also affect “employee”, as both are pointing or referring to the same object:
function doSomething(obj) {
obj.firstName = 'Peter';}
doSomething(employee);
console.log(employee.firstName);
From the output, you can see that the “firstName” is changed to “Peter”:
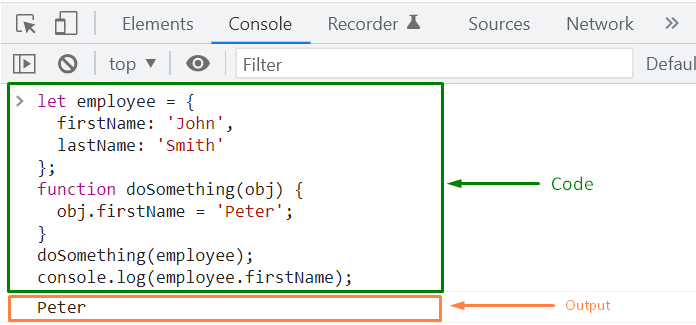


 The above example uses the toString() method to convert a an array with different datatypes into strings.
 The resultant string consists of all the elements of the original array associated with all elements of the nested array.
The toString() method separates each element of the array using a comma.
The resultant string consists of all the elements of the original array associated with all elements of the nested array.
The toString() method separates each element of the array using a comma.
 You can see that an array of nested objects result in a string value after using the toString() function.
The resulting expression shows the nested array values as [object, object].
It is due to the type of underlying objects.
You can see that an array of nested objects result in a string value after using the toString() function.
The resulting expression shows the nested array values as [object, object].
It is due to the type of underlying objects.
 An example of a left shift operator is given below programming:
let a = 8;
let b = 1;
result = a << b;
console.log(result); // 16 ( 00000000000000000000000000010000 )
An example of a left shift operator is given below programming:
let a = 8;
let b = 1;
result = a << b;
console.log(result); // 16 ( 00000000000000000000000000010000 )

 An example of a zero-fill right shift operator is given below programming:
let a = 8;
let b = 1;
let c = -3;
result = a >>> b;
result1 = c >>> b;
console.log(result);
console.log(result1);
An example of a zero-fill right shift operator is given below programming:
let a = 8;
let b = 1;
let c = -3;
result = a >>> b;
result1 = c >>> b;
console.log(result);
console.log(result1);

 An example of sign propagation right shift is given below programming:
let a = 8;
let b = 1;
let c = -3; // 11111111111111111111111111111101
result = a >> b;
result1 = c >> b;
console.log(result);
console.log(result1);
An example of sign propagation right shift is given below programming:
let a = 8;
let b = 1;
let c = -3; // 11111111111111111111111111111101
result = a >> b;
result1 = c >> b;
console.log(result);
console.log(result1);

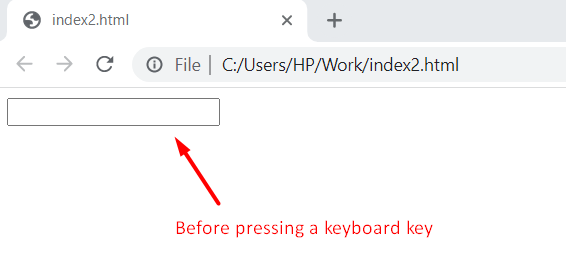 After pressing a keyboard key inside the input field.
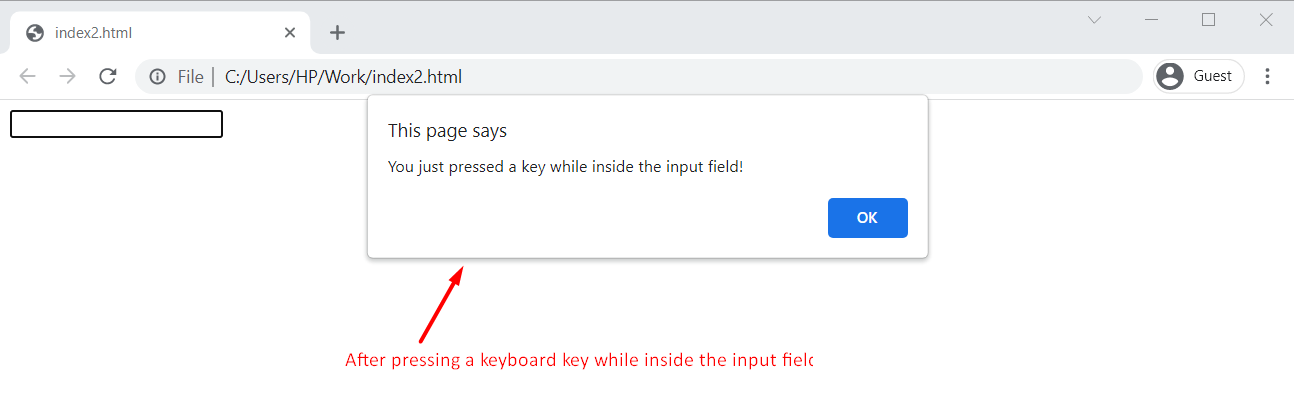
 After pressing a keyboard key, the input field background color changes to pink.

 After releasing the key.
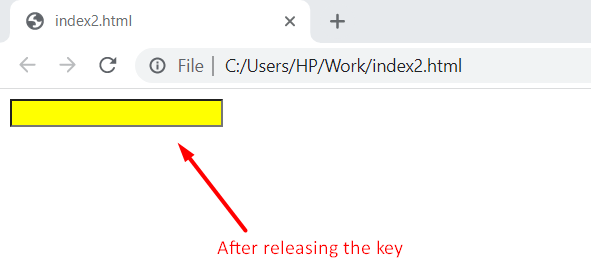
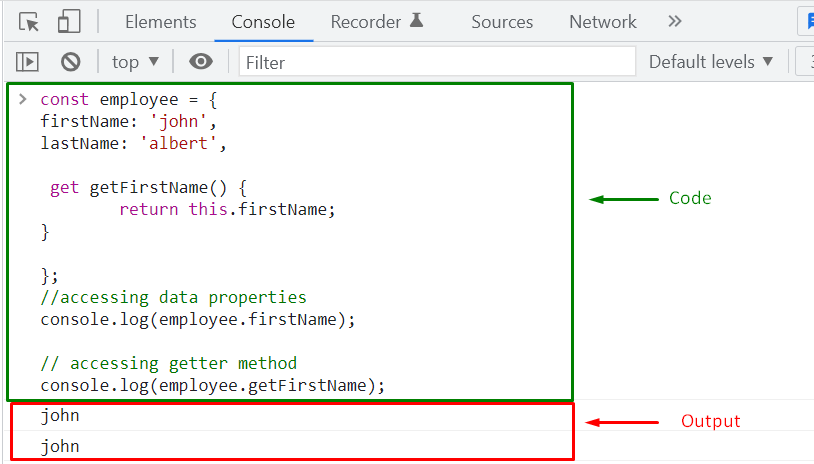
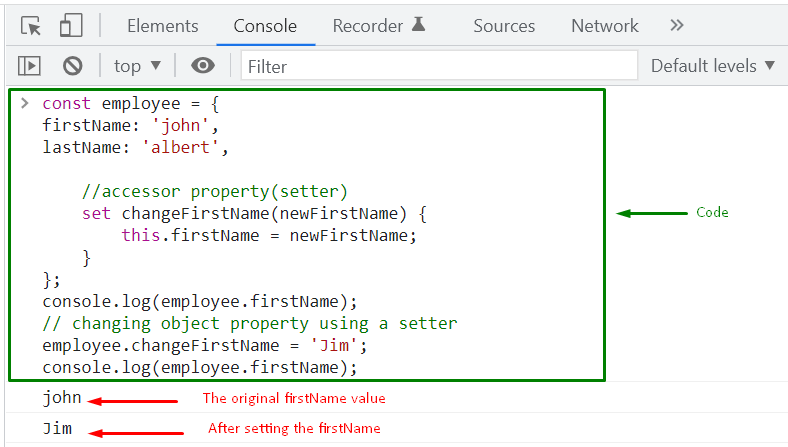

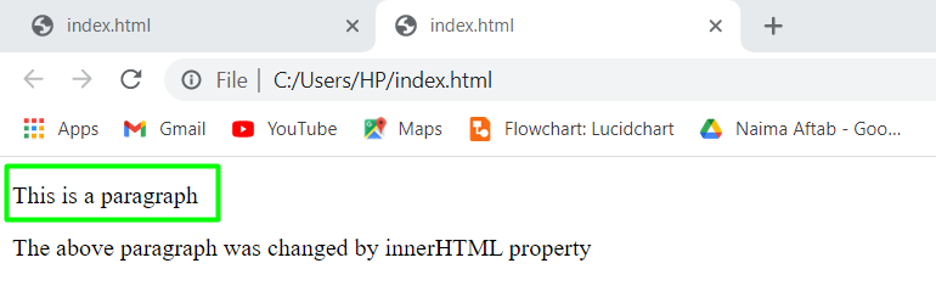 We can also change the <h> elements using this method.
Lets do an example in which the innerHTML property changes the <h2> element using its id.
Example 2
<!DOCTYPE html>
<html>
<body>
<h2 id= "head2">Lets change this heading</h2>
<script>
const element = document.getElementById ("head2");
element.innerHTML = "This heading replaces the old one";
</script>
<p>The old heading has been changed</p>
</body>
</html>
In the above example HTML DOM uses the id=”head2″ to get the <h2> element and the innerHTML property changes the content of the element.
The output is as follows.
We can also change the <h> elements using this method.
Lets do an example in which the innerHTML property changes the <h2> element using its id.
Example 2
<!DOCTYPE html>
<html>
<body>
<h2 id= "head2">Lets change this heading</h2>
<script>
const element = document.getElementById ("head2");
element.innerHTML = "This heading replaces the old one";
</script>
<p>The old heading has been changed</p>
</body>
</html>
In the above example HTML DOM uses the id=”head2″ to get the <h2> element and the innerHTML property changes the content of the element.
The output is as follows.
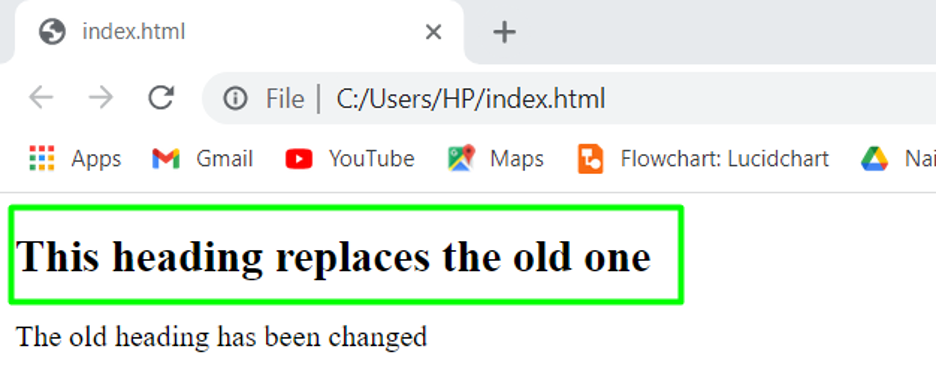 Now let us discuss how we can change the value of an HTML attribute using JavaScript.
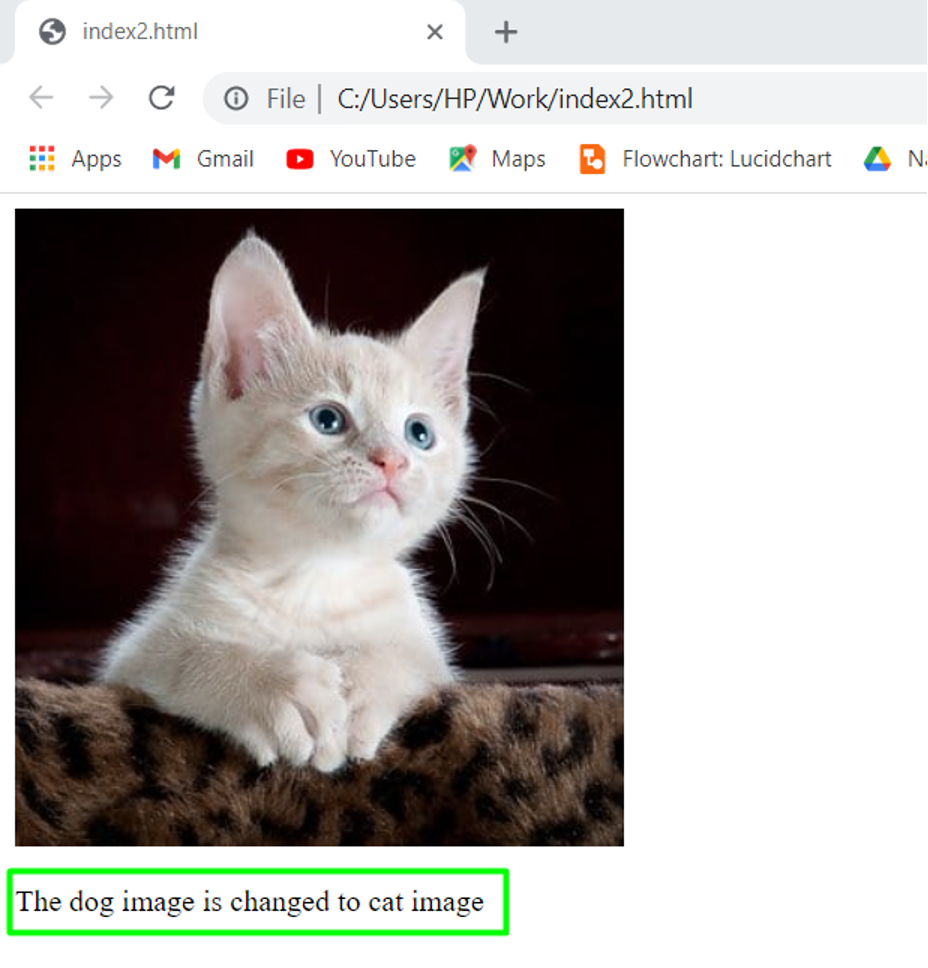 Moving on to the last method which is document.write() method.
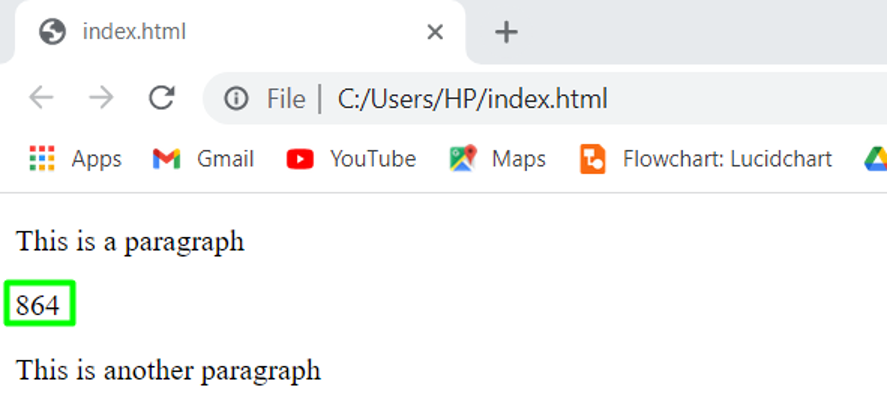
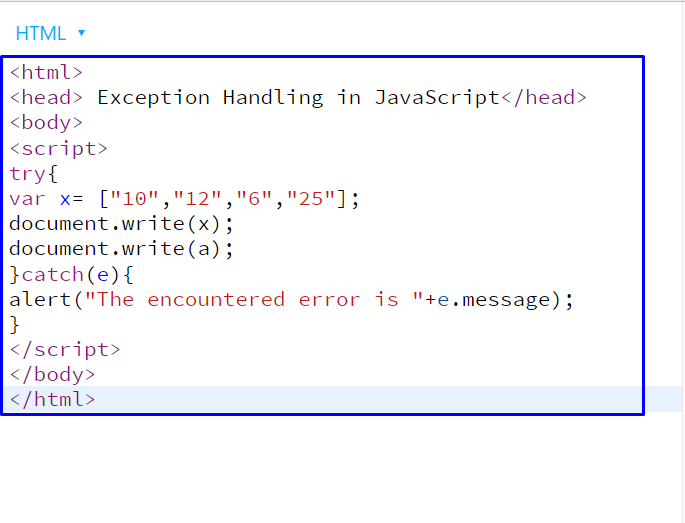 The execution of this JavaScript program will display the elements of the “x” array while showing an alert for the encountered error “a is not defined”:
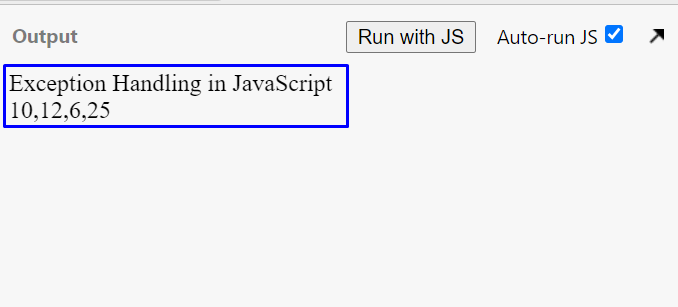
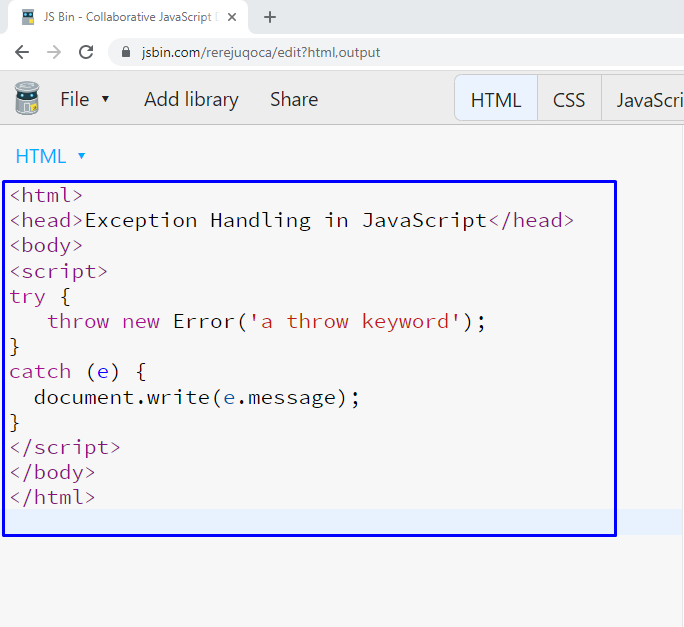 The execution of the above-given code will show you the following output:
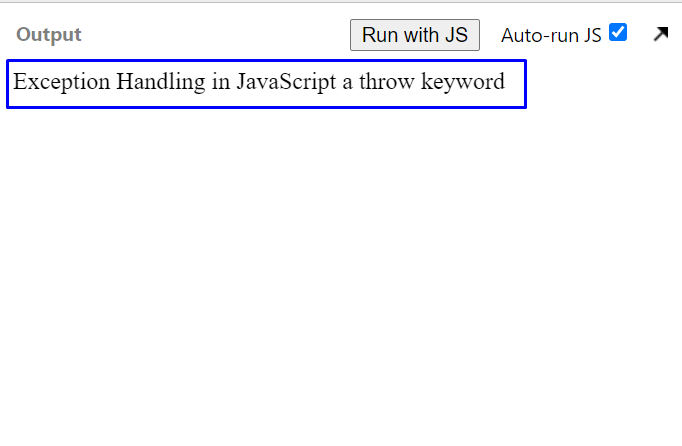
 As you can see from the output, the code written in the “try” and “finally” block is executed for the added logic in our JavaScript program:
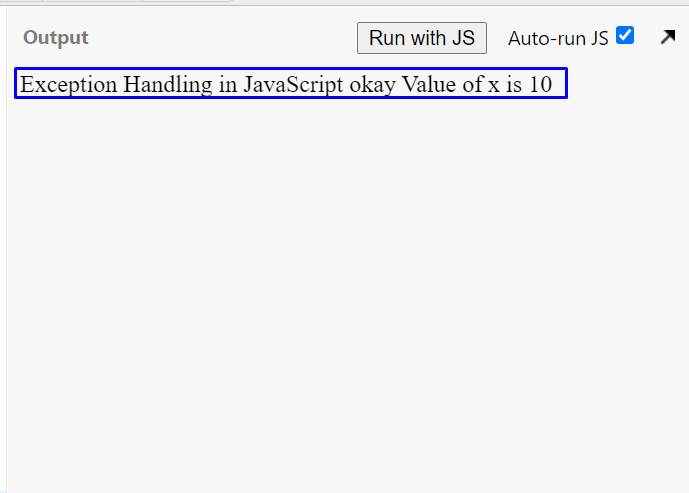
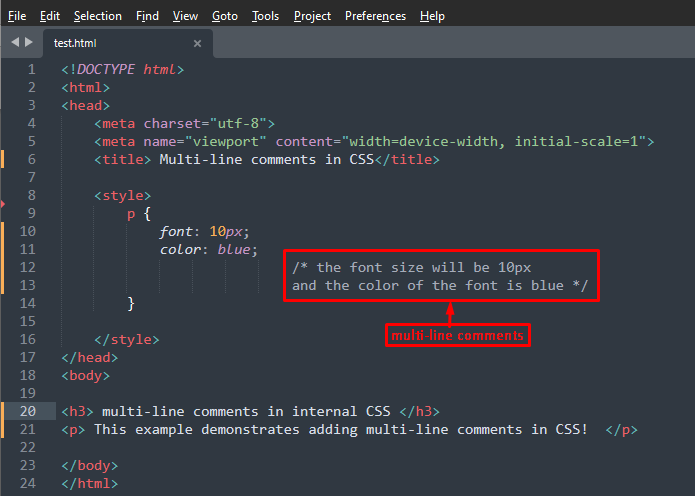
 In the above-given code, the “new Date()” constructor is utilized for creating a new Date “date1” object, and then it will output the current time and date with the help of the “console.log()” function:
 Next, to convert the date into number, we will use the “getTime()” method in this way:
const result = date1.getTime();
console.log(result);
Next, to convert the date into number, we will use the “getTime()” method in this way:
const result = date1.getTime();
console.log(result);
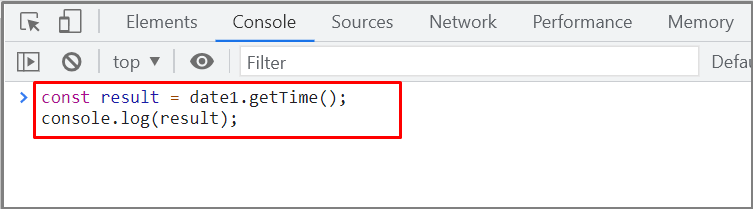 The execution of the above-given code will return the number of milliseconds between January 1, 1970 (EcmaScript epoch) and the current date:
 You can also specify a “dataString” for converting the added date to numbers.
For instance, in the below-given example, we will convert the “January 25, 1998 12:35:32” to numbers:
var x = new
You can also specify a “dataString” for converting the added date to numbers.
For instance, in the below-given example, we will convert the “January 25, 1998 12:35:32” to numbers:
var x = new  When you execute the provided code, it will show the converted number as output:

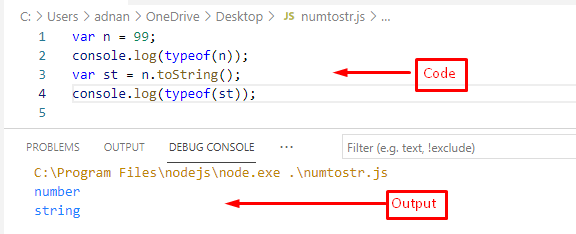
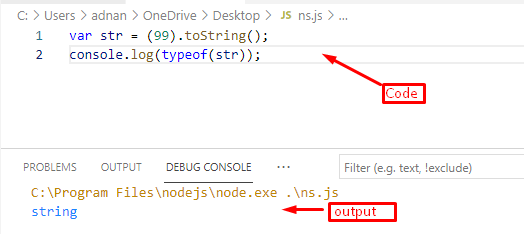
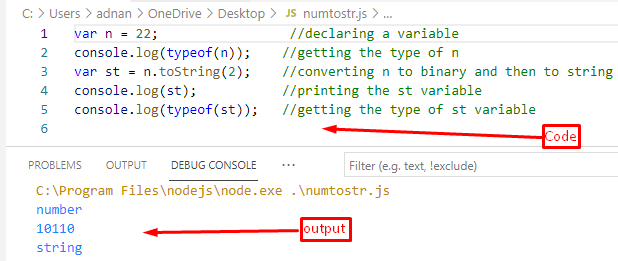
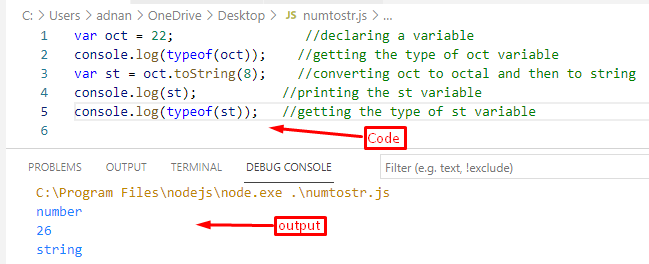 Similarly, as in Example 4 and Example 5, the .toString(10) and .toString(16) methods convert the number to decimal and hexadecimal numbers respectively.
Moreover, it will convert those numbers to string as well.
Similarly, as in Example 4 and Example 5, the .toString(10) and .toString(16) methods convert the number to decimal and hexadecimal numbers respectively.
Moreover, it will convert those numbers to string as well.
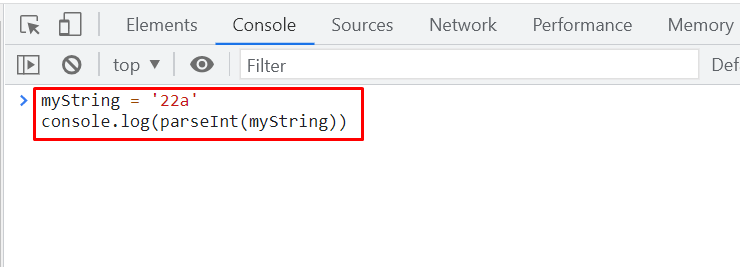 The parseInt() function will convert the value of “myString” to its corresponding number and show you the result with the help of the console.log() function:


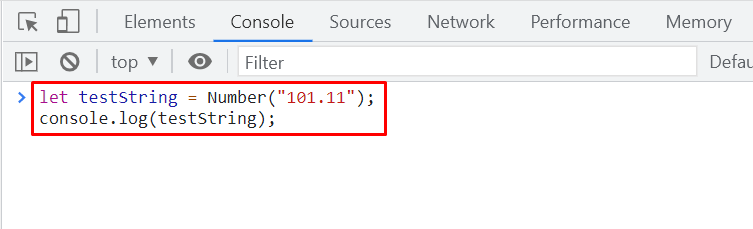 The output declares that we have successfully converted the added string to a number:


 The Math.ceil() function will round off the “578.99” string to the “579” number:
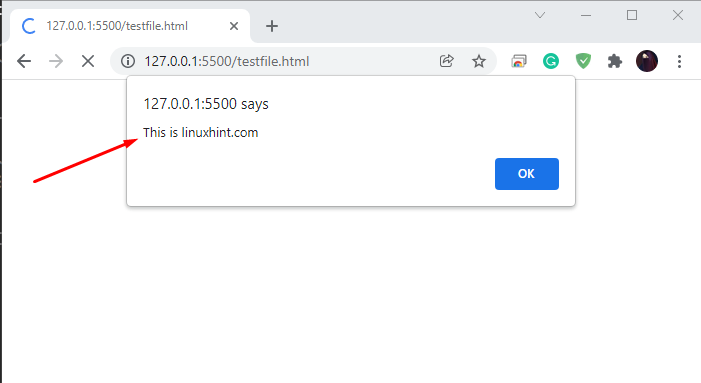
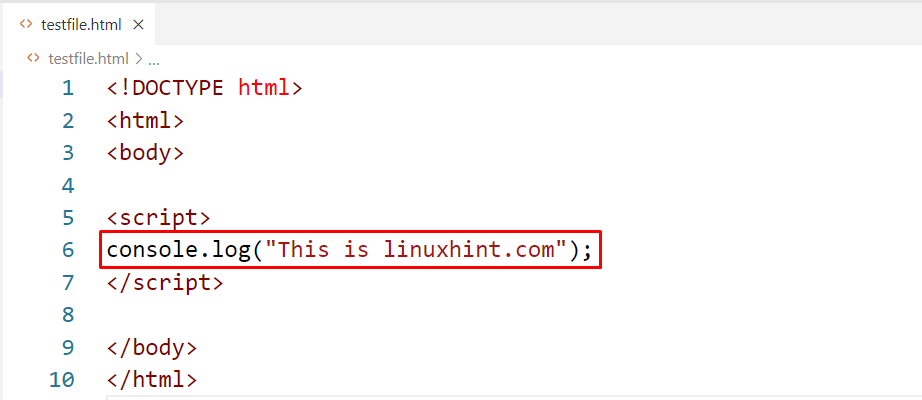 After adding the code, press “CTRL+S” to save the added code in the “testfile.html”.
Next, click on your file and open it in your favorite browser by double-clicking on the HTML file.
A blank web page will open for your “testfile.html” file.
From the right-click menu, choose the “Inspect” option to open up the Developer tools of your browser directly:
After adding the code, press “CTRL+S” to save the added code in the “testfile.html”.
Next, click on your file and open it in your favorite browser by double-clicking on the HTML file.
A blank web page will open for your “testfile.html” file.
From the right-click menu, choose the “Inspect” option to open up the Developer tools of your browser directly:
 Now, move to the “Console” tab of the developer options.
It will display the message which we have added as a parameter to the “console.log()” function:
Now, move to the “Console” tab of the developer options.
It will display the message which we have added as a parameter to the “console.log()” function:
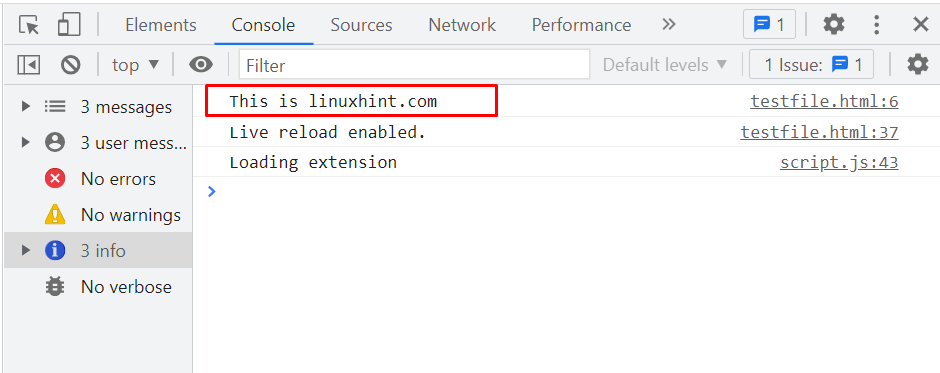
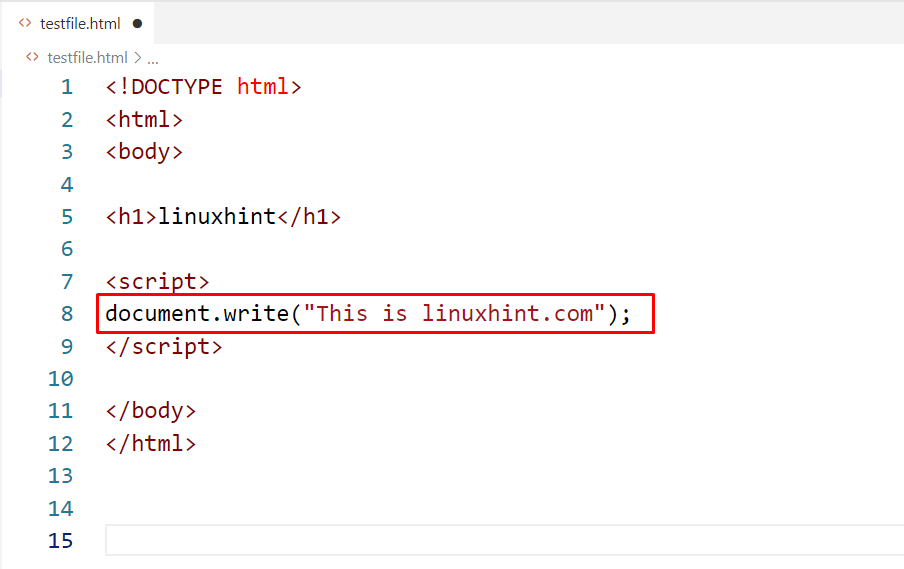 As we have added “This is linuxhint.com” as a parameter in our “document.write()” function, it will display the following output:
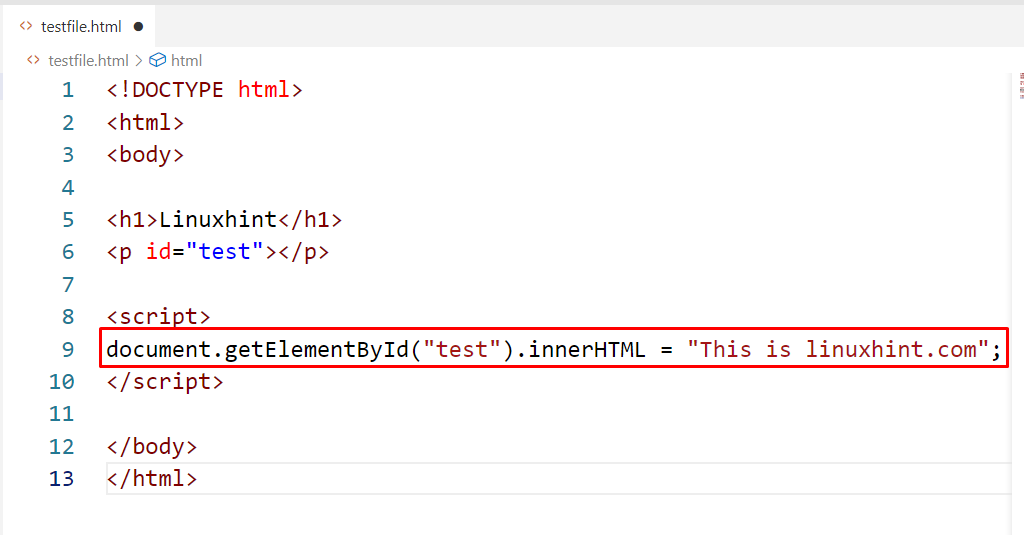 The below-given image indicates that we have successfully added the “This is linuxhint.com” string in our selected element:

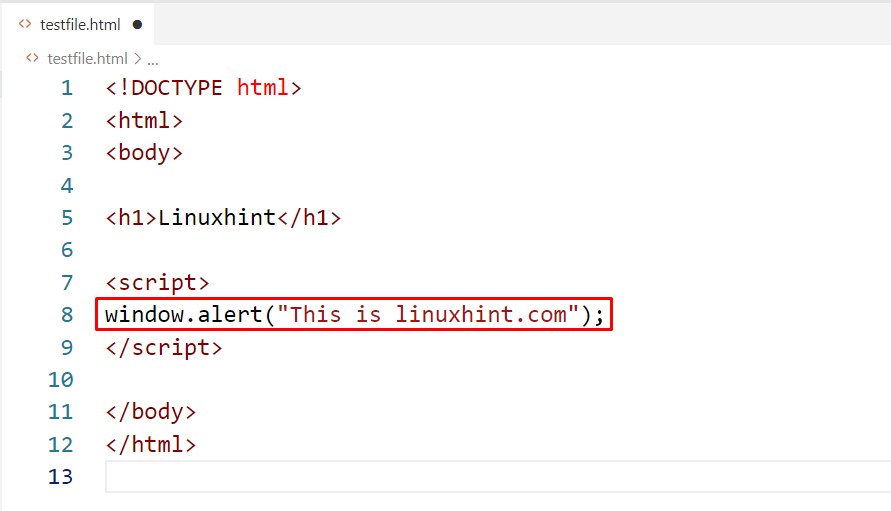 When the window.alert() pop up will appear on our web page, then any code written after the window.alert() does not get executed until you close the alert by pressing the “OK” button:


 To show you how JSBin operates for executing JavaScript, we will write out the below-given code in the left-side input section:
<!DOCTYPE html><html><body><h1>linuxhint</h1><script>
document.write("This is linuxhint.com");</script></body></html>
To show you how JSBin operates for executing JavaScript, we will write out the below-given code in the left-side input section:
<!DOCTYPE html><html><body><h1>linuxhint</h1><script>
document.write("This is linuxhint.com");</script></body></html>
 As soon as we complete our coding, its result will be shown by the JSBin in its adjacent output section:

 Then, move to the “Console” tab in between the other options:
 After doing so, type out your JavaScript code and press “Enter” to view its output:

 In the above-given code, the dot property accessor will access the “name” property of the “employee” JavaScript object:
 Here, both of the “employee” object properties are invalid identifiers as the “name-1” contain “-” and the other property starts which a number “5,” which is an indication for the invalid identifier:
 JavaScript also offers solutions for every encountered problem, including the usage of invalid identifiers.
If you have added the properties for your object having unique names, then you can utilize the square property accessor for accessing those properties.
JavaScript also offers solutions for every encountered problem, including the usage of invalid identifiers.
If you have added the properties for your object having unique names, then you can utilize the square property accessor for accessing those properties.
 The below-given output declares that we have successfully accessed the “name-1” and “5” JavaScript properties of our “employee” object:

 The below-given output declares that we have successfully accessed the “name” property of our “employee” JavaScript object with the help of the object destructuring method:

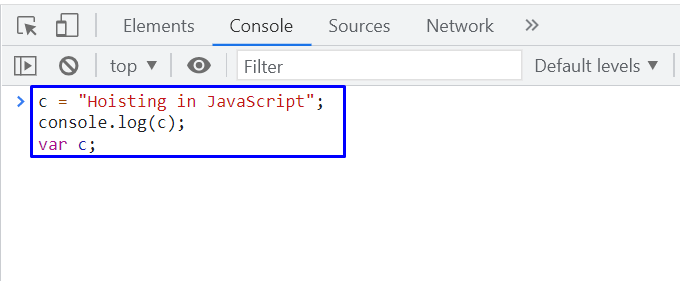 The output is displaying the string value of var “c,” which is “Hoisting”, indicating that the variable declaration is allowed for hoisting:
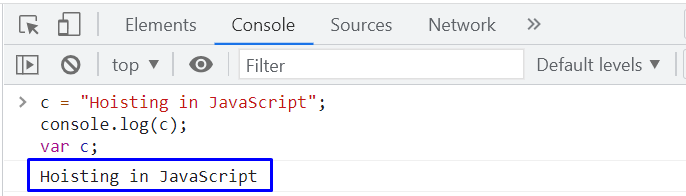 In the other case, JavaScript does not allow hoisting the variable assignment.
To confirm this statement, we will write out the following code and execute it in our console window:
console.log(d);var d = "Hoisting";
In the other case, JavaScript does not allow hoisting the variable assignment.
To confirm this statement, we will write out the following code and execute it in our console window:
console.log(d);var d = "Hoisting";
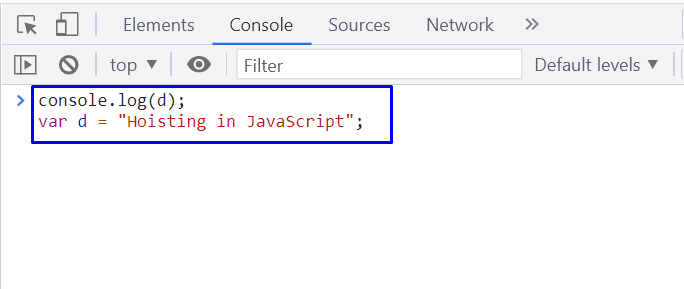 In this example, the declaration of the variable “d” is moved to the memory in the compilation phase, so the output will show you “undefined” as the value of the “d” variable because it is printed out before the initialization:
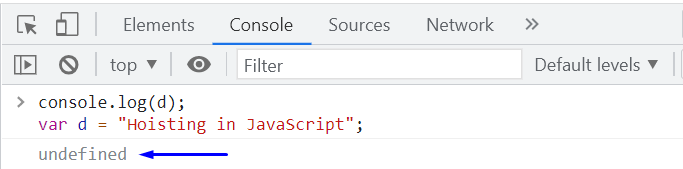
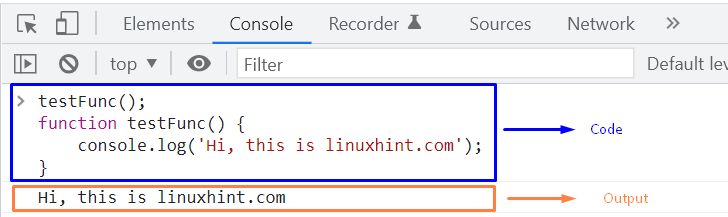 Now, let’s utilize the “testFunc2()” as Function expression in the following JavaScript code:
testFunc2();
let testFunc2 = function() {
console.log('Hi, this is linuxhint.com');}
In this case, a “ReferenceError” will occur stating that the added “testfunc2()” is not defined:
Now, let’s utilize the “testFunc2()” as Function expression in the following JavaScript code:
testFunc2();
let testFunc2 = function() {
console.log('Hi, this is linuxhint.com');}
In this case, a “ReferenceError” will occur stating that the added “testfunc2()” is not defined:
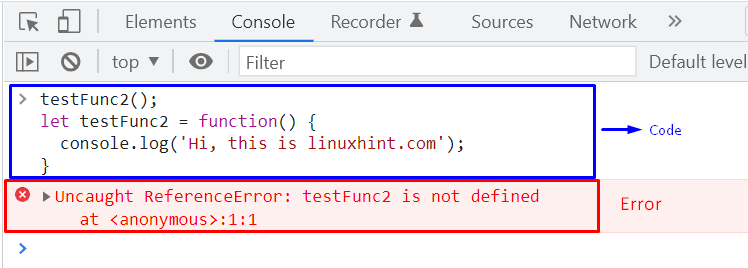 If you execute the same code while replacing the “let” with “var”, the output will show you a “TypeError” this time because the variable “testFunc1” is used as in a function expression, and the JavaScript interpreter can only hoist the function declaration but not assignment before invoking it:
testFunc1();var testFunc1 = function() {
console.log('Hi, this is linuxhint.com');}
If you execute the same code while replacing the “let” with “var”, the output will show you a “TypeError” this time because the variable “testFunc1” is used as in a function expression, and the JavaScript interpreter can only hoist the function declaration but not assignment before invoking it:
testFunc1();var testFunc1 = function() {
console.log('Hi, this is linuxhint.com');}
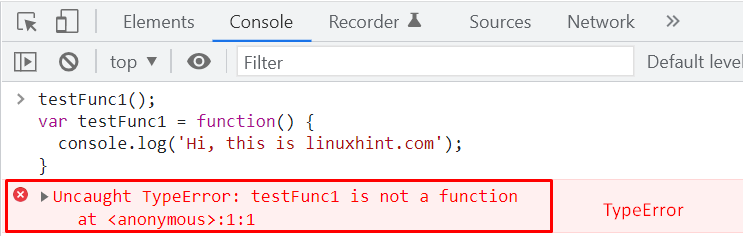
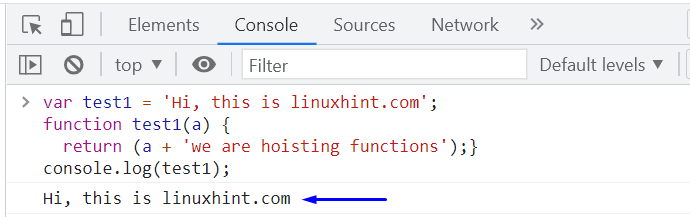
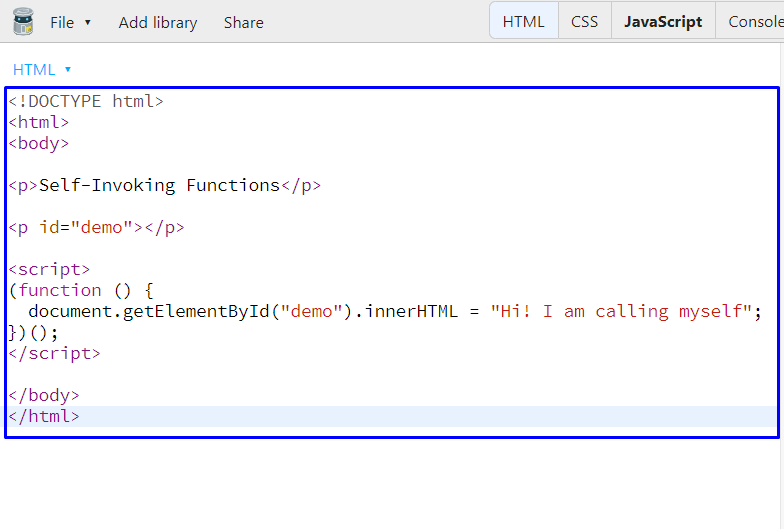 Now, check out the output generated by the defined self-invoking function:
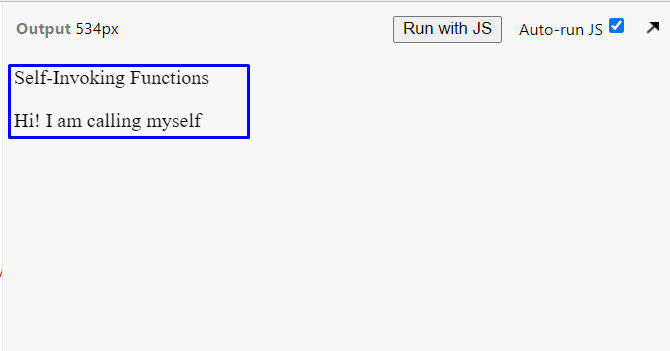
 Here is the output we got from the execution of the above-given code:
 Now, we will define a self-invoking function that will also output the same string which the normal function did.
To do so, write out the following code and start the execution:
<!DOCTYPE html><html><body><h2>Self-Invoking Functions</h2><p id="demo"></p><script>(function () {
document.write("This is Linuxhint.com");})();</script></body></html>
Now, we will define a self-invoking function that will also output the same string which the normal function did.
To do so, write out the following code and start the execution:
<!DOCTYPE html><html><body><h2>Self-Invoking Functions</h2><p id="demo"></p><script>(function () {
document.write("This is Linuxhint.com");})();</script></body></html>
 The output declares that the self-invoking JavaScript function has been successfully executed without being called in the program:
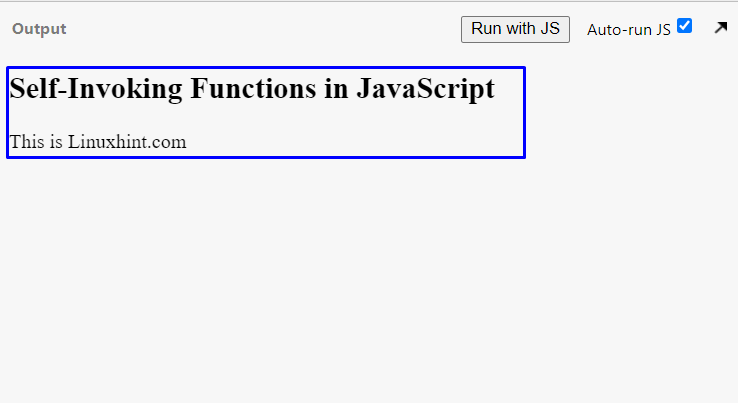
 Click on the “oracle.com” link.
The latest version of the Java JDK will appear, select the operating system of your choice.
We are working on Windows operating system so we select the option accordingly as shown in the following snippet:
Click on the “oracle.com” link.
The latest version of the Java JDK will appear, select the operating system of your choice.
We are working on Windows operating system so we select the option accordingly as shown in the following snippet:

 Click on that file a pop-up window will appear:
 Allow the permission to start the installation process:
 Click on the Next button.
In this way, the installation process will proceed further:
Click on the Next button.
In this way, the installation process will proceed further:
 And finally when the installation process will complete the following window will appear:

 All java related executable files will be there in the bin folder.
To run all the java related commands from the command prompt we have to set the bin folder path as our environment variable path.
To do this just copy the path up to the bin folder:
All java related executable files will be there in the bin folder.
To run all the java related commands from the command prompt we have to set the bin folder path as our environment variable path.
To do this just copy the path up to the bin folder:
 Next, open the settings and click on the “System” option and here search for the environment variables:
 Select the “Edit the system environment variables”.
The below-given window will appear, click on “environment variables”
Select the “Edit the system environment variables”.
The below-given window will appear, click on “environment variables”
 Select the path variable and then click on the “Edit” option to set environment variables:
 A new pop-up window will appear, click on the new button and paste your bin folder’s path (i.e “C:\Program Files\Java\jdk-17.0.1\bin”).
And lastly, click on the OK button:
A new pop-up window will appear, click on the new button and paste your bin folder’s path (i.e “C:\Program Files\Java\jdk-17.0.1\bin”).
And lastly, click on the OK button:
 Now we need to set the “JAVA_HOME” variable as well because JAVA_HOME refers to the location where JDK is installed.
 A new window will appear where we will set the variable name as “JAVA_HOME” and variable value as the path up to the JDK folder “C:\Program Files\Java\jdk-17.0.1”:

 We will pass one more command to check if the environment variable is set perfectly for the JAVA_HOME or not:
>echo %JAVA_HOME%
It will return the path that we gave in our java home environment variable:
We will pass one more command to check if the environment variable is set perfectly for the JAVA_HOME or not:
>echo %JAVA_HOME%
It will return the path that we gave in our java home environment variable:
 All the things are working perfectly and our system is ready to work with java.
To run a java program we can use any editor like notepad, eclipse, NetBeans, etc.
NetBeans is an easy-to-use tool that supports several programming languages.
It is available for every operating system like Windows, Mac, etc.
Considering these features, we will install NetBeans on our system for Java programming.
All the things are working perfectly and our system is ready to work with java.
To run a java program we can use any editor like notepad, eclipse, NetBeans, etc.
NetBeans is an easy-to-use tool that supports several programming languages.
It is available for every operating system like Windows, Mac, etc.
Considering these features, we will install NetBeans on our system for Java programming.

 Click on the following link that starts the downloading:

 After the installation process, the following window will appear:
 Lastly, click on the finish button and NetBeans is ready to use.
 The above code is executed successfully and printed the following output:

 The console.log function is utilized to produce the output of the resultant array on the browser’s console:
 The output verifies that the resultant array combines the elements of both “array1” and “array2”.
 In the output, you will observe that the “join()” function returns a string that is separated by a comma.
 In JavaScript, anyone can separate the string elements by any other symbol of theirs choice; suppose we want to use “|” as a separated instead of comma then we will utilize it as:
const Array1 = [ '5','10','15','20','25' ];const Resultant_Array = Array1.join(‘|’);
console.log("The resultant array using Join method is: ", Resultant_Array);
We will implement the above code as:
In JavaScript, anyone can separate the string elements by any other symbol of theirs choice; suppose we want to use “|” as a separated instead of comma then we will utilize it as:
const Array1 = [ '5','10','15','20','25' ];const Resultant_Array = Array1.join(‘|’);
console.log("The resultant array using Join method is: ", Resultant_Array);
We will implement the above code as:
 The resultant output will be:

 Our output shows that the “filter()” method prints the positive numbers only:

 The output of the above program will be:

 The output of the above-given code will verify that the “indexOf” method returns the first instance of the searched element:

 In Array1, ‘15’ is repeated twice, so the “lastIndexOf” method will return the index of the last occurrence of ‘15’:

 The “includes()” method will return the output true as ‘15’ is there in the array:

 We can also pass the comparison parameter.
For instance, consider the below-given code to print the array in descending order:
const Input_Array = [15, 13, 0, 12, -10, 6];
Input_Array.sort(function(lower, higher){return higher-lower;});
console.log("The sorted array : ", Input_Array);
We passed two parameters to the function “lower” and “higher”, and “higher-lower” will return the output in descending order while “lower-higher” will return the output in ascending order:
We can also pass the comparison parameter.
For instance, consider the below-given code to print the array in descending order:
const Input_Array = [15, 13, 0, 12, -10, 6];
Input_Array.sort(function(lower, higher){return higher-lower;});
console.log("The sorted array : ", Input_Array);
We passed two parameters to the function “lower” and “higher”, and “higher-lower” will return the output in descending order while “lower-higher” will return the output in ascending order:


 (Image by
  (Image by
  Insert values into the heap, and you’ll notice how a new element is inserted into the heap due to the animation:

 You can observe the removal process by observing the gif above.
 As you can see, the first element of the array is null.
The rest of the nodes are not bigger than their child nodes.
For example, if we take the node with the value 35.
The left and the right child are as:
As you can see, the first element of the array is null.
The rest of the nodes are not bigger than their child nodes.
For example, if we take the node with the value 35.
The left and the right child are as:
 You can clearly see, the parent (35) is smaller than its left child (82) and its right child (61) as well.
Similarly, every parent node is smaller then its child node, therefore we can deduce that our code is working perfectly
Similarly, by just changing the condition for comparing for being the parent node being smaller than the child to the parent node being bigger than the child node we can implement the Max-heap using the following lines of code:
letMaxHeap = function () {
let heap = [null];this.insert = function (num) {
heap.push(num);if (heap.length>2) {
letidx = heap.length - 1;while (heap[idx] > heap[
You can clearly see, the parent (35) is smaller than its left child (82) and its right child (61) as well.
Similarly, every parent node is smaller then its child node, therefore we can deduce that our code is working perfectly
Similarly, by just changing the condition for comparing for being the parent node being smaller than the child to the parent node being bigger than the child node we can implement the Max-heap using the following lines of code:
letMaxHeap = function () {
let heap = [null];this.insert = function (num) {
heap.push(num);if (heap.length>2) {
letidx = heap.length - 1;while (heap[idx] > heap[ We know that in arrays indexing starts from 0.
So initially, “8” is stored at the 0th index, “3” is stored at the first index, “1” is stored at the second index, and so on.
Now, we have to sort this array in ascending order as shown in the below-given array:
We know that in arrays indexing starts from 0.
So initially, “8” is stored at the 0th index, “3” is stored at the first index, “1” is stored at the second index, and so on.
Now, we have to sort this array in ascending order as shown in the below-given array:
 Now, we will explain the working of bubble sort step by step.
 Now the value of index 1 will be compared with the value of index 2.
The value of index 1 is 8 while the value of index 2 is 1 which is less than 8, so it will be swapped and the array will be modified as:
Now the value of index 1 will be compared with the value of index 2.
The value of index 1 is 8 while the value of index 2 is 1 which is less than 8, so it will be swapped and the array will be modified as:
 Now, we will make a comparison between index 2 and index 3.
The value of index 2 is 8 which is greater than the value of index 3 which is 2 so the values will be swapped:
Now, we will make a comparison between index 2 and index 3.
The value of index 2 is 8 which is greater than the value of index 3 which is 2 so the values will be swapped:
 Now compare the value of index 3 with the value of index 4.
At index 3 value is 8 while at index 4 value is -1 which means both these values will be swapped:
Now compare the value of index 3 with the value of index 4.
At index 3 value is 8 while at index 4 value is -1 which means both these values will be swapped:
 Finally, the value of index 4 will be compared with the value of index 5.
Again 8 is greater than 7 so, it will be replaced with 7:
Finally, the value of index 4 will be compared with the value of index 5.
Again 8 is greater than 7 so, it will be replaced with 7:
 Now, the first iteration is complete, and “8” reaches its appropriate position.
So, in the next step, the comparisons will be made till the 4th index since the value of the last index is sorted.
Now, the first iteration is complete, and “8” reaches its appropriate position.
So, in the next step, the comparisons will be made till the 4th index since the value of the last index is sorted.
 Next, we will compare the value of the 1st index with the value of the 2nd index.
Here, 3 is greater than 2 so, it will be replaced with 2:
Next, we will compare the value of the 1st index with the value of the 2nd index.
Here, 3 is greater than 2 so, it will be replaced with 2:
 Now we will compare the value of 2nd and 3rd index i.e.
3(at 2nd index) with the value of the 3rd index which is -1.
Values will be swapped again since 3 is greater than -1:
Now we will compare the value of 2nd and 3rd index i.e.
3(at 2nd index) with the value of the 3rd index which is -1.
Values will be swapped again since 3 is greater than -1:
 The value of the 3rd index is already less than the value of the 4th index so, it will remain the same:
 Now the last two indexes are sorted and the values are placed properly on the 4th and 5th indexes.
 Next, compare the next two indexes, here the value of the 1st index is greater than the value of the 2nd index therefore, their values will be swapped:
 The value of the 2nd index is already less than the value of the 3rd index therefore, their values will not be swapped:

 Next, we will compare the value of the 1st index with the value of the 2nd index.
They are already sorted, so they will remain the same:
Next, we will compare the value of the 1st index with the value of the 2nd index.
They are already sorted, so they will remain the same:
 Finally, our array is sorted in ascending order.
 In the above-given code, we created an array named ‘ary’ and assigned some data to it.
Afterwards, we created a function named bubbleSort and we passed the array to it.
A variable named ‘flag’ is initially assigned with a value ‘false’.
This flag will be used to verify if the array is completely sorted out or not.
Next, the for-loop is initialized with the 0 and it will execute until it is less than the array length.
Nested for-loop is utilized to draw a comparison of the value at the current index with the value at the adjacent index, the values will be swapped only if the value of the current index is higher than the value present at its adjacent index.
The value of the flag will be replaced with true if any value is swapped during iteration.
Once the inner loop is done, the flag variable is checked.
If the flag variable stays false, it means that the array is already sorted out and the inner loop has not changed anything.
In such a case, simply break the loop.
Finally, the array is passed to the bubbleSort() function.
The output will be:
In the above-given code, we created an array named ‘ary’ and assigned some data to it.
Afterwards, we created a function named bubbleSort and we passed the array to it.
A variable named ‘flag’ is initially assigned with a value ‘false’.
This flag will be used to verify if the array is completely sorted out or not.
Next, the for-loop is initialized with the 0 and it will execute until it is less than the array length.
Nested for-loop is utilized to draw a comparison of the value at the current index with the value at the adjacent index, the values will be swapped only if the value of the current index is higher than the value present at its adjacent index.
The value of the flag will be replaced with true if any value is swapped during iteration.
Once the inner loop is done, the flag variable is checked.
If the flag variable stays false, it means that the array is already sorted out and the inner loop has not changed anything.
In such a case, simply break the loop.
Finally, the array is passed to the bubbleSort() function.
The output will be:

 When you run this code a pop-up window will appear as shown in the below-given screenshot:
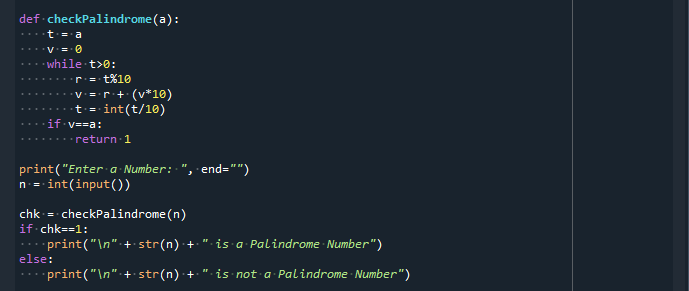 If the value entered by the user is greater than 85 then it will show an output “Well done”:
 In this example, we didn’t specify anything for the false condition.
So, if the user enters the false condition, let’s say the user enters 55 it wouldn’t show any output because we didn’t specify anything for false conditions.
Now we will extend the above-given example with the “else” statement in order to tackle the false condition.
In this example, we didn’t specify anything for the false condition.
So, if the user enters the false condition, let’s say the user enters 55 it wouldn’t show any output because we didn’t specify anything for false conditions.
Now we will extend the above-given example with the “else” statement in order to tackle the false condition.
 When we run this code a pop-up window will appear asking the user to enter the marks:
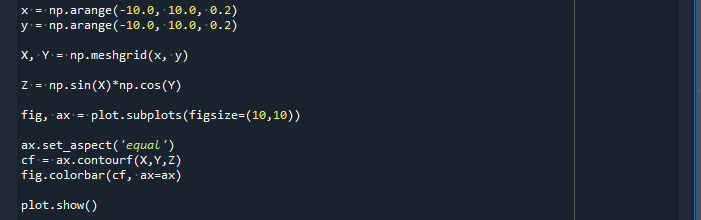 Now if the entered marks are greater than 85 it will show “well done” else it will show “better luck next time”.
Here, we enter 56 so the output will be:
Now if the entered marks are greater than 85 it will show “well done” else it will show “better luck next time”.
Here, we enter 56 so the output will be:

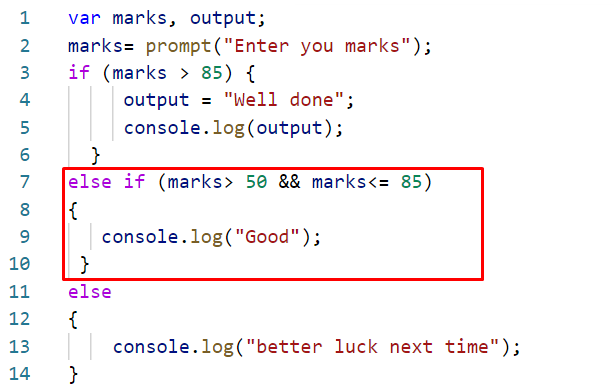 Here, we entered 67:
 The output will be:

 Copy this text, and place it in the text file and save the text file:
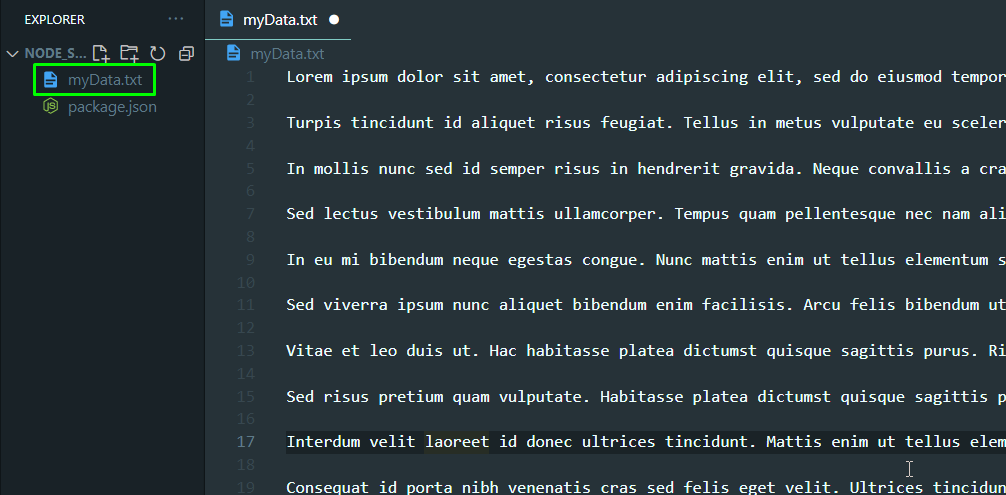 As you can see, the name of the text file is “myData.txt”.
Create a new javascript file in the same directory and name it “streamDemo.js”
As you can see, the name of the text file is “myData.txt”.
Create a new javascript file in the same directory and name it “streamDemo.js”
 To create a read or write stream we need to use the “fs” module that comes as a built-in module of the node environment.
To include the fs module in your program use the following lines of code:
var fs = require("fs");
Next, we need to create a read stream from our text file (that is placed in the same directory as the streamDemo.js file) using the following line:
var myReadStream = fs.createReadStream(__dirname + `/myData.txt`);
Now, we can use this variable “myReadStream” to perform a task every time it receives a new chunk of data.
Use to following lines of code to print the chunk onto the console every time our stream gets a new chunk:
myReadStream.on("data", function (chunk) {
console.log("New chunk has been accepted by the program");
console.log(chunk);});
To run this program, in the terminal type the following command:
node streamDemo
You will see the following output in your console:
To create a read or write stream we need to use the “fs” module that comes as a built-in module of the node environment.
To include the fs module in your program use the following lines of code:
var fs = require("fs");
Next, we need to create a read stream from our text file (that is placed in the same directory as the streamDemo.js file) using the following line:
var myReadStream = fs.createReadStream(__dirname + `/myData.txt`);
Now, we can use this variable “myReadStream” to perform a task every time it receives a new chunk of data.
Use to following lines of code to print the chunk onto the console every time our stream gets a new chunk:
myReadStream.on("data", function (chunk) {
console.log("New chunk has been accepted by the program");
console.log(chunk);});
To run this program, in the terminal type the following command:
node streamDemo
You will see the following output in your console:
 As you can see, we were able to receive and print out the data from our file, however, the data that we are getting on the console is not the same as the one we have in our file.
This is because we need to set an encoding procedure in the read stream.
Alter, the line of the read stream to match the following line of code:
var myReadStream = fs.createReadStream(__dirname + `/myData.txt`, "UTF8");
As you can see, we have added the “UTF8” encoding to our stream.
Now if we rerun using the “node streamDemo” command we get the following result on our terminal:
As you can see, we were able to receive and print out the data from our file, however, the data that we are getting on the console is not the same as the one we have in our file.
This is because we need to set an encoding procedure in the read stream.
Alter, the line of the read stream to match the following line of code:
var myReadStream = fs.createReadStream(__dirname + `/myData.txt`, "UTF8");
As you can see, we have added the “UTF8” encoding to our stream.
Now if we rerun using the “node streamDemo” command we get the following result on our terminal:
 And there you go, we are reading the correct data from the file and printing it out onto the console
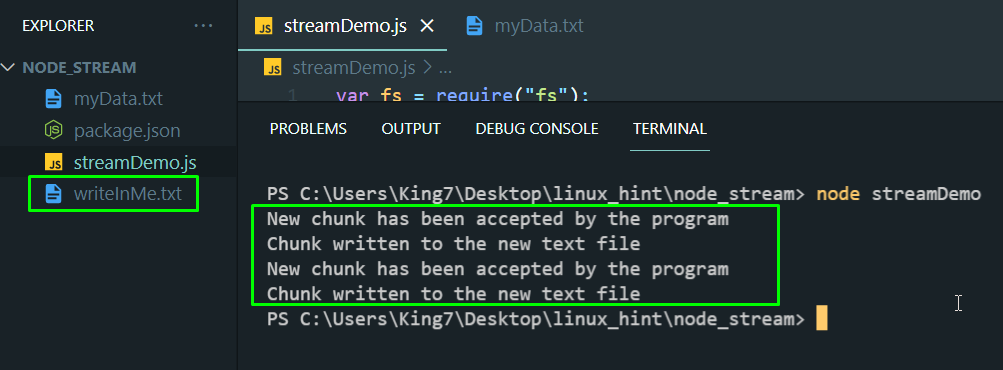 As you can see in the explorer of your code editor that a new file text was automatically created and if double click on the “writeInMe” text file you will see the following data inside that file:
 So, from the image above it is clear that we were able to write data to a file using Streams
 Therefore, the ‘+’ operator concatenates the string with the number and as a result, we will get ‘5050’ instead of ‘100’.
This shows that JavaScript implicitly converts a number into a string:
Therefore, the ‘+’ operator concatenates the string with the number and as a result, we will get ‘5050’ instead of ‘100’.
This shows that JavaScript implicitly converts a number into a string:

 Now we consider some non-numeric strings and perform the same operations on them:
let sub;
sub = 'Daniel' - 'Micheal';
console.log("Strings considered as Numbers '-' operation : " , sub);
let div;
div = 'Daniel' / 'Micheal';
console.log("Strings considered as Numbers '/' operation : " , div);
let mul;
mul = 'Daniel' * 'Micheal';
console.log("Strings considered as Numbers '*' operation : " , mul);
Here we try to subtract, multiply, and divide the operator with two alphabetic strings “Daniel” and “Micheal”:
Now we consider some non-numeric strings and perform the same operations on them:
let sub;
sub = 'Daniel' - 'Micheal';
console.log("Strings considered as Numbers '-' operation : " , sub);
let div;
div = 'Daniel' / 'Micheal';
console.log("Strings considered as Numbers '/' operation : " , div);
let mul;
mul = 'Daniel' * 'Micheal';
console.log("Strings considered as Numbers '*' operation : " , mul);
Here we try to subtract, multiply, and divide the operator with two alphabetic strings “Daniel” and “Micheal”:
 As a result, JavaScript responded with “NaN” (this means it’s not a Numeric value):
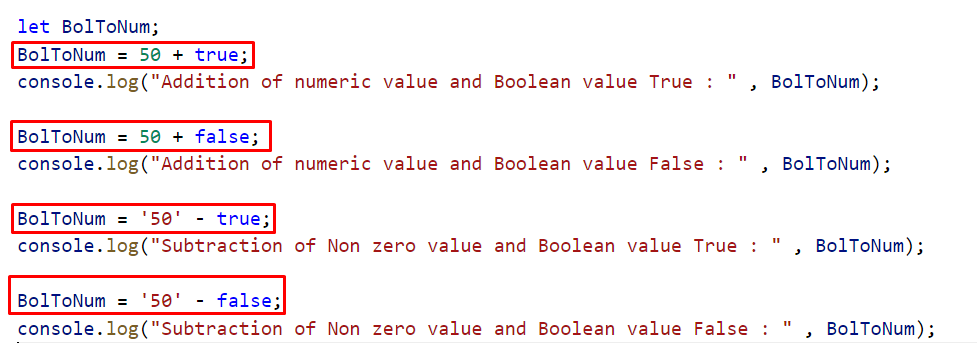 From the output, it is clear that when a Boolean value “true” is added or subtracted from the number then JavaScript added or subtracted “1” from the numeric value while when Boolean value is “false” then JavaScript added or subtracted “0” from the numeric value:
 The value of “null” is equal to zero, when we utilize an “undefined” with a numeric or Boolean value then the resultant output will be “NaN”.

 The “Number” method will convert the boolean values “true” and “false” to the numeric values “1” and “0” respectively:
 The output verifies that the “Number” method explicitly converts the boolean “true” to numeric value 1 and boolean “false” to numeric value 0, therefore we get “51”.
When 50 is added with a boolean “true” and it gives “50”.
When boolean “false” is added with the numeric value ‘50’.
JavaScript offers many more functions like “parseInt()”, “parseFloat()” and “Math.floor()” to convert a string into a number data type, we can use any of these method according to our requirement:
let StrToNum;
StrToNum = parseInt('50.50');
console.log("String converted to Number : " , StrToNum);
StrToNum = parseFloat('50.50');
console.log("String converted to Float : " , StrToNum);
StrToNum =
The output verifies that the “Number” method explicitly converts the boolean “true” to numeric value 1 and boolean “false” to numeric value 0, therefore we get “51”.
When 50 is added with a boolean “true” and it gives “50”.
When boolean “false” is added with the numeric value ‘50’.
JavaScript offers many more functions like “parseInt()”, “parseFloat()” and “Math.floor()” to convert a string into a number data type, we can use any of these method according to our requirement:
let StrToNum;
StrToNum = parseInt('50.50');
console.log("String converted to Number : " , StrToNum);
StrToNum = parseFloat('50.50');
console.log("String converted to Float : " , StrToNum);
StrToNum =  The output of the above-given example is:


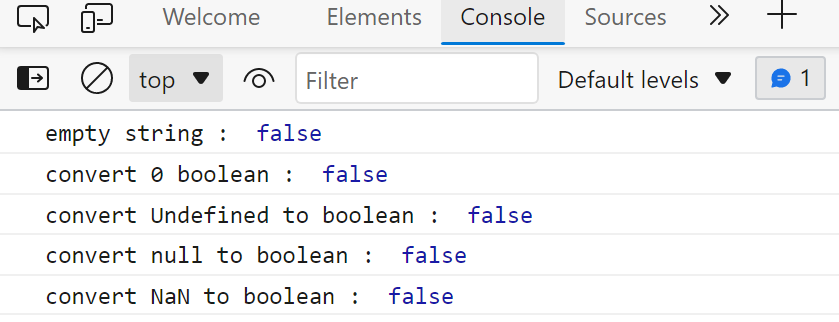 All the values except the values in above example will return “true”:
Bol =
All the values except the values in above example will return “true”:
Bol =  For example when we put a numeric value other than zero, or a string type value, then “Boolean()” method will return true:

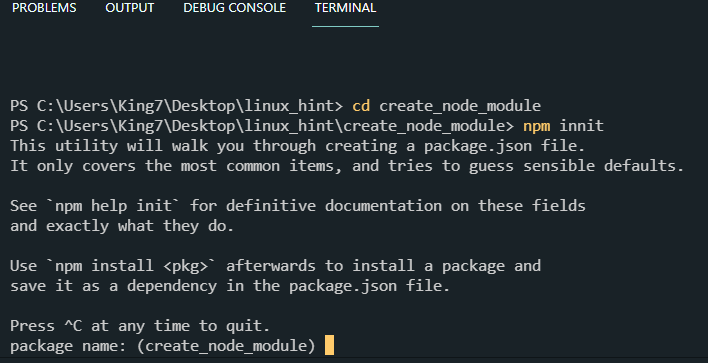 Just follow with the terminal-screen guide and provide a package name, author name, etc.
In the end, it is going to ask you if you are okay with the package.json file:
Just follow with the terminal-screen guide and provide a package name, author name, etc.
In the end, it is going to ask you if you are okay with the package.json file:
 Type yes or press enter.
Create a new file and name it “myfirstmodule.js”.
In this file, we are going to store information about super-cars, so we need a data structure of Car which we can create with the following lines of code:
class Car {
constructor(name, model) {this.name = name;this.model = model;}}
Next we need a list of cars with each entry mapped on the data structure that we just created:
const allCars = [new Car("McLaren", 2012),new Car("Bugatti", 2020),new Car("Ferrari", 2007),new Car("Lambo", 2008),new Car("Toyota", 1993),new Car("Mustang", 2017),];
Next up, we want a function that will randomly pick cars from our list.
We will also need to export this function using the keyword “exports” so that any file that requires our module can have access to this function.
Use the following lines of code:
exports.getRandomCar = () => {return allCars[
Type yes or press enter.
Create a new file and name it “myfirstmodule.js”.
In this file, we are going to store information about super-cars, so we need a data structure of Car which we can create with the following lines of code:
class Car {
constructor(name, model) {this.name = name;this.model = model;}}
Next we need a list of cars with each entry mapped on the data structure that we just created:
const allCars = [new Car("McLaren", 2012),new Car("Bugatti", 2020),new Car("Ferrari", 2007),new Car("Lambo", 2008),new Car("Toyota", 1993),new Car("Mustang", 2017),];
Next up, we want a function that will randomly pick cars from our list.
We will also need to export this function using the keyword “exports” so that any file that requires our module can have access to this function.
Use the following lines of code:
exports.getRandomCar = () => {return allCars[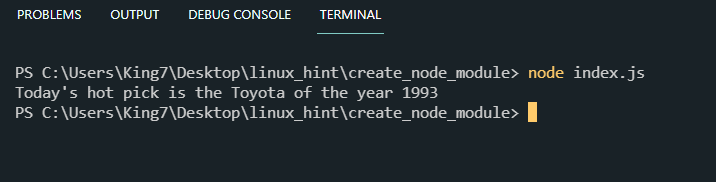 There you have it, you created your first node module, and used it in another file using exports and require statements.
If you want to go the extra mile then you can publish this module on the npm library.
There you have it, you created your first node module, and used it in another file using exports and require statements.
If you want to go the extra mile then you can publish this module on the npm library.
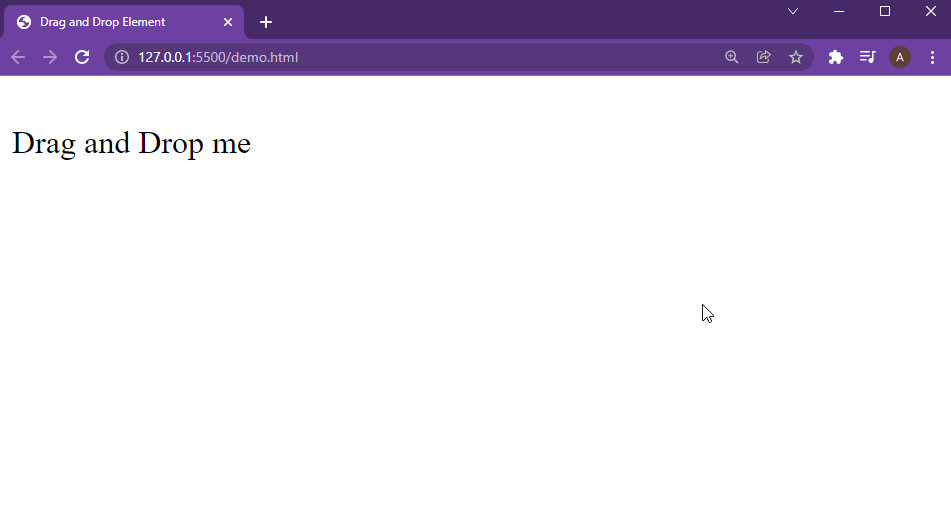 To style this element a little, write the following code outside of the <body> tag:
<style>.dragElement {width: 100px;height: 70;background-color:lightblue;display: inline-block;align-items: center;vertical-align: bottom;}
</style>
By changing this style you get the following output on the webpage:
To style this element a little, write the following code outside of the <body> tag:
<style>.dragElement {width: 100px;height: 70;background-color:lightblue;display: inline-block;align-items: center;vertical-align: bottom;}
</style>
By changing this style you get the following output on the webpage:
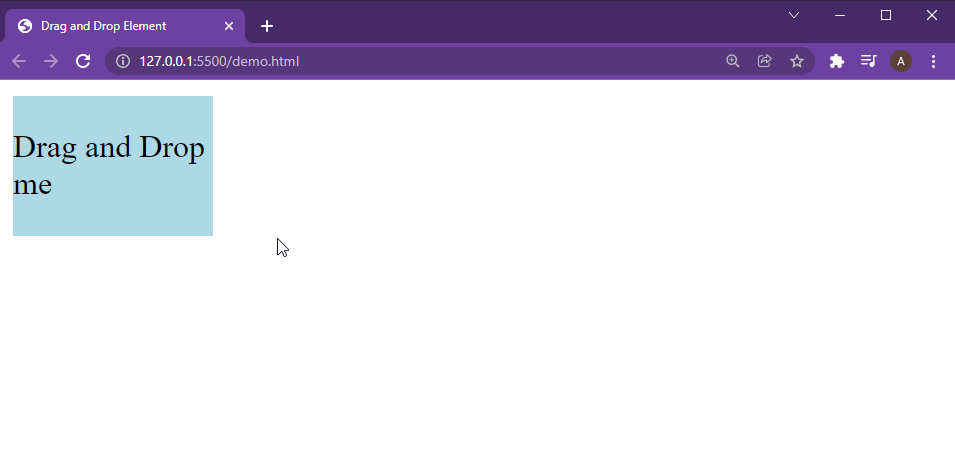 For the script code, create a new script tag <script>, the javascript we will be placed inside of this script tag.
For the javascript part, we are going to first create a new var that will later use the reference of the element to change its position on the webpage:
var dragValue;
Next, we are going to create a function named move() that we will use to move the element.
The first thing we are going to do inside this move function is to get the reference of our element inside a variable with the following line of code:
var element = document.getElementById("dragElement");
Not that we have our reference, we are going to set the position of this element to absolute.
As we are moving the element with our choice we want to place it exactly where we want, not relative to some other element:
element.style.position = "absolute";
When we click on this element, we want to pass the reference of our element to the “dragValue” variable so that we can manipulate its position:
element.onmousedown = function () {
dragValue = element;};
Now, that we have the reference of our element stored in the dragValue variable, we are now going to place it at the mouse’s location by using the following lines of code:
document.onmousemove = function (e) {
var x = e.pageX;
var y = e.pageY;
dragValue.style.left = x + "px";
dragValue.style.top = y + "px";};
When we release the mouse button, we want to remove the reference of our element from the “dragValue” variable:
element.onmouseup = function () {
dragValue = null;};
The last step is to invoke this move() function with the following line of code:
move();
The complete script code will be:
<script>
move();
var dragValue;
functionmove() {
var element = document.getElementById("dragElement");
element.style.position = "absolute";
element.onmousedown = function () {
dragValue = element;
};
element.onmouseup = function () {
dragValue = null;
};
document.onmousemove = function (e) {
var x = e.pageX;
var y = e.pageY;
dragValue.style.left = x + "px";
dragValue.style.top = y + "px";
};
}</script>
Save the file and execute the HTML, and you will get the following result on your browser:
For the script code, create a new script tag <script>, the javascript we will be placed inside of this script tag.
For the javascript part, we are going to first create a new var that will later use the reference of the element to change its position on the webpage:
var dragValue;
Next, we are going to create a function named move() that we will use to move the element.
The first thing we are going to do inside this move function is to get the reference of our element inside a variable with the following line of code:
var element = document.getElementById("dragElement");
Not that we have our reference, we are going to set the position of this element to absolute.
As we are moving the element with our choice we want to place it exactly where we want, not relative to some other element:
element.style.position = "absolute";
When we click on this element, we want to pass the reference of our element to the “dragValue” variable so that we can manipulate its position:
element.onmousedown = function () {
dragValue = element;};
Now, that we have the reference of our element stored in the dragValue variable, we are now going to place it at the mouse’s location by using the following lines of code:
document.onmousemove = function (e) {
var x = e.pageX;
var y = e.pageY;
dragValue.style.left = x + "px";
dragValue.style.top = y + "px";};
When we release the mouse button, we want to remove the reference of our element from the “dragValue” variable:
element.onmouseup = function () {
dragValue = null;};
The last step is to invoke this move() function with the following line of code:
move();
The complete script code will be:
<script>
move();
var dragValue;
functionmove() {
var element = document.getElementById("dragElement");
element.style.position = "absolute";
element.onmousedown = function () {
dragValue = element;
};
element.onmouseup = function () {
dragValue = null;
};
document.onmousemove = function (e) {
var x = e.pageX;
var y = e.pageY;
dragValue.style.left = x + "px";
dragValue.style.top = y + "px";
};
}</script>
Save the file and execute the HTML, and you will get the following result on your browser:
 And there you have it; you have made a drag and drop element in vanilla javascript
 To create deep clones in vanilla JavaScript, we need to use a combination of JSON parse() function and JSON stringify() function.
In this post, we are going to discuss what are shallow clones and deep clones, how to make clones, and how to make deep clones.
To create deep clones in vanilla JavaScript, we need to use a combination of JSON parse() function and JSON stringify() function.
In this post, we are going to discuss what are shallow clones and deep clones, how to make clones, and how to make deep clones.
 To prove these are actual clones, and not references of the original array passed inside these variables we are going to make some changes in the clones and check if these changes affect the original array or not.
clone1[0] = 1;
clone2[1] = "Hello";
Print all the arrays onto the console once again to examine the changes with the following lines:
console.log(originalArray);
console.log(clone1);
console.log(clone2);
You will observe the following output:
To prove these are actual clones, and not references of the original array passed inside these variables we are going to make some changes in the clones and check if these changes affect the original array or not.
clone1[0] = 1;
clone2[1] = "Hello";
Print all the arrays onto the console once again to examine the changes with the following lines:
console.log(originalArray);
console.log(clone1);
console.log(clone2);
You will observe the following output:
 As you can see, changes in the clone arrays didn’t affect the original array which means that other arrays didn’t copy the reference of the original array.
 Let’s try making some changes in the cloned array with the following line of code:
clone[0].push("Maps");
This should make changes in only the “clone” array and not in the original array, but this is where things get interesting.
Print out both the arrays using the console log function:
console.log(originalArray[0]);
console.log(clone[0]);
You should see the following result on your console:
Let’s try making some changes in the cloned array with the following line of code:
clone[0].push("Maps");
This should make changes in only the “clone” array and not in the original array, but this is where things get interesting.
Print out both the arrays using the console log function:
console.log(originalArray[0]);
console.log(clone[0]);
You should see the following result on your console:
 You can easily observe from the image above that changes in the cloned array caused changes in the original array.
This means that if our object\array contains object\arrays then the cloning passes reference to the nested objects thus creating a shallow clone.
You can easily observe from the image above that changes in the cloned array caused changes in the original array.
This means that if our object\array contains object\arrays then the cloning passes reference to the nested objects thus creating a shallow clone.
 Now, let’s try changing the elements of the cloned array using the following line:
deepClone[0].push("Maps");
The last thing that is left is to observe both the arrays on the console to determine whether changing the cloned array changed the original array or not:
console.log(originalArray[0]);
console.log(deepClone[0]);
You will get the following result on your console:
Now, let’s try changing the elements of the cloned array using the following line:
deepClone[0].push("Maps");
The last thing that is left is to observe both the arrays on the console to determine whether changing the cloned array changed the original array or not:
console.log(originalArray[0]);
console.log(deepClone[0]);
You will get the following result on your console:
 In the above image, you can observe that changes in the cloned array didn’t cause any change in the original array.
This means that the nested arrays\objects were also copied rather than their reference being passed to the new variable, and this is why such clones are called the deep clones.
In the above image, you can observe that changes in the cloned array didn’t cause any change in the original array.
This means that the nested arrays\objects were also copied rather than their reference being passed to the new variable, and this is why such clones are called the deep clones.
 Now press the “install” button to install the ESLint in Visual Studio Code:
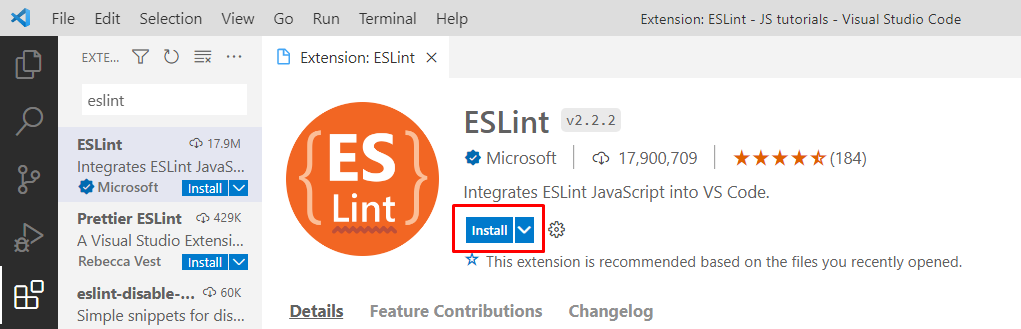 As we are done with ESlint installation within the visual studio code.
Now we need to have a project where we can test it.
Let’s initialize a project first.
As we are done with ESlint installation within the visual studio code.
Now we need to have a project where we can test it.
Let’s initialize a project first.
 Now we will use the “cd” command to access our project:
 Now it’s time to initialize our project, for this purpose we run the following command in our terminal:
> npm init -y
Now it’s time to initialize our project, for this purpose we run the following command in our terminal:
> npm init -y
 Now we are going to install ESLint in our project and then we will initialize it:
> npm install eslint@7.32.0
Now we are going to install ESLint in our project and then we will initialize it:
> npm install eslint@7.32.0
 To initialize the “ESLint” in our project, type the command:
> npx eslint --init
To initialize the “ESLint” in our project, type the command:
> npx eslint --init
 When we hit the “Enter” button then a sequence of questions appear one after the other:
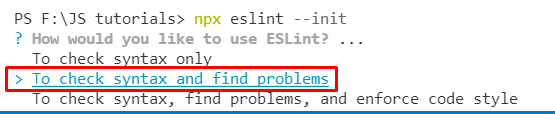 Select the second option and press the “Enter” button:
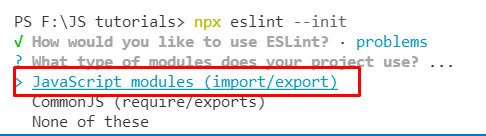 Next, select the import/export and option and hit the “Enter” button:
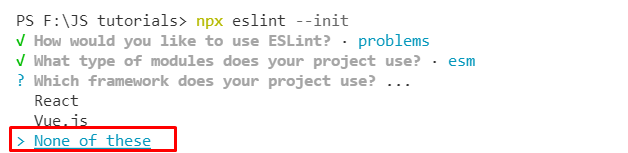 Here, select the “none of these” options to select the framework:
 Select the “no” option for the above-given question and hit the “Enter” button to move to the next question:
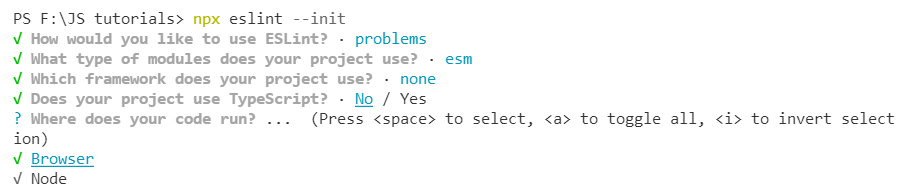 Select both options and press enter, next Select “JavaScript” for the final question,
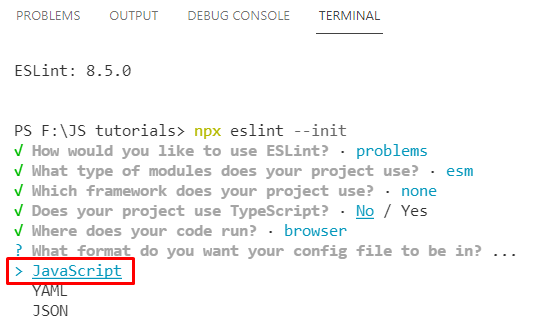 When we press enter we will get a message “successfully created”.
Now inside our project, we have the following files:
When we press enter we will get a message “successfully created”.
Now inside our project, we have the following files:
 Now we will consider an example and we will break some basic rules deliberately and we will observe how ESLint will respond when we break some rules.
var string = "Hello how are you";let val= 20;
console.log(val);
What have we done in this example? We created two variables and didn’t utilize one of them in our project:
Now we will consider an example and we will break some basic rules deliberately and we will observe how ESLint will respond when we break some rules.
var string = "Hello how are you";let val= 20;
console.log(val);
What have we done in this example? We created two variables and didn’t utilize one of them in our project:
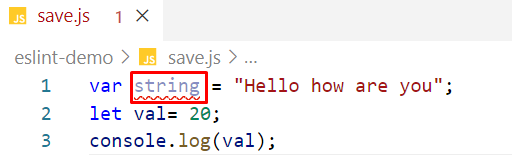 But as we enabled ESLint in our visual studio code, it underlines the variables “string” as shown in the above snippet and shows the following error in the “problems” section:
 And this problem will disappear when we utilize this variable somewhere in our code:
var string = "Hello how are you";let val= 20;
console.log(val, string);
Now have a look at the below given snipped:
And this problem will disappear when we utilize this variable somewhere in our code:
var string = "Hello how are you";let val= 20;
console.log(val, string);
Now have a look at the below given snipped:
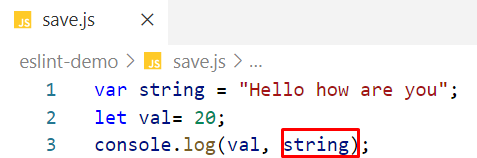 You will see that this time there is no such issue appearing in the problem section:
 For a better understanding of ESLint let’s consider another example in which we will break some rules like missing semicolons and extra spaces, and we will observe how ESLint responds to it:
var string = "Hello how are you";let val= 20
console.log(val)if (val == 20){
console.log(string)}
In this code, we add some extra white spaces and missed the semicolons intentionally:
For a better understanding of ESLint let’s consider another example in which we will break some rules like missing semicolons and extra spaces, and we will observe how ESLint responds to it:
var string = "Hello how are you";let val= 20
console.log(val)if (val == 20){
console.log(string)}
In this code, we add some extra white spaces and missed the semicolons intentionally:
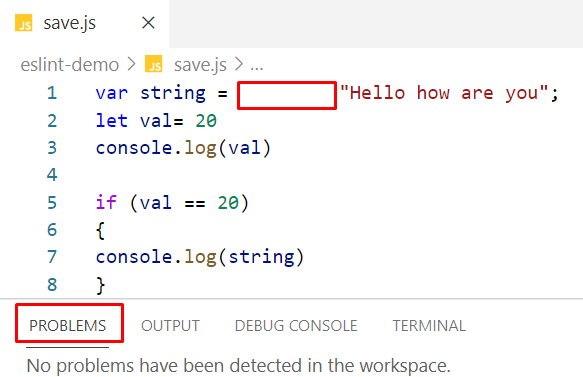 So, technically nothing wrong with it, as shown in the problem section.
However, this is not a good coding practice to put extra spaces or missing semicolons.
ESLint doesn’t show any issue because these rules are not added in ESLint.
We can specify them in the following file:
So, technically nothing wrong with it, as shown in the problem section.
However, this is not a good coding practice to put extra spaces or missing semicolons.
ESLint doesn’t show any issue because these rules are not added in ESLint.
We can specify them in the following file:
 We will open the “.eslinrc.js” file from our project’s folder and we will add some rules:
 We add the first rule to tackle with semicolons and the second rule to tackle with white spaces and save the changes.
Now if we miss the semicolon or we put extra spaces in our code then ESLint will highlight them in the problem section:
We add the first rule to tackle with semicolons and the second rule to tackle with white spaces and save the changes.
Now if we miss the semicolon or we put extra spaces in our code then ESLint will highlight them in the problem section:
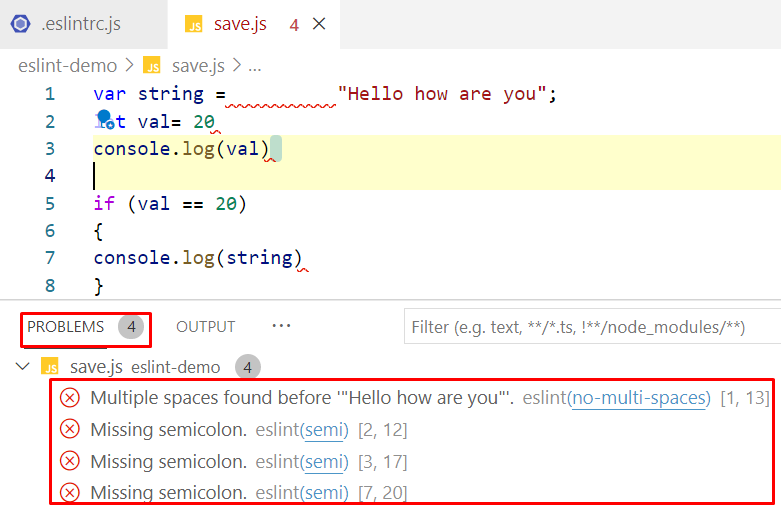
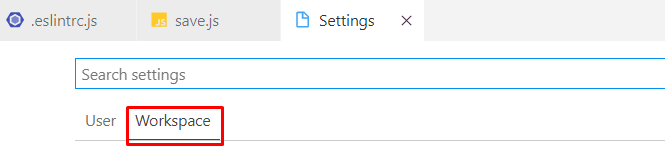 In the search box, search for the “Code Actions On Save” and select the “Edit in settings.json” option:
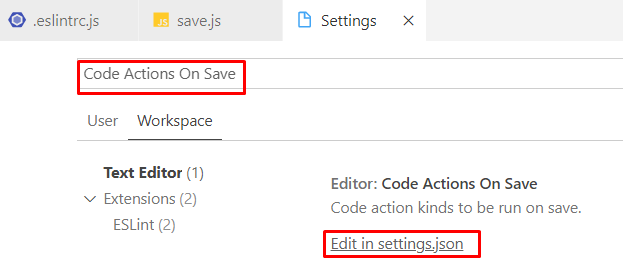 Add the following code in the Setting.json file:
 These settings will enable the linting on save.
 For the JavaScript code, the first thing we need to do is store the URL in a separate variable with the following line:
const
For the JavaScript code, the first thing we need to do is store the URL in a separate variable with the following line:
const 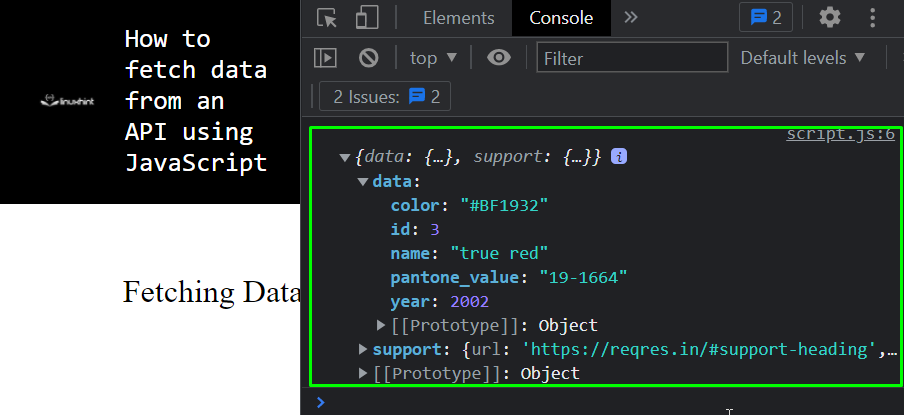 That is it, you have successfully fetched data from an API using JavaScript.
 Here, at index 0 we have a character “T”, at index 1 we have “H”, a blank space at index number 4, and at final index “20”, we have “Y”, which means it doesn’t matter whether it’s a blank space or an alphabet each character corresponds to an index.

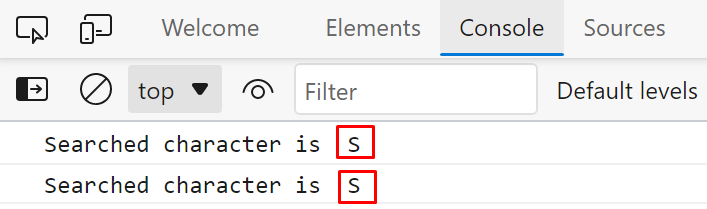
 As a result, we will get an array of 5 elements:
 Now, we can access each element of the array with its index.


 Axios is an HTTP client, which is used to make XMLHttpRequest from the browser as well as HTTP requests for projects created with NodeJS.
It is often referred to as the isomorphic HTTP client, where isomorphic means for both NodeJs and browsers(vanilla JavaScript).
Axios provides methods like get, post, and delete and automatically transforms the JSON data which is something that sets it apart from the trivial JavaScript methods like the fetch() method from the Fetch API.
Axios is an HTTP client, which is used to make XMLHttpRequest from the browser as well as HTTP requests for projects created with NodeJS.
It is often referred to as the isomorphic HTTP client, where isomorphic means for both NodeJs and browsers(vanilla JavaScript).
Axios provides methods like get, post, and delete and automatically transforms the JSON data which is something that sets it apart from the trivial JavaScript methods like the fetch() method from the Fetch API.
 To demonstrate the fetching of data using the Axios, we are going to be using the
  As you can see, we are able to fetch data from the API upon button press using Axios in our javascript code.
 If we expand this entry then we will be able to see the response of the API much more clearly:
 We made a successful GET request using Axios and printed out the response to the console.
 It takes a “name” key-value pair and a “job” key-value pair.
Let’s call the createUser() function with appropriate JSON inside it:
createUser({
name: "John Doe",
job: "Auditor",});
Run the file and you will see the following result on your browser’s console:
It takes a “name” key-value pair and a “job” key-value pair.
Let’s call the createUser() function with appropriate JSON inside it:
createUser({
name: "John Doe",
job: "Auditor",});
Run the file and you will see the following result on your browser’s console:
 That is it, we were able to send a POST request to an API using Axios.
 There you go, we have successfully made a DELETE request to an API using Axios.
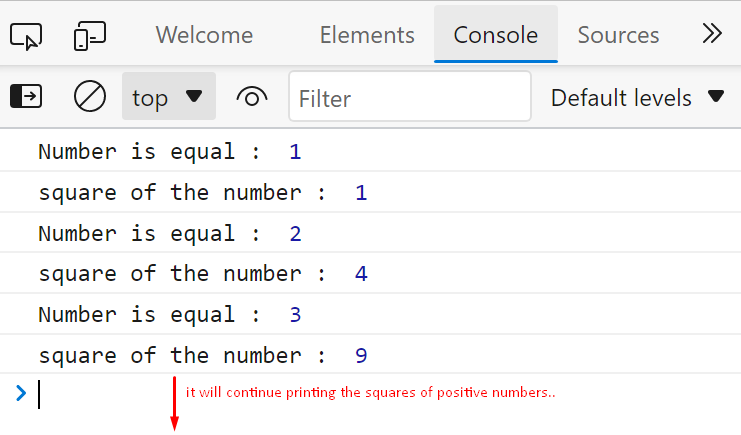
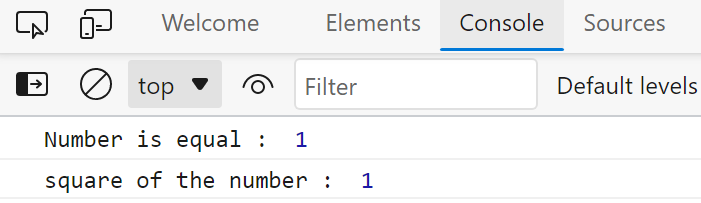
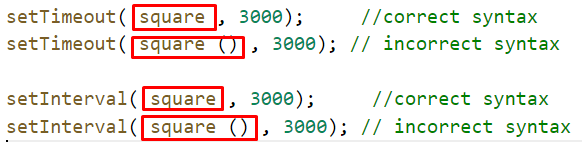

 Inside this file, the first thing that we need to add is the node-cron library with the following line:
const cron = require("node-cron");
Now, the node-cron module has a function called schedule() which takes in 2 arguments
The first is the time stamp denoted by a syntax of asterisks
The second one being the function that will be executed at a specific time
We can use this function, to run a task at every minute using the following lines:
cron.schedule('* * * * *', function() {
console.log('New task every minute');});
The syntax of asterisks can be denoted as
# ┌───────────── minute (0 - 59)
# │ ┌───────────── hour (0 - 23)
# │ │ ┌───────────── day of the month (1 - 31)
# │ │ │ ┌───────────── month (1 - 12)
# │ │ │ │ ┌───────────── day of the week (0 - 6) (Sunday to Saturday;
# │ │ │ │ │ 7 is also Sunday on some systems)
# │ │ │ │ │
# │ │ │ │ │
# * * * * *
Looking at the syntax, we used 5 asterisks meaning that the function will be called every minute till the end of time (metaphorically)
Inside this file, the first thing that we need to add is the node-cron library with the following line:
const cron = require("node-cron");
Now, the node-cron module has a function called schedule() which takes in 2 arguments
The first is the time stamp denoted by a syntax of asterisks
The second one being the function that will be executed at a specific time
We can use this function, to run a task at every minute using the following lines:
cron.schedule('* * * * *', function() {
console.log('New task every minute');});
The syntax of asterisks can be denoted as
# ┌───────────── minute (0 - 59)
# │ ┌───────────── hour (0 - 23)
# │ │ ┌───────────── day of the month (1 - 31)
# │ │ │ ┌───────────── month (1 - 12)
# │ │ │ │ ┌───────────── day of the week (0 - 6) (Sunday to Saturday;
# │ │ │ │ │ 7 is also Sunday on some systems)
# │ │ │ │ │
# │ │ │ │ │
# * * * * *
Looking at the syntax, we used 5 asterisks meaning that the function will be called every minute till the end of time (metaphorically)
 But after waiting for a few minutes, you will get the following result on your console:
 As this program has no ending condition, so if you want to close this program you need to press (Control + C) to manually stop the execution
And there you go, you have successfully learned how to run scheduled tasks in NodeJs using the node-cron module
As this program has no ending condition, so if you want to close this program you need to press (Control + C) to manually stop the execution
And there you go, you have successfully learned how to run scheduled tasks in NodeJs using the node-cron module

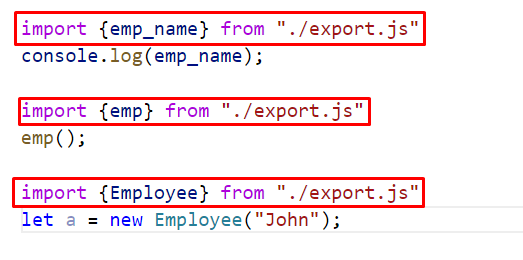 The output will verify that every element present in the “./export.js” file is imported to the “import.js” file:
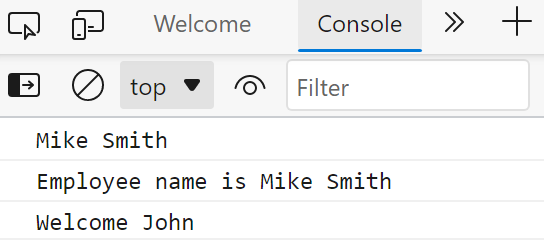 emp_name is variable, emp is a function, and Employee is a class created in the export.js file:
import { emp_name, emp, Employee } from "./export.js";
console.log(emp_name);
emp();
let a = new Employee("John");
Now here, in the above code, we import all the elements in a single statement:
emp_name is variable, emp is a function, and Employee is a class created in the export.js file:
import { emp_name, emp, Employee } from "./export.js";
console.log(emp_name);
emp();
let a = new Employee("John");
Now here, in the above code, we import all the elements in a single statement:
 We will get the following output:
 Now we will consider another example to understand how to import a default element:
import _name from "./export.js"
console.log(_name);
We import a default member from the file “export.js” with “_name”:
Now we will consider another example to understand how to import a default element:
import _name from "./export.js"
console.log(_name);
We import a default member from the file “export.js” with “_name”:
 In the “export.js” file the variable is created with the name “emp_name”:
 But we access the same variable with “_name” in the “import.js” file and get the following output:
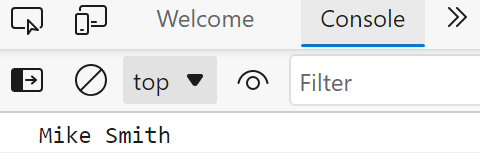 We get the same output, this means while importing any default element it is not necessary to use the same name as in the first file, instead, we can also use any different names.
 Note: We didn’t use any id or class attribute in the input field as we will be referring to our input field using the query selector.
For the JavaScript code, the first thing that we are going to do is to select the input field using the query selector:
const input = document.querySelector(`input[type="file"]`);
Next up, we are going to add an event listener of “change” on our variable input, that will call a function to load the content of the file using the following line:
input.addEventListener("change", function (e) {}, false);
This function event listener will execute every time the input tag loads a file, we can access the file using the “input.file” array.
To display the details of the loaded file we can use the following line:
console.log(input.files[0])
We get the following output on our console:
Note: We didn’t use any id or class attribute in the input field as we will be referring to our input field using the query selector.
For the JavaScript code, the first thing that we are going to do is to select the input field using the query selector:
const input = document.querySelector(`input[type="file"]`);
Next up, we are going to add an event listener of “change” on our variable input, that will call a function to load the content of the file using the following line:
input.addEventListener("change", function (e) {}, false);
This function event listener will execute every time the input tag loads a file, we can access the file using the “input.file” array.
To display the details of the loaded file we can use the following line:
console.log(input.files[0])
We get the following output on our console:
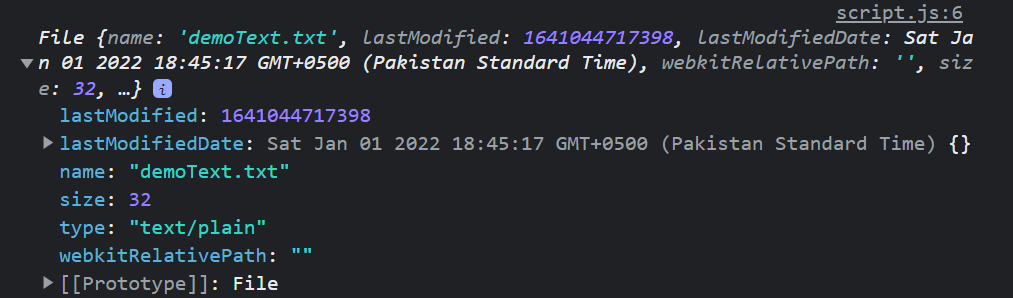 Inside the function, we are going to create our file reader object using the line:
const reader = new
Inside the function, we are going to create our file reader object using the line:
const reader = new  You will observe the following result on your console:
 And there you go, you have read the content of the file and printed them out onto the console.
 And there you go, now you know how to work with the File Reader API to read files on your local machine
 DOM can be called the structure of the document where the document can be an HTML webpage or an XML page.
In this post, we are going to know what DOM is, how to work with live DOM viewers and how to access elements with a scripting language.
DOM can be called the structure of the document where the document can be an HTML webpage or an XML page.
In this post, we are going to know what DOM is, how to work with live DOM viewers and how to access elements with a scripting language.
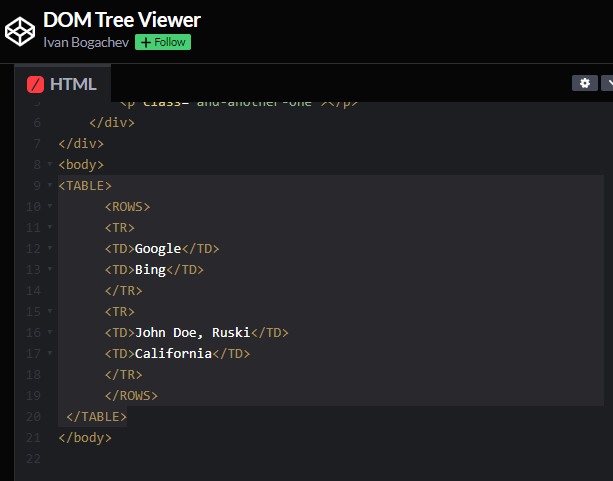 Below this HTML Tab on “codepen”, you’ll be able to see the DOM hierarchy like:
 You can clearly see the parent nodes, child nodes and siblings nodes based on their indentation in the structure
 There you go you have changed the style of an element using scripting language.
 From the above output, we can analyze that JavaScript is a case-sensitive language.
So, we have to follow the proper naming conventions.
However, variable names and function names, there is no such restriction to follow.
it is a good convention to use and follow the camel-casing naming convention i.e.
varName, funcName.
From the above output, we can analyze that JavaScript is a case-sensitive language.
So, we have to follow the proper naming conventions.
However, variable names and function names, there is no such restriction to follow.
it is a good convention to use and follow the camel-casing naming convention i.e.
varName, funcName.

 In this example, we have 7 statements but we didn’t separate them so this program wouldn’t work, it will through an error:
 We need to separate each statement, and we can do it by separating each statement by a new line and it’s a good practice to write only one statement in each line and use semicolon after each statement, as we did in the following example:
var a,b,c;
a=5;
b=6;
c=10;
console.log("value of a : ", a);
console.log("value of b : ", b);
console.log("value of c : ", c);
Now all the seven statements are separated by a semicolon “;” and JavaScript will execute each statement one after the other:
We need to separate each statement, and we can do it by separating each statement by a new line and it’s a good practice to write only one statement in each line and use semicolon after each statement, as we did in the following example:
var a,b,c;
a=5;
b=6;
c=10;
console.log("value of a : ", a);
console.log("value of b : ", b);
console.log("value of c : ", c);
Now all the seven statements are separated by a semicolon “;” and JavaScript will execute each statement one after the other:
 On successful execution, we will get the following output:
 However, if the statements are written in separate lines then JavaScript would execute perfectly fine without using semicolons at the end of the statement and throw no error.
 The output will confirm that JavaScript ignores the extra spaces and prints the output on the console:
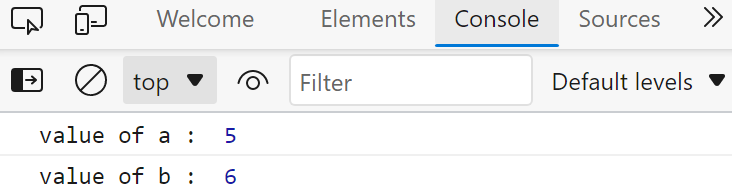
 For multiline comments use “/*” at the start and “*/” at the end:
/*
var a,b,c;
a=5;
b=6;
c=10;
console.log("value of a : ", a);
console.log("value of b : ", b);
console.log("value of c : ", c);
*/
The code between “/*” and “*/” will be commented:
For multiline comments use “/*” at the start and “*/” at the end:
/*
var a,b,c;
a=5;
b=6;
c=10;
console.log("value of a : ", a);
console.log("value of b : ", b);
console.log("value of c : ", c);
*/
The code between “/*” and “*/” will be commented:

 JavaScript wouldn’t assign a value ‘5’ to the variable “if”.
Because “if” is reserved for the conditional statements.
JavaScript wouldn’t assign a value ‘5’ to the variable “if”.
Because “if” is reserved for the conditional statements.
 For the jQuery code, we are going to turn the opacity of the div down to 0.7 but we are going to do it in 2 seconds using the following lines of code:
$("button").click(function () {
$("div:last").animate(
{
opacity: "0.5",
},2000
);});
As you can notice, we have wrapped the animate method in a click event method so that our animation is invoked only when we click the button.
Upon pressing the button, we get the following result:
For the jQuery code, we are going to turn the opacity of the div down to 0.7 but we are going to do it in 2 seconds using the following lines of code:
$("button").click(function () {
$("div:last").animate(
{
opacity: "0.5",
},2000
);});
As you can notice, we have wrapped the animate method in a click event method so that our animation is invoked only when we click the button.
Upon pressing the button, we get the following result:
 As you can see, we were able to animate the opacity using the animate method.
 As you can see, we have a div with some text inside of it along with two buttons that will use these hide and show animations respectively.
For the jQuery part, use the following lines of code in your JavaScript file:
$("#Show").click(function () {
$("#demo").show(2000);});
$("#hide").click(function () {
$("#demo").hide(2000);});
Notice: We have passed the time as 2 seconds, otherwise the change will be instant and we won’t get an animation like effect.
Execute the file and click on the Hide button and you will get the following result:
As you can see, we have a div with some text inside of it along with two buttons that will use these hide and show animations respectively.
For the jQuery part, use the following lines of code in your JavaScript file:
$("#Show").click(function () {
$("#demo").show(2000);});
$("#hide").click(function () {
$("#demo").hide(2000);});
Notice: We have passed the time as 2 seconds, otherwise the change will be instant and we won’t get an animation like effect.
Execute the file and click on the Hide button and you will get the following result:
 As you can see, we get an attractive animation, the next step is to test the show animation by clicking on the show button.
So, click on the show button and you will get the following results:
As you can see, we get an attractive animation, the next step is to test the show animation by clicking on the show button.
So, click on the show button and you will get the following results:
 As you can see, we get a smooth unhide\show animation
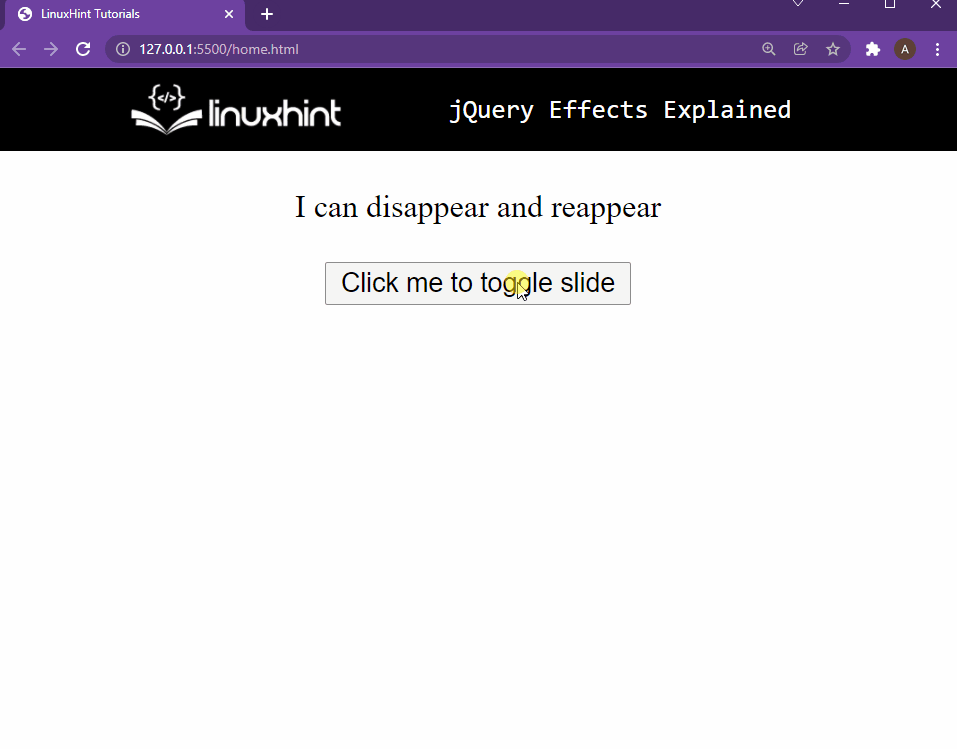 As you can see, we have a quick and smooth slide toggle animation using jQuery.
Apart from these, jQuery provides a whole bunch of other animation methods which you can try out.
As you can see, we have a quick and smooth slide toggle animation using jQuery.
Apart from these, jQuery provides a whole bunch of other animation methods which you can try out.
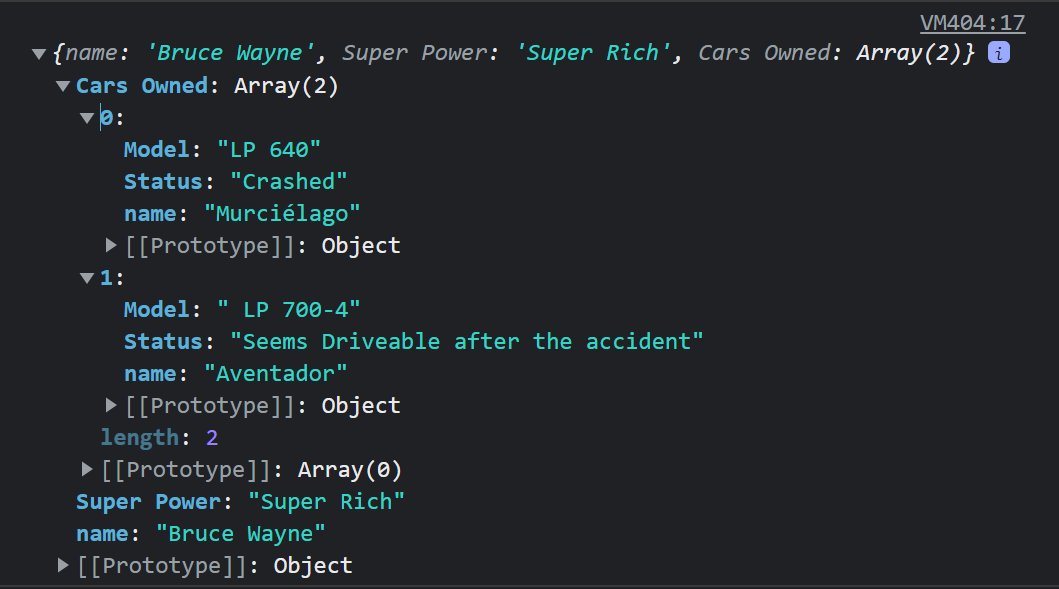
 It is clear from the out that it returns an array instead of an object
 As you can see from the output, the value of the “lastLoggedIn” is not a data value, to make it into a date value you can use the following line:
varParsed.lastLoggedIn = new
As you can see from the output, the value of the “lastLoggedIn” is not a data value, to make it into a date value you can use the following line:
varParsed.lastLoggedIn = new  As you can notice, this time around, we are getting a Date value rather than a normal string
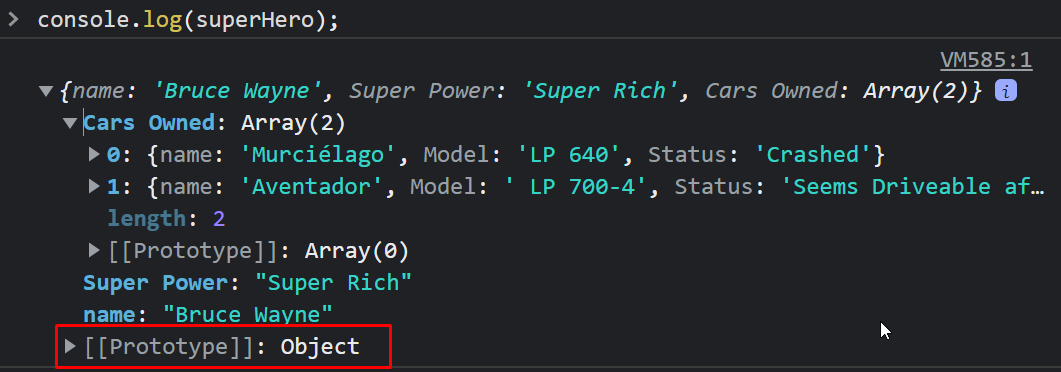 From the output, it is clear that it is indeed taken as an object by our javascript application.
Printing this object onto the console was important so that we can see the difference between a string output and an object output (because sometimes they confuse especially when working with code editors)
To convert this into a JSON string we use the following line of code:
var superHeroString = JSON.stringify(superHero);
To verify this conversion, use the following line to print the variable superHeroString onto the console:
console.log(superHeroString);
We get the following result on the console:
From the output, it is clear that it is indeed taken as an object by our javascript application.
Printing this object onto the console was important so that we can see the difference between a string output and an object output (because sometimes they confuse especially when working with code editors)
To convert this into a JSON string we use the following line of code:
var superHeroString = JSON.stringify(superHero);
To verify this conversion, use the following line to print the variable superHeroString onto the console:
console.log(superHeroString);
We get the following result on the console:
 You can observe that this time around, we have printed a string onto the console
 But what if we don’t want to include the “key-value” pair which has the key “age”.
For that, we can write a replacer method and pass it inside the second argument of the stringify method.
But what if we don’t want to include the “key-value” pair which has the key “age”.
For that, we can write a replacer method and pass it inside the second argument of the stringify method.
 As you can see, the key-value pair with the key = “age” was excluded from the resulting string.
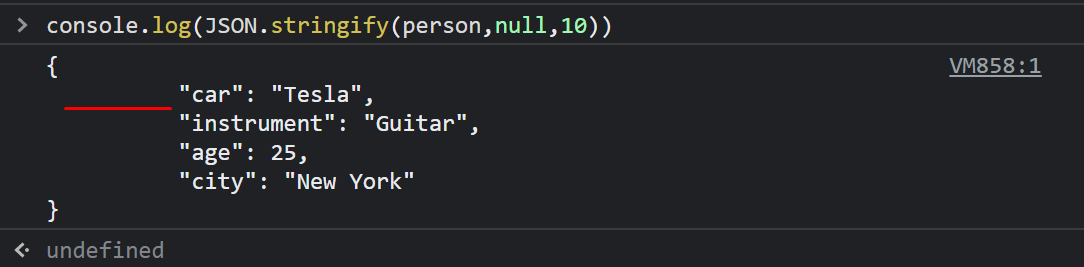 I have marked the space with a red line to make it prominent
You can use a string for the space argument as well.
This string will be added as a substring before each key-value pair.
To demonstrate this, take the following line of code:
console.log(JSON.stringify(person, null, "S"));
You will get the following outcome on your console:
I have marked the space with a red line to make it prominent
You can use a string for the space argument as well.
This string will be added as a substring before each key-value pair.
To demonstrate this, take the following line of code:
console.log(JSON.stringify(person, null, "S"));
You will get the following outcome on your console:
 As you can see, the argument “S” was added as a substring before each key-value pair.

 As you can see we were able to access the element by using its ID and then change the style of the element by using javascript.

 As you can see, we have changed the text of the elements with the tag name “article”.

 That is it for accessing elements using all the methods offered by JavaScript.
 If the remainder is equal to zero then the filter method will pick that element and put it into the filtered array.
As a result, we will get a resultant array of elements that are divisible by 2:
If the remainder is equal to zero then the filter method will pick that element and put it into the filtered array.
As a result, we will get a resultant array of elements that are divisible by 2:
 In the output, we can observe that the resultant array is reduced to 5 elements since there are only 5 elements that are divisible by 2.
 Now let’s assume an example where we searched for the element that is present in the array.
However, we restrict the includes() function to start comparison from the index 3:
const originalArray = [12, 25, 33, 20, 75, 2, 16, 77, 87, 100];const searchedElement = originalArray.includes(25, 3);
console.log("The searched element found in the array : ", searchedElement);
So in this example, the “includes()” function starts comparing ‘25’ with other values from index 3:
Although 25 is present in the array still the output will return false because we restrict the includes() function to start searching from index 3 and 25 was present at index 1:
Now let’s assume an example where we searched for the element that is present in the array.
However, we restrict the includes() function to start comparison from the index 3:
const originalArray = [12, 25, 33, 20, 75, 2, 16, 77, 87, 100];const searchedElement = originalArray.includes(25, 3);
console.log("The searched element found in the array : ", searchedElement);
So in this example, the “includes()” function starts comparing ‘25’ with other values from index 3:
Although 25 is present in the array still the output will return false because we restrict the includes() function to start searching from index 3 and 25 was present at index 1:

 Although we searched for all those elements that are less than 75 and we can note that there are many numbers that are less than 75, the find() function doesn’t return the whole list of those elements, instead it will return only the first element.
 The output will only return the first index of ‘75’.
 Output of the above code will be:
 Now, let’s see what happens if we change the value of “employee1”, will it affect the properties of “employee2”?
Let’s modify our code:
let employee1 = { name: "Joe Clarke", age: 35, id: 123, city: 'London' };
let employee2 = employee1;
employee1.name = "Dean Elgar";
console.log("updated values of employee1 : ", employee1);
console.log("updated values of employee2 : ", employee2);
Let’s check whether it affects the name property of employee2 or not.
Now, let’s see what happens if we change the value of “employee1”, will it affect the properties of “employee2”?
Let’s modify our code:
let employee1 = { name: "Joe Clarke", age: 35, id: 123, city: 'London' };
let employee2 = employee1;
employee1.name = "Dean Elgar";
console.log("updated values of employee1 : ", employee1);
console.log("updated values of employee2 : ", employee2);
Let’s check whether it affects the name property of employee2 or not.
 The output for our modified code will be:
 From the above-given output, we can see that changes that we make in the property of “employee1” has affected the value of “employee2” as well.
This happens because “employee2” was created with the reference of “employee1”.
From the above-given output, we can see that changes that we make in the property of “employee1” has affected the value of “employee2” as well.
This happens because “employee2” was created with the reference of “employee1”.
 Now let’s examine the output, you will see both variables show the same output:
 Now change the value of “employee1” and observe, will it change the value of “employee2” as well or remain the same:
var employee1= 'Daniel';
var employee2= employee1;
console.log("name of first employee : ", employee1);
console.log("name of second employee : ", employee2);
var employee1 = 'Bryn';
console.log("updated name of 1st employee : ", employee1);
console.log("updated name of 2nd employee : ", employee2);
Now, observe the output:
Now change the value of “employee1” and observe, will it change the value of “employee2” as well or remain the same:
var employee1= 'Daniel';
var employee2= employee1;
console.log("name of first employee : ", employee1);
console.log("name of second employee : ", employee2);
var employee1 = 'Bryn';
console.log("updated name of 1st employee : ", employee1);
console.log("updated name of 2nd employee : ", employee2);
Now, observe the output:
 The example clarifies that when we change the value of employee1, it doesn’t affect the value of the second variable which means JavaScript treats both of them as separate variables.
 Suppose we have an array of six elements and we want to sort it in ascending order using a quicksort algorithm:
In the initial step, we select ‘36’ as a pivot element (mid element):
Suppose we have an array of six elements and we want to sort it in ascending order using a quicksort algorithm:
In the initial step, we select ‘36’ as a pivot element (mid element):
 In the next step, we select our pointers, ‘p’ pointer to move from left to the right and ‘q’ pointer to move from right side to the left side:
 Now the value of the left pointer ‘p’ will be compared with the pivot value, as ‘35’ is less than ‘36’ move the ‘p’ pointer to the adjacent element.
On the other hand, compare the value of the right pointer ‘q’ with the pivot value, ‘39’ is greater than ‘36’ so the ‘q’ pointer will move to the left adjacent element:
Now the value of the left pointer ‘p’ will be compared with the pivot value, as ‘35’ is less than ‘36’ move the ‘p’ pointer to the adjacent element.
On the other hand, compare the value of the right pointer ‘q’ with the pivot value, ‘39’ is greater than ‘36’ so the ‘q’ pointer will move to the left adjacent element:
 Now, the ‘p’ pointer is pointing to ‘33’ and is compared with pivot ‘36’, the value of the pointer ‘p’ is less than the pivot value, therefore pointer ‘p’ will be shifted to the adjacent element.
While the ‘q’ pointer’s value ‘32’ is less than pivot value ‘36’, so it will stop here:
Now, the ‘p’ pointer is pointing to ‘33’ and is compared with pivot ‘36’, the value of the pointer ‘p’ is less than the pivot value, therefore pointer ‘p’ will be shifted to the adjacent element.
While the ‘q’ pointer’s value ‘32’ is less than pivot value ‘36’, so it will stop here:
 The left pointer’s value ‘37’ is greater than the pivot’s value ‘36’ so, it will also stop here.
Now, ‘p’ stops at ‘37’ and ‘q’ stops at ‘32’.
Now we will check whether the ‘p’ pointer crosses the ‘q’ pointer or not.
In this case, so far ‘p’ doesn’t cross the ‘q’ pointer, so we will swap the value of pointer ‘p’ with the value of pointer ‘q’:
The left pointer’s value ‘37’ is greater than the pivot’s value ‘36’ so, it will also stop here.
Now, ‘p’ stops at ‘37’ and ‘q’ stops at ‘32’.
Now we will check whether the ‘p’ pointer crosses the ‘q’ pointer or not.
In this case, so far ‘p’ doesn’t cross the ‘q’ pointer, so we will swap the value of pointer ‘p’ with the value of pointer ‘q’:
 Now ‘p’ and ‘q’ are pointing to ‘32’ and ’37’ respectively, shift the pointers one more time, now p = q(‘36’ = ‘36’):
 Move the pointers one more time, as the ‘p’ pointer crosses the ‘q’ pointer so here, it will stop and return the index of ‘p’ pointer.
Up till now, the pivot element is in its right position and all the elements greater than the pivot element are on the right side of the pivot, and all the elements less than pivot elements are on the left side of the pivot.
In this way, we will sort the whole list.
Now we will implement this concept.
First, the code to swap elements:
function swap_elements(elements, left_Index, right_Index){
var temp = elements[left_Index];
elements[left_Index] = elements[right_Index];
elements[right_Index] = temp;}
Next, the code to divide a list into sub-lists:
function Sub_lists(elements, left_pointer, right_pointer) {
var pivot = elements[
Move the pointers one more time, as the ‘p’ pointer crosses the ‘q’ pointer so here, it will stop and return the index of ‘p’ pointer.
Up till now, the pivot element is in its right position and all the elements greater than the pivot element are on the right side of the pivot, and all the elements less than pivot elements are on the left side of the pivot.
In this way, we will sort the whole list.
Now we will implement this concept.
First, the code to swap elements:
function swap_elements(elements, left_Index, right_Index){
var temp = elements[left_Index];
elements[left_Index] = elements[right_Index];
elements[right_Index] = temp;}
Next, the code to divide a list into sub-lists:
function Sub_lists(elements, left_pointer, right_pointer) {
var pivot = elements[
 So, now we know what is a basic queue, but what about the priority queue? In the priority queue, each element that enters the queue has two values, a priority value and the data.
The elements which have the same priority value will be executed based on FIFO (first in and first out) but elements with higher priority than others will be executed first no matter when they were added into the queue.
This is an advanced data structure topic, so we are assuming that you are familiar with how javascript works and the basic functionalities of javascript.
To implement a priority queue we must first know how to implement a simple queue.
So, now we know what is a basic queue, but what about the priority queue? In the priority queue, each element that enters the queue has two values, a priority value and the data.
The elements which have the same priority value will be executed based on FIFO (first in and first out) but elements with higher priority than others will be executed first no matter when they were added into the queue.
This is an advanced data structure topic, so we are assuming that you are familiar with how javascript works and the basic functionalities of javascript.
To implement a priority queue we must first know how to implement a simple queue.
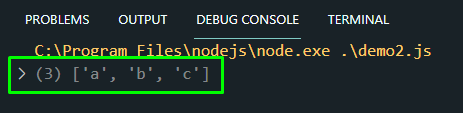 To test, if the First-in and First-out implementation is working correctly, we are going to dequeue an element from the list, and print the foremost value and then print the whole remaining queue with the following lines:
newQueue.dequeue();
console.log(newQueue.front());
newQueue.print();
The complete code snippet of the Queue structure is:
functionQueue() {
array= [];this.print = function () {
console.log(array);
};this.enqueue = function (newMem) {
array.push(newMem);
};this.dequeue = function () {
returnarray.shift();
};this.front = function () {return array[0];
};this.size = function () {
returnarray.length;
};this.isEmpty = function () {
returnarray.length === 0;
};}
varnewQueue = new Queue();
newQueue.enqueue("a");
newQueue.enqueue("b");
newQueue.enqueue("c");
newQueue.print();
newQueue.dequeue();
console.log(newQueue.front());
newQueue.print();
On executing this code, we can observe the following result on the console:
To test, if the First-in and First-out implementation is working correctly, we are going to dequeue an element from the list, and print the foremost value and then print the whole remaining queue with the following lines:
newQueue.dequeue();
console.log(newQueue.front());
newQueue.print();
The complete code snippet of the Queue structure is:
functionQueue() {
array= [];this.print = function () {
console.log(array);
};this.enqueue = function (newMem) {
array.push(newMem);
};this.dequeue = function () {
returnarray.shift();
};this.front = function () {return array[0];
};this.size = function () {
returnarray.length;
};this.isEmpty = function () {
returnarray.length === 0;
};}
varnewQueue = new Queue();
newQueue.enqueue("a");
newQueue.enqueue("b");
newQueue.enqueue("c");
newQueue.print();
newQueue.dequeue();
console.log(newQueue.front());
newQueue.print();
On executing this code, we can observe the following result on the console:
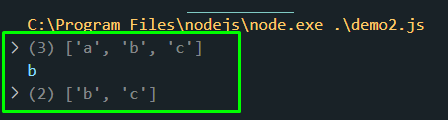 So, when we called the dequeue function it removed the first element from the list.
After that, we checked for the foremost element in the queue which was “b”.
Then we printed the queue again and it gave us the remaining queue in the correct order.
This means that our queue implementation is working perfectly:
So, when we called the dequeue function it removed the first element from the list.
After that, we checked for the foremost element in the queue which was “b”.
Then we printed the queue again and it gave us the remaining queue in the correct order.
This means that our queue implementation is working perfectly:
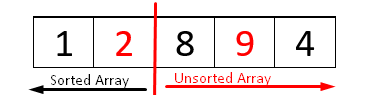 Now, if we call dequeue function and then the print function again the first element should be removed from the list:
pq.dequeue();
pq.printCollection();
Now, if we call dequeue function and then the print function again the first element should be removed from the list:
pq.dequeue();
pq.printCollection();
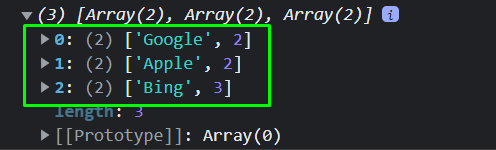 There you go, our priority queue is working perfectly.

 It means again ‘1’ will be compared with the last index where we found a value ‘4’ which is also greater than ‘1’.
 We will sort the unsorted array, so initially we will compare index one with index two, we found ‘9’ is greater than ‘8’
 As ‘8’ is less than ‘9’, so from here we will compare the value of index 2 which is ‘8’ with the other array elements.
Now ‘8’ is compared with ‘2’
As ‘8’ is less than ‘9’, so from here we will compare the value of index 2 which is ‘8’ with the other array elements.
Now ‘8’ is compared with ‘2’
 ‘2’ is less than ‘8’ therefore in the next iteration we will compare ‘2’ with the last array elements.
Compare ‘2’ with ‘4’:
‘2’ is less than ‘8’ therefore in the next iteration we will compare ‘2’ with the last array elements.
Compare ‘2’ with ‘4’:
 So, ‘2’ is the smallest element among all the unsorted array elements, so, will be swapped at the second index, resultant array after the second step will be:

 Finally, we get a sorted array, moreover, if someone is instructed to sort in descending order then it will be done in reverse order by finding the maximum value.
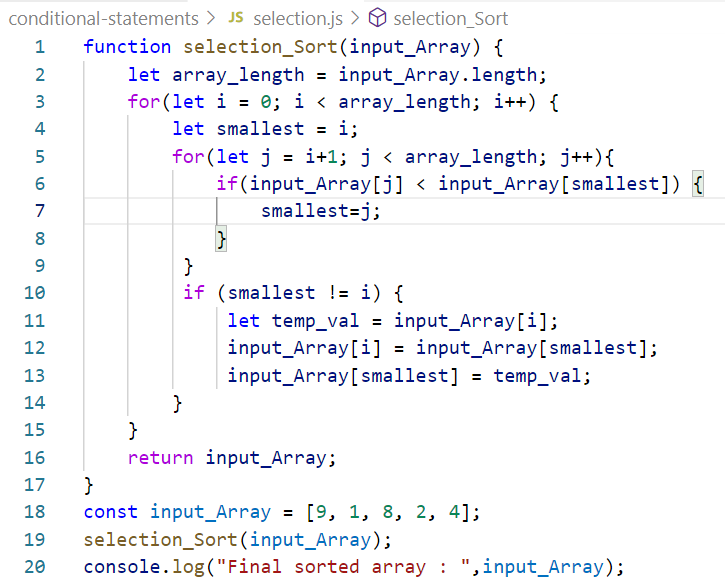 Finally, we utilized the console.log() function to the output on the browser’s console:

 When working with industrial-scale applications the servers cannot remember details about their client.
Once the session is over with the client, the server removes all the information about the client, that is why cookies are stored on the client-side.
So the next time, the client reaches out to the server with a request, a cookie is sent along with the request so that the server already knows the preferences of the client.
When working with industrial-scale applications the servers cannot remember details about their client.
Once the session is over with the client, the server removes all the information about the client, that is why cookies are stored on the client-side.
So the next time, the client reaches out to the server with a request, a cookie is sent along with the request so that the server already knows the preferences of the client.
 Now that we have our HTML set-up we can start working on our javascript code.
The first thing that we are going to implement is the functionality of the button that will add a cookie to our browser with the following lines of code:
$("#add").click(function () {
document.cookie = "name= Yummy Cookie!";
alert("Cookie added");});
Now, run the program and click on the button that says “Click to add a yummy cookie!”, you will get the following output:
Now that we have our HTML set-up we can start working on our javascript code.
The first thing that we are going to implement is the functionality of the button that will add a cookie to our browser with the following lines of code:
$("#add").click(function () {
document.cookie = "name= Yummy Cookie!";
alert("Cookie added");});
Now, run the program and click on the button that says “Click to add a yummy cookie!”, you will get the following output:
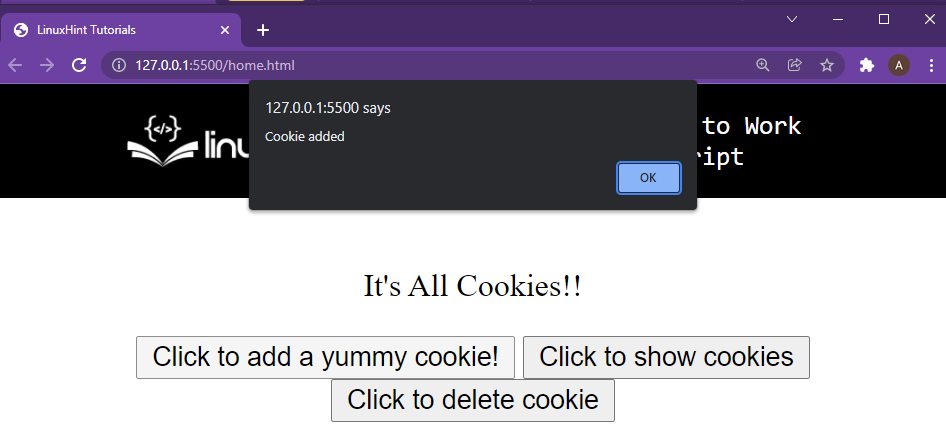 You can confirm this cookie by heading over to the developer’s console > application > cookies and finding the cookie that we just created just like shown in the image below:
 As you can see from the developer’s tools, we were able to successfully create our cookie.
The next step is to read this cookie using JavaScript and alert the user about the cookie upon the button press, we do this by using the following lines of code:
$("#show").click(function () {
alert(document.cookie);});
Click on the button that says “Click to show cookies” and you will get the following result:
As you can see from the developer’s tools, we were able to successfully create our cookie.
The next step is to read this cookie using JavaScript and alert the user about the cookie upon the button press, we do this by using the following lines of code:
$("#show").click(function () {
alert(document.cookie);});
Click on the button that says “Click to show cookies” and you will get the following result:
 As you can see, we can read the cookie and display it to the user.
Now, we need to learn how to delete a cookie from the browser.
We can delete a cookie upon button press by using the following lines of code:
$("#delete").click(function () {
document.cookie = "name=;expires=Thu, 01 Jan 1970 00:00:01 GMT";
alert("Cookie Deleted");});
We can delete cookies by setting their expiry date to a past date and that is exactly what we have done in the above code snippet.
Now, if you press the “click to delete cookie” button you will get the following result:
As you can see, we can read the cookie and display it to the user.
Now, we need to learn how to delete a cookie from the browser.
We can delete a cookie upon button press by using the following lines of code:
$("#delete").click(function () {
document.cookie = "name=;expires=Thu, 01 Jan 1970 00:00:01 GMT";
alert("Cookie Deleted");});
We can delete cookies by setting their expiry date to a past date and that is exactly what we have done in the above code snippet.
Now, if you press the “click to delete cookie” button you will get the following result:
 To verify this deletion, click on the button to show cookies once more and you will get the following result:
 As you can see, the alert dialogue box is not showing us any cookies, this is because we were able to delete the cookie using the delete button successfully.
 Now to sort the above array, we will iterate the array from index 1 to the last index.
Initially, we assume the 0th index of the array is sorted, thereafter we will make a comparison of the current element with its prior element.
If the current element is less than the prior element then we will swap their positions.
First Step
In the first step, we will compare index 1 with index 0, the value of the first index ‘47’ is greater than 0th index value, so there will be no change in the first step (elements wouldn’t swap):
Now to sort the above array, we will iterate the array from index 1 to the last index.
Initially, we assume the 0th index of the array is sorted, thereafter we will make a comparison of the current element with its prior element.
If the current element is less than the prior element then we will swap their positions.
First Step
In the first step, we will compare index 1 with index 0, the value of the first index ‘47’ is greater than 0th index value, so there will be no change in the first step (elements wouldn’t swap):
 Second Step
Now, in the second step, we will assume that the first two elements are sorted, so cursor will be at index 2, and we will compare index 2 with its prior elements:
Second Step
Now, in the second step, we will assume that the first two elements are sorted, so cursor will be at index 2, and we will compare index 2 with its prior elements:
 Since ‘25’ is smaller than ‘47’, swap ‘25’ and ‘47’.
Next, ‘25’ is also compared with the 0th index value.
‘25’ is greater than ‘15’ so it wouldn’t be swapped.
The array after the second step will be updated as:
Since ‘25’ is smaller than ‘47’, swap ‘25’ and ‘47’.
Next, ‘25’ is also compared with the 0th index value.
‘25’ is greater than ‘15’ so it wouldn’t be swapped.
The array after the second step will be updated as:
 Third Step
Here in the third step, we consider the first three values are sorted and the cursor will be at the third index.
So, we will compare the third index with its prior values:
Third Step
Here in the third step, we consider the first three values are sorted and the cursor will be at the third index.
So, we will compare the third index with its prior values:
 At index 3, ‘55’ is compared with each element one by one but it is greater than all of its prior elements so there will be no change in the position of array elements.
Fourth Step
Now we are at index 4, where we have a value ‘20’ and we have to compare it with all the prior elements of the array:
At index 3, ‘55’ is compared with each element one by one but it is greater than all of its prior elements so there will be no change in the position of array elements.
Fourth Step
Now we are at index 4, where we have a value ‘20’ and we have to compare it with all the prior elements of the array:
 Since ‘20’ is less than ‘25’, ‘47’ and ‘55’ so it will be inserted at the first index, and ‘25’, ‘47’ and ‘55’ will be moved to the right side by one index (i+1 index) from their current indexes.
The updated array will be:
Since ‘20’ is less than ‘25’, ‘47’ and ‘55’ so it will be inserted at the first index, and ‘25’, ‘47’ and ‘55’ will be moved to the right side by one index (i+1 index) from their current indexes.
The updated array will be:
 Fifth Step
Now we are at index 5 where the current value is ‘10’ which is the smallest among all the array values, so it will be inserted at the 0th index.
In this way, the whole array will be sorted using insertion sort:
Fifth Step
Now we are at index 5 where the current value is ‘10’ which is the smallest among all the array values, so it will be inserted at the 0th index.
In this way, the whole array will be sorted using insertion sort:
 As we are done with the conceptual part of insertion sort, now we will implement this concept.
 We utilize a while loop to sort array elements, here in this loop we compare the current element with its prior elements.
If the current element is less than any of the prior elements, and we found the appropriate position to insert that element in the sorted array then we insert that element at the appropriate position and move the other elements one place to the right side.
And the whole phenomenon is repeated for each step until the array is sorted completely.
We utilize a while loop to sort array elements, here in this loop we compare the current element with its prior elements.
If the current element is less than any of the prior elements, and we found the appropriate position to insert that element in the sorted array then we insert that element at the appropriate position and move the other elements one place to the right side.
And the whole phenomenon is repeated for each step until the array is sorted completely.

 As a result, forEach() method will print each element on the console:
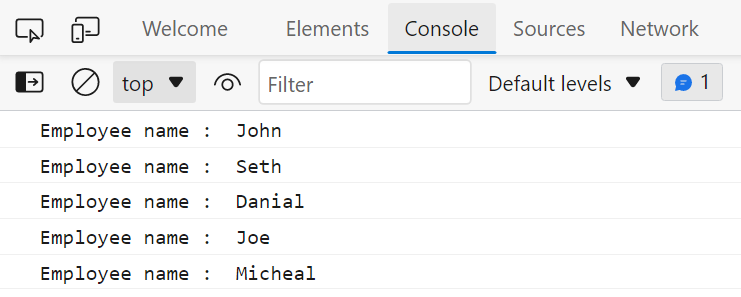
 The output will display the name of the employees that starts with “J”:
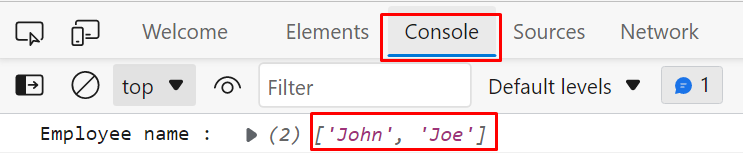
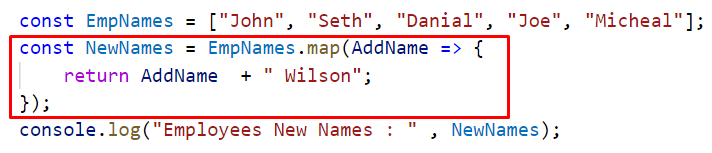 The output of the map() method will verify that it iterates each element of array “EmpNames” and perform the same functionality over the entire array:

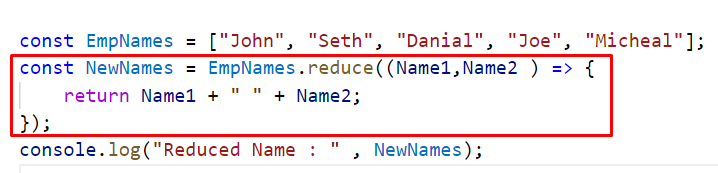 The output of the above code will be a single value:
 The reduce() method can be applied over any data type like strings, numbers, and arrays.
By default, the reduce() method works from left to right, while on the contrary in cases where we want to perform functionality from right to left we can utilize the reduceRight() method.
The reduce() method can be applied over any data type like strings, numbers, and arrays.
By default, the reduce() method works from left to right, while on the contrary in cases where we want to perform functionality from right to left we can utilize the reduceRight() method.
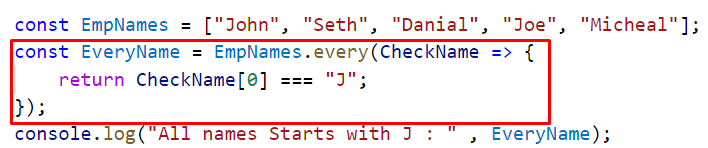 The every() method will return false because all the names in the array do not start with the letter “J”.
The output would be true if all the names in the array were started with “J”:
The every() method will return false because all the names in the array do not start with the letter “J”.
The output would be true if all the names in the array were started with “J”:

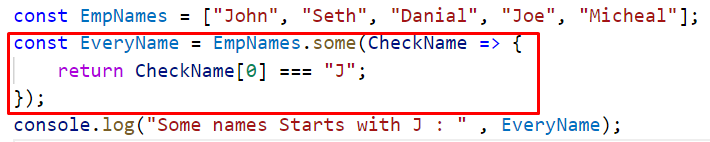 In the output, it will return true because there are some employees whose names start with “J”:

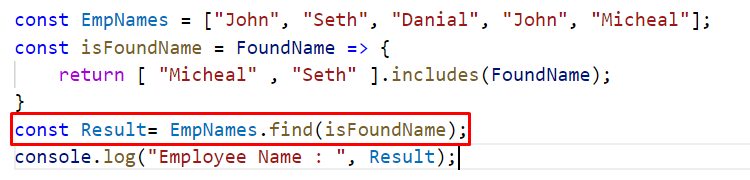 Here the find() method will search for these names in the array and it will print the name that comes first in the array:


 Enhance the above example a little bit more and access the ‘a’ variable outside of the block:
if(true){var a = 100;
console.log("variable inside the block scope : " , a);}
console.log("variable outside the block scope : " , a);
Now observe the output:
Enhance the above example a little bit more and access the ‘a’ variable outside of the block:
if(true){var a = 100;
console.log("variable inside the block scope : " , a);}
console.log("variable outside the block scope : " , a);
Now observe the output:
 The output verifies that the keyword “var” can’t have block scope.
Now create the variables with the “let” and “const” keyword, and try to access them from outside the block scope:
if(true){
let a = 100;const b = 150;
console.log("let inside the block scope : " , a);
console.log("const inside the block scope : " , b);}
console.log("let outside the block scope : " , a);
console.log("const outside the block scope : " , b);
Now access both the variables from inside as well as from outside the block:
The output will verify that these variables are accessible inside the block scope but when we try to access them from outside the block scope then an error occurs “Uncaught ReferenceError”:
The output verifies that the keyword “var” can’t have block scope.
Now create the variables with the “let” and “const” keyword, and try to access them from outside the block scope:
if(true){
let a = 100;const b = 150;
console.log("let inside the block scope : " , a);
console.log("const inside the block scope : " , b);}
console.log("let outside the block scope : " , a);
console.log("const outside the block scope : " , b);
Now access both the variables from inside as well as from outside the block:
The output will verify that these variables are accessible inside the block scope but when we try to access them from outside the block scope then an error occurs “Uncaught ReferenceError”:

 The output verifies that we can access the variables anywhere in the program that are defined globally:

 This happens because, even before the execution of this code JavaScript assigned an undefined value to the “var a” then it reads “console.log(a)” and then “a=45”, therefore it shows undefined instead of 45.
While skipping the keyword “var” means we are not declaring a variable instead we are just initializing a variable.
In this case, if we try to access a variable before its declaration we will face a RefferenceError as we did in the following example:
console.log("Access before declaration : ", a);
a = 45;
We try to print the value of “a” on the console before its declaration and then in the next statement we assign a value to the variable ‘a’ without using the keyword “var”:
This happens because, even before the execution of this code JavaScript assigned an undefined value to the “var a” then it reads “console.log(a)” and then “a=45”, therefore it shows undefined instead of 45.
While skipping the keyword “var” means we are not declaring a variable instead we are just initializing a variable.
In this case, if we try to access a variable before its declaration we will face a RefferenceError as we did in the following example:
console.log("Access before declaration : ", a);
a = 45;
We try to print the value of “a” on the console before its declaration and then in the next statement we assign a value to the variable ‘a’ without using the keyword “var”:
 We get the following output:


 Now, create another instance and check what will happen when we create two instances of a singleton class.
For this purpose simply extend the above code a little bit and create another instance of the class and assign some properties to it:
let check_instance=null;class employee {
constructor(id, name, city, designation) {
if (!check_instance) {
this.id=id;
this.name=name;
this.city=city;
this.designation=designation;
check_instance=this;
}
else
{
return check_instance;}}}const emp1 = new employee(1, 'Roman', 'Paris', 'Manager');const emp2 = new employee(2, 'Seth', ' New York', 'Director');
console.log("First employee : ",emp1);
console.log("Second employee : ",emp2);
Now implement the above code and observe whether a new employee is created or not:
Now, create another instance and check what will happen when we create two instances of a singleton class.
For this purpose simply extend the above code a little bit and create another instance of the class and assign some properties to it:
let check_instance=null;class employee {
constructor(id, name, city, designation) {
if (!check_instance) {
this.id=id;
this.name=name;
this.city=city;
this.designation=designation;
check_instance=this;
}
else
{
return check_instance;}}}const emp1 = new employee(1, 'Roman', 'Paris', 'Manager');const emp2 = new employee(2, 'Seth', ' New York', 'Director');
console.log("First employee : ",emp1);
console.log("Second employee : ",emp2);
Now implement the above code and observe whether a new employee is created or not:


 We can also implement the unary plus and unary minus operators on Boolean values.
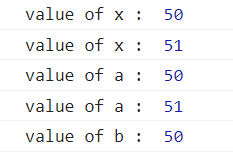
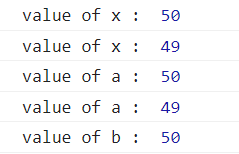

 Now we can get the output of these strings in many ways, for instance, we can print the output on the browser’s console as:
console.log("hello this is our first-string written in double-quotes");
console.log('hello this is our second-string written in the single quote');
Now we will get our output on the console as:
Now we can get the output of these strings in many ways, for instance, we can print the output on the browser’s console as:
console.log("hello this is our first-string written in double-quotes");
console.log('hello this is our second-string written in the single quote');
Now we will get our output on the console as:
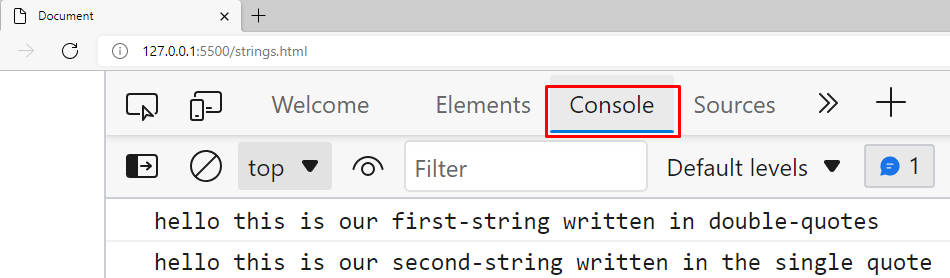 While we can also get the output on our document as:
document.write("hello this is our first-string written in double-quotes");
We will get the following output when we utilize “document.write()”:
While we can also get the output on our document as:
document.write("hello this is our first-string written in double-quotes");
We will get the following output when we utilize “document.write()”:
 Another way of printing our string is the “alert” method:
alert("hello this is our first-string written in double-quotes");
In this case, a pop-up window will appear and we will get our output on that window:
Another way of printing our string is the “alert” method:
alert("hello this is our first-string written in double-quotes");
In this case, a pop-up window will appear and we will get our output on that window:
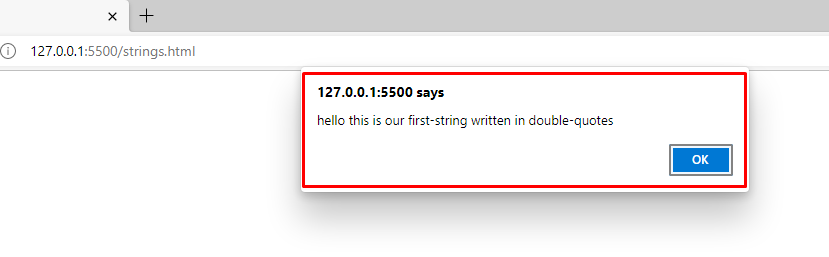 Now we will discuss the second method “template literals” to create a string.
 We will use the console.log() method to print the output of these strings:
 So we will get the following output on our console:
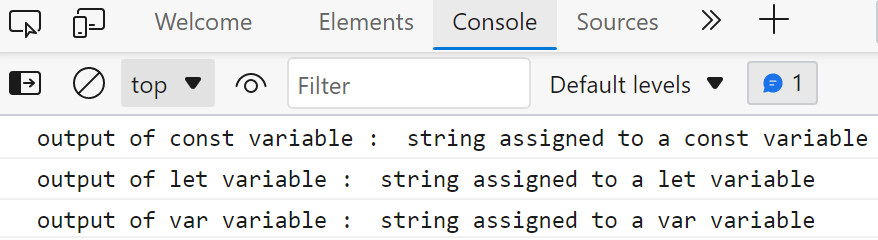
 In the above-given, we combine two strings and add a “white space” between them.
When we execute the code we get the following output:
In the above-given, we combine two strings and add a “white space” between them.
When we execute the code we get the following output:
 We can concatenate the strings directly without assigning their values to the variables, same as we did in the below example:
console.log("Name : ", 'Michael'+ " " + 'Clarke');
In this example, we combine two strings, and among them a white space:
We can concatenate the strings directly without assigning their values to the variables, same as we did in the below example:
console.log("Name : ", 'Michael'+ " " + 'Clarke');
In this example, we combine two strings, and among them a white space:
 And we get the following output on successful execution:
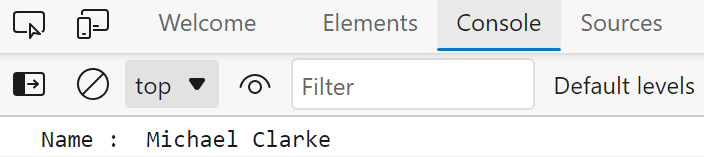 Till now we worked on the strings with a single quote or strings enclosed in double-quotes.
Now we will consider an example to understand how back-tick works:
let First_name = "Daniel";
let Full_name = `Joe ${First_name}` ;
console.log("Name : ", Full_name);
In this example, we combine “First_name” with “Joe” using (`), and prints the output on the console:
Till now we worked on the strings with a single quote or strings enclosed in double-quotes.
Now we will consider an example to understand how back-tick works:
let First_name = "Daniel";
let Full_name = `Joe ${First_name}` ;
console.log("Name : ", Full_name);
In this example, we combine “First_name” with “Joe” using (`), and prints the output on the console:
 We will get the following output for the above code:
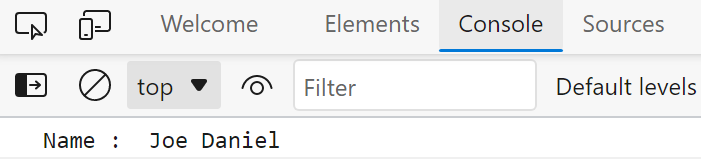
 As in the above snippet, we see that Visual Studio Code is showing an error, so if still, we try to run this code then we will get the following output:
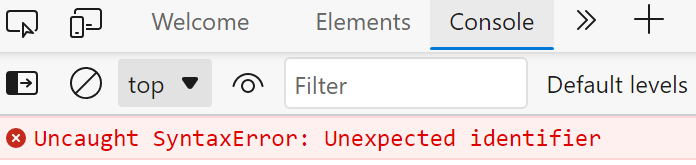 Therefore to tackle such special cases JavaScript provides some special characters like backslash ‘\’, tab ‘\t’ etc.
We will take an example where we will add ‘\’ in the string:
let str = 'I\'m a string!';
console.log("The String : " , str);
The ‘\’ will escape the single quote as:
Therefore to tackle such special cases JavaScript provides some special characters like backslash ‘\’, tab ‘\t’ etc.
We will take an example where we will add ‘\’ in the string:
let str = 'I\'m a string!';
console.log("The String : " , str);
The ‘\’ will escape the single quote as:
 And we will get the resultant output for the string as:
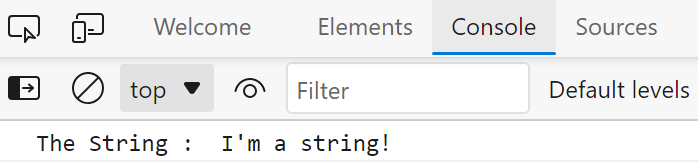
 Upon successful execution, we will get the 8th character of the string which is “i”:
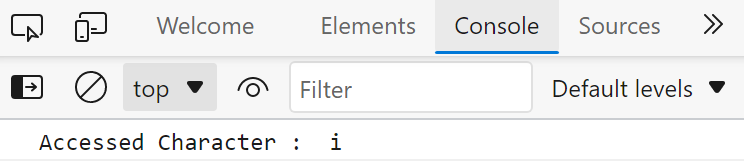
 Next, use the downloaded file to complete the installation of Node.js and after completing the specified operation, execute the below-given in your Command Prompt:
> node -v
The above-given “node” command with the “-v” option will print out the current version of the “Node.js” which is installed on your system:
Next, use the downloaded file to complete the installation of Node.js and after completing the specified operation, execute the below-given in your Command Prompt:
> node -v
The above-given “node” command with the “-v” option will print out the current version of the “Node.js” which is installed on your system:
 After installing Node.js, we will move ahead towards the procedure of development of the server.
For this purpose, firstly, we will create a base folder and then install all of the required packages or dependencies for the Node server development.
For the specified operation, you can use also Command Prompt.
However, we will utilize the “Visual Studio Code” terminal which will also make it easy to work in the Node Server files.
After installing Node.js, we will move ahead towards the procedure of development of the server.
For this purpose, firstly, we will create a base folder and then install all of the required packages or dependencies for the Node server development.
For the specified operation, you can use also Command Prompt.
However, we will utilize the “Visual Studio Code” terminal which will also make it easy to work in the Node Server files.
 In the next step, we will open up our base folder by using the “Open Folder” option of the “File” menu:
 We have selected the “Employee-mern-project” folder for storing the files related to the Node server of the MERN stack:
 Now, press “CTRL+SHIFT+`” to open up a new terminal window in the Visual Studio code.
You can also utilize the “Terminal” menu for this purpose:
Now, press “CTRL+SHIFT+`” to open up a new terminal window in the Visual Studio code.
You can also utilize the “Terminal” menu for this purpose:
 In the next step, we will create a “backend” folder inside of our “Employee-mern-project” root or base folder.
To do the same, you can execute the below-given “mkdir” command in the opened terminal:
> mkdir backend
In the next step, we will create a “backend” folder inside of our “Employee-mern-project” root or base folder.
To do the same, you can execute the below-given “mkdir” command in the opened terminal:
> mkdir backend
 After doing so, we will move into the newly created “backend” folder to add the server related file and packages in it:
> cd backend
After doing so, we will move into the newly created “backend” folder to add the server related file and packages in it:
> cd backend
 Inside of the “backend” folder, we will now create a “package.json” file.
The package.json file is the core element of a Node server in the MERN stack development.
It comprises the metadata of your MERN stack project and also defines the functional attributes that can be then utilized by the npm for executing scripts and installing dependencies.
To create a new package.json file for your Node server, type out the following command:
> npm init -y
Inside of the “backend” folder, we will now create a “package.json” file.
The package.json file is the core element of a Node server in the MERN stack development.
It comprises the metadata of your MERN stack project and also defines the functional attributes that can be then utilized by the npm for executing scripts and installing dependencies.
To create a new package.json file for your Node server, type out the following command:
> npm init -y

 For our Node server, another package that we are going to install is “nodemon”.
It automatically restarts the node application when you made some changes in the file while developing the Node.js based application:
> sudo npm install -g nodemon
For our Node server, another package that we are going to install is “nodemon”.
It automatically restarts the node application when you made some changes in the file while developing the Node.js based application:
> sudo npm install -g nodemon

 Here, you can a new “server.js” JavaScript file is added in the backend folder:
 Now, in the “server.js” file, we will create an “express” server, then we will attach the “express.json” middleware and “cors”.
The “express.json” middleware will be used for sending and receiving “json”.
Also, the Node.js server will be permitted to listen on the “5000” port:
const express = require('express');
const cors = require('cors');
require('dotenv').config();
const app = express();
const port = process.env.PORT || 5000;
app.use(cors());
app.use(express.json());
app.listen(port, () => {
console.log(`Server is running on port: ${port}`);
});
Now, in the “server.js” file, we will create an “express” server, then we will attach the “express.json” middleware and “cors”.
The “express.json” middleware will be used for sending and receiving “json”.
Also, the Node.js server will be permitted to listen on the “5000” port:
const express = require('express');
const cors = require('cors');
require('dotenv').config();
const app = express();
const port = process.env.PORT || 5000;
app.use(cors());
app.use(express.json());
app.listen(port, () => {
console.log(`Server is running on port: ${port}`);
});
 After adding the above-given code in the “server.js” file, press “CTRL+S” to save the changes and then run your Node server using “nodemon”:
> nodemon server
From the output, you can see that our server is successfully running on port “5000”:
After adding the above-given code in the “server.js” file, press “CTRL+S” to save the changes and then run your Node server using “nodemon”:
> nodemon server
From the output, you can see that our server is successfully running on port “5000”:
 After successfully running the Node.js server on the specified port, move ahead towards the process of connecting the Node.js server to the MongoDB database.
For that, you have to create a MongoDB account first.
After successfully running the Node.js server on the specified port, move ahead towards the process of connecting the Node.js server to the MongoDB database.
For that, you have to create a MongoDB account first.
 Now, create an account for hosting the database in the “MongoDB Atlas”:
 You will see the below-given dashboard after MongoDB account creation.
Now, click on the “New Project” button which is located at the right side of the dashboard:
You will see the below-given dashboard after MongoDB account creation.
Now, click on the “New Project” button which is located at the right side of the dashboard:
 In the highlighted input field, enter your MongoDB project name and click on the “Next” button:
 At this point, your MongoDB project is created and you are all ready to build a new database:
 In the next step, select the provider and the zone for your database.
For instance, we have selected “Google Cloud” as a cloud provider and “lowa” as our region.
It is also recommended to choose a free tier which turns out great for a sandbox environment.
After selecting the required options, click on the “Create Cluster” button to move ahead:
In the next step, select the provider and the zone for your database.
For instance, we have selected “Google Cloud” as a cloud provider and “lowa” as our region.
It is also recommended to choose a free tier which turns out great for a sandbox environment.
After selecting the required options, click on the “Create Cluster” button to move ahead:
 For maintaining the MongoDB security, choose an option between “Username and Password” and “Certificate” for authenticating the connection from or to the Node.js.
In our case, we have added the username and password:
For maintaining the MongoDB security, choose an option between “Username and Password” and “Certificate” for authenticating the connection from or to the Node.js.
In our case, we have added the username and password:
 Now, add your IP addresses to the MongoDB whitelist.
This option will permit the configured IP address to access the project’s clusters:
Now, add your IP addresses to the MongoDB whitelist.
This option will permit the configured IP address to access the project’s clusters:
 After setting up the IP address, click on the “Finish and Close” button:
 Within a few minutes, the created cluster of your MongoDB project will be provisioned:

 Then, you will be asked to choose the connection method for Cluster0.
We want to connect our Node.js server to the MongoDB database in MERN Stack application development, so we will go with the “Connect your application” options:
Then, you will be asked to choose the connection method for Cluster0.
We want to connect our Node.js server to the MongoDB database in MERN Stack application development, so we will go with the “Connect your application” options:
 Next, select the “DRIVER” and its “VERSION” and then copy the connection string from the bottom of the window:

 > nodeman server
 In the next step, we will add “mongoose” library.
The “mongoose” Node.js library helps in establishing a connection between the MongoDB cluster and Node.js server:
const mongoose = require('mongoose');
In the next step, we will add “mongoose” library.
The “mongoose” Node.js library helps in establishing a connection between the MongoDB cluster and Node.js server:
const mongoose = require('mongoose');
 Now, we will create a separate “.env” file for storing the MongoDB Atlas “URI” or the “Connection String”.
For this purpose, click on the Node.js server folder which is “backend” in our case, and then creates a “New File”:
Now, we will create a separate “.env” file for storing the MongoDB Atlas “URI” or the “Connection String”.
For this purpose, click on the Node.js server folder which is “backend” in our case, and then creates a “New File”:
 We have named the new file as “.env”:
 If you do not have the connection string, then copy it from the highlighted section:
 Then, add the copied connection string as “ATLAS_URI” in the “.env” file:
ATLAS_URI=mongodb+srv://linuxhint:<password>@cluster0.8jdc7.mongodb.net/myFirstDatabase?retryWrites=true&w=majority
Then, add the copied connection string as “ATLAS_URI” in the “.env” file:
ATLAS_URI=mongodb+srv://linuxhint:<password>@cluster0.8jdc7.mongodb.net/myFirstDatabase?retryWrites=true&w=majority
 In the added “ATLAS_URI” specify your MongoDB username and password and press “CTRL+S” to save the added changes:
 Now, add the following code in your Node.js “server” file:
const uri = process.env.ATLAS_URI;
mongoose.connect(uri);
const connection = mongoose.connection;
connection.once('open', () => {
console.log("MongoDB database connection established successfully");
})
The added code will try to connect with the “MongoDB Atlas” using “mongoose” library and the ALTAS_URI and if the connection get established, it will print out “MongoDB database connection established successfully” on the terminal window:
Now, add the following code in your Node.js “server” file:
const uri = process.env.ATLAS_URI;
mongoose.connect(uri);
const connection = mongoose.connection;
connection.once('open', () => {
console.log("MongoDB database connection established successfully");
})
The added code will try to connect with the “MongoDB Atlas” using “mongoose” library and the ALTAS_URI and if the connection get established, it will print out “MongoDB database connection established successfully” on the terminal window:
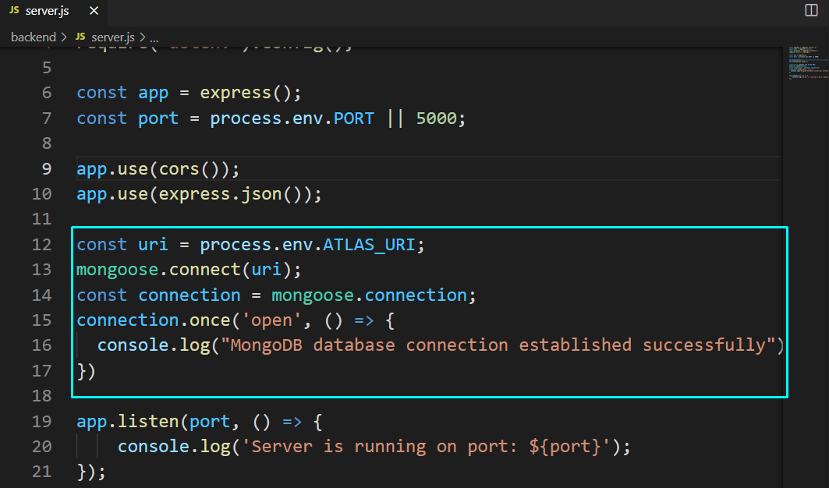 Press “CTRL+S” to save the added changes and then run your Node.js server:
> nodemon server
The below-given output declares that we have successfully connected our Node.js server to the MongoDB database in the MERN Stack development:
Press “CTRL+S” to save the added changes and then run your Node.js server:
> nodemon server
The below-given output declares that we have successfully connected our Node.js server to the MongoDB database in the MERN Stack development:
 Now, we will check out the method of setting up React.js on Client-Side in MERN Stack development.
 In the opened application, click on the “File” option of the menu bar and select the “Open Folder” option:
 Now, browse for the folder where you want to place your React.js application-related file.
In our case, we have selected the “Employee-mern-project” folder, present in the “Local Disk (E:)”:
Now, browse for the folder where you want to place your React.js application-related file.
In our case, we have selected the “Employee-mern-project” folder, present in the “Local Disk (E:)”:
 Next, press “CTRL+SHIFT+`” to open the Visual Studio Code terminal.
You can also perform the specified operation with the help of the “Terminal” menu:
Next, press “CTRL+SHIFT+`” to open the Visual Studio Code terminal.
You can also perform the specified operation with the help of the “Terminal” menu:
 At this point, we are all ready to set up the React.js application in MERN Stack Development.
The execution of the “npx” command with the “create-react-app” option assists you in creating a React.js application.
For instance, the below-given “npx” command will create a “mern-emsystem” React.js application which will have all of the required dependencies in its project folder:
> npx create-react-app mern-emsystem
At this point, we are all ready to set up the React.js application in MERN Stack Development.
The execution of the “npx” command with the “create-react-app” option assists you in creating a React.js application.
For instance, the below-given “npx” command will create a “mern-emsystem” React.js application which will have all of the required dependencies in its project folder:
> npx create-react-app mern-emsystem
 Wait for a few minutes, as the installation of the packages will take some time:
 The below-given error-free output indicates that we have successfully installed the “mern-emsystem” React.js application:
 The Visual Studio code will automatically load the created the Reactjs-application folder in it.
Now, we will make some changes in the “index.html” file of the “mern-emsystem” React.js application:
The Visual Studio code will automatically load the created the Reactjs-application folder in it.
Now, we will make some changes in the “index.html” file of the “mern-emsystem” React.js application:
 The “index.html” file of your React.js application will somehow look like this:
 Here, “React App” is representing the “title” of our “mern-emsystem” application:
 We will utilize the created React.js application for developing a Employee Management System with MERN Stack.
So, firstly, we will change the title of our “mern-emsystem” React.js application to “Employee Management System” and save the opened “index.html” file:
We will utilize the created React.js application for developing a Employee Management System with MERN Stack.
So, firstly, we will change the title of our “mern-emsystem” React.js application to “Employee Management System” and save the opened “index.html” file:
 In the next step, we will change the current working directory to “mern-emsystem” using the terminal:
> cd mern-emsystem
In the next step, we will change the current working directory to “mern-emsystem” using the terminal:
> cd mern-emsystem
 Now, write-out the below-given “npm” command for starting the development of the web server:
> npm start
Now, write-out the below-given “npm” command for starting the development of the web server:
> npm start
 As you can see from the output that our “mern-emsystem” project is compiled successfully and ready to view in the browser:
 By typing the “localhost:3000” in the address bar of our browser we will see the following interface for the “mern-emsystem” React.js application:
 You can also add change the content of the “App.js” JavaScript file for handling or viewing the components of your React application:
 For instance, adding the following code in our “App.js” file will save the “Employee Management System” content inside a container:
import './App.css';function App() {
return (
<div className="container">
Employee Management System
</div>
);}export default App;
For instance, adding the following code in our “App.js” file will save the “Employee Management System” content inside a container:
import './App.css';function App() {
return (
<div className="container">
Employee Management System
</div>
);}export default App;
 From the below-given image, you can see that the added “Employee Management System” content for our React.js application is successfully displayed:
 That was all about the procedure of setting up React.js application on Client-Side in MERN Stack Development.
You can do further customization according to your requirements.
That was all about the procedure of setting up React.js application on Client-Side in MERN Stack Development.
You can do further customization according to your requirements.
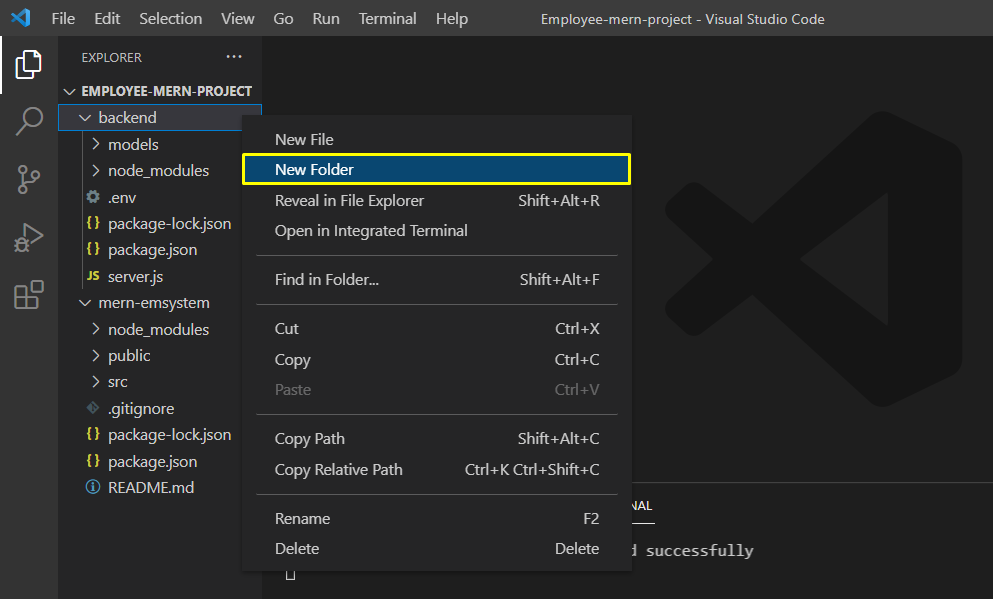 We will name the newly created folder as “routes”:
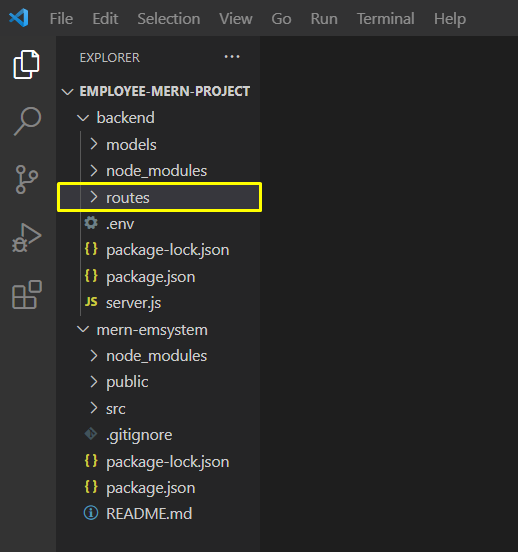 Next, click on the “routes” folder and select the “New File” option for creating an “employee.js” route file:
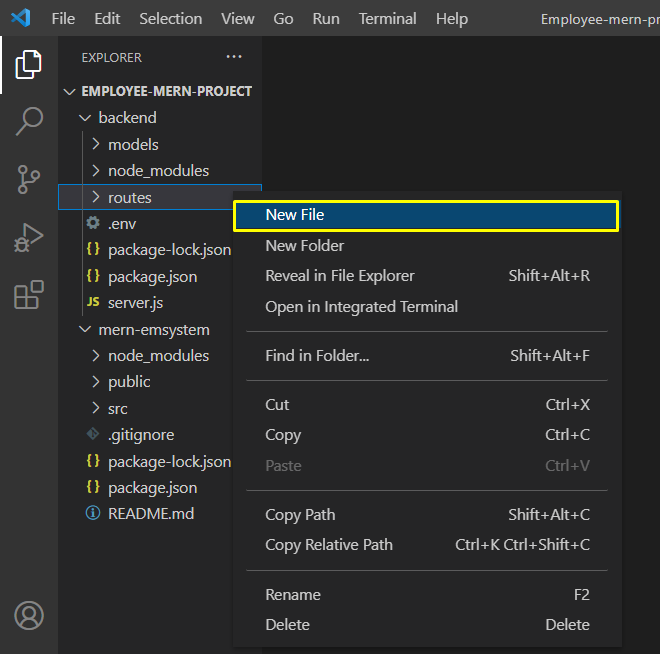 By utilizing the same method, we will create another route file, “designation.js” in the routes folder:
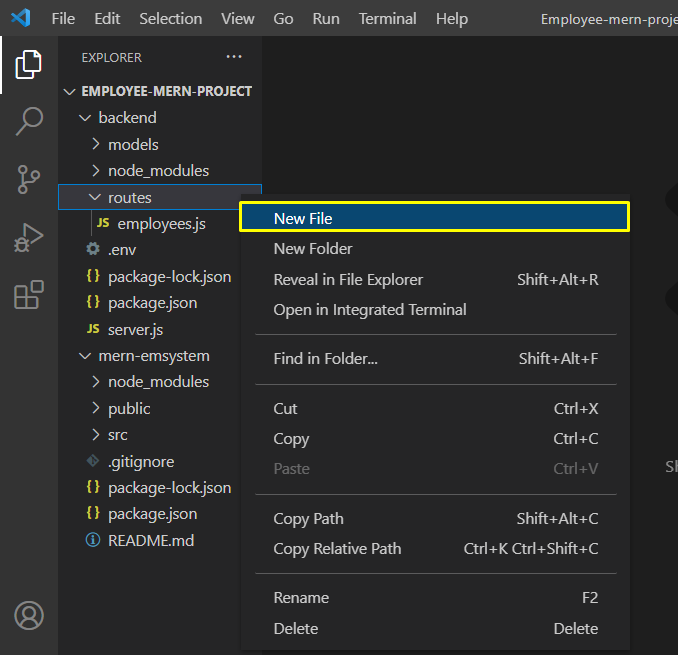 As you can see, we have created two routes file, “employee.js” and “designation.file” in the “routes” folder:
 In the terminal, execute the following command for setting up the React router as it is the standard library that can be used for routing:
> npm install react-router-dom
In the terminal, execute the following command for setting up the React router as it is the standard library that can be used for routing:
> npm install react-router-dom
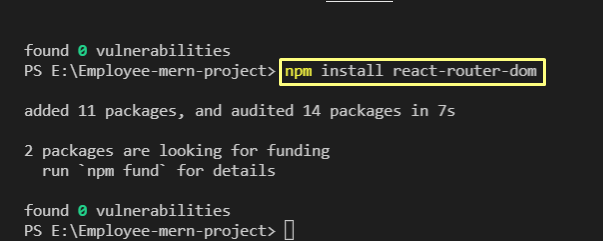 After doing so, add the following line in your Project’s “App.js” file:
import { BrowserRouter as Router, Route } from "react-router-dom";
After doing so, add the following line in your Project’s “App.js” file:
import { BrowserRouter as Router, Route } from "react-router-dom";
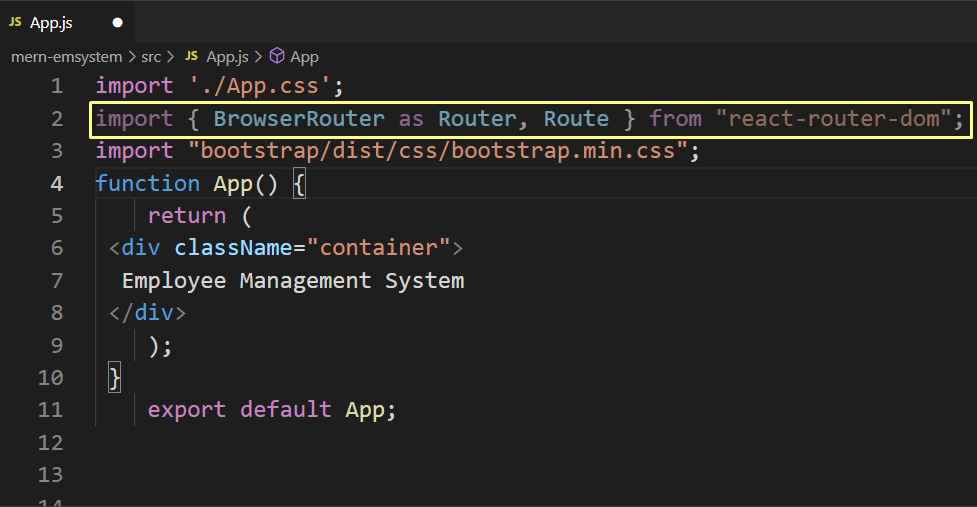 In the next step, open up the “employee.js” file ad add the below-given code in it:
 In this code, we have added two endpoints.
The first endpoint will handle the incoming HTTP “GET” requests on the “/employees/” URL path.
Next, the “Employee.find()” method is called for getting the list of Employees from the MongoDB database.
This find() method will return a promise, and the result will be returned in JSON format.
The second endpoint which we have added in our “employee” route file, will handle the incoming HTTP “POST” requests on the “/employees/add/ URL path.
The new employee name will be considered as part of the request.
After receiving the new employee name, a new instance of the Employee will be created, and then the “save()” function will save the new Employee record in the MongoDB database.
If the specified operation is completed successfully, then the “Employee added!” string will be returned:
const router = require('express').Router();
let Employee = require('../models/employee.model');
router.route('/').get((req, res) => {
Employee.find()
.then(employees => res.json(employees))
.catch(err => res.status(400).json('Error: ' + err));});
router.route('/add').post((req, res) => {
const employeename = req.body.employeename;
const newEmployee = new Employee({employeename});
newEmployee.save()
.then(() => res.json('Employee added!'))
.catch(err => res.status(400).json('Error: ' + err));});
module.exports = router;
In this code, we have added two endpoints.
The first endpoint will handle the incoming HTTP “GET” requests on the “/employees/” URL path.
Next, the “Employee.find()” method is called for getting the list of Employees from the MongoDB database.
This find() method will return a promise, and the result will be returned in JSON format.
The second endpoint which we have added in our “employee” route file, will handle the incoming HTTP “POST” requests on the “/employees/add/ URL path.
The new employee name will be considered as part of the request.
After receiving the new employee name, a new instance of the Employee will be created, and then the “save()” function will save the new Employee record in the MongoDB database.
If the specified operation is completed successfully, then the “Employee added!” string will be returned:
const router = require('express').Router();
let Employee = require('../models/employee.model');
router.route('/').get((req, res) => {
Employee.find()
.then(employees => res.json(employees))
.catch(err => res.status(400).json('Error: ' + err));});
router.route('/add').post((req, res) => {
const employeename = req.body.employeename;
const newEmployee = new Employee({employeename});
newEmployee.save()
.then(() => res.json('Employee added!'))
.catch(err => res.status(400).json('Error: ' + err));});
module.exports = router;
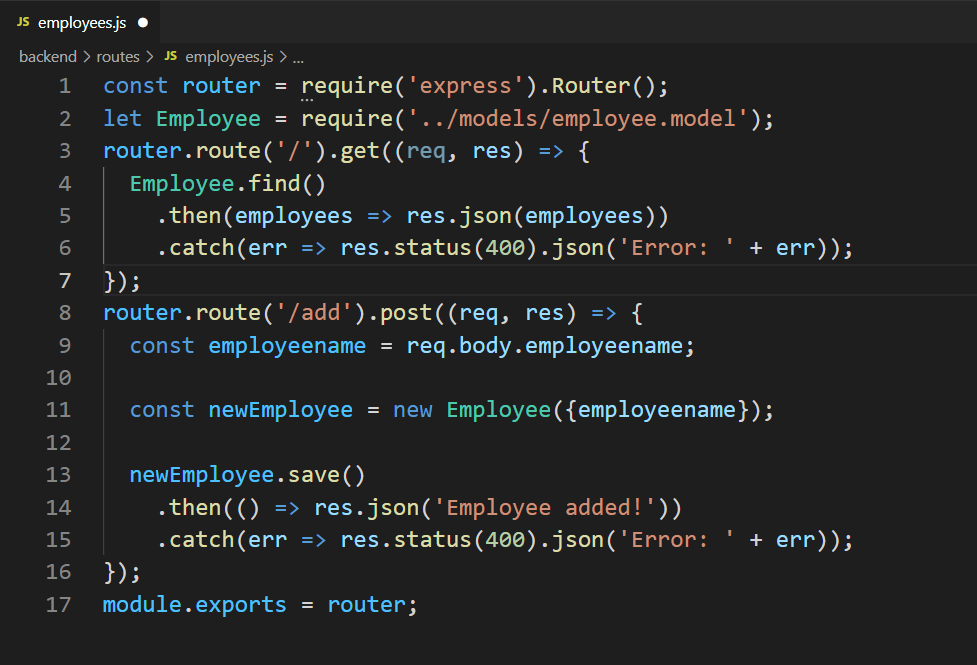 Next, open up the “designation.js” file for creating the designations routes:
 Now, firstly, we will add the same endpoints which we have added in the “employees.js” routes file.
However, this time we will break all three fields “employeename”, “designation”, and “date” from the submitted data:
const router = require('express').Router();
let Designation = require('../models/designation.model');
router.route('/').get((req, res) => {
Designation.find()
.then(designations => res.json(designations))
.catch(err => res.status(400).json('Error: ' + err));});
router.route('/add').post((req, res) => {
const employeename = req.body.employeename
const designation = req.body.designation;
const date = Date.parse(req.body.date);
const newDesignation = new Designation({
employeename,
designation,
date,
});
newDesignation.save()
.then(() => res.json('Designation added!'))
.catch(err => res.status(400).json('Error: ' + err));});
module.exports = router;
Now, firstly, we will add the same endpoints which we have added in the “employees.js” routes file.
However, this time we will break all three fields “employeename”, “designation”, and “date” from the submitted data:
const router = require('express').Router();
let Designation = require('../models/designation.model');
router.route('/').get((req, res) => {
Designation.find()
.then(designations => res.json(designations))
.catch(err => res.status(400).json('Error: ' + err));});
router.route('/add').post((req, res) => {
const employeename = req.body.employeename
const designation = req.body.designation;
const date = Date.parse(req.body.date);
const newDesignation = new Designation({
employeename,
designation,
date,
});
newDesignation.save()
.then(() => res.json('Designation added!'))
.catch(err => res.status(400).json('Error: ' + err));});
module.exports = router;
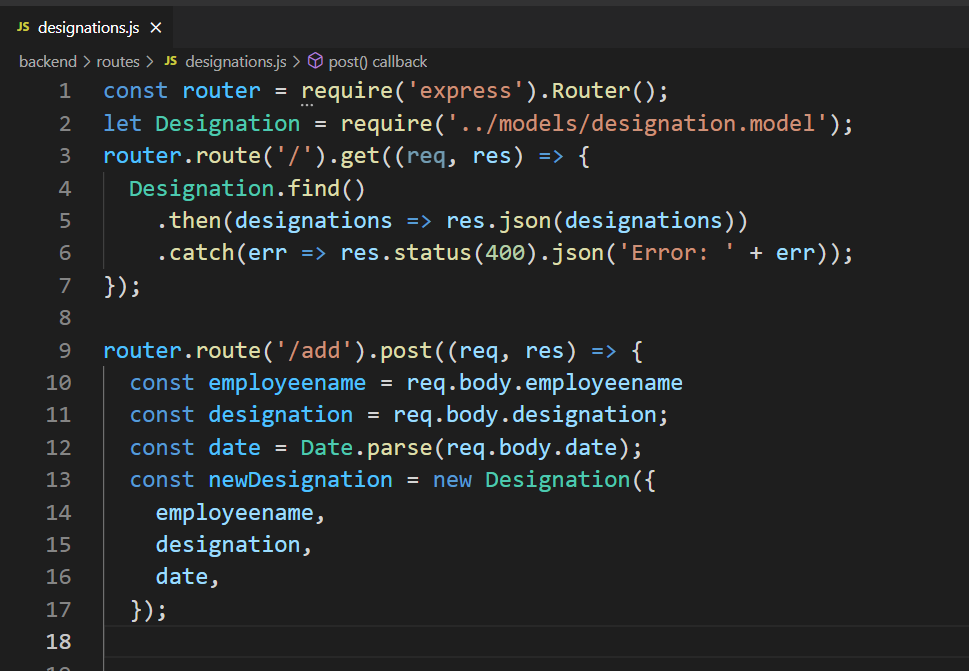 The previously added endpoints can be utilized for reading and creating the designation items.
Now, we will create two routes for the remaining CRUD operations, which are “update” and “delete”.
In the below-given code “/:id” GET endpoint will return a designation item that will have the specified item, and it will be deleted using the “delete()” function.
The “/update/:id” POST endpoint will update the existing designation items.
For the update endpoint, firstly, we will retrieve the existing designation item from the MongoDB database based on the specified id.
After doing so, we will set the designation property values, such as “employeename”, “designation”, and “date” to the values received in the request body.
Lastly, we will call the “designation.save()” method for saving the updated designation object in our database:
router.route('/:id').get((req, res) => {
Designation.findById(req.params.id)
.then(designation => res.json(designation))
.catch(err => res.status(400).json('Error: ' + err));});
router.route('/:id').delete((req, res) => {
Designation.findByIdAndDelete(req.params.id)
.then(() => res.json('Designation deleted.'))
.catch(err => res.status(400).json('Error: ' + err));});
router.route('/update/:id').post((req, res) => {
Designation.findById(req.params.id)
.then(designation => {
designation.employeename = req.body.employeename;
designation.designation = req.body.designation;
designation.date = Date.parse(req.body.date);
designation.save()
.then(() => res.json('Designation updated!'))
.catch(err => res.status(400).json('Error: ' + err));
})
.catch(err => res.status(400).json('Error: ' + err));});
The previously added endpoints can be utilized for reading and creating the designation items.
Now, we will create two routes for the remaining CRUD operations, which are “update” and “delete”.
In the below-given code “/:id” GET endpoint will return a designation item that will have the specified item, and it will be deleted using the “delete()” function.
The “/update/:id” POST endpoint will update the existing designation items.
For the update endpoint, firstly, we will retrieve the existing designation item from the MongoDB database based on the specified id.
After doing so, we will set the designation property values, such as “employeename”, “designation”, and “date” to the values received in the request body.
Lastly, we will call the “designation.save()” method for saving the updated designation object in our database:
router.route('/:id').get((req, res) => {
Designation.findById(req.params.id)
.then(designation => res.json(designation))
.catch(err => res.status(400).json('Error: ' + err));});
router.route('/:id').delete((req, res) => {
Designation.findByIdAndDelete(req.params.id)
.then(() => res.json('Designation deleted.'))
.catch(err => res.status(400).json('Error: ' + err));});
router.route('/update/:id').post((req, res) => {
Designation.findById(req.params.id)
.then(designation => {
designation.employeename = req.body.employeename;
designation.designation = req.body.designation;
designation.date = Date.parse(req.body.date);
designation.save()
.then(() => res.json('Designation updated!'))
.catch(err => res.status(400).json('Error: ' + err));
})
.catch(err => res.status(400).json('Error: ' + err));});
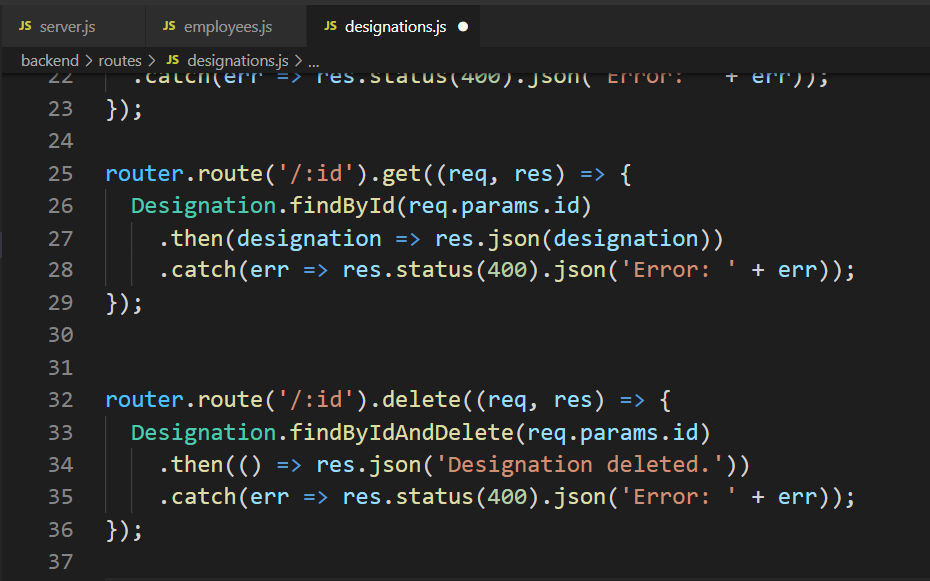 Now, let us tell the Node.js server to use the routes we created in the “routes” folder.
To do so, we will open the “server.js” JavaScript file of our server-side:
Now, let us tell the Node.js server to use the routes we created in the “routes” folder.
To do so, we will open the “server.js” JavaScript file of our server-side:
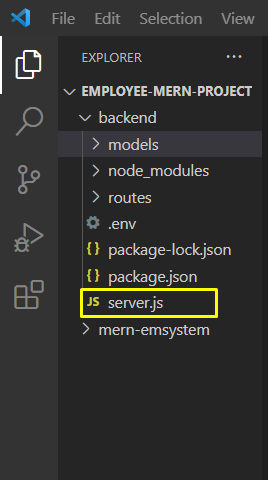 This is how our “server.js” file looks like at this point:
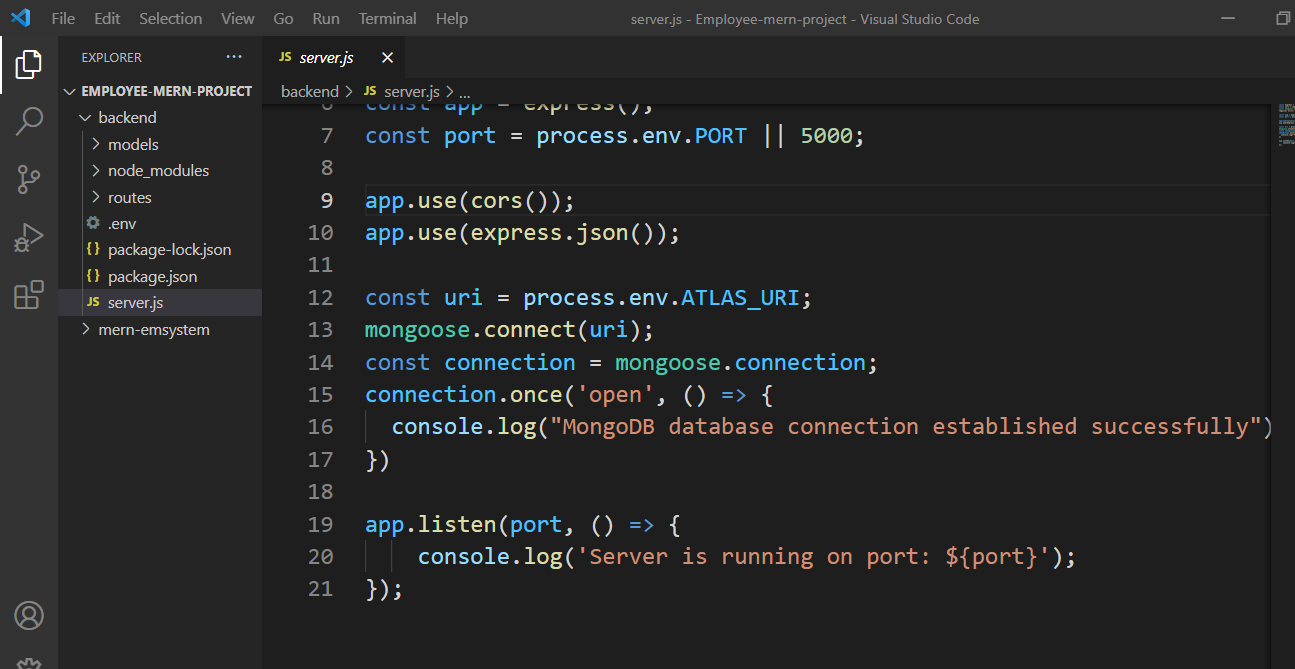 The code you are going to add should be placed before the “app.listen(port, function() ” line:
 Now, add the following code in the highlighted section:
const designationsRouter = require('./routes/designations');const employeesRouter = require('./routes/employees');
app.use('/designations', designationsRouter);
app.use('/employees', employeesRouter);
The first two lines in the above-given code will load the router from the “designations” and “employees” files which we have created in the “routes folder,” and then the routers are defined as middleware:
Now, add the following code in the highlighted section:
const designationsRouter = require('./routes/designations');const employeesRouter = require('./routes/employees');
app.use('/designations', designationsRouter);
app.use('/employees', employeesRouter);
The first two lines in the above-given code will load the router from the “designations” and “employees” files which we have created in the “routes folder,” and then the routers are defined as middleware:
 Press “CTRL+S” to save the added changes into your Node.js server-side file:
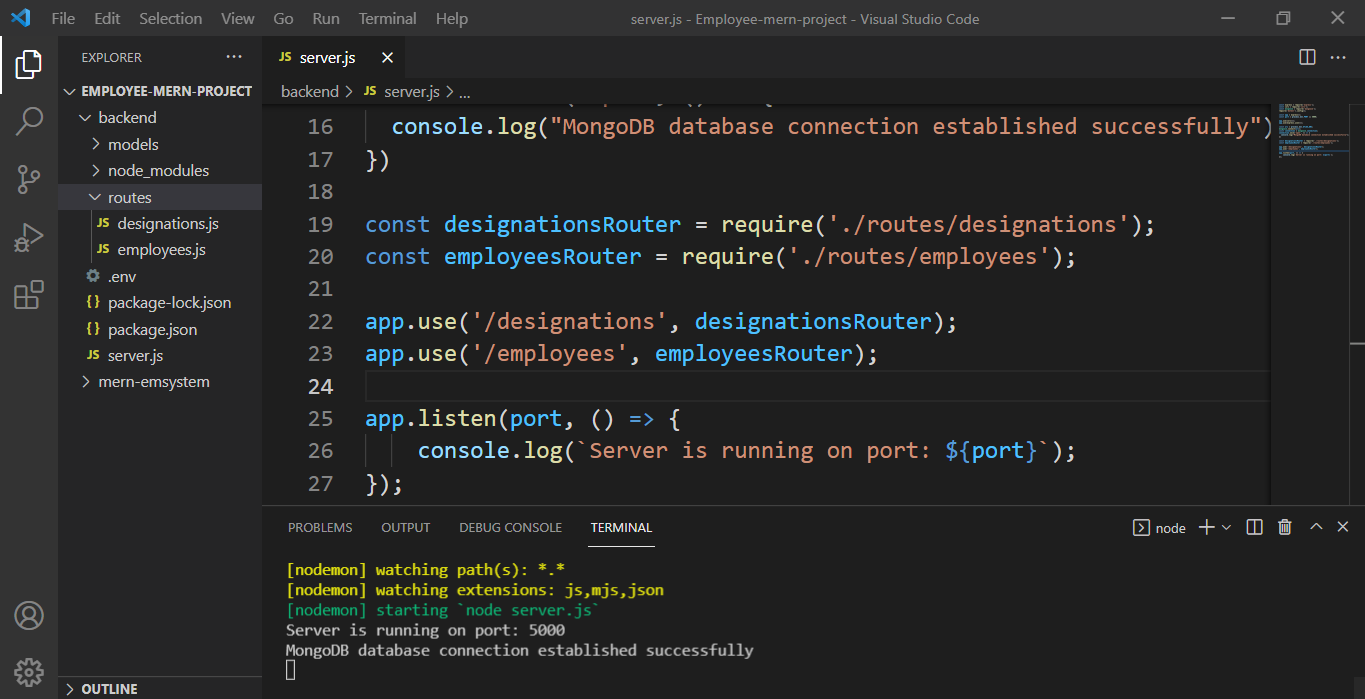 After creating the routes on the server-side in Node.js, you can test them using any API testing application such as
 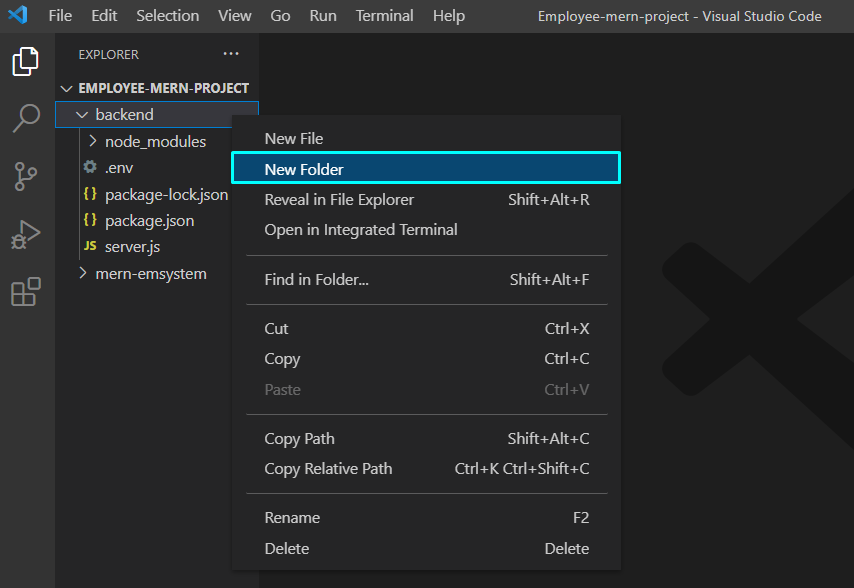 Now, we will name the newly created folder as “models”.
This “models” folder is created to store the “employee” and “designation” models in it:
Now, we will name the newly created folder as “models”.
This “models” folder is created to store the “employee” and “designation” models in it:
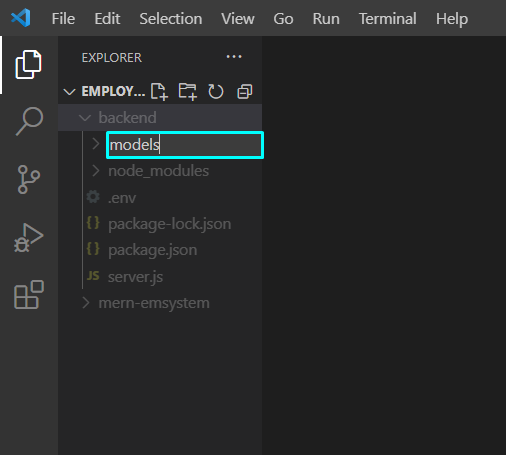 In the next step, we will create a new JavaScript file in the “models” folder and will name it “designation.model.js”:
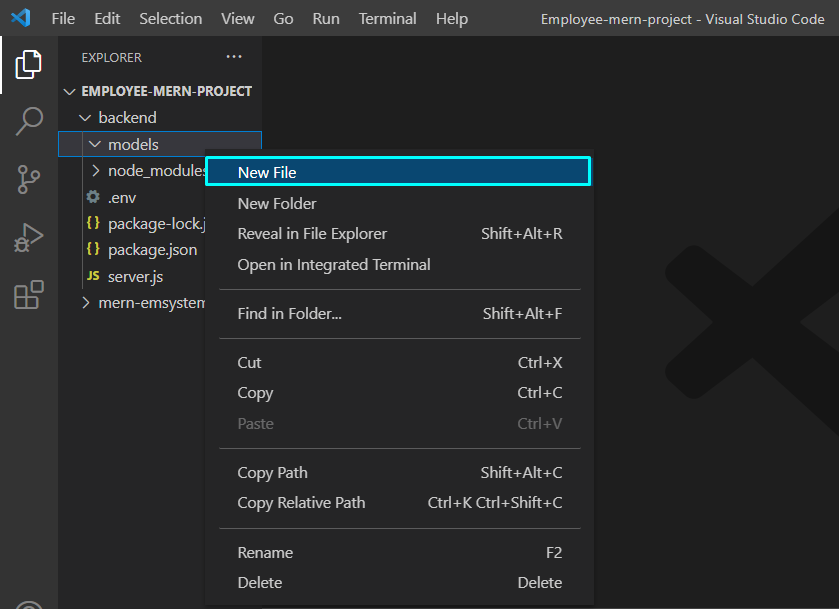
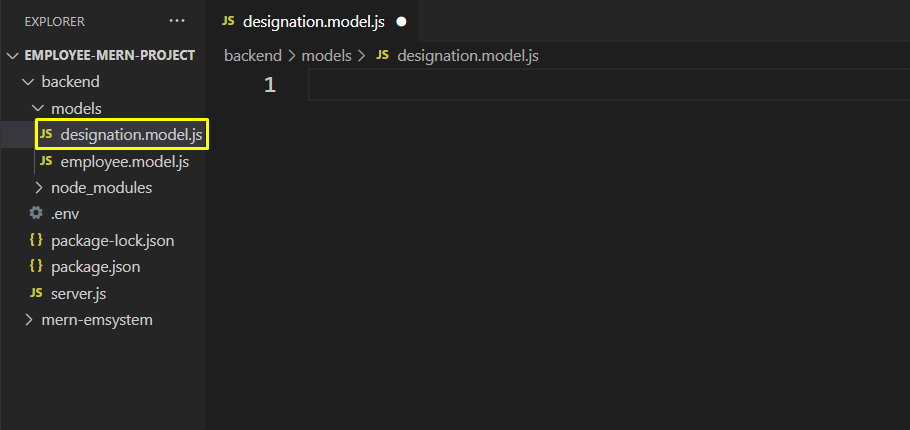 Now, add the following code in the “designation.model.js” file:
const mongoose = require('mongoose');const Schema = mongoose.Schema;const designationSchema = new Schema({
employeename: { type: String, required: true },
designation: { type: String, required: true },
date: { type: Date, required: true },}, {
timestamps: true,});const Designation = mongoose.model('Designation', designationSchema);
module.exports = Designation;
The added code will create a designation schema having three fields, “employeename”, “designation”, and “date”.
Also, the “timestamp: true” option will create “createdAt,” and “updatedAt” fields for the “designations” model and these fields will be automatically updated when the “designation” model changes:
Now, add the following code in the “designation.model.js” file:
const mongoose = require('mongoose');const Schema = mongoose.Schema;const designationSchema = new Schema({
employeename: { type: String, required: true },
designation: { type: String, required: true },
date: { type: Date, required: true },}, {
timestamps: true,});const Designation = mongoose.model('Designation', designationSchema);
module.exports = Designation;
The added code will create a designation schema having three fields, “employeename”, “designation”, and “date”.
Also, the “timestamp: true” option will create “createdAt,” and “updatedAt” fields for the “designations” model and these fields will be automatically updated when the “designation” model changes:
 To create an “employee” model, we will add another file in the “models” folder:
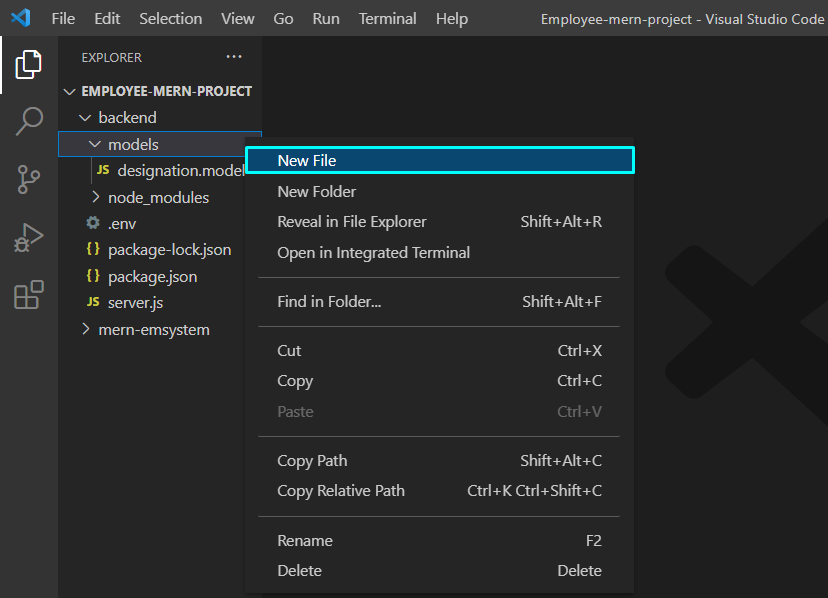 As you can see “employee.model.js” JavaScript file is now created:
 To create an “employee” model, add the following code in the “employee.model.js” file:
const mongoose = require('mongoose');const Schema = mongoose.Schema;const employeeSchema = new Schema({
employeename: {
type: String,
required: true,
unique: true,
trim: true,
minlength: 5
},}, {
timestamps: true,});const Employee = mongoose.model('Employee', employeeSchema);
module.exports = Employee;
Our “employee” schema only comprises a single field called “employeename”.
We also have added some validations such as the employeename is required, it must be unique and at least five characters long.
Also, white space at the end of the employeename will be trimmed off:
To create an “employee” model, add the following code in the “employee.model.js” file:
const mongoose = require('mongoose');const Schema = mongoose.Schema;const employeeSchema = new Schema({
employeename: {
type: String,
required: true,
unique: true,
trim: true,
minlength: 5
},}, {
timestamps: true,});const Employee = mongoose.model('Employee', employeeSchema);
module.exports = Employee;
Our “employee” schema only comprises a single field called “employeename”.
We also have added some validations such as the employeename is required, it must be unique and at least five characters long.
Also, white space at the end of the employeename will be trimmed off:
 Press “CTRL+S” to save the added code, and the created models are all ready to use!
 You can see in the picture above as well, that we were able to change the style of the element.
 As you can see, you were able to add another class to the class attribute of the element by using JavaScript.
If you want to remove an already existing class from the list, you can use the following line of code:
cc.classList.remove("myClass");
After executing the above line, you will see the following results in the developer’s console:
As you can see, you were able to add another class to the class attribute of the element by using JavaScript.
If you want to remove an already existing class from the list, you can use the following line of code:
cc.classList.remove("myClass");
After executing the above line, you will see the following results in the developer’s console:
 And there you go; you were able to remove a class from the classes list of an element using JavaScript.
 We can even assign our own attributes to the element by using the function, for example, if we want an attribute of “newAttr” to this element with a value of “done”, we can add that by using the following line of code:
ca.setAttribute("newAttr", "done");
And if we observe the element in the developer console, we can see the following result:
We can even assign our own attributes to the element by using the function, for example, if we want an attribute of “newAttr” to this element with a value of “done”, we can add that by using the following line of code:
ca.setAttribute("newAttr", "done");
And if we observe the element in the developer console, we can see the following result:
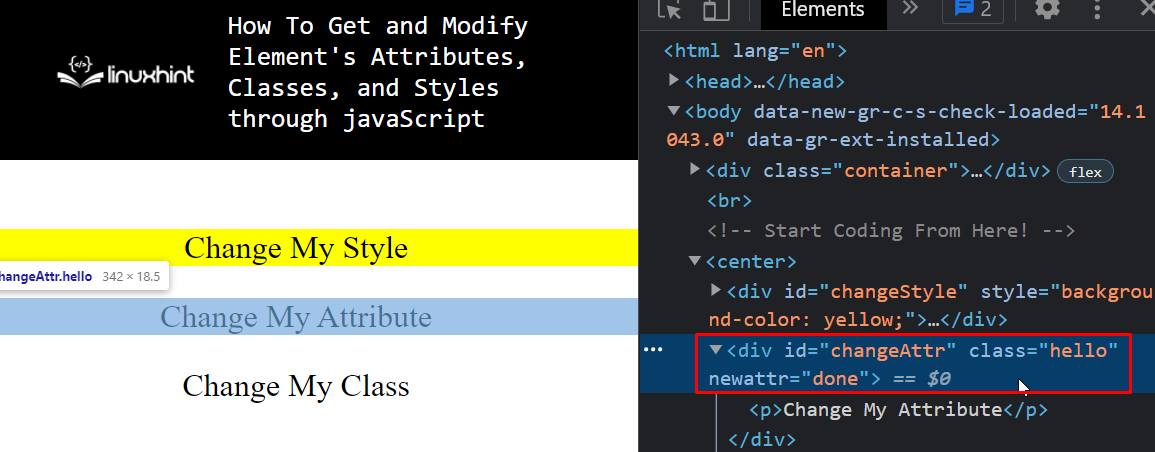 As it is clear in the image above, we were able to add a new attribute named “newAttr” to our element using JavaScript.
 As you can see the test was a success because our calculator works perfectly fine, the complete Code snippet is as:
const operatorVar = prompt("Enter the operator that you want to use");const operand1 = prompt("Enter the First Value");if (isDigit(operand1) == false) {
alert("Wrong input at operand 1| Not an integer Value");}const operand2 = prompt("Enter the Second Value");if (isDigit(operand2) == false) {
alert("Wrong input at operand 2| Not an integer Value");}var result;if (operatorVar == "*") {
result = operand1 * operand2;} else if (operatorVar == "-") {
result = operand1 - operand2;} else if (operatorVar == "/") {
result = operand1 / operand2;} else if (operatorVar == "+") {
result = parseInt(operand1) + parseInt(operand2);} else {
alert("Invalid Operator");}
alert("The result is : " + result);function isDigit(input) {
var integer = true;
for (var char of input) {
if (char `9`) {
integer = false;
}
}
return integer;}
As you can see the test was a success because our calculator works perfectly fine, the complete Code snippet is as:
const operatorVar = prompt("Enter the operator that you want to use");const operand1 = prompt("Enter the First Value");if (isDigit(operand1) == false) {
alert("Wrong input at operand 1| Not an integer Value");}const operand2 = prompt("Enter the Second Value");if (isDigit(operand2) == false) {
alert("Wrong input at operand 2| Not an integer Value");}var result;if (operatorVar == "*") {
result = operand1 * operand2;} else if (operatorVar == "-") {
result = operand1 - operand2;} else if (operatorVar == "/") {
result = operand1 / operand2;} else if (operatorVar == "+") {
result = parseInt(operand1) + parseInt(operand2);} else {
alert("Invalid Operator");}
alert("The result is : " + result);function isDigit(input) {
var integer = true;
for (var char of input) {
if (char `9`) {
integer = false;
}
}
return integer;}
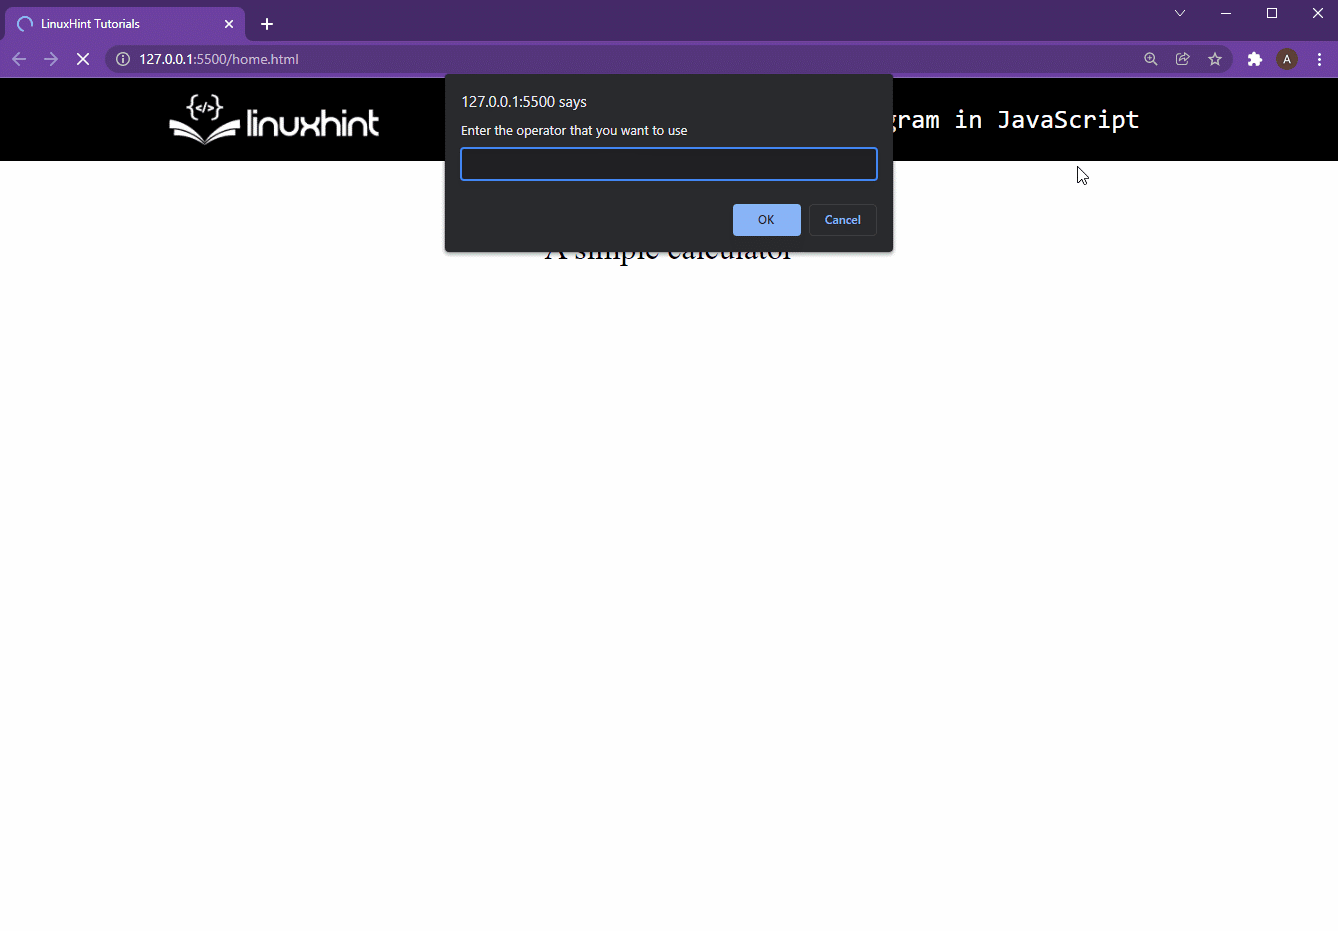 That is it, you have coded a simple calculator using JavaScript.
 On jQuery’s website, there are two different versions available for download, one of the versions is known as the “Production version” and the other one is known as the “Development Version”.
The main difference between both of these versions is that the production one is compressed and is the most suitable for live websites while the development one is an uncompressed version for testing out newly released features and beta features as well.
Once you have downloaded the version you seem adequate, you need to include the jQuery file in the HTML with the script tag because, at the end of the day, jQuery is JavaScript’s library.
For this linking you use the following lines of code:
<head><script src="jquery-3.5.1.min.js"></script></head>
And with these you are now ready to write jQuery code in your website.
On jQuery’s website, there are two different versions available for download, one of the versions is known as the “Production version” and the other one is known as the “Development Version”.
The main difference between both of these versions is that the production one is compressed and is the most suitable for live websites while the development one is an uncompressed version for testing out newly released features and beta features as well.
Once you have downloaded the version you seem adequate, you need to include the jQuery file in the HTML with the script tag because, at the end of the day, jQuery is JavaScript’s library.
For this linking you use the following lines of code:
<head><script src="jquery-3.5.1.min.js"></script></head>
And with these you are now ready to write jQuery code in your website.
 Copy this link and paste it inside your HTML File under the script tag, it will look like this
<head><script src="https://ajax.googleapis.com/ajax/libs/jquery/3.6.0/jquery.min.js"></script></head>
Using a CDN hosted jQuery has its own benefits, first and the foremost advantage of using this is that your jQuery is always up-to-date.
And secondly, most of the browsers have stumbled on a CDN-hosted jQuery while surfing the internet, so when the client comes to your website, their browser doesn’t need to download the jQuery as it is already present in its cache memory.
Copy this link and paste it inside your HTML File under the script tag, it will look like this
<head><script src="https://ajax.googleapis.com/ajax/libs/jquery/3.6.0/jquery.min.js"></script></head>
Using a CDN hosted jQuery has its own benefits, first and the foremost advantage of using this is that your jQuery is always up-to-date.
And secondly, most of the browsers have stumbled on a CDN-hosted jQuery while surfing the internet, so when the client comes to your website, their browser doesn’t need to download the jQuery as it is already present in its cache memory.
 Now, create a script tag and write the following jQuery lines inside it to change the background color of the text field:
<script>
$(document).ready(function () {
$("#demo").css("background", "yellow");
});</script>
With these lines you will observe the following change in the output:
Now, create a script tag and write the following jQuery lines inside it to change the background color of the text field:
<script>
$(document).ready(function () {
$("#demo").css("background", "yellow");
});</script>
With these lines you will observe the following change in the output:
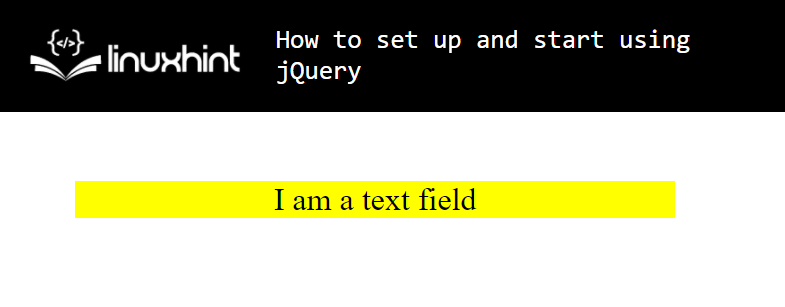 That’s it, you have successfully set-up and used jQuery.
 In the opened application, click on the “File” option of the menu bar and select the “Open Folder” option:
 Now, browse for the folder where you want to place your React.js application-related file.
In our case, we have selected the “Employee-mern-project” folder, present in the “Local Disk (E:)”:
Now, browse for the folder where you want to place your React.js application-related file.
In our case, we have selected the “Employee-mern-project” folder, present in the “Local Disk (E:)”:
 Next, press CTRL + SHIFT + ` to open the Visual Studio Code terminal.
You can also perform the specified operation with the help of the “Terminal” menu:
Next, press CTRL + SHIFT + ` to open the Visual Studio Code terminal.
You can also perform the specified operation with the help of the “Terminal” menu:
 At this point, we are all ready to set up the React.js application in MERN Stack Development.
The execution of the “npx” command with the “create-react-app” option assists you in creating a React.js application.
For instance, the below-given “npx” command will create a “mern-emsystem” React.js application which will have all of the required dependencies in its project folder:
>npx create-react-app mern-emsystem
At this point, we are all ready to set up the React.js application in MERN Stack Development.
The execution of the “npx” command with the “create-react-app” option assists you in creating a React.js application.
For instance, the below-given “npx” command will create a “mern-emsystem” React.js application which will have all of the required dependencies in its project folder:
>npx create-react-app mern-emsystem
 Wait for a few minutes, as the installation of the packages will take some time:
 The below-given error-free output indicates that we have successfully installed the “mern-emsystem” React.js application:
 The Visual Studio Code will automatically load the create React.js application folder.
Now, we will make some changes in the “index.html” file of the “mern-emsystem” React.js application:
The Visual Studio Code will automatically load the create React.js application folder.
Now, we will make some changes in the “index.html” file of the “mern-emsystem” React.js application:
 The “index.html” file of your React.js application will somehow look like this:
 Here, “React App” represents the “title” of our “mern-emsystem” application:
 We will utilize the created React.js application for developing an Employee Management System with MERN Stack.
So, firstly, we will change the title of our “mern-emsystem” React.js application to “Employee Management System” and save the opened “index.html” file:
We will utilize the created React.js application for developing an Employee Management System with MERN Stack.
So, firstly, we will change the title of our “mern-emsystem” React.js application to “Employee Management System” and save the opened “index.html” file:
 In the next step, we will change the current working directory to “mern-emsystem” using the terminal:
>cd mern-emsystem
In the next step, we will change the current working directory to “mern-emsystem” using the terminal:
>cd mern-emsystem
 Now, write out the below-given “npm” command for starting the development of the webserver:
>npm start
Now, write out the below-given “npm” command for starting the development of the webserver:
>npm start
 As you can see from the output that our “mern-emsystem” project is compiled successfully and ready to view in the browser:
 By typing the “localhost:3000” in the address bar of our browser, we will see the following interface for the “mern-emsystem” React.js application:
 You can also change the content of the “App.js” JavaScript file for handling or viewing the components of your React application:
 For instance, adding the following code in our “App.js” file will save the “Employee Management System” content inside a container:
import './App.css';function App() {
return (
<div className="container">
Employee Management System
</div>
);}export default App;
For instance, adding the following code in our “App.js” file will save the “Employee Management System” content inside a container:
import './App.css';function App() {
return (
<div className="container">
Employee Management System
</div>
);}export default App;
 From the below-given image, you can see that the added “Employee Management System” content for our React.js application is successfully displayed:
 That was all about the procedure of setting up React.js application on Client-Side in MERN Stack Development.
You can do further customization according to your requirements.
That was all about the procedure of setting up React.js application on Client-Side in MERN Stack Development.
You can do further customization according to your requirements.
 Next, use the downloaded file to complete the installation of Node.js.
After completing the specified operation, execute the below-given in your Command Prompt:
>node -v
The above-given “node” command with the “-v” option will print out the current version of the “Node.js” which is installed on your system:
Next, use the downloaded file to complete the installation of Node.js.
After completing the specified operation, execute the below-given in your Command Prompt:
>node -v
The above-given “node” command with the “-v” option will print out the current version of the “Node.js” which is installed on your system:
 After installing Node.js, we will move towards the server’s development procedure.
For this purpose, firstly, we will create a base folder and then install all of the required packages or dependencies for the Node server development.
For the specified operation, you can use also Command Prompt.
However, we will utilize the “Visual Studio Code” terminal, making it easy to work in the Node Server files.
After installing Node.js, we will move towards the server’s development procedure.
For this purpose, firstly, we will create a base folder and then install all of the required packages or dependencies for the Node server development.
For the specified operation, you can use also Command Prompt.
However, we will utilize the “Visual Studio Code” terminal, making it easy to work in the Node Server files.
 In the next step, we will open up our base folder by using the “Open Folder” option of the “File” menu:
 We have selected the “Employee-mern-project” folder for storing the files related to the Node server of the MERN stack:
 Now, press “CTRL+SHIFT+`” to open a new terminal window in the Visual Studio code.
You can also utilize the “Terminal” menu for this purpose:
Now, press “CTRL+SHIFT+`” to open a new terminal window in the Visual Studio code.
You can also utilize the “Terminal” menu for this purpose:
 In the next step, we will create a “backend” folder inside our “Employee-mern-project” root or base folder.
To do the same, you can execute the below-given “mkdir” command in the opened terminal:
>mkdir backend
In the next step, we will create a “backend” folder inside our “Employee-mern-project” root or base folder.
To do the same, you can execute the below-given “mkdir” command in the opened terminal:
>mkdir backend
 After doing so, we will move into the newly created “backend” folder to add the server related file and packages in it:
>cd backend
After doing so, we will move into the newly created “backend” folder to add the server related file and packages in it:
>cd backend
 Inside the “backend” folder, we will create a “package.json” file.
The package.json file is the core element of a Node server in the MERN stack development.
It comprises your MERN stack project’s metadata and defines the functional attributes that the npm can utilize for executing scripts and installing dependencies.
To create a new package.json file for your Node server, type out the following command:
>npm init -y
Inside the “backend” folder, we will create a “package.json” file.
The package.json file is the core element of a Node server in the MERN stack development.
It comprises your MERN stack project’s metadata and defines the functional attributes that the npm can utilize for executing scripts and installing dependencies.
To create a new package.json file for your Node server, type out the following command:
>npm init -y

 For our Node server, another package that we will install is “nodemon”.
It automatically restarts the node application when you make some changes in the file while developing the Node.js based application:
>sudo npm install -g nodemon
For our Node server, another package that we will install is “nodemon”.
It automatically restarts the node application when you make some changes in the file while developing the Node.js based application:
>sudo npm install -g nodemon
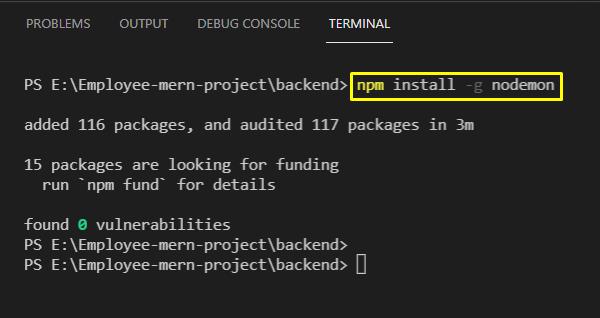
 Here, you can a new “server.js” JavaScript file is added in the backend folder:
 Now, in the “server.js” file, we will create an “express” server, then we will attach the “express.json” middleware and “cors”.
The “express.json” middleware will send and receive “JSON”.
Also, the Node.js server will be permitted to listen on the “5000” port:
const express = require('express');const cors = require('cors');
require('dotenv').config();const app = express();const port = process.env.PORT || 5000;
app.use(cors());
app.use(express.json());
app.listen(port, () =>{
console.log(`Server is running on port: ${port}`);});
Now, in the “server.js” file, we will create an “express” server, then we will attach the “express.json” middleware and “cors”.
The “express.json” middleware will send and receive “JSON”.
Also, the Node.js server will be permitted to listen on the “5000” port:
const express = require('express');const cors = require('cors');
require('dotenv').config();const app = express();const port = process.env.PORT || 5000;
app.use(cors());
app.use(express.json());
app.listen(port, () =>{
console.log(`Server is running on port: ${port}`);});
 After adding the above-given code in the “server.js” file, press “CTRL+S” to save the changes and then run your Node server using “nodemon”:
>nodemon server
From the output, you can see that our server is successfully running on port “5000”:
After adding the above-given code in the “server.js” file, press “CTRL+S” to save the changes and then run your Node server using “nodemon”:
>nodemon server
From the output, you can see that our server is successfully running on port “5000”:

 If you are working on a Windows operating system then you can download Node.js from the prominent green button, but if you are working with any other operating system then you need to click on the download tabs like
 On the “downloads” page, you should be able to see different versions for macOS and Linux-based operating systems as well as shown below:
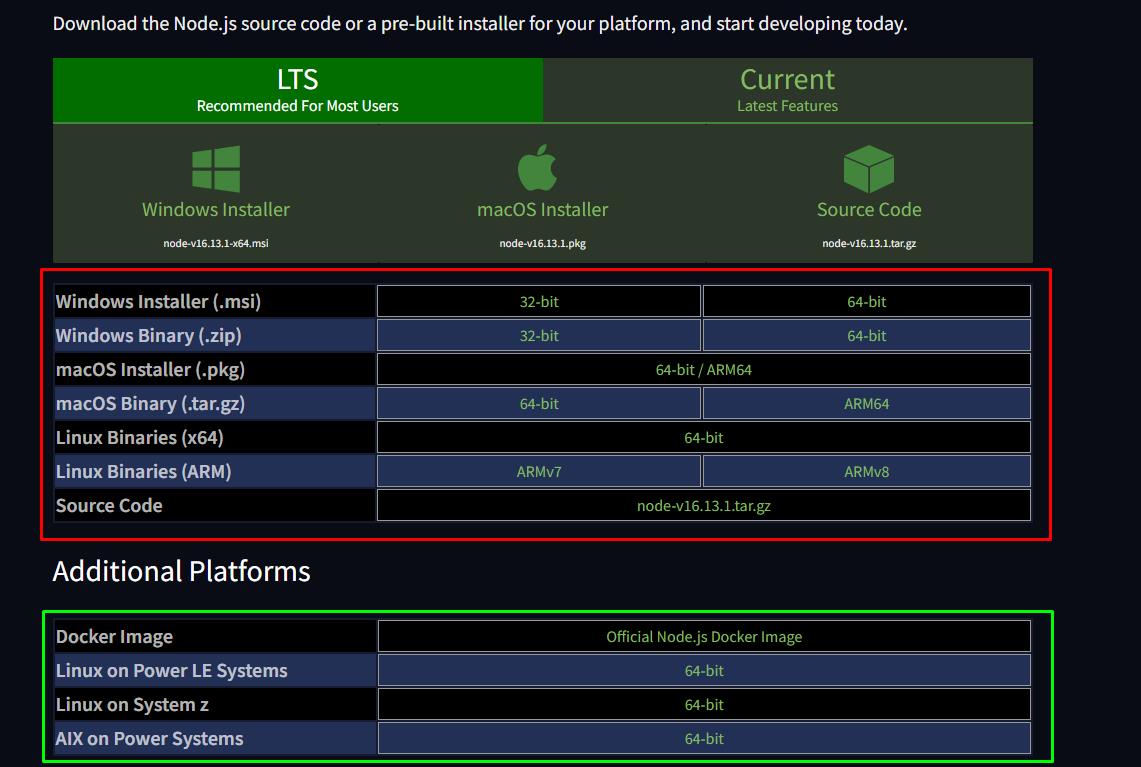 Once, you have downloaded the file corresponding to your operating system, click on the file and follow the instructions to finish the installation process:
 Select the default and features and click on next:
 And then simply wait for the installation process to finish:
 Once the setup is done, you can move on to the next step.
 Open up the first option that shows up, and then in the new dialogue box click on the button that says “Environment Variables” like so:
 Click on the “Path” under the system variables tab and click on “Edit”:
 And make sure you see an entry like:
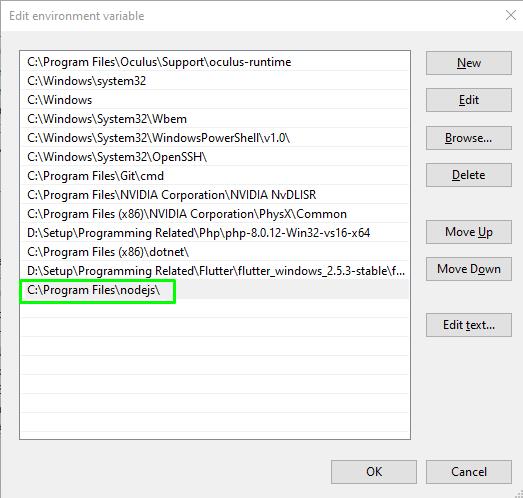 If you don’t see an entry with Node.js, you need to manually add the path to the installation directory for the Node.js.
To check the node and NPM version, open up a command prompt and run the following commands:
node --version
npm --version
You should be able to see the version of the node as well as the NPM on your machine like so:
If you don’t see an entry with Node.js, you need to manually add the path to the installation directory for the Node.js.
To check the node and NPM version, open up a command prompt and run the following commands:
node --version
npm --version
You should be able to see the version of the node as well as the NPM on your machine like so:

 Type in the following lines of code inside the file:
var name = "LinuxHint";
console.log(`Hello World! This is ${name}`);
And inside the terminal type in the following command to run our file which is named as “firstCode.js”:
node firstCode.js
You should be able to see the following output on your terminal or console:
Type in the following lines of code inside the file:
var name = "LinuxHint";
console.log(`Hello World! This is ${name}`);
And inside the terminal type in the following command to run our file which is named as “firstCode.js”:
node firstCode.js
You should be able to see the following output on your terminal or console:
 That is it, you have successfully run your JavaScript code wit Node.js, now all that there is left to do is to play around with JavaScript and start deploying your code with Node.js.

 We compare ‘1’ with ‘8’, ‘1’ is less than ‘8’ so again we will compare ‘1’ with the value of the next index (3rd index),
 ‘1’ is less than ‘2’.
 It means again ‘1’ will be compared with the last index where we found a value ‘4’ which is also greater than ‘1’.
 So step by step we compare 1 with each element of the array, as a result, we witnessed that ‘1’ is the smallest number among all the array elements.
So finally we got a sorted value for the index 0.
So step by step we compare 1 with each element of the array, as a result, we witnessed that ‘1’ is the smallest number among all the array elements.
So finally we got a sorted value for the index 0.

 We will sort the unsorted array, so initially we will compare index one with index two, we found ‘9’ is greater than ‘8’
 As ‘8’ is less than ‘9’, so from here we will compare the value of index 2 which is ‘8’ with the other array elements.
Now ‘8’ is compared with ‘2’
As ‘8’ is less than ‘9’, so from here we will compare the value of index 2 which is ‘8’ with the other array elements.
Now ‘8’ is compared with ‘2’
 ‘2’ is less than ‘8’ therefore in the next iteration we will compare ‘2’ with the last array elements.
Compare ‘2’ with ‘4’:
‘2’ is less than ‘8’ therefore in the next iteration we will compare ‘2’ with the last array elements.
Compare ‘2’ with ‘4’:
 So, ‘2’ is the smallest element among all the unsorted array elements, so, will be swapped at the second index, resultant array after the second step will be:

 Compare ‘8’ with ‘4’, here ‘4’ is less than ‘8’ and ‘4’ is the last element of the array, therefore ‘4’ will be swapped with ‘8’: and the updated array will be:

 Finally, we get a sorted array, moreover, if someone is instructed to sort in descending order then it will be done in reverse order by finding the maximum value.
 Finally, we utilized the console.log function to print the output on the browser’s console:

 When you run this code a pop-up window will appear as shown in the below-given screenshot:
 If the value entered by the user is greater than 85 then it will show an output “Well done”:
 In this example, we didn’t specify anything for the false condition.
So, if the user enters the false condition, let’s say the user enters 55 it wouldn’t show any output instead it will show a blank page because we didn’t specify anything for false conditions.
Now we will extend the above-given example with the “else” statement in order to tackle the false statement.
In this example, we didn’t specify anything for the false condition.
So, if the user enters the false condition, let’s say the user enters 55 it wouldn’t show any output instead it will show a blank page because we didn’t specify anything for false conditions.
Now we will extend the above-given example with the “else” statement in order to tackle the false statement.
 When we run this code a pop-up window will appear asking the user to enter the marks:
 Now if the entered marks are greater than 85 it will show “well done” else it will show “better luck next time”.
Here, we enter 56 so the output will be:
Now if the entered marks are greater than 85 it will show “well done” else it will show “better luck next time”.
Here, we enter 56 so the output will be:
 Here, we entered 67:
 The output will be:

 Output of above code will be:
 Now, let’s see what happens if we change the value of “employee1”, will it affect the properties of “employee2”? Let’s modify our code:
let employee1 = { name: "Joe Clarke", age: 35, id: 123, city: 'London' };
let employee2 = employee1;
employee1.name = "Dean Elgar";
console.log("updated values of employee1 : ", employee1);
console.log("updated values of employee2 : ", employee2);
Let’s modify the previous example, for instance, change the employee1 name from “Joe Clarke” to “Dean Elgar”, and check whether it affects the name property of employee2 or not.
Now, let’s see what happens if we change the value of “employee1”, will it affect the properties of “employee2”? Let’s modify our code:
let employee1 = { name: "Joe Clarke", age: 35, id: 123, city: 'London' };
let employee2 = employee1;
employee1.name = "Dean Elgar";
console.log("updated values of employee1 : ", employee1);
console.log("updated values of employee2 : ", employee2);
Let’s modify the previous example, for instance, change the employee1 name from “Joe Clarke” to “Dean Elgar”, and check whether it affects the name property of employee2 or not.
 The output for our modified code will be:
 From the above-given output, we can see that changes that we make in the property of employee1 affect the value of employee2 as well, this happens because employee2 was created with the reference of employee1.
 Now let’s examine the output, you will see both variable shows same output:
 Now change the value of “employee2” and observe, will it change the value of “employee1” or the value for the first variable will remain the same:
var employee1= 'Daniel';var employee2= employee1;
console.log("name of first employee : ", employee1);
console.log("name of second employee : ", employee2);var employee2 = 'Bryn';
console.log("updated name of 1st employee : ", employee1);
console.log("updated name of 2nd employee : ", employee2);
We assign ‘Bryn’ to the second variable:
Now change the value of “employee2” and observe, will it change the value of “employee1” or the value for the first variable will remain the same:
var employee1= 'Daniel';var employee2= employee1;
console.log("name of first employee : ", employee1);
console.log("name of second employee : ", employee2);var employee2 = 'Bryn';
console.log("updated name of 1st employee : ", employee1);
console.log("updated name of 2nd employee : ", employee2);
We assign ‘Bryn’ to the second variable:
 Now, observe the output:
 The example clarifies that when we changed the value of employee2, we observed that changing the name of the second variable doesn’t affect the value of the first variable which means JavaScript treats both of them as separate variables, and it actually reassigns the value to the second variable.
We will consider another example to figure out the immutable data.
var str = "hello";
console.log("original string : ", str);
str.toUpperCase();
console.log("string after toUpperCase method : ", str);
We took a string variable and assigned it a value “hello” then we used a string method “toUpper”.
Upon running the program we observed that it didn’t change the string because strings are immutable data types and they can’t be modified after creation.
The example clarifies that when we changed the value of employee2, we observed that changing the name of the second variable doesn’t affect the value of the first variable which means JavaScript treats both of them as separate variables, and it actually reassigns the value to the second variable.
We will consider another example to figure out the immutable data.
var str = "hello";
console.log("original string : ", str);
str.toUpperCase();
console.log("string after toUpperCase method : ", str);
We took a string variable and assigned it a value “hello” then we used a string method “toUpper”.
Upon running the program we observed that it didn’t change the string because strings are immutable data types and they can’t be modified after creation.
 The output of above-given code will be:
 You can noticed that toUpperCase doesn’t change the lower case letters to the upper case letters because we can’t modify the immutable data after its creation.
 Inside the HTML file, link the CSS file and the script.js file using the following lines before the body tag:
<script type=" module" src="script.js"></script><link rel=" stylesheet" href="style.css" />
Now, we are going to implement a fade-in animation on an image, and for the image, we are going to be using a royalty-free image from
Inside the HTML file, link the CSS file and the script.js file using the following lines before the body tag:
<script type=" module" src="script.js"></script><link rel=" stylesheet" href="style.css" />
Now, we are going to implement a fade-in animation on an image, and for the image, we are going to be using a royalty-free image from  We have our image in the center of the screen and right beneath the image we have our button.
 As you can see in the above gif that our animation is working perfectly.
 The first event that we are going to go over is the document-on-ready event.
This event is automatically executed when the DOM verifies that the webpage has been completely loaded and is not waiting for any further actions or responses.
So, we are going to change the background of the <h1> tag upon document load, with the following lines of code:
$(document).ready(function () {
$("h1").css("background", "red");});
You will get the following output:
The first event that we are going to go over is the document-on-ready event.
This event is automatically executed when the DOM verifies that the webpage has been completely loaded and is not waiting for any further actions or responses.
So, we are going to change the background of the <h1> tag upon document load, with the following lines of code:
$(document).ready(function () {
$("h1").css("background", "red");});
You will get the following output:
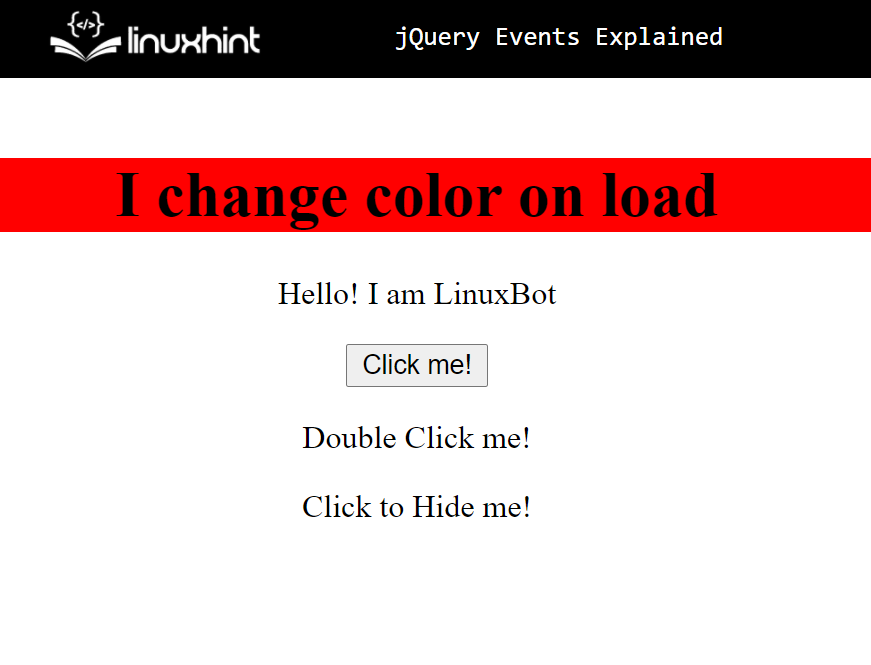 As you can see, we were able to change the background color of the h1 with jQuery events.
The next event is going to be the button press, we are going to prompt the user for his name upon button press.
Use the code:
$("button").click(function () {
var Xyz = prompt("Enter your full name");});
You get the following output on pressing the button:
As you can see, we were able to change the background color of the h1 with jQuery events.
The next event is going to be the button press, we are going to prompt the user for his name upon button press.
Use the code:
$("button").click(function () {
var Xyz = prompt("Enter your full name");});
You get the following output on pressing the button:
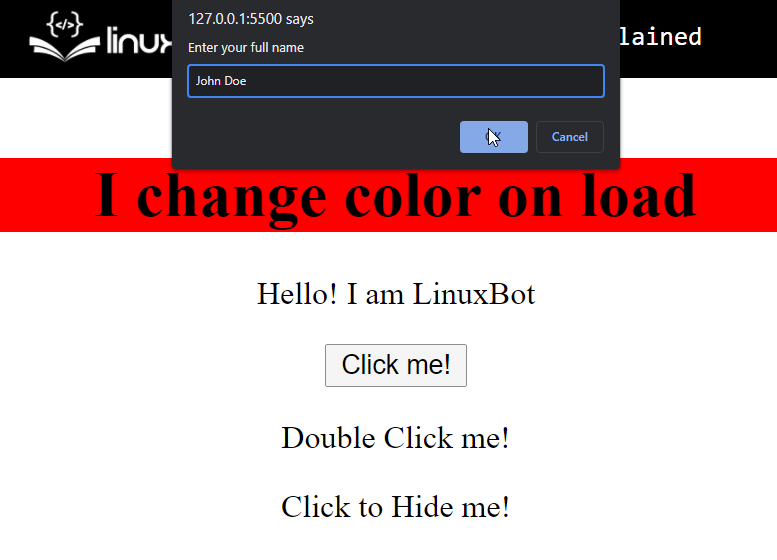 As you can see, upon clicking the button that says “Click me!”, a prompt dialogue box was shown asking for the user’s full name.
Mouse click events are pretty common, but something which is widely used is the double click event.
To demonstrate this, we are going to display a message on the screen as an alert when the user double clicks on the paragraph with the id “dblclick” with the following lines of code:
$("#dblClick").dblclick(function(){
alert("Have a nice day!");})
With the above lines, the output is as
As you can see, upon clicking the button that says “Click me!”, a prompt dialogue box was shown asking for the user’s full name.
Mouse click events are pretty common, but something which is widely used is the double click event.
To demonstrate this, we are going to display a message on the screen as an alert when the user double clicks on the paragraph with the id “dblclick” with the following lines of code:
$("#dblClick").dblclick(function(){
alert("Have a nice day!");})
With the above lines, the output is as
 Upon double-clicking on the text, a new alert dialogue box was shown to the user with a greeting.
We can even use the “this” reference when working with jQuery events, to demonstrate we are going to hide the text with the id “hide” upon click.
We do this by using the following lines of code:
$("#hide").click(function () {
$(this).hide();});
You get the following output upon clicking the text that says “Click to Hide me!”:
Upon double-clicking on the text, a new alert dialogue box was shown to the user with a greeting.
We can even use the “this” reference when working with jQuery events, to demonstrate we are going to hide the text with the id “hide” upon click.
We do this by using the following lines of code:
$("#hide").click(function () {
$(this).hide();});
You get the following output upon clicking the text that says “Click to Hide me!”:
 The text was hidden upon clicking on it once.
 To manipulate the <p> tags use the following script code:
$(document).ready(function () {
$("p").css("background", "yellow");});
With the above lines, the output will look like this
To manipulate the <p> tags use the following script code:
$(document).ready(function () {
$("p").css("background", "yellow");});
With the above lines, the output will look like this
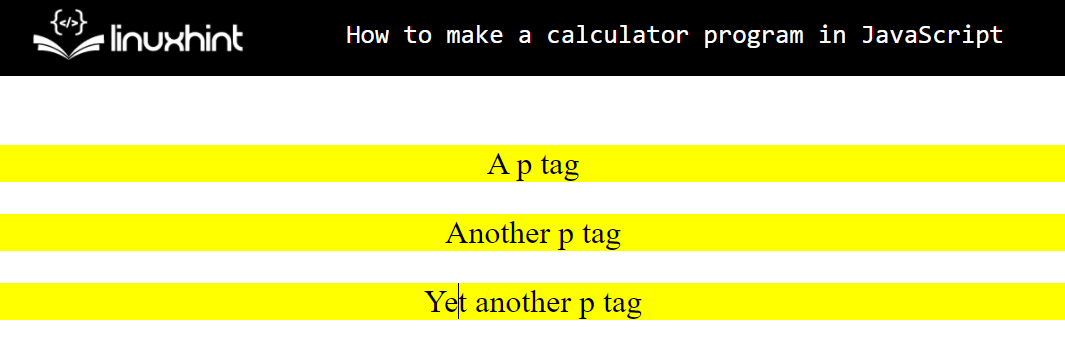 We even have filter selectors; suppose we only want to select the last <p> tag then we can use the following script code:
$(document).ready(function () {
$("p:last").css("background", "yellow");});
This will give us the following output:
We even have filter selectors; suppose we only want to select the last <p> tag then we can use the following script code:
$(document).ready(function () {
$("p:last").css("background", "yellow");});
This will give us the following output:
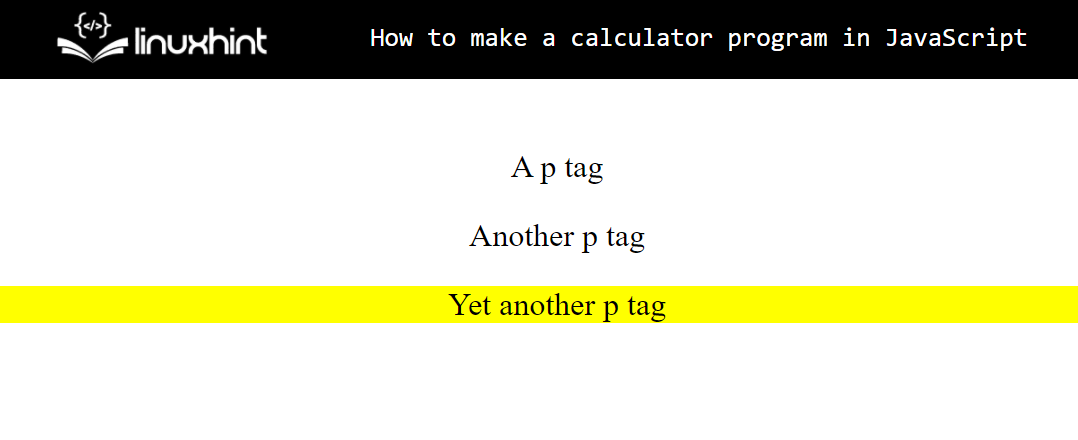 As you can see, we were able to select on a specific <p> tag using the filtered name selector.
 As you can see in the image above, we were able to select an element using its id and manipulate its styling property using jQuery id selector.
 As you can see, we were able to manipulate the element with the class “myClass” by using jQuery class selectors.
 For this purpose, we will move into our React.js application folder by executing the following command in the terminal:
> cd mern-emsystem
For this purpose, we will move into our React.js application folder by executing the following command in the terminal:
> cd mern-emsystem
 At this point, you have to make sure that your React.js application is running on the specified port.
If it is not, then write out the below-given command for starting your front-end web server:
> npm start
At this point, you have to make sure that your React.js application is running on the specified port.
If it is not, then write out the below-given command for starting your front-end web server:
> npm start
 Here is the basic interface of our Employee Management System application:
 Now, open up a new terminal window by clicking the “+” button, which is highlighted in the below-given image:
 We will utilize the new terminal window for installing the Bootstrap CSS framework for making the styling easier:
> npm install bootstrap
We will utilize the new terminal window for installing the Bootstrap CSS framework for making the styling easier:
> npm install bootstrap
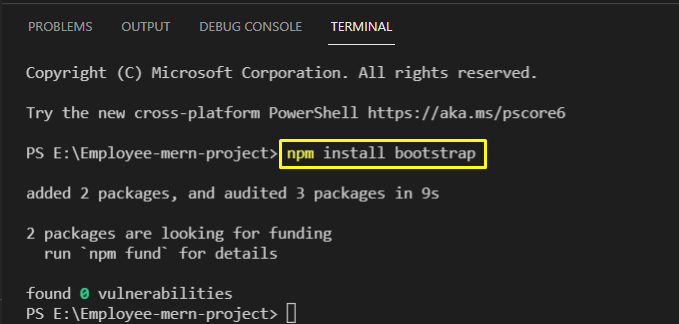 In the next step, open up the “App.js” JavaScript file, located in the “src” directory:
 Now, import the “bootstrap” CSS file by adding the following lines:
import "bootstrap/dist/css/bootstrap.min.css";
Now, import the “bootstrap” CSS file by adding the following lines:
import "bootstrap/dist/css/bootstrap.min.css";
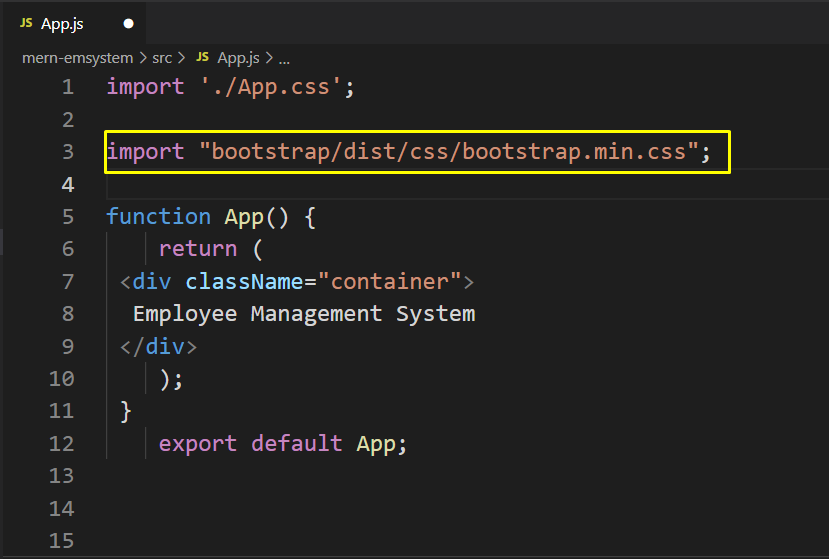 Press “Ctrl+S” to save the added changes and then create a new “Components” folder in the “src” folder:
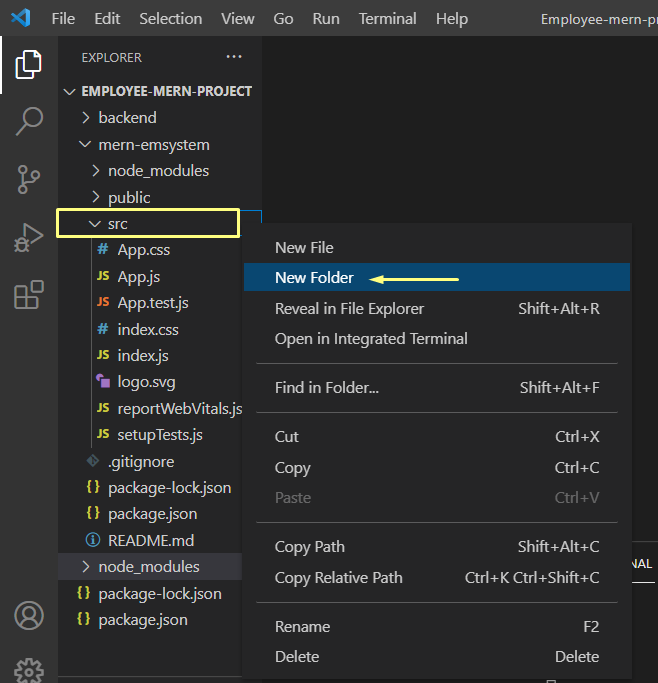 After doing so, we will create a new “Instructions.js” component file:
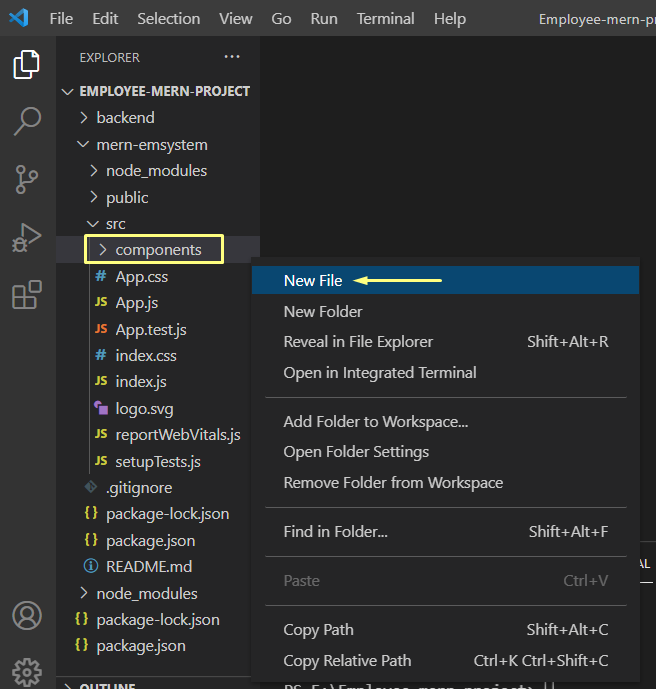 Then, open up the created “Instructions.js” file and add the below-given code in it:
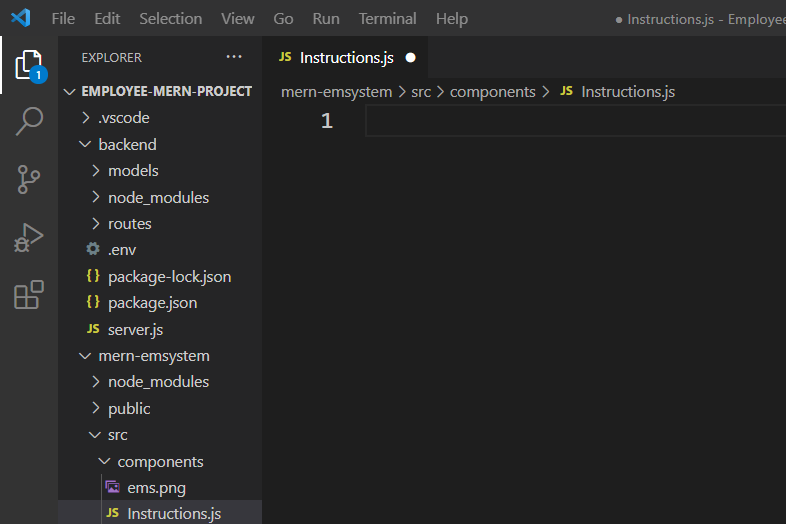 Our idea is to create a custom component that will display a heading, some description, and an image related to our Employee Management System React.js application.
For this purpose, firstly, we will import the “React” and its “Component” class and the “ems.png” image, which we want to add to this Instructions component.
The “Component” base class can be then extended for creating the required components.
The “Component” class has various functions that can be utilized to enhance the functionality of the created method and “render()” is one such method.
“render()” is used for returning the JSX code which you want to view in the browser:
import React, { Component } from 'react';import ems from './ems.png';export class Instructions extends Component {
render() {
return(
<div>
<h1>Employee Mern Project</h1>
<p>This is an Employee Management System</p>
<img src="{ems}" />;
</div>
)
}}export default Instructions;
After adding the code in the “Instruction.js”, press “CTRL+S” to save it and then open up your “App.js” file:
Our idea is to create a custom component that will display a heading, some description, and an image related to our Employee Management System React.js application.
For this purpose, firstly, we will import the “React” and its “Component” class and the “ems.png” image, which we want to add to this Instructions component.
The “Component” base class can be then extended for creating the required components.
The “Component” class has various functions that can be utilized to enhance the functionality of the created method and “render()” is one such method.
“render()” is used for returning the JSX code which you want to view in the browser:
import React, { Component } from 'react';import ems from './ems.png';export class Instructions extends Component {
render() {
return(
<div>
<h1>Employee Mern Project</h1>
<p>This is an Employee Management System</p>
<img src="{ems}" />;
</div>
)
}}export default Instructions;
After adding the code in the “Instruction.js”, press “CTRL+S” to save it and then open up your “App.js” file:
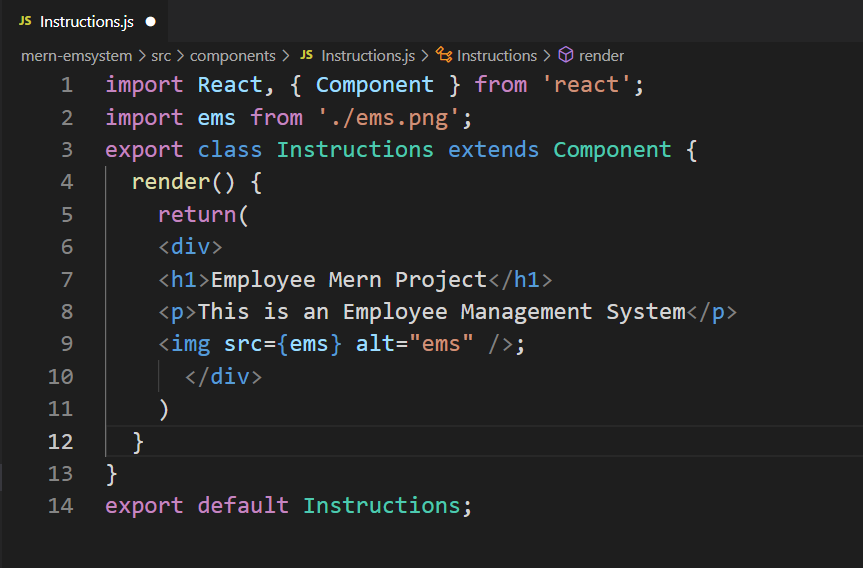 Your created React.js component will be of no use until you import it into your “App.js” file and wrap the created components with the angle brackets.
Here we have imported the “Instructions” component and added the specified component as “” in the “return()” function of the App():
import React from 'react';import "bootstrap/dist/css/bootstrap.min.css";import Instructions from './components/Instructions';function App() {
return (
<div>
</div>
);}export default App;
Your created React.js component will be of no use until you import it into your “App.js” file and wrap the created components with the angle brackets.
Here we have imported the “Instructions” component and added the specified component as “” in the “return()” function of the App():
import React from 'react';import "bootstrap/dist/css/bootstrap.min.css";import Instructions from './components/Instructions';function App() {
return (
<div>
</div>
);}export default App;
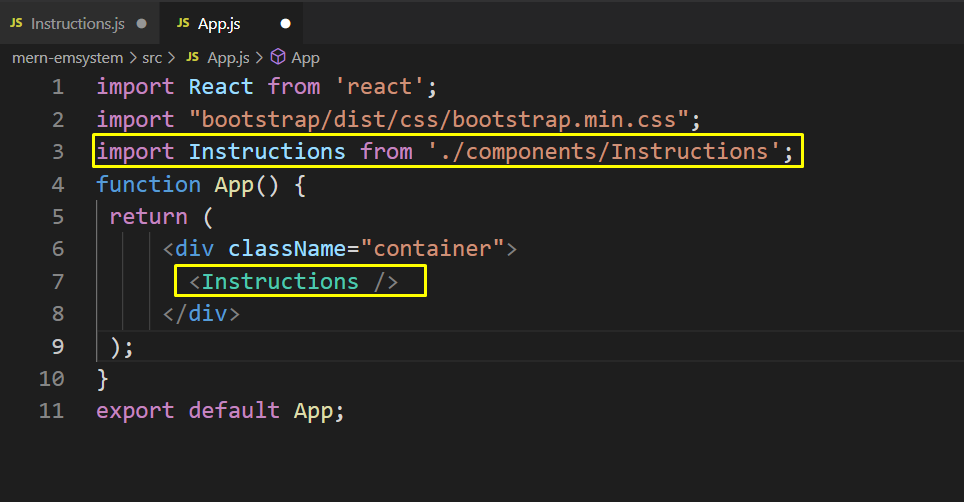 After importing the “Instructions” component, we will run our React.js application:
> npm start
After importing the “Instructions” component, we will run our React.js application:
> npm start
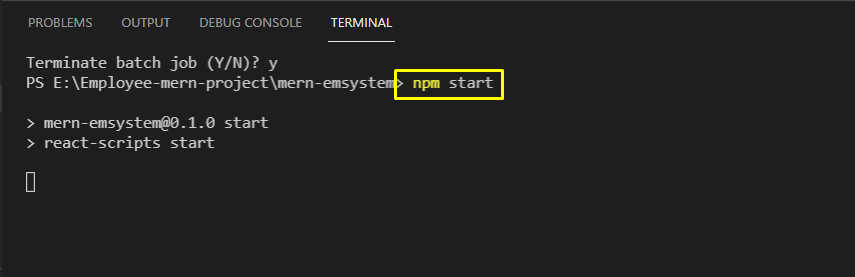 From the output, you can see that our “Instructions” component is successfully displaying the added content:

 Now, we can pass this object in the JSON.stringify() function and store it inside another variable using the following line:
var converted = JSON.stringify(myObject);
This variable can be printed by using the console.log() function:
console.log(converted);
After executing the following program, you should see the following output on your console:
Now, we can pass this object in the JSON.stringify() function and store it inside another variable using the following line:
var converted = JSON.stringify(myObject);
This variable can be printed by using the console.log() function:
console.log(converted);
After executing the following program, you should see the following output on your console:
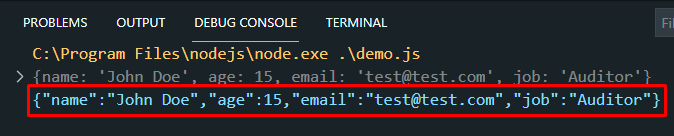 As you can see, we were able to convert the JSON object into a string that can be transferred over a network or stored in some file for later use.
The Stringify() function takes 2 additional arguments which are optional but still very useful:
one is the function known as the replacer argument
second one is called the space argument
As you can see, we were able to convert the JSON object into a string that can be transferred over a network or stored in some file for later use.
The Stringify() function takes 2 additional arguments which are optional but still very useful:
one is the function known as the replacer argument
second one is called the space argument
 As you can see, since the “job” key had the value of “Auditor” therefor it was skipped from the resulting string
 You can observe the space between each key-value pair (space is marked by the yellow line to make it more prominent)
To demonstrate the appending of a string before each key-value pair in the resulting string, use the following lines of code:
console.log(JSON.stringify(myObject, null, " A "));
You will observe the following result on the console:
You can observe the space between each key-value pair (space is marked by the yellow line to make it more prominent)
To demonstrate the appending of a string before each key-value pair in the resulting string, use the following lines of code:
console.log(JSON.stringify(myObject, null, " A "));
You will observe the following result on the console:
 The prefixed substring is easily noticeable
 You can access the values from this resulting object like any other normal object, try the following line of code to verify this:
console.log(myObject.job + " " + myObject.name);
You will get the following output on your console:
You can access the values from this resulting object like any other normal object, try the following line of code to verify this:
console.log(myObject.job + " " + myObject.name);
You will get the following output on your console:
 That is it for JSON.parse() function and JSON.stringify() function
 In this example, we added two values and assign their result to a variable a.
“console.log” is a method, that will print the output on the browser’s console.
The output of the above example will be:
In this example, we added two values and assign their result to a variable a.
“console.log” is a method, that will print the output on the browser’s console.
The output of the above example will be:
 In JavaScript, the values can be literals or variables, or expressions.
In the above example, we have literals (12+ 14) while in the next example we will add the two numbers and assign the result to the third variable (a+ b):
let a= 12;
let b=14;
let c=a+ b;
console.log("The sum of a and b :" , c);
Implement the above code.
In JavaScript, the values can be literals or variables, or expressions.
In the above example, we have literals (12+ 14) while in the next example we will add the two numbers and assign the result to the third variable (a+ b):
let a= 12;
let b=14;
let c=a+ b;
console.log("The sum of a and b :" , c);
Implement the above code.
 This example and the previous example will produce the same result:
 Must remember that “+” will act as a concatenation operator when we add two strings.
So, pay attention and use the “+” operator carefully.
Must remember that “+” will act as a concatenation operator when we add two strings.
So, pay attention and use the “+” operator carefully.
 Here we use the console.log function to print the output on the console you can also use the console.log to display the output on the document:

 The output of the above-given program will be:

 The output for the above-given code will be:

 In this example, a variable “a” will take a value from the user.
 If a user enters an odd value it will print a message “you enter an odd value”.
The modulus operator divides the given value with 2, if the remainder is 1 it will show an odd value:
If a user enters an odd value it will print a message “you enter an odd value”.
The modulus operator divides the given value with 2, if the remainder is 1 it will show an odd value:
 If the user enters an even number;
 Then it will print a message “you enter an even value”:

 The output of the above-given code will be:
 In JavaScript, an alternate method is also available to find the power of a number.
 The output of the math.pow method will be the same as the output of the exponentiation operator:

 The output will be:

 The output of the above-given code will be:

 The output will verify that the above code follows the precedence order.
According to this, it will first solve “4 **2” because exponents have higher precedence then it will multiply the result of exponents with the 3 and at the end, it will perform addition.
So, the output is:
The output will verify that the above code follows the precedence order.
According to this, it will first solve “4 **2” because exponents have higher precedence then it will multiply the result of exponents with the 3 and at the end, it will perform addition.
So, the output is:

 Now, create an account for hosting the database in the “MongoDB Atlas”:
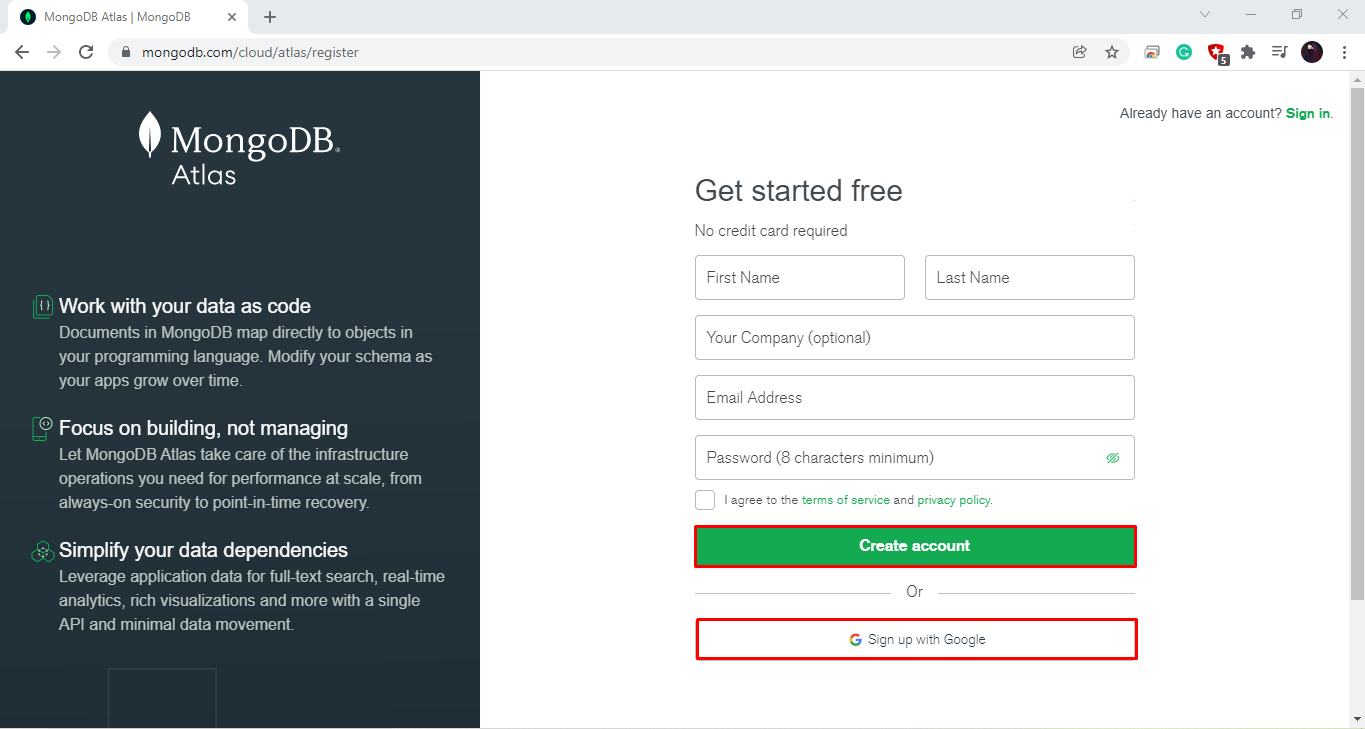 You will see the below-given dashboard after MongoDB account creation.
Now, click on the “New Project” button, which is located at the right side of the dashboard:
You will see the below-given dashboard after MongoDB account creation.
Now, click on the “New Project” button, which is located at the right side of the dashboard:
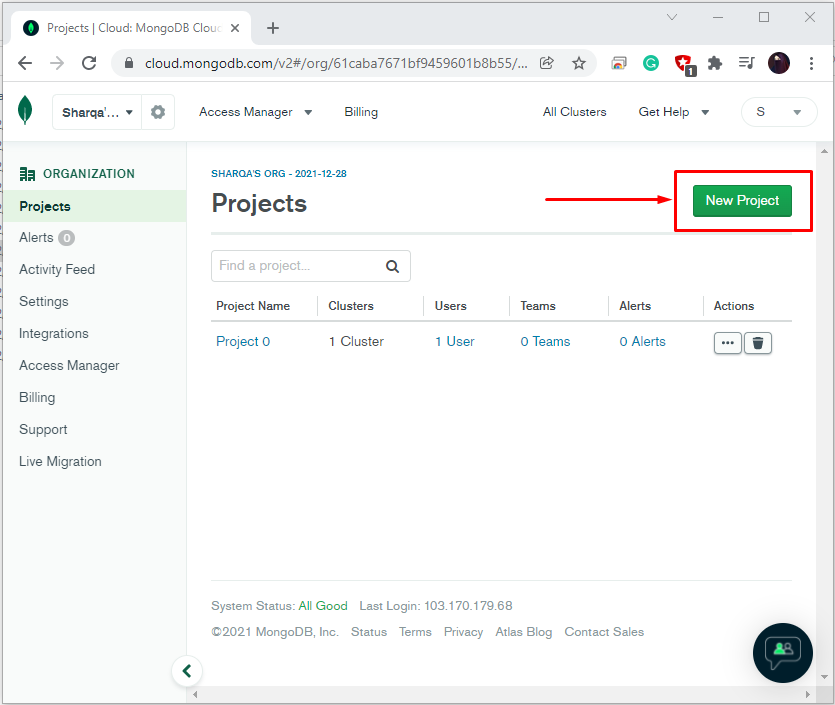 In the highlighted input field, enter your MongoDB project name and click on the “Next” button:
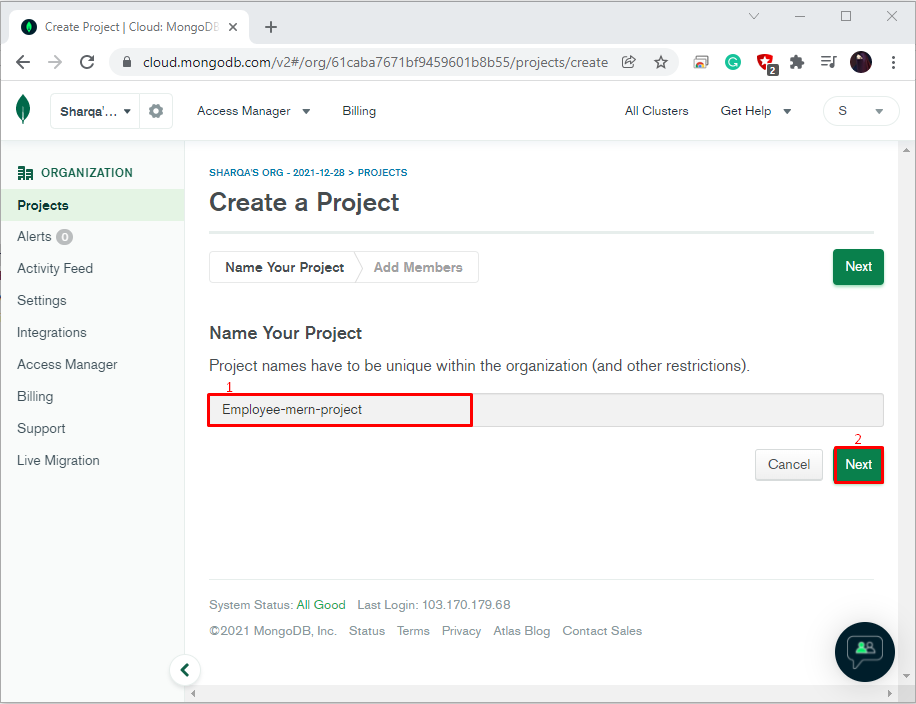 At this point, your MongoDB project is created, and you are all ready to build a new database:
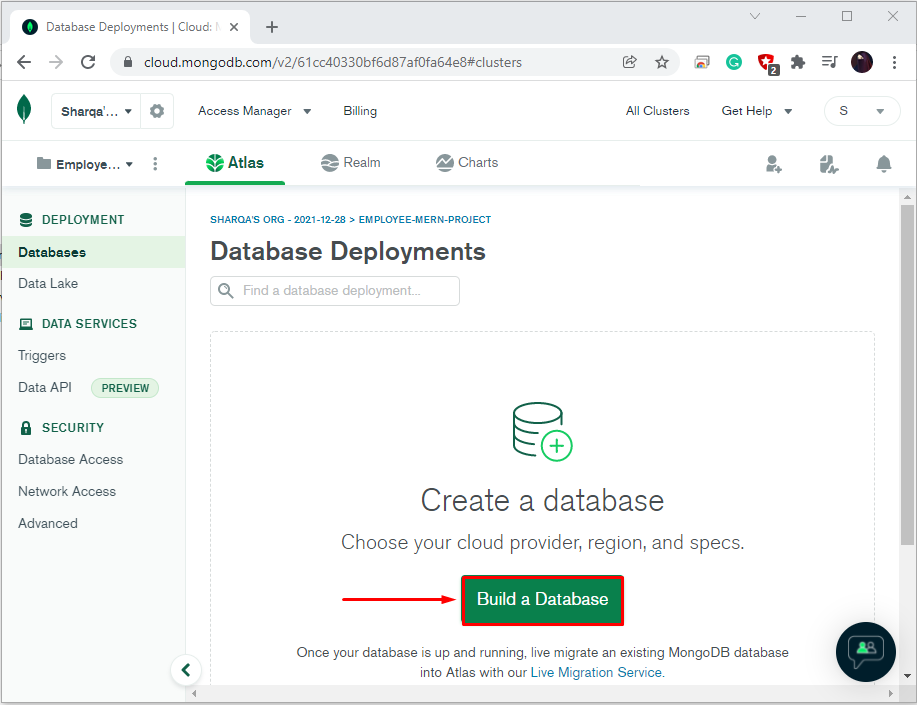 Next, select the provider and the zone for your database.
For instance, we have selected “Google Cloud” as a cloud provider and “lowa” as our region.
It is also recommended to choose a free tier that is great for a sandbox environment.
After selecting the required options, click on the “Create Cluster” button to move ahead:
Next, select the provider and the zone for your database.
For instance, we have selected “Google Cloud” as a cloud provider and “lowa” as our region.
It is also recommended to choose a free tier that is great for a sandbox environment.
After selecting the required options, click on the “Create Cluster” button to move ahead:
 To maintain the MongoDB security, choose an option between “Username and Password” and “Certificate” for authenticating the connection from or to the Node.js.
In our case, we have added the username and password:
To maintain the MongoDB security, choose an option between “Username and Password” and “Certificate” for authenticating the connection from or to the Node.js.
In our case, we have added the username and password:
 Now, add your IP addresses to the MongoDB safelist.
This option will permit the configured IP address to access the project’s clusters:
Now, add your IP addresses to the MongoDB safelist.
This option will permit the configured IP address to access the project’s clusters:
 After setting up the IP address, click on the “Finish and Close” button:
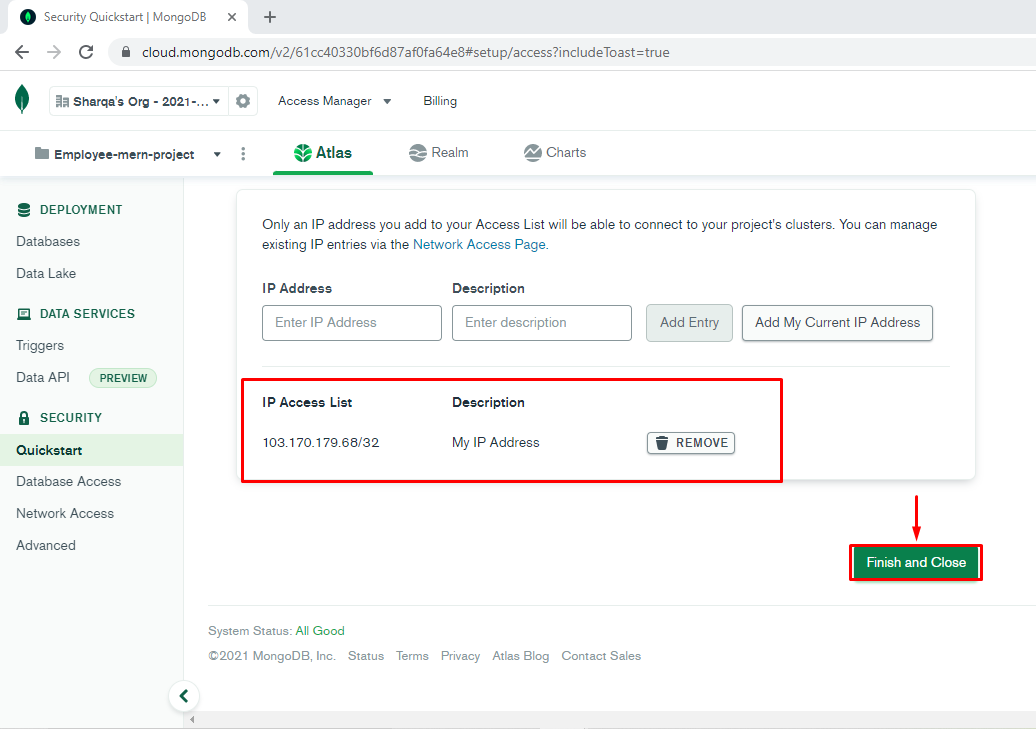 Within a few minutes, the created cluster of your MongoDB project will be provisioned:
 Then, you will be asked to choose the connection method for Cluster0.
We want to connect our Node.js server to the MongoDB database in MERN Stack application development, so we will go with the “Connect your application” options:
Then, you will be asked to choose the connection method for Cluster0.
We want to connect our Node.js server to the MongoDB database in MERN Stack application development, so we will go with the “Connect your application” options:
 Next, select the “DRIVER” and its “VERSION” and then copy the connection string from the bottom of the window:
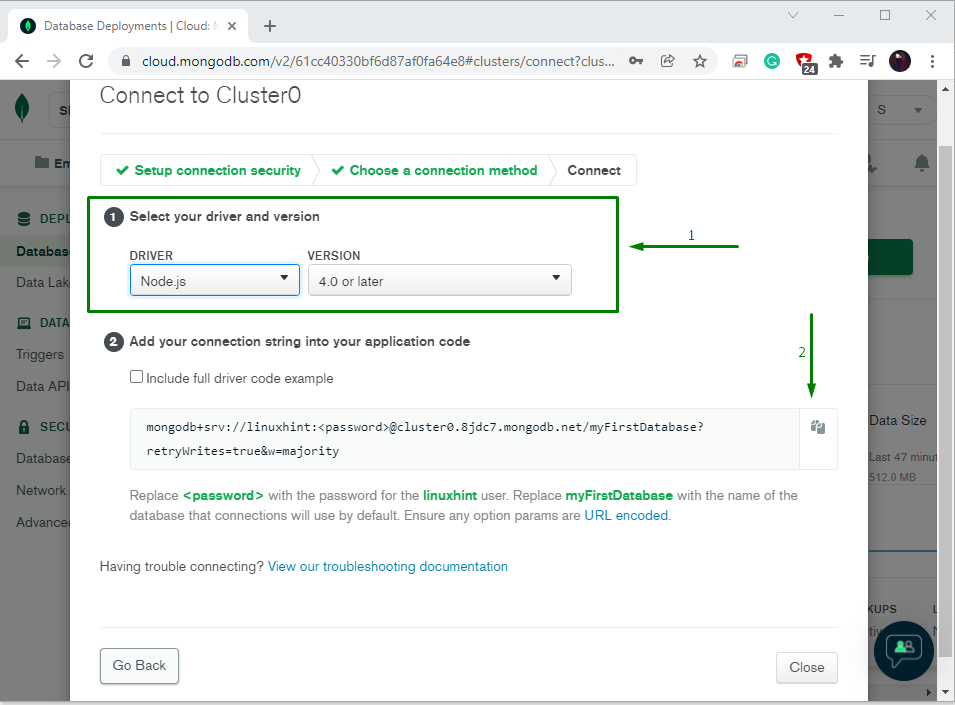
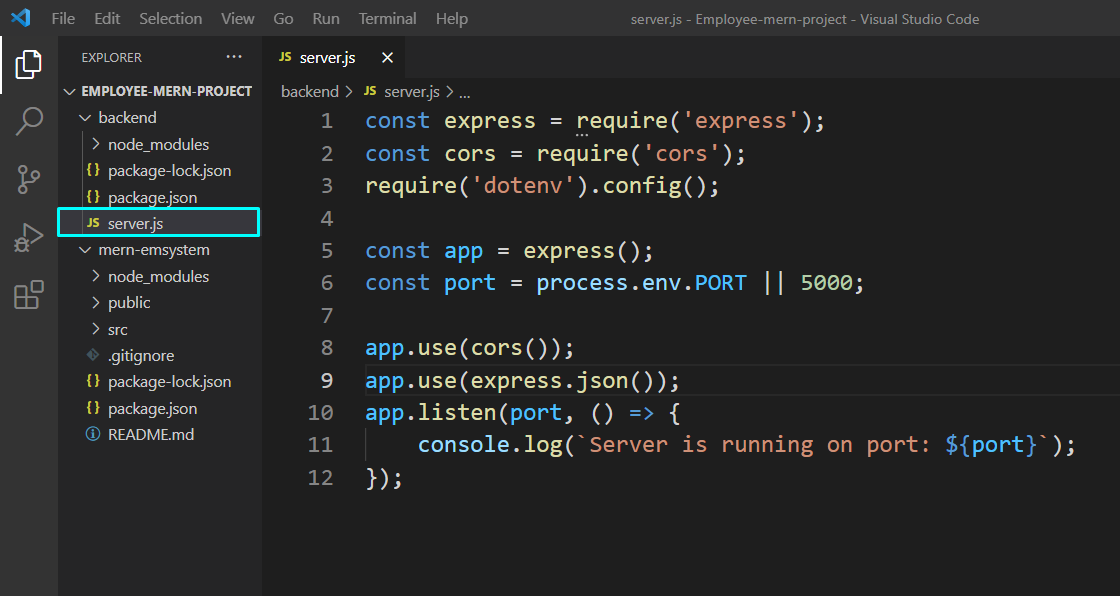 > nodeman server
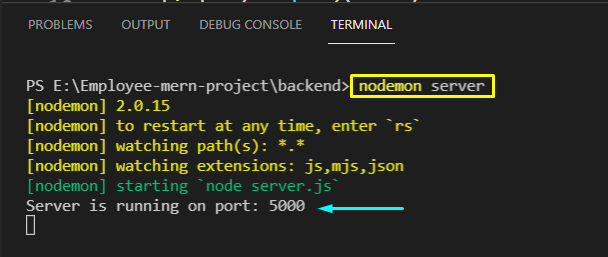 In the next step, we will add the “mongoose” library.
The “mongoose” Node.js library helps in establishing a connection between the MongoDB cluster and Node.js server:
const mongoose = require('mongoose');
In the next step, we will add the “mongoose” library.
The “mongoose” Node.js library helps in establishing a connection between the MongoDB cluster and Node.js server:
const mongoose = require('mongoose');
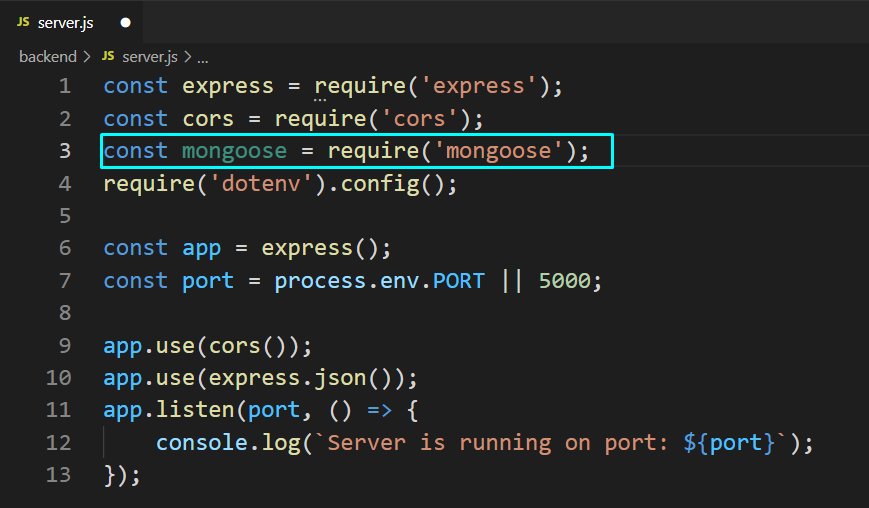 Now, we will create a separate “.env” file for storing the MongoDB Atlas “URI” or the “Connection String”.
For this purpose, click on the Node.js server folder, which is “backend” in our case, and then create a “New File”:
Now, we will create a separate “.env” file for storing the MongoDB Atlas “URI” or the “Connection String”.
For this purpose, click on the Node.js server folder, which is “backend” in our case, and then create a “New File”:
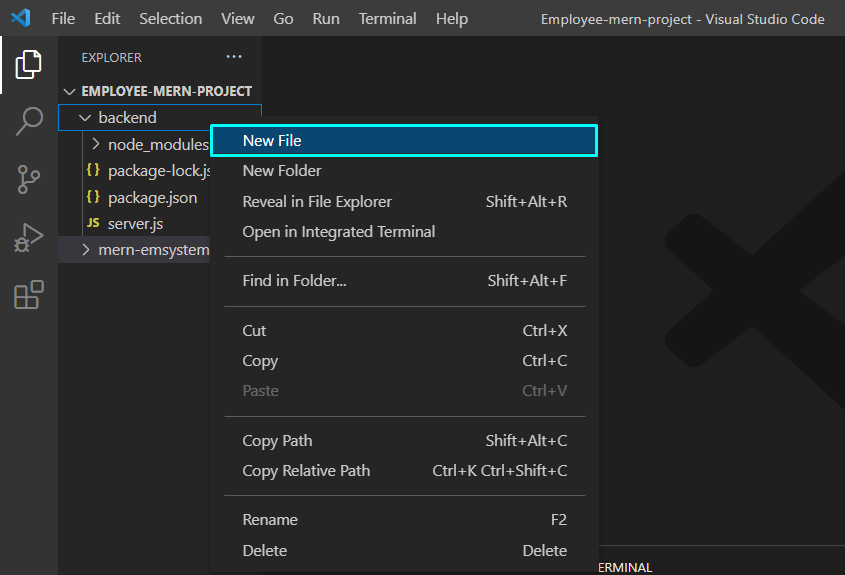 We have named the newly created file as “.env”:
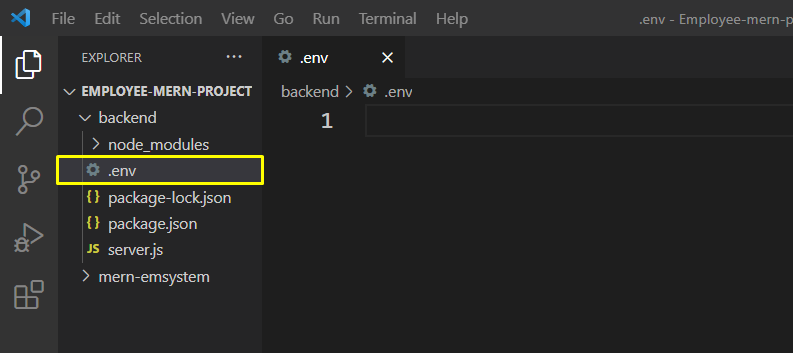 If you do not have the connection string, then copy it from the highlighted section:
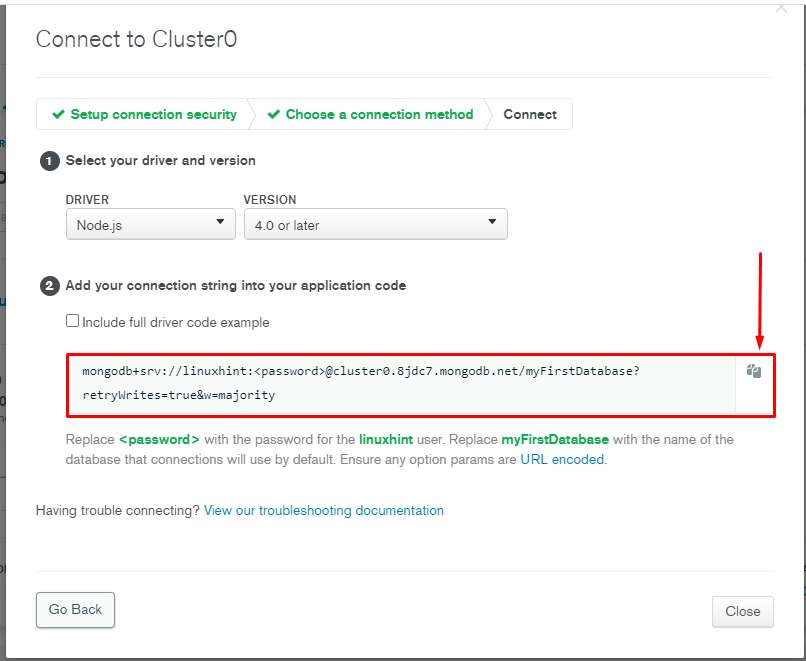 Then, add the copied connection string as “ATLAS_URI” in the “.env” file:
ATLAS_URI=mongodb+srv://linuxhint:@cluster0.8jdc7.mongodb.net/myFirstDatabase?retryWrites=true&w=majority
Then, add the copied connection string as “ATLAS_URI” in the “.env” file:
ATLAS_URI=mongodb+srv://linuxhint:@cluster0.8jdc7.mongodb.net/myFirstDatabase?retryWrites=true&w=majority
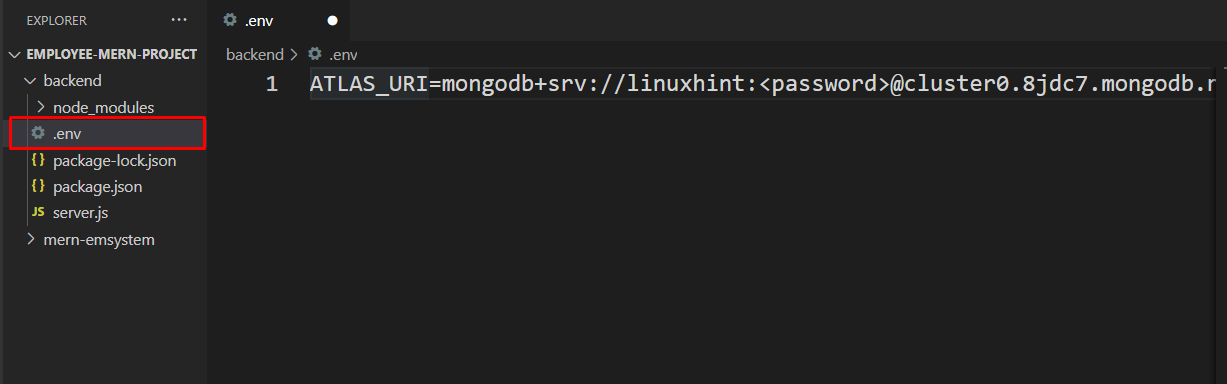 In the added “ATLAS_URI,” specify your MongoDB username and password and press “CTRL+S” to save the added changes:
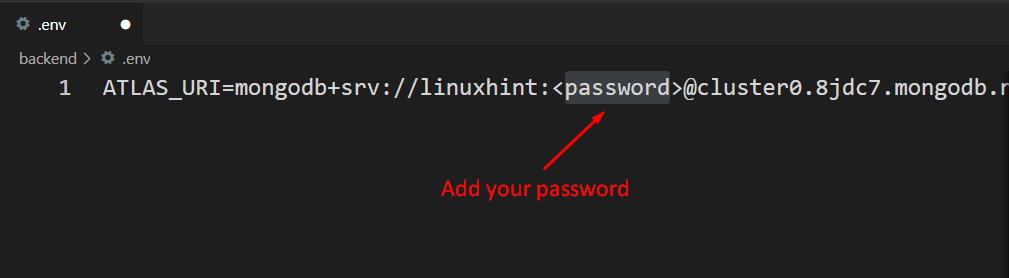 Now, add the following code in your Node.js “server” file:
const uri = process.env.ATLAS_URI;
mongoose.connect(uri);const connection = mongoose.connection;
connection.once('open', () => {
console.log("MongoDB database connection established successfully");})
The added code will connect with the “MongoDB Atlas” using the “mongoose” library and the ALTAS_URI.
If the connection gets established, it will print out “MongoDB database connection established successfully” on the terminal window:
Now, add the following code in your Node.js “server” file:
const uri = process.env.ATLAS_URI;
mongoose.connect(uri);const connection = mongoose.connection;
connection.once('open', () => {
console.log("MongoDB database connection established successfully");})
The added code will connect with the “MongoDB Atlas” using the “mongoose” library and the ALTAS_URI.
If the connection gets established, it will print out “MongoDB database connection established successfully” on the terminal window:
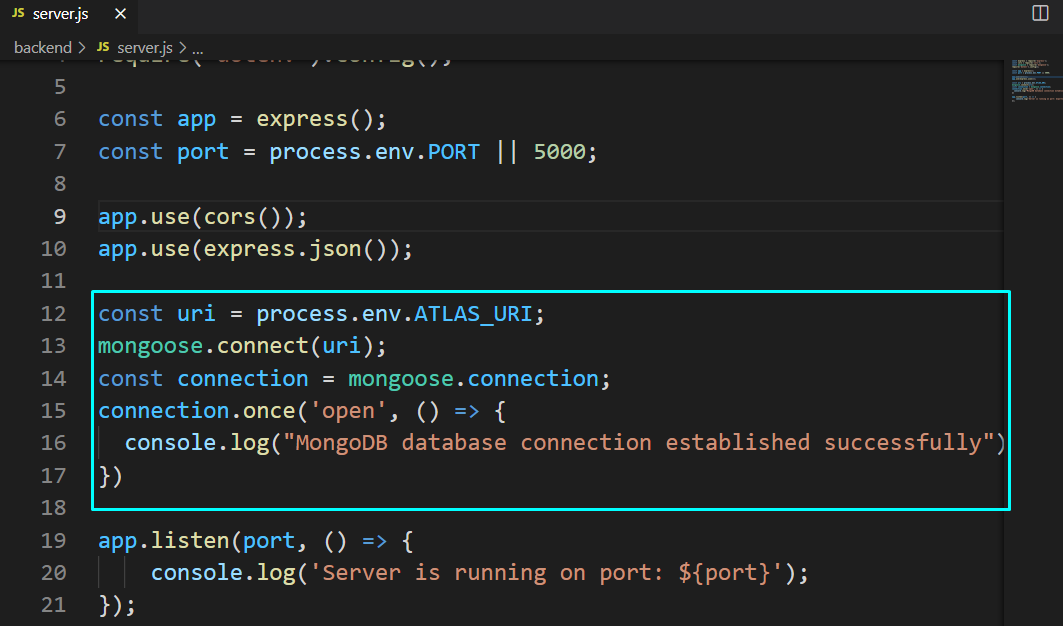 Press “CTRL+S” to save the added changes and then run your Node.js server:
> nodemon server
The below-given output declares that we have successfully connected our Node.js server to the MongoDB database in the MERN Stack development:
Press “CTRL+S” to save the added changes and then run your Node.js server:
> nodemon server
The below-given output declares that we have successfully connected our Node.js server to the MongoDB database in the MERN Stack development:
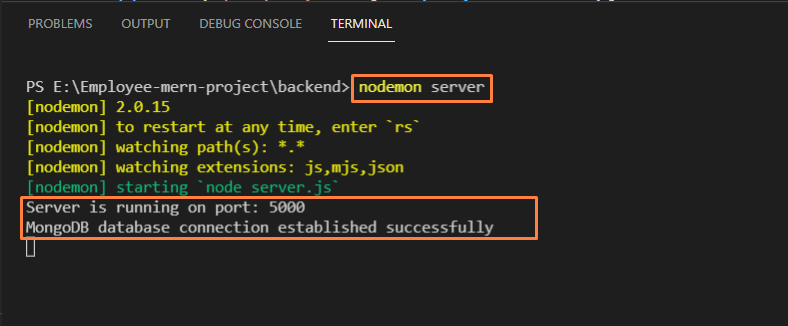
 To verify this, go to the “applications” tab in the developer’s tools and expand local storage.
You should be able to see the value in the explorer:
To verify this, go to the “applications” tab in the developer’s tools and expand local storage.
You should be able to see the value in the explorer:

 Or we can use the command as shown:
console.log(localStorage.getItem("Name"));
The output is as
Or we can use the command as shown:
console.log(localStorage.getItem("Name"));
The output is as

 All of the above steps can be done with the sessionStorage Object but remember it will delete all the data when the session expires.
Let’s see the demonstration.
All of the above steps can be done with the sessionStorage Object but remember it will delete all the data when the session expires.
Let’s see the demonstration.
 We can verify the storage under the session storage tab:
 Close the browsers, and reopen the same link and then go to developer’s tools > Applications > sessions storage, you will see the following results:
 You can see that the entry was deleted, this proves that the sessionStorage object only stores data for in the local storage of the browser for only one session.
 That is it for object destructuring ES6
 That is it for using Rest Parameters, we can now move on to our next topic.
 As you can see, the elements of the array were successfully passed to the function as arguments with the use of spread syntax.
 We know that in arrays indexing starts from 0.
So initially, at index 0 the value is 8.
The value of index 1 is 3, and 1 is placed at index 3, and so on.
Now, we have to sort this array in ascending order as shown in the below-given array:
We know that in arrays indexing starts from 0.
So initially, at index 0 the value is 8.
The value of index 1 is 3, and 1 is placed at index 3, and so on.
Now, we have to sort this array in ascending order as shown in the below-given array:
 Now, we will explain the working of bubble sort step by step.
 Now the value of index 1 will be compared with the value of index 2.
The value of index 1 is 8 while the value of index 2 is 1 which is less than 8, so it will be swapped and the array will be modified as:
Now the value of index 1 will be compared with the value of index 2.
The value of index 1 is 8 while the value of index 2 is 1 which is less than 8, so it will be swapped and the array will be modified as:
 Now, we will make a comparison between index 2 and index 3.
The value of index 2 is 8 which is greater than the value of index 3 which is 2 so the values will be swapped:
Now, we will make a comparison between index 2 and index 3.
The value of index 2 is 8 which is greater than the value of index 3 which is 2 so the values will be swapped:
 Now compare the value of index 3 with the value of index 4.
At index 3 value is 8 while at index 4 value is -1 which means both these values will be swapped:
Now compare the value of index 3 with the value of index 4.
At index 3 value is 8 while at index 4 value is -1 which means both these values will be swapped:
 Finally, the value of index 4 will be compared with the value of index 5.
Again 8 is greater than 7 so, it will be replaced with 7:
Finally, the value of index 4 will be compared with the value of index 5.
Again 8 is greater than 7 so, it will be replaced with 7:
 Now, the first iteration is complete, and “8” reaches its appropriate position.
So, in the next step, the comparisons will be made till the 4th index since the value of the last index is sorted.
Now, the first iteration is complete, and “8” reaches its appropriate position.
So, in the next step, the comparisons will be made till the 4th index since the value of the last index is sorted.
 Next, we will compare the value of the 1st index with the value of the 2nd index.
Here, 3 is greater than 2 so, it will be replaced with 2:
Next, we will compare the value of the 1st index with the value of the 2nd index.
Here, 3 is greater than 2 so, it will be replaced with 2:
 Now we will compare the value of the 2nd index i.e.
3 with the value of the 3rd index which is -1.
Values will be swapped again since 3 is greater than -1:
Now we will compare the value of the 2nd index i.e.
3 with the value of the 3rd index which is -1.
Values will be swapped again since 3 is greater than -1:
 The value of the 3rd index is less than the value of the 4th index so, it will remain the same:
 Now the last two indexes are sorted and the values are placed properly on the 4th and 5th indexes.
 Next, compare the next two indexes, here the value of the 1st index is greater than the value of the 2nd index therefore, their values will be swapped:
 The value of the 2nd index is less than the value of the 3rd index therefore, their values will not be swapped:
 Next, we will compare the value of the 1st index with the value of the 2nd index.
They are already sorted, so they will remain the same:
Next, we will compare the value of the 1st index with the value of the 2nd index.
They are already sorted, so they will remain the same:
 Finally, our array is sorted in ascending order.
 In the above-given code, we created an array named ‘ary’ and assigned some data to it.
Then we created a function named bubbleSort and we passed the array to it.
A variable named ‘flag’ is initially assigned with a value ‘false’.
Next, the for-loop is initialized with the 0 and it will execute until it is less than the array length.
Nested for-loops are utilized to draw a comparison of the value at the current index with the value at the adjacent index, the values will be swapped only if the value of the current index is higher than the value present at its adjacent index.
The value of the flag will be replaced with true if a value is swapped during iteration.
Finally, the array is called using the bubbleSort function.
The output will be:
In the above-given code, we created an array named ‘ary’ and assigned some data to it.
Then we created a function named bubbleSort and we passed the array to it.
A variable named ‘flag’ is initially assigned with a value ‘false’.
Next, the for-loop is initialized with the 0 and it will execute until it is less than the array length.
Nested for-loops are utilized to draw a comparison of the value at the current index with the value at the adjacent index, the values will be swapped only if the value of the current index is higher than the value present at its adjacent index.
The value of the flag will be replaced with true if a value is swapped during iteration.
Finally, the array is called using the bubbleSort function.
The output will be:

 As you can see, the functions or lines invoked first were always finished first.
The reason for showing you a simple example like this was to make you notice when the execution sequence will change with async await and promises.
As you can see, the functions or lines invoked first were always finished first.
The reason for showing you a simple example like this was to make you notice when the execution sequence will change with async await and promises.
 As we can see the function returned as the string that says, users.
Let’s try putting the keyword async before function definition as:
async function getUsers() {
console.log("Inside the getUsers function");
return "Users";}
Now, on your console you will see that this time around the function returned a promise that had the status “fulfilled”:
As we can see the function returned as the string that says, users.
Let’s try putting the keyword async before function definition as:
async function getUsers() {
console.log("Inside the getUsers function");
return "Users";}
Now, on your console you will see that this time around the function returned a promise that had the status “fulfilled”:
 But in cases where you are fetching some data from some REST API or any WEB API, this promise will change multiple states, from pending to fulfilled/rejected.
In such cases, we wait for the return of the promise’s result by using the await keyword.
For this, we are going to use the
But in cases where you are fetching some data from some REST API or any WEB API, this promise will change multiple states, from pending to fulfilled/rejected.
In such cases, we wait for the return of the promise’s result by using the await keyword.
For this, we are going to use the  Examine the output closely and you will notice the flow of execution as:
Code starts and the variable is declared on the function.
The pointer goes inside the function, prints the first line, sees the await keyword, leaves the function, and returns a pending promise to the variable “list” that we just created.
Executes other parts of the code (that is why you can see “last line of the code”) while waiting for the promise in the await.
Sees the line list.then() but it will not be executed until the function getUsers returns a promise with a status solved/rejected.
Goes back inside the function, API responds, creates a list of users, and converts it into JSON.
The status of the promises returned by the async function getUsers changes to fulfilled and the list.then() line executed and we get the JSON data printed onto the console.
That is how you alter sequential execution and implement asynchronous execution
Examine the output closely and you will notice the flow of execution as:
Code starts and the variable is declared on the function.
The pointer goes inside the function, prints the first line, sees the await keyword, leaves the function, and returns a pending promise to the variable “list” that we just created.
Executes other parts of the code (that is why you can see “last line of the code”) while waiting for the promise in the await.
Sees the line list.then() but it will not be executed until the function getUsers returns a promise with a status solved/rejected.
Goes back inside the function, API responds, creates a list of users, and converts it into JSON.
The status of the promises returned by the async function getUsers changes to fulfilled and the list.then() line executed and we get the JSON data printed onto the console.
That is how you alter sequential execution and implement asynchronous execution
 Similarly, you can use the apply() method for the same purpose using the of code:
person1.printName.apply(person2);
But what if the printName() function is taking in some arguments like:
printName: function (city, siblings) {
console.log(`${this.name} from ${city} has ${siblings} siblings`);
},
For this case, you will use the call function with the following line of code:
person1.printName.call(person2, "New York", 4);
The complete code snippet is as:
var person1 = {
name: "John Doe",
age: 25,
designation: "Auditor",
printName: function (city, siblings) {
console.log(`${this.name} from ${city} has ${siblings} siblings`);
},};var person2 = {
name: "Baba Yaga",
age: 22,
designation: "Unemployed",};
person1.printName.call(person2, "New York", 4);
If you execute the following code, you will get the output as:
Similarly, you can use the apply() method for the same purpose using the of code:
person1.printName.apply(person2);
But what if the printName() function is taking in some arguments like:
printName: function (city, siblings) {
console.log(`${this.name} from ${city} has ${siblings} siblings`);
},
For this case, you will use the call function with the following line of code:
person1.printName.call(person2, "New York", 4);
The complete code snippet is as:
var person1 = {
name: "John Doe",
age: 25,
designation: "Auditor",
printName: function (city, siblings) {
console.log(`${this.name} from ${city} has ${siblings} siblings`);
},};var person2 = {
name: "Baba Yaga",
age: 22,
designation: "Unemployed",};
person1.printName.call(person2, "New York", 4);
If you execute the following code, you will get the output as:
 As you can see, you were able to pass the arguments using the call method, you can do this by using the apply() method as well by using the following code snippet:
var person1 = {
name: "John Doe",
age: 25,
designation: "Auditor",
printName: function (city, siblings) {
console.log(`${this.name} from ${city} has ${siblings} siblings`);
},};var person2 = {
name: "Baba Yaga",
age: 22,
designation: "Unemployed",};
person1.printName.apply(person2, ["New York", 4]);
Note: for passing arguments to the borrowed function through the apply() method, we are using an array containing the arguments.
If you execute this code you will get the same identical output as:
As you can see, you were able to pass the arguments using the call method, you can do this by using the apply() method as well by using the following code snippet:
var person1 = {
name: "John Doe",
age: 25,
designation: "Auditor",
printName: function (city, siblings) {
console.log(`${this.name} from ${city} has ${siblings} siblings`);
},};var person2 = {
name: "Baba Yaga",
age: 22,
designation: "Unemployed",};
person1.printName.apply(person2, ["New York", 4]);
Note: for passing arguments to the borrowed function through the apply() method, we are using an array containing the arguments.
If you execute this code you will get the same identical output as:
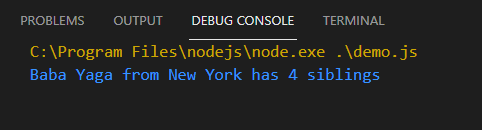 But what if you don’t want to borrow a function from some object? This is where the bind method comes into play.
 There you go, you have duplicated a function from person1 object, passed the reference of person2 object, and stored it as a separate function.
 Note that there is an interesting thing inside the output that differentiates a map from an object, In Objects, key-value pairs are separated by a colon “:” while in the case of Maps, the key-value pairs are separated by an arrow “=>”.
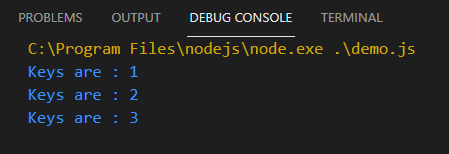

 As you can see, you were able to get the value of a specific key using the get method.
 As you can see, every key was added into the dataSet along with its value, and that is how maps work.
 The global execution context maintains a stack of all the functions being executed, it works on the behavior “last in first out”.
Whereas, the Web API environment picks up the functions which are part of Web API (API calls, AJAX call, setTimeout(), and more) from the execution stack and starts executing them in its own environment.
This, in turn, allows the execution stack to work on something else, thus implementing an asynchronous behavior.
When the WEB API finishes executing on the function it places the result onto the Event queue.
Whenever the execution stack is empty, the event loop picks up the function in the event queue and places it back into the execution stack.
This whole circle is known as the Event Loops.
Try this simple sequential code:
function f2() {
console.log("Inside function F2");
console.log("F2 has finished");}function f1() {
console.log("Inside Function F1");
f2();
console.log("Ending of Function F1");}
f1();
The output of this code is as
The global execution context maintains a stack of all the functions being executed, it works on the behavior “last in first out”.
Whereas, the Web API environment picks up the functions which are part of Web API (API calls, AJAX call, setTimeout(), and more) from the execution stack and starts executing them in its own environment.
This, in turn, allows the execution stack to work on something else, thus implementing an asynchronous behavior.
When the WEB API finishes executing on the function it places the result onto the Event queue.
Whenever the execution stack is empty, the event loop picks up the function in the event queue and places it back into the execution stack.
This whole circle is known as the Event Loops.
Try this simple sequential code:
function f2() {
console.log("Inside function F2");
console.log("F2 has finished");}function f1() {
console.log("Inside Function F1");
f2();
console.log("Ending of Function F1");}
f1();
The output of this code is as
 This code looks like this on the execution stack:
 The stack works in this order:
Pointers goes in f1, and executes the command to print “inside function F1” and removes it from the stack
Pointer sees the line f2() and goes inside the f2
Pointer executes “Inside function F2” and removes it from the stack
Prints the lines “F2 has finished working” and removes it from the stack
Since f2 is done, it removed the “f2();” from the stack and returns to f1 to execute the remaining part of the f1 function
The stack works in this order:
Pointers goes in f1, and executes the command to print “inside function F1” and removes it from the stack
Pointer sees the line f2() and goes inside the f2
Pointer executes “Inside function F2” and removes it from the stack
Prints the lines “F2 has finished working” and removes it from the stack
Since f2 is done, it removed the “f2();” from the stack and returns to f1 to execute the remaining part of the f1 function
 Prints the line “Ending of function F1” and removes it from the stack
Since no command is left in f1(), the pointer removes it from the stack as well.
Now, that you know how the execution stack works, you can move on to async code example by testing out the following lines of code:
function f2() {
console.log("Inside function F2");
setTimeout(() => {
console.log("F2 has finished");
}, 3000);}function f1() {
console.log("Inside Function F1");
f2();
console.log("Ending of Function F1");}
f1();
As you can see, in function f2() we are now doing a task that takes 3 seconds to finish.
When the pointer reaches this setTimeout() statement, it places it inside the Web APIs environment and removes it from the execution stack.
The execution stack will keep working on the other part of the code while the WEB API will wait for the setTimeout() to finish like:
Prints the line “Ending of function F1” and removes it from the stack
Since no command is left in f1(), the pointer removes it from the stack as well.
Now, that you know how the execution stack works, you can move on to async code example by testing out the following lines of code:
function f2() {
console.log("Inside function F2");
setTimeout(() => {
console.log("F2 has finished");
}, 3000);}function f1() {
console.log("Inside Function F1");
f2();
console.log("Ending of Function F1");}
f1();
As you can see, in function f2() we are now doing a task that takes 3 seconds to finish.
When the pointer reaches this setTimeout() statement, it places it inside the Web APIs environment and removes it from the execution stack.
The execution stack will keep working on the other part of the code while the WEB API will wait for the setTimeout() to finish like:
 After this setTimeout() instruction has been moved to the Web API environment, the execution stack will look like this:
 As you can see, while the Web API is working on the setTimeout function, the execution stack is working on other instructions and removing them from the stack.
When the Web API finishes working on the “setTimeout()” it will move it to the event queue, while the Event loops wait for the execution stack to become empty.
As you can see, while the Web API is working on the setTimeout function, the execution stack is working on other instructions and removing them from the stack.
When the Web API finishes working on the “setTimeout()” it will move it to the event queue, while the Event loops wait for the execution stack to become empty.
 When the stack is empty, the Event loop will move the setTimeout result to the execution stack as:
 And then:
 This is how the event loop works, that is why you get the following output on your console:
 With the above output, you can verify the execution of the event loop
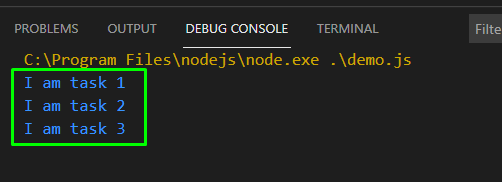 But what if we want to invoke task 2 only when task 1 finishes its processing.
For that, we need callback functions and some basic understanding of asynchronous execution.
But what if we want to invoke task 2 only when task 1 finishes its processing.
For that, we need callback functions and some basic understanding of asynchronous execution.
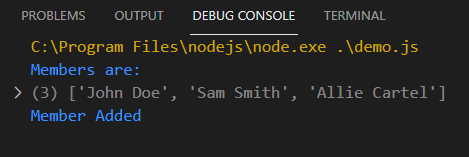 The list was printed first, and then the member was added.
This is because the program did not wait for the addMember() function to finish processing.
Now if we use callback functions to execute the getAllMembers() function only after the addNewMember() is finished, our code becomes:
var members = ["John Doe", "Sam Smith", "Allie Cartel"];function addNewMember(newUser, callback) {
setTimeout(function () {
members.push(newUser);
console.log("Member Added");
callback();
}, 200);}function getAllMembers() {
setTimeout(function () {
console.log("Members are:");
console.log(members);
}, 100);}
addNewMember("Alpha", getAllMembers);
If you look at the code, you will see that inside the addNewMember() function we are taking a callback argument, this will ensure that the callback function will be executed in our desired sequence.
The output of the above code snippet is as:
The list was printed first, and then the member was added.
This is because the program did not wait for the addMember() function to finish processing.
Now if we use callback functions to execute the getAllMembers() function only after the addNewMember() is finished, our code becomes:
var members = ["John Doe", "Sam Smith", "Allie Cartel"];function addNewMember(newUser, callback) {
setTimeout(function () {
members.push(newUser);
console.log("Member Added");
callback();
}, 200);}function getAllMembers() {
setTimeout(function () {
console.log("Members are:");
console.log(members);
}, 100);}
addNewMember("Alpha", getAllMembers);
If you look at the code, you will see that inside the addNewMember() function we are taking a callback argument, this will ensure that the callback function will be executed in our desired sequence.
The output of the above code snippet is as:
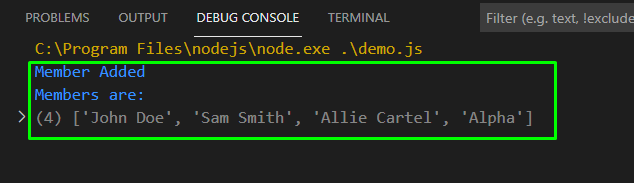 The new member was added first and then the whole list was printed onto the console.
That is how you can use callbacks to gain control of the sequence of execution.
The new member was added first and then the whole list was printed onto the console.
That is how you can use callbacks to gain control of the sequence of execution.
 From the output, we can see that the numbers are equal.

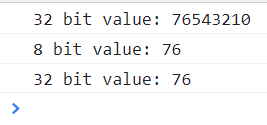
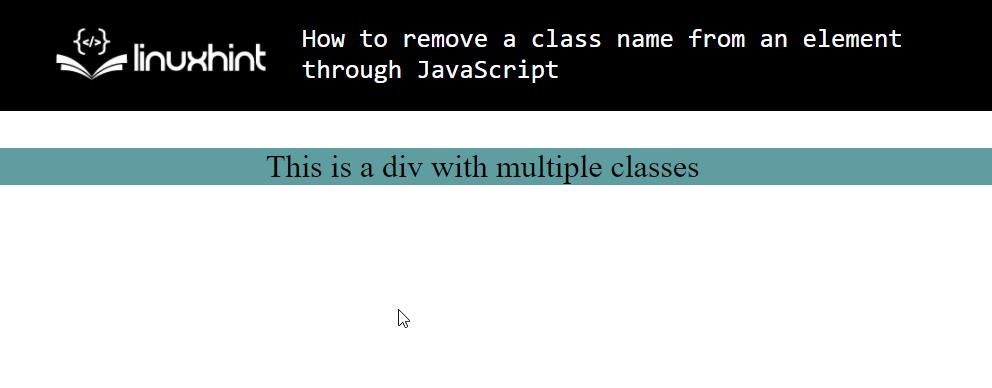 Now that we have a basic HTML page, let’s create a button that will remove a class from the <div>element.
We do that by using the following lines of code:
<button onclick="removeClass()">Remove Class</button>
Our webpage will look like this:
Now that we have a basic HTML page, let’s create a button that will remove a class from the <div>element.
We do that by using the following lines of code:
<button onclick="removeClass()">Remove Class</button>
Our webpage will look like this:
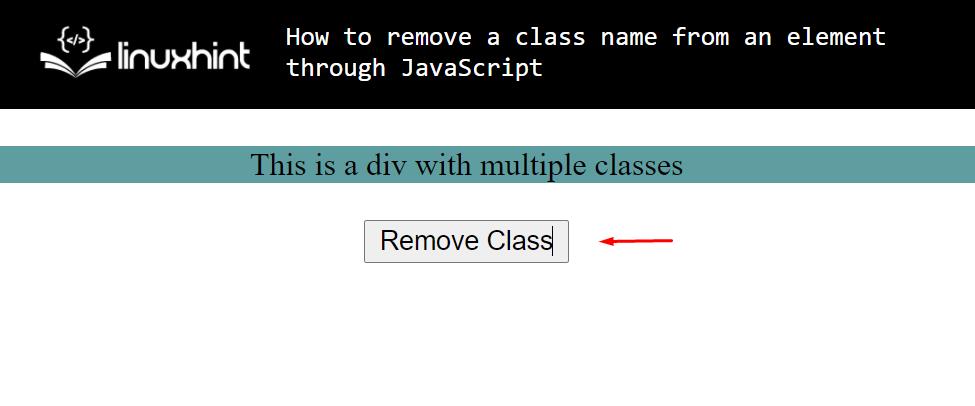
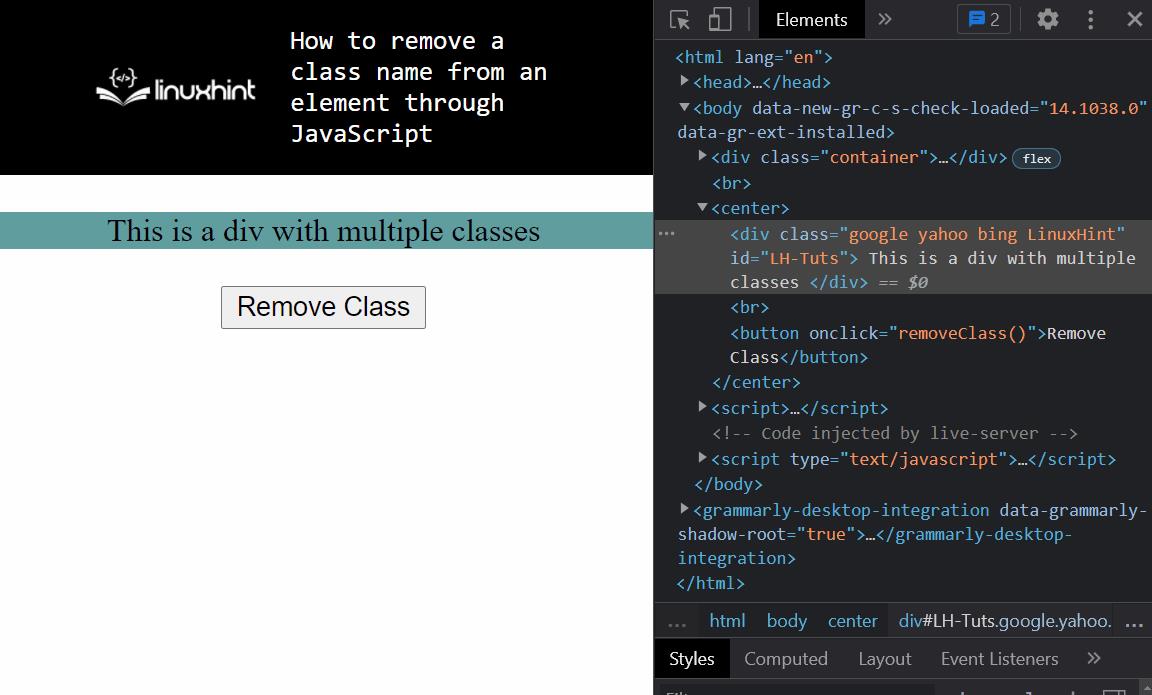 As you can see, at first the div has 4 different classes.
But as soon as we press the button, the “google” class name gets removed from the list of the class names.
We can even remove multiple classes at the same time, for that we use the line:
div.classList.remove("google", "yahoo", "bing");
The function snippet would become:
<script>
function removeClass() {
div = document.getElementById("LH-Tuts");
div.classList.remove("google", "yahoo", "bing");
}</script>
Now, if we examine the output with the browser’s developer tools, we get:
As you can see, at first the div has 4 different classes.
But as soon as we press the button, the “google” class name gets removed from the list of the class names.
We can even remove multiple classes at the same time, for that we use the line:
div.classList.remove("google", "yahoo", "bing");
The function snippet would become:
<script>
function removeClass() {
div = document.getElementById("LH-Tuts");
div.classList.remove("google", "yahoo", "bing");
}</script>
Now, if we examine the output with the browser’s developer tools, we get:
 As you can see, we were able to remove multiple classes at the same time as well.
 That is it for removing a class name from an element using JavaScript.
 $ sudo apt upgrade -y


 Now, to download Deno use the following command
$ curl -Lo "deno.zip" "https://github.com/denoland/deno/releases/latest/download/deno-x86_64-unknown-linux-gnu.zip"
This command would start downloading the deno.zip from its Github, after executing the command you should see a progress bar like:
Now, to download Deno use the following command
$ curl -Lo "deno.zip" "https://github.com/denoland/deno/releases/latest/download/deno-x86_64-unknown-linux-gnu.zip"
This command would start downloading the deno.zip from its Github, after executing the command you should see a progress bar like:
 If curl is not installed then install it using the command provided below:
$ sudo apt install curl
If curl is not installed then install it using the command provided below:
$ sudo apt install curl

 This above command will unzip/install the Deno javascript in the /usr/local/bin folder, the next thing we need to do is to make sure the root and owner permission is correct, to verify that use the following command:
$ ls -al /usr/local/bin/deno
You should see the following output on the terminal:
This above command will unzip/install the Deno javascript in the /usr/local/bin folder, the next thing we need to do is to make sure the root and owner permission is correct, to verify that use the following command:
$ ls -al /usr/local/bin/deno
You should see the following output on the terminal:


 And then we use the following command:
['hello', 'world'].join(' ')
You will see the below-mentioned output on your screen:
And then we use the following command:
['hello', 'world'].join(' ')
You will see the below-mentioned output on your screen:
 That is it, you have installed Deno JavaScript on Ubuntu 20.04


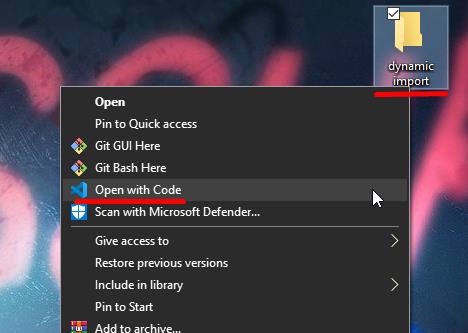 Inside the folder, create an HTML file named home.html and a script file as script.js:
 We are going to display some words by using the script file.
So, in the HTML file add the following script tag.
<script type="module" src="script.js"></script>
Note: we are using the type property and setting it equal to module to notify the browser that this is a modular script.
Now, inside the script file, type in the following lines of code to print text to the HTML web page.
const el = document.createElement(`p`);const words = "Linux, Hint, Tutorial!";const text = document.createTextNode(words);
el.appendChild(text);
document.body.appendChild(el);
To run the file, open the terminal of the VS Code and type “npx serve”, if it is your first time trying the npx serve command then it might install the “serve” package and ask for affirmation, and then it will start the installation:
We are going to display some words by using the script file.
So, in the HTML file add the following script tag.
<script type="module" src="script.js"></script>
Note: we are using the type property and setting it equal to module to notify the browser that this is a modular script.
Now, inside the script file, type in the following lines of code to print text to the HTML web page.
const el = document.createElement(`p`);const words = "Linux, Hint, Tutorial!";const text = document.createTextNode(words);
el.appendChild(text);
document.body.appendChild(el);
To run the file, open the terminal of the VS Code and type “npx serve”, if it is your first time trying the npx serve command then it might install the “serve” package and ask for affirmation, and then it will start the installation:
 After that, the npx serve command will show us where is it hosting our HTML webpage, so click on the link as follows:
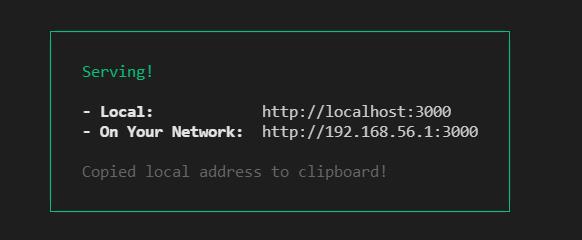 When you open the link http://localhost:3000 you would see the following output:
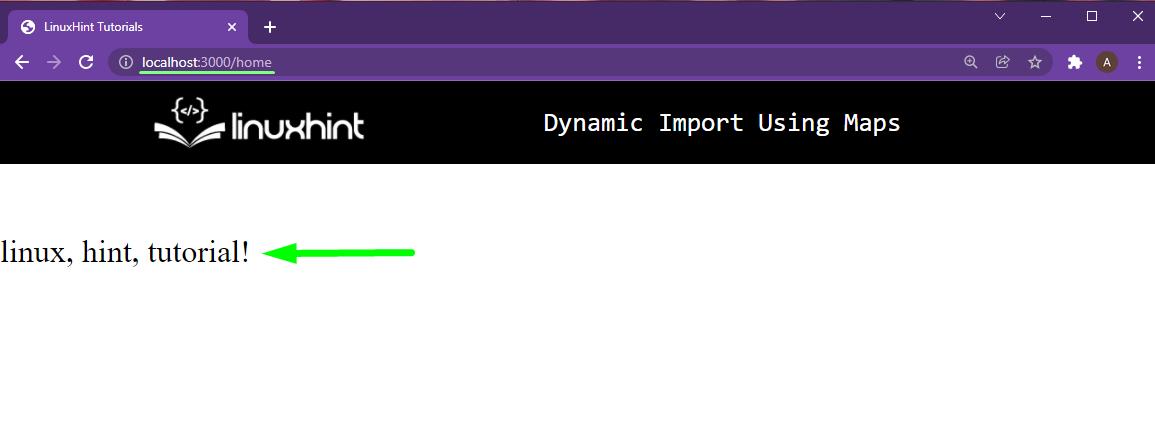
 This is because the browser doesn’t know what to do with this import statement at the start of the script
file.
The browser is trying to find the lodash package on the local web server, this is also the default behavior of the build tool.
To change this we use import maps in HTML files.
This is because the browser doesn’t know what to do with this import statement at the start of the script
file.
The browser is trying to find the lodash package on the local web server, this is also the default behavior of the build tool.
To change this we use import maps in HTML files.
 As you can see, the startCase method successfully converted our string words in to “start the case” type.
You are now including external libraries dynamically and we can examine the lazy loading in the developer tools of the browser.
As you can see, the startCase method successfully converted our string words in to “start the case” type.
You are now including external libraries dynamically and we can examine the lazy loading in the developer tools of the browser.
 Under the waterfall, you can see which script was loading at what time:
 And from here you can clearly see that all of the scripts were not loaded at the start, they were loaded lazily meaning at run time.
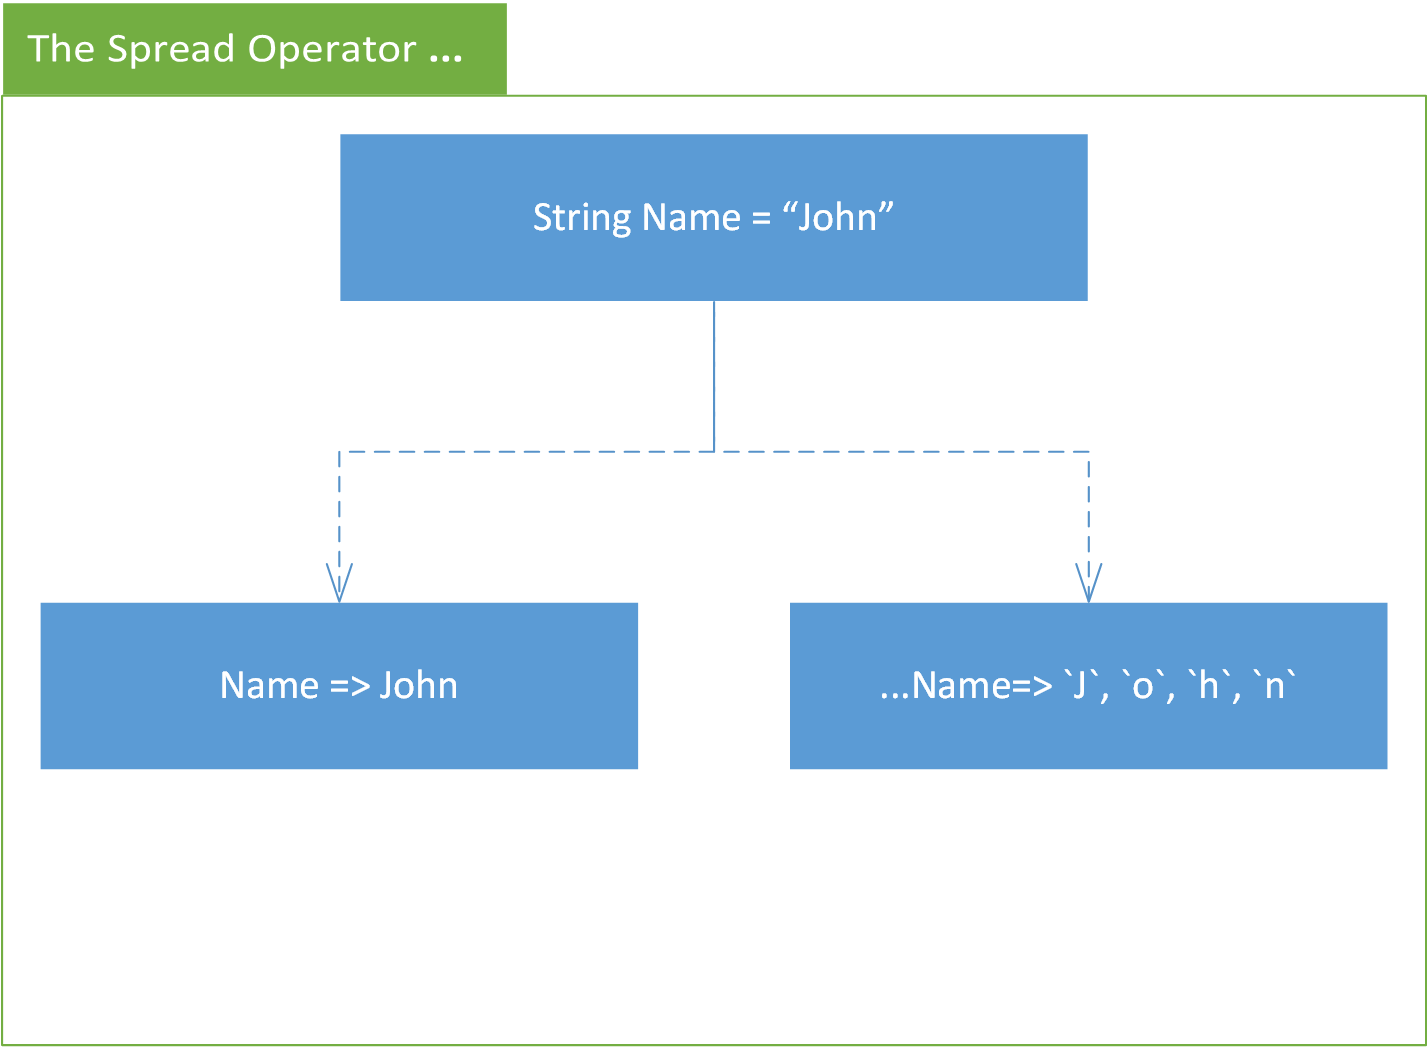
 The arrow is pointing at the normal string output and the red rectangle is enclosing the output of the spread syntax.
You can notice gaps between each character of the spread syntax output that is because each character is being treated as a different element.
The arrow is pointing at the normal string output and the red rectangle is enclosing the output of the spread syntax.
You can notice gaps between each character of the spread syntax output that is because each character is being treated as a different element.
 All the elements inside the numbers array were passed as individual arguments to the function and then each argument was added printed on the console.
But, What if your numbers array has more elements than the arguments of the function?; Well, in that case, only the first 5 elements of the array will be used and others will be discarded, thus, preventing any error.
To showcase this, take the above-mentioned function and pass in the following array inside it:
Array:
Numbers = [3,52,6,7,1,3,5,3,1,5,3,6,7,3,5,6,1,2];
By using the following command:
printSum(...Numbers);
You will see the following result on the console:
All the elements inside the numbers array were passed as individual arguments to the function and then each argument was added printed on the console.
But, What if your numbers array has more elements than the arguments of the function?; Well, in that case, only the first 5 elements of the array will be used and others will be discarded, thus, preventing any error.
To showcase this, take the above-mentioned function and pass in the following array inside it:
Array:
Numbers = [3,52,6,7,1,3,5,3,1,5,3,6,7,3,5,6,1,2];
By using the following command:
printSum(...Numbers);
You will see the following result on the console:
 You can see, even though we had more elements inside the array that were passed into the argument’s list with the spread syntax, the extra elements were all discarded, and therefore, we did not get any errors.
 You can see that the finallArray has both the array1 and array2 concatenated inside it and we only gave two elements in the “finalArray”.
That is for the spread syntax.
You can see that the finallArray has both the array1 and array2 concatenated inside it and we only gave two elements in the “finalArray”.
That is for the spread syntax.
 And generator function work like this:
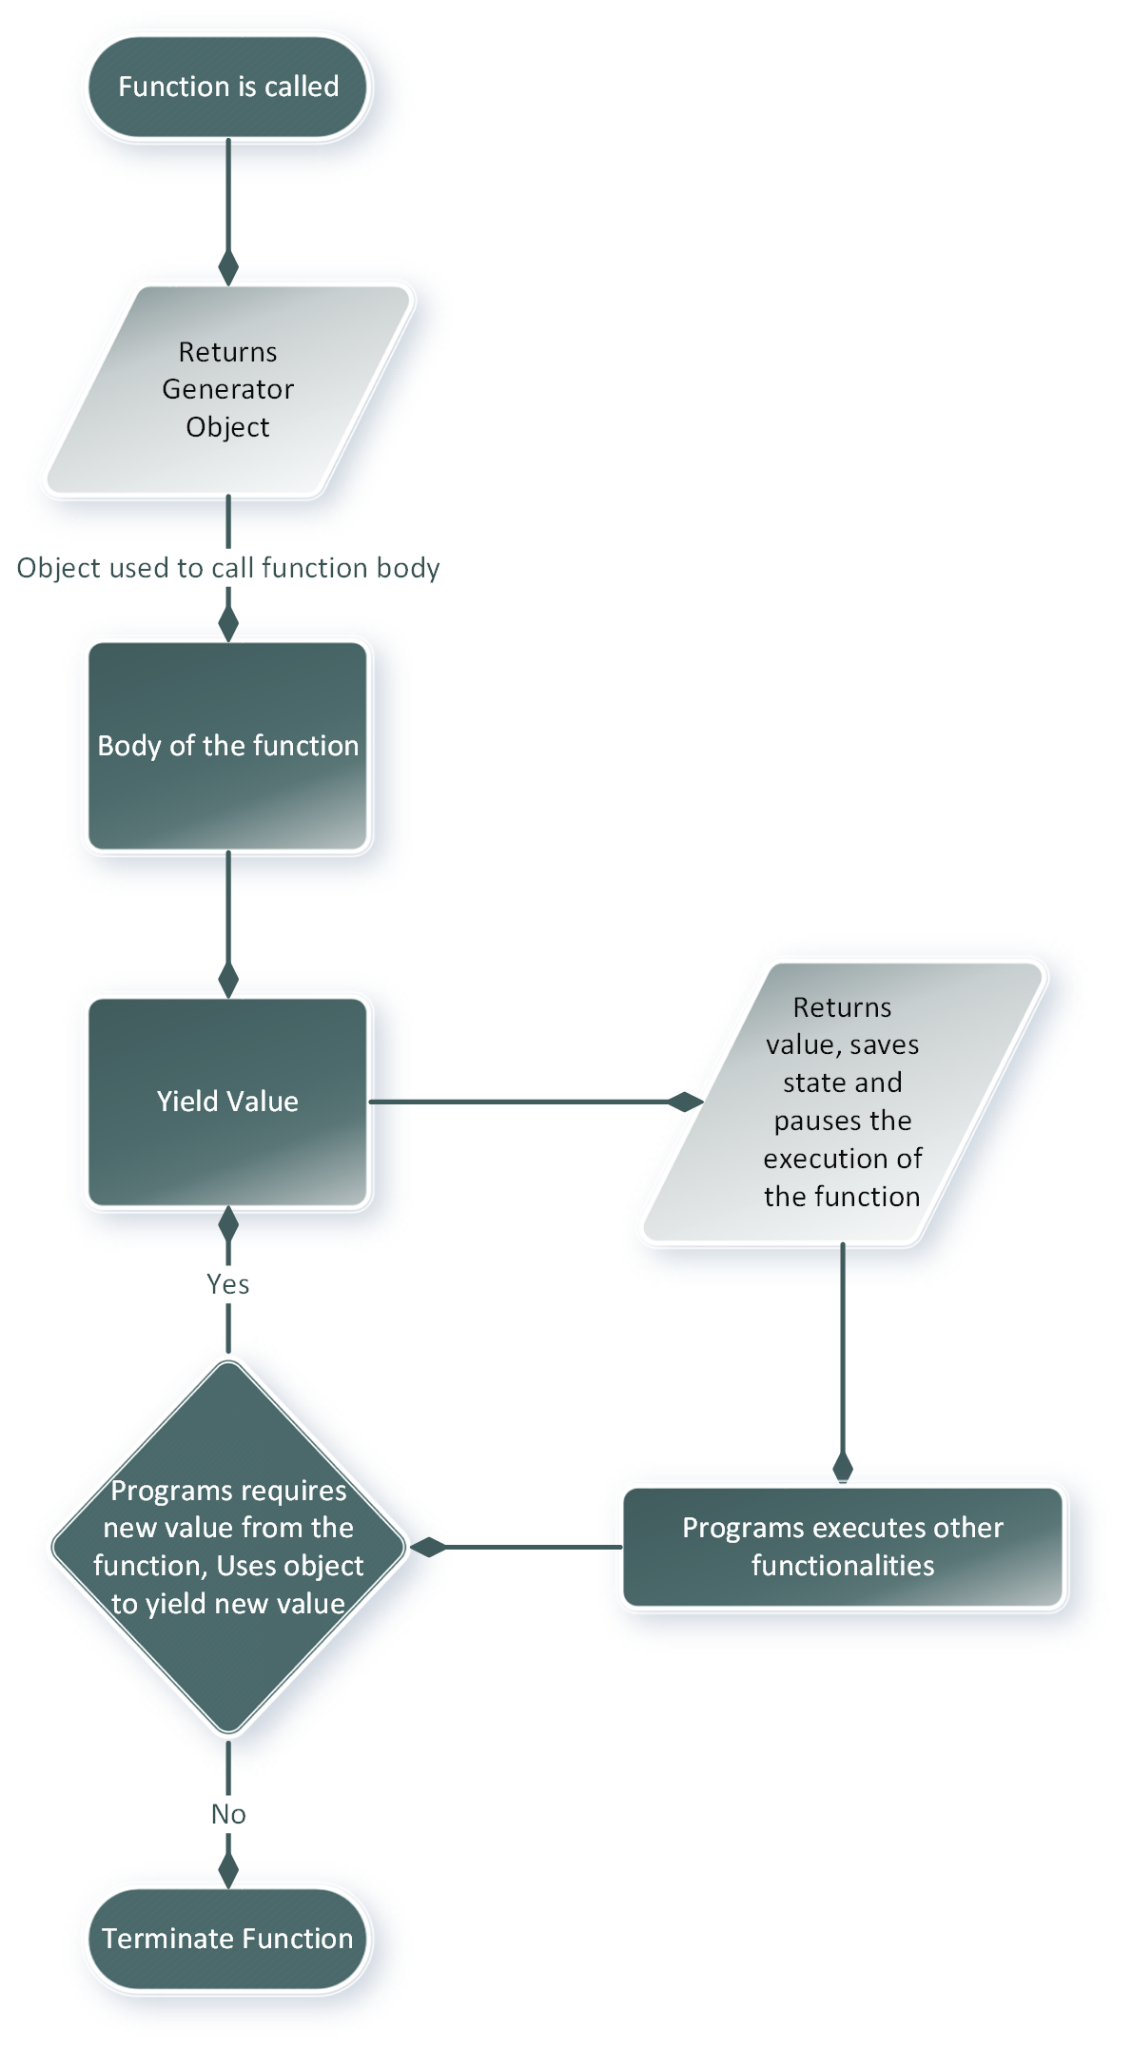
 As you can see, we have printed 3 different JSON objects with 3 different calls to the same generator function.
But, sometimes we want to use the value, not the JSON object.
We can do that by accessing the value property of the JSON object with the following line of code:
console.log(genObject.next().value);
console.log(genObject.next().value);
console.log(genObject.next().value);
With these lines, we get the following output:
As you can see, we have printed 3 different JSON objects with 3 different calls to the same generator function.
But, sometimes we want to use the value, not the JSON object.
We can do that by accessing the value property of the JSON object with the following line of code:
console.log(genObject.next().value);
console.log(genObject.next().value);
console.log(genObject.next().value);
With these lines, we get the following output:
 As you can see, the object.next().value returns us a value which we can even pass onto some other function.
 As you can see, the program goes inside the generator function and yields a new value, saves states, pauses the execution of the function, goes inside the “tablePrinter” function, and performs execution there.
Once done it goes back inside the generator function for a new yield.
This whole process is repeated until the generator keeps producing new yields.
Thus, making it a Stream of data.
That’s it for Generators.
As you can see, the program goes inside the generator function and yields a new value, saves states, pauses the execution of the function, goes inside the “tablePrinter” function, and performs execution there.
Once done it goes back inside the generator function for a new yield.
This whole process is repeated until the generator keeps producing new yields.
Thus, making it a Stream of data.
That’s it for Generators.


 Output is exactly what we wanted, but it’s not an efficient way of doing it.
Let’s try using the For loop for solving the same problem.
The code is as:
for (let i = 0 ; i <=10 ; i ++){
console.log(i)}
The output is exactly the same:
Output is exactly what we wanted, but it’s not an efficient way of doing it.
Let’s try using the For loop for solving the same problem.
The code is as:
for (let i = 0 ; i <=10 ; i ++){
console.log(i)}
The output is exactly the same:
 If we go over the code, we created a block-scoped counter variable “i” and initialized it with an integer value 0.
In the second parameter, we set a condition that we want to run until the counter variable reaches the value 10, and in the last parameter, we set a final expression to increase this counter variable by 1 every time the loop reaches the end of each iteration.
If we go over the code, we created a block-scoped counter variable “i” and initialized it with an integer value 0.
In the second parameter, we set a condition that we want to run until the counter variable reaches the value 10, and in the last parameter, we set a final expression to increase this counter variable by 1 every time the loop reaches the end of each iteration.
 Note: We used the condition, i < array.length because the index of the last element in the array, will always be one less than the length of the array and that is because in arrays the index starts from zero
We can even use the For loop to traverse in the array from the last to first by using the code:
for (let i = array.length-1 ; i >= 0 ; i--){
console.log(array[i]);}
We initialized the counter variable with a value one less than the length of that array to access the last element of the array, and started reducing the counter variable by 1 in each iteration.
The output is:
Note: We used the condition, i < array.length because the index of the last element in the array, will always be one less than the length of the array and that is because in arrays the index starts from zero
We can even use the For loop to traverse in the array from the last to first by using the code:
for (let i = array.length-1 ; i >= 0 ; i--){
console.log(array[i]);}
We initialized the counter variable with a value one less than the length of that array to access the last element of the array, and started reducing the counter variable by 1 in each iteration.
The output is:
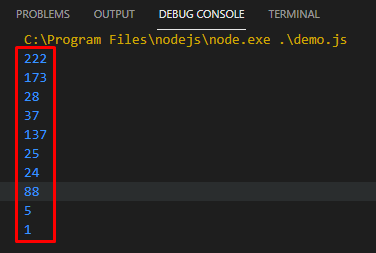
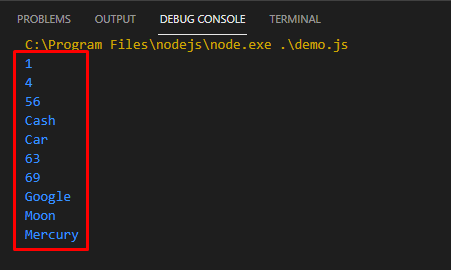 We have traversed through the elements of the array using the for..of loop.
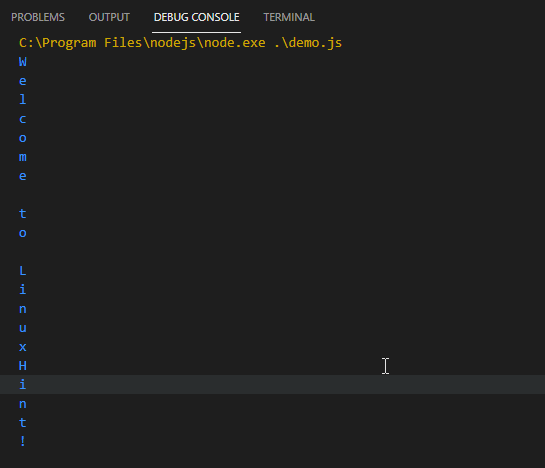 As you can see, with the help of the For-of loop, we were able to access each individual character from within a string.
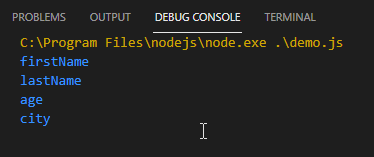 As you can see the for-in loop accesses the names of the properties of the items.
 JavaScript is known to give a webpage the ability to “think and act” which is all possible due to Events.
Events act as triggers that prompt the backend scripts to perform actions.
They can be easily referred to as “things” that happen on a webpage, these events can be anything: loading a webpage, clicking an HTML button, or hovering the mouse over a specific HTML element.
There are gazillions of events that can trigger JavaScript, we have events to trigger a function on mouse click, or on mouse hover, but we are going to cover working with events and JavaScript.
A simple example of a JavaScript event being executed upon a button press is shown below:
JavaScript is known to give a webpage the ability to “think and act” which is all possible due to Events.
Events act as triggers that prompt the backend scripts to perform actions.
They can be easily referred to as “things” that happen on a webpage, these events can be anything: loading a webpage, clicking an HTML button, or hovering the mouse over a specific HTML element.
There are gazillions of events that can trigger JavaScript, we have events to trigger a function on mouse click, or on mouse hover, but we are going to cover working with events and JavaScript.
A simple example of a JavaScript event being executed upon a button press is shown below:
 As you can see, after completely loading the webpage, the JavaScript alerts the user that the webpage has loaded.
Note: the window object is used to work on global events.
As you can see, after completely loading the webpage, the JavaScript alerts the user that the webpage has loaded.
Note: the window object is used to work on global events.
 As you can see in the console, our event handlers are working and the JavaScript code is being executed.
That is it for Events
As you can see in the console, our event handlers are working and the JavaScript code is being executed.
That is it for Events
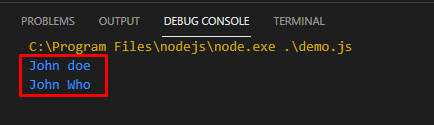 For the first function call, it used the default value “doe” for the parameter “lastName” and for the second it used both the arguments.
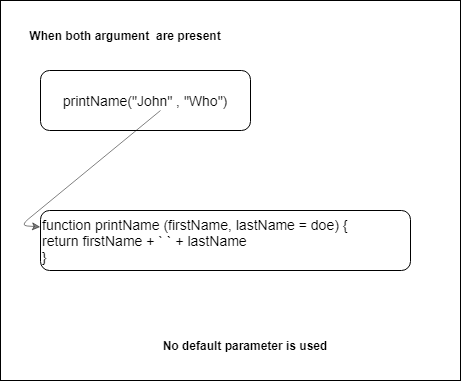 And for the second case, in which one of the arguments was missing, the function used the value that we defined as the default value within the parameter like:
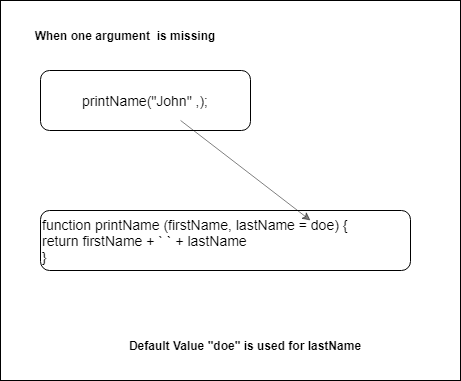
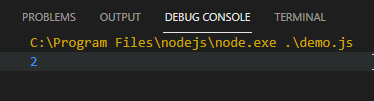 As you can see we can handle the issue of missing arguments like this as well.
However, being a good programmer is all about being efficient, and this trivial approach is not an efficient solution.
If we were to solve the same problem using the default parameters, the solution would be much more concise like:
function addNumbers(num1 = 1, num2 = 1) {return num1 + num2;}
console.log(addNumbers());
As you can see, instead of writing numerous lines, we did it in a single line and the output is exactly the same with no errors and no NaN.
As you can see we can handle the issue of missing arguments like this as well.
However, being a good programmer is all about being efficient, and this trivial approach is not an efficient solution.
If we were to solve the same problem using the default parameters, the solution would be much more concise like:
function addNumbers(num1 = 1, num2 = 1) {return num1 + num2;}
console.log(addNumbers());
As you can see, instead of writing numerous lines, we did it in a single line and the output is exactly the same with no errors and no NaN.

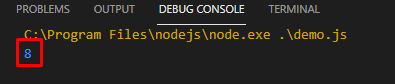 Since, the parameters are initialized from left to right, if we use a later parameter as the default value of an earlier parameter then it will result in an error.
Take the following code as an example:
function errorGen(a = b, b = 2) {return a + b;}
console.log(errorGen());
The above will meet an error since it’s trying to access the parameter “b” even before it is initialized.
The output is as:
Since, the parameters are initialized from left to right, if we use a later parameter as the default value of an earlier parameter then it will result in an error.
Take the following code as an example:
function errorGen(a = b, b = 2) {return a + b;}
console.log(errorGen());
The above will meet an error since it’s trying to access the parameter “b” even before it is initialized.
The output is as:

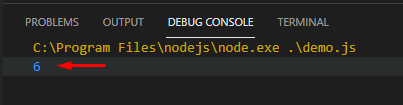 That’s it for default parameters.
 We declared two variables (x and y) with values 5 and 10 and tried to compare them with the statement, X == Y, and as a result, we got False.
Here, is another example where we use the values 5 and 5 for the variable X and Y respectively,
We declared two variables (x and y) with values 5 and 10 and tried to compare them with the statement, X == Y, and as a result, we got False.
Here, is another example where we use the values 5 and 5 for the variable X and Y respectively,
 The output is True.
Not equal to ‘ != ’ operator
This operator returns True when two values are not equal to each other, False if they are equal.
The output is True.
Not equal to ‘ != ’ operator
This operator returns True when two values are not equal to each other, False if they are equal.
 As you can see, it returned True because variables had different values
Greater than “ > ” operator
Comparing operands on both sides and returning True only if the Right-hand side value is bigger.
Like this:
As you can see, it returned True because variables had different values
Greater than “ > ” operator
Comparing operands on both sides and returning True only if the Right-hand side value is bigger.
Like this:
 We placed the values 5 and 3 in variables X and Y respectively, asked the program if X was greater than Y and it returned true.
Less than “ < ” operator
Comparing operands on both sides and returning True only if the left-hand side value is bigger.
We placed the values 5 and 3 in variables X and Y respectively, asked the program if X was greater than Y and it returned true.
Less than “ < ” operator
Comparing operands on both sides and returning True only if the left-hand side value is bigger.
 Since 23 is less than 41, it returns True.
Greater than equal to “ >= ” operator
It is the conjunction of both greater than operator as well as the equal to operator.
Returns true if and only if the value of the variable on the left-hand side is bigger than or the same as the one on the right, else False
Since 23 is less than 41, it returns True.
Greater than equal to “ >= ” operator
It is the conjunction of both greater than operator as well as the equal to operator.
Returns true if and only if the value of the variable on the left-hand side is bigger than or the same as the one on the right, else False
 First, we assign values 99 and 99 to variables X and Y respectively and try using the operator on these variables.
It compares both the variables and returns True because they are equal to each other.
Then we change the value of Y to 100 and try using this operator on the variables again.
First, we assign values 99 and 99 to variables X and Y respectively and try using the operator on these variables.
It compares both the variables and returns True because they are equal to each other.
Then we change the value of Y to 100 and try using this operator on the variables again.
 This time it returns False because 99 is neither greater than 100 nor is it equal to 100.
Less than equal to “<= ” operator
It is the conjunction of both greater than operator as well as the equal to operator.
Returns true if and only if the value of the variable on the left-hand side is smaller than or the same as the one on the right.
Otherwise, it will return False.
This time it returns False because 99 is neither greater than 100 nor is it equal to 100.
Less than equal to “<= ” operator
It is the conjunction of both greater than operator as well as the equal to operator.
Returns true if and only if the value of the variable on the left-hand side is smaller than or the same as the one on the right.
Otherwise, it will return False.
 In the above snippet, first, it returns true because the value 21 is less than the value 23.
Afterward, we changed the value of the variable X to 23.
In the above snippet, first, it returns true because the value 21 is less than the value 23.
Afterward, we changed the value of the variable X to 23.
 The result is True because both the variables “X” and “Y” have the same values.
Strict Equal to “ === ” operator
Returns True if and only if, both the variables \ operands have the same value plus the same data type.
Otherwise, it will return False.
The result is True because both the variables “X” and “Y” have the same values.
Strict Equal to “ === ” operator
Returns True if and only if, both the variables \ operands have the same value plus the same data type.
Otherwise, it will return False.
 In the above code snippet, we created a variable with the name of “name” and gave a string value “LinuxHint”.
When we try comparing this variable with a number it returns False because the operands are not of the same type.
Then we compare this variable with the string “LinuxHint” and it returns true because the value of both the operands and the type is the same.
In the above code snippet, we created a variable with the name of “name” and gave a string value “LinuxHint”.
When we try comparing this variable with a number it returns False because the operands are not of the same type.
Then we compare this variable with the string “LinuxHint” and it returns true because the value of both the operands and the type is the same.
 To further clarify this value and type confusion, let’s look at this example.
 We created a variable “num” with string value “2”.
We first try to compare it to a numerical value 2. It returns false because one is a string value “2” and the other operand is a numerical value 2.
Later on, when we compare the variable num to string “2”.
We created a variable “num” with string value “2”.
We first try to compare it to a numerical value 2. It returns false because one is a string value “2” and the other operand is a numerical value 2.
Later on, when we compare the variable num to string “2”.
 True – because the type and the value of both the operands involved were the same.
Strict Not equal to “ !== ” operator
If and only if the type and the values of both the variables involved are different, so the outcome will be True, otherwise False.
True – because the type and the value of both the operands involved were the same.
Strict Not equal to “ !== ” operator
If and only if the type and the values of both the variables involved are different, so the outcome will be True, otherwise False.
 Just like the last example, we created a variable “num” with a string value “2”, and tried to compare it with numerical value 2.
The operator returned True because the types of both the operands were different.
When we tried comparing it with the string value “2” it return False because both the operands were of the same value and of the same type.
Just like the last example, we created a variable “num” with a string value “2”, and tried to compare it with numerical value 2.
The operator returned True because the types of both the operands were different.
When we tried comparing it with the string value “2” it return False because both the operands were of the same value and of the same type.
 Since both the conditions were true, the AND operator returned True.
 As you can see, one of the conditions was returning true and the other one was returning false, but we still got the result as True, that is how we can conclude that this is used to implement the OR GATE.
 As you can clearly see, we created a variable “value” and set it equal to boolean true.
And when we used the Negative operator on it, it inverted its boolean value.
As you can clearly see, we created a variable “value” and set it equal to boolean true.
And when we used the Negative operator on it, it inverted its boolean value.
 Classes were added in 2015 with the release of the ES6 version of JavaScript.
Classes are the mapping for real objects into programming languages objects.
Classes were added in 2015 with the release of the ES6 version of JavaScript.
Classes are the mapping for real objects into programming languages objects.
 As you can see in the snippet above, we printed out the details of 2 different objects having the same properties but different values.
 Instead of the boolean value, the string match can also be returned with another built-in method which is the match() method.
The code below is implementing the match() method:
var myString = "Hello World!";// pattern
var myRegex = /Hello/;
console.log(myString.match(myRegex)); // Hello
An array will be returned which will contain the input string to the match() method, the index on which the match is found as well as the match itself.
Instead of the boolean value, the string match can also be returned with another built-in method which is the match() method.
The code below is implementing the match() method:
var myString = "Hello World!";// pattern
var myRegex = /Hello/;
console.log(myString.match(myRegex)); // Hello
An array will be returned which will contain the input string to the match() method, the index on which the match is found as well as the match itself.
 If a match is not found then null will be returned:
var myString = "Hello World!";// pattern
var myRegex = /Hi/;
console.log(myString.match(myRegex)); // null
If a match is not found then null will be returned:
var myString = "Hello World!";// pattern
var myRegex = /Hi/;
console.log(myString.match(myRegex)); // null

 To use the ignore flag with RegExp object copy the following code:
var myRegex = new RegExp('hello', 'i');
console.log(myRegex.test("Hello World!")); // true
To use the ignore flag with RegExp object copy the following code:
var myRegex = new RegExp('hello', 'i');
console.log(myRegex.test("Hello World!")); // true
 Similarly, we can use the global flag denoted by g whose function is to return all the matches in the string.
Without the global flag, only the first match is returned.
The below code uses the global flag:
var myString = 'Hello World! and hello Universe!';
var myRegex = /hello/gi;
var matches = [];
var match;do {
match = myRegex.exec(myString);if(match) {
matches.push(match);}} while(match != null)
console.log(matches);
First, we initialized myString which contains the string that will be used for searching a pattern, and after that, we created a regular expression pattern that contains the global flag and ignore flag.
The global flag will search for all the matches whereas the ignore flag will ignore case sensitivity.
In the above code, another built-in method is used which is the exec() whose function is to return an array that contains the match.
However, if there was no match between the pattern and the string then null will be returned.
It should be noted that the exec() method only returns a single match at one time hence we use the do-while loop and push all the matches to the matches array.
In the end, we console log the matches array which contains all the matches:
Similarly, we can use the global flag denoted by g whose function is to return all the matches in the string.
Without the global flag, only the first match is returned.
The below code uses the global flag:
var myString = 'Hello World! and hello Universe!';
var myRegex = /hello/gi;
var matches = [];
var match;do {
match = myRegex.exec(myString);if(match) {
matches.push(match);}} while(match != null)
console.log(matches);
First, we initialized myString which contains the string that will be used for searching a pattern, and after that, we created a regular expression pattern that contains the global flag and ignore flag.
The global flag will search for all the matches whereas the ignore flag will ignore case sensitivity.
In the above code, another built-in method is used which is the exec() whose function is to return an array that contains the match.
However, if there was no match between the pattern and the string then null will be returned.
It should be noted that the exec() method only returns a single match at one time hence we use the do-while loop and push all the matches to the matches array.
In the end, we console log the matches array which contains all the matches:

 Destructuring works by assigning the values of the elements of the array/object to multiple variables by using a single line of code, then you can access those values by using those new variables.
Remember, there is no particular destructuring “symbol” or “operator”.
Syntax
The syntax of using the destructuring assignment is rather simple; to destructure the object into multiple variables:
Use the curly Brackets { } after the variable definition
Put in the variables inside the curly brackets
then set it(whole variable declaration) equal to the object
Objects:
const {var1,var2} = objectName;
Similarly, to destructure arrays to multiple variables, use the square brackets [ ] instead of curly brackets.
Arrays:
const [variable1,variable2] = arrayName;
Note: In the case of destructuring objects, the name of the variables should be the same as the name of the properties of the object.
Destructuring works by assigning the values of the elements of the array/object to multiple variables by using a single line of code, then you can access those values by using those new variables.
Remember, there is no particular destructuring “symbol” or “operator”.
Syntax
The syntax of using the destructuring assignment is rather simple; to destructure the object into multiple variables:
Use the curly Brackets { } after the variable definition
Put in the variables inside the curly brackets
then set it(whole variable declaration) equal to the object
Objects:
const {var1,var2} = objectName;
Similarly, to destructure arrays to multiple variables, use the square brackets [ ] instead of curly brackets.
Arrays:
const [variable1,variable2] = arrayName;
Note: In the case of destructuring objects, the name of the variables should be the same as the name of the properties of the object.
 You can see, the variables had their values from the elements of the array.
 You can see that you were able to successfully destructure the array and verify the result in the end as well.
 You have successfully created an object, and that is it for destructuring objects and arrays.
 Because we are not passing anything to the setTimeout() method.
To add the delay using the setTimeout() method we think that the correct way is :
for (let i = 1 ; i console.log(i), 1000 );}
Rather than getting a 1-second delay after every number, what we get is a 1-second delay in the start and then all the numbers are printed instantly.
As shown below:
Because we are not passing anything to the setTimeout() method.
To add the delay using the setTimeout() method we think that the correct way is :
for (let i = 1 ; i console.log(i), 1000 );}
Rather than getting a 1-second delay after every number, what we get is a 1-second delay in the start and then all the numbers are printed instantly.
As shown below:
 We had the initial delay, but no delay after that.
Why is that so? Well, the way the setTimeout() works is that it always runs in synchronous mode.
This means that even having multiple calls to the same function will result in the delay of 1 sec.
What we did was, we invoked each setTimeout() method one after another and due to the asynchronous nature of the setTimeout() method, it does not wait for the previous setTimeout() method to finish and then execute the next one.
So ultimately we made 10 calls to setTimeout() method all having the same delay time.
There is a way to fix this, and that is by using increasing delay timer like:
setTimeout( () => console.log(i), 1000 );
setTimeout( () => console.log(i), 2000 );
setTimeout( () => console.log(i), 3000 );
The above code example of printing 10 numbers would become this:
for (let i = 1 ; i console.log(i), i * 1000 );}
We are using the increasing value of the “i” variable and multiplying it with the 1-second delay to create incrementing delays for each call of setTimeout()
We had the initial delay, but no delay after that.
Why is that so? Well, the way the setTimeout() works is that it always runs in synchronous mode.
This means that even having multiple calls to the same function will result in the delay of 1 sec.
What we did was, we invoked each setTimeout() method one after another and due to the asynchronous nature of the setTimeout() method, it does not wait for the previous setTimeout() method to finish and then execute the next one.
So ultimately we made 10 calls to setTimeout() method all having the same delay time.
There is a way to fix this, and that is by using increasing delay timer like:
setTimeout( () => console.log(i), 1000 );
setTimeout( () => console.log(i), 2000 );
setTimeout( () => console.log(i), 3000 );
The above code example of printing 10 numbers would become this:
for (let i = 1 ; i console.log(i), i * 1000 );}
We are using the increasing value of the “i” variable and multiplying it with the 1-second delay to create incrementing delays for each call of setTimeout()
 We finally did it.
But there is still something wrong here.
That is the fact that calculating delays this way is very complicated especially when you are working in a real-world application.
There is a way for that too, create your own delay/wait method.
We finally did it.
But there is still something wrong here.
That is the fact that calculating delays this way is very complicated especially when you are working in a real-world application.
There is a way for that too, create your own delay/wait method.
 We are creating a promise and setTimeout() method with some delay to resolve the promise.
You can read more about
We are creating a promise and setTimeout() method with some delay to resolve the promise.
You can read more about  Coming to our problem, the number printer from 1 to 10, we need to create it inside an async function and call the “delay” method which we just created like:
async function numberPrinter() {
for (let i = 1; i <= 10; i++){
console.log(i);
await delay(1000)
}}
And we need to call this function with:
numberPrinter();
The output that we get with this is:
Coming to our problem, the number printer from 1 to 10, we need to create it inside an async function and call the “delay” method which we just created like:
async function numberPrinter() {
for (let i = 1; i <= 10; i++){
console.log(i);
await delay(1000)
}}
And we need to call this function with:
numberPrinter();
The output that we get with this is:
 That is it for our “delay” function.
 We have tested creating a function and we have successfully invoked that function as well.
 And that’s about it for this post.
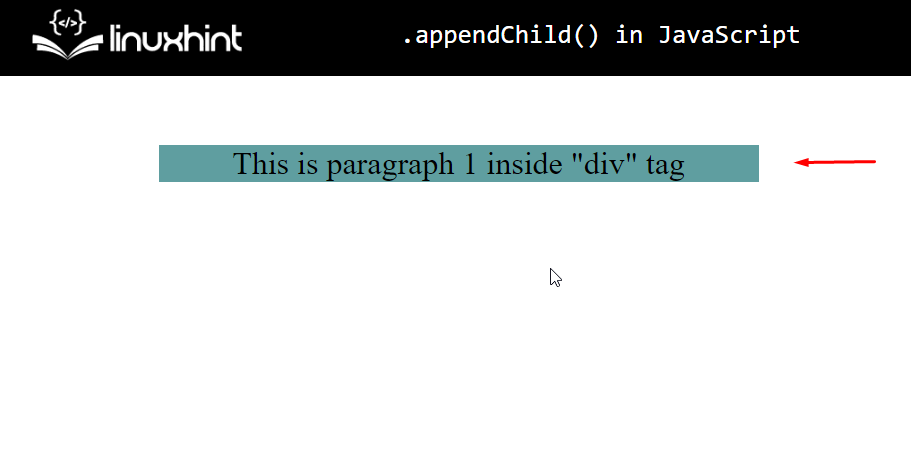 Now we know that the parent Node <div> of <p> tag is highlighted.
If we add any child node inside this parent node, the highlighted area would increase.
Coming back to appending a child node.
Let’s create a trigger to append a child node, and for that purpose, we are going to add a button on-screen with the following line:
<button onclick="btnClicked()">Click to appendChild</button>
With this, our output becomes:
Now we know that the parent Node <div> of <p> tag is highlighted.
If we add any child node inside this parent node, the highlighted area would increase.
Coming back to appending a child node.
Let’s create a trigger to append a child node, and for that purpose, we are going to add a button on-screen with the following line:
<button onclick="btnClicked()">Click to appendChild</button>
With this, our output becomes:
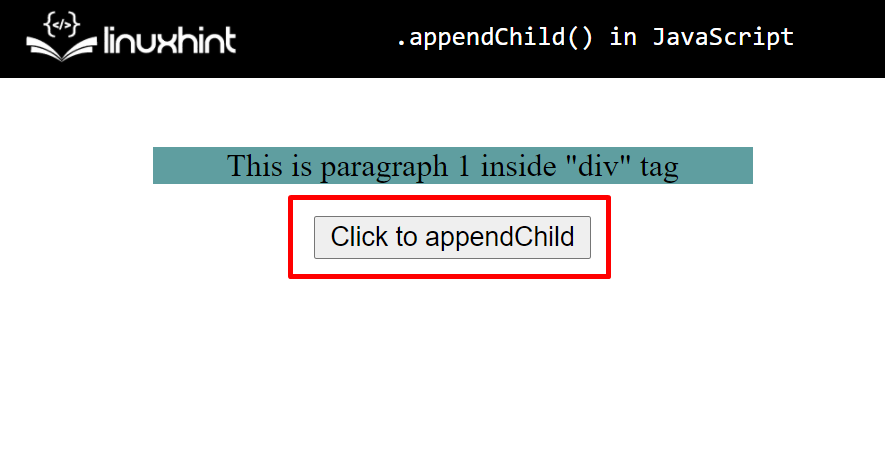 We need to declare the function that will append a child node inside the div on every button press.
Create the function like this:
let counter = 2;function btnClicked(){// Add the later code inside here.}
As you may notice, we created a variable called “counter”.
This variable will keep a check on how many child nodes we have appended in the parent node.
Since we already have a <p> tag as the first child, we start the counter from “2”.
Now we need a child node.
For this, we are going to create a <p> tag with some text inside it.
For creating a <p> tag, we first need to create a TextNode and a paragraph node and then append the text node into the <p> tag node.
Create a TextNode with the following command:
textNode = document.createTextNode("This is paragraph "+ counter + ‘ inside "div" tag’);
As you can see we are using the counter value to prompt the user on how many child nodes are present in the parent node.
Next up is to create the <p> tag element:
pTag = document.createElement("p");
Now, we need to add the TextNode into the pTag:
pTag.appendChild(textNode);
Lastly, we need to append this pTag inside the div with the id=” demo”:
parentNode = document.getElementById("demo");
parentNode.appendChild(pTag);
Before exiting the btnClicked() function, we need to increase the value of the counter as well:
counter++;
The complete code snippet will look like this:
<script>
let counter = 2;
function btnClicked() {
textNode = document.createTextNode(
"This is paragraph " + counter + ' inside "div" tag'
);
pTag = document.createElement("p");
pTag.appendChild(textNode);
parentNode = document.getElementById("demo");
parentNode.appendChild(pTag);
counter++;
}</script>
Time to finally run our webpage and look at the results.
You should see this on your screen:
We need to declare the function that will append a child node inside the div on every button press.
Create the function like this:
let counter = 2;function btnClicked(){// Add the later code inside here.}
As you may notice, we created a variable called “counter”.
This variable will keep a check on how many child nodes we have appended in the parent node.
Since we already have a <p> tag as the first child, we start the counter from “2”.
Now we need a child node.
For this, we are going to create a <p> tag with some text inside it.
For creating a <p> tag, we first need to create a TextNode and a paragraph node and then append the text node into the <p> tag node.
Create a TextNode with the following command:
textNode = document.createTextNode("This is paragraph "+ counter + ‘ inside "div" tag’);
As you can see we are using the counter value to prompt the user on how many child nodes are present in the parent node.
Next up is to create the <p> tag element:
pTag = document.createElement("p");
Now, we need to add the TextNode into the pTag:
pTag.appendChild(textNode);
Lastly, we need to append this pTag inside the div with the id=” demo”:
parentNode = document.getElementById("demo");
parentNode.appendChild(pTag);
Before exiting the btnClicked() function, we need to increase the value of the counter as well:
counter++;
The complete code snippet will look like this:
<script>
let counter = 2;
function btnClicked() {
textNode = document.createTextNode(
"This is paragraph " + counter + ' inside "div" tag'
);
pTag = document.createElement("p");
pTag.appendChild(textNode);
parentNode = document.getElementById("demo");
parentNode.appendChild(pTag);
counter++;
}</script>
Time to finally run our webpage and look at the results.
You should see this on your screen:
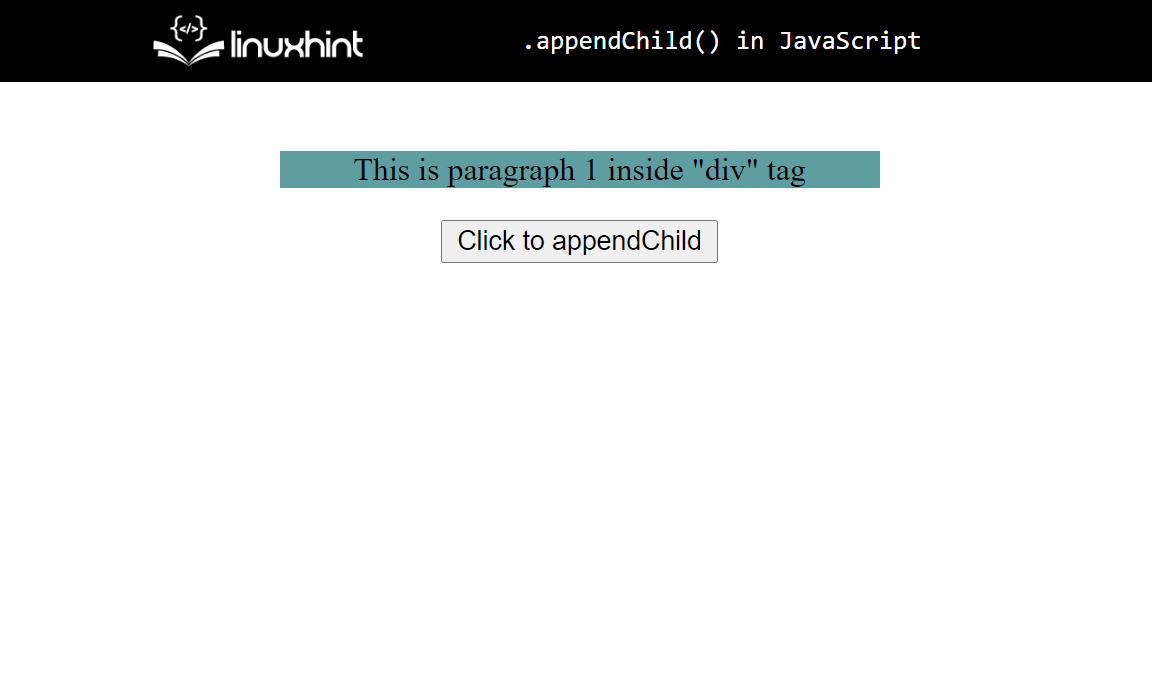 There you have it, we have successfully appended various child nodes inside a parent node.
We can also confirm it by examining the parent node inside the browser’s developer tools.
There you have it, we have successfully appended various child nodes inside a parent node.
We can also confirm it by examining the parent node inside the browser’s developer tools.
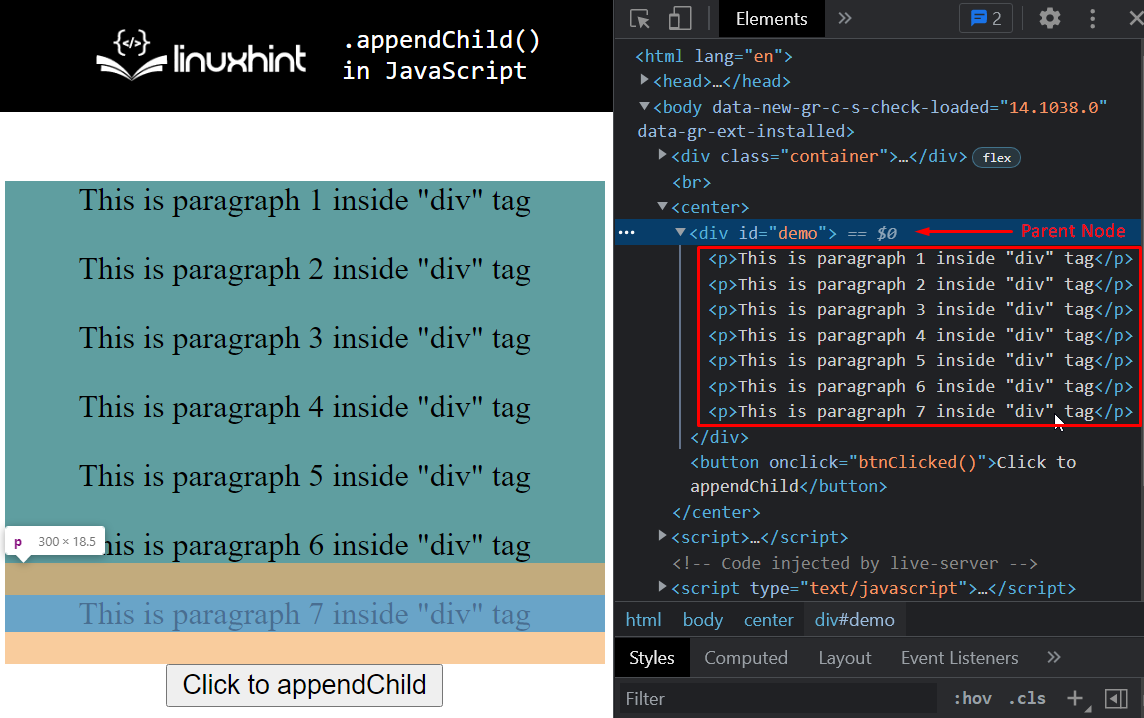 We can clearly see that all the child nodes (<p> tags ) are indeed appended into the div with the id=” demo”.
 Testing is by far the most important thing in the software development life cycle because without testing the product has no integrity.
No renowned company will release a product to the market without testing it out first because testing ensures quality.
In JavaScript, there are various tools and libraries that are used for testing.
Some of the famous tools for testing are Jest, Mocha, and Cypress.
In this post, we are going to go over the following topics:
Why is testing important?
Different Types of testing
What are the different concepts of testing?
Brief Introduction and installation of Jest, Mocha, and Cypress.
Testing is by far the most important thing in the software development life cycle because without testing the product has no integrity.
No renowned company will release a product to the market without testing it out first because testing ensures quality.
In JavaScript, there are various tools and libraries that are used for testing.
Some of the famous tools for testing are Jest, Mocha, and Cypress.
In this post, we are going to go over the following topics:
Why is testing important?
Different Types of testing
What are the different concepts of testing?
Brief Introduction and installation of Jest, Mocha, and Cypress.
 The first block of testing is the unit testing, then we move on to the integration testing and the last block is the functional testing.
 Let’s see whether the startsWith() is case sensitive or case insensitive:
var myString = "Hello! My name is Josh";
console.log(myString.startsWith("HELLO")); // false
Let’s see whether the startsWith() is case sensitive or case insensitive:
var myString = "Hello! My name is Josh";
console.log(myString.startsWith("HELLO")); // false
 As the result is false, hence we can conclude that the startsWith() method is case sensitive.
 If we change the index then it should return false:
var myString = "Hello! My name is Josh";
console.log(myString.startsWith("name",5)); // false
If we change the index then it should return false:
var myString = "Hello! My name is Josh";
console.log(myString.startsWith("name",5)); // false

 We can see that when the user clicks on the button, the Hello! alert showed up.
 We will see the name on the console window now:

 Let’s see the output in the console log when we click on the ok button of the confirm box:
 Now let’s see the output when we click on the cancel button in the console log:
 The console shows the following output:
 Since the operation was successful, we see Operation Successful in the console log.
Let us now change the numbers initialized in the call-back function to see whether the catch function detects an error or not.
// Promise initializing
varmyPromise = newPromise(function(resolve, reject) {const num1 = 5;const num2 = 4;// compare two numbersif(num1 === num2) {// when operation is successful
resolve();
} else {// when error comes
reject();
}});// Promise Consumers
myPromise.
then(function () {
console.log("Operation Successful");
}).
catch(function () {
console.log('Error Occurred');
});
Since the numbers are not equal now, the reject() function will be invoked and the error will be cached by the catch function:
Since the operation was successful, we see Operation Successful in the console log.
Let us now change the numbers initialized in the call-back function to see whether the catch function detects an error or not.
// Promise initializing
varmyPromise = newPromise(function(resolve, reject) {const num1 = 5;const num2 = 4;// compare two numbersif(num1 === num2) {// when operation is successful
resolve();
} else {// when error comes
reject();
}});// Promise Consumers
myPromise.
then(function () {
console.log("Operation Successful");
}).
catch(function () {
console.log('Error Occurred');
});
Since the numbers are not equal now, the reject() function will be invoked and the error will be cached by the catch function:


 Now let’s see how we can achieve the same functionality using Template Literal where we will simply write the second string on another line:
var myString = `Hello
World!`;
console.log(myString);
Now let’s see how we can achieve the same functionality using Template Literal where we will simply write the second string on another line:
var myString = `Hello
World!`;
console.log(myString);
 We can see that Template Literals made it very easy for us to write multiline strings and it is more easily readable and understandable.
 Let us now look at another example where we will pass literals as well as substitutions to the tag function:
// values
let greet = "Hello!";
let name = "Jhon";// tag function
function transform(literals, ...substitutions) {
console.log(literals); // ["", " my name is "]
console.log(substitutions); // ["Hello", "Jhon"]}// call Tag Literal function
transform`${greet} my name is ${name}`;
In the above code, we first define the transform tag function which takes in two arguments; “literals” that is an array and has static content (“my name is”) while the substitutions rest parameter is also an array having all the tags(greet, name).
The output of the above code is shown below:
Let us now look at another example where we will pass literals as well as substitutions to the tag function:
// values
let greet = "Hello!";
let name = "Jhon";// tag function
function transform(literals, ...substitutions) {
console.log(literals); // ["", " my name is "]
console.log(substitutions); // ["Hello", "Jhon"]}// call Tag Literal function
transform`${greet} my name is ${name}`;
In the above code, we first define the transform tag function which takes in two arguments; “literals” that is an array and has static content (“my name is”) while the substitutions rest parameter is also an array having all the tags(greet, name).
The output of the above code is shown below:
 The whole code is given below:
<!DOCTYPE html><html lang="en"><head><title>AJAX Example</title></head><body><div id="example"><h2>The XMLHttpRequest Object</h2><button type="button" onclick="changeContent()">Change Content</button></div><script>
function changeContent() {// XMLHttpREquest Object initializationconst xhttp = new XMLHttpRequest();// using onload function
xhttp.onload = function() {// updating div element content
document.getElementById("example").innerHTML =this.responseText;}// get file ajax_info.txt
xhttp.open("GET", "ajax_info.txt");
xhttp.send();}</script></body></html>
The output of the above code is provided below:
The whole code is given below:
<!DOCTYPE html><html lang="en"><head><title>AJAX Example</title></head><body><div id="example"><h2>The XMLHttpRequest Object</h2><button type="button" onclick="changeContent()">Change Content</button></div><script>
function changeContent() {// XMLHttpREquest Object initializationconst xhttp = new XMLHttpRequest();// using onload function
xhttp.onload = function() {// updating div element content
document.getElementById("example").innerHTML =this.responseText;}// get file ajax_info.txt
xhttp.open("GET", "ajax_info.txt");
xhttp.send();}</script></body></html>
The output of the above code is provided below:
 We can see that when the user clicks on the button, the text “changes” to the text that was present inside the ajax_info.txt file.
 Now that we see how to call an object method, let us discuss some of the built-in methods of the global Object that we can call and use.
 As we can observe that apart from the changed last name, the newStudent object has the same properties and method as the student object.


 Let us now fill the two fields and see the output:


 Let us now modify the CSS classes using the classList property.
As seen earlier, the classList property offers us some built-in methods that we can use to modify CSS classes.
We will use the classList.add() which will add a class in the following example:
// Select the first divconst hideDiv = document.querySelector('div');
hideDiv.classList.add('hidden'); // hidden class added
Next, go to the CSS file and initialize the hidden class by making the display none so that the div is not visible:
.hidden{display: none;}
Now you will see that the div element will be hidden and you will not see anything on your webpage:
Let us now modify the CSS classes using the classList property.
As seen earlier, the classList property offers us some built-in methods that we can use to modify CSS classes.
We will use the classList.add() which will add a class in the following example:
// Select the first divconst hideDiv = document.querySelector('div');
hideDiv.classList.add('hidden'); // hidden class added
Next, go to the CSS file and initialize the hidden class by making the display none so that the div is not visible:
.hidden{display: none;}
Now you will see that the div element will be hidden and you will not see anything on your webpage:
 Let us now use the classList.replace() method where we will replace the existing hidden class with another class wrap.
// Select the first divconst hideDiv = document.querySelector('div');
hideDiv.classList.add('hidden'); // hidden class added
hideDiv.classList.replace('hidden', 'wrap'); // replace hidden class with info class
Next, go to your CSS file and style the wrap class:
.wrap{font-size: large;}
You will now see that our content is now visible and the font size will be larger than before:
Let us now use the classList.replace() method where we will replace the existing hidden class with another class wrap.
// Select the first divconst hideDiv = document.querySelector('div');
hideDiv.classList.add('hidden'); // hidden class added
hideDiv.classList.replace('hidden', 'wrap'); // replace hidden class with info class
Next, go to your CSS file and style the wrap class:
.wrap{font-size: large;}
You will now see that our content is now visible and the font size will be larger than before:

 The status code seen in the developer tools is 200 which means ok:

 If you already have an account then simply log in to your account.
Once you are logged into your Discord account, go to the below URL:
If you already have an account then simply log in to your account.
Once you are logged into your Discord account, go to the below URL:
 You will be asked to name your application.
In my case, I have named it as technicalWriter:
You will be asked to name your application.
In my case, I have named it as technicalWriter:
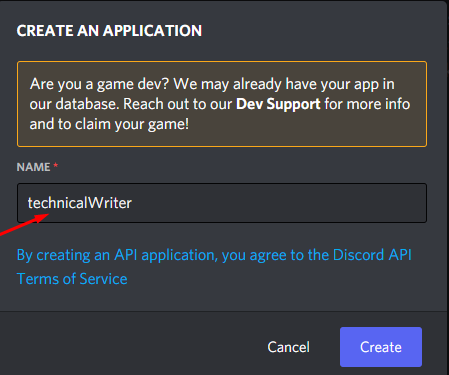 Click on Create and you will be redirected to your created application dashboard.
On your app dashboard click on the Bot and then click on Add Bot button to enable your app as a bot:
Click on Create and you will be redirected to your created application dashboard.
On your app dashboard click on the Bot and then click on Add Bot button to enable your app as a bot:
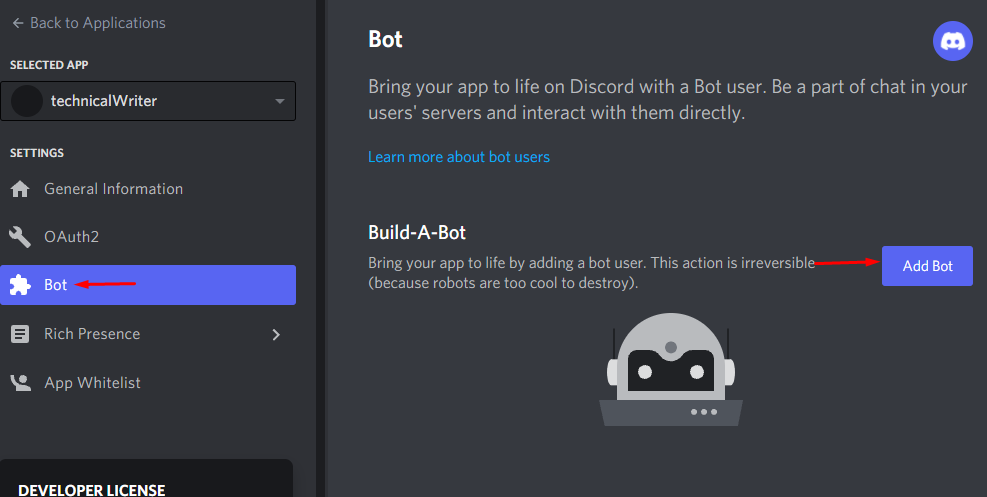 You will see that your bot has been created:
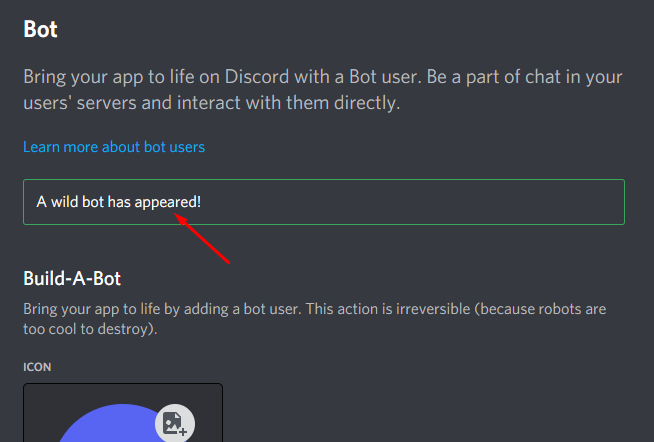 The next step is to copy the token and paste it somewhere where you have access to it, as we will use this token later in our VScode editor(or any other editor of your choice) to connect to the JavaScript bot:
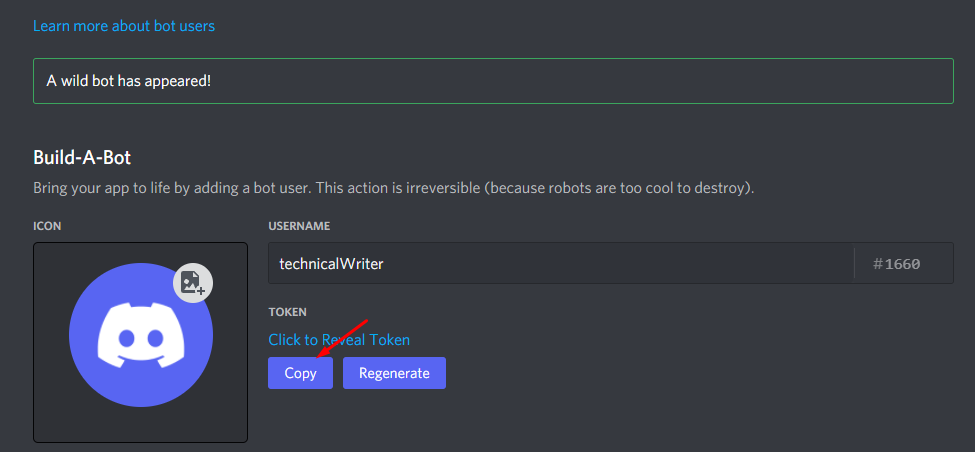
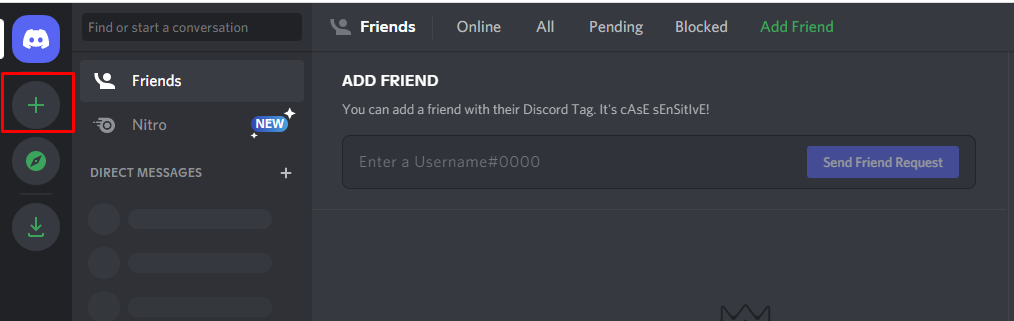 You will see Create a Server window on your screen where you have to click on the Create my own option as shown below:
 Next, you will be asked to give a name to your server.
In our case we have chosen the name technicalWriter:
Next, you will be asked to give a name to your server.
In our case we have chosen the name technicalWriter:
 Once done you will see your server on the left side of the screen:
 Once done, go back to the Discord Developer Portal:
 When you select bot you will see the bot permissions where you have to select all the permissions that you want for your bot.
We chose the send messages and read message history as shown below:
When you select bot you will see the bot permissions where you have to select all the permissions that you want for your bot.
We chose the send messages and read message history as shown below:
 A URL has been generated in the below text field.
Copy this URL by clicking on the copy button and then paste the copied URL on a new tab:
A URL has been generated in the below text field.
Copy this URL by clicking on the copy button and then paste the copied URL on a new tab:
 Once done, you will be redirected to the following page where you will install the bot to your preferred Discord Serve by choosing the server you created before.
I created technicalWriter so I will select that and then will click on the Authorize button:
Once done, you will be redirected to the following page where you will install the bot to your preferred Discord Serve by choosing the server you created before.
I created technicalWriter so I will select that and then will click on the Authorize button:
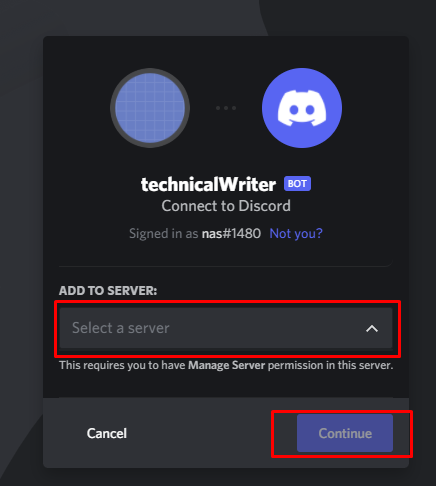 When you click on the continue button you will see the confirmation screen where you have to click on the authorize button:
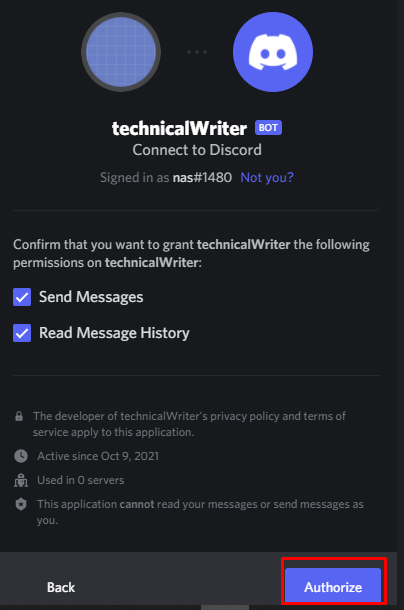 After clicking on the Authorize button you will see the following screen:
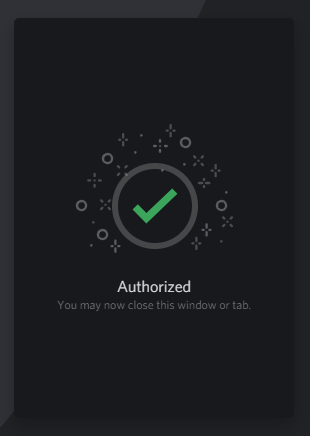 Close the tab and let us now move towards the installation of discord in our IDE.
 $ npm init -y
Now run the above command which will initialize NPM and create a package.json file in the test directory:
$ npm init -y
Now run the above command which will initialize NPM and create a package.json file in the test directory:
 Let’s install Discord.js with the below-given command:
$ npm i discord.js
Let’s install Discord.js with the below-given command:
$ npm i discord.js
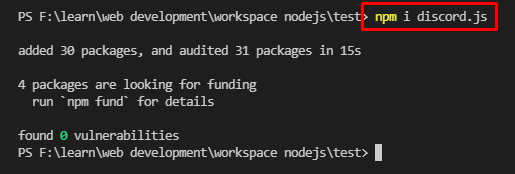 The next step is to install a nodemon that is used for automatic restarting of our server:
$ npm i nodemon
The next step is to install a nodemon that is used for automatic restarting of our server:
$ npm i nodemon
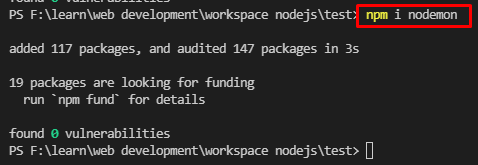 We have successfully installed all the dependencies that are required to create a discord bot.
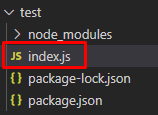 Open the package.json file seen in the above screenshot and add the below script so that we are able to run our file:
"scripts": {"start": "node index.js","dev": "nodemon index.js","test": "echo "
Open the package.json file seen in the above screenshot and add the below script so that we are able to run our file:
"scripts": {"start": "node index.js","dev": "nodemon index.js","test": "echo "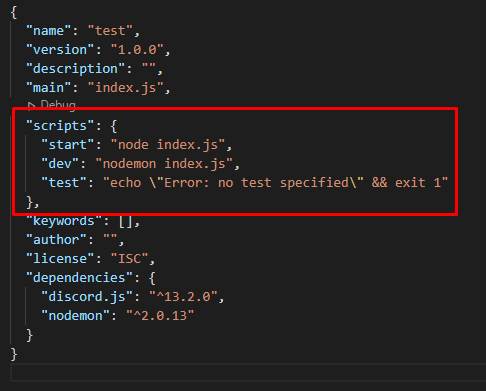 Now we will be able to run our application with the command of npm run start and can start the development server with npm run dev command.
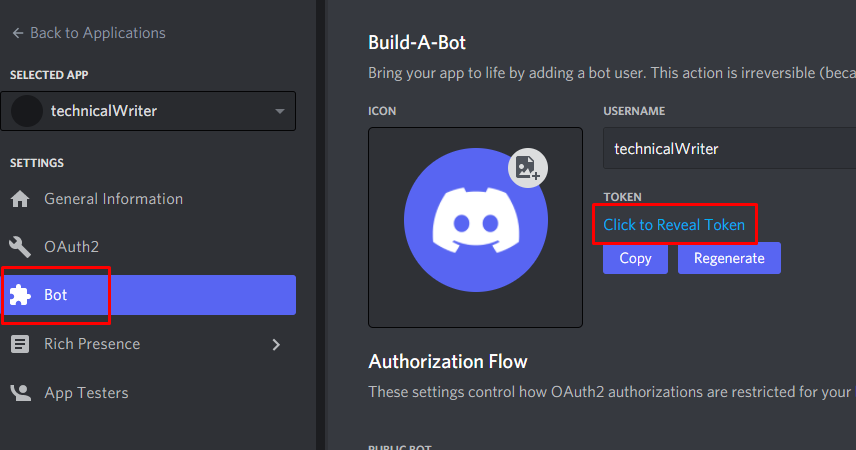 Copy the revealed token and replace it with the bot_secret_token in the above code.
Once done, run your application by going to the terminal and executing the below command:
$ nodemon index
The output should say Connected as if you were successful in creating your first test bot:
Copy the revealed token and replace it with the bot_secret_token in the above code.
Once done, run your application by going to the terminal and executing the below command:
$ nodemon index
The output should say Connected as if you were successful in creating your first test bot:
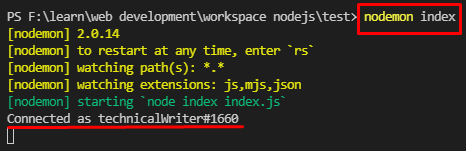
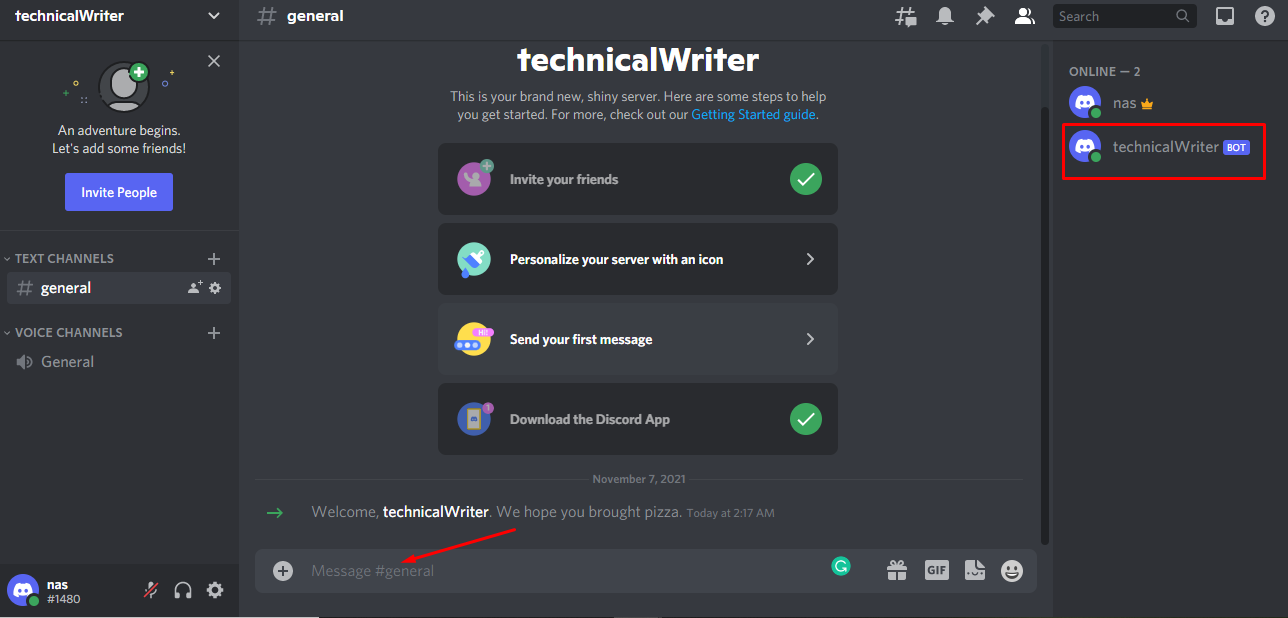 Now send a message Hello discordbot! in the general text channel and you will see the following output:
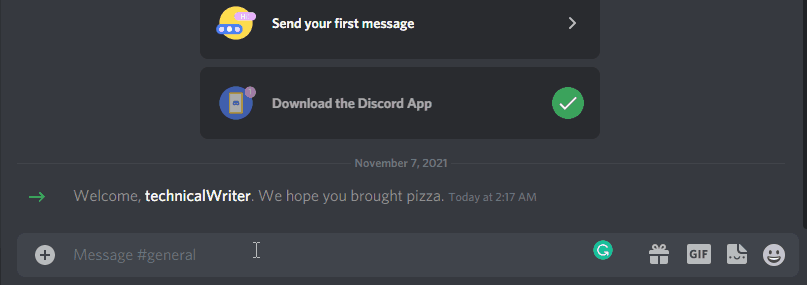 Congratulations! We have successfully created a discord bot that reads a message and then replies to that message automatically.
 We can see in the above output that every element of the original array is multiplied by 2 and we got our desired result.
When the operation you are performing on each element is of one line of code then the simpler and cleaner way of implementing the map() method is used which is given below:
// an array
constmyNumbers = [4, 8, 9, 15, 20];// multiply each element of array with 2
constmultipliedWithTwo = myNumbers.map((value)=>value*2);// display the returned array
console.log(multipliedWithTwo);
There are no curly brackets and return.
We can see in the above output that every element of the original array is multiplied by 2 and we got our desired result.
When the operation you are performing on each element is of one line of code then the simpler and cleaner way of implementing the map() method is used which is given below:
// an array
constmyNumbers = [4, 8, 9, 15, 20];// multiply each element of array with 2
constmultipliedWithTwo = myNumbers.map((value)=>value*2);// display the returned array
console.log(multipliedWithTwo);
There are no curly brackets and return.
 The output is still the same as seen in the above screenshot.
 We can see that with every element man has been concatenated.
 We can see that whenever we click on the Magic button, it creates a new button with the title “New Button”.
 Whenever we click on the Magic Button, a new element h2 is created via JavaScript’s createElement() method.
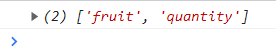 The second approach we can take is to use the spread operator “…” whose function is to take an iterable and then convert that iterable into individual elements.
// create map
var map = newMap();// set up keys and values for map object
map.set('fruit', 'apple');
map.set('quantity', 20); // convert map keys to array
let keys =[ ...map.keys() ];
console.log(keys); // [fruit, quantity]
The code given above remains the same with the exception of the usage of spread operator “…”.
As you can see in the output that we have successfully converted our map object into an iterable array:
The second approach we can take is to use the spread operator “…” whose function is to take an iterable and then convert that iterable into individual elements.
// create map
var map = newMap();// set up keys and values for map object
map.set('fruit', 'apple');
map.set('quantity', 20); // convert map keys to array
let keys =[ ...map.keys() ];
console.log(keys); // [fruit, quantity]
The code given above remains the same with the exception of the usage of spread operator “…”.
As you can see in the output that we have successfully converted our map object into an iterable array:
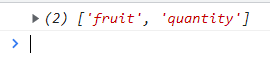


 clearInterval() Method
Similarly, to stop the execution of the setInterval() function, we can use the clearInterval() method that will also take the variable returned from the setInterval() as an argument.
clearInterval() Method
Similarly, to stop the execution of the setInterval() function, we can use the clearInterval() method that will also take the variable returned from the setInterval() as an argument.
 When we clicked on the “Stop time” button, the system time stopped displaying on our console log:

 Let’s create the JavaScript part of the tutorial.
First, we create the function “btnClick()”, under the script tag or in a different script file.
function btnClick() {
// put the later commands inside here}
To change the <p> tag or its child nodes, we first need to get its reference as soon as the button is pressed.
To get the reference of the <p> tag which is inside the <div> tag, we use a query selector.
Since the div has the id = “demo” we use the following command:
const pTag = document.querySelector("#demo p");
Now we need an element that will replace the <p> tag.
So, let’s create an input element and then give it some value, like:
const newInput = document.createElement("input");
newInput.value = "Replaced the Old Node";
Now that we have created an element to replace the
tag with, let’s actually replace it using the replaceWith() method by using the following code snippet:
pTag.replaceWith(newInput);
Lastly, if we want to remove the button as well from the screen.
To do that use:
const btn = document.getElementById("btn");
btn.remove();
The complete code snippet would look like this:
function btnClick() {
const pTag = document.querySelector("#demo p");
const newInput = document.createElement("input");
newInput.value = "Replaced the Old Node";
pTag.replaceWith(newInput);
const btn = document.getElementById("btn");
btn.remove();}
Run the HTML file and you will see this result:
Let’s create the JavaScript part of the tutorial.
First, we create the function “btnClick()”, under the script tag or in a different script file.
function btnClick() {
// put the later commands inside here}
To change the <p> tag or its child nodes, we first need to get its reference as soon as the button is pressed.
To get the reference of the <p> tag which is inside the <div> tag, we use a query selector.
Since the div has the id = “demo” we use the following command:
const pTag = document.querySelector("#demo p");
Now we need an element that will replace the <p> tag.
So, let’s create an input element and then give it some value, like:
const newInput = document.createElement("input");
newInput.value = "Replaced the Old Node";
Now that we have created an element to replace the
tag with, let’s actually replace it using the replaceWith() method by using the following code snippet:
pTag.replaceWith(newInput);
Lastly, if we want to remove the button as well from the screen.
To do that use:
const btn = document.getElementById("btn");
btn.remove();
The complete code snippet would look like this:
function btnClick() {
const pTag = document.querySelector("#demo p");
const newInput = document.createElement("input");
newInput.value = "Replaced the Old Node";
pTag.replaceWith(newInput);
const btn = document.getElementById("btn");
btn.remove();}
Run the HTML file and you will see this result:
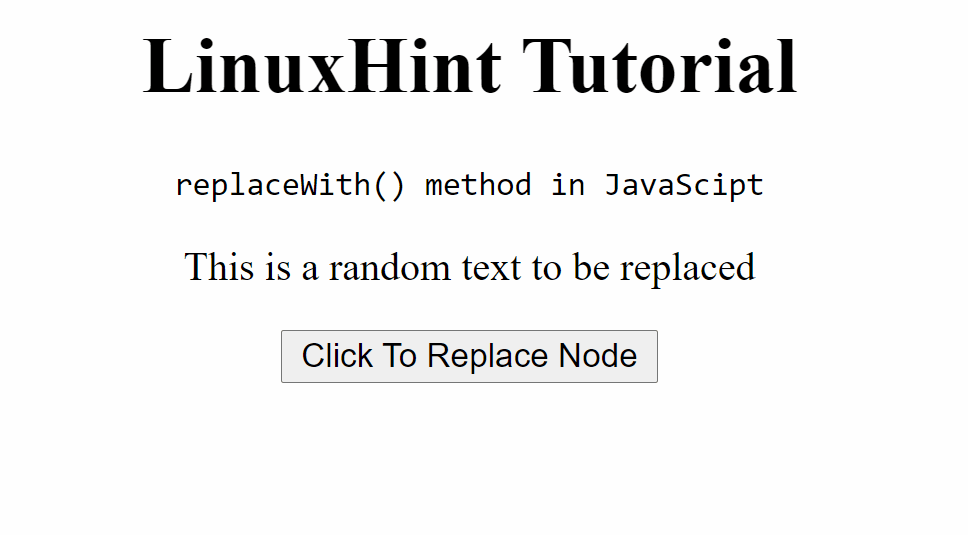 Now to check if the <p> tag was actually replaced we can do that by checking the source code with the developer tools.
At first, it’s like this:
Now to check if the <p> tag was actually replaced we can do that by checking the source code with the developer tools.
At first, it’s like this:
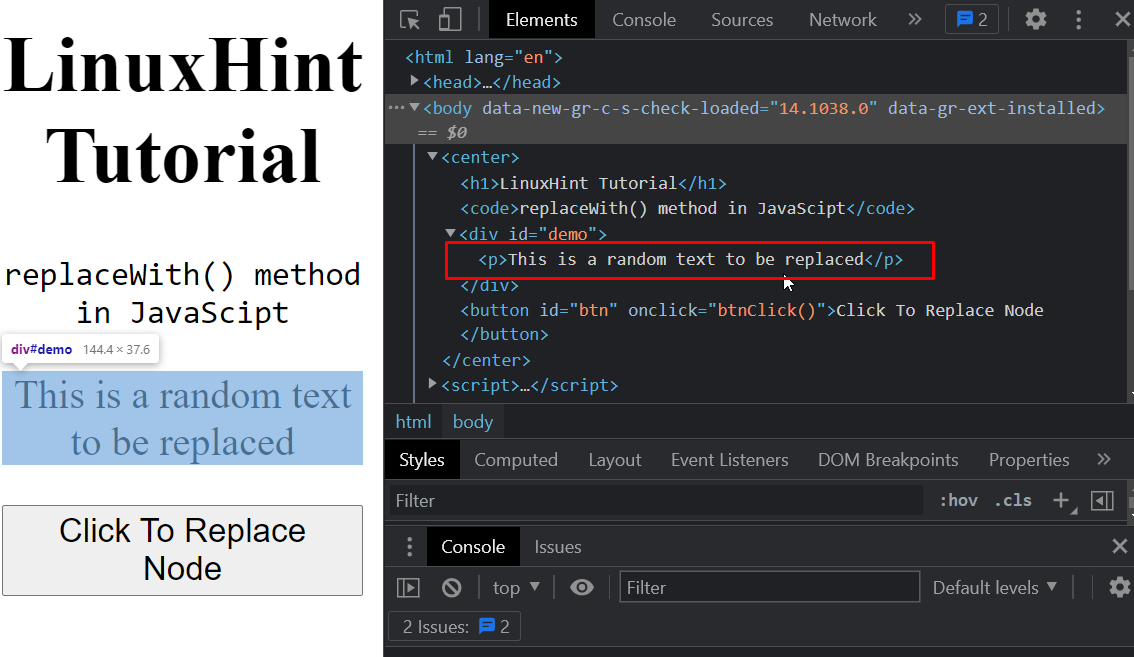 After clicking the Button it becomes like this:
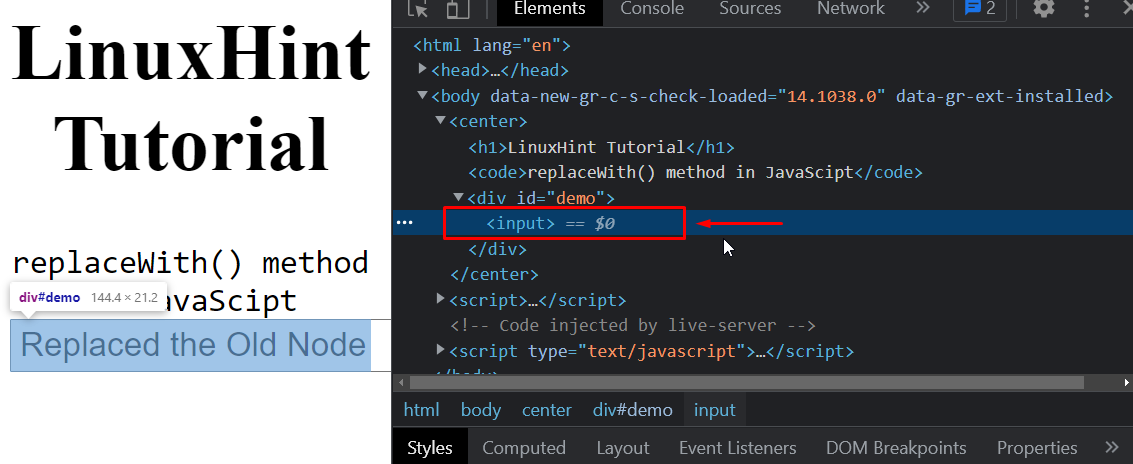 As you can see, the <p> tag gets entirely replaced with the <input> tag, when we press the button and now there is only the input tag inside the “#demo div”.
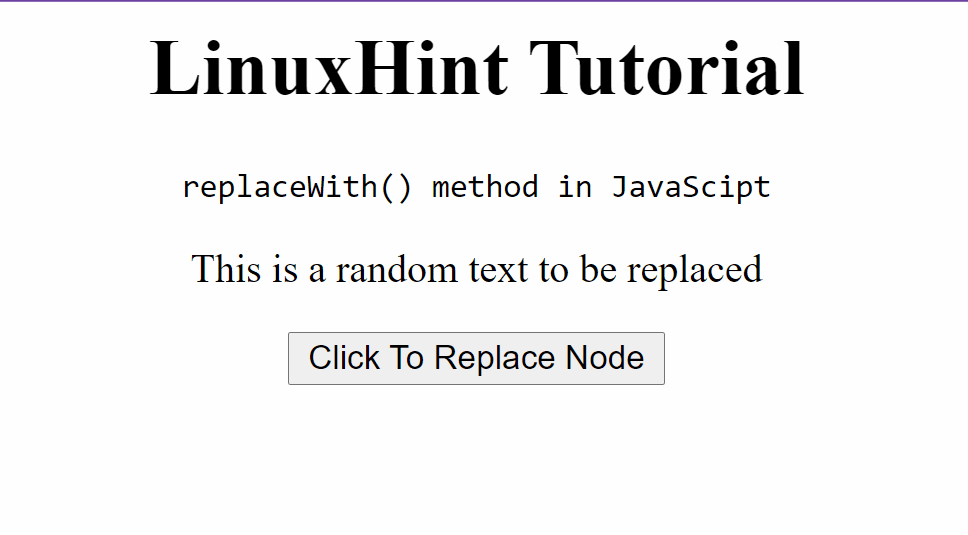
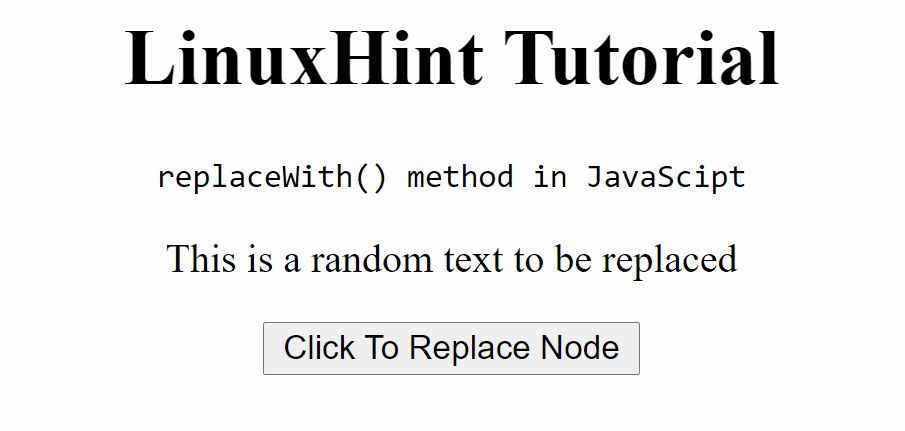 Let’s examine the source code from the developer tools option of the browser to check that the <p> wasn’t entirely removed rather than the bold tag and its content was added inside the <p> tag as its child nodes.
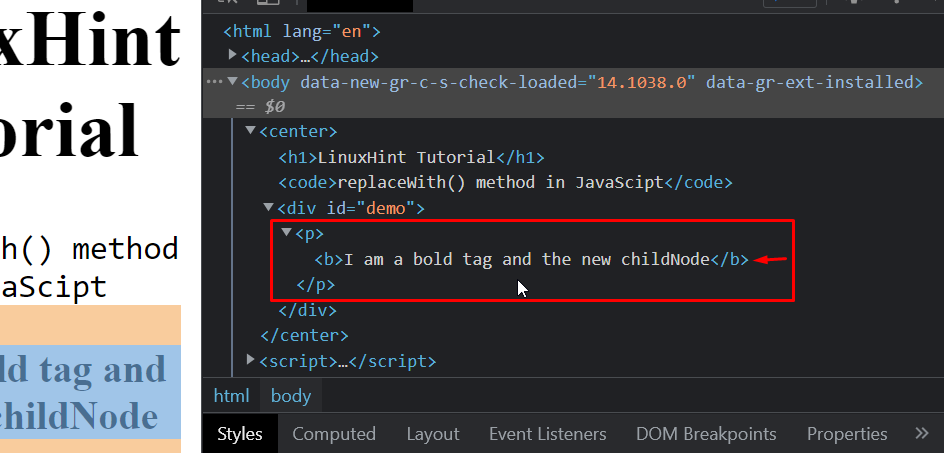 Now, as you can clearly see, we have successfully replaced the child node of the <p> tag and added another tag <b> inside it as its child node.
That’s it for the replaceWith() method.
Now, as you can clearly see, we have successfully replaced the child node of the <p> tag and added another tag <b> inside it as its child node.
That’s it for the replaceWith() method.
 The object is printed onto the console and you can see the key-value pairs clearly.
 You can see the key-value pairs on the console, the string values are enclosed inside the quotation marks, and integer values are not enclosed by anything.
 That’s all about JavaScript objects.
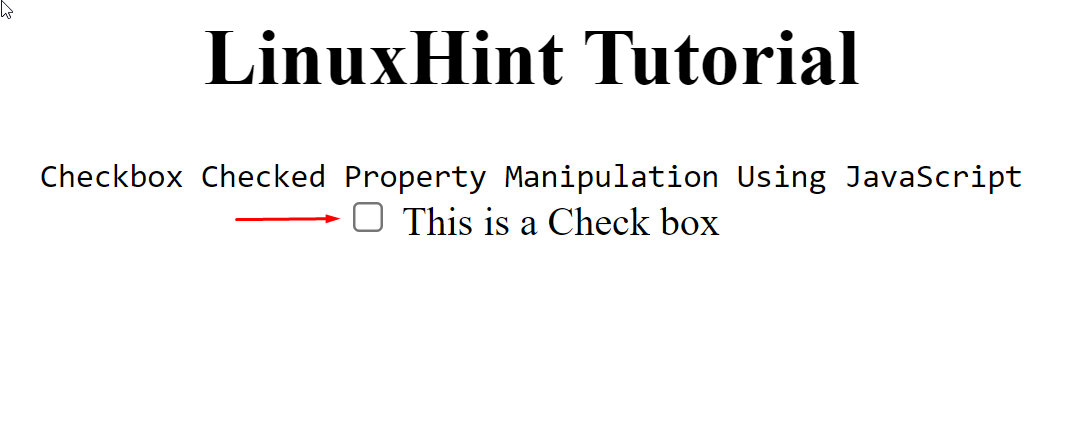 As we can see, we have a checkbox being displayed on the screen.
Let’s add the “checked” property so that the checkbox is already marked when the page loads.
For adding the “checked” property, use the following line in your code:
<input type="checkbox" name="cBox" id="cBox" checked/> This is a Check box
As we can see, we have a checkbox being displayed on the screen.
Let’s add the “checked” property so that the checkbox is already marked when the page loads.
For adding the “checked” property, use the following line in your code:
<input type="checkbox" name="cBox" id="cBox" checked/> This is a Check box
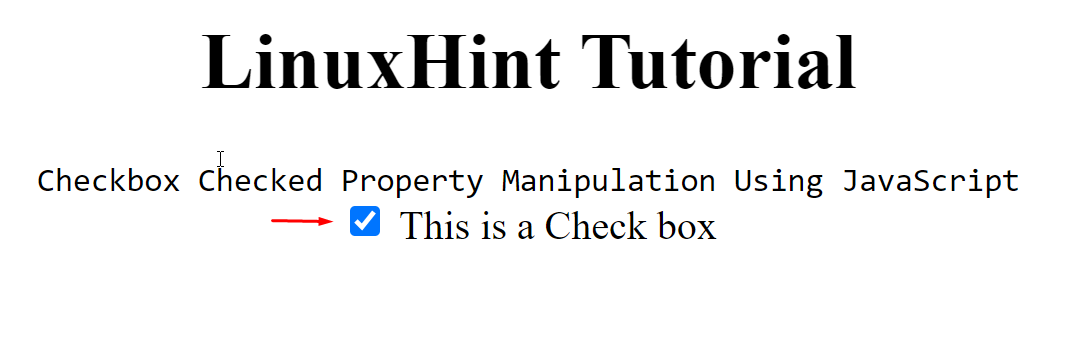 We can confirm this by even going to the browser’s developer tools and then into the properties tab, where we can see the property “checked” and its value like:
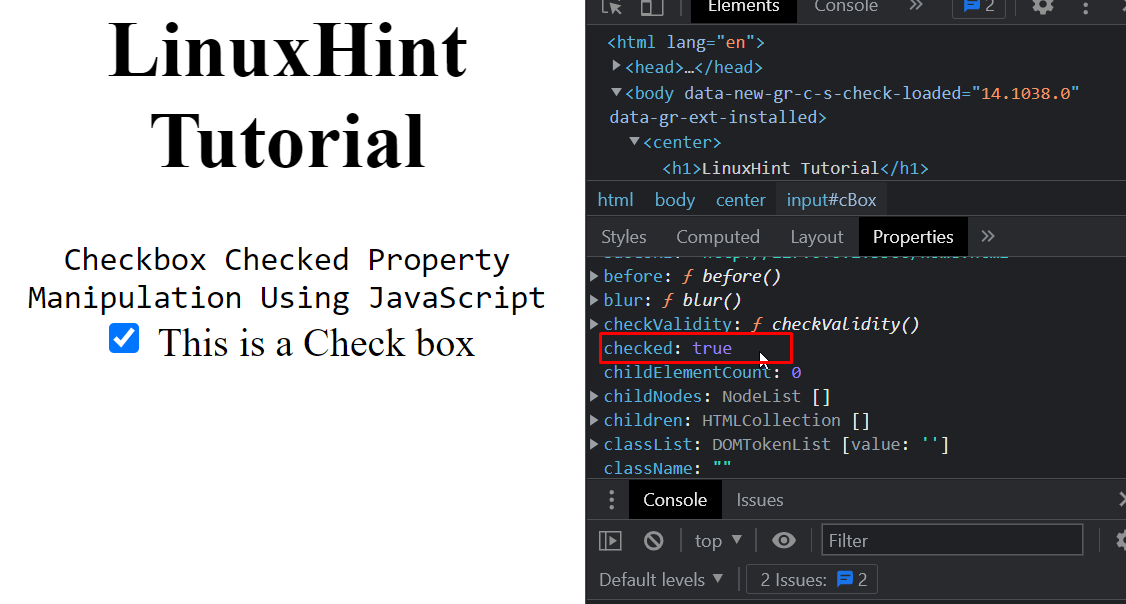 We can change the checked property by clicking on the checkbox itself, like:
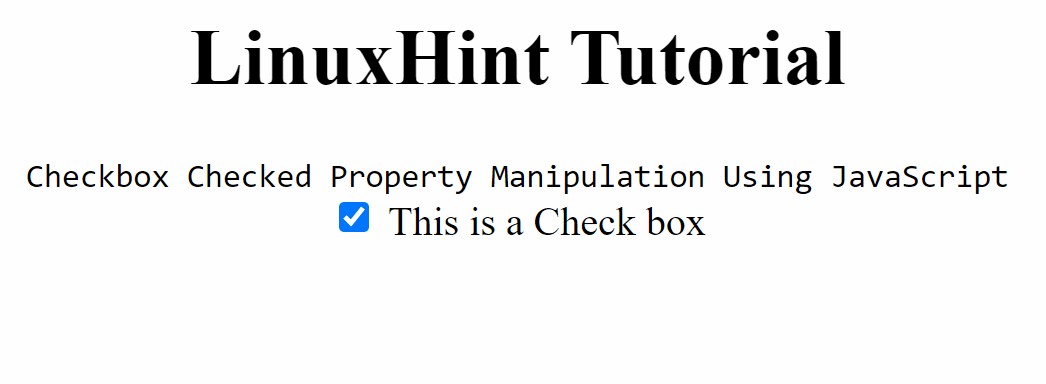 But what if we want to use JavaScript to manipulate the checked property.
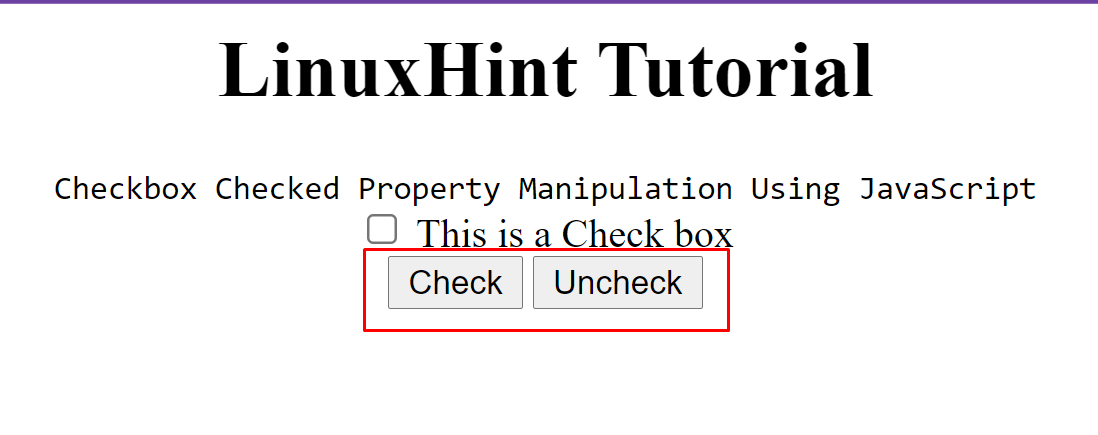 Time to bind these buttons with the functions that we have defined inside the “onclick” property.
To create these two functions, use the following commands inside the script tag <script>.
<script>function checkBtnClick() {
document.getElementById("cBox").checked = true;
}function uncheckBtnClick() {
document.getElementById("cBox").checked = false;
}</script>
Run the file again and click on these buttons to examine the behavior of the checkbox.
You will have this behavior.
Time to bind these buttons with the functions that we have defined inside the “onclick” property.
To create these two functions, use the following commands inside the script tag <script>.
<script>function checkBtnClick() {
document.getElementById("cBox").checked = true;
}function uncheckBtnClick() {
document.getElementById("cBox").checked = false;
}</script>
Run the file again and click on these buttons to examine the behavior of the checkbox.
You will have this behavior.
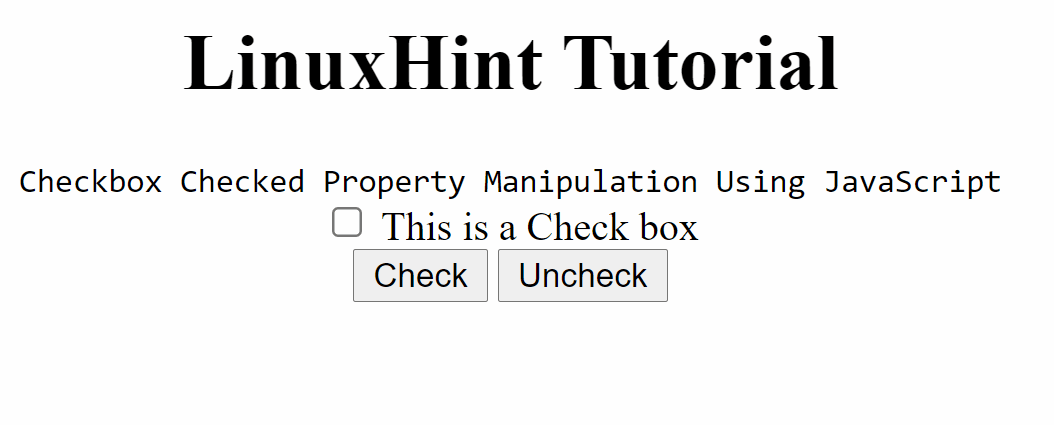 As you can see, we are now changing the checked property’s value of the checkbox using JavaScript.
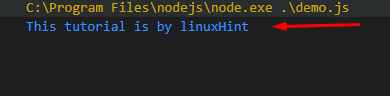 Note: It is not a good practice to use global variables when they are not needed as every code block will have access to those variables.
 You can see in the output that it is working perfectly fine as expected.
However, if we try to access this variable outside of the function then we get an error:
function abc() {
year = 2021;// the "year" variable can be accessed inside this function}// the "year" variable cannot be accessed outside here
console.log("The year is "+ Year);
abc();
You can see in the output that it is working perfectly fine as expected.
However, if we try to access this variable outside of the function then we get an error:
function abc() {
year = 2021;// the "year" variable can be accessed inside this function}// the "year" variable cannot be accessed outside here
console.log("The year is "+ Year);
abc();
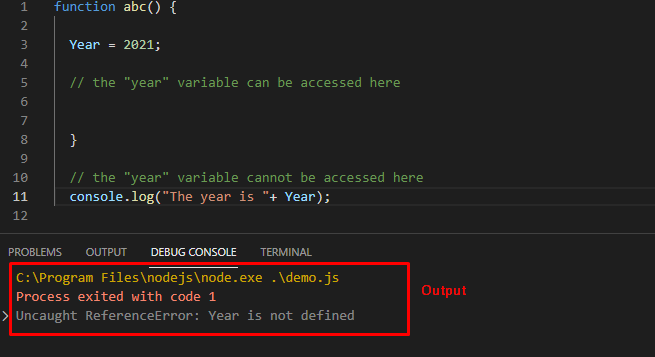
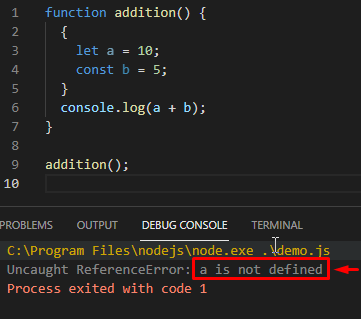 The keywords let and const are used to define block variables.
For Example
The following checks the marks obtained by a student and shows whether the student passed or failed.
marksObtained = 60if(marksObtained >= 45){
let status = "Passed";
console.log("Subject Remarks: " + status);}else{
let status = "Failed";
console.log("Subject Remarks: " + status);}
We created a block-scoped local variable enclosed within curly brackets {} by using the keyword let.
We can even replace this let with the const. The output is as:
The keywords let and const are used to define block variables.
For Example
The following checks the marks obtained by a student and shows whether the student passed or failed.
marksObtained = 60if(marksObtained >= 45){
let status = "Passed";
console.log("Subject Remarks: " + status);}else{
let status = "Failed";
console.log("Subject Remarks: " + status);}
We created a block-scoped local variable enclosed within curly brackets {} by using the keyword let.
We can even replace this let with the const. The output is as:
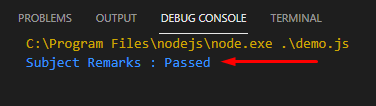 If you are trying to refer to the local variable from outside the function you will get an error “status(variable name) is not defined”:
 Note: To refer to the “status” variable, we are calling the console.log() function from outside the conditional brackets;
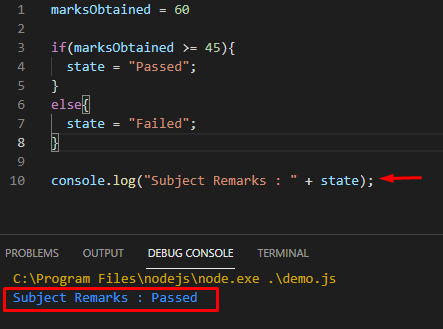 As you can clearly see, we were able to access this variable outside of the curly brackets {}, which means that the variable without the “let” and “const” keywords gets defined with a global scope.
 As you can clearly see, we were able to access the siteName variables inside a function, but we were not able to access the local variable topicName outside of its function.
You can learn more details about these
As you can clearly see, we were able to access the siteName variables inside a function, but we were not able to access the local variable topicName outside of its function.
You can learn more details about these  The output of the above code is:
 We were able to get the values of both the variables and print them out to the console using the console.log() function.

 Let’s see how we can accomplish the same task using the .some() method.
console.log (age.some(checkAge));function checkAge (age){
return age > 25;}
So, let’s go over this very short code snippet.
So, we call the .some() method on the array “age” and pass in the function checkAge.
The function checkAge takes each element of the array one by one and compares it with 25 and returns true or false based on the condition.
The .some() method compares elements one by one by passing it into the checkAge function and upon receiving a true, it stops executing further elements as we have accomplished our task.
Let’s see how we can accomplish the same task using the .some() method.
console.log (age.some(checkAge));function checkAge (age){
return age > 25;}
So, let’s go over this very short code snippet.
So, we call the .some() method on the array “age” and pass in the function checkAge.
The function checkAge takes each element of the array one by one and compares it with 25 and returns true or false based on the condition.
The .some() method compares elements one by one by passing it into the checkAge function and upon receiving a true, it stops executing further elements as we have accomplished our task.

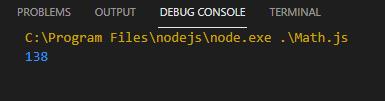 You can witness that the number “138.2293” is rounded down to “138”.
Here is another example in which we are feeding a number whose floating point number is greater than “0.50” plus we are directly using a number in the parameters of the Math.round() function.
You can witness that the number “138.2293” is rounded down to “138”.
Here is another example in which we are feeding a number whose floating point number is greater than “0.50” plus we are directly using a number in the parameters of the Math.round() function.
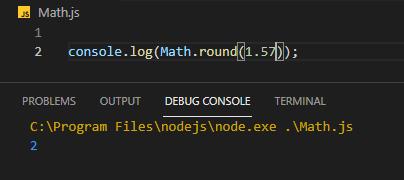 Now, the Math.round() method has rounded up “1.57” to “2” and returned “2” as a result.
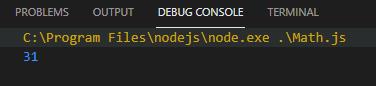 You can witness that even if the floating point number is as low as “.12” but Math.ceil() method has rounded up the number to “31”.
Let’s take another example of Math.ceil() method in which we will feed the number with floating point number “.00” to the math.ceil() function:
You can witness that even if the floating point number is as low as “.12” but Math.ceil() method has rounded up the number to “31”.
Let’s take another example of Math.ceil() method in which we will feed the number with floating point number “.00” to the math.ceil() function:
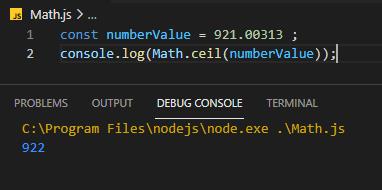 The output is “922” and you can confirm from this example that the number always gets rounded up using the Math.ceil() method.
 You can see that even if the floating point number is greater than “.5” but Math.floor() method has rounded down the number to “53”.
Here is an example of Math.floor() method without using a variable to store the number:
You can see that even if the floating point number is greater than “.5” but Math.floor() method has rounded down the number to “53”.
Here is an example of Math.floor() method without using a variable to store the number:
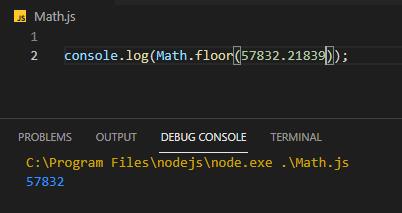
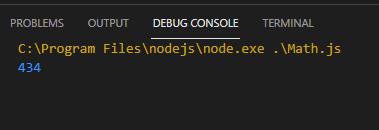 Here is another example without storing the value in a variable:
console.log(Math.trunc(874.921395753));
Here is another example without storing the value in a variable:
console.log(Math.trunc(874.921395753));
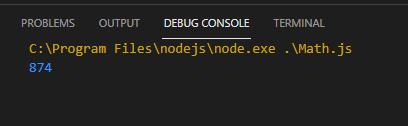
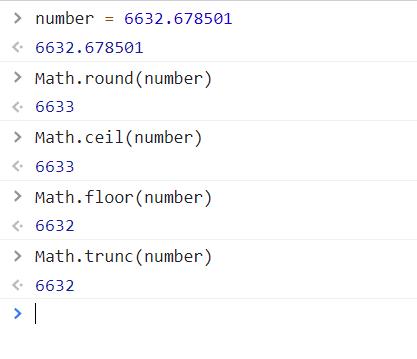
 JavaScript is often misinterpreted as an Object-oriented language but in reality, that is not true; JavaScript is a prototype-based language.
Inheritance is achieved by something called Prototypal Inheritance.
To understand that, we first need to be familiar with how a constructor works, how an object is created against a constructor, and what is prototype chaining.
This is one of the advanced topics of JavaScript and we are going to take you very slow and try to explain every little bit of information along with snippets, let’s get started.
JavaScript is often misinterpreted as an Object-oriented language but in reality, that is not true; JavaScript is a prototype-based language.
Inheritance is achieved by something called Prototypal Inheritance.
To understand that, we first need to be familiar with how a constructor works, how an object is created against a constructor, and what is prototype chaining.
This is one of the advanced topics of JavaScript and we are going to take you very slow and try to explain every little bit of information along with snippets, let’s get started.
 Now here is the major issue with using this type of template, imagine that you have 100 objects of Person, these 100 Objects will have their own 100 different getName() functions:
 This is because these objects are the instances of the Person, thus making it redundant on the memory.
This is where the Prototype property comes into play.
This is because these objects are the instances of the Person, thus making it redundant on the memory.
This is where the Prototype property comes into play.
 If we were to create some objects based on this function “x”, they would inherit the methods and properties inside the “prototype” of the function.
In our example, the main function would be the Person and the objects are p1, p2, like:
If we were to create some objects based on this function “x”, they would inherit the methods and properties inside the “prototype” of the function.
In our example, the main function would be the Person and the objects are p1, p2, like:

 But the difference this time is, that rather than each object having its own getName() function, each object is accessing the getName() function in its parent and using that function to execute the instruction given to it.
This is called “Prototypal Inheritance”.
Eventually, not making it redundant in the memory.
But the difference this time is, that rather than each object having its own getName() function, each object is accessing the getName() function in its parent and using that function to execute the instruction given to it.
This is called “Prototypal Inheritance”.
Eventually, not making it redundant in the memory.
 Expand the little arrowhead, and examine the __proto__ property of this function, the __proto__ property tells us on what object was this function mapped, you will see this:
 Now, let’s create an instance of this demo function and examine its __proto__ like:
var demo = function(){}
let x = new demo();
console.dir(x);
After running this code, you should see the following output on the console:
Now, let’s create an instance of this demo function and examine its __proto__ like:
var demo = function(){}
let x = new demo();
console.dir(x);
After running this code, you should see the following output on the console:
 Expand this and examine the constructor on which the instance “x” was mapped you will see:
 Meaning that object x has the parent demo, and we already know that the function demois mapped on the JavaScript Object.
This creates a prototyping chain as:
Meaning that object x has the parent demo, and we already know that the function demois mapped on the JavaScript Object.
This creates a prototyping chain as:
 The object “x” can access the methods and properties of the master object, thus creating a chain of inheritance.
If we look in our console for the last time, we can examine that the master Object has this one method in its prototype property which is toString() as:
The object “x” can access the methods and properties of the master object, thus creating a chain of inheritance.
If we look in our console for the last time, we can examine that the master Object has this one method in its prototype property which is toString() as:
 And we call this property on the object “x” and on the function demo that you created as:
console.log(x.toString());
console.log(demo.toString());
You get the output as:
And we call this property on the object “x” and on the function demo that you created as:
console.log(x.toString());
console.log(demo.toString());
You get the output as:
 You can see, both the object and the function were able to access this method even though it was not defined inside them.
That is how inheritance works through prototypes.
You can see, both the object and the function were able to access this method even though it was not defined inside them.
That is how inheritance works through prototypes.
 With the arrival of ES6, a wave of new features hit the JavaScript language, most of these features were entirely new and the others were an efficient alternative to already existing solutions.
Rest parameter was one of the new features that got introduced in the ES6 version of JavaScript.
By the time you reach the bottom of this page, you would have learned what the rest of the parameters are, how they are different from normal arguments, and how to use them along with their examples.
With the arrival of ES6, a wave of new features hit the JavaScript language, most of these features were entirely new and the others were an efficient alternative to already existing solutions.
Rest parameter was one of the new features that got introduced in the ES6 version of JavaScript.
By the time you reach the bottom of this page, you would have learned what the rest of the parameters are, how they are different from normal arguments, and how to use them along with their examples.
 The program crashes on function definition and exits the execution with error code 1(unexpected crash)
 The program crashes on function definition and exits the execution with error code 1.
 From the output, we can clearly conclude that the arguments are being stored inside an array instance.
 Our program runs smoothly and without any error, you can try different variations so arguments inside it as well.
That’s it for the Rest parameters.
Our program runs smoothly and without any error, you can try different variations so arguments inside it as well.
That’s it for the Rest parameters.

 As you can see, the elements of an array are now in reverse order.
But how do we actually sort an array in descending order?
As you can see, the elements of an array are now in reverse order.
But how do we actually sort an array in descending order?
 That is it, that is our array sorted in descending alphabetical order.
Now let’s see how to work with numeric values.
That is it, that is our array sorted in descending alphabetical order.
Now let’s see how to work with numeric values.
 As you can see, the outcome is off the mark.
Why is that so?.
Well, we have already explained how the .sort() method works.
What happens is that it takes the first character of the string and compares it with the first characters of the next value, although 100 is bigger than 33.
But, when you compare the first characters, “1” is smaller than “3”, hence 100 is placed before 33.
So do we fix this issue? Well, we do that by using a compare function inside the sort function.
The compare function is as:
function(a , b) {return a-b}
We take the “numberArray” from the above example and apply this compare function on it to observe the output.
numberArray = [2, 3, 4, 6, 66, 100, 25, 33];
numberArray.sort(function (a, b) {
return a - b;});
console.log(numberArray);
With this, we get the following output.
As you can see, the outcome is off the mark.
Why is that so?.
Well, we have already explained how the .sort() method works.
What happens is that it takes the first character of the string and compares it with the first characters of the next value, although 100 is bigger than 33.
But, when you compare the first characters, “1” is smaller than “3”, hence 100 is placed before 33.
So do we fix this issue? Well, we do that by using a compare function inside the sort function.
The compare function is as:
function(a , b) {return a-b}
We take the “numberArray” from the above example and apply this compare function on it to observe the output.
numberArray = [2, 3, 4, 6, 66, 100, 25, 33];
numberArray.sort(function (a, b) {
return a - b;});
console.log(numberArray);
With this, we get the following output.
 As you can see, we finally have our number array sorted in descending order.
 However, there is another way of doing that, and that is to change the return statement in the compare function.
Change the statement to this:
return b-a;
After that, we simply print out the array using the console.log() method.
The complete code snippet is as:
numberArray = [2, 3, 4, 6, 66, 100, 25, 33];
numberArray.sort(function (x, y) {
return y - x;});
console.log(numberArray);
The output will be:
However, there is another way of doing that, and that is to change the return statement in the compare function.
Change the statement to this:
return b-a;
After that, we simply print out the array using the console.log() method.
The complete code snippet is as:
numberArray = [2, 3, 4, 6, 66, 100, 25, 33];
numberArray.sort(function (x, y) {
return y - x;});
console.log(numberArray);
The output will be:

 As we can see, all the objects are now sorted based on their “yob” which is the year of birth of the person.
That is it for sorting.
As we can see, all the objects are now sorted based on their “yob” which is the year of birth of the person.
That is it for sorting.
 Note: The above code is from Google’s Colab code-playground.
But, what if you are an expert in something? Well, even then code playgrounds are useful to you.
You can keep up with coding trends on these code playgrounds.
And, if you want to show off your skills to your friends, then some of these online coding platforms allow the feature to do exactly that.
Now that we have a basic understanding of what code playgrounds are, We can now talk about the topic at hand, that is, Best JavaScript Code Playgrounds, available on the internet.
Note: The above code is from Google’s Colab code-playground.
But, what if you are an expert in something? Well, even then code playgrounds are useful to you.
You can keep up with coding trends on these code playgrounds.
And, if you want to show off your skills to your friends, then some of these online coding platforms allow the feature to do exactly that.
Now that we have a basic understanding of what code playgrounds are, We can now talk about the topic at hand, that is, Best JavaScript Code Playgrounds, available on the internet.
 CodeSandbox.io works on the concept of sandboxes.
If you don’t have the concept of sandboxes then in simple words, it is an isolated testing environment.
CodeSandbox.io’s sandbox is a no-setup environment that is made for super-fast development purposes.
Sandboxes, in general, are mostly used for testing purposes.
CodeSandbox.io includes support for JavaScript and almost all of its popular frameworks, and CodeSandbox is one of the very few playgrounds that support Backend development along with the traditional front-end development.
Moreover, there are templates available for all these frameworks.
So, you just have to go to their website and choose from the template available to start coding.
A snippet of the CodeSandbox.io coding page shows a lot of JavaScript frameworks as:
CodeSandbox.io works on the concept of sandboxes.
If you don’t have the concept of sandboxes then in simple words, it is an isolated testing environment.
CodeSandbox.io’s sandbox is a no-setup environment that is made for super-fast development purposes.
Sandboxes, in general, are mostly used for testing purposes.
CodeSandbox.io includes support for JavaScript and almost all of its popular frameworks, and CodeSandbox is one of the very few playgrounds that support Backend development along with the traditional front-end development.
Moreover, there are templates available for all these frameworks.
So, you just have to go to their website and choose from the template available to start coding.
A snippet of the CodeSandbox.io coding page shows a lot of JavaScript frameworks as:
 Key Features
Git integration
Support for back-end along with front-end development
Can be used to develop a full-stack web app
Templates available for major Js Frameworks
Auto-configuration
Support for VS code integration (Visual Studio Code)
Host Static websites
Note: One major benefit of using CodeSandbox.io is that you don’t have to worry about setting up the configuration as CodeSandbox takes care of it.
2.
Codepen.io
If you are only interested in front-end development and want to try something out, or maybe build a project to show off your skills in front-end development, then chances are you have already heard the name
Key Features
Git integration
Support for back-end along with front-end development
Can be used to develop a full-stack web app
Templates available for major Js Frameworks
Auto-configuration
Support for VS code integration (Visual Studio Code)
Host Static websites
Note: One major benefit of using CodeSandbox.io is that you don’t have to worry about setting up the configuration as CodeSandbox takes care of it.
2.
Codepen.io
If you are only interested in front-end development and want to try something out, or maybe build a project to show off your skills in front-end development, then chances are you have already heard the name  Key Features
Git integration \ support
Allows users to share projects with other users
Setting up is effortless
Big community to share the projects with
Stay up-to-date with front-end trends
Helps in sharing code snippets
3.
StackBlitz
If you are like most of the programmers out there that love the Visual Studio Code, then chances are that you are going to like this next sandbox a lot.
Key Features
Git integration \ support
Allows users to share projects with other users
Setting up is effortless
Big community to share the projects with
Stay up-to-date with front-end trends
Helps in sharing code snippets
3.
StackBlitz
If you are like most of the programmers out there that love the Visual Studio Code, then chances are that you are going to like this next sandbox a lot.
 Stackblitz is one of the most popularly known JavaScript playgrounds out there because of being very similar to visual studio code.
Stackblitz comes with the ability to create a development-ready environment with a single click.
It comes with the support to develop full-stack web applications as well, with an info panel to run Angular and React CLI commands in, meaning there is no explicit terminal to run these commands in.
Key Features
It is powered by Visual Studio Code
Supports Backend development as well as Frontend
One-click setup.
Offline Development (because of the in-browser development environment)
TypeScript support (because of VS code support)
Visual Studio Code integration
Git support
Sharing project using an invitational URL link
4.
JSFiddle
Stackblitz is one of the most popularly known JavaScript playgrounds out there because of being very similar to visual studio code.
Stackblitz comes with the ability to create a development-ready environment with a single click.
It comes with the support to develop full-stack web applications as well, with an info panel to run Angular and React CLI commands in, meaning there is no explicit terminal to run these commands in.
Key Features
It is powered by Visual Studio Code
Supports Backend development as well as Frontend
One-click setup.
Offline Development (because of the in-browser development environment)
TypeScript support (because of VS code support)
Visual Studio Code integration
Git support
Sharing project using an invitational URL link
4.
JSFiddle
 On JsFiddle, the code snippets or static websites are known as “Fiddles”, and the user can share the code on Stack Overflow.
It even contains a bug static report for git.
Key features
Asynchronous Ajax request support
Sharing fiddles on Stack Overflow
Bug Statistic Report
Start coding instantly
Support for installing external JavaScript frameworks
Git integration
5.
SoloLearn
On JsFiddle, the code snippets or static websites are known as “Fiddles”, and the user can share the code on Stack Overflow.
It even contains a bug static report for git.
Key features
Asynchronous Ajax request support
Sharing fiddles on Stack Overflow
Bug Statistic Report
Start coding instantly
Support for installing external JavaScript frameworks
Git integration
5.
SoloLearn
 Apart from that, SoloLearn has its code playground.
It may not be that much unique when compared with other JavaScript Code playgrounds available on the internet, but it is unique in its own ways, especially, the SoloLearn platform has a vast global community that keeps the user up-to-date with the changes in coding trends and practices.
When you visit
Apart from that, SoloLearn has its code playground.
It may not be that much unique when compared with other JavaScript Code playgrounds available on the internet, but it is unique in its own ways, especially, the SoloLearn platform has a vast global community that keeps the user up-to-date with the changes in coding trends and practices.
When you visit  As you can see, SoloLearnCode isn’t only a JavaScript code playground but it supports a variety of programming languages.
Anyways, after selecting the template or the technology that you want to work with, you are taken to its IDE, which is rather simple unlike other code playgrounds; it provides a clean and distraction-free environment.
As you can see, SoloLearnCode isn’t only a JavaScript code playground but it supports a variety of programming languages.
Anyways, after selecting the template or the technology that you want to work with, you are taken to its IDE, which is rather simple unlike other code playgrounds; it provides a clean and distraction-free environment.
 Key Features
Massive Global Community
Support for console
Supports multiple languages
Live Sharing
Bug Report
Key Features
Massive Global Community
Support for console
Supports multiple languages
Live Sharing
Bug Report
 Example 2
This example is the same as example 1 except that in this example we will pass a separator “-” in the join() method:
// array containing bird namesconst birds = ['Eagle', 'Dove', 'Parrot'];
console.log(birds.join('-')); // Eagle-Dove-Parrot
We will now see that the elements are separated with a dash:
Example 2
This example is the same as example 1 except that in this example we will pass a separator “-” in the join() method:
// array containing bird namesconst birds = ['Eagle', 'Dove', 'Parrot'];
console.log(birds.join('-')); // Eagle-Dove-Parrot
We will now see that the elements are separated with a dash:
 Example 3
If you don’t want any separator then you can simply pass a blank string in place of the separator as shown below:
// array containing bird namesconst birds = ['Eagle', 'Dove', 'Parrot'];
console.log(birds.join('')); // EagleDoveParrot
Example 3
If you don’t want any separator then you can simply pass a blank string in place of the separator as shown below:
// array containing bird namesconst birds = ['Eagle', 'Dove', 'Parrot'];
console.log(birds.join('')); // EagleDoveParrot


 Now that we have established that we should start learning JavaScript, we are greeted with another question which is “HOW to get started with JavaScript?”.
There are some prerequisites for learning to program such as:
A compatible browser (Almost all browsers Support Js)
An Internet Connection
A Code Editor (most famous being Visual Studio Code)
A strong will to learn
Now that we have established that we should start learning JavaScript, we are greeted with another question which is “HOW to get started with JavaScript?”.
There are some prerequisites for learning to program such as:
A compatible browser (Almost all browsers Support Js)
An Internet Connection
A Code Editor (most famous being Visual Studio Code)
A strong will to learn
 Almost every current day browser supports JavaScript, that is why we can start JavaScript code directly inside the terminal or console.
Type in the following command inside the console and press enter.
console.log("hello LinuxHint");
After pressing the enter key, you should see something like this on your screen:
Almost every current day browser supports JavaScript, that is why we can start JavaScript code directly inside the terminal or console.
Type in the following command inside the console and press enter.
console.log("hello LinuxHint");
After pressing the enter key, you should see something like this on your screen:
 The first line is the JavaScript command that you wrote, and the follow-up line is the output of that line.
And with that, you have created a simple, traditional “Hello” program.
But let’s try to create something a bit interesting.
Let’s try to show an alert box on the browser to greet the user with the following code:
alert("Hey! Welcome to our Page");
When you press enter, you would see a pop-up on the top of the screen with the alert message like:
The first line is the JavaScript command that you wrote, and the follow-up line is the output of that line.
And with that, you have created a simple, traditional “Hello” program.
But let’s try to create something a bit interesting.
Let’s try to show an alert box on the browser to greet the user with the following code:
alert("Hey! Welcome to our Page");
When you press enter, you would see a pop-up on the top of the screen with the alert message like:
 That’s it, you have successfully learned how to run your first JavaScript program.
But, there is still one unanswered question remaining that is crucial to progress as a JavaScript programmer and that would be “how to learn JavaScript?”
That’s it, you have successfully learned how to run your first JavaScript program.
But, there is still one unanswered question remaining that is crucial to progress as a JavaScript programmer and that would be “how to learn JavaScript?”
 Becoming a top-tier JavaScript programmer is rather easy.
As we have already mentioned, due to JavaScript’s popularity, there are gazillions of tutorials available on the internet.
However, the best practice is to go over the
Becoming a top-tier JavaScript programmer is rather easy.
As we have already mentioned, due to JavaScript’s popularity, there are gazillions of tutorials available on the internet.
However, the best practice is to go over the 
 As you can see on your console, we can see an object being printed.
This is because we created an object by setting it equal to a variable.
As you can see on your console, we can see an object being printed.
This is because we created an object by setting it equal to a variable.
 You can even print the full Name using the following line:
console.log(
"The person's full name is as: " + person.firstName + person.lastName);
You will get the following output:
You can even print the full Name using the following line:
console.log(
"The person's full name is as: " + person.firstName + person.lastName);
You will get the following output:
 As you can see, we concatenated the first name and the last name and displayed it on the console.
This way you can access JSON key-value pairs.
As you can see, we concatenated the first name and the last name and displayed it on the console.
This way you can access JSON key-value pairs.
 As you can see, the job was not part of the JSON object at first, but you were able to append it into the JSON object and print it out to the console as well.
 As you can see, the JSON object has been converted into a String object, this is highly beneficial in transferring data across the internet at really high speeds.
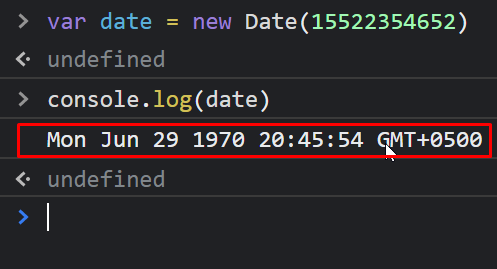 As you can see, we were able to create an object using milliseconds (timestamps) in the arguments.
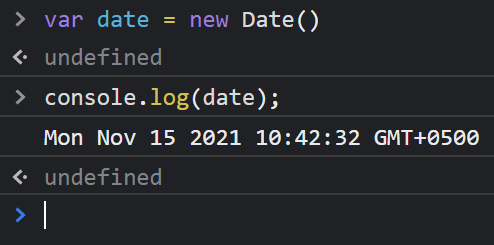 As you can see, we were able to create an object to store the current time and date, and then we used the console.log() function to print out that date and time.
 We successfully created an object using the date-specified arguments.
 We created an object using a Date-string based argument.
We can use the following table to put all the different constructor syntax in one place
We created an object using a Date-string based argument.
We can use the following table to put all the different constructor syntax in one place
 Let’s create a date object using the current date and time and then fetch minutes and only the year.
Using the following lines of code:
var dateValue = new Date();
console.log("The minutes in the hour are: " + dateValue.getMinutes());
console.log("The Year in four digits is : " +dateValue.getFullYear());
The output is:
Let’s create a date object using the current date and time and then fetch minutes and only the year.
Using the following lines of code:
var dateValue = new Date();
console.log("The minutes in the hour are: " + dateValue.getMinutes());
console.log("The Year in four digits is : " +dateValue.getFullYear());
The output is:
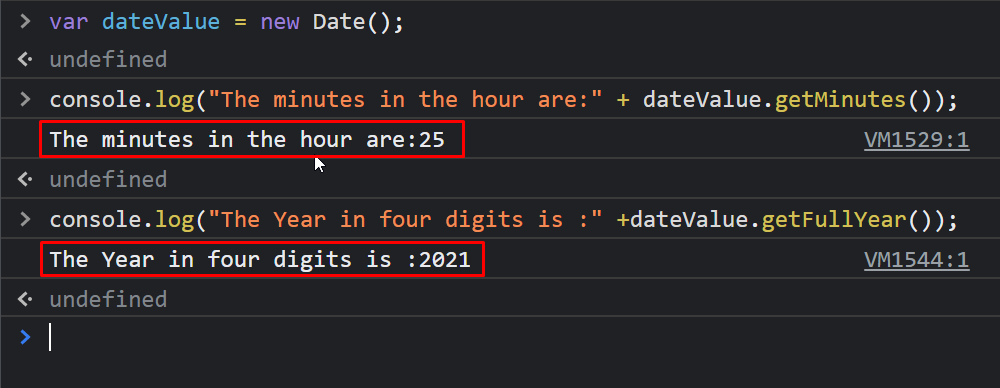 That’s it now we know how to manipulate Date and time using JavaScript.


 But printing out “Hello World” is rather boring, let’s try to use the browser’s alert dialogue box to say hello to the world.
You can do this by using the “alert” command:
alert("Hello World! This is LinuxHint");
Type or copy this command in the console and press enter.
You’ll see an alert box like this:
But printing out “Hello World” is rather boring, let’s try to use the browser’s alert dialogue box to say hello to the world.
You can do this by using the “alert” command:
alert("Hello World! This is LinuxHint");
Type or copy this command in the console and press enter.
You’ll see an alert box like this:
 That’s it, now you know how to run JavaScript in the Developer console in various browsers.
 It returns true, meaning that the element we were searching for is indeed present in the array.
Time to check if the number 23 is present inside our array or not.
We can search for 23 by using the command:
console.log(arr.includes(23));
We get the output:
It returns true, meaning that the element we were searching for is indeed present in the array.
Time to check if the number 23 is present inside our array or not.
We can search for 23 by using the command:
console.log(arr.includes(23));
We get the output:
 It returned false, meaning there is no such element present inside the array.
 The output is 4, as the element “Table and Chair” was the fifth element inside the array and we know that the first element inside the array starts from index “0”, so that is why the 5th element has the index 4.
Let’s take another example in which we will try to find the index of the element “Yahoo” inside our array.
console.log(array.indexOf("Yahoo"));
We get the following output:
The output is 4, as the element “Table and Chair” was the fifth element inside the array and we know that the first element inside the array starts from index “0”, so that is why the 5th element has the index 4.
Let’s take another example in which we will try to find the index of the element “Yahoo” inside our array.
console.log(array.indexOf("Yahoo"));
We get the following output:
 As we can see the output is -1, which means the element “Yahoo” is not present inside our array.
 As we already knew, we had no element with a length more than 30, therefore, the function returned to us with “undefined”.
 As you can see, this method returned an array of all the elements that fulfilled our condition.
But what if, just like the examples in the previous method, we want to search for the elements with a length of more than 30?.
Well, we do that by using the following statement:
console.log(array.filter((elem) => elem.length > 30));
The output we get is:
As you can see, this method returned an array of all the elements that fulfilled our condition.
But what if, just like the examples in the previous method, we want to search for the elements with a length of more than 30?.
Well, we do that by using the following statement:
console.log(array.filter((elem) => elem.length > 30));
The output we get is:
 Since there was not even a single element inside the array that had a length of more than 30, that is why this method returned us an empty array.
So, in the end, we are now aware of some answers after using these methods:
Do you want to know if an element is present inside an array?
Use the .includes() method
Do you want to find and get the index of a specific element inside the array?
Use the .indexOf() method
Do you want to know which element or elements meet a specific condition?
Use the .find() and .filter() methods
Since there was not even a single element inside the array that had a length of more than 30, that is why this method returned us an empty array.
So, in the end, we are now aware of some answers after using these methods:
Do you want to know if an element is present inside an array?
Use the .includes() method
Do you want to find and get the index of a specific element inside the array?
Use the .indexOf() method
Do you want to know which element or elements meet a specific condition?
Use the .find() and .filter() methods
 As we can see, the variable “newString” has the updated string inside it.
 The output is:
 That is not what we wanted.
So what went wrong? Well, Nothing went wrong.
The way the .replace() method works is that it finds the first instance of the substring, replaces it, and stops executing.
So, if we want to check for multiple instances we have to use regex with the global flag “g”.
Learn more about
That is not what we wanted.
So what went wrong? Well, Nothing went wrong.
The way the .replace() method works is that it finds the first instance of the substring, replaces it, and stops executing.
So, if we want to check for multiple instances we have to use regex with the global flag “g”.
Learn more about 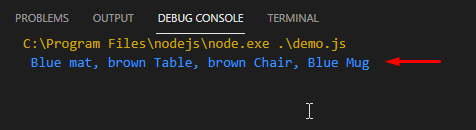 We got exactly what we wanted.
But there is still something missing, and that is the case where the multiple instances of the same substring are different case-sensitive.
Imagine the same string from above but with slight changes like this:
string = " Brown mat, brown Table, brown Chair, Brown Mug";
Now, as you can see, the substring that we want to replace “Brown” has two different case-sensitive versions, one starting with the capital letter “B” and the other one starting with the lower letter “b”.
If we use the normal regex with the global flag “g” like so:
string = " Brown mat, brown Table, brown Chair, Brown Mug";
newString = string.replace(/Brown/g, "Blue");
console.log(newString);
We get the following output:
We got exactly what we wanted.
But there is still something missing, and that is the case where the multiple instances of the same substring are different case-sensitive.
Imagine the same string from above but with slight changes like this:
string = " Brown mat, brown Table, brown Chair, Brown Mug";
Now, as you can see, the substring that we want to replace “Brown” has two different case-sensitive versions, one starting with the capital letter “B” and the other one starting with the lower letter “b”.
If we use the normal regex with the global flag “g” like so:
string = " Brown mat, brown Table, brown Chair, Brown Mug";
newString = string.replace(/Brown/g, "Blue");
console.log(newString);
We get the following output:
 We are going over multiple instances but our search method is case-sensitive.
To change it to case-insensitive we can use the flag “i” along with the global flag “g” like:
newString = string.replace(/Brown/gi, "Blue");
When we are using this statement instead of the old one we get the following output;
We are going over multiple instances but our search method is case-sensitive.
To change it to case-insensitive we can use the flag “i” along with the global flag “g” like:
newString = string.replace(/Brown/gi, "Blue");
When we are using this statement instead of the old one we get the following output;

 Modules are used to implement the concept of modularity which is, at its very core, the process of dividing a solution into smaller, compact, and more meaningful components., modularity is achieved by using exports and imports keywords.
When JavaScript is used as a modular script with an HTML webpage, the keyword “module” is added as the type of the script tag
Modules are used to implement the concept of modularity which is, at its very core, the process of dividing a solution into smaller, compact, and more meaningful components., modularity is achieved by using exports and imports keywords.
When JavaScript is used as a modular script with an HTML webpage, the keyword “module” is added as the type of the script tag

 Now, in your HTML, link the mainScript.js using the following command:
<script type="module" src="mainScript.js"></script>
As you can see, unlike normal script tags, we are not only passing the source link, but also the type which is set to “module”, to notify the browser that this script is in modular form.
Now, in your HTML, link the mainScript.js using the following command:
<script type="module" src="mainScript.js"></script>
As you can see, unlike normal script tags, we are not only passing the source link, but also the type which is set to “module”, to notify the browser that this script is in modular form.

 Now, to use it inside the mainScript.js, we need to catch this export using the import function.
You can do that by using the following syntax:
import { function-name } from "scriptSoruce.js;
In our case, this line would change into:
import { printNumbers } from "./compScript.js";
Now to use this function in our main script file, you can simply call the function as we call any other function:
printNumbers(5);
The mainScript.js will look like this:
Now, to use it inside the mainScript.js, we need to catch this export using the import function.
You can do that by using the following syntax:
import { function-name } from "scriptSoruce.js;
In our case, this line would change into:
import { printNumbers } from "./compScript.js";
Now to use this function in our main script file, you can simply call the function as we call any other function:
printNumbers(5);
The mainScript.js will look like this:
 Save the file, and refresh the HTML, and head over to the developer console and you will see the following output:
 And if you pay close attention to the output inside the console, you will see:
 Even though you only linked the mianScript.js with the HTML page, our component was successfully executed.
Therefore, you can say that you have successfully implemented the concept of componential modularity.
Even though you only linked the mianScript.js with the HTML page, our component was successfully executed.
Therefore, you can say that you have successfully implemented the concept of componential modularity.
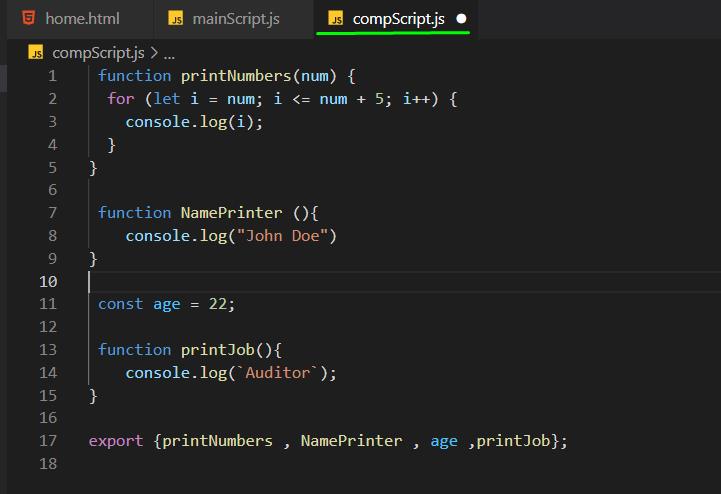 Similarly, to import all the functions and variables with the export keyword from a file, you can use the asterisk “*” symbol as shown below:
import * as comp from "./compScript.js";
The asterisk symbol “ * ” means that you want to import all the exports of the file under the name “comp”,
To use the function and variables that we just imported, use the dot operator along with the name of the function/variable:
comp.NamePrinter();
If you were to use all the exports from the compScript.js file, then you will use the following code:
import * as comp from "./compScript.js";
comp.NamePrinter();
console.log(" Age is: " + comp.age);
comp.printJob();
comp.printNumbers(2);
Then your mainScript.js will look like this:
Similarly, to import all the functions and variables with the export keyword from a file, you can use the asterisk “*” symbol as shown below:
import * as comp from "./compScript.js";
The asterisk symbol “ * ” means that you want to import all the exports of the file under the name “comp”,
To use the function and variables that we just imported, use the dot operator along with the name of the function/variable:
comp.NamePrinter();
If you were to use all the exports from the compScript.js file, then you will use the following code:
import * as comp from "./compScript.js";
comp.NamePrinter();
console.log(" Age is: " + comp.age);
comp.printJob();
comp.printNumbers(2);
Then your mainScript.js will look like this:
 Save the files and refresh the webpage and you will see the output inside the console as
 As you can see, we successfully utilized every export from the compScript.js inside our mainScript.js file.

 Writing 10 lines to print 10 numbers might not seem like that much of a big deal.
However, imagine if you were assigned a task to print a thousand numbers then it would look like a really big task.
Let’s take a look at how we can do this using While Loop:
Writing 10 lines to print 10 numbers might not seem like that much of a big deal.
However, imagine if you were assigned a task to print a thousand numbers then it would look like a really big task.
Let’s take a look at how we can do this using While Loop:
 We have accomplished this task by using only 5 lines.
Even if we wanted to print the first thousand numbers we would have to use these exact 5 lines and change the condition to:
while( i <= 1000)
Now we have a better understanding of how the while loop works, but we still haven’t found a basis on which we will differentiate it from the Do-While loop.
So, for that let’s try and make a code that fails the condition on the very first try.
Like this:
value = false;while(value){
console.log("I am the body of the while loop");}
console.log("end of program");
This program doesn’t give any output to the console because when the while loop checks the condition and decides that the condition is false, therefore, there is no need to go inside the body of the loop, that is why the line inside the loop does not execute and the line outside of the loop executes.
Just like this:
We have accomplished this task by using only 5 lines.
Even if we wanted to print the first thousand numbers we would have to use these exact 5 lines and change the condition to:
while( i <= 1000)
Now we have a better understanding of how the while loop works, but we still haven’t found a basis on which we will differentiate it from the Do-While loop.
So, for that let’s try and make a code that fails the condition on the very first try.
Like this:
value = false;while(value){
console.log("I am the body of the while loop");}
console.log("end of program");
This program doesn’t give any output to the console because when the while loop checks the condition and decides that the condition is false, therefore, there is no need to go inside the body of the loop, that is why the line inside the loop does not execute and the line outside of the loop executes.
Just like this:
 That is it for the while loop, we have a clear understanding of the working of the while loop now.

 The working is, as you can see, pretty similar to the While-loop.
But, let’s differentiate between both of the loops by trying to perform the example we did in the while loop’s section with a condition that is always false:
value=false;do{
console.log("This is inside the body of the Do-while Loop");}while(value);
console.log("This is outside the body of the loop");
The output is as:
The working is, as you can see, pretty similar to the While-loop.
But, let’s differentiate between both of the loops by trying to perform the example we did in the while loop’s section with a condition that is always false:
value=false;do{
console.log("This is inside the body of the Do-while Loop");}while(value);
console.log("This is outside the body of the loop");
The output is as:
 As you can see, we are executing the command which was present inside the body of the loop even though the condition was never true.
That is because of the reason that the Do-while loop executes the body of the first and then checks for the condition, meaning that the code or instructions inside the body are executed once no matter what the condition returns.
As you can see, we are executing the command which was present inside the body of the loop even though the condition was never true.
That is because of the reason that the Do-while loop executes the body of the first and then checks for the condition, meaning that the code or instructions inside the body are executed once no matter what the condition returns.

 Note: This technique essentially removes all of the div’s content and replaces it with new stuff.
Any listeners linked to the child nodes of that div will be lost as a result.
That is why we always concatenate it.
Note: This technique essentially removes all of the div’s content and replaces it with new stuff.
Any listeners linked to the child nodes of that div will be lost as a result.
That is why we always concatenate it.
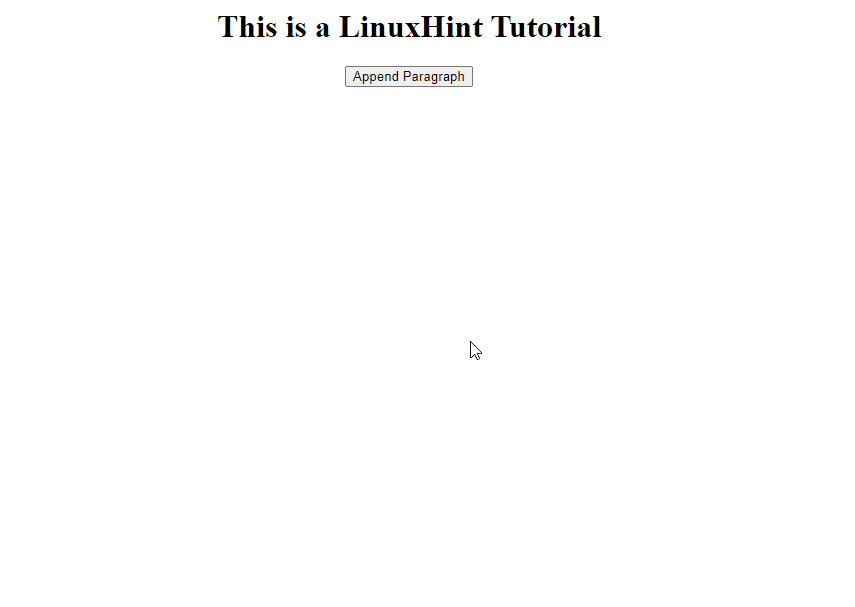 That’s it, you have learned how can we append some HTML code through JavaScript.
 Note: If you want an in-depth guide on how to install NodeJs then you can visit this
  Write some JavaScript code in it.
let
Write some JavaScript code in it.
let  Type the following command:
$ node demo.js
You will see the following output:
Type the following command:
$ node demo.js
You will see the following output:
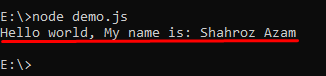 Congratulations you’ve successfully run your first JavaScript file inside the terminal.
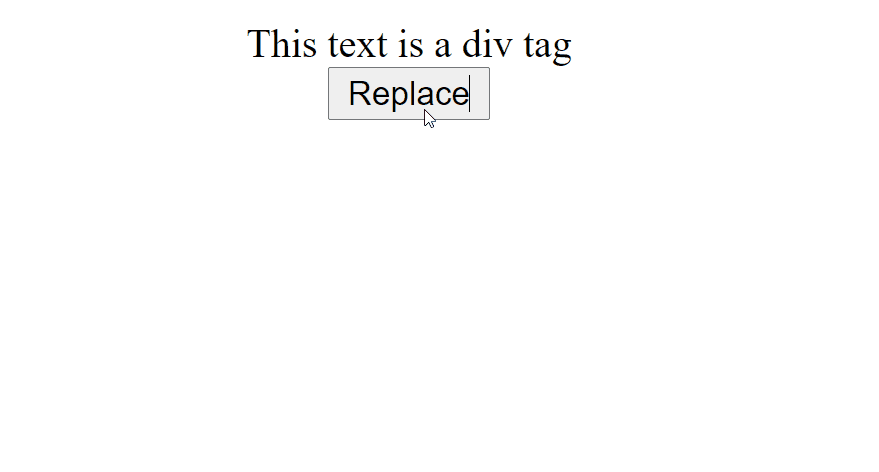 You can witness that the element was successfully replaced.

 Let us now select this file from HTML and see whether we can see the file content or not:
 We have successfully chosen a file and read its content and then printed that content.
 This was a traditional way to open a link in a new tab.
Now we are going to have a look at how we can achieve this by using JavaScript
This was a traditional way to open a link in a new tab.
Now we are going to have a look at how we can achieve this by using JavaScript
 Or if you want to install “Jimp” using Yarn then execute the command:
$ yarn add jimp
Now you are ready to write some code to perform the conversion.
Or if you want to install “Jimp” using Yarn then execute the command:
$ yarn add jimp
Now you are ready to write some code to perform the conversion.
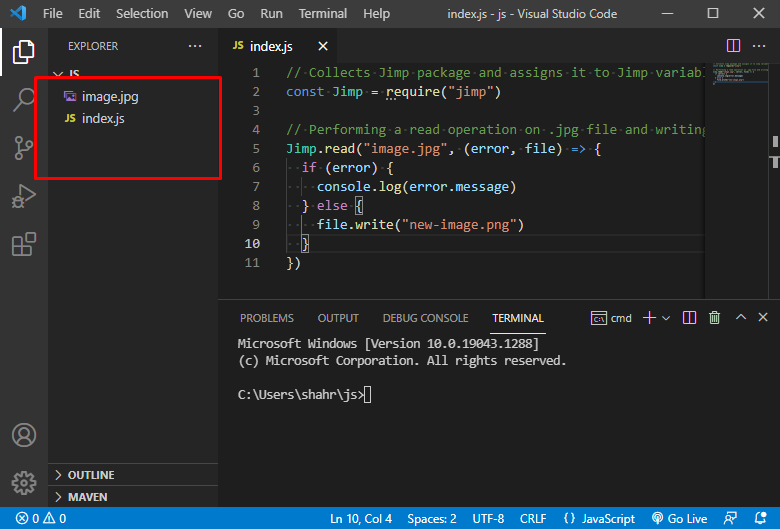 Now when I run the script, this will create a “new-image.png” file in the same directory.
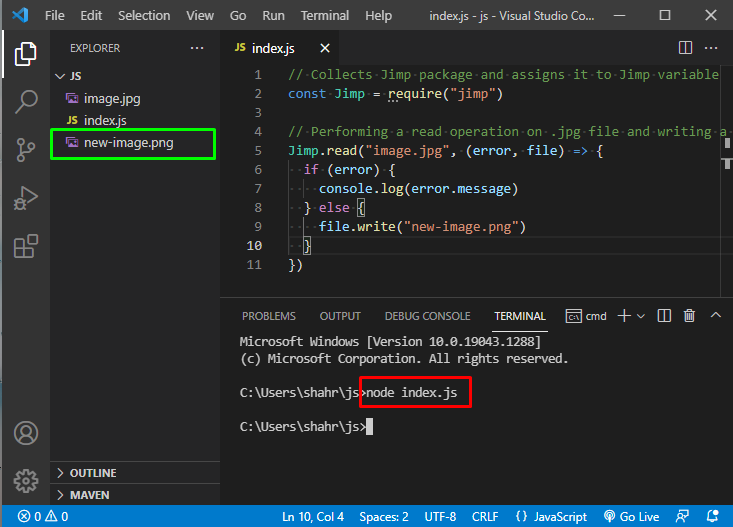 Does that make sense? Cool! Now let’s move to the next part and try to convert a PNG file to JPG file in an example.
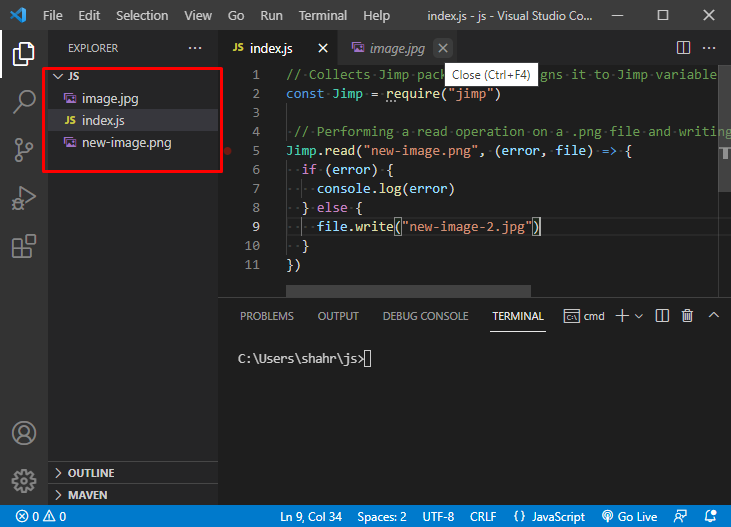 After running the script, Jimp will automatically generate the “new-image-2.jpg” file in the same directory.
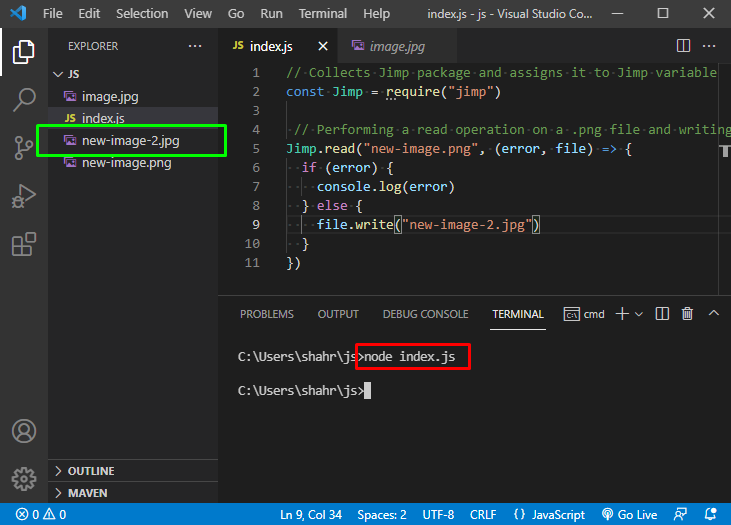
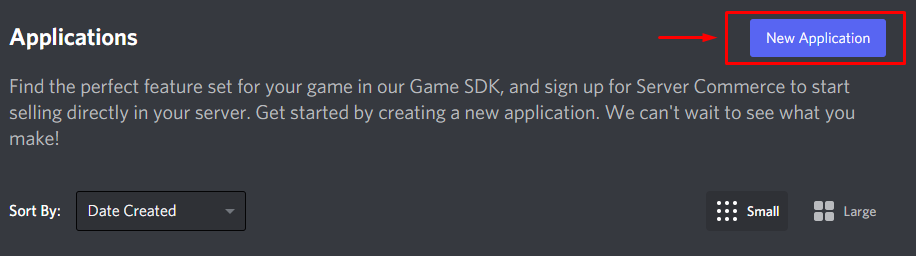 Next, you’ll see a screen where the name of the application would be demanded from you.
For this post, we’ll call out the bot “my-greeter-bot”.
Next, hit on the button that says “Create”.
This will create the Discord API application.
Next, you’ll see a screen where the name of the application would be demanded from you.
For this post, we’ll call out the bot “my-greeter-bot”.
Next, hit on the button that says “Create”.
This will create the Discord API application.
 This will create the bot as an application under the name given by you.
In our tutorial, it is called “my-greeter-bot”.
Now you’ll be able to notice client ID and other information about the bot application.
Like the image below.
This will create the bot as an application under the name given by you.
In our tutorial, it is called “my-greeter-bot”.
Now you’ll be able to notice client ID and other information about the bot application.
Like the image below.
 What we want is to give this bot permission and invite it to our server and get the TOKEN.
For that, click on the “Bot” tab from the left sidebar.
What we want is to give this bot permission and invite it to our server and get the TOKEN.
For that, click on the “Bot” tab from the left sidebar.
 Now click on add Bot on the right side and our bot will be created.
 Once the process has finished creating and setting up the bot on the Discord server, you’ll be able to see its information.
Click on the COPY TOKEN option on the screen, this will copy the authorization token code, now save this code somewhere in a text file or write it down.
Once the process has finished creating and setting up the bot on the Discord server, you’ll be able to see its information.
Click on the COPY TOKEN option on the screen, this will copy the authorization token code, now save this code somewhere in a text file or write it down.
 We will require this code later on in the tutorial to connect our VS Code (or any editor of your choice) to the bot:
 From the permission, listen beneath it, select Send messages, and Read Message History as well.
We’ll have our bot go through messages in the text channel and reply to those messages which meet the criteria determined by us.
From the permission, listen beneath it, select Send messages, and Read Message History as well.
We’ll have our bot go through messages in the text channel and reply to those messages which meet the criteria determined by us.
 Copy the link and open it.
There you’ll see a pop-up box that will ask you about which server to ask the bot into.
Copy the link and open it.
There you’ll see a pop-up box that will ask you about which server to ask the bot into.
 Select your desired server and voila, you have added your custom bot to your desired server.

 And name it as “.env” just like it is shown in the image below.
 Once the file is created what you are going to do now is to add one environment variable called TOKEN to the file like:
TOKEN=my-unique-bot-token
Make sure to replace “my-unique-bot-token” with your bot token.
Once the file is created what you are going to do now is to add one environment variable called TOKEN to the file like:
TOKEN=my-unique-bot-token
Make sure to replace “my-unique-bot-token” with your bot token.
 After this file has been created we can start working on coding our bot now.
Start by requiring “dotenv”, by doing that we are going to be able to use various environment variables, but in our case, it is only going to be the TOKEN variable.
In order to access this variable, the one we have created in the .env, we use the line: const TOKEN = process.env.token ;
And lastly, to link our code to the discord bot which we have just added to our discord server, we use the command
bot.log(TOKEN), the block of code is as:
require('dotenv').config();const Discord = require('Discord.js');const bot = new Discord.Client();const TOKEN = process.env.TOKEN;
bot.login(TOKEN);
The next step is to set up a listener, which only listens for the “ready” Event:
Knowing node.js, we can listen for events.
The ready event automatically launches once we have connected to the bot.
bot.on('ready', () => {
console.info(`Logged in as ${bot.user.tag}!`);});
To test if the bot you are getting connected to or not.
Type the following command in the terminal of the root directory of the project “node index.js”.
You should see something like this.
After this file has been created we can start working on coding our bot now.
Start by requiring “dotenv”, by doing that we are going to be able to use various environment variables, but in our case, it is only going to be the TOKEN variable.
In order to access this variable, the one we have created in the .env, we use the line: const TOKEN = process.env.token ;
And lastly, to link our code to the discord bot which we have just added to our discord server, we use the command
bot.log(TOKEN), the block of code is as:
require('dotenv').config();const Discord = require('Discord.js');const bot = new Discord.Client();const TOKEN = process.env.TOKEN;
bot.login(TOKEN);
The next step is to set up a listener, which only listens for the “ready” Event:
Knowing node.js, we can listen for events.
The ready event automatically launches once we have connected to the bot.
bot.on('ready', () => {
console.info(`Logged in as ${bot.user.tag}!`);});
To test if the bot you are getting connected to or not.
Type the following command in the terminal of the root directory of the project “node index.js”.
You should see something like this.
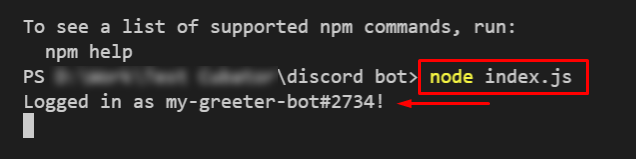
 That’s it.
You have created your first ever Discord bot, which reads and replies to messages.
That’s it.
You have created your first ever Discord bot, which reads and replies to messages.
 The next step is to change the directory to the file we just created which is fileupload.
$ cd fileupload
The next step is to change the directory to the file we just created which is fileupload.
$ cd fileupload
 The next step is to install Axios which is a promise-based HTTP client and will help us in sending the selected file to a server.
To install Axios execute the below given command in the terminal:
$ npm install axios
The next step is to install Axios which is a promise-based HTTP client and will help us in sending the selected file to a server.
To install Axios execute the below given command in the terminal:
$ npm install axios
 Now that we are done with creating the basics of our application and installing Axios let us open the App.js file and modify that file to achieve file uploading in React.js.

 Starting off, we have the simplest thing in this whole list.
To create a TODO-List.
The functionality of this To-Do List is going to be very simple.
It’s going to show the user a list, much like a tabular form with two columns, one for the task and the other one for the checkboxes.
The user will have the option of adding items to the List.
Each item will have a check-box in the list right next to it.
When the user clicks on the check box, it would get marked, and the Item on the list gets a line passing through the text showing that this item has been completed.
Starting off, we have the simplest thing in this whole list.
To create a TODO-List.
The functionality of this To-Do List is going to be very simple.
It’s going to show the user a list, much like a tabular form with two columns, one for the task and the other one for the checkboxes.
The user will have the option of adding items to the List.
Each item will have a check-box in the list right next to it.
When the user clicks on the check box, it would get marked, and the Item on the list gets a line passing through the text showing that this item has been completed.
 The next project is to create a simple JavaScript-based Calculator.
This Calculator should have all the basic math DMAS functions.
The UI of the Calculator should have pressable buttons on it.
And a Screen where every input is displayed and the output of every operation should also be displayed on it.
Also, The calculator should follow the DMAS rules, which stand for division, multiplication, addition, and then lastly subtraction.
The next project is to create a simple JavaScript-based Calculator.
This Calculator should have all the basic math DMAS functions.
The UI of the Calculator should have pressable buttons on it.
And a Screen where every input is displayed and the output of every operation should also be displayed on it.
Also, The calculator should follow the DMAS rules, which stand for division, multiplication, addition, and then lastly subtraction.
 One of my favorite games of childhood, the hangman.
It’s a simple guess for the word game.
The system randomly selects a word and shows some blank dashes equal to the size of the word to the user.
The user has to guess the word under a certain amount of tries or else the user will die in-game.
If the user successfully, the hangman lives to see another day, else He gets hanged on the noose.
One of my favorite games of childhood, the hangman.
It’s a simple guess for the word game.
The system randomly selects a word and shows some blank dashes equal to the size of the word to the user.
The user has to guess the word under a certain amount of tries or else the user will die in-game.
If the user successfully, the hangman lives to see another day, else He gets hanged on the noose.
 Next up the list is a very simple project, ”Weight Conversion Tool”.
The user chooses the unit of weight to convert from and the unit into which the application is going to convert the weight into.
After that, the user is shown an input bar where the user inputs his weight and the converted weight is shown to the user.
Next up the list is a very simple project, ”Weight Conversion Tool”.
The user chooses the unit of weight to convert from and the unit into which the application is going to convert the weight into.
After that, the user is shown an input bar where the user inputs his weight and the converted weight is shown to the user.
 This is when things start to get much more interesting.
You are going to develop graphical tic-tac-toe.
A game for 2 users.
One will be named as player “X”, and the other will be named as player “Y”.
The rules for the game would remain the same as they are in the real world.
Three same signs in any direction would declare the winner.
The winner who wins would be highlighted on the screen.
This is when things start to get much more interesting.
You are going to develop graphical tic-tac-toe.
A game for 2 users.
One will be named as player “X”, and the other will be named as player “Y”.
The rules for the game would remain the same as they are in the real world.
Three same signs in any direction would declare the winner.
The winner who wins would be highlighted on the screen.
 Let’s get familiar with the use of API.
What we are going to do now is develop a very minimalistic whether application.
That would track the location of the user, and depending upon the weather conditions on the outside and the Data from the weather API, it will give us the exactly reading of the weather
Let’s get familiar with the use of API.
What we are going to do now is develop a very minimalistic whether application.
That would track the location of the user, and depending upon the weather conditions on the outside and the Data from the weather API, it will give us the exactly reading of the weather
 As we all know, javascript became famous for its use in building web applications.
Well, the most important aspect of web applications is the validation forms.
So, we need to build a form with all sorts of validation put into it.
These validations should include, verification of a valid email address, 13-digits of a phone number.
Cross-checking passwords and confirming passwords and much more according to your need.
As we all know, javascript became famous for its use in building web applications.
Well, the most important aspect of web applications is the validation forms.
So, we need to build a form with all sorts of validation put into it.
These validations should include, verification of a valid email address, 13-digits of a phone number.
Cross-checking passwords and confirming passwords and much more according to your need.
 The next project would be to bring back another game from the back of our memories into the digital world.
The user has to play against a computer and he will be shown an option to choose what he wants to be put in next turn, Rock, Paper, or maybe scissor.
Meanwhile, the computer would randomly choose any one of the signs and use it in the match.
The winner of the match will high-lighted.
The next project would be to bring back another game from the back of our memories into the digital world.
The user has to play against a computer and he will be shown an option to choose what he wants to be put in next turn, Rock, Paper, or maybe scissor.
Meanwhile, the computer would randomly choose any one of the signs and use it in the match.
The winner of the match will high-lighted.
 The above error was triggered due to the missing “+” operator in the console.log function.
So, you can easily fix this bug by inserting the “+” operator in the console.log function as shown in the example below.
console.log('Generating Random Number: ' +
The above error was triggered due to the missing “+” operator in the console.log function.
So, you can easily fix this bug by inserting the “+” operator in the console.log function as shown in the example below.
console.log('Generating Random Number: ' +  The concatenation of two strings is illustrated in the example shown below.
But the document.write() function doesn’t work as the “+” operator is missing.
Therefore, an error is triggered.
<!DOCTYPE html><html><body><script>
var string1 = 'You are learning ';
var string2 = 'Syntax Error: missing ) after argument list';
document.write(string1 string2);</script></body></html>
Output
The concatenation of two strings is illustrated in the example shown below.
But the document.write() function doesn’t work as the “+” operator is missing.
Therefore, an error is triggered.
<!DOCTYPE html><html><body><script>
var string1 = 'You are learning ';
var string2 = 'Syntax Error: missing ) after argument list';
document.write(string1 string2);</script></body></html>
Output
 Above mentioned error was triggered due to the missing “+” operator in the document.write() function.
So, you can easily fix this bug by inserting the “+” operator in document.write() function as illustrated in the below-mentioned example.
<!DOCTYPE html>
<html>
<body>
<script>
var string1 = 'You are learning ';
var string2 = 'Syntax Error: missing ) after argument list';
document.write(string1 + string2);
</script>
</body>
</html>
Output
Above mentioned error was triggered due to the missing “+” operator in the document.write() function.
So, you can easily fix this bug by inserting the “+” operator in document.write() function as illustrated in the below-mentioned example.
<!DOCTYPE html>
<html>
<body>
<script>
var string1 = 'You are learning ';
var string2 = 'Syntax Error: missing ) after argument list';
document.write(string1 + string2);
</script>
</body>
</html>
Output
 In the example below, we simply concatenate two strings by using the “+” operator but an “invalid or unexpected token” error is triggered.
This error is triggered due to a typo error.
console.log('"Learning" + "missing ) error"");
In the example below, we simply concatenate two strings by using the “+” operator but an “invalid or unexpected token” error is triggered.
This error is triggered due to a typo error.
console.log('"Learning" + "missing ) error"");
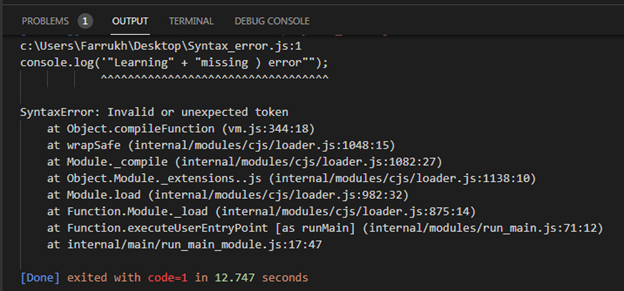 If you want to fix this bug then you have to insert “ ‘ “ as shown in the example below.
console.log('"Learning" + "missing ) error"');
If you want to fix this bug then you have to insert “ ‘ “ as shown in the example below.
console.log('"Learning" + "missing ) error"');

 We can also check whether a value is NaN or not with the help of the global method isNaN():
const output = 10+0/0;
console.log(isNaN(output)); // true
We can also check whether a value is NaN or not with the help of the global method isNaN():
const output = 10+0/0;
console.log(isNaN(output)); // true


 If you are converting a string to a number then NaN will be returned hence in short we can say that parsing fails when one converts a string to a number:
const myString = 'Hello!';const myNumber = parseInt(myString);
console.log(myNumber); // NaN
If you are converting a string to a number then NaN will be returned hence in short we can say that parsing fails when one converts a string to a number:
const myString = 'Hello!';const myNumber = parseInt(myString);
console.log(myNumber); // NaN
 In a+b, a and b are operands, and + is operator hence when you use undefined in place of an operand and performs some operation then NaN will be returned:
console.log(undefined + 3); // NaN
In a+b, a and b are operands, and + is operator hence when you use undefined in place of an operand and performs some operation then NaN will be returned:
console.log(undefined + 3); // NaN
 When you use string as an operand in any math operation it will also return NaN:
console.log(("myString"/3)); // NaN
When you use string as an operand in any math operation it will also return NaN:
console.log(("myString"/3)); // NaN
 When you give invalid arguments to a math function, it will also return NaN for example:
console.log(
When you give invalid arguments to a math function, it will also return NaN for example:
console.log(

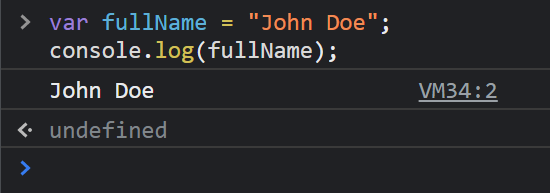
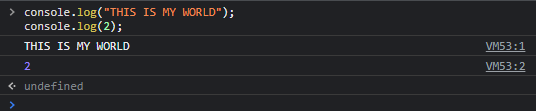 Using an Array: Next up, it would be an example using an array of String objects.
var arr = ["Cricket", "Hockey", "Badminton", "Squash", "Tennis"];
console.log(arr);
Output
The output can be seen in the image below:
Using an Array: Next up, it would be an example using an array of String objects.
var arr = ["Cricket", "Hockey", "Badminton", "Squash", "Tennis"];
console.log(arr);
Output
The output can be seen in the image below:
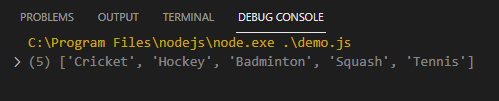 Using an object: Now that we have used a simple numeric value, a string, and even an array of strings, it’s time to move on to Objects.
var myObj = { firstname : "John", lastname : "Doe" };
console.log(myObj);
Output
The output of using the console.log() with an object as its parameter is as follows:
Using an object: Now that we have used a simple numeric value, a string, and even an array of strings, it’s time to move on to Objects.
var myObj = { firstname : "John", lastname : "Doe" };
console.log(myObj);
Output
The output of using the console.log() with an object as its parameter is as follows:

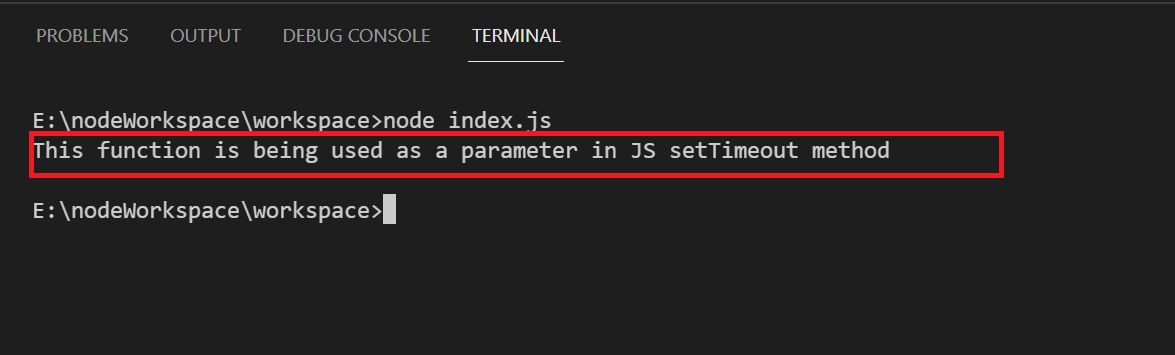
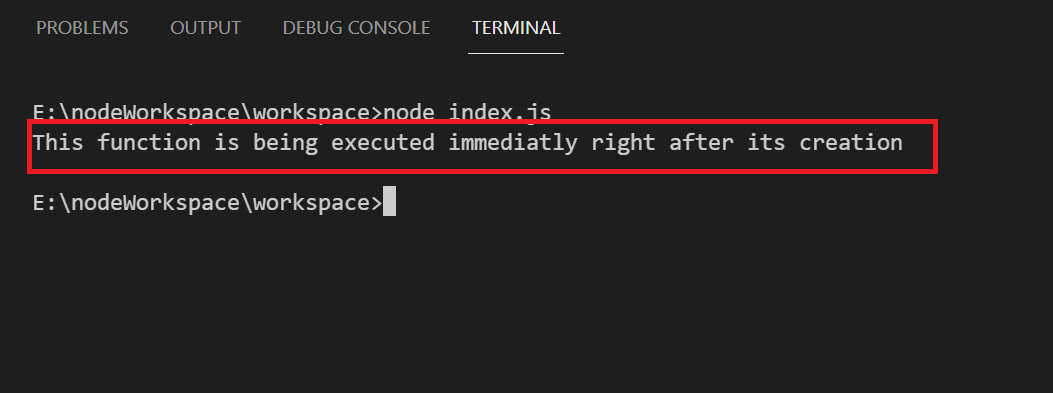 So in the above example, the function is getting executed right after its creation.
The syntax is simple: you can simply declare the anonymous function and make it execute by just calling it using the parenthesis at the end of the function.
Here is how you can do this below:
let obj = {'name': 'John Doe','age': 22,'address': 'xyz'};(function() {
console.log('My name is ', obj.name, ' and my age is', obj.age, ' and I live in ', obj.address);})(obj);
Output
So in the above example, the function is getting executed right after its creation.
The syntax is simple: you can simply declare the anonymous function and make it execute by just calling it using the parenthesis at the end of the function.
Here is how you can do this below:
let obj = {'name': 'John Doe','age': 22,'address': 'xyz'};(function() {
console.log('My name is ', obj.name, ' and my age is', obj.age, ' and I live in ', obj.address);})(obj);
Output
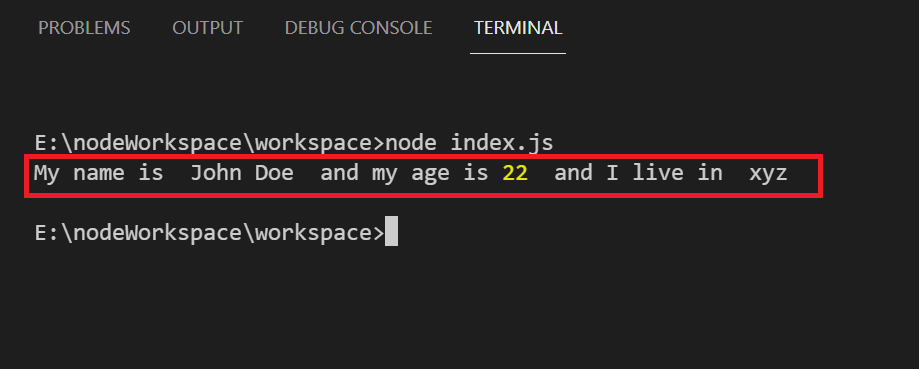 You can simply pass the parameters inside the immediate execution of the anonymous function as we have seen in the above example.

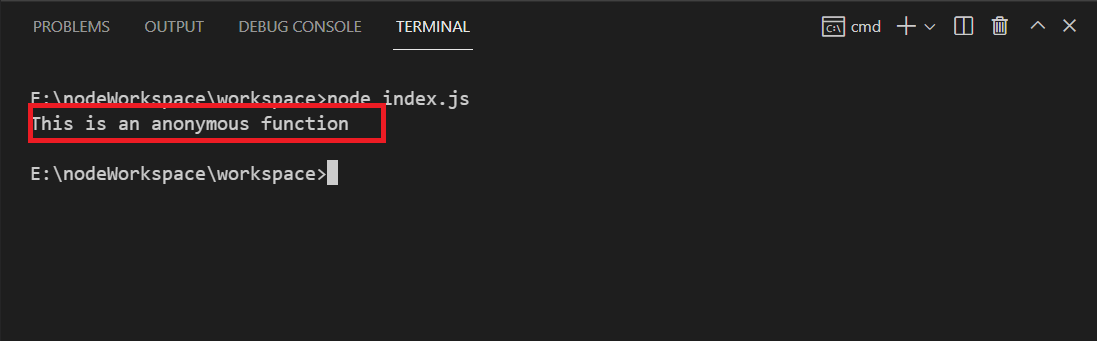 So if you take a look at the above example, you will find out that there’s no name between the function keyword and parentheses which is making it completely Anonymous but why we are assigning this anonymous function to an AnonymousFunc variable is because we want this function to be callable later.
 Let us now explore other areas where we can apply the modulo operators so we can get a grip on how to use the modulo operator.


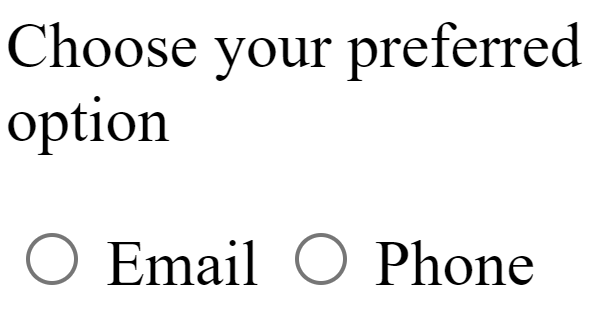 We can also see that only one radio button can be selected at any given time.
Before going towards the JavaScript part, let us initiate a submit in HTML as well so that we can later listen for events on this button.
<body>
<p>Choose your preferred option</p>
<input type="radio" name="contact" value="email"/>
<label for="email">Email</label>
<input type="radio" name="contact" value="phone"/>
<label for="phone">Phone</label>
<button onclick="handleClick()">Submit</button>
<script src="code.js"></script>
</body>
We initiated a button and gave it an onclick event so that when the user clicks on the submit button, the handleClick() function will start executing.
In the end, we referenced our JavaScript filename with the help of script tag and using the src attribute passed the file name which is code.js.
We can also see that only one radio button can be selected at any given time.
Before going towards the JavaScript part, let us initiate a submit in HTML as well so that we can later listen for events on this button.
<body>
<p>Choose your preferred option</p>
<input type="radio" name="contact" value="email"/>
<label for="email">Email</label>
<input type="radio" name="contact" value="phone"/>
<label for="phone">Phone</label>
<button onclick="handleClick()">Submit</button>
<script src="code.js"></script>
</body>
We initiated a button and gave it an onclick event so that when the user clicks on the submit button, the handleClick() function will start executing.
In the end, we referenced our JavaScript filename with the help of script tag and using the src attribute passed the file name which is code.js.

 We can see in the above output that when we didn’t select a radio button the alert showed us the message that Please Select an option.
However, when we select the Email radio button, we see the value of email and when we select the Phone radio button then we see the value of the phone.
We can see in the above output that when we didn’t select a radio button the alert showed us the message that Please Select an option.
However, when we select the Email radio button, we see the value of email and when we select the Phone radio button then we see the value of the phone.
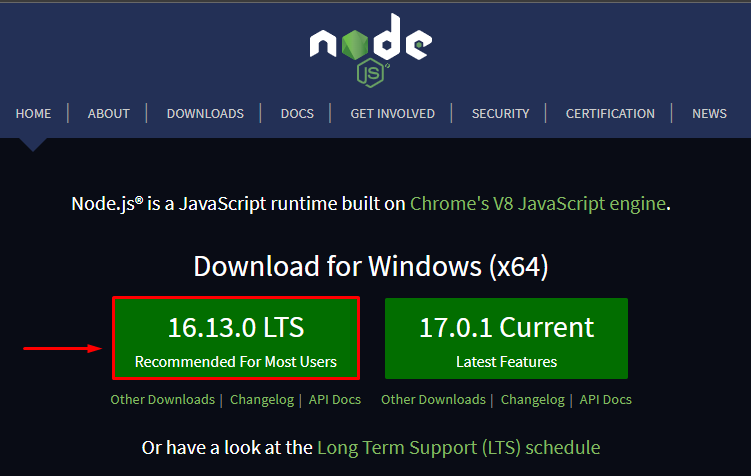
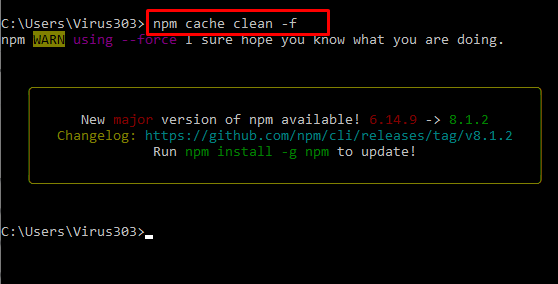 Then you may install the most recent version of Node: n stable or To install, choose one of the following versions: n [version-number] – the version number might be anything from 614.9 to v8.1.2.
 for installing a specific version of the node you can type the following command
$ nvm install <version-number>
Here the version-number is the version of the node which you will be installing particularly.
for example
$ nvm install 12.18.2
output
for installing a specific version of the node you can type the following command
$ nvm install <version-number>
Here the version-number is the version of the node which you will be installing particularly.
for example
$ nvm install 12.18.2
output
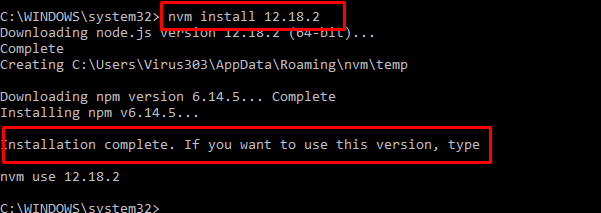 Similarly you can downgrade your node version to the specific version you want by just typing the version number in the above described command and that’s it.


 Click the button and see if it is actually creating the link for us or not.
 Here in the above screen, you can see that after clicking the button, the link was created successfully and displayed on our webpage.
This link has given up with the address of linuxhint.com which means if you click on it you will be directed to linuxhint.com.
Here in the above screen, you can see that after clicking the button, the link was created successfully and displayed on our webpage.
This link has given up with the address of linuxhint.com which means if you click on it you will be directed to linuxhint.com.
 Remember that we have appended the link in our JavaScript code that’s why it is appearing below everything.
So now if you want to prepend the link to the top of some HTML element or at the top of the page then simply prepend the anchor tag instead of appending it to the body to achieve this objective.
Prepend the <a> tagThe only change that we need is to use “document.body.prepend” instead of “document.body.append” to prepend the anchor tag to the top of the page above every element.
document.body.prepend(anchor);
Output
Remember that we have appended the link in our JavaScript code that’s why it is appearing below everything.
So now if you want to prepend the link to the top of some HTML element or at the top of the page then simply prepend the anchor tag instead of appending it to the body to achieve this objective.
Prepend the <a> tagThe only change that we need is to use “document.body.prepend” instead of “document.body.append” to prepend the anchor tag to the top of the page above every element.
document.body.prepend(anchor);
Output
 As you can see above, the link was prepended on top of every HTML element and is clickable with the address attached to it.
 After entering the values we will see the following results:
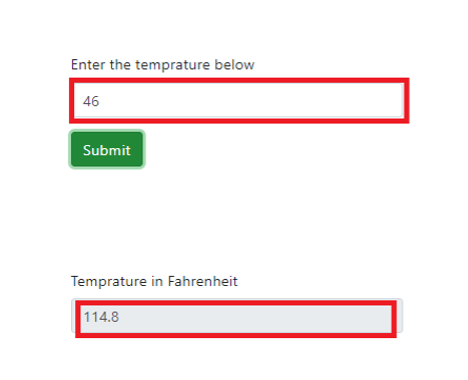


 We can see that when we are clicking the button, repeatedly we don’t see any output.
However, when we clicked the button last time and left it, we saw the alert message after two seconds.
Hence, we can conclude that every click calls the debounce function and resets the timer delaying the call.
We can see that when we are clicking the button, repeatedly we don’t see any output.
However, when we clicked the button last time and left it, we saw the alert message after two seconds.
Hence, we can conclude that every click calls the debounce function and resets the timer delaying the call.
 Hence to solve this problem, in this post, we will learn a couple of ways to compare two arrays.
 From the above output, we can see that “array1” is equal to “array2” but “array1” is not equal to “array3”.
 If we change the code a little bit by providing two arrays that are equal e.g:
function compareArrays() {
const array1 = [1, 2, 3];
const array2 = [1, 2, 3];
// Check length of both arrays
// if length not equal then arrays are different
if(array1.length!=array2.length)
return "False";
else {
// check every element of the two arrays
for(var i=0;i<array1.length;i++)
if(array1[i]!=array2[i])
return "False";
return "True";
}}
console.log(compareArrays()); // true
The following output will be generated:
If we change the code a little bit by providing two arrays that are equal e.g:
function compareArrays() {
const array1 = [1, 2, 3];
const array2 = [1, 2, 3];
// Check length of both arrays
// if length not equal then arrays are different
if(array1.length!=array2.length)
return "False";
else {
// check every element of the two arrays
for(var i=0;i<array1.length;i++)
if(array1[i]!=array2[i])
return "False";
return "True";
}}
console.log(compareArrays()); // true
The following output will be generated:

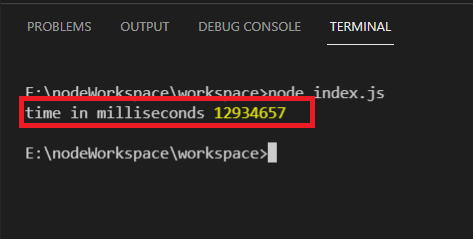 Now, the result is in milliseconds and we must convert this result to days.
The formula for converting milliseconds into the days is:
(1000 milliseconds * (60 seconds * 60 minutes) * 24 hours)
let TotalDays = Math.ceil(difference / (1000 * 3600 * 24));
console.log(TotalDays + ' days to world Cup');
This will calculate the days between the given two dates.
Now, the result is in milliseconds and we must convert this result to days.
The formula for converting milliseconds into the days is:
(1000 milliseconds * (60 seconds * 60 minutes) * 24 hours)
let TotalDays = Math.ceil(difference / (1000 * 3600 * 24));
console.log(TotalDays + ' days to world Cup');
This will calculate the days between the given two dates.
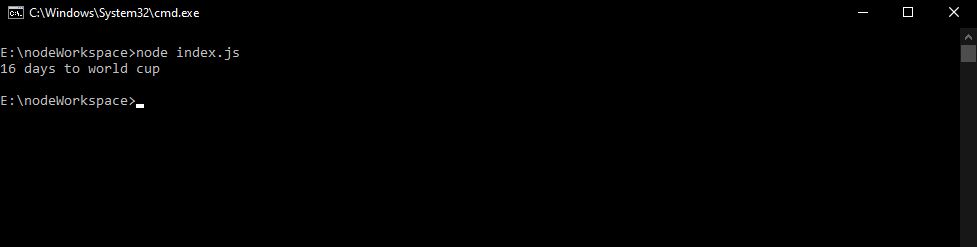


 There are various frameworks out there to improve website responsiveness, however, Bootstrap is the most extensively utilized in client-side web development.
Popular web applications developed in bootstrap are given below:
Paypal
Lyft
Apple Maps Connect
Whatsapp
Vogue Magazine
There are various frameworks out there to improve website responsiveness, however, Bootstrap is the most extensively utilized in client-side web development.
Popular web applications developed in bootstrap are given below:
Paypal
Lyft
Apple Maps Connect
Whatsapp
Vogue Magazine
 When you click the blue button, downloading will start:
 Once your download is finished, click on the downloaded file shown in the above screenshot.
Once done, you will see a window pop up which is a License agreement for Visual Studio Code.
Select the “I accept the agreement” option and then click on the Next button:
Once your download is finished, click on the downloaded file shown in the above screenshot.
Once done, you will see a window pop up which is a License agreement for Visual Studio Code.
Select the “I accept the agreement” option and then click on the Next button:
 The next window that will pop up will be for selecting additional tasks.
Select all the options you need and then click on Next button:
The next window that will pop up will be for selecting additional tasks.
Select all the options you need and then click on Next button:
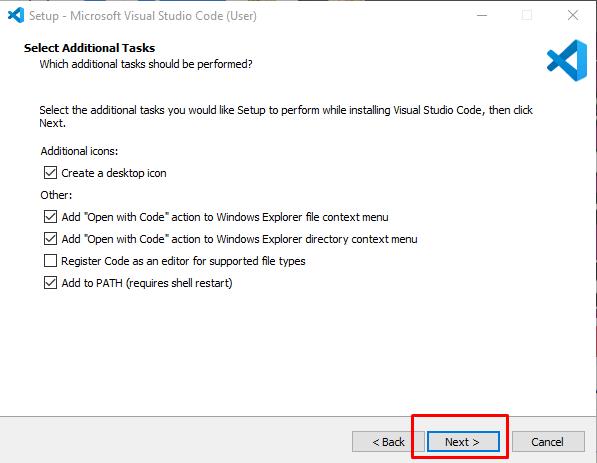 Once you click the Next button, the Ready to Install window will show up where you have to click on the Install button:
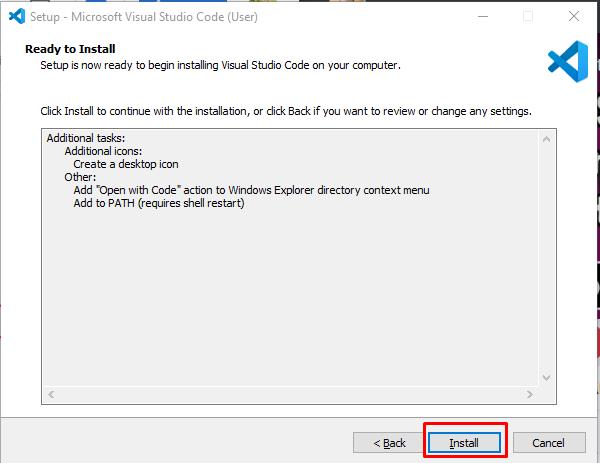 The installation will now start:
 Once the installation is complete click on the finish button and your Visual Studio Code will launch.
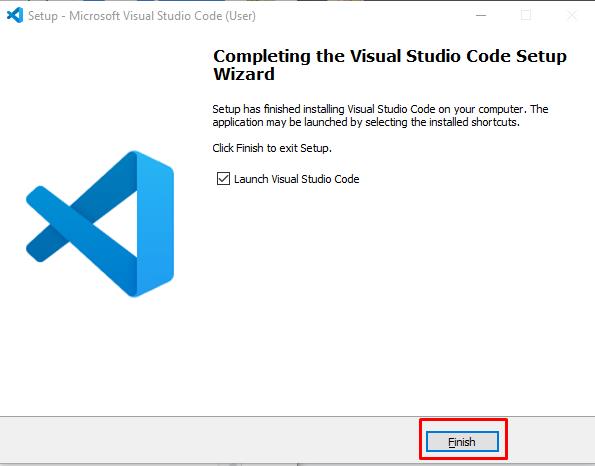
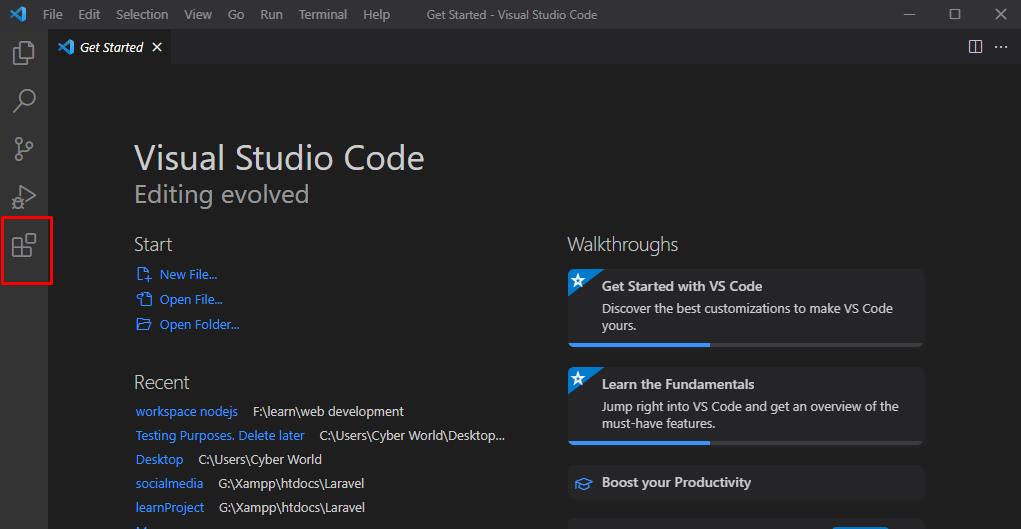 Once you click the extension’s icon, search for the desired extension you want to install.
 Let’s install the LiveServer extension which is very useful as it has the automatic live reload feature.
We don’t need to save our file, it will automatically save and show the output on our browser whenever we make changes to our code.
Search the Live Server in the extension tab and click on the below-mentioned icon:
Let’s install the LiveServer extension which is very useful as it has the automatic live reload feature.
We don’t need to save our file, it will automatically save and show the output on our browser whenever we make changes to our code.
Search the Live Server in the extension tab and click on the below-mentioned icon:
 Once you click on the Live Server, you will see the install option on the right-hand side.
Click on the install button to install Live Server:
Once you click on the Live Server, you will see the install option on the right-hand side.
Click on the install button to install Live Server:
 Once you click on the install button, your Live Server will install:
 Another extension we can install in our Visual Studio Code is the JavaScript (ES6) code snippet which is very useful as this extension comes in numerous built-in code snippets.
The procedure for installing ES6 code snippets is the same as installing the Live Server extension.
Another extension we can install in our Visual Studio Code is the JavaScript (ES6) code snippet which is very useful as this extension comes in numerous built-in code snippets.
The procedure for installing ES6 code snippets is the same as installing the Live Server extension.
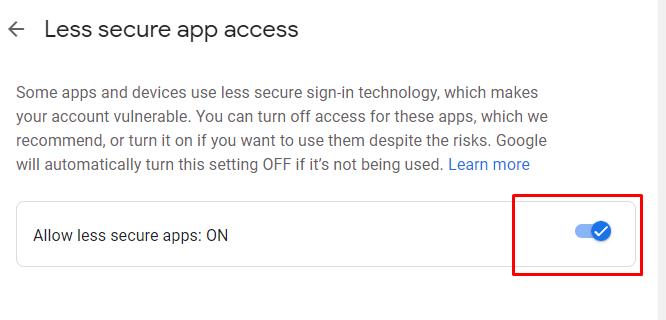
 In the end, we used the script tag to include SMTP protocol and then another script tag to reference the JavaScript file(code.js) that has the function sendMail().
JavaScript:, we initiated the sendMail() function and then stored all the values of the input fields defined in HTML.
We achieve this task by referencing the input fields with the name they were given earlier in HTML.
After getting all the values, we will send the email using these values.
If the process of sending an email is successful we will see an alert of Email Sent Successfully.
function sendMail() {
//getting values from input fields
var sender=Form.sender.value;
var password=Form.password.value;
var receiver=Form.reciever.value;
var content=Form.content.value;
//Sending email
Email.send({
Host: "smtp.gmail.com",
Username: sender,
Password:password,
To: receiver,
From: sender,
Subject: "Check Email Sending",
Body: content,
}).then(function (message) {
alert("Email sent successfully")
});}
Fill all the required credentials and then click on the Send Email button:
In the end, we used the script tag to include SMTP protocol and then another script tag to reference the JavaScript file(code.js) that has the function sendMail().
JavaScript:, we initiated the sendMail() function and then stored all the values of the input fields defined in HTML.
We achieve this task by referencing the input fields with the name they were given earlier in HTML.
After getting all the values, we will send the email using these values.
If the process of sending an email is successful we will see an alert of Email Sent Successfully.
function sendMail() {
//getting values from input fields
var sender=Form.sender.value;
var password=Form.password.value;
var receiver=Form.reciever.value;
var content=Form.content.value;
//Sending email
Email.send({
Host: "smtp.gmail.com",
Username: sender,
Password:password,
To: receiver,
From: sender,
Subject: "Check Email Sending",
Body: content,
}).then(function (message) {
alert("Email sent successfully")
});}
Fill all the required credentials and then click on the Send Email button:
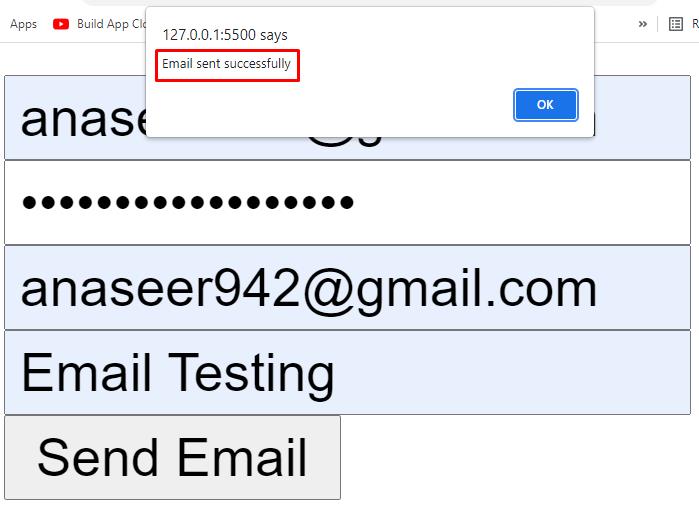 Now go to your Gmail account and you will see that you have received an Email:

 It returns an array of all matches of “ello” in the string variable.
Also, “g” in the code is a flag that tells the method to search for all possible matches in the string and to not stop at the first match.
It returns an array of all matches of “ello” in the string variable.
Also, “g” in the code is a flag that tells the method to search for all possible matches in the string and to not stop at the first match.
 The next example is without the use of a global flag:
Code
var string = "Hello World!! hello!";
console.log(string.match(/ello/));
Output
The next example is without the use of a global flag:
Code
var string = "Hello World!! hello!";
console.log(string.match(/ello/));
Output
 Even though there are two matching strings against the regular expression “/ello/”, the .match() method only stops at the first match.
The next is using the case-insensitivity flag “i”.
This flag ignores the case sensitivity of the string and tries to find the match by considering the whole string and the regex in the lower case.
var string = "Hello World!! HELLO! HELLO";
console.log(string.match(/ello/gi));
Output
Even though there are two matching strings against the regular expression “/ello/”, the .match() method only stops at the first match.
The next is using the case-insensitivity flag “i”.
This flag ignores the case sensitivity of the string and tries to find the match by considering the whole string and the regex in the lower case.
var string = "Hello World!! HELLO! HELLO";
console.log(string.match(/ello/gi));
Output
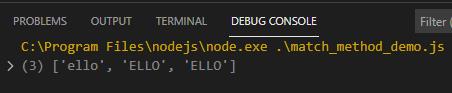 In the array which is returned by the .match() method.
We can see that it contains both lowercase and upper case strings that matched the regex.
In the array which is returned by the .match() method.
We can see that it contains both lowercase and upper case strings that matched the regex.
 Well, the main reason for using the .matchAll() method can easily be seen.
We can see this from the output that it is to used for the improved access to capture groups
Well, the main reason for using the .matchAll() method can easily be seen.
We can see this from the output that it is to used for the improved access to capture groups
 We can also execute JavaScript code within the PHP tags by making the script tag and whatever is inside the script tag as a string and then we will send it to the client browser which will execute it.
The following code demonstrates this:
<!DOCTYPE html><html lang="en"><head>
<meta charset="UTF-8">
<meta http-equiv="X-UA-Compatible" content="IE=edge">
<meta name="viewport" content="width=device-width, initial-scale=1.0">
<title>JS and PHP</title>
<?php
echo '<script type="text/javascript">
alert("Execute Javascript Code");
</script>';
?></head><body></body></html>
We can also execute JavaScript code within the PHP tags by making the script tag and whatever is inside the script tag as a string and then we will send it to the client browser which will execute it.
The following code demonstrates this:
<!DOCTYPE html><html lang="en"><head>
<meta charset="UTF-8">
<meta http-equiv="X-UA-Compatible" content="IE=edge">
<meta name="viewport" content="width=device-width, initial-scale=1.0">
<title>JS and PHP</title>
<?php
echo '<script type="text/javascript">
alert("Execute Javascript Code");
</script>';
?></head><body></body></html>

 You can see we are encountering node is not recognized as an internal or external command error.
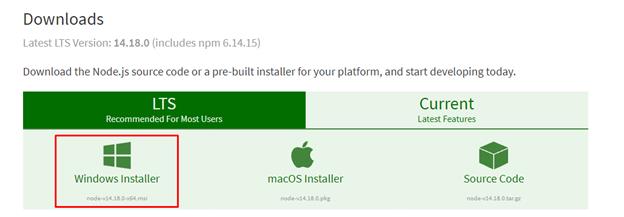 Your Node.js installer will start downloading and once the downloading finishes, navigate to your downloads folder and click on the Node.js installer.
Keep on clicking the Next button until your Node.js gets successfully installed.
Your Node.js installer will start downloading and once the downloading finishes, navigate to your downloads folder and click on the Node.js installer.
Keep on clicking the Next button until your Node.js gets successfully installed.
 To verify installation open cmd on your system and execute the below command:
$ node -v
To verify installation open cmd on your system and execute the below command:
$ node -v

 Click on the edit system environment variables, a window will open where you have to click on Environment Variables.
 The Environment Variables window will open where you have to select or double click on the variable Path.
 Now paste the complete path where Node.js was installed.
Click on ok and restart your system.
Now paste the complete path where Node.js was installed.
Click on ok and restart your system.
 You can find the path of Node.js by searching node in the search bar located at the left bottom corner of windows 10.
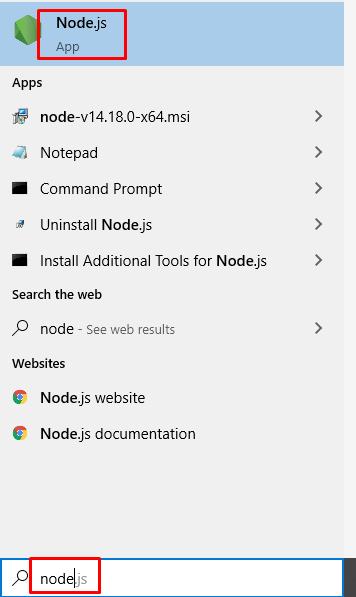 You’ll see the node application, right-click on the node application and then click on an open file location.
 The file location of Node.js will open and you have to copy the path shown in the below screenshot:
 Once done, open the command prompt and execute the below-mentioned command again:
$ node -v
Once done, open the command prompt and execute the below-mentioned command again:
$ node -v
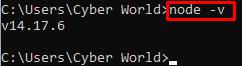 You will see the Node.js version installed on your system and the error has been terminated.
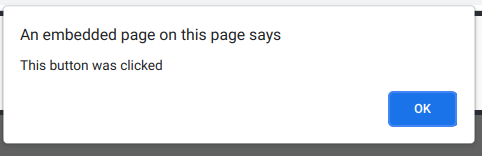 So with the above example, once the button was clicked, it’s going to trigger the event attached to it and remove that event after disabling the button to avoid multiple clicks at the same time from the user.
That’s how you get rid of JavaScript event listeners from HTML elements.
For removing an event listener from an HTML element, you need to take care of the two things, you have to define the type of the event and the second thing is that you need to provide the reference function that is attached to the event listener.
So with the above example, once the button was clicked, it’s going to trigger the event attached to it and remove that event after disabling the button to avoid multiple clicks at the same time from the user.
That’s how you get rid of JavaScript event listeners from HTML elements.
For removing an event listener from an HTML element, you need to take care of the two things, you have to define the type of the event and the second thing is that you need to provide the reference function that is attached to the event listener.
 Now suppose you have added two-three characters by mistake hence we can also remove a string from a string using the replace method in the same manner:
var myStr = 'Hello wy Nas';
console.log("original string:",myStr); // Hello wy Nasvar newStr = myStr.replace('wy', '');
console.log('After string removed: ', newStr); // Hello Nas
Now suppose you have added two-three characters by mistake hence we can also remove a string from a string using the replace method in the same manner:
var myStr = 'Hello wy Nas';
console.log("original string:",myStr); // Hello wy Nasvar newStr = myStr.replace('wy', '');
console.log('After string removed: ', newStr); // Hello Nas
 Now that we know how to remove a character or a string from a specified string, let us use the replace() method with regular expressions.
In the previous examples, the drawback of the replace method was that it only removed the first occurrence of the specified string or character in the original string.
To overcome this drawback, we use the regular expression from which we can remove every instance of a specified character or string.
var myStr = 'I have two blue shirts and two blue caps';
console.log("original string:",myStr);var newStr = myStr.replace(/blue/g, '');
console.log('After character removed: ', newStr);
We used the /blue/g which means it will remove every instance of blue in the myStr string:
Now that we know how to remove a character or a string from a specified string, let us use the replace() method with regular expressions.
In the previous examples, the drawback of the replace method was that it only removed the first occurrence of the specified string or character in the original string.
To overcome this drawback, we use the regular expression from which we can remove every instance of a specified character or string.
var myStr = 'I have two blue shirts and two blue caps';
console.log("original string:",myStr);var newStr = myStr.replace(/blue/g, '');
console.log('After character removed: ', newStr);
We used the /blue/g which means it will remove every instance of blue in the myStr string:
 JavaScript had no concept of input\output, as it was not a normal programming language, it was created to be a “Scripting Language”, a language only capable of running various scripts.
Despite how it started, JavaScript is now a globally used language that has almost everything in it.
If there is something that JavaScript is lacking, there is either a package of JS that is completing that void or the package is under development.
According to wiki: around 97% of the websites available on the internet use Javascript in some form.
You can read more about JS on the wiki by clicking
JavaScript had no concept of input\output, as it was not a normal programming language, it was created to be a “Scripting Language”, a language only capable of running various scripts.
Despite how it started, JavaScript is now a globally used language that has almost everything in it.
If there is something that JavaScript is lacking, there is either a package of JS that is completing that void or the package is under development.
According to wiki: around 97% of the websites available on the internet use Javascript in some form.
You can read more about JS on the wiki by clicking  To answer the question – “Why do you need to practice JavaScript?” – To put it simply, even if you are starting your programming journey with JavaScript or even if you are already a JavaScript pro, you have to keep practicing or else you will lose the touch.
 You can get started with JavaScript, by going to linuxhint’s extensive library of articles on javascript, by clicking
  and if there is anything that you want to know about, which belongs to JavaScript in general you can always check out the official docs at the Mozilla developer network web docs (or MDN Web Docs)
 Also, you might want to get these things set up.:
Online Editor \ Browser’s console: If you are just starting out then use
Also, you might want to get these things set up.:
Online Editor \ Browser’s console: If you are just starting out then use  If that is your case, then you should focus on certain programming concepts and practices, which will help you grow as a programmer when working as a full-time developer at a professional firm.
These concepts and practices include the following:
OOP: By far the most widely used programming concept is Object-Oriented Programming, read more information about
If that is your case, then you should focus on certain programming concepts and practices, which will help you grow as a programmer when working as a full-time developer at a professional firm.
These concepts and practices include the following:
OOP: By far the most widely used programming concept is Object-Oriented Programming, read more information about  Also, there is also one fact that you can never argue with, and that fact is “No one is perfect”, and if no one is perfect then how can their code be perfect as well.
So, one really good practice to become a pro at JavaScript is to revisit your old code and be very critical of it.
And, once you notice your silly mistakes, then improve that code.
One major step, for being up-to-date with new packages for JavaScript or even new features of JavaScript itself, is to join JavaScript communities, Join discord servers, and by taking part forums.
Also, there is also one fact that you can never argue with, and that fact is “No one is perfect”, and if no one is perfect then how can their code be perfect as well.
So, one really good practice to become a pro at JavaScript is to revisit your old code and be very critical of it.
And, once you notice your silly mistakes, then improve that code.
One major step, for being up-to-date with new packages for JavaScript or even new features of JavaScript itself, is to join JavaScript communities, Join discord servers, and by taking part forums.
 So, explore more and more frameworks, and choose the field that you want to jump into.
It can be web-app development, perhaps only iOS development, or even server-side development.
Once you know, which field do you want to conquer, then you can bee-line your focus on only those frameworks that help you become a pro in that specific field.
So, explore more and more frameworks, and choose the field that you want to jump into.
It can be web-app development, perhaps only iOS development, or even server-side development.
Once you know, which field do you want to conquer, then you can bee-line your focus on only those frameworks that help you become a pro in that specific field.
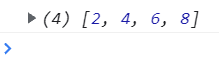 Let us see some other examples of the map() method.
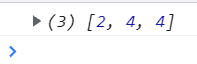
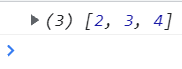


 If you want to use an object containing the current date and time then you have to format it accordingly through several Date methods of JavaScript.
Run the below-mentioned code if you want to get the current date with a specific format.
const date_obj = new Date();const current_date = date_obj.getDate();
console.log("Current Date" + ":" + current_date);const current_month = date_obj.getMonth();
console.log("Current Month" + ":" + current_month);const current_year = date_obj.getFullYear();
console.log("Current Year" + ":" + current_year);return console.log(current_date + '/' + (current_month + 1) + '/' + current_year);
Output
If you want to use an object containing the current date and time then you have to format it accordingly through several Date methods of JavaScript.
Run the below-mentioned code if you want to get the current date with a specific format.
const date_obj = new Date();const current_date = date_obj.getDate();
console.log("Current Date" + ":" + current_date);const current_month = date_obj.getMonth();
console.log("Current Month" + ":" + current_month);const current_year = date_obj.getFullYear();
console.log("Current Year" + ":" + current_year);return console.log(current_date + '/' + (current_month + 1) + '/' + current_year);
Output
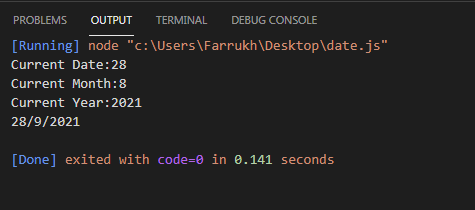 Formatting a date according to your time zone is a way much easier task.
Moreover, if you want to display distinct time zones for several countries on a web application then you need to do some calculations and convert local time accordingly.
For instance, we have to implement functionality that gives an alert after every 16 hours according to a particular time zone.
For this, below mentioned steps should be followed.
Formatting a date according to your time zone is a way much easier task.
Moreover, if you want to display distinct time zones for several countries on a web application then you need to do some calculations and convert local time accordingly.
For instance, we have to implement functionality that gives an alert after every 16 hours according to a particular time zone.
For this, below mentioned steps should be followed.
 Here is the output of Singapore’s local time.
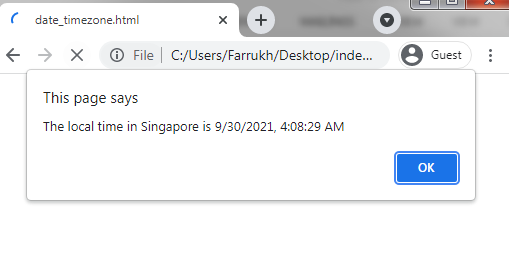 Here is the output of London’s local time.
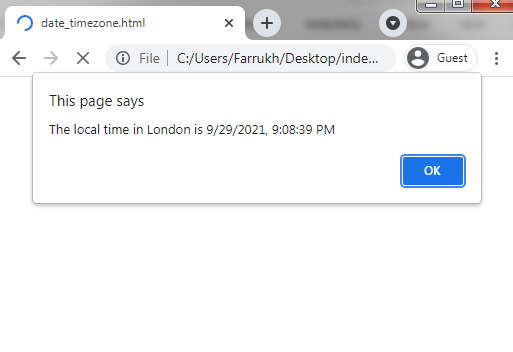
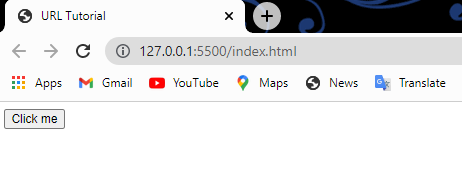 When we click on the button, an alert pops up which displays the URL of the current webpage:
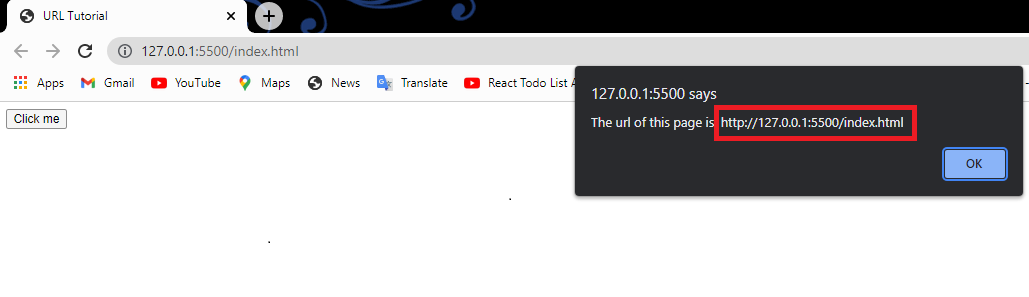 Here you can see that we have used window.location.href inside the code to get the URL of the webpage and return it into the browser as an alert.
So whenever you click on the ‘’Click me’’ button you will see an alert on the screen with the message containing the URL of the current webpage.
Here you can see that we have used window.location.href inside the code to get the URL of the webpage and return it into the browser as an alert.
So whenever you click on the ‘’Click me’’ button you will see an alert on the screen with the message containing the URL of the current webpage.
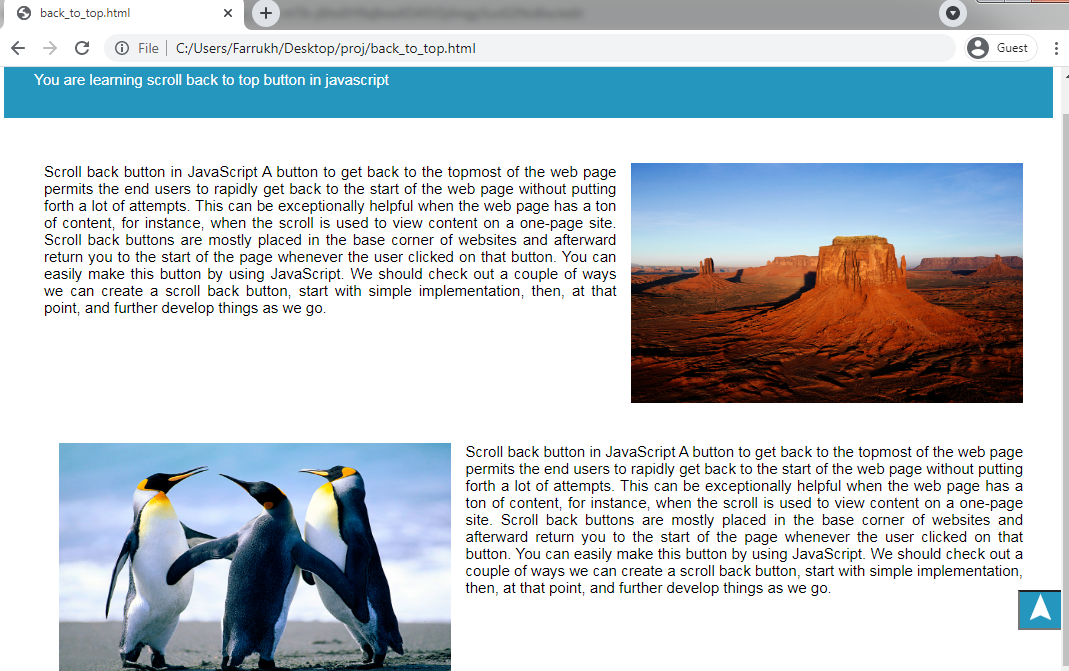

 We entered the text copy to clipboard article in the input field and now we will click on the copy button.
We will see an alert showing the copied text:
We entered the text copy to clipboard article in the input field and now we will click on the copy button.
We will see an alert showing the copied text:
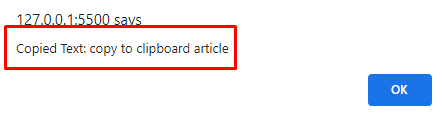 Go to a new window or a word file and press CTRL+V which will paste the copy to the clipboard article in that window.

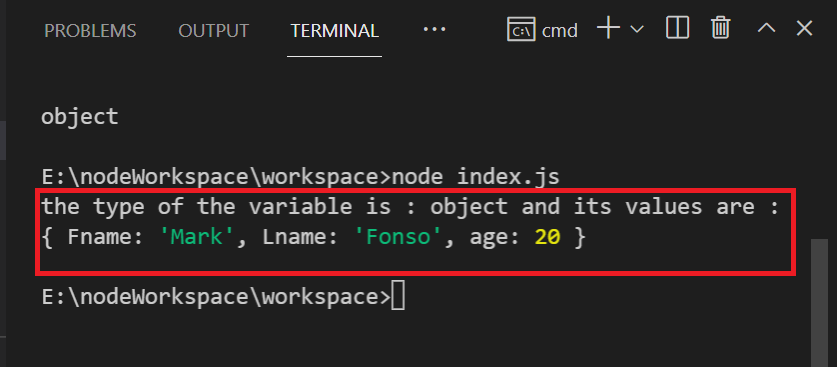 Here you can see that the type of object is Object as I said that there is no traditional data type called object hence JavaScript objects are treated as objects in some cases.
Let’s take another example of creating a new Object in below example
Example
let expObject = {
firstName : "John Doe",
"Ten": 10,
10: "Any Integer",
"experience": 0};
console.log('Type: ',typeof(expObject), '\n','Values: ', expObject)
Here in the above example, we have created and initialized a new object with the name expObject and console logged it into the terminal while checking its data type and displaying the values inside it.
Here you can see that the type of object is Object as I said that there is no traditional data type called object hence JavaScript objects are treated as objects in some cases.
Let’s take another example of creating a new Object in below example
Example
let expObject = {
firstName : "John Doe",
"Ten": 10,
10: "Any Integer",
"experience": 0};
console.log('Type: ',typeof(expObject), '\n','Values: ', expObject)
Here in the above example, we have created and initialized a new object with the name expObject and console logged it into the terminal while checking its data type and displaying the values inside it.
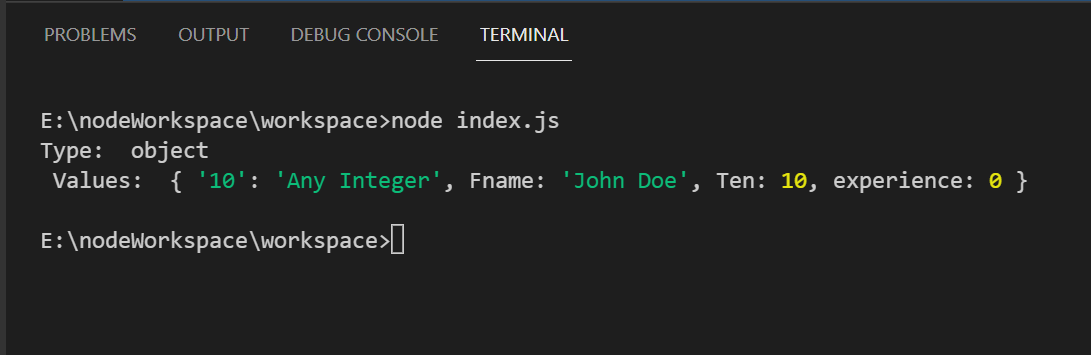 As you can see in the above output screen that the type is being displayed as an Object while its values are also being displayed in the output terminal as we expected.
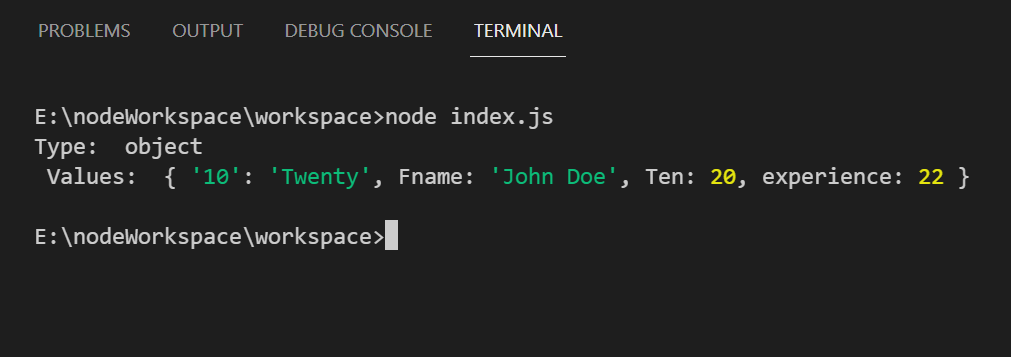 You can now clearly see in the above provided output screen that the values have been updated in the object.
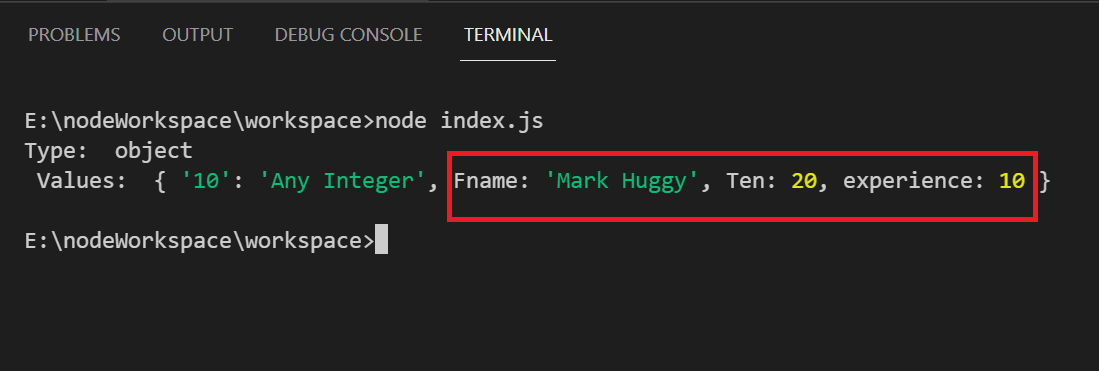 You can see that the above-highlighted values are updated in the object.
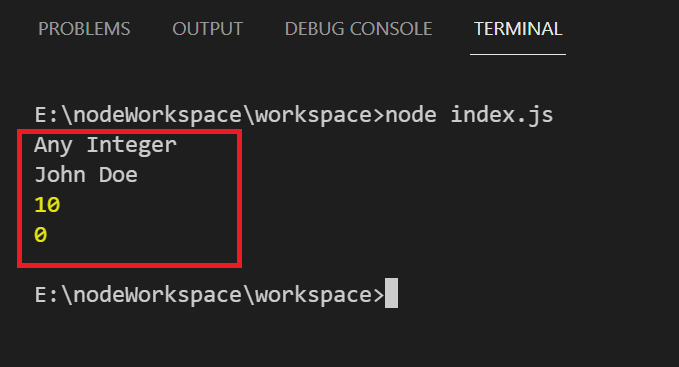 The values are being displayed against each key with the help of a for loop
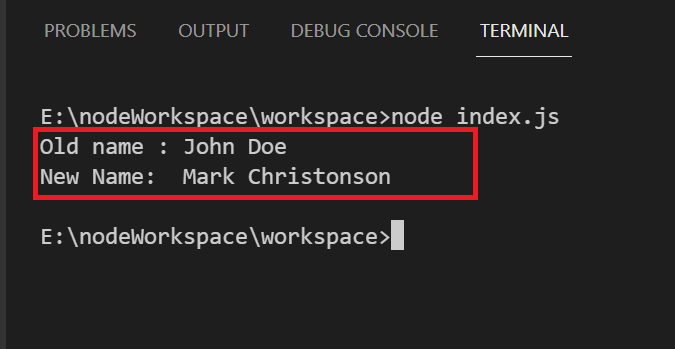 You can see both the old and the new name fields in the above output screen.
 It’s also worth noting that the Date object just represents the amount of milliseconds from January 1, 1970.

 As you can see, we have passed a string but the type of the string has been changed to a number and the value can now be used for any numeric operation.
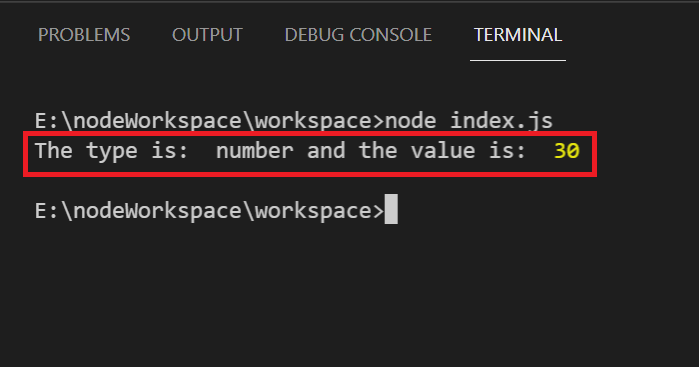 As I described above that parseInt() method only parses the first string while it ignores all the other strings following the first one, so here in the above example, you can clearly see that the “30” is parsed into a number while the 50 followed by the 30 is being ignored by the method.
 As you can see in the above example, the spaces are being ignored by the parseInt() method and producing the desired result.
 As you can see above, when you pass the alphabetic string into the method, it parses its type into the number but because the string was not a numeric formatted string, it produces a result with NaN which means the provided format was not accepted by the method.
 As you can see in the above output, the string after the floating point is ignored by the method and only the string before the floating point is parsed into the number.

 The above could return 35 which actually is defined as 3 x 10 + 5 = 35.
Radix – 8
Let’s take another example, in which we want to parse the string into the octal numbers.
We will pass 8 as the base number as shown in the code given below:
let number = parseInt("56",8);
console.log("The type is: ",typeof(number), "and the value is: ", number);
The above code returns 46 which is actually calculated as
= 5 x (8)1 + 6 x (8)
The above could return 35 which actually is defined as 3 x 10 + 5 = 35.
Radix – 8
Let’s take another example, in which we want to parse the string into the octal numbers.
We will pass 8 as the base number as shown in the code given below:
let number = parseInt("56",8);
console.log("The type is: ",typeof(number), "and the value is: ", number);
The above code returns 46 which is actually calculated as
= 5 x (8)1 + 6 x (8) Radix – 16
Let’s take another example with base-16 this time.
let number = parseInt("56",16);
console.log(number)
Output
Radix – 16
Let’s take another example with base-16 this time.
let number = parseInt("56",16);
console.log(number)
Output
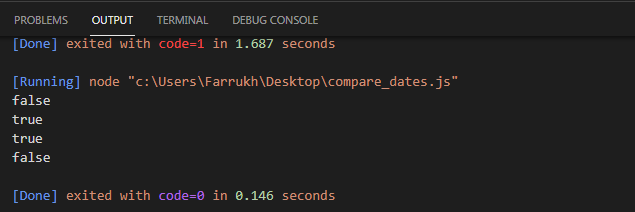
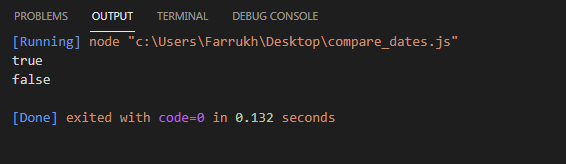
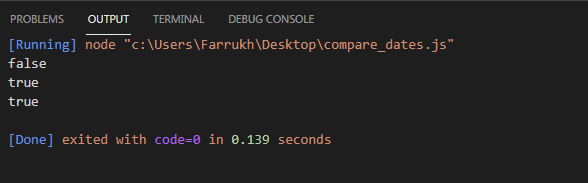
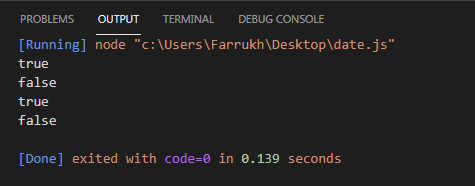
 There are many frontend frameworks but the most popular ones are AngularJS, ReactJS, and VueJS.
Due to speed advantages, one-page apps are the way to go nowadays.
Learning a front-end framework is the most practical way to create one.
The most popular are Angular, React, and Vue, although they aren’t the only ones.
In the JavaScript world, there’s a race.
If you Google “Angular versus React,” you’ll find a slew of articles comparing the benefits and drawbacks of each.
Because of the given reasons, I prefer Angular.
In some cases, React or Vue might be a nice option.
There are many frontend frameworks but the most popular ones are AngularJS, ReactJS, and VueJS.
Due to speed advantages, one-page apps are the way to go nowadays.
Learning a front-end framework is the most practical way to create one.
The most popular are Angular, React, and Vue, although they aren’t the only ones.
In the JavaScript world, there’s a race.
If you Google “Angular versus React,” you’ll find a slew of articles comparing the benefits and drawbacks of each.
Because of the given reasons, I prefer Angular.
In some cases, React or Vue might be a nice option.
 NodeJS is a programming environment that allows you to run JavaScript on the backend like any other programming language.
There will, of course, be some small distinctions between JavaScript on the desktop and JavaScript on the browser.
The V8 engine is used by both the browser and Node to execute JavaScript.
The main distinction is that the browser offers an extra API for accessing the DOM, whereas Node adds an API for interacting with the operating system.
You’ll need to know NodeJS if you want to do full-stack JavaScript.
The nice thing is that you do not need to learn a new language from scratch.
Express is then a complete framework that allows a rapid development process and makes life easier as it provides a complete backend utility where we don’t have to write the server-side code by ourselves as it provides on its own.
NodeJS is a programming environment that allows you to run JavaScript on the backend like any other programming language.
There will, of course, be some small distinctions between JavaScript on the desktop and JavaScript on the browser.
The V8 engine is used by both the browser and Node to execute JavaScript.
The main distinction is that the browser offers an extra API for accessing the DOM, whereas Node adds an API for interacting with the operating system.
You’ll need to know NodeJS if you want to do full-stack JavaScript.
The nice thing is that you do not need to learn a new language from scratch.
Express is then a complete framework that allows a rapid development process and makes life easier as it provides a complete backend utility where we don’t have to write the server-side code by ourselves as it provides on its own.
 Because it is globally scoped, it’s better to use let and const.
The reason is that sometimes you want to declare a variable in an if statement, and outside that if statement you want to declare the variable with the same name.
Using var will cause problems.
To understand more about global variables, you can check this article.
The Remaining two types of variables that are available are let and const.
Using let we can declare any data type, whereas, in the case of const, only constant values are declared.
let msg= "Hello World";
console.log(msg);
msg= 10;
console.log(msg);
Output:
Because it is globally scoped, it’s better to use let and const.
The reason is that sometimes you want to declare a variable in an if statement, and outside that if statement you want to declare the variable with the same name.
Using var will cause problems.
To understand more about global variables, you can check this article.
The Remaining two types of variables that are available are let and const.
Using let we can declare any data type, whereas, in the case of const, only constant values are declared.
let msg= "Hello World";
console.log(msg);
msg= 10;
console.log(msg);
Output:
 Here, we declared a string as well as a number data type using the let variable.
Now, using const, if we try to declare any value other than constant, it’ll give us an error.
// Below will cause an error.const pi = 3.142;
console.log(pi);
pi = 3.15;
console.log(pi);
Here, we declared a string as well as a number data type using the let variable.
Now, using const, if we try to declare any value other than constant, it’ll give us an error.
// Below will cause an error.const pi = 3.142;
console.log(pi);
pi = 3.15;
console.log(pi);

 String: To store a sequence of characters, the String data type is used.
let x = "Welcome"
console.log(x);
console.log(typeof x);
Output:
String: To store a sequence of characters, the String data type is used.
let x = "Welcome"
console.log(x);
console.log(typeof x);
Output:
 Boolean: A data type that represents true and false values in a program.
let x = true
console.log(x);
console.log(typeof x);
Output:
Boolean: A data type that represents true and false values in a program.
let x = true
console.log(x);
console.log(typeof x);
Output:
 Objects: To store the collection of various data types in a single variable, Objects are used.
let movie = {
name : "Inception",
genre: "Thriller",
yearOfRelease : "2010",
numberOfCopies : 10
};
console.log(movie);
console.log(type of movie);
Output:
Objects: To store the collection of various data types in a single variable, Objects are used.
let movie = {
name : "Inception",
genre: "Thriller",
yearOfRelease : "2010",
numberOfCopies : 10
};
console.log(movie);
console.log(type of movie);
Output:
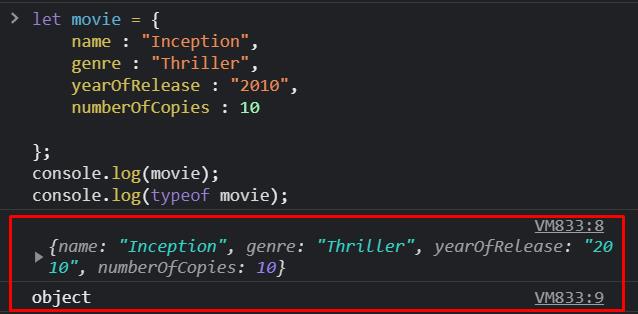
 To better understand the Array concept, check this
  Of Course, there are several other methods, if you want to learn more check this article as well.
Number Methods: Similarly for manipulating the value of a Number data type, there are various methods.
Some of these are provided below:
let x = 4445.4//To convert numbers to a string
console.log(x.toString);//To convert number to its exponential form console.log(x.toExponential());//Returns the number with specified length
console.log(x.toPrecision(2));
Output:
Of Course, there are several other methods, if you want to learn more check this article as well.
Number Methods: Similarly for manipulating the value of a Number data type, there are various methods.
Some of these are provided below:
let x = 4445.4//To convert numbers to a string
console.log(x.toString);//To convert number to its exponential form console.log(x.toExponential());//Returns the number with specified length
console.log(x.toPrecision(2));
Output:
 Javascript provides us with methods for objects, boolean, arrays, and more.
 If..
else if…else:
let balance = 1200;if(balance <1000){ console.log("Balance less than 1000"); }else if(balance >1000 && balance <1500){ console.log("Balance between 1000-1500"); }else { console.log("Balance more than 1500"); }
Output:
If..
else if…else:
let balance = 1200;if(balance <1000){ console.log("Balance less than 1000"); }else if(balance >1000 && balance <1500){ console.log("Balance between 1000-1500"); }else { console.log("Balance more than 1500"); }
Output:
 Switch:
let alphabet = 'B';switch(alphabet){
case 'A':
console.log("Egg");
break;
case 'B':
console.log("Mango");
break;
default:
console.log("Tea!");}
Output:
Switch:
let alphabet = 'B';switch(alphabet){
case 'A':
console.log("Egg");
break;
case 'B':
console.log("Mango");
break;
default:
console.log("Tea!");}
Output:
 To understand the topic better you can check these articles of if-else and switch conditional statements in detail.
 You can understand the concept and work of this through this article.


 This is just to give you a basic understanding.
If you want to understand this in-depth, check this article, or to understand the for-in loop you can check this article as well.
This is just to give you a basic understanding.
If you want to understand this in-depth, check this article, or to understand the for-in loop you can check this article as well.
 In the above example, two numbers were passed into the function of addition() and were stored in the variable result.
JavaScript provides us with various data types, functions, methods, and more in-depth.
These are extremely useful and make the understanding of the program easy.
There are so many ways you can learn JavaScript, Through books, as well as through online resources.
In the above example, two numbers were passed into the function of addition() and were stored in the variable result.
JavaScript provides us with various data types, functions, methods, and more in-depth.
These are extremely useful and make the understanding of the program easy.
There are so many ways you can learn JavaScript, Through books, as well as through online resources.

 A set of attributes will appear, one of which is __proto__, which links to Array.
We can also open it and proceed through the list until we find another __proto__ property with the value Object.
Now let’s return to the in operator again and test this operator with the JavaScript array:
const array = [1, 2, 3, 4];
console.log('Yes 3 is in the array :',3 in array)
console.log('Yes 2 is in the array :',2 in array)
console.log('filter' in array)
Here in the above code we have created an array with the values 1,2,3 and 4 and tested the values using in operator whether they are existing in the array or not.
Output
A set of attributes will appear, one of which is __proto__, which links to Array.
We can also open it and proceed through the list until we find another __proto__ property with the value Object.
Now let’s return to the in operator again and test this operator with the JavaScript array:
const array = [1, 2, 3, 4];
console.log('Yes 3 is in the array :',3 in array)
console.log('Yes 2 is in the array :',2 in array)
console.log('filter' in array)
Here in the above code we have created an array with the values 1,2,3 and 4 and tested the values using in operator whether they are existing in the array or not.
Output
 Afterwards, we got all the responses true and printed on the output screen because all the values that we are checking are existing on the array collection.


 To iterate over map values, we will simply change employees.keys() to employees.values():
// creating map objectvar employees = new Map([
["john", 'admin'],
["Sarah", 'editor'],
["Sam", 'writer']]);// for loopfor (var position of employees.values()) {
console.log(position);}
To iterate over map values, we will simply change employees.keys() to employees.values():
// creating map objectvar employees = new Map([
["john", 'admin'],
["Sarah", 'editor'],
["Sam", 'writer']]);// for loopfor (var position of employees.values()) {
console.log(position);}


 On the other hand, the yield* is a keyword/expression that can be used to represent an iterative object or other generator function.
The yield* iterates and returns value correspondingly until the Boolean value is true.
The syntax of yield* expression/keyword is as follows:
yield* expression
Now we are going to present an example of yield* expression/keyword.
<html><head>
<title>JavaScript yield* keyword/expression</title></head><body>
<script>
function* first_func() {
yield 10;
}
function* second_func() {
yield* first_func();
}
const generator_iterator = second_func();
console.log(generator_iterator.next().value);
</script></body></html>
Output
On the other hand, the yield* is a keyword/expression that can be used to represent an iterative object or other generator function.
The yield* iterates and returns value correspondingly until the Boolean value is true.
The syntax of yield* expression/keyword is as follows:
yield* expression
Now we are going to present an example of yield* expression/keyword.
<html><head>
<title>JavaScript yield* keyword/expression</title></head><body>
<script>
function* first_func() {
yield 10;
}
function* second_func() {
yield* first_func();
}
const generator_iterator = second_func();
console.log(generator_iterator.next().value);
</script></body></html>
Output
 Example
In this example, generatorfunc1() function returns yielded values through next() function similar to those values that are yielded through generatorfunc2() function.
Subsequently, through this generatorfunc2() function, we can easily insert more generators as much as we can.
<html><head>
<title>JavaScript yield* representing other generator </title></head><body>
<script>
function* generatorfunc1() {
yield 22;
yield 33;
yield 44;
}
function* generatorfunc2() {
yield 11;
yield* generatorfunc1();
yield 55;
}
const iterative_value = generatorfunc2();
// it return value 11 whereas done i.e.
boolean value is false
console.log(iterative_value.next());
// it return value 22 whereas done i.e.
boolean value is false
console.log(iterative_value.next());
// it return value 33 whereas done i.e.
boolean value is false
console.log(iterative_value.next());
// it return value 44 whereas done i.e.
boolean value is false
console.log(iterative_value.next());
// it return value 55 whereas done i.e.
boolean value is false
console.log(iterative_value.next());
// it return undefined value whereas done i.e.
boolean value is true
console.log(iterative_value.next());
</script></body></html>
Output
Example
In this example, generatorfunc1() function returns yielded values through next() function similar to those values that are yielded through generatorfunc2() function.
Subsequently, through this generatorfunc2() function, we can easily insert more generators as much as we can.
<html><head>
<title>JavaScript yield* representing other generator </title></head><body>
<script>
function* generatorfunc1() {
yield 22;
yield 33;
yield 44;
}
function* generatorfunc2() {
yield 11;
yield* generatorfunc1();
yield 55;
}
const iterative_value = generatorfunc2();
// it return value 11 whereas done i.e.
boolean value is false
console.log(iterative_value.next());
// it return value 22 whereas done i.e.
boolean value is false
console.log(iterative_value.next());
// it return value 33 whereas done i.e.
boolean value is false
console.log(iterative_value.next());
// it return value 44 whereas done i.e.
boolean value is false
console.log(iterative_value.next());
// it return value 55 whereas done i.e.
boolean value is false
console.log(iterative_value.next());
// it return undefined value whereas done i.e.
boolean value is true
console.log(iterative_value.next());
</script></body></html>
Output


 We can see that copies weren’t made in the function and the original properties of the computer object were changed, hence it is passed by reference.

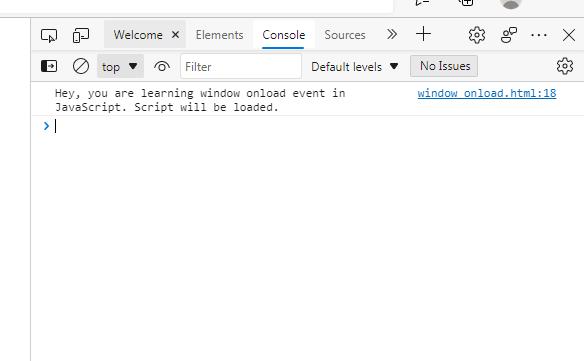
 In the above code, we initialized the label tag which shows an example of the phone number that is accepted by the below input tag where we have defined a pattern.
Now the input tag itself will be responsible for validating the input taken from the user.
After this, we defined a button and gave it the type of button.
Whenever a user will click on the submit button it will generate a response based on the form tag action.
Some of the examples are below:
If we click on the submit button leaving the phone number input box blank:
In the above code, we initialized the label tag which shows an example of the phone number that is accepted by the below input tag where we have defined a pattern.
Now the input tag itself will be responsible for validating the input taken from the user.
After this, we defined a button and gave it the type of button.
Whenever a user will click on the submit button it will generate a response based on the form tag action.
Some of the examples are below:
If we click on the submit button leaving the phone number input box blank:
 If we give a wrong pattern and click on the submit button we will see the following warning:
 Next, we will type a wrong format number, then we will see the following output:
 In the end, let us go for the correct format and see the output:


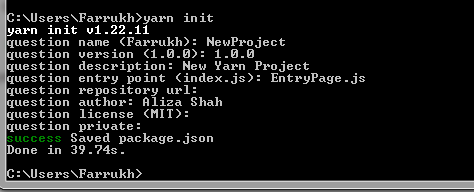

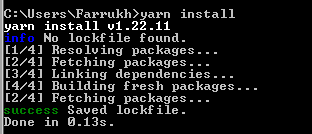


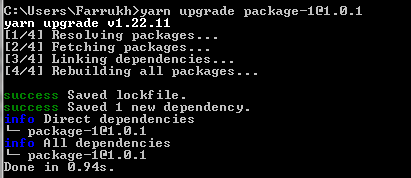


 Different data processing including interactive processing and stream processing could be done through yarn.
It helps to process data which is stored in HDFS “Hadoop distributed file system”.
This shows a plus point of yarn.
Different data processing including interactive processing and stream processing could be done through yarn.
It helps to process data which is stored in HDFS “Hadoop distributed file system”.
This shows a plus point of yarn.
 Num1 and num2 variables are assigned values of 10 and 5and after this, we add both num1 and num2 and alert the result which can be seen in the above screenshot.
 Now we change the code a little bit i-e assigned the value of 10 to num2 and then checked whether num1 and num2 are equal and it is as it returns a true value.
var num1=10;var num2=10;
alert(num1==num2);
Now we change the code a little bit i-e assigned the value of 10 to num2 and then checked whether num1 and num2 are equal and it is as it returns a true value.
var num1=10;var num2=10;
alert(num1==num2);

 Now we change the above code a little bit and initiated num2 with a value of 10 to it.
We then alert whether num1 and num2 are equal which returns true as the values and the datatype are both same in num1 and num2:
var num1=10;var num2=10;
alert(num1===num2);
Now we change the above code a little bit and initiated num2 with a value of 10 to it.
We then alert whether num1 and num2 are equal which returns true as the values and the datatype are both same in num1 and num2:
var num1=10;var num2=10;
alert(num1===num2);

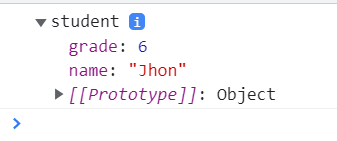 If we expand the prototype seen in the above screenshot we will see that the proto references the student prototype which in fact references the Object prototype.


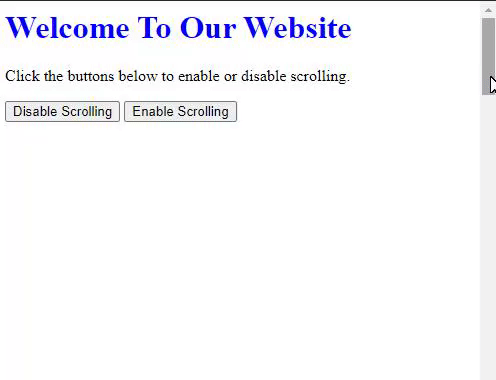


 Now if it is turned on then simply tap on the toggle button to turn JavaScript off (from green to black).
If the button is toggled (black) then it shows that JavaScript has been successfully disabled on your iPhone (Safari).
Now you just need to simply go back to the main menu screen and start browsing again.
Now if it is turned on then simply tap on the toggle button to turn JavaScript off (from green to black).
If the button is toggled (black) then it shows that JavaScript has been successfully disabled on your iPhone (Safari).
Now you just need to simply go back to the main menu screen and start browsing again.
 If we fill the array with elements then:
varnotAnEmptyArray = [1, 2, 3, 4, 5];if (notAnEmptyArray.length === 0) {
console.log('The array is empty.');}else{
console.log('The array has at least one or more elements.');}
If we fill the array with elements then:
varnotAnEmptyArray = [1, 2, 3, 4, 5];if (notAnEmptyArray.length === 0) {
console.log('The array is empty.');}else{
console.log('The array has at least one or more elements.');}
 The thing about the .length method is that it can work with data types other than arrays:
varnotAnArray = 'This is not an array.';if (notAnArray.length === 0) {
console.log('The array is empty.');}else{
console.log('The array has at least one or more elements.');}
The thing about the .length method is that it can work with data types other than arrays:
varnotAnArray = 'This is not an array.';if (notAnArray.length === 0) {
console.log('The array is empty.');}else{
console.log('The array has at least one or more elements.');}
 As you can see in the example above, the code was interpreted by the browser without any errors even though there was no array present in the code.
So if we are unsure about the data type of our variable, we might first want to check whether it’s an array or some other variable.
For this purpose we will not use typeof operator as arrays are instances of objects and their data types are objects.
Rather we will use the Array.isArray() method:
varnotAnArray = 'This is not an array.';if (
As you can see in the example above, the code was interpreted by the browser without any errors even though there was no array present in the code.
So if we are unsure about the data type of our variable, we might first want to check whether it’s an array or some other variable.
For this purpose we will not use typeof operator as arrays are instances of objects and their data types are objects.
Rather we will use the Array.isArray() method:
varnotAnArray = 'This is not an array.';if ( If we change the variable to an empty array:
varnotAnArray = [];if (
If we change the variable to an empty array:
varnotAnArray = [];if (
 It should be noted that the window.print() method does not take or contain any parameters and also doesn’t return anything.
 When we click on the Click Me button, the Print Dialog box will open:
 We can see the content of our webpage on the left-hand side of the Print dialog box and when we click on the print button it will print or save the current viewscreen in a file.
 AngularJS uses the Model view controller software architecture as most JavaScript frameworks.

 Next open the browser and search for the following link:
http://localhost:8000/
When you search the above link you will see the Hello Beginners! Output:
Next open the browser and search for the following link:
http://localhost:8000/
When you search the above link you will see the Hello Beginners! Output:
 Congratulations! You have successfully created your first express js application.
 You can also execute multiple if conditions in which each if condition will be checked, but, it’s better to use if-else condition instead of using multiple if conditions at once.

 Furthermore, we can also use comparison as well as logical operators in the conditional statements to check more than one condition as a single condition, more precisely.
Comparison Operators (, ===, !==, >=, <=)
Logical Operators (&& checks two statements both of which need to be true for the code to be executed.
Whereas, || checks two statements of which only one can be true for the code to be executed)
Example:
<!DOCTYPE html>
<html>
<body>
<p>Click the button to check which range the number falls into.</p>
<button onclick="Display()">Check</button>
<p id="div"></p>
<script>
function Display() {
var x = 13;
if (x >0 && x<=5) {
document.getElementById("div").innerHTML = "Number between range of 0-5";
}
else if(x>5 && x<= 10){
document.getElementById("div").innerHTML = "Number between range of 5-10";
}
else if(x>10 && x<= 15){
document.getElementById("div").innerHTML = "Number between range of 10-15";
}
else {
document.getElementById("div").innerHTML = "Number Greater than 15 ";
}}
</script>
</body>
</html>
Output:
Furthermore, we can also use comparison as well as logical operators in the conditional statements to check more than one condition as a single condition, more precisely.
Comparison Operators (, ===, !==, >=, <=)
Logical Operators (&& checks two statements both of which need to be true for the code to be executed.
Whereas, || checks two statements of which only one can be true for the code to be executed)
Example:
<!DOCTYPE html>
<html>
<body>
<p>Click the button to check which range the number falls into.</p>
<button onclick="Display()">Check</button>
<p id="div"></p>
<script>
function Display() {
var x = 13;
if (x >0 && x<=5) {
document.getElementById("div").innerHTML = "Number between range of 0-5";
}
else if(x>5 && x<= 10){
document.getElementById("div").innerHTML = "Number between range of 5-10";
}
else if(x>10 && x<= 15){
document.getElementById("div").innerHTML = "Number between range of 10-15";
}
else {
document.getElementById("div").innerHTML = "Number Greater than 15 ";
}}
</script>
</body>
</html>
Output:
 In the above example, the user checked various conditions using the logical operator.
Program checked both the conditions mentioned and executed the code if both were true.
In the above example, the user checked various conditions using the logical operator.
Program checked both the conditions mentioned and executed the code if both were true.
 Here, the statement was checked against each case and the output was generated when it matched the case.
 Here, when we compared the string with a number, “==” gave us true because it didn’t check the data types of both variables.
Whereas, “===” gave us false, as it stricity checks the data types of variables as well.
Here, when we compared the string with a number, “==” gave us true because it didn’t check the data types of both variables.
Whereas, “===” gave us false, as it stricity checks the data types of variables as well.
 As we can not define the type of data while declaring variables, and if these types are not properly handled, it causes some unpredictable results shown through the above example.
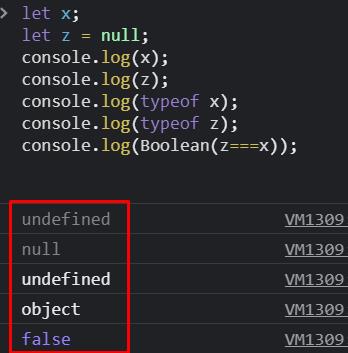 Here, the type of undefined is undefined whereas that of null is an object.
Hence when compared, it generated false as an output.
Here, the type of undefined is undefined whereas that of null is an object.
Hence when compared, it generated false as an output.
 To avoid this type of mistakes, rewrite your code as:
 In this way it checked the condition and hence no output was generated.

 It’s worth noting that we used the super() keyword to refer to the parent class in the above example.
When we call the super() method we are in fact calling the parent class constructor and we can access all of the parent’s methods and properties thanks to the super keyword.
It’s worth noting that we used the super() keyword to refer to the parent class in the above example.
When we call the super() method we are in fact calling the parent class constructor and we can access all of the parent’s methods and properties thanks to the super keyword.
 We can also set a property in the same way by adding just one more line using the above code.
classAnimalName {
constructor(name) {this._animalName = name;
}
get getAnimalName(){
returnthis._animalName;
}
set setAnimalName(nam){this._animalName = nam;
}
present() {return'Name: ' + this._animalName;
}}
classAnimalextendsAnimalName {
constructor(name, quantity) {super(name);this.quantity = quantity;
}
whatAnimal() {
returnthis.getAnimalName;
}}const animal = new Animal("chicken", 5);
animal.setAnimalName="Cow";
alert(animal.whatAnimal());
The output will now be updated to “cow”.
We can also set a property in the same way by adding just one more line using the above code.
classAnimalName {
constructor(name) {this._animalName = name;
}
get getAnimalName(){
returnthis._animalName;
}
set setAnimalName(nam){this._animalName = nam;
}
present() {return'Name: ' + this._animalName;
}}
classAnimalextendsAnimalName {
constructor(name, quantity) {super(name);this.quantity = quantity;
}
whatAnimal() {
returnthis.getAnimalName;
}}const animal = new Animal("chicken", 5);
animal.setAnimalName="Cow";
alert(animal.whatAnimal());
The output will now be updated to “cow”.

 However, it should be kept in mind that most programmers do not recommend declaring a variable globally because there is a risk of duplicate variable names while doing so.
Duplicate variable names occur when two variables have the same name.
In most cases, this will cause an error that will be hard to debug.
However, it should be kept in mind that most programmers do not recommend declaring a variable globally because there is a risk of duplicate variable names while doing so.
Duplicate variable names occur when two variables have the same name.
In most cases, this will cause an error that will be hard to debug.

 The output of “Hello Rey Mysterio” is seen in the console log.
However, when we console log it outside the braces an error will be generated.
The output of “Hello Rey Mysterio” is seen in the console log.
However, when we console log it outside the braces an error will be generated.
 This error is solved by closures.


 Step 2: Now that the browser is opened go to the address bar and there you’ve to type “about:config” as shown below and press Enter.
 Step 3: This will show you a message as shown below, in this you just have to click on the “Accept the Risk and Continue” button provided at the button of the page.
 Step 4: Now a search bar will be loaded on your screen and in that search bar you’ve to type “javascript.enabled” and press Enter.
 Step 5: After you’ve pressed Enter, a search for javascript.enabled will be shown along its “true” value.
Here you’ve to select the toggle button present at the right to change the value of javascript.enabled to false.
Before:
Step 5: After you’ve pressed Enter, a search for javascript.enabled will be shown along its “true” value.
Here you’ve to select the toggle button present at the right to change the value of javascript.enabled to false.
Before:
 After:
 Step 6: Now JavaScript is disabled on your Firefox browser and you can verify it by using the website, as shown below:

 You can clearly see the difference JavaScript adds to a website and how it adds “life” to it.
 Drop down menu will be opened containing multiple options:
 Step2: In the drop-down menu navigate to the “settings‘ option and click on it.
 You will be directed towards the settings screen.
 Step3: Here you will be able to search the search bar which is present at the top of your webpage.
It will be labeled as “Search settings”.
Search “Javascript” in this search bar.
Look for “Site Settings” once you are finished typing.
Click on it:
Step3: Here you will be able to search the search bar which is present at the top of your webpage.
It will be labeled as “Search settings”.
Search “Javascript” in this search bar.
Look for “Site Settings” once you are finished typing.
Click on it:
 Step5: After clicking on “Site Settings”, find JavaScript.
Site settings contain many permissions which you can update.
Simply scroll down to “JavaScript” and click on it.
Step5: After clicking on “Site Settings”, find JavaScript.
Site settings contain many permissions which you can update.
Simply scroll down to “JavaScript” and click on it.
 Step6: Now you need to enable JavaScript.
The option for this is available at the top.
You’ll see either label of “Allowed(recommended)”.
When you enable it, all the web pages you visit will have JavaScript enabled.
If you don’t see the label “Allowed (recommended)” then two radio buttons will be present.
The first radio option will say “Sites can use JavaScript” on which you have to click or select:
Step6: Now you need to enable JavaScript.
The option for this is available at the top.
You’ll see either label of “Allowed(recommended)”.
When you enable it, all the web pages you visit will have JavaScript enabled.
If you don’t see the label “Allowed (recommended)” then two radio buttons will be present.
The first radio option will say “Sites can use JavaScript” on which you have to click or select:
 However, it should be noted that you can block or allow only some web pages.
This option is available here after the labeling “Allowed”.
Now that you have enabled JavaScript, you can close the settings tab.
However, it should be noted that you can block or allow only some web pages.
This option is available here after the labeling “Allowed”.
Now that you have enabled JavaScript, you can close the settings tab.
 Step2: Click on the menu symbol or hamburger icon located at the top right corner of the Tor browser:
 Step3: When you click on the menu bar symbol a menu will open as shown in the above screenshot, after which look for options and click on it.
 Step4: Now the settings tab will open where you have to open up the “privacy & security” settings by clicking on the “Privacy & security” option from the left menu bar of the viewscreen:
 Step5: When you click on Settings and privacy, scroll down until you find security option:
 Step6: Click on the safest option and JavaScript will be disabled.
 You have successfully disabled JavaScript on the Tor browser.
 After successfully opening the dev tool, you have to open the command menu by pressing CTRL+SHIFT+P.
The following picture shows the command menu.
After successfully opening the dev tool, you have to open the command menu by pressing CTRL+SHIFT+P.
The following picture shows the command menu.
 Now you have to write JavaScript in the bar of the command menu as shown in the picture below.
Subsequently, choose the option i.e.
“disable JavaScript” from the list and then press enter.
Now you have to write JavaScript in the bar of the command menu as shown in the picture below.
Subsequently, choose the option i.e.
“disable JavaScript” from the list and then press enter.
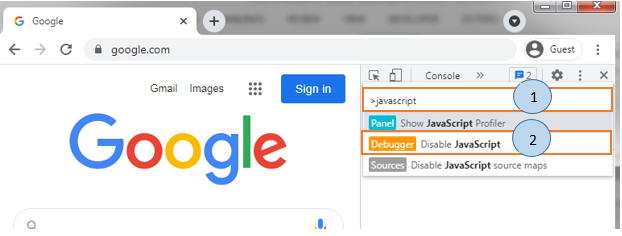 Now you have successfully disabled JavaScript for your Chrome browser.
The warning icon beside the source will assure you of a JavaScript disability.
Now you have successfully disabled JavaScript for your Chrome browser.
The warning icon beside the source will assure you of a JavaScript disability.
 JavaScript will be disabled until the dev tool is closed.
JavaScript will remain disabled even when you reload the page.
JavaScript will be disabled until the dev tool is closed.
JavaScript will remain disabled even when you reload the page.
 Subsequently, chrome settings will be opened as shown in the picture below.
 Navigate down the page up to the “Privacy and Security” panel and select site settings as shown below.
 After selecting site settings then you will see the following interface as shown below.
 Navigating down the page up to the “Content” panel.
Then select the “JavaScript” option.
Navigating down the page up to the “Content” panel.
Then select the “JavaScript” option.
 After selecting JavaScript a new window will appear as shown below and you have to toggle the option “Don’t allow sites to use JavaScript”.
 Now you have successfully disabled JavaScript for your Chrome browser.

 The next inbuilt method used a lot by developers is the join() method.
This has the exact same function of toString() i-e converts an array to string.
The only difference in the join() method is that here we can specify the separator.
For example, in place of commas, we can put a full stop.
For Example:
//array having the name of soccer leaguesconst leagues=["Laliga","Premier League","Bundesliga","Serie a"];//converting to string with .
separator
console.log(leagues.join("."));
Here we specified that the values of an array should be separated with full stop when the array is converted to a string.
The next inbuilt method used a lot by developers is the join() method.
This has the exact same function of toString() i-e converts an array to string.
The only difference in the join() method is that here we can specify the separator.
For example, in place of commas, we can put a full stop.
For Example:
//array having the name of soccer leaguesconst leagues=["Laliga","Premier League","Bundesliga","Serie a"];//converting to string with .
separator
console.log(leagues.join("."));
Here we specified that the values of an array should be separated with full stop when the array is converted to a string.

 As we can see in the screenshot of the console that the pop item was on the last index and after that when we console log the array there was no Seria a.

 The unshift() method is the same as the push() method except that it adds an element at the start of the array.
The syntax is the same as the shift method i-e leagues.unshift(“Scottish League”).
The unshift() method is the same as the push() method except that it adds an element at the start of the array.
The syntax is the same as the shift method i-e leagues.unshift(“Scottish League”).

 We can also use the splice method to remove a value at the specified index.
ForExample:
//array having the name of soccer leaguesconst leagues=["Laliga","Premier League","Bundesliga","Serie a"];
leagues.splice(0,1);//converting array to string
console.log(leagues.toString());
It will remove the element that is at the first index.
We can also use the splice method to remove a value at the specified index.
ForExample:
//array having the name of soccer leaguesconst leagues=["Laliga","Premier League","Bundesliga","Serie a"];
leagues.splice(0,1);//converting array to string
console.log(leagues.toString());
It will remove the element that is at the first index.

 We added the lowerLeagues to leagues.


 The debugger keyword forces a breakpoint or stops the execution of the code and invokes the debugging function.
If any debugging is required, the debugger function is called; otherwise, nothing is done.
The debugger keyword forces a breakpoint or stops the execution of the code and invokes the debugging function.
If any debugging is required, the debugger function is called; otherwise, nothing is done.
 In the above code, the function message() is passed as an argument and it is called after 2000 milliseconds (2 seconds).
Now to relate this to the call back function, the message() function was called after 2 seconds.
It wasn’t executed before those 2 seconds.
Hence it is a callback function.
In the above code, the function message() is passed as an argument and it is called after 2000 milliseconds (2 seconds).
Now to relate this to the call back function, the message() function was called after 2 seconds.
It wasn’t executed before those 2 seconds.
Hence it is a callback function.
 As expected, the function firstMessage() is executed first and then the secondMessage() function is executed.
 After 3 seconds the 1 will be shown:
 As we can see, the firstMessage() function was called first and then the secondMessage() function was called.
However, we cannot see the result in the sequence we called our function.
It’s not that JavaScript did not return our code sequentially, it’s just that JavaScript did not wait for the firstMessage() function to execute completely and started executing the secondMessage() function.
This example was solely put here to show you why we need callback functions.
Callback functions let us make sure that some code will not execute until our required code has been executed.
As we can see, the firstMessage() function was called first and then the secondMessage() function was called.
However, we cannot see the result in the sequence we called our function.
It’s not that JavaScript did not return our code sequentially, it’s just that JavaScript did not wait for the firstMessage() function to execute completely and started executing the secondMessage() function.
This example was solely put here to show you why we need callback functions.
Callback functions let us make sure that some code will not execute until our required code has been executed.

 “name is not defined” error will be caused in the above scenario.
Let us have a look at another example where strict mode is used inside the function.
“use strict” scope will be functional i-e limited to the function.
“name is not defined” error will be caused in the above scenario.
Let us have a look at another example where strict mode is used inside the function.
“use strict” scope will be functional i-e limited to the function.
 In this example, the first variable “name” will not have an error as we are not using strict mode.
However, in the function, we will be shown an error of “y” is not declared as we are using “use strict” mode.
Let me stress again that in this example the strict mode scope is restricted to the “myFunc()” function.
In this example, the first variable “name” will not have an error as we are not using strict mode.
However, in the function, we will be shown an error of “y” is not declared as we are using “use strict” mode.
Let me stress again that in this example the strict mode scope is restricted to the “myFunc()” function.


 In the function example we are getting the myFunc() as a function i-e player.myFunc().
However, in the getter example, we are accessing the property i-e player.myFunc().
Now we know that the getter syntax is more easy and readable than the function.
In the function example we are getting the myFunc() as a function i-e player.myFunc().
However, in the getter example, we are accessing the property i-e player.myFunc().
Now we know that the getter syntax is more easy and readable than the function.
 It is true that when we use getters and setters, JavaScript secures better data quality.

 Note: This method modifies the original string.
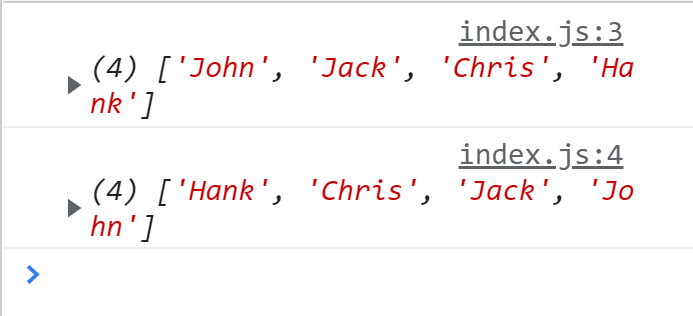 We can also use the push and unshift methods in combination with a for loop to reverse an array without modifying the original array:
let employeeNames = ['John', 'Jack', 'Chris', 'Hank'];
let reverseArr = [];for (let i = 0; i <= employeeNames.length - 1; i++) {
reverseArr.unshift(employeeNames[i]);}
console.log(reverseArr);
We can also use the push and unshift methods in combination with a for loop to reverse an array without modifying the original array:
let employeeNames = ['John', 'Jack', 'Chris', 'Hank'];
let reverseArr = [];for (let i = 0; i <= employeeNames.length - 1; i++) {
reverseArr.unshift(employeeNames[i]);}
console.log(reverseArr);
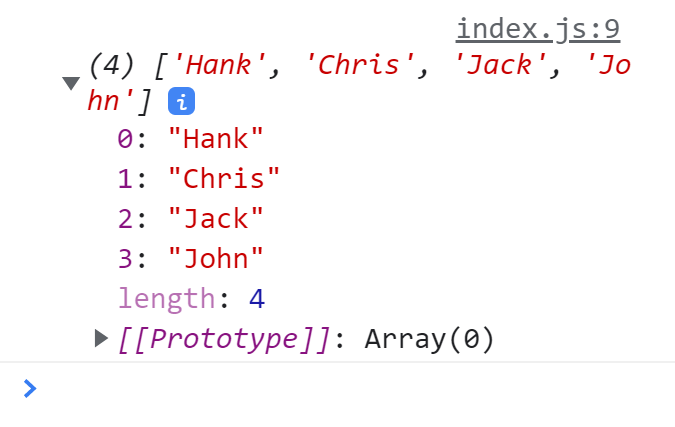 In the example above, we started the loop from i = 0 as the array indexing starts at 0; then we set the condition as i <= employeeNames.length – 1 as the highest index in an array will always be one number less than the total number of elements in the array.
Inside the for loop we used the unshift function to add the elements of the employeeNames array to the new reverseArr array.
In the first iteration of the loop the i is equal to 0, so employeeNames[i] selects the first element of the array and the unshift function puts it on the first index of the reverseArr.
On the second iteration i is equal to 1, so employeeNames[i] selects the second element of the array and the unshift function puts it on the first index.
The element previously present on the first index now moves onto the second index.
This process will keep on repeating until it reaches the last element and the whole array is reversed.
We can also use the push method to reverse an array in the same way, but for that we will have to use a decrementing for loop index.
let employeeNames = ['John', 'Jack', 'Chris', 'Hank'];
let reverseArr = [];for (let i = employeeNames.length - 1; i >= 0; i--) {
reverseArr.push(employeeNames[i]);}
console.log(reverseArr);
In the example above, we started the loop from i = 0 as the array indexing starts at 0; then we set the condition as i <= employeeNames.length – 1 as the highest index in an array will always be one number less than the total number of elements in the array.
Inside the for loop we used the unshift function to add the elements of the employeeNames array to the new reverseArr array.
In the first iteration of the loop the i is equal to 0, so employeeNames[i] selects the first element of the array and the unshift function puts it on the first index of the reverseArr.
On the second iteration i is equal to 1, so employeeNames[i] selects the second element of the array and the unshift function puts it on the first index.
The element previously present on the first index now moves onto the second index.
This process will keep on repeating until it reaches the last element and the whole array is reversed.
We can also use the push method to reverse an array in the same way, but for that we will have to use a decrementing for loop index.
let employeeNames = ['John', 'Jack', 'Chris', 'Hank'];
let reverseArr = [];for (let i = employeeNames.length - 1; i >= 0; i--) {
reverseArr.push(employeeNames[i]);}
console.log(reverseArr);


 We can see in the above screenshot that the code and js are returned as separate separated by a comma.
The pop() method removes/pops the last element of an array or string and returns that as a value.
Let’s implement the pop() method:
var filename = ["code" , "js"];var returned = filename.pop();
alert(returned); // js
We can see in the below screenshot that the pop() method popped the last element of the filename array and returned it:
We can see in the above screenshot that the code and js are returned as separate separated by a comma.
The pop() method removes/pops the last element of an array or string and returns that as a value.
Let’s implement the pop() method:
var filename = ["code" , "js"];var returned = filename.pop();
alert(returned); // js
We can see in the below screenshot that the pop() method popped the last element of the filename array and returned it:
 Let us now combine the two i-e pop() method and split() method to achieve our task of getting the extension of a file:
function getFileExtension(fileName){
//extract file extension
const extension = fileName.split('.').pop();
return extension;}// passing the filenameconst fileExtension = getFileExtension('code.js');
alert(fileExtension);
In the above code, we made a small function with the name of getFileExtension() so that we don’t have to repeat the process of writing the code again and again.
The getFileExtension() function receives a filename parameter and then splits and pops the last element of the filename and returns the result.
Let us now combine the two i-e pop() method and split() method to achieve our task of getting the extension of a file:
function getFileExtension(fileName){
//extract file extension
const extension = fileName.split('.').pop();
return extension;}// passing the filenameconst fileExtension = getFileExtension('code.js');
alert(fileExtension);
In the above code, we made a small function with the name of getFileExtension() so that we don’t have to repeat the process of writing the code again and again.
The getFileExtension() function receives a filename parameter and then splits and pops the last element of the filename and returns the result.

 The lastIndexOf() method is used to find the location of a specified character or a substring in a string and returns an index value of the last occurrence of a specified value in a string.
The lastIndexOf() returns a value of negative one (-1) if the value is not found.
var machine = "Aeroplane";var lastIndex = machine.lastIndexOf("a");
alert(lastIndex); // 6
The lastIndexOf() method is used to find the location of a specified character or a substring in a string and returns an index value of the last occurrence of a specified value in a string.
The lastIndexOf() returns a value of negative one (-1) if the value is not found.
var machine = "Aeroplane";var lastIndex = machine.lastIndexOf("a");
alert(lastIndex); // 6
 Let us now combine the two methods, substring() and lastIndexOf() to extract the file extension from a filename:
function getFileExtension(fileName) {
return fileName.substring(fileName.lastIndexOf(".") + 1);}var filename = "code.js";var extension = getFileExtension(filename);
alert(extension); // js
Let us now combine the two methods, substring() and lastIndexOf() to extract the file extension from a filename:
function getFileExtension(fileName) {
return fileName.substring(fileName.lastIndexOf(".") + 1);}var filename = "code.js";var extension = getFileExtension(filename);
alert(extension); // js
 The fileName.lastIndexOf(“.”)+1 returns the last position or index of the .
In the file name and the +1 is because the index starts from 0.
The fileName.lastIndexOf(“.”)+1 returns the last position or index of the .
In the file name and the +1 is because the index starts from 0.
 We can also chain all of these methods together:
let greetings = "Welcome to Linux Hint";
let reversedString = greetings.split("").reverse().join("");
console.log(reversedString);
We can also chain all of these methods together:
let greetings = "Welcome to Linux Hint";
let reversedString = greetings.split("").reverse().join("");
console.log(reversedString);


 Congratulations! We have successfully linked JavaScript with HTML by adding JavaScript code inside the script tag.
This method is good for small web pages or one webpage.
However, as your web app grows bigger the script code will also get bigger and it will become really difficult to handle as well as to read.
The solution is to write JavaScript in a dedicated separate javaScript file and provide the reference of the JavaScript file in the HTML file.
Congratulations! We have successfully linked JavaScript with HTML by adding JavaScript code inside the script tag.
This method is good for small web pages or one webpage.
However, as your web app grows bigger the script code will also get bigger and it will become really difficult to handle as well as to read.
The solution is to write JavaScript in a dedicated separate javaScript file and provide the reference of the JavaScript file in the HTML file.
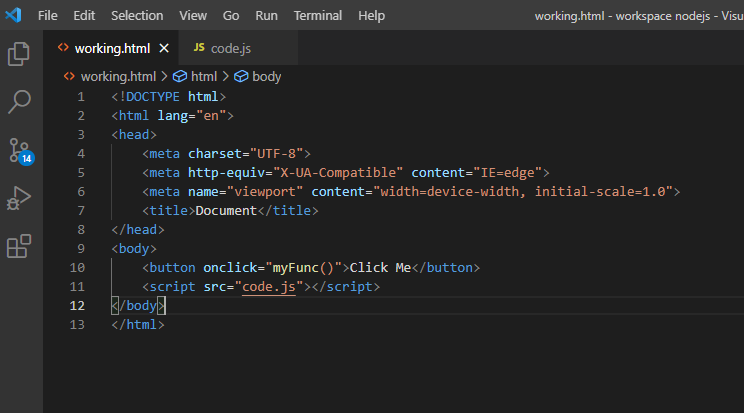 We referenced the “code.js” file using the src attribute of <script> tag.
Now the code.js file:
function myFunc(){
alert("You Clicked me");}
We referenced the “code.js” file using the src attribute of <script> tag.
Now the code.js file:
function myFunc(){
alert("You Clicked me");}
 The result will be the same as the previous example i-e.

 So, now we have to fix this bug quickly.
In this step, our main target is to detect the source of bugs.
For rapid detection of the bug, you should debug the JavaScript code in Chrome.
For this, you need to run the application on Chrome, and then you have to open devTool by pressing the short keys CTRL+SHIFT+I.
After opening the devTool, you will be able to see the screen shown below.
Besides many tasks performed by Devtool, it can also monitor requests, change CSS.
So, now we have to fix this bug quickly.
In this step, our main target is to detect the source of bugs.
For rapid detection of the bug, you should debug the JavaScript code in Chrome.
For this, you need to run the application on Chrome, and then you have to open devTool by pressing the short keys CTRL+SHIFT+I.
After opening the devTool, you will be able to see the screen shown below.
Besides many tasks performed by Devtool, it can also monitor requests, change CSS.
 Code Debugging
The simplest way to debug a bug in your code is that you have to insert the console.log() function within your code for inspecting values simultaneously.
function updateLabel() {
var value1 = getNum1();
console.log('value1:', value1);
var value2 = getNum2();
console.log('value2:', value2);
var mod = parseInt(value1) % parseInt(value2);
console.log('result:', mod);
label.textContent = value1 + ' % ' + value2 + ' = ' + mod;}
Although the console.log() function can be a good option for detecting the bugs but breakpoints could be a more effective option as it allows you to pause code during its execution and analyze the corresponding value.
Moreover, a breakpoint is better than console.log() because working with console.log() you have to observe many steps which have to be done manually in order to view values in the console window while breakpoints make it easier by working directly.
Code Debugging
The simplest way to debug a bug in your code is that you have to insert the console.log() function within your code for inspecting values simultaneously.
function updateLabel() {
var value1 = getNum1();
console.log('value1:', value1);
var value2 = getNum2();
console.log('value2:', value2);
var mod = parseInt(value1) % parseInt(value2);
console.log('result:', mod);
label.textContent = value1 + ' % ' + value2 + ' = ' + mod;}
Although the console.log() function can be a good option for detecting the bugs but breakpoints could be a more effective option as it allows you to pause code during its execution and analyze the corresponding value.
Moreover, a breakpoint is better than console.log() because working with console.log() you have to observe many steps which have to be done manually in order to view values in the console window while breakpoints make it easier by working directly.


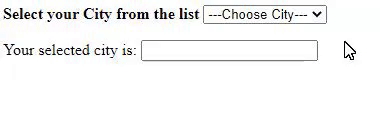

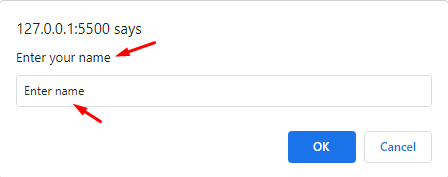 Let’s remove the Enter name and type your name:
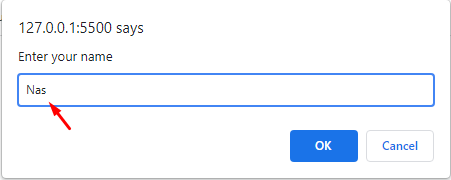 Now when you click on the OK button you will see the Hello! Nas message alert:
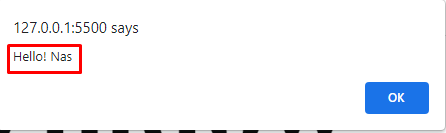
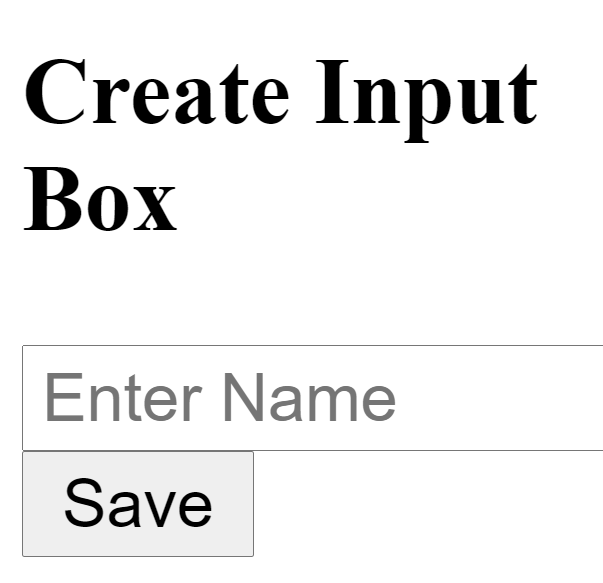
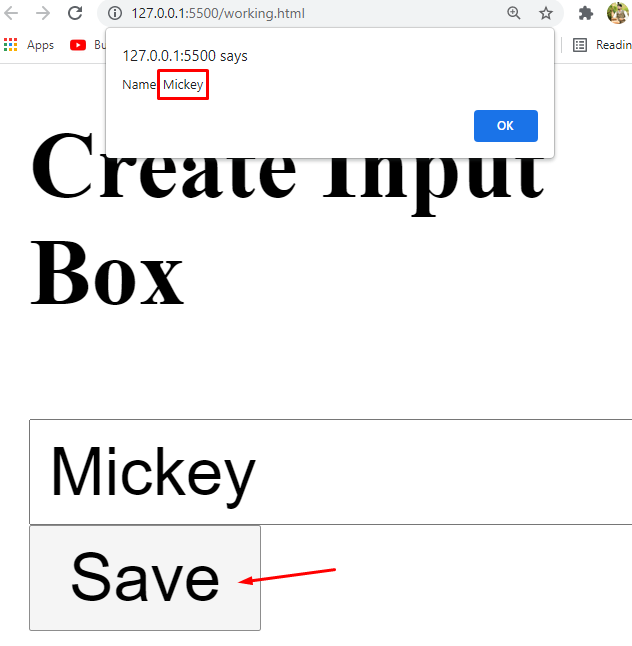

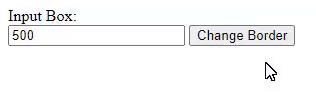
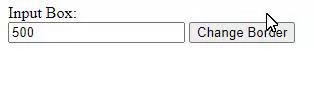

 Example2: JavaScript in the body section
<!DOCTYPE html>
<head>
<title>page title</title>
</head>
<body>
<script>
document.write("JavaScript added in body section");
</script>
<p> This example shows how to include JavaScript in the body section </p>
</body>
</html>
Example2: JavaScript in the body section
<!DOCTYPE html>
<head>
<title>page title</title>
</head>
<body>
<script>
document.write("JavaScript added in body section");
</script>
<p> This example shows how to include JavaScript in the body section </p>
</body>
</html>


 After submit the URL looks like this:

 After submitting the URL looks like this:

 Here in this example, we simply used the function() keyword to declare a function and then stored it into a variable called “welcome”.
Then through that variable we accessed the function.
Here in this example, we simply used the function() keyword to declare a function and then stored it into a variable called “welcome”.
Then through that variable we accessed the function.

 Here the function is immediately executed and it works as described below:
First declare the function without any identifier as we do normally:
(function() {
console.log('Welcome to Our Website'); })
Now the function is declared but it won’t execute, so in order to execute it we use the trailing parenthesis “()” which are followed by the terminator “;” that’ll execute the below code:
(function() {
console.log('Welcome to Our Website'); })();
Sometimes we can also pass arguments into the anonymous function as shown below by the given example:
let user = {
firstName: 'Mark',
lastName: 'Jacob'};(function () {
console.log(`${user.firstName} ${user.lastName}`);})(user);
Output:
Here the function is immediately executed and it works as described below:
First declare the function without any identifier as we do normally:
(function() {
console.log('Welcome to Our Website'); })
Now the function is declared but it won’t execute, so in order to execute it we use the trailing parenthesis “()” which are followed by the terminator “;” that’ll execute the below code:
(function() {
console.log('Welcome to Our Website'); })();
Sometimes we can also pass arguments into the anonymous function as shown below by the given example:
let user = {
firstName: 'Mark',
lastName: 'Jacob'};(function () {
console.log(`${user.firstName} ${user.lastName}`);})(user);
Output:


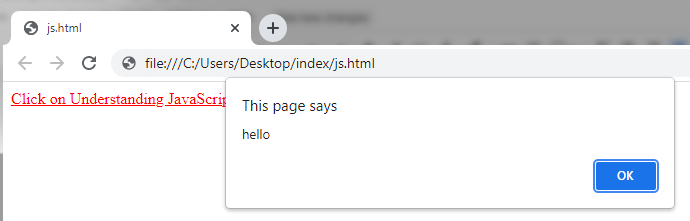 The following example shows that code will show an alert box whenever you click on the anchor tag but the web page will not be reloaded.
<html><body><a href="javascript:void(0); alert('Prevent reload and refresh')"> JavaScript:
The following example shows that code will show an alert box whenever you click on the anchor tag but the web page will not be reloaded.
<html><body><a href="javascript:void(0); alert('Prevent reload and refresh')"> JavaScript:


 The apply() method is used similarly to call a function but it accepts an array whereas the call() method accepts a list of values.
const num = [2, 6, 11, 33, 4];const max = Math.max.apply(null, num);
console.log(max);const min = Math.min.apply(null, num);
console.log(min);
The apply() method is used similarly to call a function but it accepts an array whereas the call() method accepts a list of values.
const num = [2, 6, 11, 33, 4];const max = Math.max.apply(null, num);
console.log(max);const min = Math.min.apply(null, num);
console.log(min);
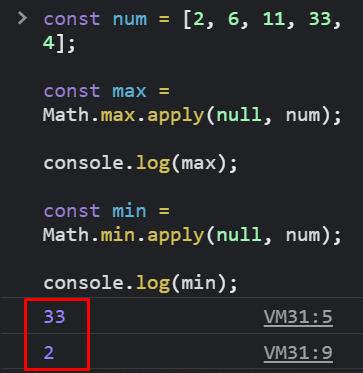
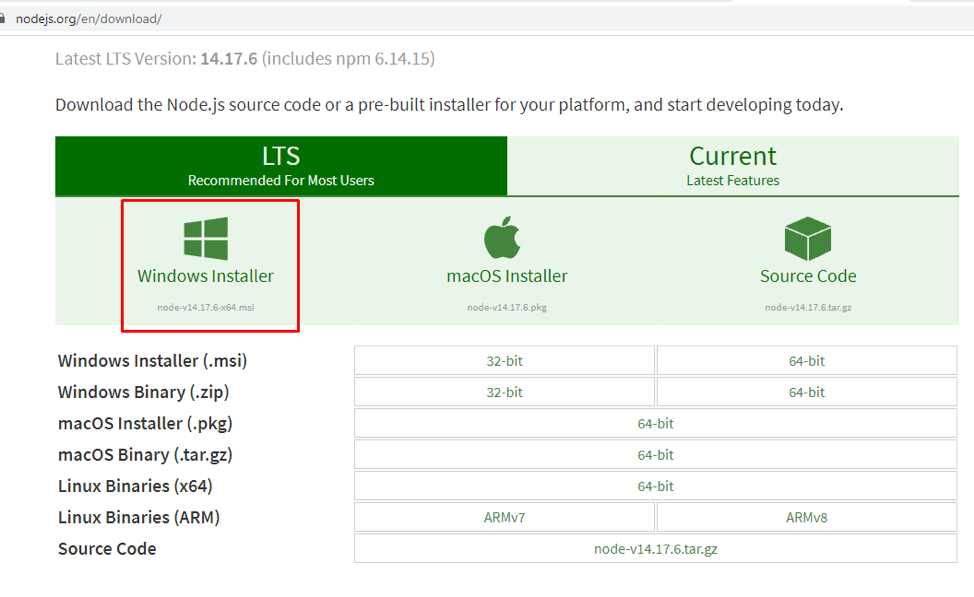 Keep in mind that the Node.js installer already has an NPM package manager.
Once clicked your download will start.
Keep in mind that the Node.js installer already has an NPM package manager.
Once clicked your download will start.
 Step 2: Once completed go to the Downloads folder on your computer and open the Node.js file.
Welcome to the Node.js Setup screen where you have to click on the Next button.
Step 2: Once completed go to the Downloads folder on your computer and open the Node.js file.
Welcome to the Node.js Setup screen where you have to click on the Next button.
 Step 3: Next the License Agreement screen will be shown where you have to tick the accepting terms option and then click on the Next button:
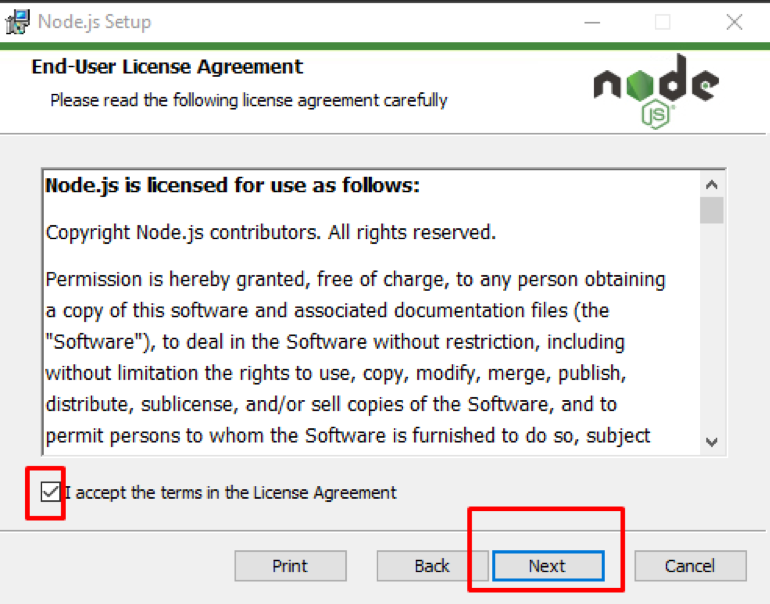 Step 4: This step involves choosing a destination folder where Node.js will be installed.
Once you have chosen your destination folder, click on the Next button:
Step 4: This step involves choosing a destination folder where Node.js will be installed.
Once you have chosen your destination folder, click on the Next button:
 Step 5: Now the custom setup screen will be shown where you can select components to include or remove from the installation which depends on your requirements.
When you are done, click on the Next button:
Step 5: Now the custom setup screen will be shown where you can select components to include or remove from the installation which depends on your requirements.
When you are done, click on the Next button:
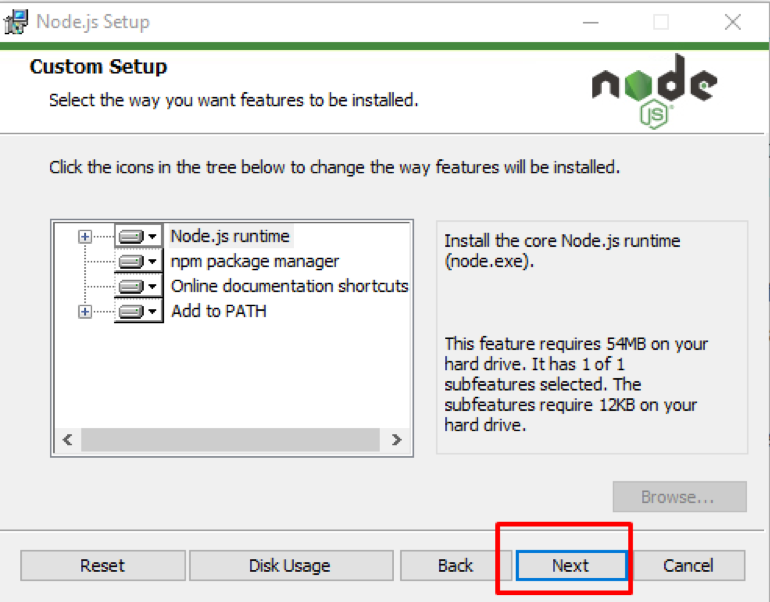 Step 6: The next window that will be shown is the Native Modules window where you can click on the automatic installation of all the required tools for Node.js or leave it unticked.
Click on the Next button:
Step 6: The next window that will be shown is the Native Modules window where you can click on the automatic installation of all the required tools for Node.js or leave it unticked.
Click on the Next button:
 Step 7: You can finally click on the Install button after which the installation will start:
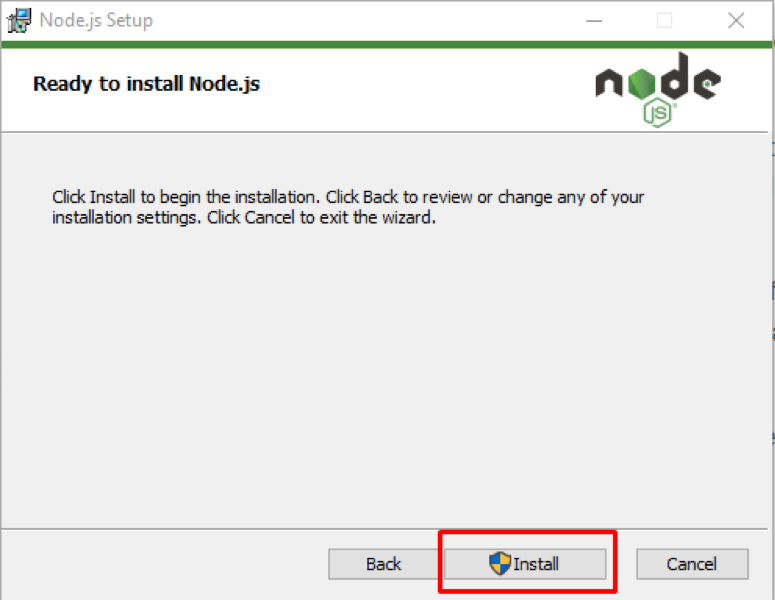 Step 8: Once the installation is completed you will see the completed Node.js Setup Wizard on the screen after which you have to click on the Finish button:

 We can also check for the NPM version for which we have to execute the below command:
$ npm -v
We can also check for the NPM version for which we have to execute the below command:
$ npm -v
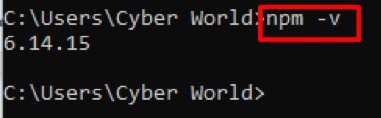
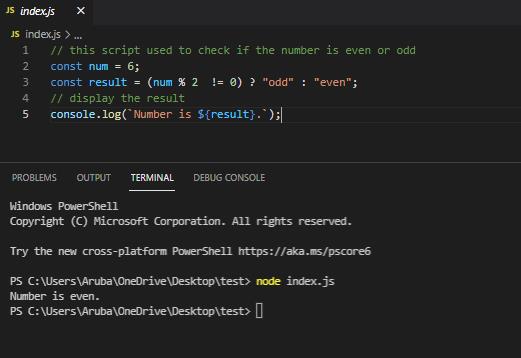 On the other hand, we assigned 43 to the num variable and it gives the following output.
// this script used to check if the number is even or oddconst num = 43;const result = (num % 2 != 0) ? "odd" : "even";// display the result
console.log(`Number is ${result}.`);
On the other hand, we assigned 43 to the num variable and it gives the following output.
// this script used to check if the number is even or oddconst num = 43;const result = (num % 2 != 0) ? "odd" : "even";// display the result
console.log(`Number is ${result}.`);
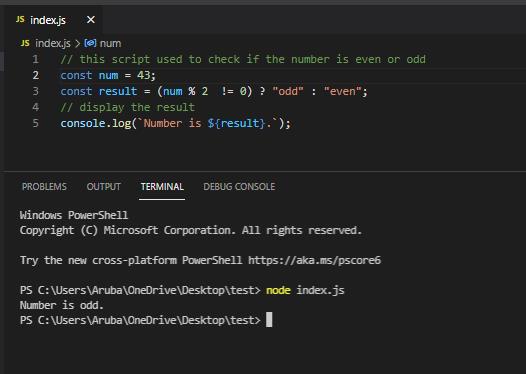
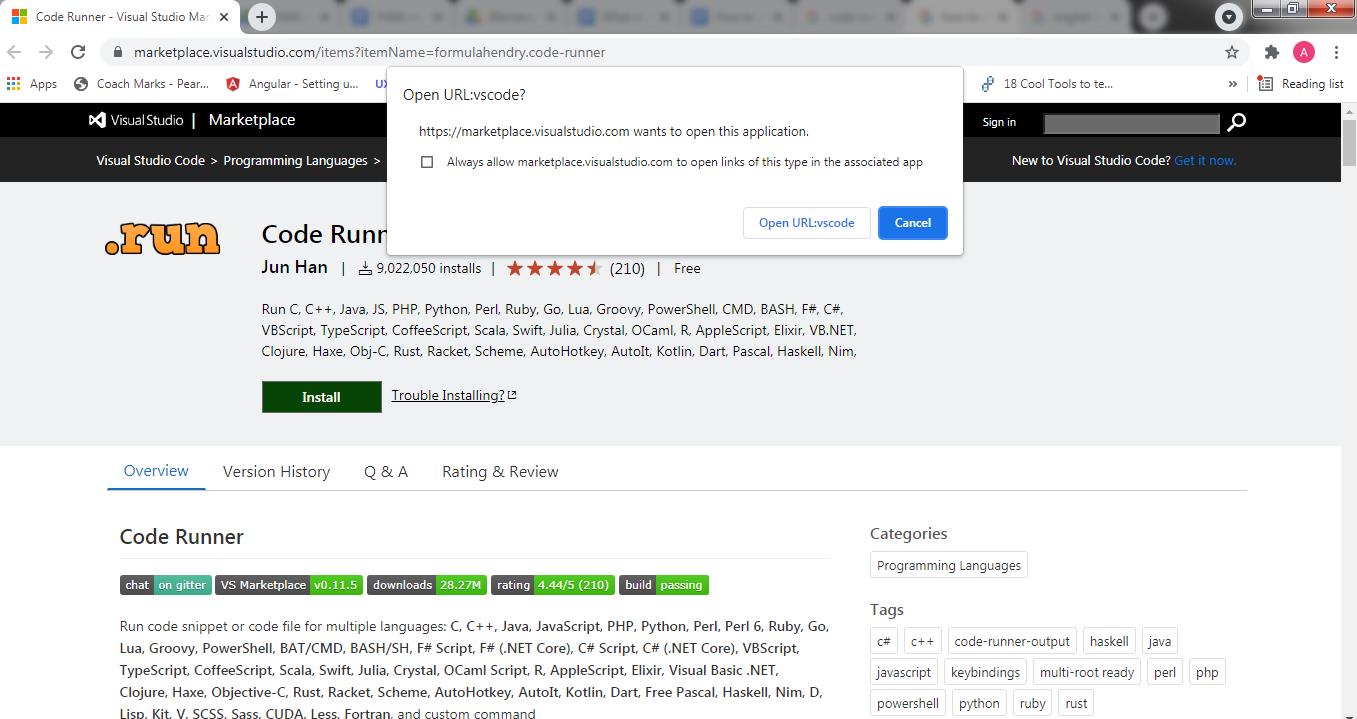 Then click on the Open URL:vscode button.
The following window is shown as mentioned below.
Then click on the Open URL:vscode button.
The following window is shown as mentioned below.
 2.After installation of the code runner extension, open JavaScript Code in VSCode.
Press CTRL+ALT+N shortcut or you may press F1 then write Run Code to run the code.
Subsequently, you will see the following output in the “OUTPUT” tab.
// this script used to check if the number is even or oddconst num = 6;const result = (num % 2 != 0) ? "odd" : "even";// display the result
console.log(`Number is ${result}.`);
2.After installation of the code runner extension, open JavaScript Code in VSCode.
Press CTRL+ALT+N shortcut or you may press F1 then write Run Code to run the code.
Subsequently, you will see the following output in the “OUTPUT” tab.
// this script used to check if the number is even or oddconst num = 6;const result = (num % 2 != 0) ? "odd" : "even";// display the result
console.log(`Number is ${result}.`);
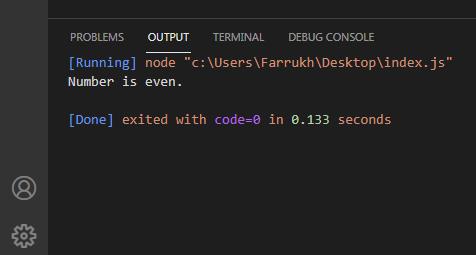
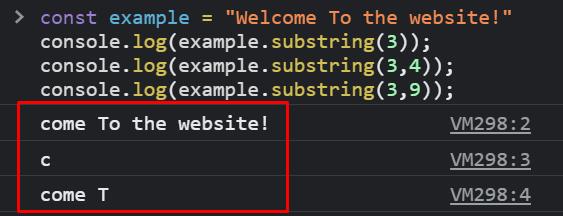
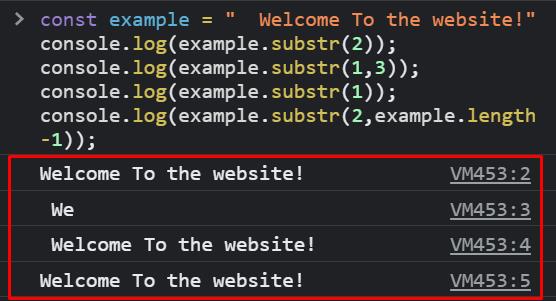


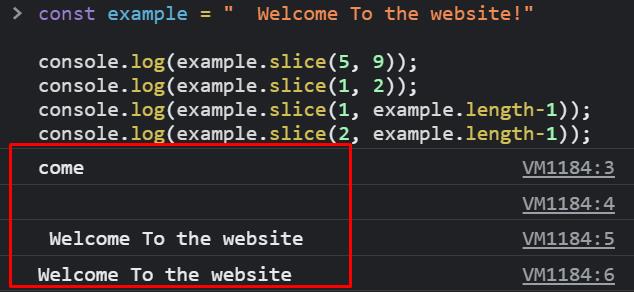
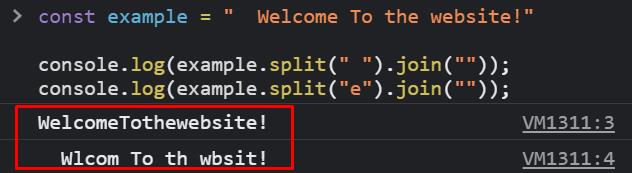
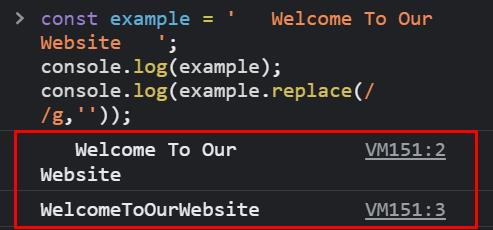 In order to remove all the whitespaces and not just the space character then you can use “\s” which will match against all the newline character, space character, tab character and translate it into a simpler code.
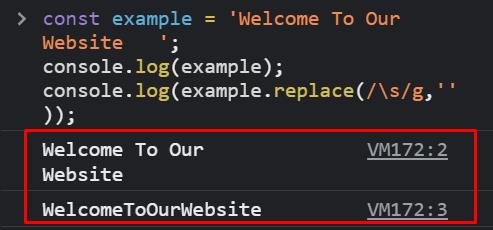
 You can also use \s for removing all the whitespace characters from the string.

 To remove whitespaces from only the beginning or end of the string we’ll use trimStart() and trimEnd() methods.

 Below is the screenshot showing the name I set after refreshing the page:
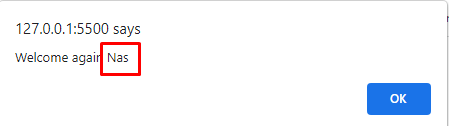
 We used this keyword in the above example because we wanted to access the property of an object within a method of the same object.
Suppose we invoked the fullName without the parenthesis () then it will simply return the function definition:
const student = {
firstName: "Jhon",
lastName: "Cena",
Regno: 12311,
fullName: function() {
return this.firstName + " " + this.lastName;
}};
alert(student.fullName);
We used this keyword in the above example because we wanted to access the property of an object within a method of the same object.
Suppose we invoked the fullName without the parenthesis () then it will simply return the function definition:
const student = {
firstName: "Jhon",
lastName: "Cena",
Regno: 12311,
fullName: function() {
return this.firstName + " " + this.lastName;
}};
alert(student.fullName);


 In the above example, we declared a name and then alert that name by using the inbuilt method toUpperCase() and we can see in the screenshot above that the name was converted to upper case.
Apart from the toUpperCase(), there are also numerous built-in methods that we can use, for example:v
Date()
Date.now()
Math.round(num)
Math.floor(num)
string.length()
string.toLowerCase()
Array.length
array.push()
In the above example, we declared a name and then alert that name by using the inbuilt method toUpperCase() and we can see in the screenshot above that the name was converted to upper case.
Apart from the toUpperCase(), there are also numerous built-in methods that we can use, for example:v
Date()
Date.now()
Math.round(num)
Math.floor(num)
string.length()
string.toLowerCase()
Array.length
array.push()
 This is all through JavaScript to keep the users engaged as well as make the website look more lively and aesthetically pleasing.
Furthermore, a lot of time you open a site and the loading time takes a lot of time while you’re stuck looking at a white screen.
To make the waiting process a lot less painful for users a lot of websites add loading animation to keep their users engaged such as the one provided below:
This is all through JavaScript to keep the users engaged as well as make the website look more lively and aesthetically pleasing.
Furthermore, a lot of time you open a site and the loading time takes a lot of time while you’re stuck looking at a white screen.
To make the waiting process a lot less painful for users a lot of websites add loading animation to keep their users engaged such as the one provided below:
 Moreover, various scroll bars and navigation bar techniques are used to add animation to a website through JavaScript or how a button reacts on each click.
 In this way users can make their website more engaging and add various dynamic behaviours through the help of JavaScript.


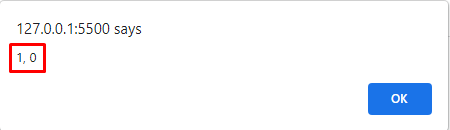
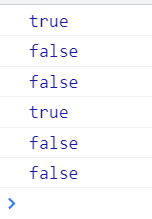


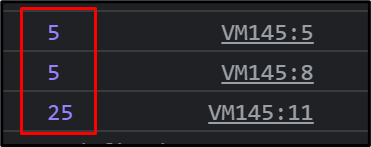
 Here, note that when null and undefined is used with the String() method it converts them to string.
Whereas, the toString() method generates an error.
Here, note that when null and undefined is used with the String() method it converts them to string.
Whereas, the toString() method generates an error.

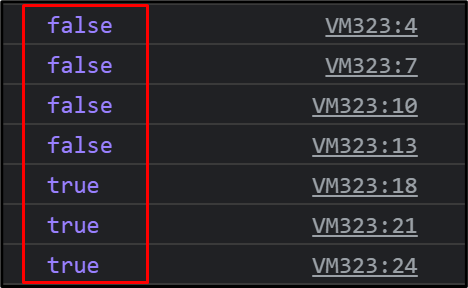 Here, anything with some value will generate true.
Whereas, anything not defined or without a value generates false.
Here, anything with some value will generate true.
Whereas, anything not defined or without a value generates false.


 We can also use the “this” keyword alone using strict mode.
The solution will be the same i-e it will show the [object Window] alert.
The code will look like this:
const xyz=this;
alert(xyz);
We can also use the “this” keyword alone using strict mode.
The solution will be the same i-e it will show the [object Window] alert.
The code will look like this:
const xyz=this;
alert(xyz);
 However, if we use this keyword in strict mode then the result is undefined.
It is because in strict mode JavaScript restricts default binding.
For Example:
use strict";
function myFunc(){
alert(this);
}
myFunc();
In this example, we used “use strict”.
We will be returned undefined when we run this code.
However, if we use this keyword in strict mode then the result is undefined.
It is because in strict mode JavaScript restricts default binding.
For Example:
use strict";
function myFunc(){
alert(this);
}
myFunc();
In this example, we used “use strict”.
We will be returned undefined when we run this code.

 When we click on the click me to see magic button it will vanish.


 Well, what happens when the search method is unable to find the specific word in the string.
Following example demonstrate this:
<html><body><p>Hello!! Welcome to our Website..</p><p>What's the position of "here" in the above string? Click the button to see the position.</p>
<button onclick="searchMethod()">Search</button>
<p></p>
<script>
function searchMethod() {
var str = "Hello!! Welcome to our Website..";
var n = str.search("here");
document.getElementById("div").innerHTML = n;
}
</script>
</body>
</html>
In this example, the word “here” is not present in the string.
That’s why it returned -1 as an output.
Output:
Well, what happens when the search method is unable to find the specific word in the string.
Following example demonstrate this:
<html><body><p>Hello!! Welcome to our Website..</p><p>What's the position of "here" in the above string? Click the button to see the position.</p>
<button onclick="searchMethod()">Search</button>
<p></p>
<script>
function searchMethod() {
var str = "Hello!! Welcome to our Website..";
var n = str.search("here");
document.getElementById("div").innerHTML = n;
}
</script>
</body>
</html>
In this example, the word “here” is not present in the string.
That’s why it returned -1 as an output.
Output:
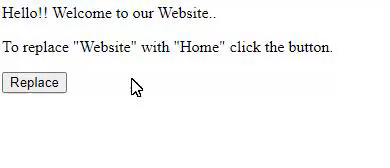
 Here are some more examples to give better understanding of the method:
let str = "Hello world, welcome to our website";
console.log(str.indexOf("e", 5)); // Returns 14
console.log(str.indexOf("Welcome")); // Returns -1
Here, in the first example the position was given 5, so it started searching from the 5th index.
In the second example “Welcome” with capital W was written for the search.
As it’s a case sensitive method so it returned -1.
Output:
Here are some more examples to give better understanding of the method:
let str = "Hello world, welcome to our website";
console.log(str.indexOf("e", 5)); // Returns 14
console.log(str.indexOf("Welcome")); // Returns -1
Here, in the first example the position was given 5, so it started searching from the 5th index.
In the second example “Welcome” with capital W was written for the search.
As it’s a case sensitive method so it returned -1.
Output:


 Example:
let regexp = new RegExp('hello there');
console.log(regexp);
Output:
Example:
let regexp = new RegExp('hello there');
console.log(regexp);
Output:

 Example:
let regexp = /hello/;
let check = regexp.test('hi world');
console.log(check);
Output:
Example:
let regexp = /hello/;
let check = regexp.test('hi world');
console.log(check);
Output:
 match() method
Another method that is used with the regular expression is match() methods that check a string and return an array of all the matches, in case no match found null is returned.
Below is an example for the method match() along with the flag g which is a global flag that we will see in the article, it helps searching for all the matches in the string:
let regexp = "Welcome to our website";
let check = console.log(regexp.match(/come/g));
Output:
match() method
Another method that is used with the regular expression is match() methods that check a string and return an array of all the matches, in case no match found null is returned.
Below is an example for the method match() along with the flag g which is a global flag that we will see in the article, it helps searching for all the matches in the string:
let regexp = "Welcome to our website";
let check = console.log(regexp.match(/come/g));
Output:
 search() method
Another useful method is the search() method in which we pass the value that needs to be searched in the string and when found the index of that word is returned as an output:
let regexp = "Hey there, welcome!";
let check = console.log(regexp.search("there"));
Output:
search() method
Another useful method is the search() method in which we pass the value that needs to be searched in the string and when found the index of that word is returned as an output:
let regexp = "Hey there, welcome!";
let check = console.log(regexp.search("there"));
Output:
 replace() methodreplace() method is used to replace a specific value in the string.
It takes in two parameter and searches the string with first parameter, when found replace it with the value to be replaced:
let regexp = "Hey there, welcome!";
let check = console.log(regexp.replace("there", "you"));
Output:
replace() methodreplace() method is used to replace a specific value in the string.
It takes in two parameter and searches the string with first parameter, when found replace it with the value to be replaced:
let regexp = "Hey there, welcome!";
let check = console.log(regexp.replace("there", "you"));
Output:

 (g) global flag
Mostly when using the method match() to search for a particular match in a string, it returns only the first match.
But, with the use of the “g” global flag along with the method, it searches for all the matches in the string and returns an array of the matches found.
let regexp = "The cook was cooking cookies";
let check = console.log(regexp.match(/cook/g));
Output:
(g) global flag
Mostly when using the method match() to search for a particular match in a string, it returns only the first match.
But, with the use of the “g” global flag along with the method, it searches for all the matches in the string and returns an array of the matches found.
let regexp = "The cook was cooking cookies";
let check = console.log(regexp.match(/cook/g));
Output:
 You can also use two flags together for a better result as shown below in this example:
let regexp = `Name: John
Age: 45
City: New York`;
console.log( regexp.match(/a/gi) );
Output:
You can also use two flags together for a better result as shown below in this example:
let regexp = `Name: John
Age: 45
City: New York`;
console.log( regexp.match(/a/gi) );
Output:

 Now to avoid such errors, optional chaining was introduced through which we simply insert a question mark operator “?” between the property names as shown below:
const employee = {
name: "Mark",
workingSince: 2015}
employee.write?.salary();
Output:
Now to avoid such errors, optional chaining was introduced through which we simply insert a question mark operator “?” between the property names as shown below:
const employee = {
name: "Mark",
workingSince: 2015}
employee.write?.salary();
Output:
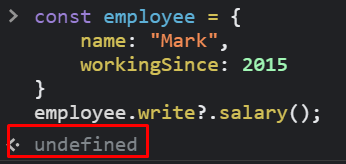 Through optional chaining it simply gave output “undefined” instead of throwing any errors and hence it’s one of the best features for developers to avoid such errors more efficiently.
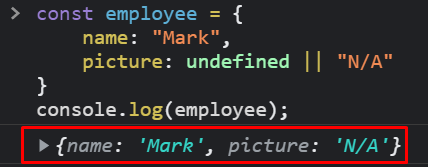 But while dealing with “||” the logical operator OR, you might encounter some issues if you consider some values as usable, such as “ “ and “0”.
For example we’ve declared a variable with value 0 or an empty string along with “||” logical OR operator, so the operator will consider the value as NULL or undefined and hence it’ll return some default value that we’ve fixed, as shown by the example below:
const example1 = 0 || 'default string';
console.log(example1);const example2 = '' || 500;
console.log(example2);
Output:
But while dealing with “||” the logical operator OR, you might encounter some issues if you consider some values as usable, such as “ “ and “0”.
For example we’ve declared a variable with value 0 or an empty string along with “||” logical OR operator, so the operator will consider the value as NULL or undefined and hence it’ll return some default value that we’ve fixed, as shown by the example below:
const example1 = 0 || 'default string';
console.log(example1);const example2 = '' || 500;
console.log(example2);
Output:
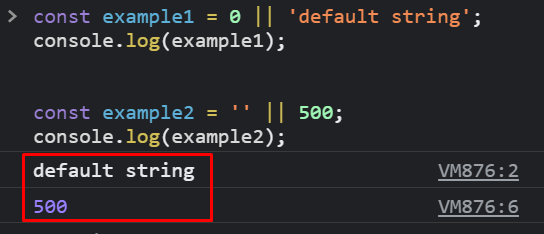 Here in the above example although we’ve set the values of both as 0 and empty string still it’s taking it as null and undefined and displaying the default value that we set.
To solve this issue we use Nullish Coalescing or double question marks(??) as shown below:
const example1 = 0 ?? 'default string';
console.log(example1);const example2 = '' ?? 500;
console.log(example2);
Output:
Here in the above example although we’ve set the values of both as 0 and empty string still it’s taking it as null and undefined and displaying the default value that we set.
To solve this issue we use Nullish Coalescing or double question marks(??) as shown below:
const example1 = 0 ?? 'default string';
console.log(example1);const example2 = '' ?? 500;
console.log(example2);
Output:
 This way the nullish coalescing is used which only accepts null and undefined values, other than that it always displays the right side values.
 Furthermore, when boolean values true and false are passed, the program returns 1 and 0 as output.
Example:
console.log(Number(true)); // returns 1
console.log(Number(false)); // returns 0
Output:
Furthermore, when boolean values true and false are passed, the program returns 1 and 0 as output.
Example:
console.log(Number(true)); // returns 1
console.log(Number(false)); // returns 0
Output:

 Here, in example 4, passing 2 as a parameter will return the binary value of the number.

 Here, in these examples it’s only returning the value before the decimal point.
In the second example it returned only 14, but in the third NaN because it’s unable to find the number value in it.
Here, in these examples it’s only returning the value before the decimal point.
In the second example it returned only 14, but in the third NaN because it’s unable to find the number value in it.
 Here, in the third example it only returned the first number and not the second.
It differs from parseInt() as it also returns the decimal value.
Here, in the third example it only returned the first number and not the second.
It differs from parseInt() as it also returns the decimal value.


 Another way of using it is through setTimeout() that redirects to a new page after a particular time assigned to it.
<head>
<script>
function pageRedirect() {
window.location.replace("https://www.google.com/");
}
setTimeout("pageRedirect()", 2000);
</script></head><body>
<p><strong>Note:</strong>You can go to Google after 2 seconds.</p></body>
Another way of using it is through setTimeout() that redirects to a new page after a particular time assigned to it.
<head>
<script>
function pageRedirect() {
window.location.replace("https://www.google.com/");
}
setTimeout("pageRedirect()", 2000);
</script></head><body>
<p><strong>Note:</strong>You can go to Google after 2 seconds.</p></body>

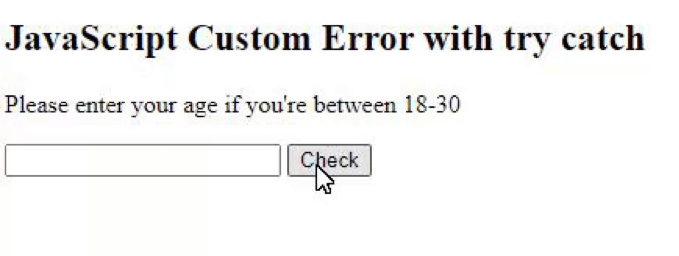 Now, when a number between 18-30 was entered:
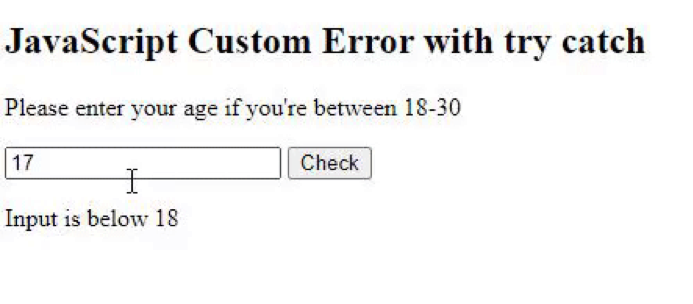 Furthermore, when the user entered an input that wasn’t a number:
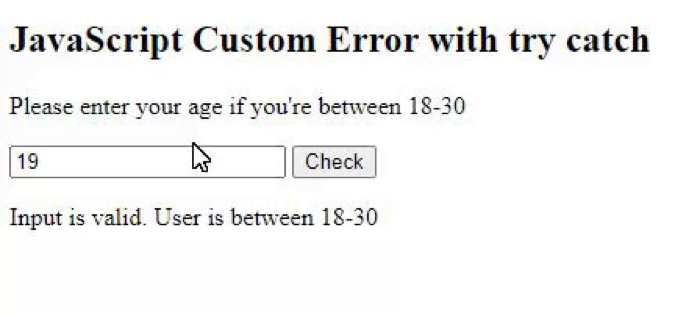 This shows how an exception was thrown depending on various inputs.
 In the above example, on line 1 we call the Parent Constructor because it sets the message property as well as the name and stack property of the Error.
Furthermore, it’s obligatory to call super in the child constructor.
In the above example, on line 1 we call the Parent Constructor because it sets the message property as well as the name and stack property of the Error.
Furthermore, it’s obligatory to call super in the child constructor.
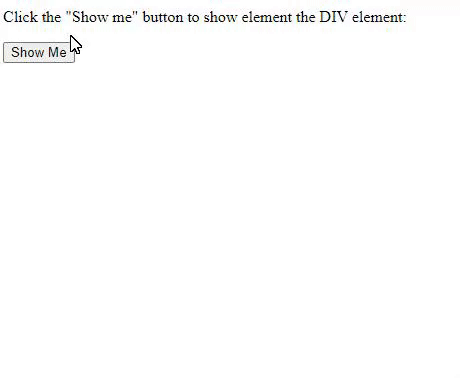 Through these ways, the element will be displayed or completely hidden and not just its visibility.
The page will be rebuilt according to these behaviours.
How to use style.visibility : The style visibility works in the similar way, but the difference is that only the visibility of the element is hidden from the screen reader.
This means that the element is not removed from the page flow, hence leaving space for it on the page.
Through these ways, the element will be displayed or completely hidden and not just its visibility.
The page will be rebuilt according to these behaviours.
How to use style.visibility : The style visibility works in the similar way, but the difference is that only the visibility of the element is hidden from the screen reader.
This means that the element is not removed from the page flow, hence leaving space for it on the page.
 In this, the space on the web page was not occupied by the element.
This shows how style.display and style.visibility differ.
In this, the space on the web page was not occupied by the element.
This shows how style.display and style.visibility differ.
 UglifyJs
Another tool available for this purpose is
UglifyJs
Another tool available for this purpose is  Jscrambler

 Minify your JavaScript
This
Minify your JavaScript
This 
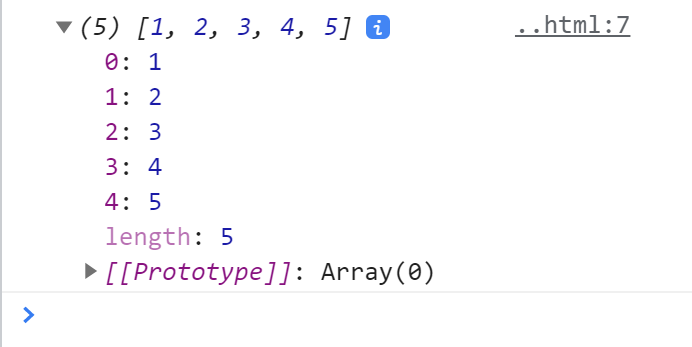
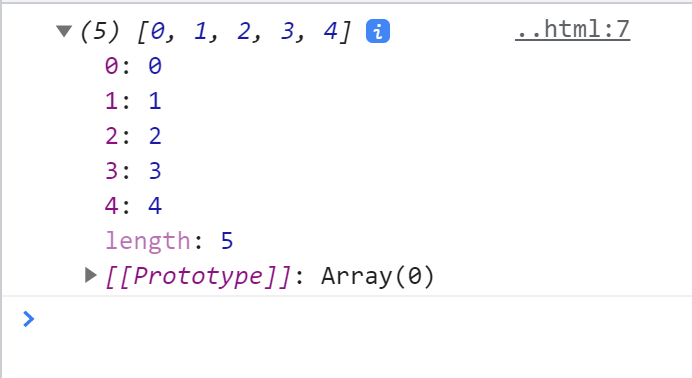
 Now we will remove every element that less than 3:
var num = [0, 1, 2, 3, 4, 5];var num2 = num.filter(element => element > 2)
console.log(num2);
Now we will remove every element that less than 3:
var num = [0, 1, 2, 3, 4, 5];var num2 = num.filter(element => element > 2)
console.log(num2);


 After, those 8 lines are minimized to a single line code:
function car(c){console.log("Car color is "+c)}car("Red");
After, those 8 lines are minimized to a single line code:
function car(c){console.log("Car color is "+c)}car("Red");


 So this is how, using the JSON.parse() method, the string will be parsed into the JSON format.
 So this is how, using the JSON.stringify() method, the JSON can be parsed into the string format.
 This will return “Harry” as the indexing starts from 0.
We have seen that we can get an element from an array by specifying an index number.
But it would be too hectic if there were 100 names in the above-mentioned array.
The solution is using loops; loops can easily handle arrays with numerous entries.
This post is focussing on how we can use JavaScript loops to iterate over an array to be an efficient programmer.
Note: The browser console is used for the demonstration of examples in this article.
This will return “Harry” as the indexing starts from 0.
We have seen that we can get an element from an array by specifying an index number.
But it would be too hectic if there were 100 names in the above-mentioned array.
The solution is using loops; loops can easily handle arrays with numerous entries.
This post is focussing on how we can use JavaScript loops to iterate over an array to be an efficient programmer.
Note: The browser console is used for the demonstration of examples in this article.
 We first declared an array named names, then a for loop and initialized a variable called index inside the for loop; This will act as the index for the array.
After that, we put the condition that the loop should run till it is one less than array length i-e from 0 to 2 (3 times in total).
The last parenthesis tells the loop that for every cycle increment the index by 1.
Every cycle of the loop, we console logged the array elements one by one using the variable initialized that is index.
To put it simply, the loop starts at the 0th index and then the length of the array is checked.
If the condition is true then loop runs the block of code that is inside the parentheses which is console logging.
After this, it increments “index” and then checks the condition again.
Same cycle repeats until the specified condition is no longer true.
We first declared an array named names, then a for loop and initialized a variable called index inside the for loop; This will act as the index for the array.
After that, we put the condition that the loop should run till it is one less than array length i-e from 0 to 2 (3 times in total).
The last parenthesis tells the loop that for every cycle increment the index by 1.
Every cycle of the loop, we console logged the array elements one by one using the variable initialized that is index.
To put it simply, the loop starts at the 0th index and then the length of the array is checked.
If the condition is true then loop runs the block of code that is inside the parentheses which is console logging.
After this, it increments “index” and then checks the condition again.
Same cycle repeats until the specified condition is no longer true.


 Now if we change the array in the above example:
const arr = [1, 3, 16, 3, 5, 7];
Now if we change the array in the above example:
const arr = [1, 3, 16, 3, 5, 7];

 In the above given HTML file we have a paragraph with a unique id i.e.
example-id.
If we want to access this paragraph element, we can use the getElementById() method:
<script>const paragraph = document.getElementById('example-id');
console.log(paragraph);</script>
In the above given HTML file we have a paragraph with a unique id i.e.
example-id.
If we want to access this paragraph element, we can use the getElementById() method:
<script>const paragraph = document.getElementById('example-id');
console.log(paragraph);</script>
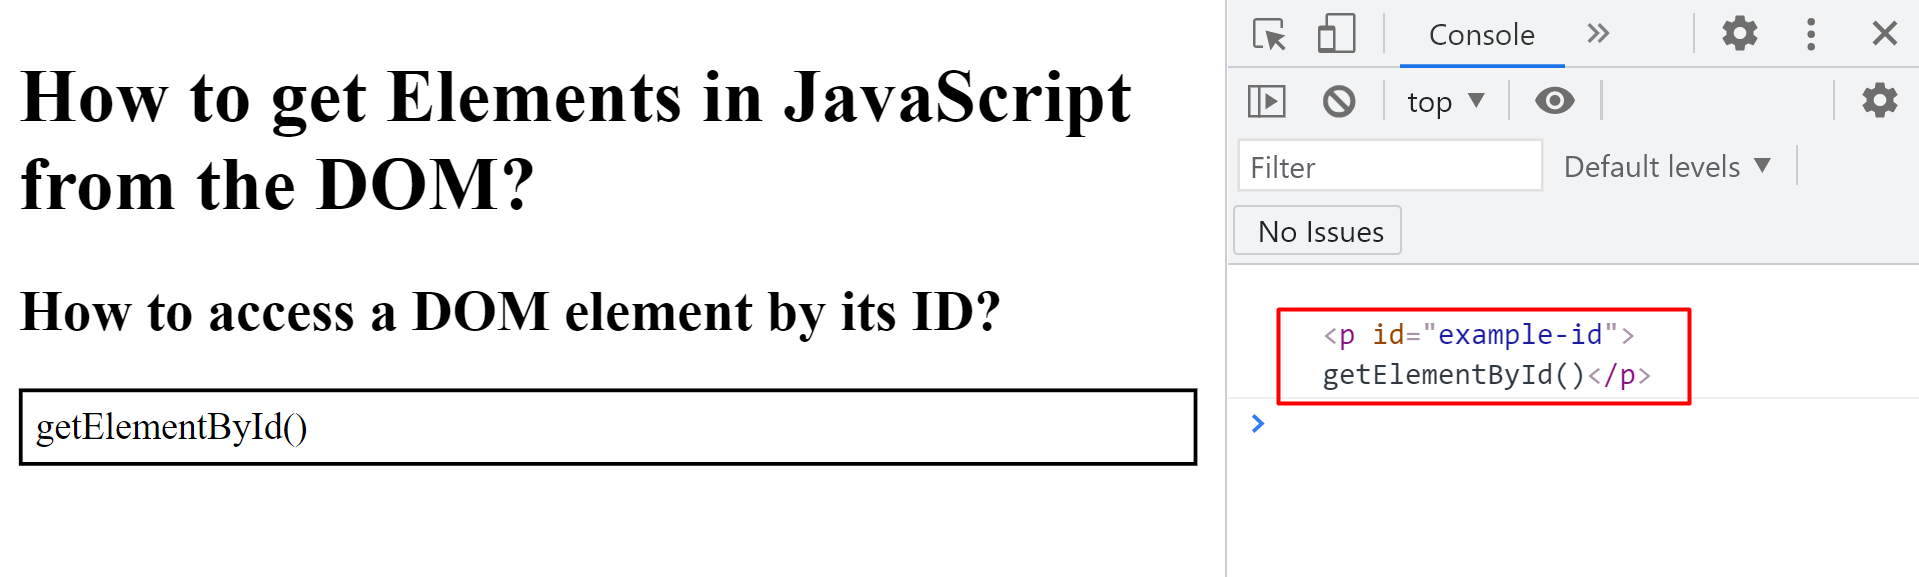 We can now use the newly created paragraph variable to manipulate the example-id element directly from JavaScript e.g if we want to change the background and text-color of the paragraph then:
<script>const paragraph = document.getElementById('example-id');
paragraph.style.color = 'white';
paragraph.style.backgroundColor = 'black';</script>
We can now use the newly created paragraph variable to manipulate the example-id element directly from JavaScript e.g if we want to change the background and text-color of the paragraph then:
<script>const paragraph = document.getElementById('example-id');
paragraph.style.color = 'white';
paragraph.style.backgroundColor = 'black';</script>
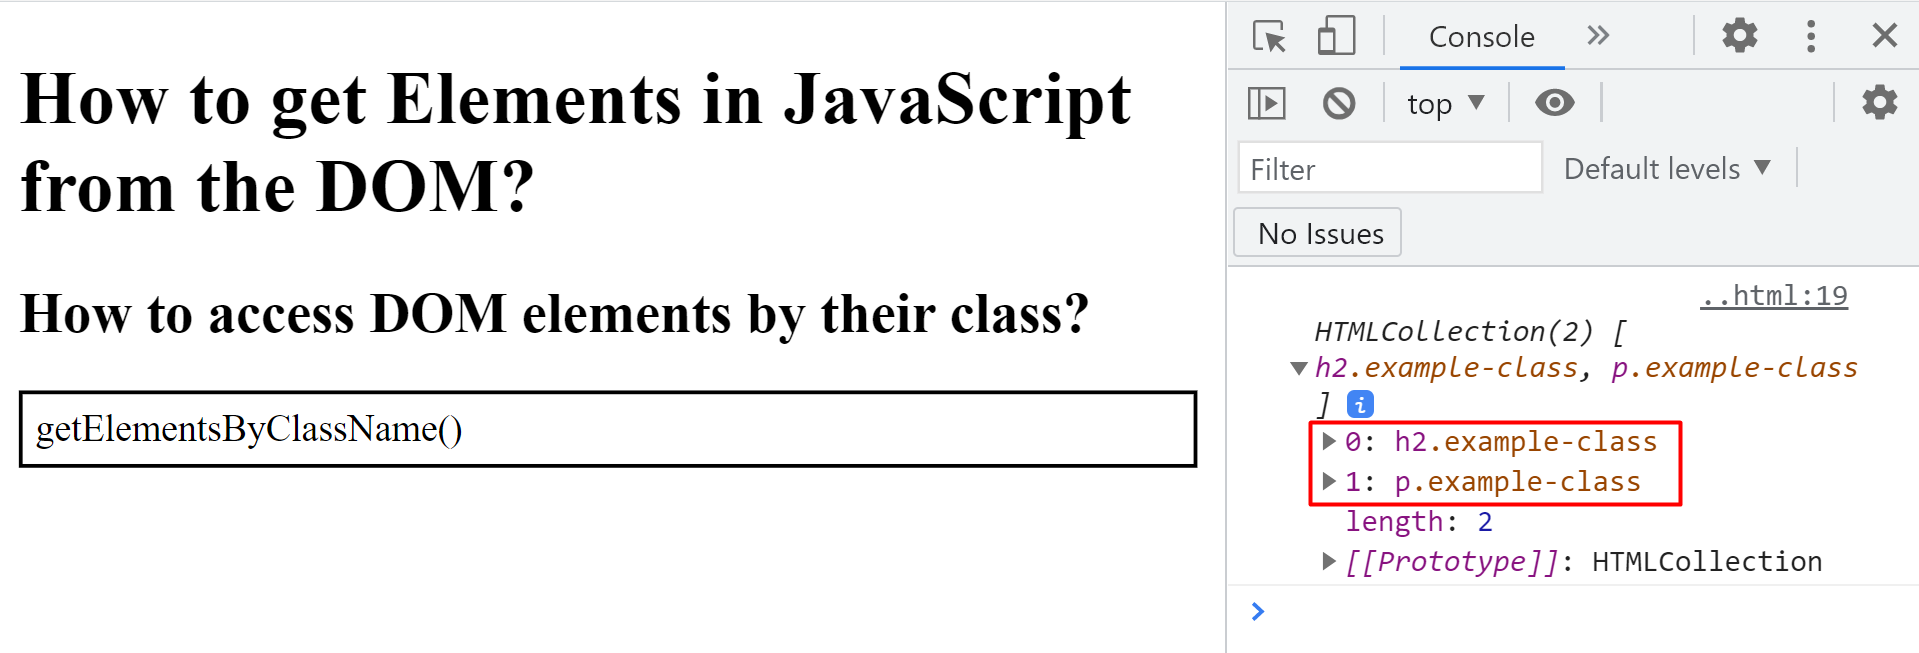 The getElementsByClassName() method returns all the elements that have a specific class in the form of an array.
So if we want to modify only one of the elements present inside the returned array we will need to access it with its index number:
<script>const sameClassElements = document.getElementsByClassName('example-class');
sameClassElements[0].style.color = 'blue';</script>
The getElementsByClassName() method returns all the elements that have a specific class in the form of an array.
So if we want to modify only one of the elements present inside the returned array we will need to access it with its index number:
<script>const sameClassElements = document.getElementsByClassName('example-class');
sameClassElements[0].style.color = 'blue';</script>
 We can use a for loop if we want to apply the same changes to all the elements of the array:
<script>const sameClassElements = document.getElementsByClassName('example-class');for (let index = 0; index < sameClassElements.length; index++) {
sameClassElements[index].style.color = 'blue';}</script>
We can use a for loop if we want to apply the same changes to all the elements of the array:
<script>const sameClassElements = document.getElementsByClassName('example-class');for (let index = 0; index < sameClassElements.length; index++) {
sameClassElements[index].style.color = 'blue';}</script>

 We can again use a loop to apply the same changes to all the elements present within the new array:
<script>const sameTagElements = document.getElementsByTagName('li')for (let index = 0; index < sameTagElements.length; index++) {
sameTagElements[index].style.fontFamily = 'sans-serif';}</script>
We can again use a loop to apply the same changes to all the elements present within the new array:
<script>const sameTagElements = document.getElementsByTagName('li')for (let index = 0; index < sameTagElements.length; index++) {
sameTagElements[index].style.fontFamily = 'sans-serif';}</script>
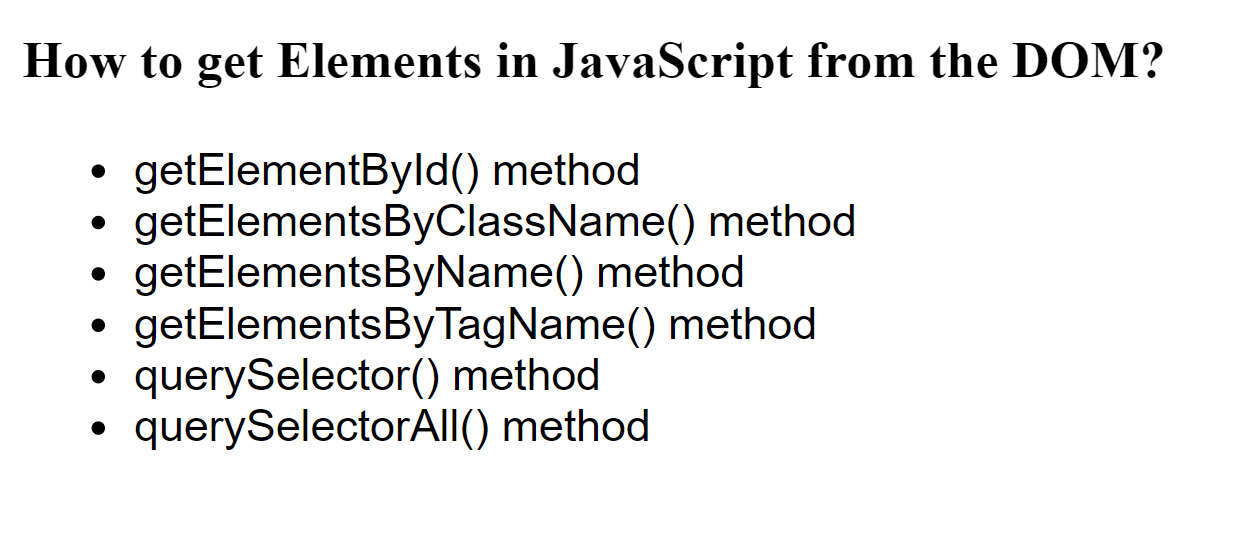
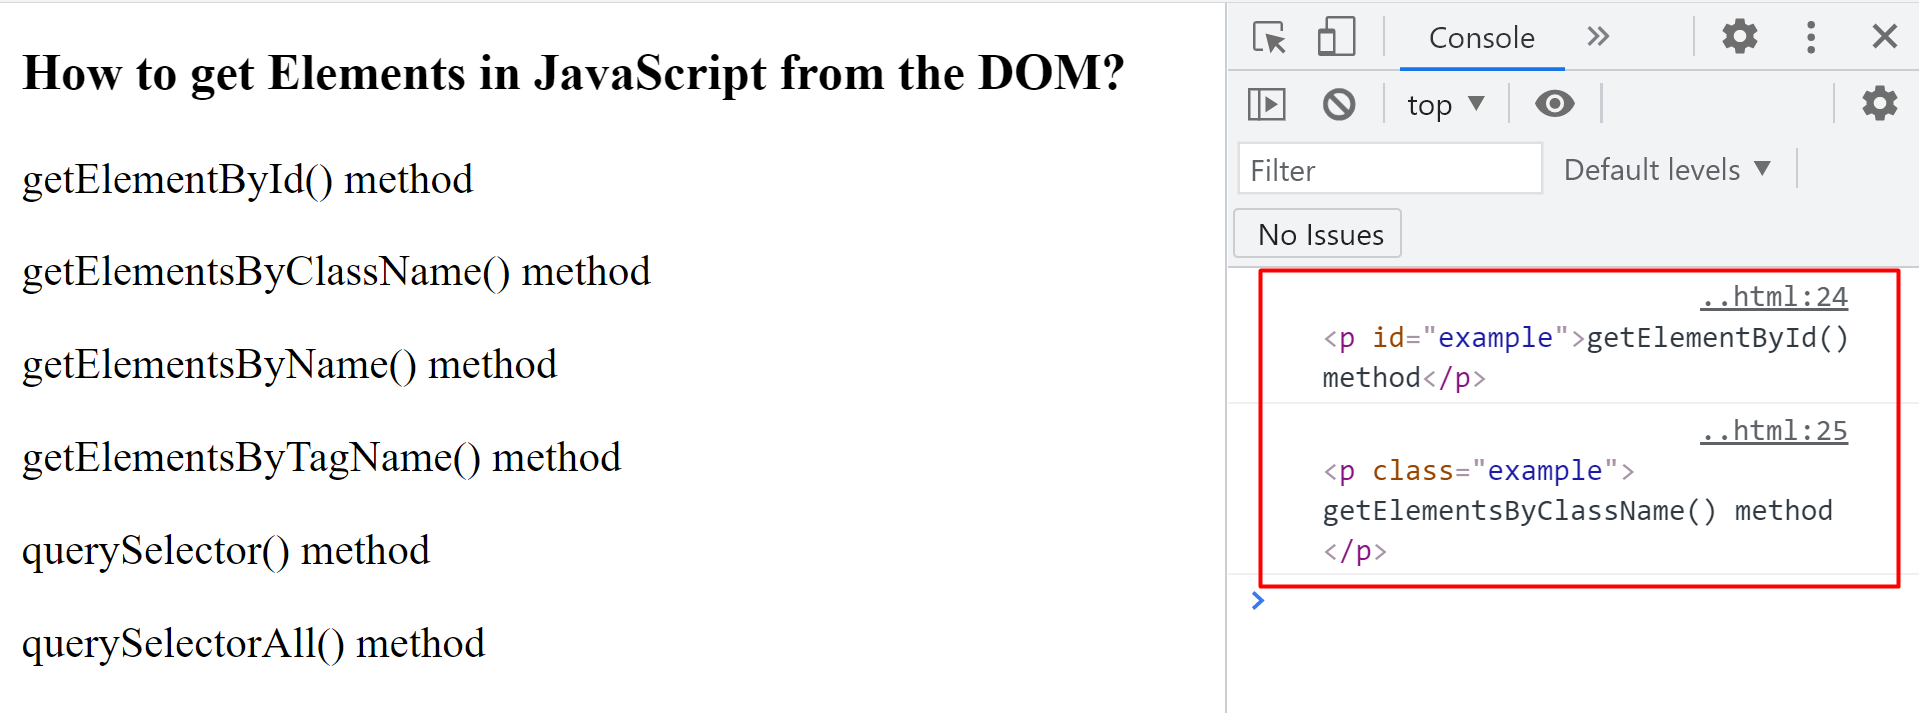 The querySelectorAll() method returns an array containing all the DOM elements with a specific class name or an ID:
<!DOCTYPE html><html lang="en"><head><title>Accessing DOM Elements</title></head><body><h3>How to get Elements from the DOM?</h3><p id="example-id">getElementById() method</p><p id="example-id">getElementsByClassName() method</p><p id="example-id">getElementsByName() method</p><p id="example-id">getElementsByTagName() method</p><p id="example-id">querySelector() method</p><p id="example-id">querySelectorAll() method</p><script>const paragraphs = document.querySelectorAll('#example-id');
console.log(paragraphs);</script></body></html>
The querySelectorAll() method returns an array containing all the DOM elements with a specific class name or an ID:
<!DOCTYPE html><html lang="en"><head><title>Accessing DOM Elements</title></head><body><h3>How to get Elements from the DOM?</h3><p id="example-id">getElementById() method</p><p id="example-id">getElementsByClassName() method</p><p id="example-id">getElementsByName() method</p><p id="example-id">getElementsByTagName() method</p><p id="example-id">querySelector() method</p><p id="example-id">querySelectorAll() method</p><script>const paragraphs = document.querySelectorAll('#example-id');
console.log(paragraphs);</script></body></html>
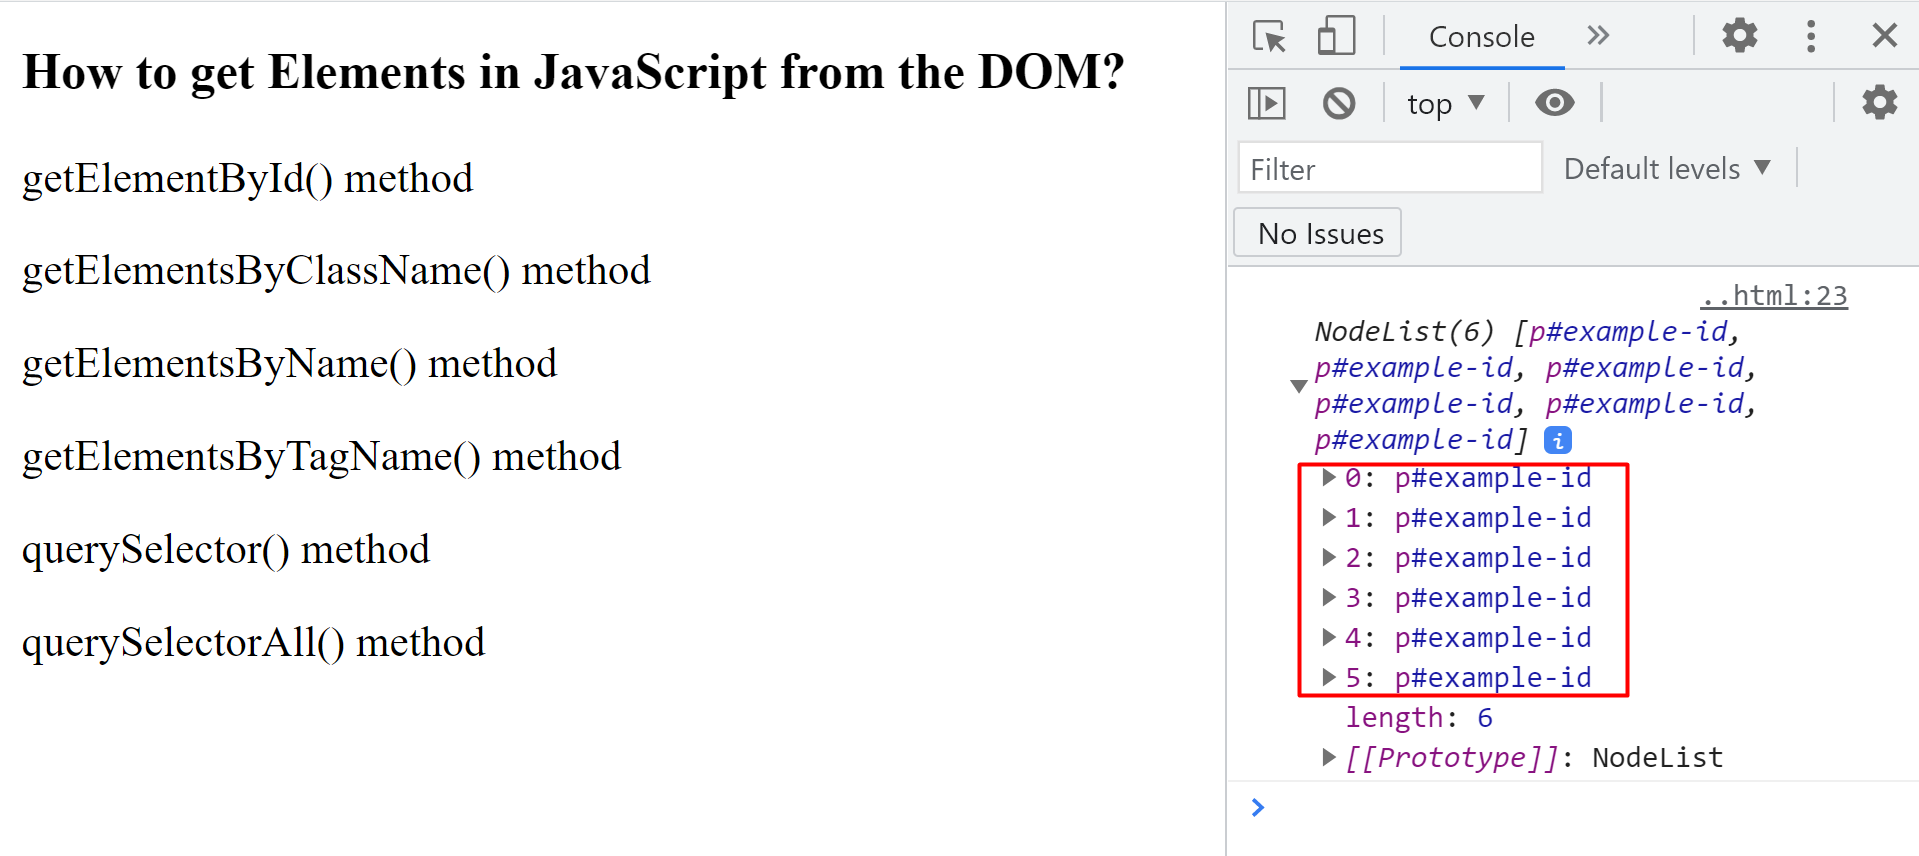 We can perform different methods such as .forEach() method on the arrays returned by the querySelectorAll().
These methods do not work with the arrays returned by getElement methods.
We can perform different methods such as .forEach() method on the arrays returned by the querySelectorAll().
These methods do not work with the arrays returned by getElement methods.
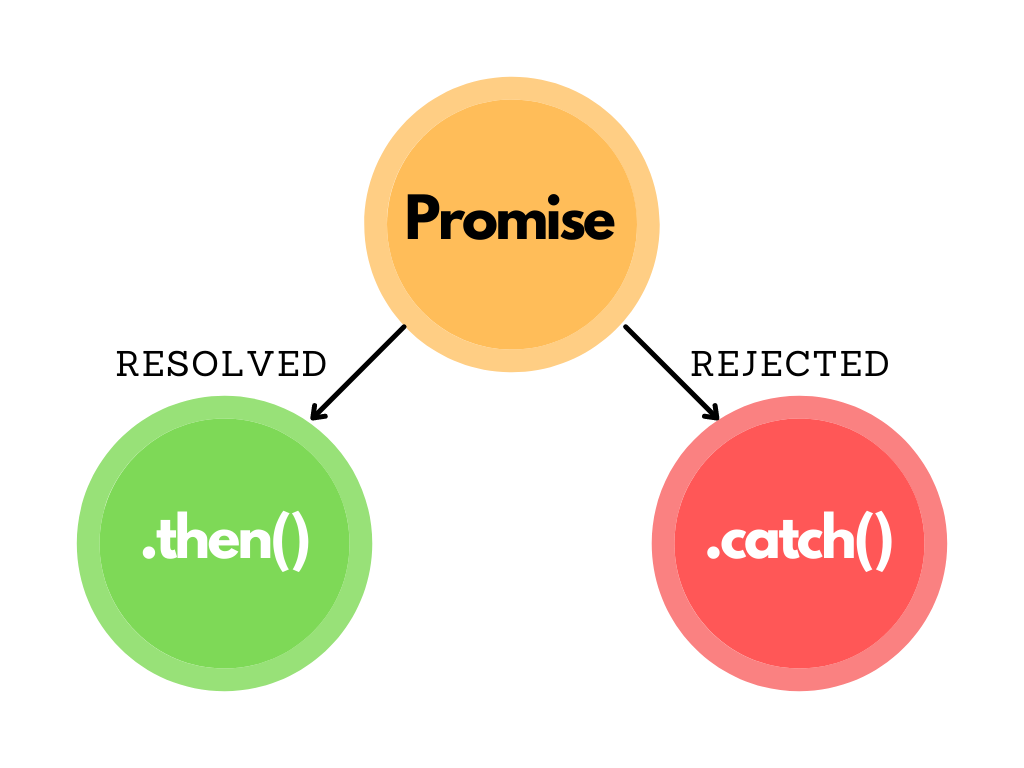
 myPromise.then((message) => {
console.log(message);}).catch((message) => {
console.log(message);});
It can be written in two different ways; separately or in combination with the then() method.
In case the promise is unfulfilled, it will execute the catch() method and this time a different message will be shown on the console.
myPromise.then((message) => {
console.log(message);}).catch((message) => {
console.log(message);});
It can be written in two different ways; separately or in combination with the then() method.
In case the promise is unfulfilled, it will execute the catch() method and this time a different message will be shown on the console.


 Now that we know what problem we are facing, the question arises: what is the solution? The Solution to this problem is “prototype”.
 To put simply, the prototype property of JavaScript helps us in adding new properties to object constructors as shown in the above example.
 We can also see in this example that the prototype property is not exposed to the object, we can only access it using the “__proto__”.

 {const pi = Math.PI;// Output: Value of PI
console.log(pi);}const pi = 4;// Output: 4 (without any error as it is out of the scope)
console.log(pi);
{const pi = Math.PI;// Output: Value of PI
console.log(pi);}const pi = 4;// Output: 4 (without any error as it is out of the scope)
console.log(pi);
 If an object has been declared using const, its keys cannot be changed.
However its values can be changed:
const user = {
name: "Steve",
age: 13
}
user = {
userName: "Harry",
grade: "3rd"
} // TypeError: Assignment to constant variable.
If an object has been declared using const, its keys cannot be changed.
However its values can be changed:
const user = {
name: "Steve",
age: 13
}
user = {
userName: "Harry",
grade: "3rd"
} // TypeError: Assignment to constant variable.
 const user = {
name: "Steve",
age: 13
}
user.name = "Harry";
console.log(user);
const user = {
name: "Steve",
age: 13
}
user.name = "Harry";
console.log(user);


 The arrow functions do have their limitations and cannot be used everywhere.


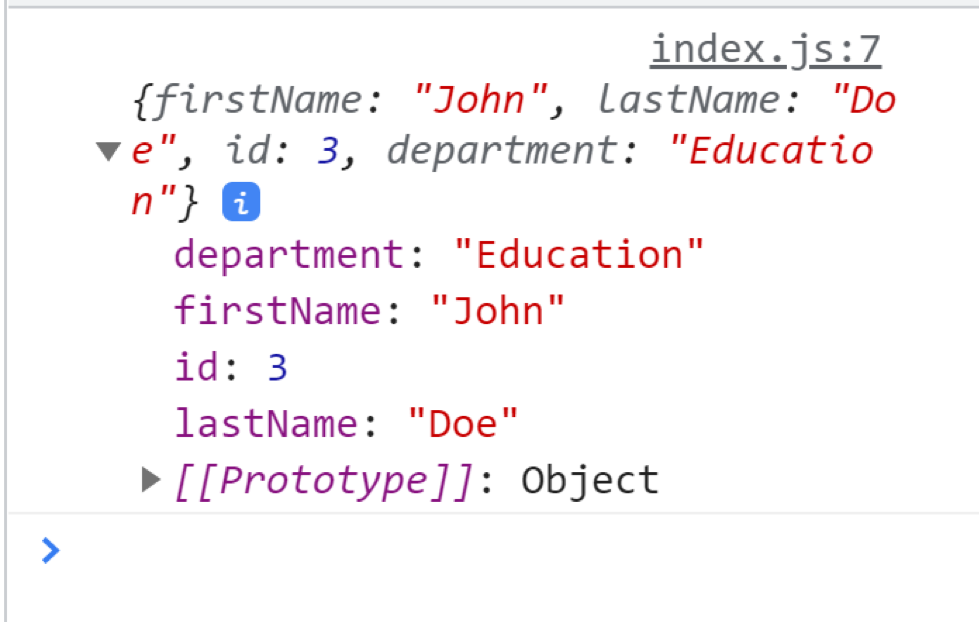
 In ES6
var diameter = (radius) => {
let dia = 2*radius;
return dia;};
diameter(8);
In ES6
var diameter = (radius) => {
let dia = 2*radius;
return dia;};
diameter(8);
 For/Of Loops
Using for/of, you can iterate over iterable data structures such as arrays, strings, maps etc:
var num = [5, 6, 7, 8, 9];for (let d of num) {
console.log(d);}
For/Of Loops
Using for/of, you can iterate over iterable data structures such as arrays, strings, maps etc:
var num = [5, 6, 7, 8, 9];for (let d of num) {
console.log(d);}


 A countdown timer has been successfully made; now you can style it using CSS.
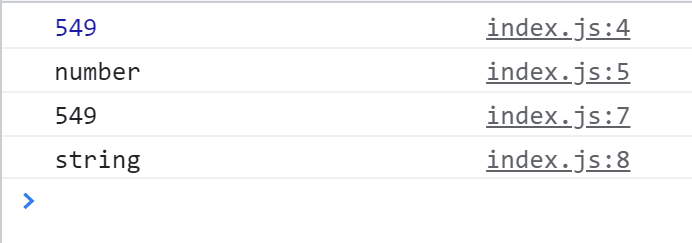


 Similarly we can convert any data type into a string:
var bool = true;
var str = bool.toString();
console.log(str);
console.log(typeof str);
Similarly we can convert any data type into a string:
var bool = true;
var str = bool.toString();
console.log(str);
console.log(typeof str);
 You can also add multiple values to an array using the unshift() method:
var num = [1, 2, 3, 4, 5];
num.unshift(-5, -4, -3, -2, -1, 0);
console.log(num);
You can also add multiple values to an array using the unshift() method:
var num = [1, 2, 3, 4, 5];
num.unshift(-5, -4, -3, -2, -1, 0);
console.log(num);
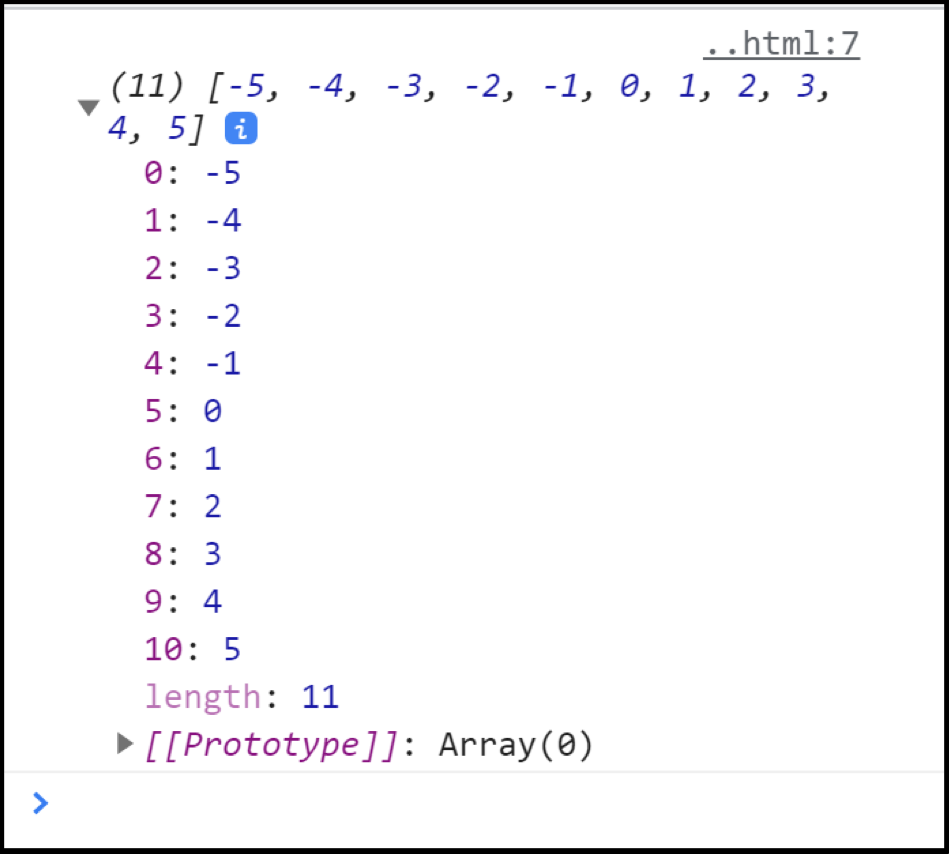
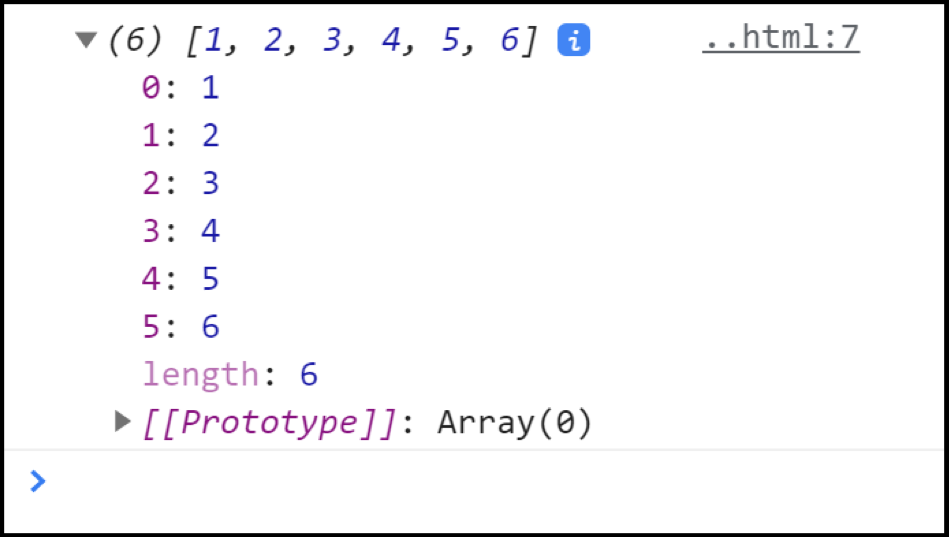 For multiple values:
var num = [1, 2, 3, 4, 5];
num.push(6, 7, 8, 9);
console.log(num);
For multiple values:
var num = [1, 2, 3, 4, 5];
num.push(6, 7, 8, 9);
console.log(num);

 To add elements to the end of the array:
var num = [1, 2, 3, 4, 5];var num2 =[].concat(num, 6, 7, 8, 9);
console.log(num2);
To add elements to the end of the array:
var num = [1, 2, 3, 4, 5];var num2 =[].concat(num, 6, 7, 8, 9);
console.log(num2);
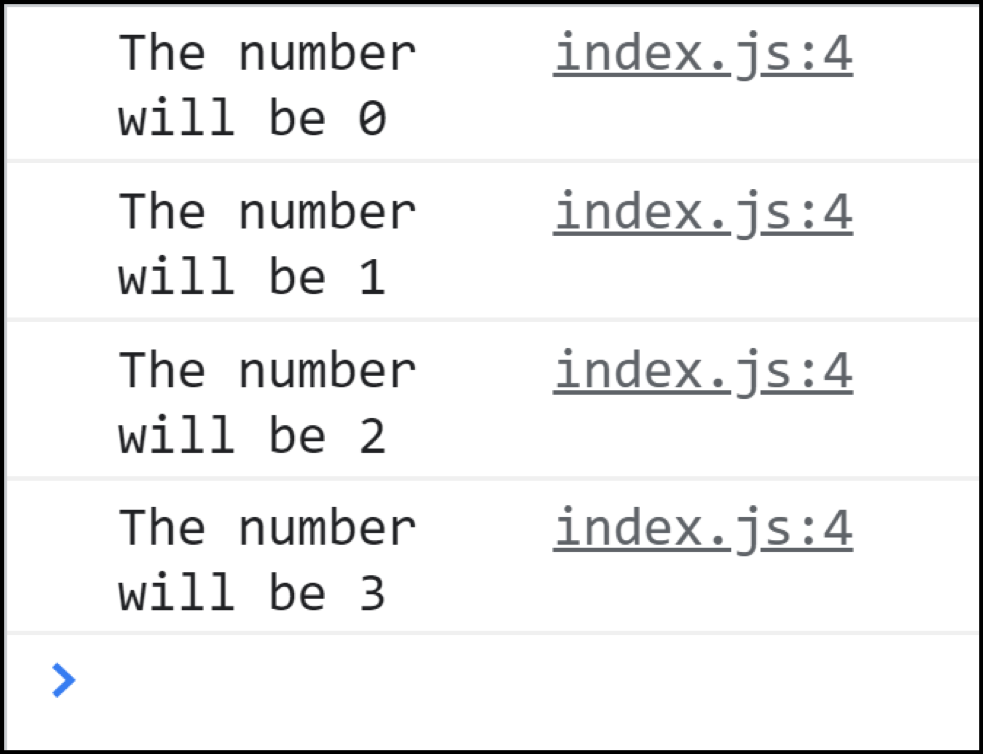
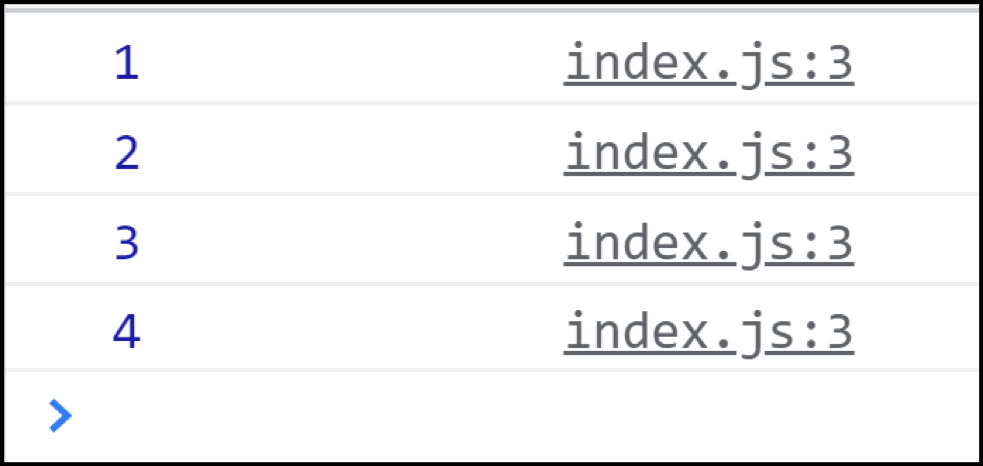
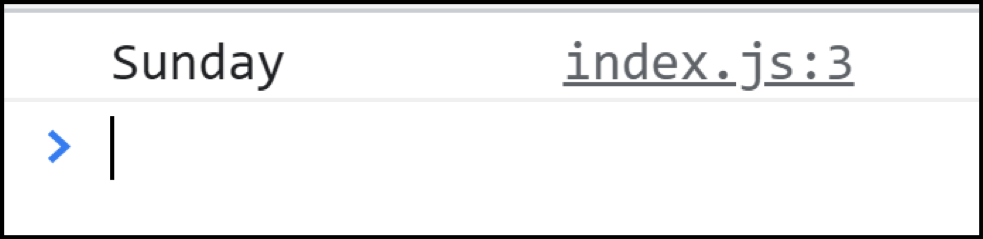
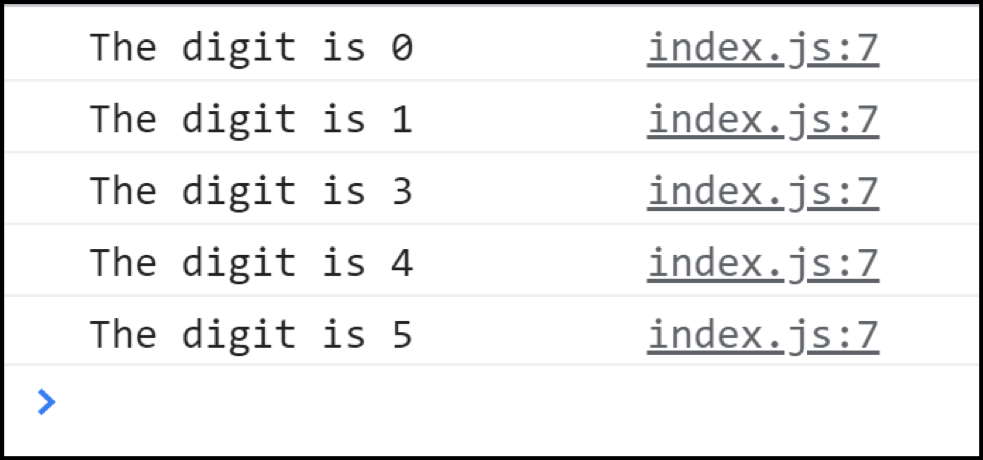
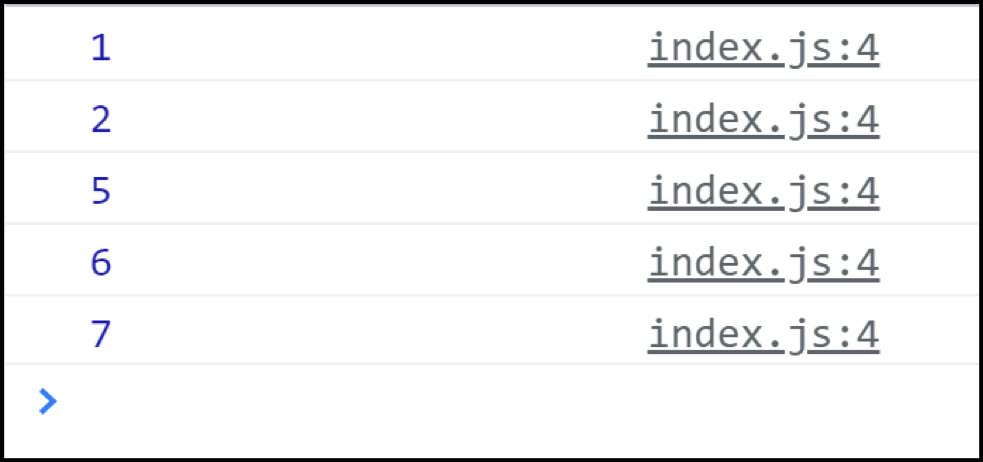
 If we click on any of these buttons, their respective onclick() event handler is triggered which prints a message onto the console.
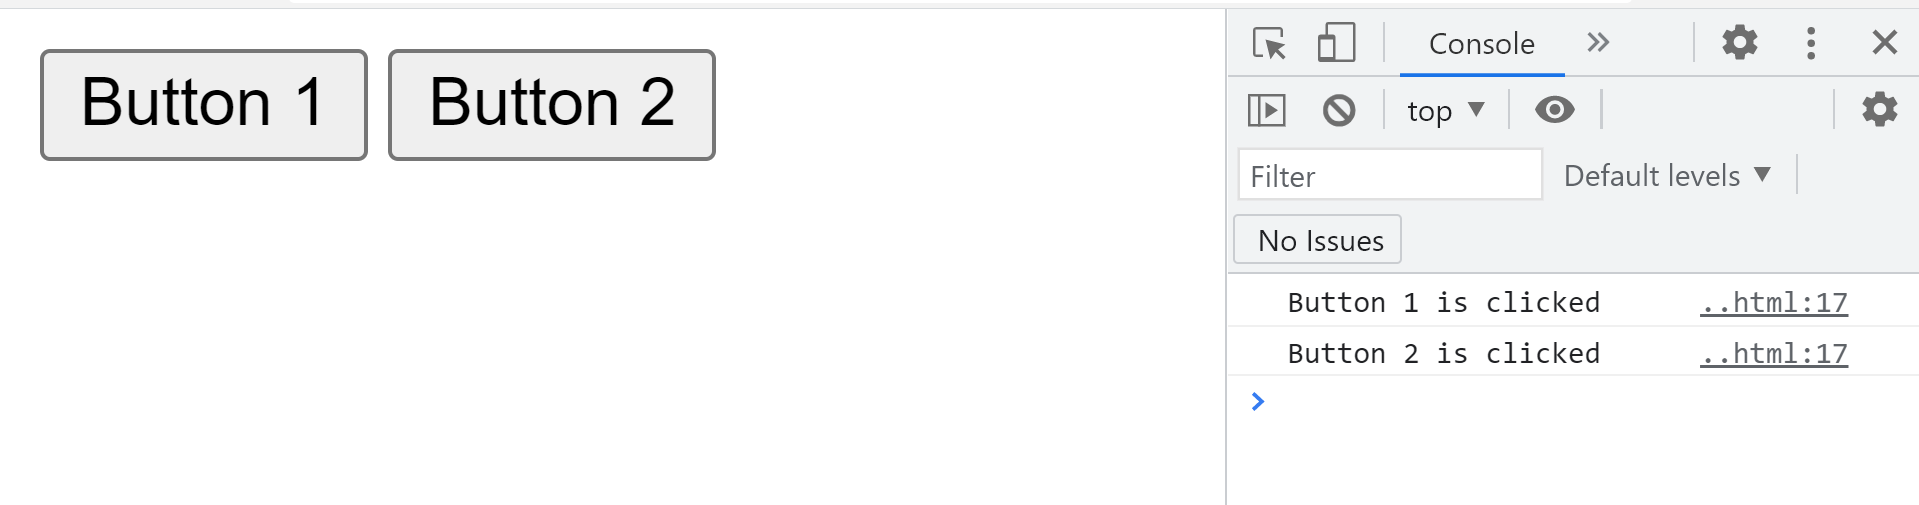


 This is how you can read/write data into a file using the browserify-fs module.
 There are also other ways we can implement this, for example:
const btn=document.querySelector(".clickme");
btn.onclick= function(){
alert("You clicked the button");};
There are also other ways we can implement this, for example:
const btn=document.querySelector(".clickme");
btn.onclick= function(){
alert("You clicked the button");};
 When we left the password field empty and clicked on the register an event triggered i-e submit.
But based on our handler the input field “Password” was empty hence a message “Please fill the required fields” is shown.
When we filled both the fields and clicked on the register button, “Registered” was shown.
When we left the password field empty and clicked on the register an event triggered i-e submit.
But based on our handler the input field “Password” was empty hence a message “Please fill the required fields” is shown.
When we filled both the fields and clicked on the register button, “Registered” was shown.

 Boolean for no defined value
console.log('Boolean(0) is ' + Boolean(0));
console.log('Boolean(NaN) is '
+ Boolean(NaN));
console.log('Boolean(null) is '
+ Boolean(null));
Boolean for no defined value
console.log('Boolean(0) is ' + Boolean(0));
console.log('Boolean(NaN) is '
+ Boolean(NaN));
console.log('Boolean(null) is '
+ Boolean(null));
 Furthermore, a Boolean object always returns true in a conditional statement regardless of whatever value is assigned to it.
 In the above example, Boolean objects and primitive types of boolean are compared.
Despite the fact that a false value was assigned to a Boolean object, it was still executed.
The reason is that the object evaluates to true when it’s provided in an if condition.
In the above example, Boolean objects and primitive types of boolean are compared.
Despite the fact that a false value was assigned to a Boolean object, it was still executed.
The reason is that the object evaluates to true when it’s provided in an if condition.

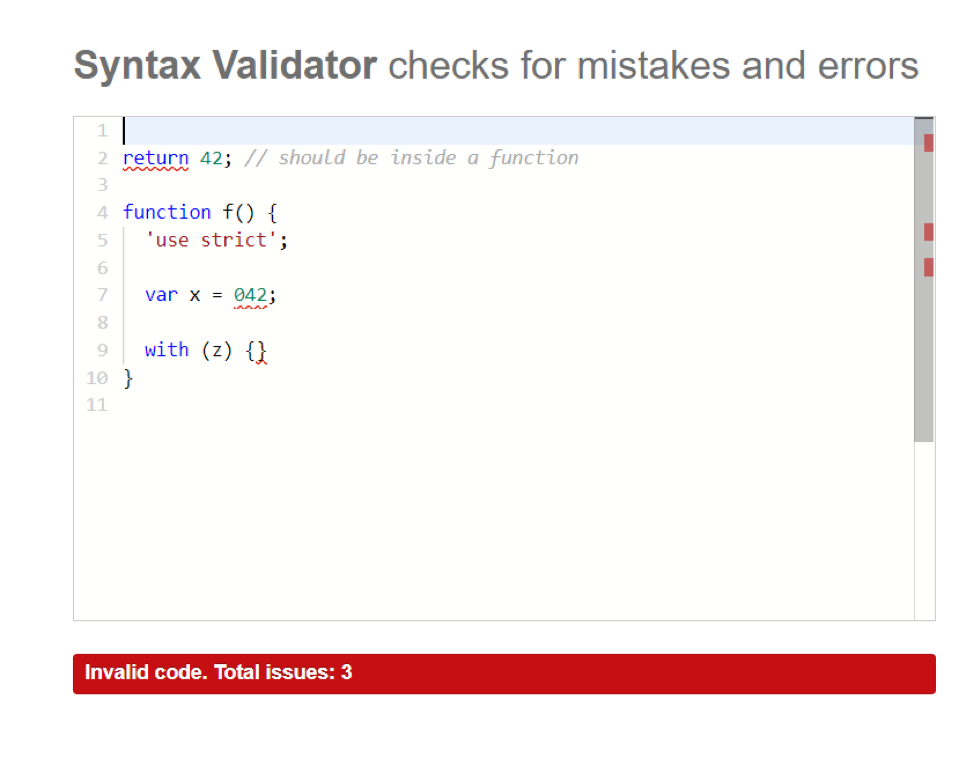
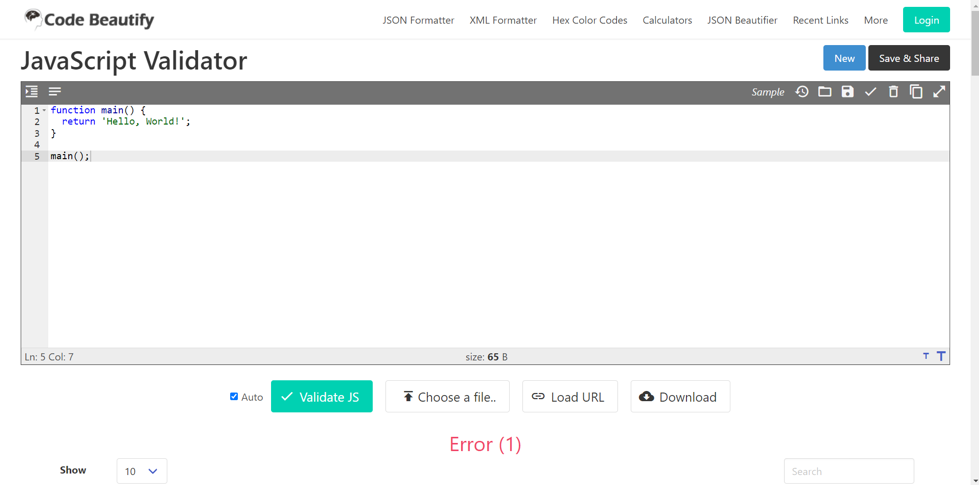

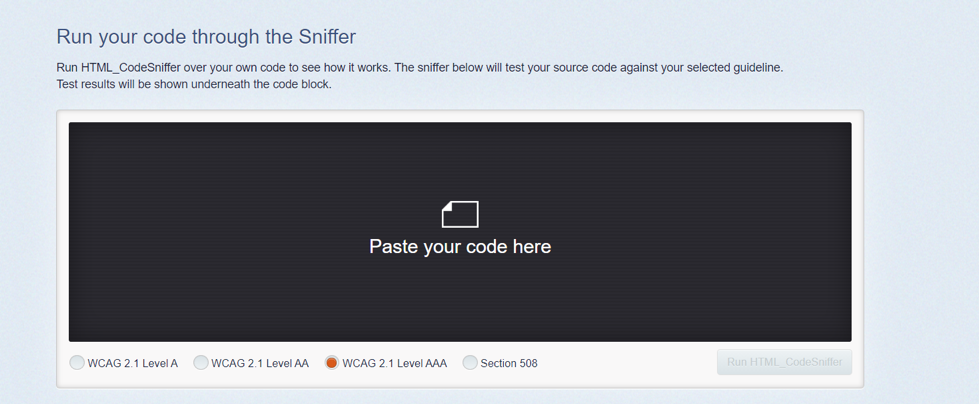
 Block-scope : A block of code is defined by curly braces.
This type of scope will help us prominently differentiate between the three methods of declaring variables:
Following is an example where we have declared variables with var, let, and const in an if block and then logged them to the console:
if (true) {
var message1 = 'Hi from Linuxhint';
let message2 = 'Hello from Linuxhint';
const message3 = 'Hi again from Linuxhint';
console.log("in: " + message1); // 'Hi from Linuxhint';
console.log("in: " + message2); // 'Hello from Linuxhint';
console.log("in: " + message3); // 'Hi again from Linuxhint';}
Block-scope : A block of code is defined by curly braces.
This type of scope will help us prominently differentiate between the three methods of declaring variables:
Following is an example where we have declared variables with var, let, and const in an if block and then logged them to the console:
if (true) {
var message1 = 'Hi from Linuxhint';
let message2 = 'Hello from Linuxhint';
const message3 = 'Hi again from Linuxhint';
console.log("in: " + message1); // 'Hi from Linuxhint';
console.log("in: " + message2); // 'Hello from Linuxhint';
console.log("in: " + message3); // 'Hi again from Linuxhint';}
 All of the variables have been logged to the console without any error as they were logged from the same block.
However, if we try to log them from outside of the if block, the below-mentioned error will appear:
if (true) {
var message1 = 'Hi from Linuxhint';
let message2 = 'Hello from Linuxhint';
const message3 = 'Hi again from Linuxhint';
console.log("in: " + message1); // 'Hi from Linuxhint';
console.log("in: " + message2); // 'Hello from Linuxhint';
console.log("in: " + message3); // 'Hi again from Linuxhint';}
console.log("out: " + message1); // 'Hi from Linuxhint';
console.log("out: " + message2); // ReferenceError: message2 is not defined
console.log("out: " + message3); // ReferenceError: message3 is not defined
All of the variables have been logged to the console without any error as they were logged from the same block.
However, if we try to log them from outside of the if block, the below-mentioned error will appear:
if (true) {
var message1 = 'Hi from Linuxhint';
let message2 = 'Hello from Linuxhint';
const message3 = 'Hi again from Linuxhint';
console.log("in: " + message1); // 'Hi from Linuxhint';
console.log("in: " + message2); // 'Hello from Linuxhint';
console.log("in: " + message3); // 'Hi again from Linuxhint';}
console.log("out: " + message1); // 'Hi from Linuxhint';
console.log("out: " + message2); // ReferenceError: message2 is not defined
console.log("out: " + message3); // ReferenceError: message3 is not defined

 This will give us an error which is because the message is not available outside the function.
var outside of a for-loop : The variable “i” can be accessed from the outside of the for-loop.
for (var i = 0; i < 5; i++) {
console.log("in: " + i);}
console.log("out: " + i);
This will give us an error which is because the message is not available outside the function.
var outside of a for-loop : The variable “i” can be accessed from the outside of the for-loop.
for (var i = 0; i < 5; i++) {
console.log("in: " + i);}
console.log("out: " + i);
 var variables can be re-declared and updated : In JavaScript variables declared with var keyword can be redeclared and updated in the same scope:
function showMessage() {
var message = 'Hi from Linuxhint';
message = 'Hello from Linuxhint';
var message = 'Hi again from Linuxhint';
console.log(message); // 'Hi again from Linuxhint';}
showMessage()
var variables can be re-declared and updated : In JavaScript variables declared with var keyword can be redeclared and updated in the same scope:
function showMessage() {
var message = 'Hi from Linuxhint';
message = 'Hello from Linuxhint';
var message = 'Hi again from Linuxhint';
console.log(message); // 'Hi again from Linuxhint';}
showMessage()
 How to use let to declare a variable : The let keyword is now preferred over var for variable declarations; it comes with a few improvements over var.
let is block scoped : In JavaScript, a block of code is the collection of statements that are bounded by a pair of curly brackets {}.
A variable declared using the let keyword is only available to use within that block and cannot be accessed from outside:
if (true) {
let message = 'Hi from Linuxhint';
console.log("in: " + message); // "Hi from Linuxhint"}
console.log("out: " + message); // ReferenceError
How to use let to declare a variable : The let keyword is now preferred over var for variable declarations; it comes with a few improvements over var.
let is block scoped : In JavaScript, a block of code is the collection of statements that are bounded by a pair of curly brackets {}.
A variable declared using the let keyword is only available to use within that block and cannot be accessed from outside:
if (true) {
let message = 'Hi from Linuxhint';
console.log("in: " + message); // "Hi from Linuxhint"}
console.log("out: " + message); // ReferenceError
 If we use the message outside of the block where it was defined, it will return an error.
This is because let variables are block-scoped.
let outside of a for-loop : The following example demonstrating the let variable output using for loop:
for (let i = 0; i < 5; i++) {
console.log("in: " + i);}
console.log("out: " + i);
If we use the message outside of the block where it was defined, it will return an error.
This is because let variables are block-scoped.
let outside of a for-loop : The following example demonstrating the let variable output using for loop:
for (let i = 0; i < 5; i++) {
console.log("in: " + i);}
console.log("out: " + i);
 let can be updated but not re-declared : A variable declared with let can be updated within its scope just like var, but unlike var, it cannot be redeclared:
let message = 'Hi from Linuxhint';
message = 'Hello from Linuxhint';
let can be updated but not re-declared : A variable declared with let can be updated within its scope just like var, but unlike var, it cannot be redeclared:
let message = 'Hi from Linuxhint';
message = 'Hello from Linuxhint';
 The console is completely empty and is not returning any errors.
These statements will return an error:
let message = 'Hi from Linuxhint';
let message = 'Hello from Linuxhint'; // SyntaxError: Identifier 'message' has already been declared
The console is completely empty and is not returning any errors.
These statements will return an error:
let message = 'Hi from Linuxhint';
let message = 'Hello from Linuxhint'; // SyntaxError: Identifier 'message' has already been declared
 However, redefining the same variable in a different scope using let does not return any error:
let message = 'Hi from Linuxhint';if (true) {
let message = 'Hello from Linuxhint';
console.log("in: " + message); // "Hello from Linuxhint"}
console.log("out: " + message); // "Hi from Linuxhint"
However, redefining the same variable in a different scope using let does not return any error:
let message = 'Hi from Linuxhint';if (true) {
let message = 'Hello from Linuxhint';
console.log("in: " + message); // "Hello from Linuxhint"}
console.log("out: " + message); // "Hi from Linuxhint"
 The let keyword treats these two variables as different if they are in different scopes so it does not return any error; this feature of the let keyword makes it a better choice than var.
When using let, you can reuse variable names in different scopes without worrying about whether you have used that variable name before.
The let keyword treats these two variables as different if they are in different scopes so it does not return any error; this feature of the let keyword makes it a better choice than var.
When using let, you can reuse variable names in different scopes without worrying about whether you have used that variable name before.
 Nor will we be able to do this:
const message = 'Hi from Linuxhint';const message = 'Hello from Linuxhint'; // SyntaxError
Nor will we be able to do this:
const message = 'Hi from Linuxhint';const message = 'Hello from Linuxhint'; // SyntaxError
 Every variable which is declared using the const keyword must be initialized at the time of its declaration.
This behavior of the const keyword somehow changes when it comes to objects.
While the object declared cannot be updated, its properties can be changed
So, if we declare an object with const:
const user = {
name: "Steve",
age: 13}
While this cannot be done:
user = {
userName: "Harry",
grade: "3rd"} // TypeError: Assignment to constant variable.
This can be done:
user.name = "Harry";
This will change the value of the user.name without returning any errors.
Every variable which is declared using the const keyword must be initialized at the time of its declaration.
This behavior of the const keyword somehow changes when it comes to objects.
While the object declared cannot be updated, its properties can be changed
So, if we declare an object with const:
const user = {
name: "Steve",
age: 13}
While this cannot be done:
user = {
userName: "Harry",
grade: "3rd"} // TypeError: Assignment to constant variable.
This can be done:
user.name = "Harry";
This will change the value of the user.name without returning any errors.
 If we give a negative number as an argument then:
 Math.floor() method : This method rounds the decimal number down to its nearest integer:
 For a negative number:
 Math.round() method : The Math.round() method takes a number as an argument and returns its nearest integer.
It rounds the number down to the nearest integer if the digit after the decimal is less than 5:
Math.round() method : The Math.round() method takes a number as an argument and returns its nearest integer.
It rounds the number down to the nearest integer if the digit after the decimal is less than 5:
 If the number after the decimal is greater than five then this method rounds the number up to the nearest integer:
 If the number after the decimal is 5 then the Math.round() method rounds the number to its nearest integer in the direction of +infinity:
 Math.trunc() method : This method truncates the decimal part of a number number and only returns the whole number part:
 For negative numbers:
 How to use the .toFixed() method : The .toFixed() method is used to round a decimal number upto or down to a specific number of decimals.
It takes one optional argument which specifies the number of decimals which by default is 0:
How to use the .toFixed() method : The .toFixed() method is used to round a decimal number upto or down to a specific number of decimals.
It takes one optional argument which specifies the number of decimals which by default is 0:
 If we want the number to have 2 decimal points then:
 If the specified number of decimal points is higher than the decimal points present in the number then 0s are added to create the desired length:
 This method converts the number into a string:

 In bubbling, which is represented by false, the sequence of occurrence goes from inner to outer.
The <p> tag will be handled first and then the <div> tag.
Whereas, for capturing, that’s represented through true, the outermost event is handled first before the inner element.
First, <div> will be handled and then the <p> tag.
In bubbling, which is represented by false, the sequence of occurrence goes from inner to outer.
The <p> tag will be handled first and then the <div> tag.
Whereas, for capturing, that’s represented through true, the outermost event is handled first before the inner element.
First, <div> will be handled and then the <p> tag.


 To access multiple elements, the querySelectorAll() method is used:
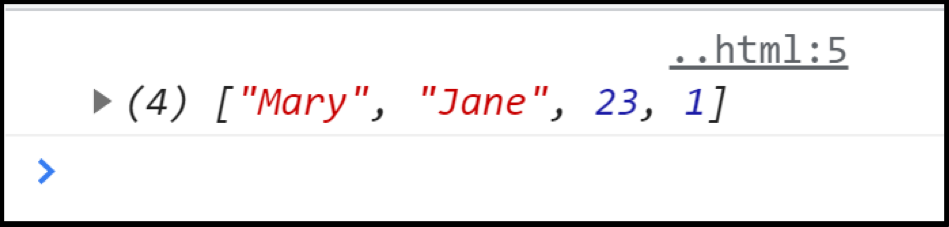
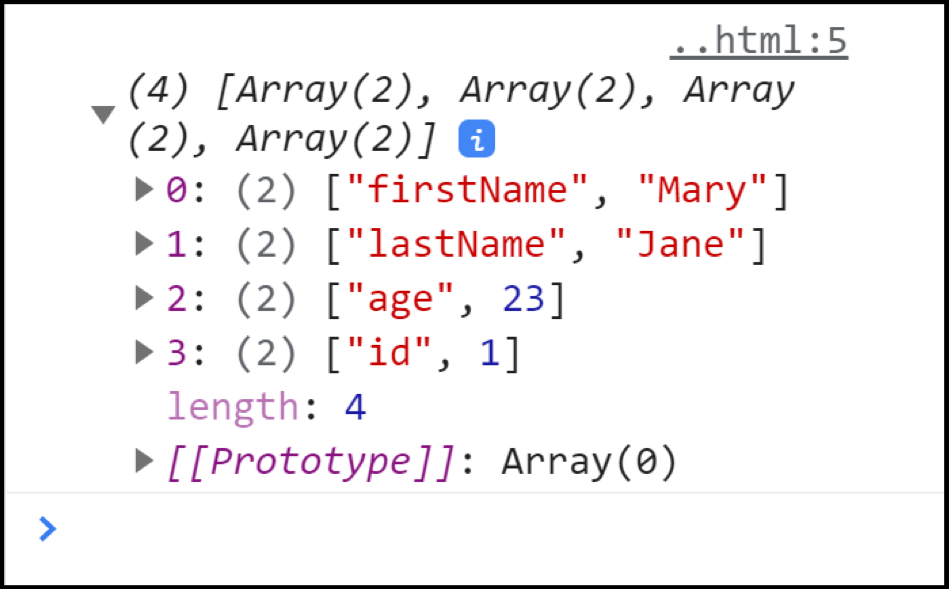 We can access any entry using the array index:
const user = {firstName:"Mary", lastName:"Jane", age:23, id:01};
console.log(Object.entries(user)[0]);
We can access any entry using the array index:
const user = {firstName:"Mary", lastName:"Jane", age:23, id:01};
console.log(Object.entries(user)[0]);
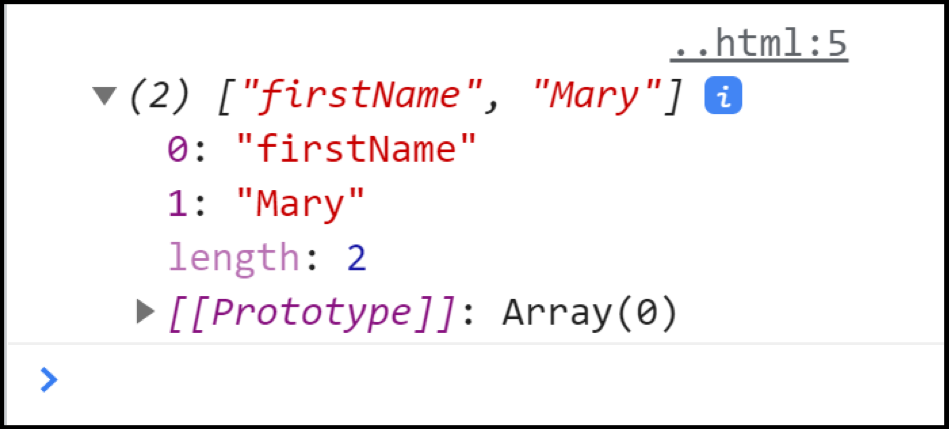 If we want to access the key or its value inside the array then we will need to provide two indices:
const user = {firstName:"Mary", lastName:"Jane", age:23, id:01};
console.log(Object.entries(user)[0][1]);
If we want to access the key or its value inside the array then we will need to provide two indices:
const user = {firstName:"Mary", lastName:"Jane", age:23, id:01};
console.log(Object.entries(user)[0][1]);

 The list of other seven properties is given below:
E
SQRT2
SQRT1_2
LN2
LN10
LOG2E
LOG10E
Math.E : This property is used to get the Euler’s number:
var e = Math.E;
console.log(e);
The list of other seven properties is given below:
E
SQRT2
SQRT1_2
LN2
LN10
LOG2E
LOG10E
Math.E : This property is used to get the Euler’s number:
var e = Math.E;
console.log(e);
 Math.SQRT2 : This property returns the value of the square root of 2:
var s = Math.SQRT2;
console.log(s);
Math.SQRT2 : This property returns the value of the square root of 2:
var s = Math.SQRT2;
console.log(s);
 Math.SQRT1_2 : The Math.SQRT1_2 is used to get the value of the square root of half (
 Math.LN2 : When we need the value of the natural log of two in our code then we use the Math.LN2 property:
var l = Math.LN2;
console.log(l);
Math.LN2 : When we need the value of the natural log of two in our code then we use the Math.LN2 property:
var l = Math.LN2;
console.log(l);
 Math.LN10 : We can get the value of the natural log of ten in the following way:
var l = Math.LN10;
console.log(l);
Math.LN10 : We can get the value of the natural log of ten in the following way:
var l = Math.LN10;
console.log(l);
 Math.LOG2E : This method returns the base 2 logarithm of E:
var l = Math.LOG2E;
console.log(l);
Math.LOG2E : This method returns the base 2 logarithm of E:
var l = Math.LOG2E;
console.log(l);
 Math.LOG10E : Similar to the Math.LOG2E property this property also returns the value of the logarithm of E but of base 10:
var l = Math.LOG10E;
console.log(l);
Math.LOG10E : Similar to the Math.LOG2E property this property also returns the value of the logarithm of E but of base 10:
var l = Math.LOG10E;
console.log(l);

 And if the digit after the decimal is 5 or greater than five then:
var num = Math.round(1.5);
console.log(num);
And if the digit after the decimal is 5 or greater than five then:
var num = Math.round(1.5);
console.log(num);
 Similarly, the Math.ceil() and the Math.floor() methods are used to round the number up to its nearest integer and down to its nearest integer respectively.
 Two other methods Math.trunc() and Math.sign() were added in the ES6 version.
Math.truc() function truncates the decimal part of an integer and returns the whole number whereas Math.sign() returns 1 or -1 to show whether the integer given to it was negative or positive.
It returns 0 if you give it 0 as an argument:
Two other methods Math.trunc() and Math.sign() were added in the ES6 version.
Math.truc() function truncates the decimal part of an integer and returns the whole number whereas Math.sign() returns 1 or -1 to show whether the integer given to it was negative or positive.
It returns 0 if you give it 0 as an argument:

 The .sqrt() method takes a single argument and returns the value of its square root:
var num = Math.sqrt(256);
console.log(num);
The .sqrt() method takes a single argument and returns the value of its square root:
var num = Math.sqrt(256);
console.log(num);

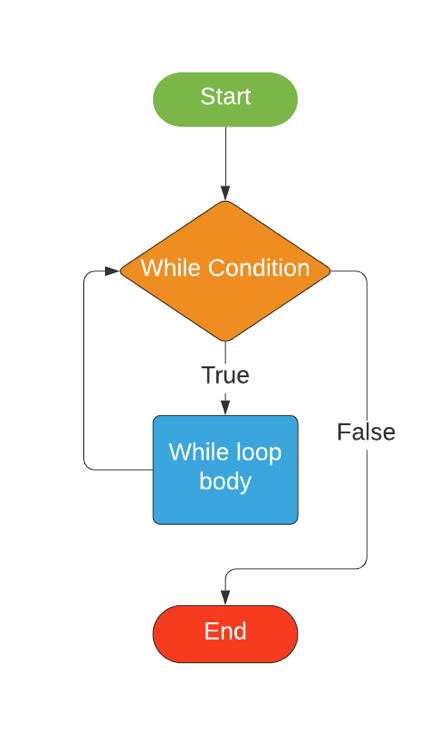
 The code in the above example looks repetitive; we can perform the same task in a few lines of code using a loop; Here we will use the while loop:
i = 1;
while (i<=10) {
console.log("2 * " + i + " = " + 2 * i)
i++;}
The code in the above example looks repetitive; we can perform the same task in a few lines of code using a loop; Here we will use the while loop:
i = 1;
while (i<=10) {
console.log("2 * " + i + " = " + 2 * i)
i++;}
 As already mentioned above loops are interchangeable; they can be replaced with each other.
The task performed in the example given above can be performed by using a for loop.
In general for loops are used when the loop has to run for a definite number of times whereas the while loop is used when the loop is going to run for an indefinite number of times until the condition is satisfied.
For our next example we will create a program with a while loop which will run for an indefinite number of times:
randomNumber = 0;
while (randomNumber < 500) {
randomNumber = Math.trunc(Math.random()*1000);
console.log(randomNumber);}
As already mentioned above loops are interchangeable; they can be replaced with each other.
The task performed in the example given above can be performed by using a for loop.
In general for loops are used when the loop has to run for a definite number of times whereas the while loop is used when the loop is going to run for an indefinite number of times until the condition is satisfied.
For our next example we will create a program with a while loop which will run for an indefinite number of times:
randomNumber = 0;
while (randomNumber < 500) {
randomNumber = Math.trunc(Math.random()*1000);
console.log(randomNumber);}
 In the example given above we first created a variable named randomNumber and assigned it a value 0.
This was only done because the while loops check the condition before every iteration (on the first iteration the loop ran because the condition was true as 0 < 500).
We then declared a while loop and gave it a condition which is randomNumber < 500.
Inside the body of the loop we used the Math object to get a random number between 0 and 999 and assigned this number to the randomNumber variable.
Then we used the console.log method to print the randomNumber onto the console.
The while loop kept iterating and the Math object kept generating random numbers until the condition was met which was a random number greater than 500.
In the example given above we first created a variable named randomNumber and assigned it a value 0.
This was only done because the while loops check the condition before every iteration (on the first iteration the loop ran because the condition was true as 0 < 500).
We then declared a while loop and gave it a condition which is randomNumber < 500.
Inside the body of the loop we used the Math object to get a random number between 0 and 999 and assigned this number to the randomNumber variable.
Then we used the console.log method to print the randomNumber onto the console.
The while loop kept iterating and the Math object kept generating random numbers until the condition was met which was a random number greater than 500.
 As 10 satisfies the condition of our break statement the loop is executed after the fourth iteration.
 If there is a multiple of 10 in the table of 2 then the continue statement skips the iteration and moves to the next:
 In the example above the code in the body of the do while loop was executed for the first iteration even though the condition was false.
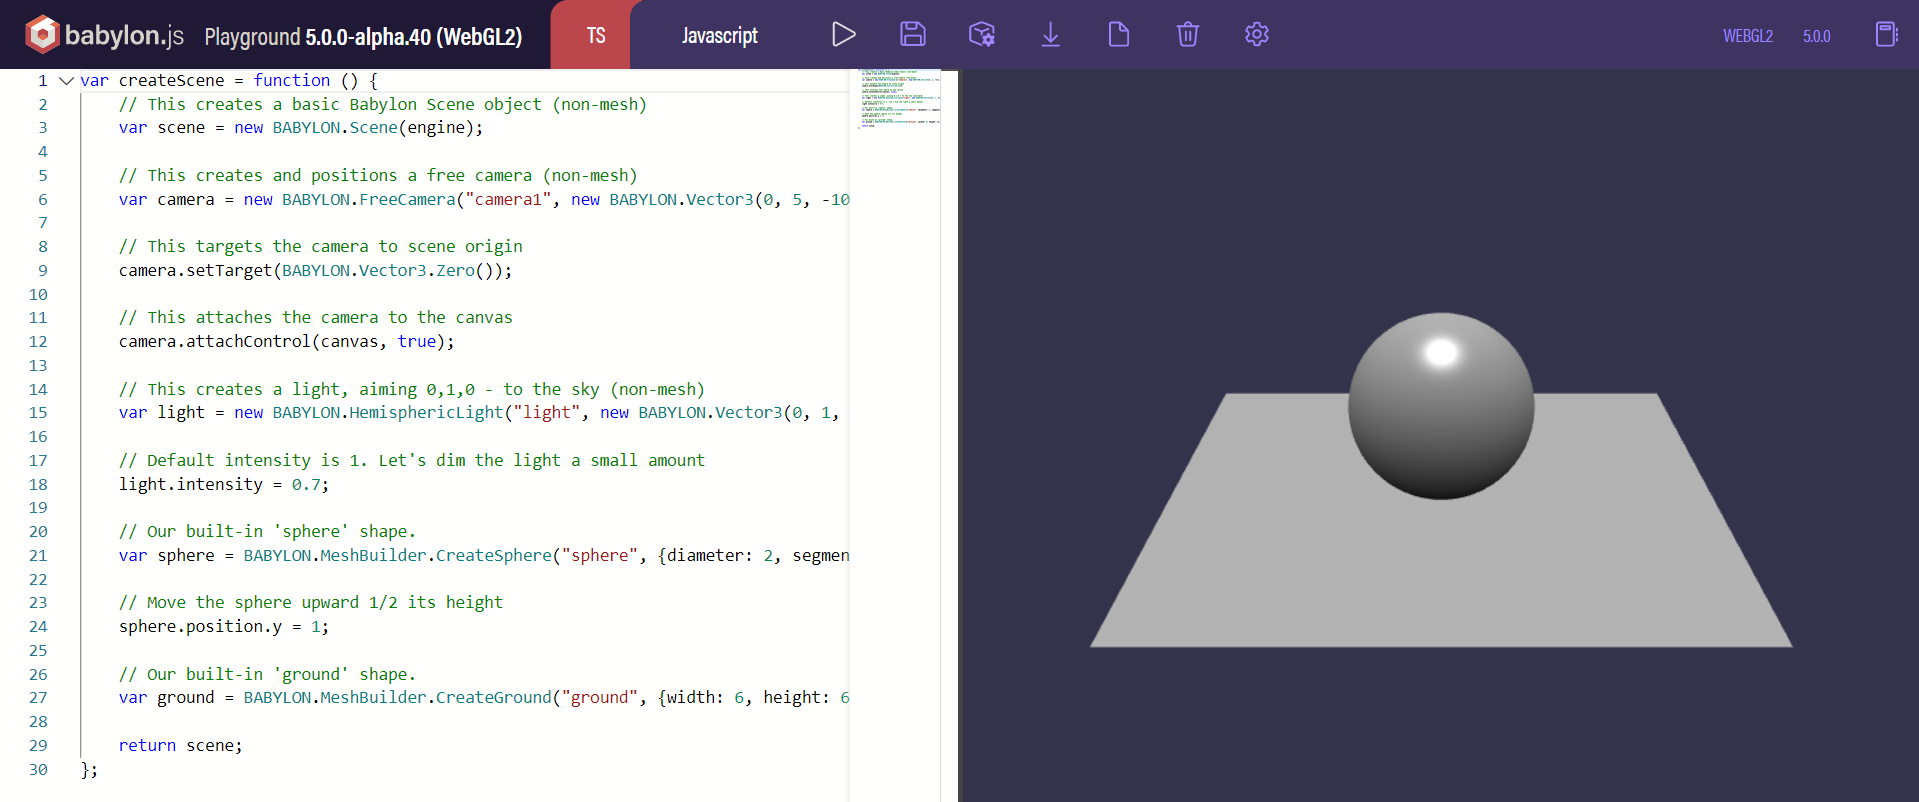


 Let’s take a look at another example:
async function foo() {
await 1;}
The above function is equivalent to the following function:
function foo() {
return Promise.resolve(1).then(() => undefined)}
Above example represents that the code after each await expression is likely to be in the callback i.e .then.
Through the functions, the promise chain is automatically constructed step by step at each reentry stage.
The return value forms the last step in the chain.
Let’s take a look at another example:
async function foo() {
await 1;}
The above function is equivalent to the following function:
function foo() {
return Promise.resolve(1).then(() => undefined)}
Above example represents that the code after each await expression is likely to be in the callback i.e .then.
Through the functions, the promise chain is automatically constructed step by step at each reentry stage.
The return value forms the last step in the chain.
 JavaScript executes code sequentially.
In the example above we can see that the console.log(1) was printed first as expected.
After this the getData() function was called where we initiated a variable with the name of y and we used the await keyword in it.
The await keyword will cause the JS runtime to stop or pause the code in that line i-e where we have written “Hello world”.
It won’t allow the execution of further code until the async function call returns the result.
It will send this task to the task queue and the next lines of code will start to run.
In the next line after calling the function getData() we are console logging the 2 to the console window.
Hence we saw 2 before “Hello world”.
Now after this when the async call function returns the result only then will the code resume to run again and hence we see “Hello World” at the end of the console window.
JavaScript executes code sequentially.
In the example above we can see that the console.log(1) was printed first as expected.
After this the getData() function was called where we initiated a variable with the name of y and we used the await keyword in it.
The await keyword will cause the JS runtime to stop or pause the code in that line i-e where we have written “Hello world”.
It won’t allow the execution of further code until the async function call returns the result.
It will send this task to the task queue and the next lines of code will start to run.
In the next line after calling the function getData() we are console logging the 2 to the console window.
Hence we saw 2 before “Hello world”.
Now after this when the async call function returns the result only then will the code resume to run again and hence we see “Hello World” at the end of the console window.


 The + operator can also be used to concatenate strings:
let str1 = "Welcome";
let str2 = "to Linux Hint";
let str3 = str1 + " " + str2;
The + operator can also be used to concatenate strings:
let str1 = "Welcome";
let str2 = "to Linux Hint";
let str3 = str1 + " " + str2;
 This method is also case sensitive:
 If we do not use /g as an argument then only the first instance will be returned.
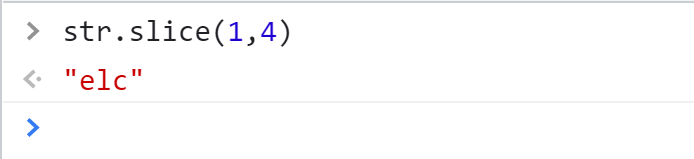
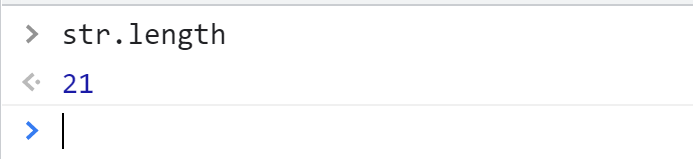
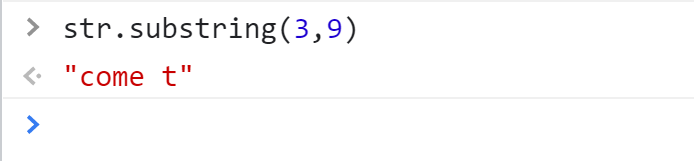
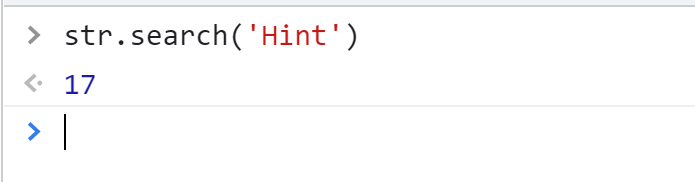
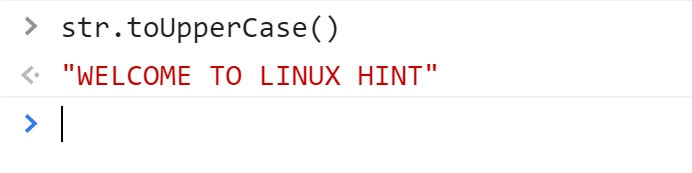
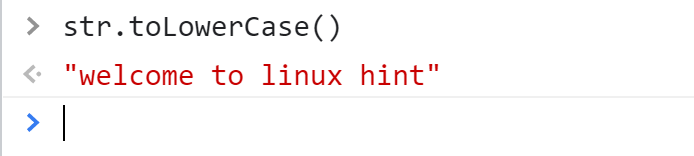
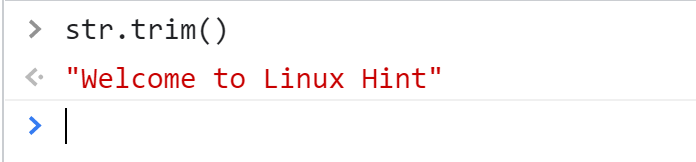

 For better readability we can write it in this way as well:
var nums = [
[1,2,3],
[4,5,6]
];
Now it looks very similar to a matrix.
For better readability we can write it in this way as well:
var nums = [
[1,2,3],
[4,5,6]
];
Now it looks very similar to a matrix.
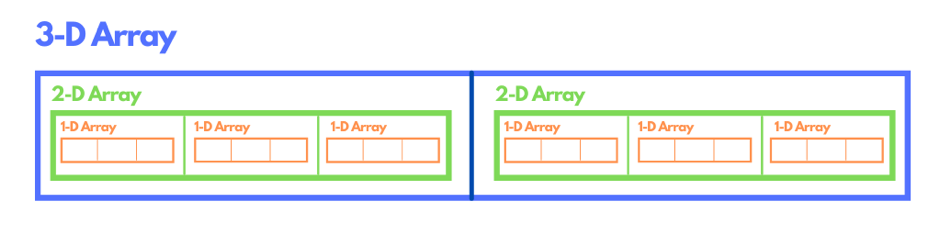 // Declaration of a 3-Dimensional array
threeDimensionalArray = [
// two 2-Dimensional arrays within a 3-D array
[
// two 1-Dimensional arrays inside a 2-D array
[],
[]
],
[
// two 1-Dimensional arrays inside a 2-D array
[],
[]
]];
// Declaration of a 3-Dimensional array
threeDimensionalArray = [
// two 2-Dimensional arrays within a 3-D array
[
// two 1-Dimensional arrays inside a 2-D array
[],
[]
],
[
// two 1-Dimensional arrays inside a 2-D array
[],
[]
]];
 In the above example the first loop, loops through the rows of the matrix while the second loop, loops through the columns.
The second/nested loop iterates through the columns until there are no columns left then it terminates.
The first loop then goes to the next row and the nested loop again starts from the 0th column of the next line.
We can assign values to a multidimensional array when we are declaring it (as shown above in the 2-D array declaration section).
We can also modify these values later in the following way:
var num = [[1,2,3],[4,5,6]];
num[0][0] = 99;
console.log(num[0][0]);
In the above example the first loop, loops through the rows of the matrix while the second loop, loops through the columns.
The second/nested loop iterates through the columns until there are no columns left then it terminates.
The first loop then goes to the next row and the nested loop again starts from the 0th column of the next line.
We can assign values to a multidimensional array when we are declaring it (as shown above in the 2-D array declaration section).
We can also modify these values later in the following way:
var num = [[1,2,3],[4,5,6]];
num[0][0] = 99;
console.log(num[0][0]);


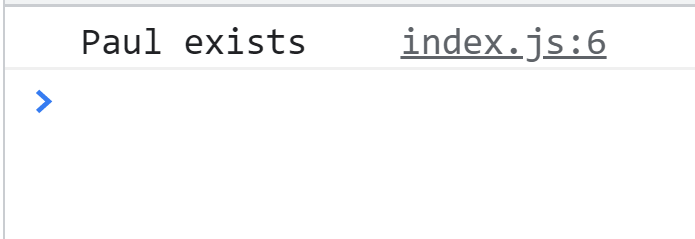 Yes, you got it right.
It will be “Paul exists”.
Now.
let’s have another example in which we will try to find a value inside the object using array.find() method:
Example 2:
Here we have a list of client objects as well as their bill
let clients = [{
name: 'pvt ltd',
bill: 90}, {
name: 'pharma ',
bill: 150}, {
name: 'realtor',
bill: 200}];
We are going to apply the find method in such a way that the client whose bill is greater than 90 will appear right in front of us.
console.log(clients.find(c => c.bill > 90));
And the result is going to be:
Yes, you got it right.
It will be “Paul exists”.
Now.
let’s have another example in which we will try to find a value inside the object using array.find() method:
Example 2:
Here we have a list of client objects as well as their bill
let clients = [{
name: 'pvt ltd',
bill: 90}, {
name: 'pharma ',
bill: 150}, {
name: 'realtor',
bill: 200}];
We are going to apply the find method in such a way that the client whose bill is greater than 90 will appear right in front of us.
console.log(clients.find(c => c.bill > 90));
And the result is going to be:
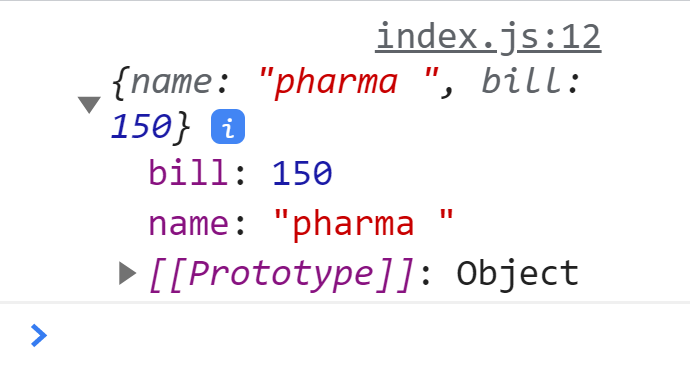 Example 3:
Let’s suppose we have a list of colors.
const colors = [
"blue",
"grey",
"pink",
"violet"];
Now the statement for finding the color with the first letter as “g” will go like that:
console.log(colors.find(color => color.startsWith("g")));
And the output will definitely be the grey color.
Example 3:
Let’s suppose we have a list of colors.
const colors = [
"blue",
"grey",
"pink",
"violet"];
Now the statement for finding the color with the first letter as “g” will go like that:
console.log(colors.find(color => color.startsWith("g")));
And the output will definitely be the grey color.
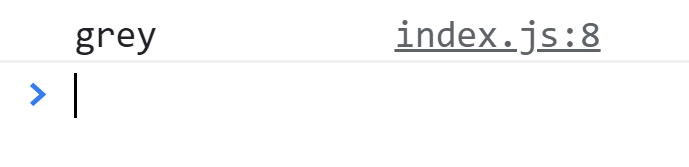
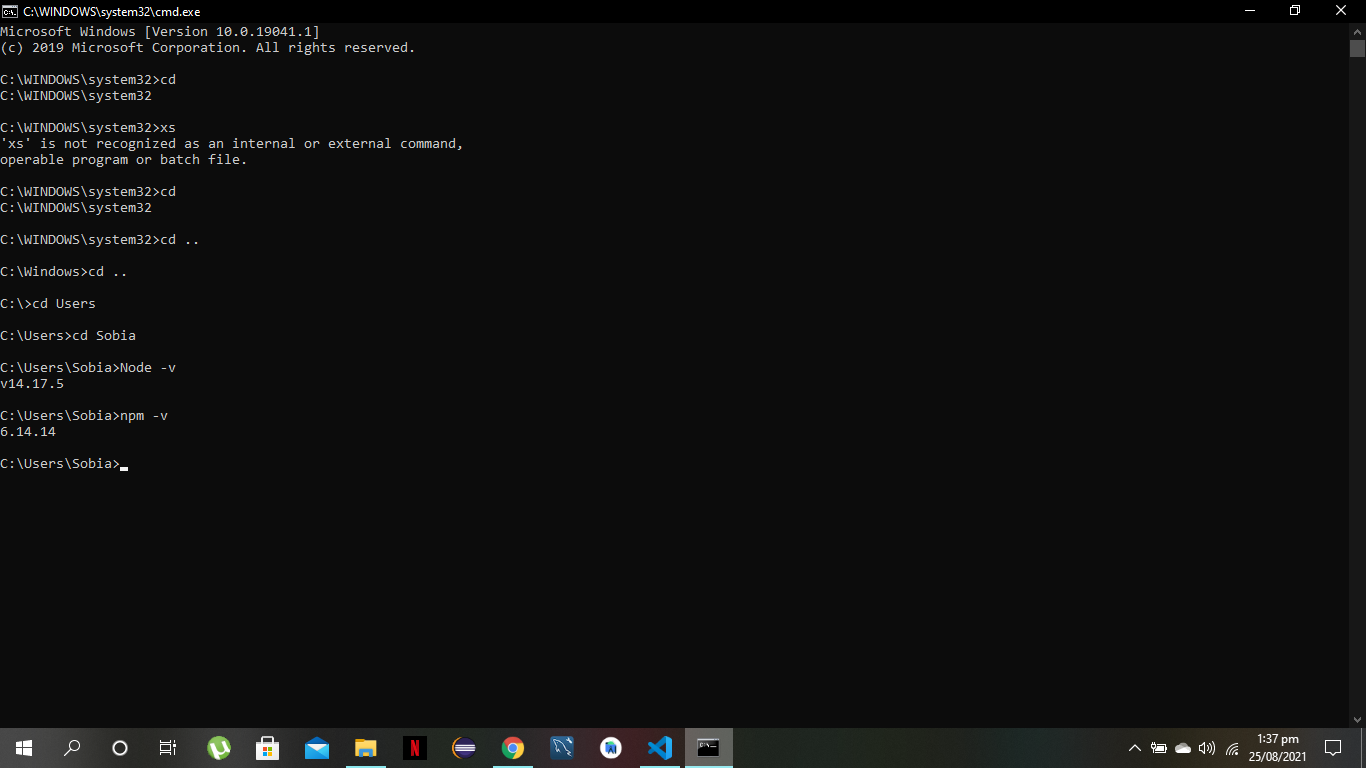
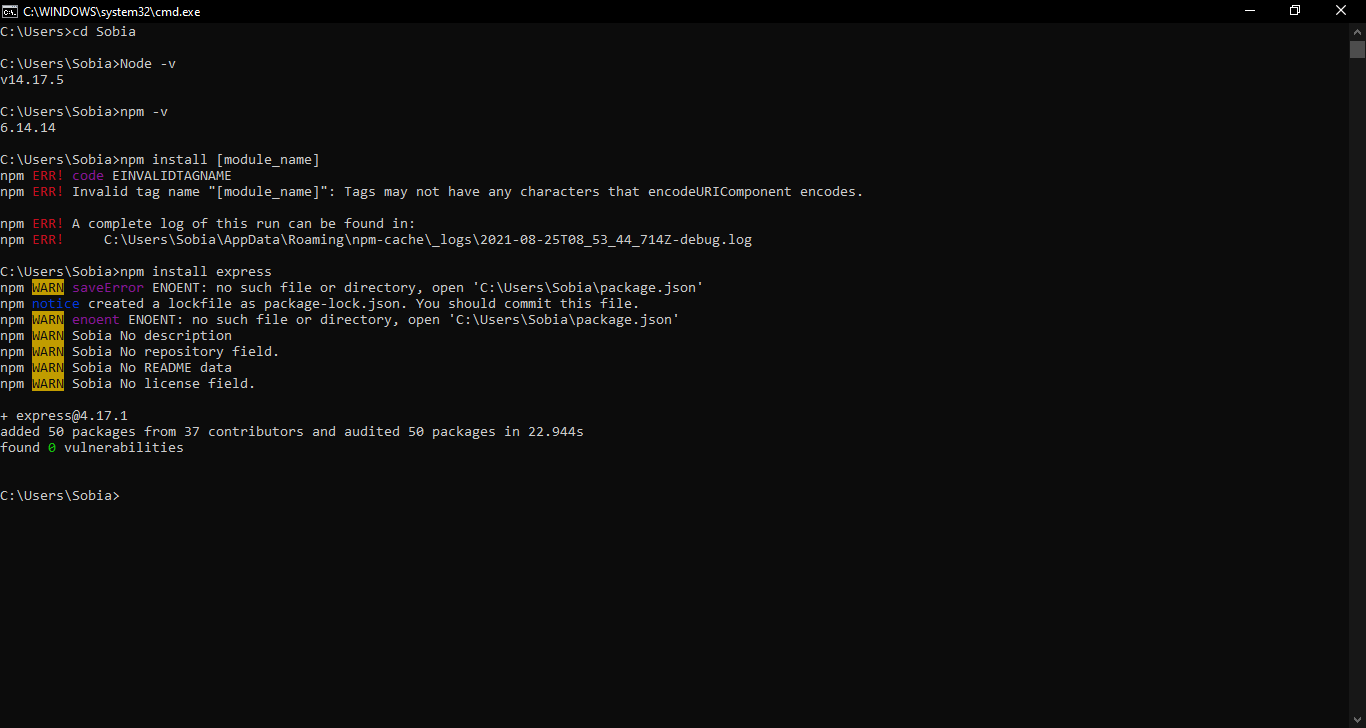 A new folder will be created automatically by NPM by the name “node_modules”, It will store all your modules and packages.
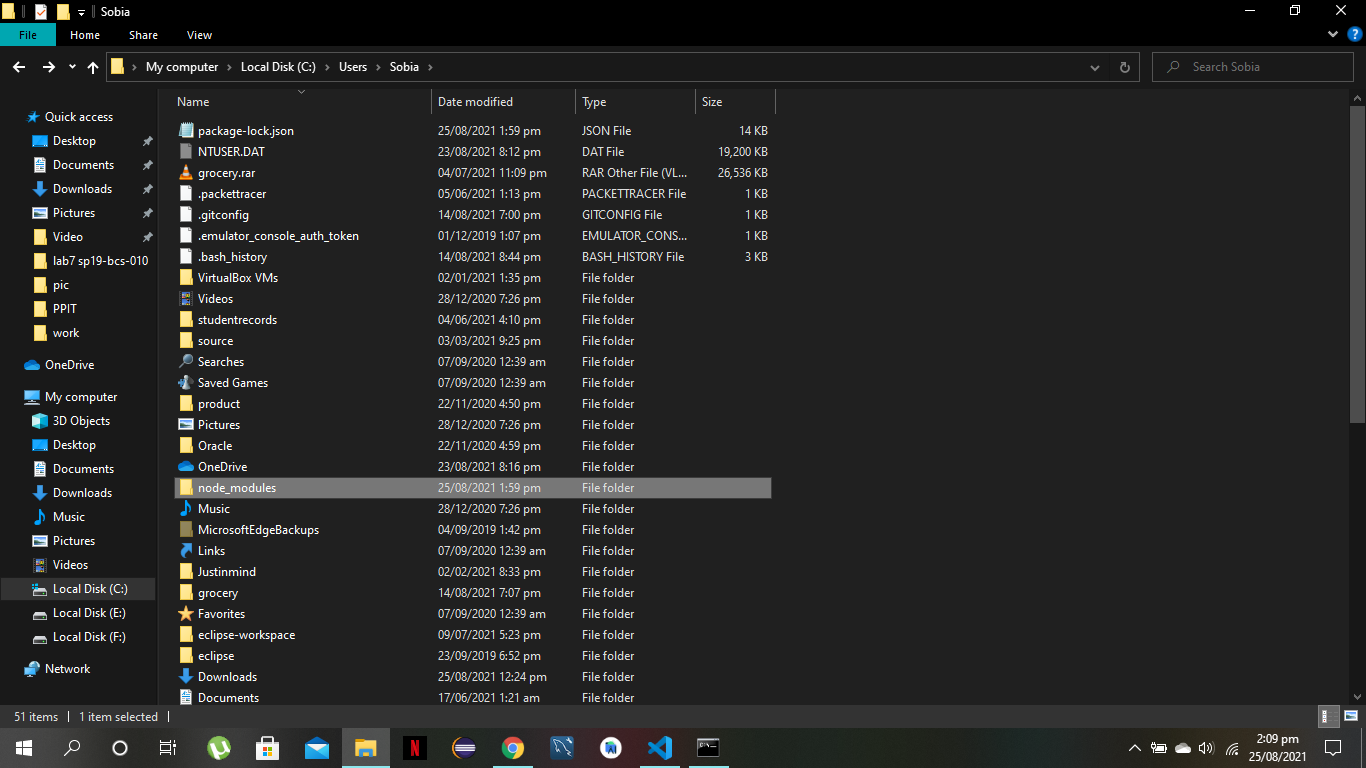

 Why is that? Well, the reason is that NodeJS is a server-side technology.
It comes with it’s perks, but a major drawback is you can not run your module on your browser without installing some tools.
Why is that? Well, the reason is that NodeJS is a server-side technology.
It comes with it’s perks, but a major drawback is you can not run your module on your browser without installing some tools.
 Now, the following command needs to be run so that you can run your application in the browser without any errors.
browserify name-of-file.js -o bundle.js
Now, the following command needs to be run so that you can run your application in the browser without any errors.
browserify name-of-file.js -o bundle.js
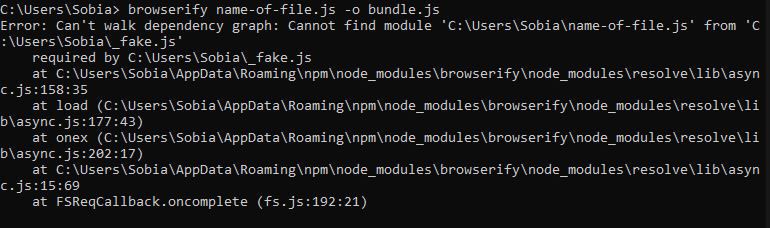 This command will resolve all the dependencies and combine your source code into a file that can be included with a single script tag.
But note that these commands need to be run each time you make changes in your original source code.
Now, just replace the name of the source in the script tag with “bundle.js” in the html file.
<!DOCTYPE html><html><body><script src = "bundle.js"></script></body></html>
Now, if your run this HTML file and open the console, it will not display any error and the result will be displayed:
This command will resolve all the dependencies and combine your source code into a file that can be included with a single script tag.
But note that these commands need to be run each time you make changes in your original source code.
Now, just replace the name of the source in the script tag with “bundle.js” in the html file.
<!DOCTYPE html><html><body><script src = "bundle.js"></script></body></html>
Now, if your run this HTML file and open the console, it will not display any error and the result will be displayed:
 In this way you can easily use your script through a single script tag inside an HTML file.
Through Browserify, you can easily run your modules on browsers without any error.
In this way you can easily use your script through a single script tag inside an HTML file.
Through Browserify, you can easily run your modules on browsers without any error.
 The match method returns only the first occurrence of the regular expression inside the string.
If we need to check for multiple occurrences then we will need to add the g modifier.
The g modifier is a global search modifier that searches the expression at all instances.
This returns all the matched elements.
If we don’t put this modifier then only the first match will be returned:
var str = "Hello and Welcome to Linux Hint!";
console.log(str.match(/el/g));
The match method returns only the first occurrence of the regular expression inside the string.
If we need to check for multiple occurrences then we will need to add the g modifier.
The g modifier is a global search modifier that searches the expression at all instances.
This returns all the matched elements.
If we don’t put this modifier then only the first match will be returned:
var str = "Hello and Welcome to Linux Hint!";
console.log(str.match(/el/g));
 We can also use the i modifier with the match method as well.
This performs case insensitive matching.
In simple words, the match method by default performs a case sensitive search but when we use the i modifier it ignores case sensitivity.
var str = "Hello and Welcome to Linux Hint!";
console.log(str.match(/linux/i));
We can also use the i modifier with the match method as well.
This performs case insensitive matching.
In simple words, the match method by default performs a case sensitive search but when we use the i modifier it ignores case sensitivity.
var str = "Hello and Welcome to Linux Hint!";
console.log(str.match(/linux/i));
 The match method returns null if no match is found:
var str = "Hello and Welcome to Linux Hint!";
console.log(str.match('my'));
The match method returns null if no match is found:
var str = "Hello and Welcome to Linux Hint!";
console.log(str.match('my'));
 If we do not give any parameter the match method then it returns the array object containing an empty string:
var str = "Hello and Welcome to Linux Hint!";
console.log(str.match());
If we do not give any parameter the match method then it returns the array object containing an empty string:
var str = "Hello and Welcome to Linux Hint!";
console.log(str.match());

 If we want to get all of the digits present in the string:
var str = "abcdefghjkl123456789";
console.log(str.match(/\d/g));
If we want to get all of the digits present in the string:
var str = "abcdefghjkl123456789";
console.log(str.match(/\d/g));
 The \D sign will output an array of object that contains every character that the /d sign ignores:
var str = "abcdefghjkl123456789";
console.log(str.match(/\D/g));
The \D sign will output an array of object that contains every character that the /d sign ignores:
var str = "abcdefghjkl123456789";
console.log(str.match(/\D/g));
 A character followed by the $ sign can be used to check whether that is the last character of the given string:
var str = "Hello and Welcome to Linux Hint!";
console.log(str.match(/!$/));
A character followed by the $ sign can be used to check whether that is the last character of the given string:
var str = "Hello and Welcome to Linux Hint!";
console.log(str.match(/!$/));
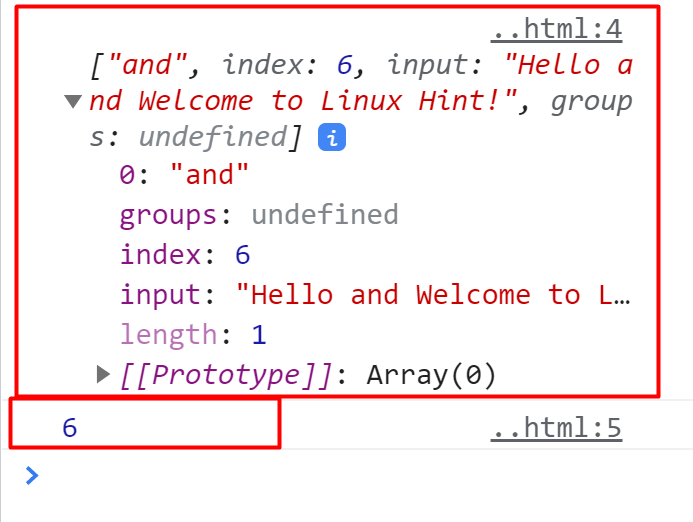 If the match is not found then the search method returns -1 whereas the match() method returns null:
var str = "Hello and Welcome to Linux Hint!";
console.log(str.match('near'));
console.log(str.search('near'));
If the match is not found then the search method returns -1 whereas the match() method returns null:
var str = "Hello and Welcome to Linux Hint!";
console.log(str.match('near'));
console.log(str.search('near'));
 Note: You can put your JavaScript code in a script tag and then run your html file in the browser or just create a different file with js extension and reference it inside the html file using the script tag.
 Example 2
In this example, we will try to pass variables to the eval() function and see what will happen:
var f = 6, g = 7, h = 8, sum, mul, sub;
sum = eval(" f + g + h ");
mul = eval(" f * g * h");
sub = eval(" f - g");
console.log(sum);
console.log(mul);
console.log(sub);
In the above code, we clearly initiated the variables f,g, and h with values.
Then we performed some basic arithmetic operations in order to assess the functionality of the eval() function.
That’s how the eval() function behaves in case of no string.
It evaluates the expression being put inside.
The result is going to be
Result
Example 2
In this example, we will try to pass variables to the eval() function and see what will happen:
var f = 6, g = 7, h = 8, sum, mul, sub;
sum = eval(" f + g + h ");
mul = eval(" f * g * h");
sub = eval(" f - g");
console.log(sum);
console.log(mul);
console.log(sub);
In the above code, we clearly initiated the variables f,g, and h with values.
Then we performed some basic arithmetic operations in order to assess the functionality of the eval() function.
That’s how the eval() function behaves in case of no string.
It evaluates the expression being put inside.
The result is going to be
Result
 Example 3
Let’s try to put something more complex like calling a function and assigning that function call to a variable:
var test;function func1(m, n){
return m * n;}
eval("test = func1(30, 20);");
console.log(test);
How are you going to assess the output? It’s simple.
Here’s how:
First, we declared the variable test.
Then we introduce the function as “func1” which consists of two arguments “m” and “n”.
The return value of that function is going to be the multiplication of these two parameters “m” and “n”.
The result is going to be stored in the test variable and the function will be called by the eval() function.
Hence, the output is going to be
Example 3
Let’s try to put something more complex like calling a function and assigning that function call to a variable:
var test;function func1(m, n){
return m * n;}
eval("test = func1(30, 20);");
console.log(test);
How are you going to assess the output? It’s simple.
Here’s how:
First, we declared the variable test.
Then we introduce the function as “func1” which consists of two arguments “m” and “n”.
The return value of that function is going to be the multiplication of these two parameters “m” and “n”.
The result is going to be stored in the test variable and the function will be called by the eval() function.
Hence, the output is going to be

 Suppose the user enters 18.
Then the condition age >= 18 is checked which evaluates to true.
So, the first expression will be assigned to the result variable.
And if the user enters something like 15 then the condition evaluates to false and the second expression pass is assigned to the result variable.
Suppose the user enters 18.
Then the condition age >= 18 is checked which evaluates to true.
So, the first expression will be assigned to the result variable.
And if the user enters something like 15 then the condition evaluates to false and the second expression pass is assigned to the result variable.
 With:
// ternary operator to check the test result
let numbers = 70;
let result =
(numbers >= 50) ? "You have passed the test." : "You failed the test.";
console.log(result);
With:
// ternary operator to check the test result
let numbers = 70;
let result =
(numbers >= 50) ? "You have passed the test." : "You failed the test.";
console.log(result);


 Or:
console.log(students.size);
Or:
console.log(students.size);
 You can see that the “Bob” is not added twice and the size of the students Set is the same as before.


 Let’s take a look at the syntax of the for loop to understand why:
for ( initialization ; condition ; variable modification ) {
// code statements to be executed}
The for loop takes three arguments, initialization, condition and variable modification:
The first argument i.e.
initialization runs only one time before the execution of the loop; It initializes a variable which is used in the condition for the loop.
The second argument i.e.
condition is evaluated before every iteration; the loop terminates when this condition is satisfied.
The third and the last argument variable modification is used to modify the value of the variable used in condition after every iteration of the loop.
The arguments of the for loops specify the definite number of iterations it is going to run.
They specify the starting point (initialization) and the ending point (condition) of the loop.
Although all of the arguments are optional (the for loop will run even if you do not specify the condition) however it is not recommended to leave the condition argument empty as it will create an infinite loop which can crash your browser.
Now let’s try an example to better understand for loop:
Note: The browser console is used for the demonstration of examples in this article.
In this example we will count down from 10 to 1 using a for loop:
for (let index = 10; index >= 1; index--) {
console.log(index);}
Let’s take a look at the syntax of the for loop to understand why:
for ( initialization ; condition ; variable modification ) {
// code statements to be executed}
The for loop takes three arguments, initialization, condition and variable modification:
The first argument i.e.
initialization runs only one time before the execution of the loop; It initializes a variable which is used in the condition for the loop.
The second argument i.e.
condition is evaluated before every iteration; the loop terminates when this condition is satisfied.
The third and the last argument variable modification is used to modify the value of the variable used in condition after every iteration of the loop.
The arguments of the for loops specify the definite number of iterations it is going to run.
They specify the starting point (initialization) and the ending point (condition) of the loop.
Although all of the arguments are optional (the for loop will run even if you do not specify the condition) however it is not recommended to leave the condition argument empty as it will create an infinite loop which can crash your browser.
Now let’s try an example to better understand for loop:
Note: The browser console is used for the demonstration of examples in this article.
In this example we will count down from 10 to 1 using a for loop:
for (let index = 10; index >= 1; index--) {
console.log(index);}
 In the above example:
Index is initialized to 10
Then the condition is checked, since the index is greater than or equal to 1 condition is true the loop is executed and the value of index is printed to the console
After the first iteration the index variable is decremented by one.
The — operator reduces the value of the index by one.
Then the condition is again checked; As the condition is still true the loop is again executed.
This process keeps recurring as long as the condition for the loop remains true.
When the value of the index recheas 0, the condition greater than or equal to 1 is no longer true and the loop terminates.
We can perform any operation on the variable in the last argument of the for loop statement:
for (let index = 2; index < 500; index*=2) {
console.log(index);}
In the above example:
Index is initialized to 10
Then the condition is checked, since the index is greater than or equal to 1 condition is true the loop is executed and the value of index is printed to the console
After the first iteration the index variable is decremented by one.
The — operator reduces the value of the index by one.
Then the condition is again checked; As the condition is still true the loop is again executed.
This process keeps recurring as long as the condition for the loop remains true.
When the value of the index recheas 0, the condition greater than or equal to 1 is no longer true and the loop terminates.
We can perform any operation on the variable in the last argument of the for loop statement:
for (let index = 2; index < 500; index*=2) {
console.log(index);}

 They are mostly used when the code has to run an unknown number of times until the condition is satisfied:
while (condition) {
// Statements}
Let’s take a look at an example where we will generate a random number by using the Math.random() method inside the loop; The loop will keep running until the Math.random() method produces an odd number:
runLoopAgain = true;
while (runLoopAgain) {
num = Math.random().toFixed(1)*10;
if (num % 2 != 0) {
runLoopAgain = false;
}
console.log(num);}
They are mostly used when the code has to run an unknown number of times until the condition is satisfied:
while (condition) {
// Statements}
Let’s take a look at an example where we will generate a random number by using the Math.random() method inside the loop; The loop will keep running until the Math.random() method produces an odd number:
runLoopAgain = true;
while (runLoopAgain) {
num = Math.random().toFixed(1)*10;
if (num % 2 != 0) {
runLoopAgain = false;
}
console.log(num);}
 In the above example we first declared a boolean named runLoopAgain and assigned it a value i.e true.
The while loop evaluates the condition before the execution of the loop; as the variable runLoopAgain is the condition of the loop and is true the while loop is executed.
Inside the body of the while loop we have used the random method of the Math object along with the .toFixed method to get a random number between zero and nine.
Then we have used a conditional statement to check if the number is divisible by two (to check if it is even or odd).
If the number is odd then the runLoopAgain variable will become false and the loop will terminate otherwise the variable/condition will remain true and the loop will keep running.
The tasks that we performed in the above examples using the for loop can also be performed with while loop:
let i = 10;
while (i >= 1) {
console.log(i);
i--;}
In the above example we first declared a boolean named runLoopAgain and assigned it a value i.e true.
The while loop evaluates the condition before the execution of the loop; as the variable runLoopAgain is the condition of the loop and is true the while loop is executed.
Inside the body of the while loop we have used the random method of the Math object along with the .toFixed method to get a random number between zero and nine.
Then we have used a conditional statement to check if the number is divisible by two (to check if it is even or odd).
If the number is odd then the runLoopAgain variable will become false and the loop will terminate otherwise the variable/condition will remain true and the loop will keep running.
The tasks that we performed in the above examples using the for loop can also be performed with while loop:
let i = 10;
while (i >= 1) {
console.log(i);
i--;}
 let i = 2;
while (i < 500) {
console.log(i);
i*=2;}
let i = 2;
while (i < 500) {
console.log(i);
i*=2;}

 In this example I have used a while loop to print out every even number which is less than 21 but I am only getting even numbers less than 9; why is that? This is because I have used a break statement which terminates the loop if the even number is a multiple of 5.
We can use the break statement to have different conditions for the termination of a while loop inside the loop’s body:
In this example I have used a while loop to print out every even number which is less than 21 but I am only getting even numbers less than 9; why is that? This is because I have used a break statement which terminates the loop if the even number is a multiple of 5.
We can use the break statement to have different conditions for the termination of a while loop inside the loop’s body:
 As you can see that 5, 10 and 20 are missing because they are multiples of 5 as well as being even numbers.
 In while loop the condition is evaluated before the execution of the loop’s body whereas the do while loop does the opposite and checks it after the execution of the body of the loop.
runLoopAgain = true;
while (runLoopAgain) {
num = Math.random().toFixed(1)*10;
if (num % 2 != 0) {
runLoopAgain = false;
}
console.log(num);}
In this example given above we had to declare and initialize the runLoopAgain variable before the body of the loop because the while loop evaluates the condition before the iteration.
The do while loop checks the condition after every iteration, so If we are sure that we want to run the code present inside the loop at least one time then we use the do while loop.
As we are sure in this example that we have to at least generate one random number before we check whether it is even or odd, a better way to write it would be:
do {
num = Math.random().toFixed(1)*10;
console.log(num);} while (num % 2 == 0);
In while loop the condition is evaluated before the execution of the loop’s body whereas the do while loop does the opposite and checks it after the execution of the body of the loop.
runLoopAgain = true;
while (runLoopAgain) {
num = Math.random().toFixed(1)*10;
if (num % 2 != 0) {
runLoopAgain = false;
}
console.log(num);}
In this example given above we had to declare and initialize the runLoopAgain variable before the body of the loop because the while loop evaluates the condition before the iteration.
The do while loop checks the condition after every iteration, so If we are sure that we want to run the code present inside the loop at least one time then we use the do while loop.
As we are sure in this example that we have to at least generate one random number before we check whether it is even or odd, a better way to write it would be:
do {
num = Math.random().toFixed(1)*10;
console.log(num);} while (num % 2 == 0);

 If the for in loop is applied to an array, it returns the index of each element.
If we want to get the value present at each index then we can use the for of loop.
var num = [5, 6, 7, 8, 9];for (let d of num) {
console.log(d);}
If the for in loop is applied to an array, it returns the index of each element.
If we want to get the value present at each index then we can use the for of loop.
var num = [5, 6, 7, 8, 9];for (let d of num) {
console.log(d);}
 The for of loop is used to loop through iterable objects such as arrays, Maps, strings etc.
If we use the for of loop on a string then it returns one character of the string each iteration:
var greet = "Welcome to Linux Hint!";for (let c of greet) {
console.log(c);}
The for of loop is used to loop through iterable objects such as arrays, Maps, strings etc.
If we use the for of loop on a string then it returns one character of the string each iteration:
var greet = "Welcome to Linux Hint!";for (let c of greet) {
console.log(c);}
 The .foreach() loop is used to perform a specific action on each element of the array; it loops through elements of the array and calls a function once for every element.
The .foreach() loop takes a callback function as an argument which further takes three arguments, two of which are optional; The only required argument is the value of the current element.
The index of the element and the whole array itself can be given as arguments to the callback function as well.
Now we will look at an example where we have used the .foreach() loop to multiply each element of the array by two and print it to the console:
var numbers= [99, 85, 788, 2, 255, 598];
numbers.forEach(function (value) {
console.log(value +" * 2 = " + value*2);})
The .foreach() loop is used to perform a specific action on each element of the array; it loops through elements of the array and calls a function once for every element.
The .foreach() loop takes a callback function as an argument which further takes three arguments, two of which are optional; The only required argument is the value of the current element.
The index of the element and the whole array itself can be given as arguments to the callback function as well.
Now we will look at an example where we have used the .foreach() loop to multiply each element of the array by two and print it to the console:
var numbers= [99, 85, 788, 2, 255, 598];
numbers.forEach(function (value) {
console.log(value +" * 2 = " + value*2);})

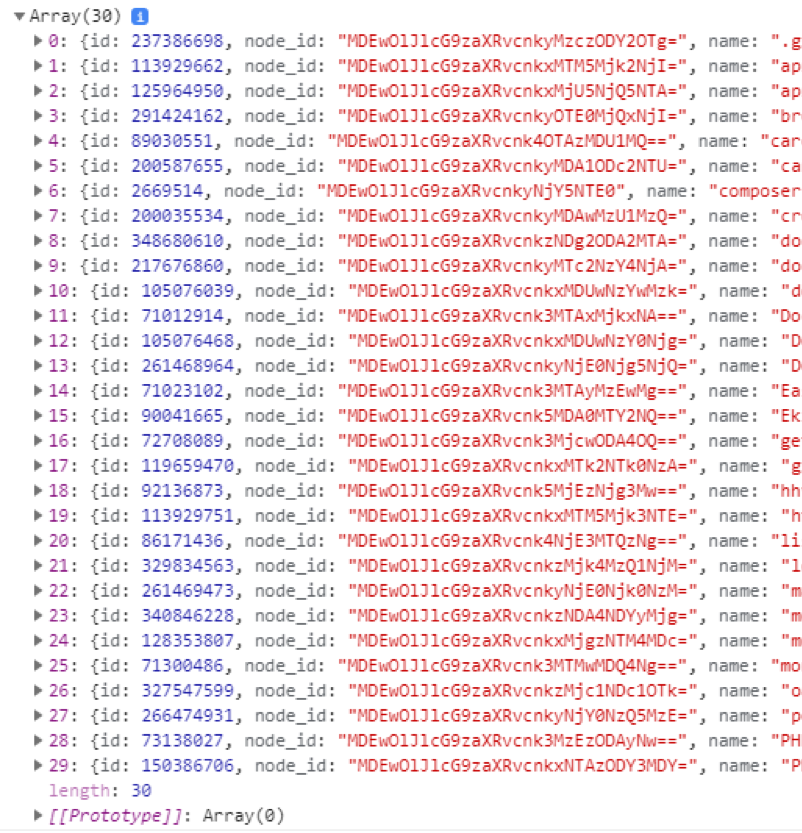 In the screenshot given above the promise was resolved and the body of the .then() method was executed.
If the promise had remained unresolved due to some reason then the body of the .catch() method would have been executed which would do all the error handling.
We have just used the .catch() method to print an error message in case the promise is unfulfilled.
In the screenshot given above the promise was resolved and the body of the .then() method was executed.
If the promise had remained unresolved due to some reason then the body of the .catch() method would have been executed which would do all the error handling.
We have just used the .catch() method to print an error message in case the promise is unfulfilled.
 Get This Book Now:
  Get This Book Now:
  Get This Book Now:
  Get This Book Now:
  Get This Book Now:
  Get This Book Now:
  Get This Book Now:
  Get This Book Now:
  Get This Book Now:
  Get This Book Now:
 NPM creates a new folder by the name of (if it doesn’t already exist) “node_modules” to store the package.
Now all your downloaded packages will be stored in this folder.
NPM creates a new folder by the name of (if it doesn’t already exist) “node_modules” to store the package.
Now all your downloaded packages will be stored in this folder.
 To verify the successful installation of your package, run the below-given command:
> ls node_modules
To verify the successful installation of your package, run the below-given command:
> ls node_modules

 We can eliminate this error by installing any tool that will handle all the dependencies of the require() function in a browser.
Here we will use a tool named Browserify.
To install Browserify, run the following command:
npm install -g browserify
Now use the following command to make a file out of your source code where all the dependencies have been resolved:
> browserify source-code_file-name.js -o bundle.js
(You will have to run the above command each time you make any changes in the original source code)
If you get an error by running the command as mentioned above, then open up the windows power shell and use the below-given commands before using the command given above:
> Set-ExecutionPolicy -Scope CurrentUser -ExecutionPolicy Unrestricted> Set-ExecutionPolicy RemoteSigned
[These commands expose you to great security risks as they enable you to run unknown scripts on your system]
Now run the command as mentioned above again; it should work this time.
Now replace the script source from your source-code file’s name with bundle.js in the HTML file’ header and run the code again.
The code will run properly this time and will not give any error.
We can eliminate this error by installing any tool that will handle all the dependencies of the require() function in a browser.
Here we will use a tool named Browserify.
To install Browserify, run the following command:
npm install -g browserify
Now use the following command to make a file out of your source code where all the dependencies have been resolved:
> browserify source-code_file-name.js -o bundle.js
(You will have to run the above command each time you make any changes in the original source code)
If you get an error by running the command as mentioned above, then open up the windows power shell and use the below-given commands before using the command given above:
> Set-ExecutionPolicy -Scope CurrentUser -ExecutionPolicy Unrestricted> Set-ExecutionPolicy RemoteSigned
[These commands expose you to great security risks as they enable you to run unknown scripts on your system]
Now run the command as mentioned above again; it should work this time.
Now replace the script source from your source-code file’s name with bundle.js in the HTML file’ header and run the code again.
The code will run properly this time and will not give any error.

 Similarly, we can also use this method on a string:
var str = 'Welcome to Linux Hint!';
console.log(str.indexOf('to'));
Similarly, we can also use this method on a string:
var str = 'Welcome to Linux Hint!';
console.log(str.indexOf('to'));
 It can also be used to find a single character:
var str = 'Welcome to Linux Hint!';
console.log(str.indexOf('c'));
It can also be used to find a single character:
var str = 'Welcome to Linux Hint!';
console.log(str.indexOf('c'));
 The indexOf() method by default starts searching from 0; but we can pass the starting point as an argument as well:
var animals = ['Lion', 'Monkey', 'Rhino', 'Cat'];
console.log(animals.indexOf('Rhino', 3));
The indexOf() method by default starts searching from 0; but we can pass the starting point as an argument as well:
var animals = ['Lion', 'Monkey', 'Rhino', 'Cat'];
console.log(animals.indexOf('Rhino', 3));
 The method has returned -1 as it cannot find ‘Rhino’ if it starts the search from 3.
Now, if we change the starting point to 2, then:
var animals = ['Lion', 'Monkey', 'Rhino', 'Cat'];
console.log(animals.indexOf('Rhino', 2));
The method has returned -1 as it cannot find ‘Rhino’ if it starts the search from 3.
Now, if we change the starting point to 2, then:
var animals = ['Lion', 'Monkey', 'Rhino', 'Cat'];
console.log(animals.indexOf('Rhino', 2));
 Similarly for strings:
var str = 'Welcome to Linux Hint!';
console.log(str.indexOf('c', 5));
Similarly for strings:
var str = 'Welcome to Linux Hint!';
console.log(str.indexOf('c', 5));
 var str = 'Welcome to Linux Hint!';
console.log(str.indexOf('c', 1));
var str = 'Welcome to Linux Hint!';
console.log(str.indexOf('c', 1));
 The index() method starts searching from 0 to the end of an array/string; and returns the index of the first occurrence of the search value.
If there are two similar items in an array or a string and you want to find the index of the last one, then you should use the lastIndexOf() method:
var str = 'Welcome to Linux Hint!';
console.log(str.lastIndexOf('t'));
The index() method starts searching from 0 to the end of an array/string; and returns the index of the first occurrence of the search value.
If there are two similar items in an array or a string and you want to find the index of the last one, then you should use the lastIndexOf() method:
var str = 'Welcome to Linux Hint!';
console.log(str.lastIndexOf('t'));
 Similarly for an array:
var animals = ['Lion', 'Monkey', 'Rhino', 'Cat', 'Lion'];
console.log(animals.lastIndexOf('Lion'));
Similarly for an array:
var animals = ['Lion', 'Monkey', 'Rhino', 'Cat', 'Lion'];
console.log(animals.lastIndexOf('Lion'));
 The indexOf() method is case-sensitive.
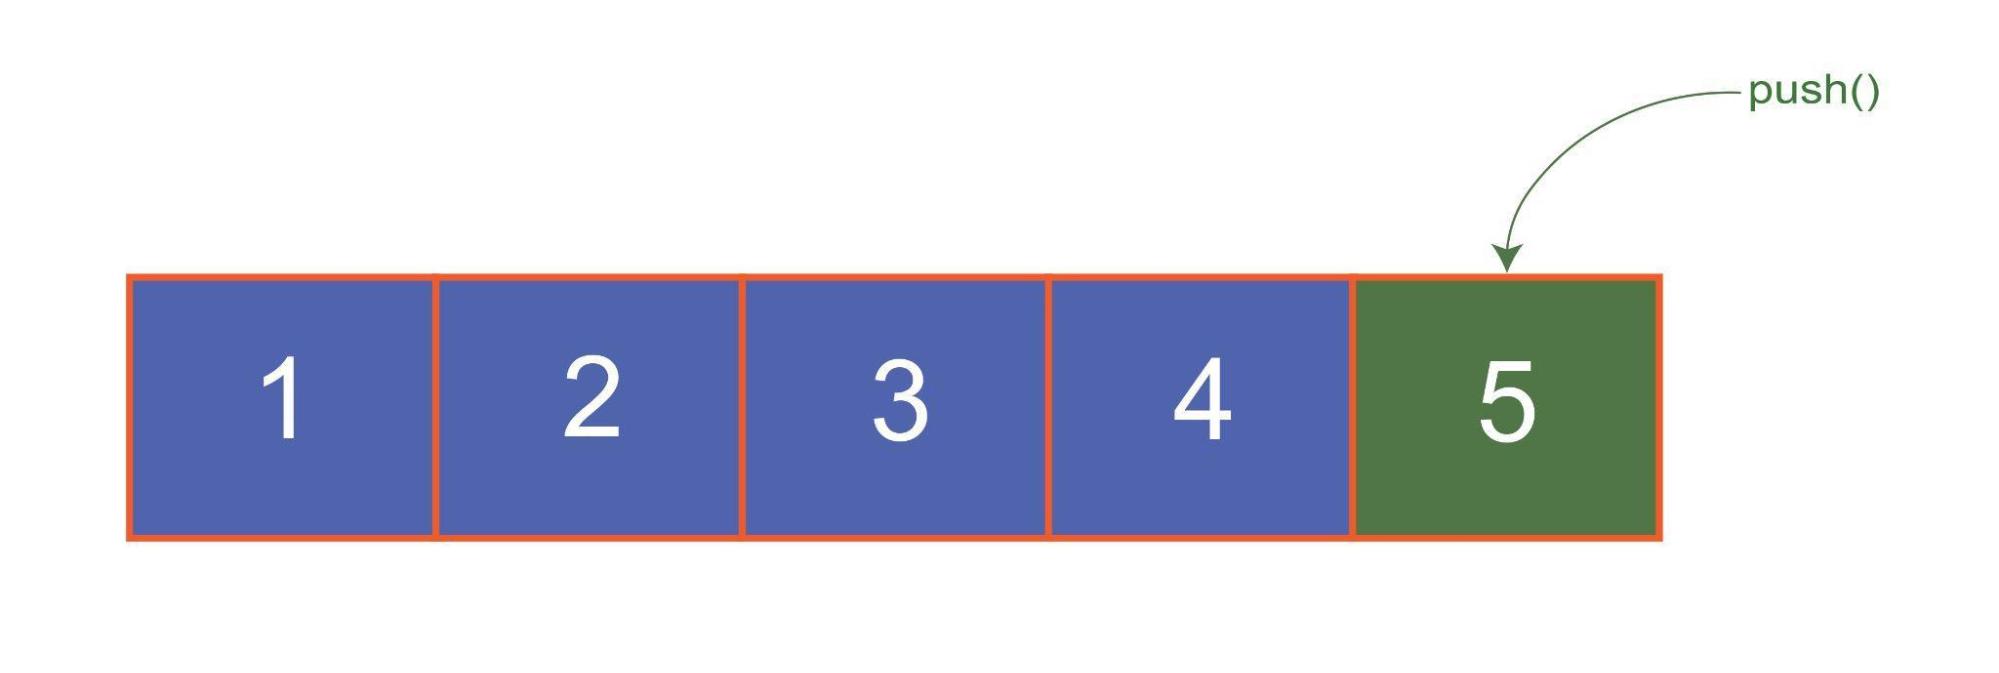 The pop() function is used to delete the last element/item of the array.
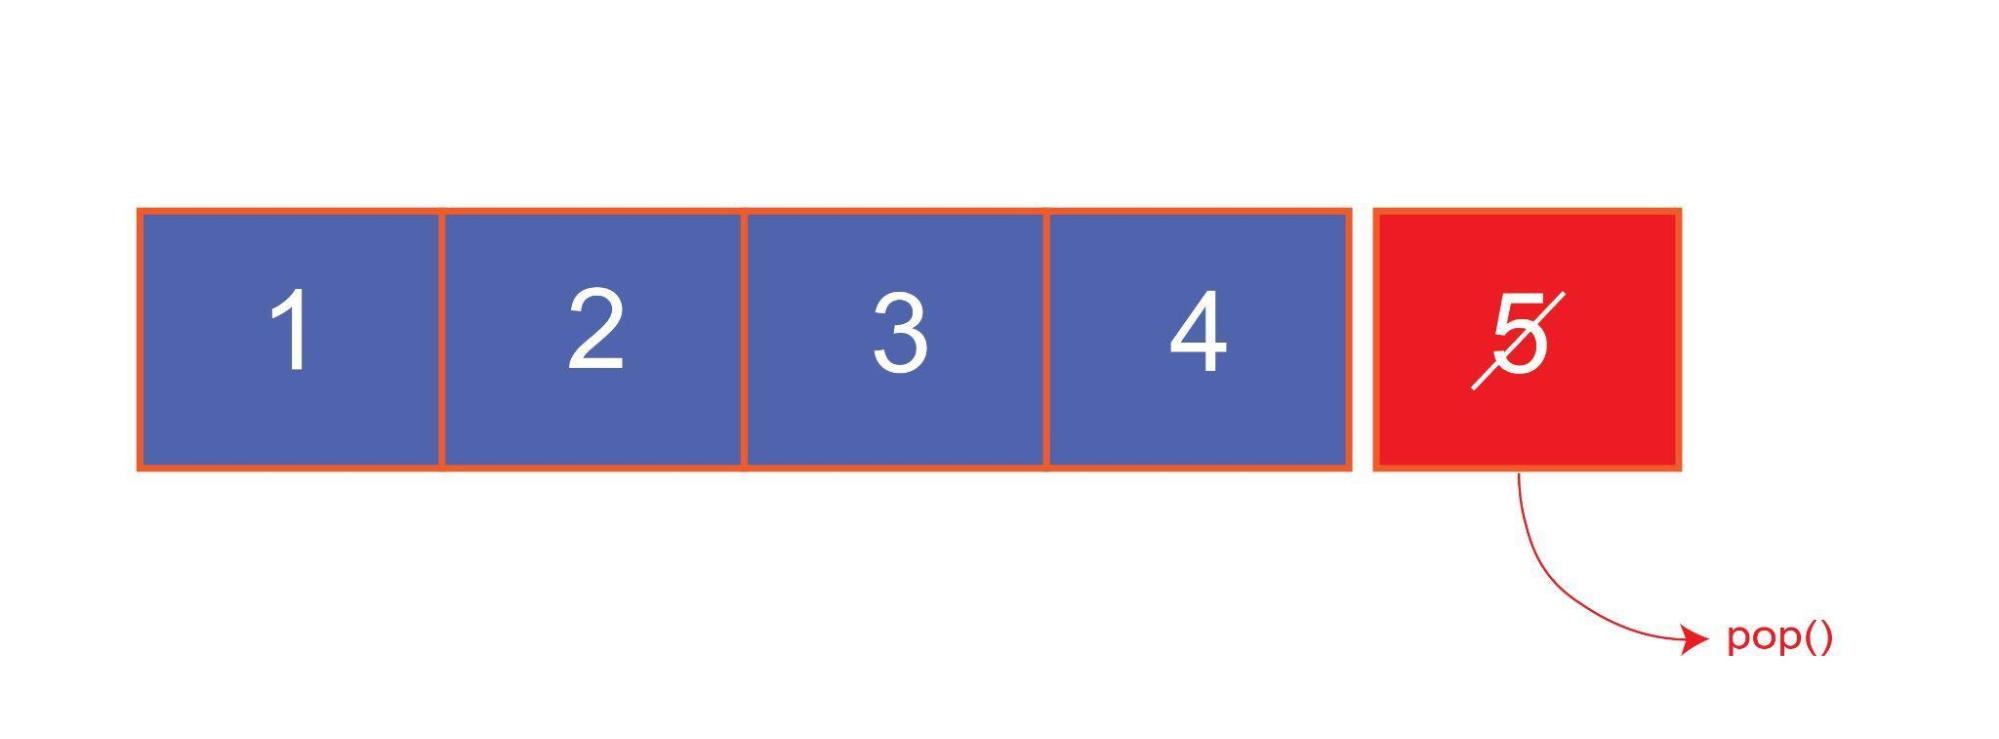 Let’s try to add and remove elements from an array using push() and pop() methods to understand these methods better.
Note: We will use the browser console to demonstrate examples performed in this post.
To open up the browser console:
Use the F12 key in Chrome and other chromium-based browsers.
Use CTRL + SHIFT + K keyboard shortcut keys for Mozilla.
Use Option +
Let’s try to add and remove elements from an array using push() and pop() methods to understand these methods better.
Note: We will use the browser console to demonstrate examples performed in this post.
To open up the browser console:
Use the F12 key in Chrome and other chromium-based browsers.
Use CTRL + SHIFT + K keyboard shortcut keys for Mozilla.
Use Option + 

 Now, if we add another element to the array and use the array.length property again, then the output on the console changes to:
var students= ["John Doe", "Jane Doe", "John Smith", "Jacob Smith"];
console.log(students.length)
Now, if we add another element to the array and use the array.length property again, then the output on the console changes to:
var students= ["John Doe", "Jane Doe", "John Smith", "Jacob Smith"];
console.log(students.length)

 The array.length property has added another element which is a non-iterable empty slot.
We can verify this by outputting the whole array to the console:
var students= ["John Doe", "Jane Doe", "John Smith", "Jacob Smith"];
students.length = 5;
console.log(students.length)
console.log(students)
The array.length property has added another element which is a non-iterable empty slot.
We can verify this by outputting the whole array to the console:
var students= ["John Doe", "Jane Doe", "John Smith", "Jacob Smith"];
students.length = 5;
console.log(students.length)
console.log(students)
 Now we will use the array.length property once again to reduce the number of elements from 5 to 3:
var students= ["John Doe", "Jane Doe", "John Smith", "Jacob Smith"];
students.length = 5;
console.log(students.length)
console.log(students)
students.length = 3;
console.log(students.length)
console.log(students)
Now we will use the array.length property once again to reduce the number of elements from 5 to 3:
var students= ["John Doe", "Jane Doe", "John Smith", "Jacob Smith"];
students.length = 5;
console.log(students.length)
console.log(students)
students.length = 3;
console.log(students.length)
console.log(students)
 The maximum number of elements an array can have is 4294967295, as it is a 32-bit data type.
As you can see in the example below, if we try to make an array of length4294967296, we will get an error.
students.length = 4294967296;
console.log(students.length)
The maximum number of elements an array can have is 4294967295, as it is a 32-bit data type.
As you can see in the example below, if we try to make an array of length4294967296, we will get an error.
students.length = 4294967296;
console.log(students.length)

 The unshift() method is used to add an element/item to the starting point of an array.
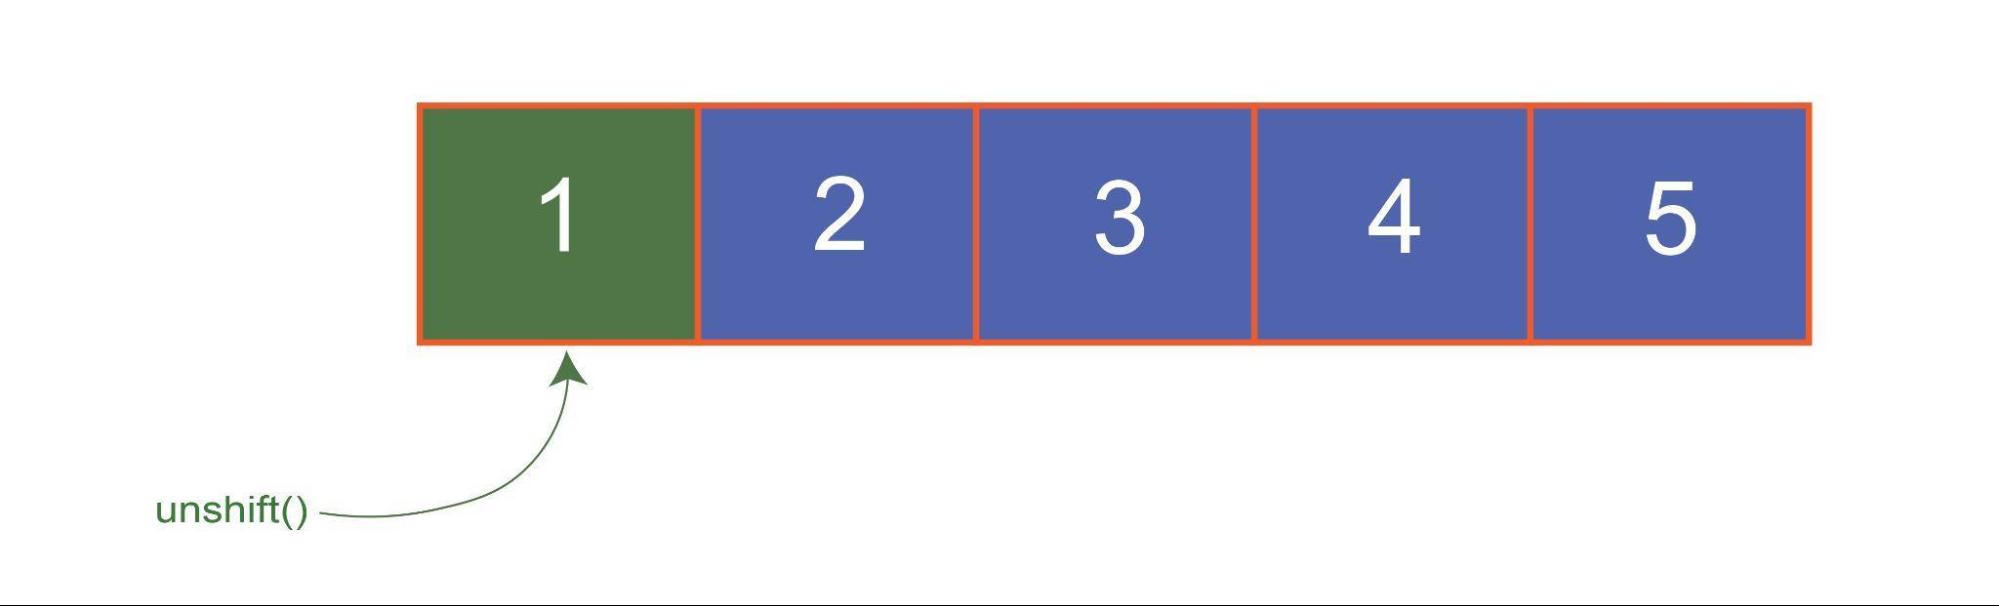 Let’s try to add and remove elements from an array using shift() and unshift() methods to understand these methods better.
Note: We will use the browser console to demonstrate examples performed in this post.
To open up the browser console:
Use the F12 key in Chrome and other chromium-based browsers.
Use CTRL + SHIFT + K keyboard shortcut keys for Mozilla.
Use Option +
Let’s try to add and remove elements from an array using shift() and unshift() methods to understand these methods better.
Note: We will use the browser console to demonstrate examples performed in this post.
To open up the browser console:
Use the F12 key in Chrome and other chromium-based browsers.
Use CTRL + SHIFT + K keyboard shortcut keys for Mozilla.
Use Option + 


 In the output, you can see the Array is sorted as we desired:
 Now select the Console option to open the console:
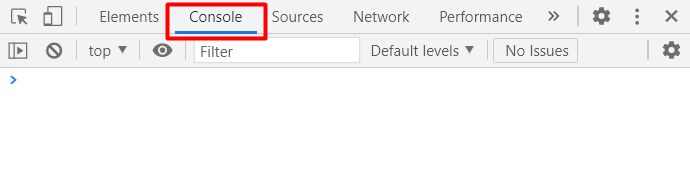
 In the same manner, console.info, console.error, and console.warn can also be used to output text on the console:
console.info("Hello! This is Linux Hint.");
console.error("This is an error message");
console.warn("This is a warning message");
In the same manner, console.info, console.error, and console.warn can also be used to output text on the console:
console.info("Hello! This is Linux Hint.");
console.error("This is an error message");
console.warn("This is a warning message");


 The new Date() function without any parenthesis creates an object with the current date.
We can also pass arguments to the new Date() function to create new date objects with specified date and time.
Please see
The new Date() function without any parenthesis creates an object with the current date.
We can also pass arguments to the new Date() function to create new date objects with specified date and time.
Please see  This method is used to get only the date part from the whole date string.


 In the above example, we increment the variable that contains the current month’s value because the months start at 0.


 The new Date() function without any parenthesis creates an object with the current date.
We can also pass arguments to the new Date() function to create new date objects with any specified date and time.
The arguments use the following syntax in the new Date() function:
new
The new Date() function without any parenthesis creates an object with the current date.
We can also pass arguments to the new Date() function to create new date objects with any specified date and time.
The arguments use the following syntax in the new Date() function:
new  In the above example, the 10th month is November; this is because JavaScript starts counting months from 0.
So January is the 0th month.
We can pass (minimum) 1 to (maximum) 7 arguments to the new Date() function.
Now let’s try with five parameters:
new
In the above example, the 10th month is November; this is because JavaScript starts counting months from 0.
So January is the 0th month.
We can pass (minimum) 1 to (maximum) 7 arguments to the new Date() function.
Now let’s try with five parameters:
new  The seconds are 00 by default.
In the same way, we can also give two, three, four, and six arguments.
The order of the arguments will always remain the same unless we are only giving a single argument.
If only one parameter is supplied to the new Date() function, it will be considered as milliseconds:
var date = new
The seconds are 00 by default.
In the same way, we can also give two, three, four, and six arguments.
The order of the arguments will always remain the same unless we are only giving a single argument.
If only one parameter is supplied to the new Date() function, it will be considered as milliseconds:
var date = new  The time shown in the screenshot above is 2001 milliseconds past midnight of January 01, 1970.
One or two-digit years will be considered from the previous century:
var date = new
The time shown in the screenshot above is 2001 milliseconds past midnight of January 01, 1970.
One or two-digit years will be considered from the previous century:
var date = new  We can also pass a date string to the new Date() function:
var date = new
We can also pass a date string to the new Date() function:
var date = new 

 Note: This value is always one less than the actual month.
Similarly the getDate(), getHours(), getMinutes(), getSeconds() and getMilliseconds() can be used to get the individual values of Date, Hours, Minutes, Seconds and Milliseconds respectively.
Note: This value is always one less than the actual month.
Similarly the getDate(), getHours(), getMinutes(), getSeconds() and getMilliseconds() can be used to get the individual values of Date, Hours, Minutes, Seconds and Milliseconds respectively.


 Similarly the setDate(), setHours(), setMinutes(), setSeconds() and setMilliseconds() can be used to set the individual values of Date, Hours, Minutes, Seconds and Milliseconds (respectively) in the date object.

 Although we have got the desired range as output.
But, why not use a smart and easy way to get the filtered Array using the filter() method of the array, where we do not have to mutate the variables like “filteredArray.”
Although we have got the desired range as output.
But, why not use a smart and easy way to get the filtered Array using the filter() method of the array, where we do not have to mutate the variables like “filteredArray.”
 You can verify by looking in the screenshot provided above that the filter() function has returned all the numbers which are greater than 18.
Another shorter and easier way to write filter() function is to make the callback function of filter() function an arrow function:
The syntax of writing the callback function within the filter() function’s parentheses will be like this:
varfilteredArray = numbers.filter((n) => {return n >18});
console.log(filteredArray);
You can verify by looking in the screenshot provided above that the filter() function has returned all the numbers which are greater than 18.
Another shorter and easier way to write filter() function is to make the callback function of filter() function an arrow function:
The syntax of writing the callback function within the filter() function’s parentheses will be like this:
varfilteredArray = numbers.filter((n) => {return n >18});
console.log(filteredArray);
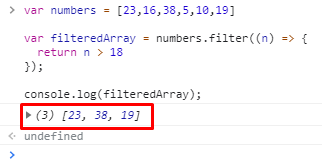 Alright, this was the simple example in which we have an array of numbers only; what about the array of objects.
Let’s try that one as well.
Alright, this was the simple example in which we have an array of numbers only; what about the array of objects.
Let’s try that one as well.
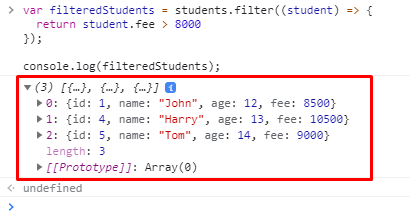 By looking at the screenshot attached above, you can see that students’ fees are greater than $8000 and are displayed as an output.
So this is how we can access the objects of an array in the filter() function.
By looking at the screenshot attached above, you can see that students’ fees are greater than $8000 and are displayed as an output.
So this is how we can access the objects of an array in the filter() function.


 Download form
  Download form
  Download form
  Download form
 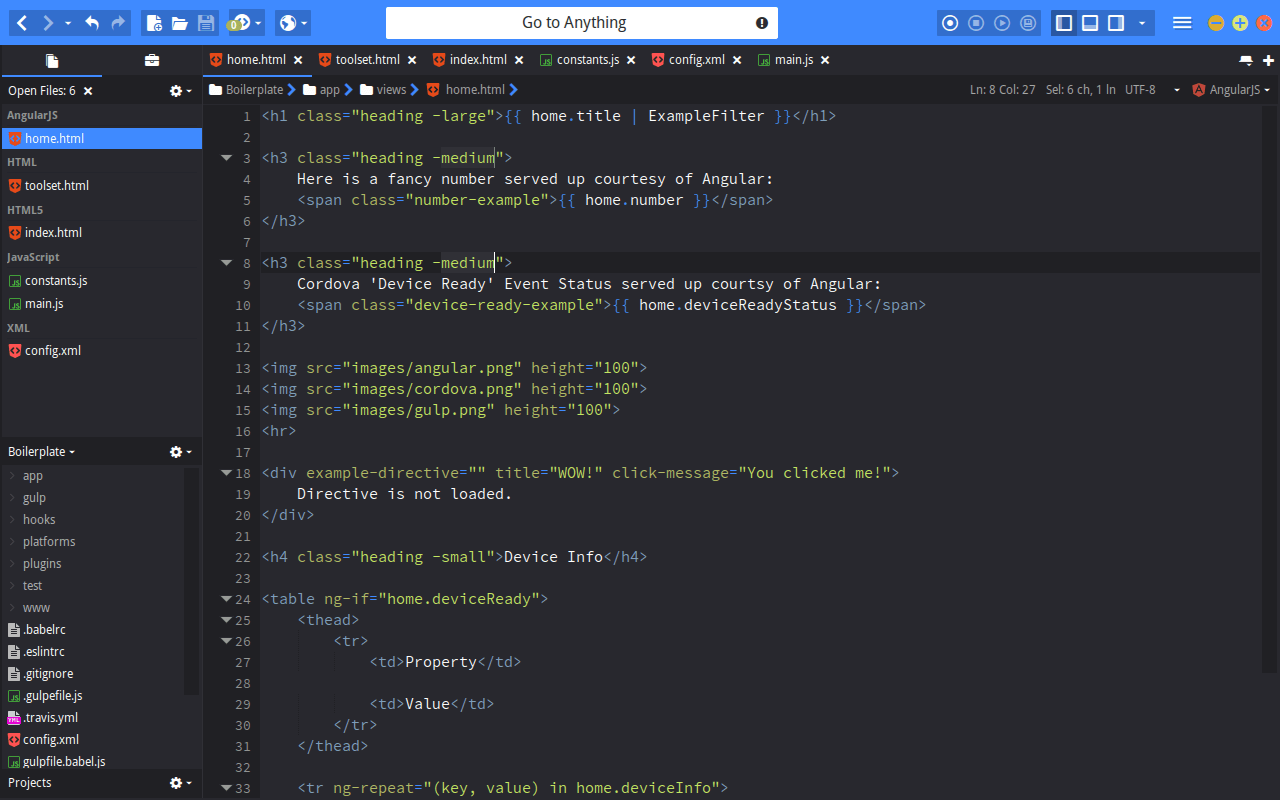 Download form
  If we assign a new value to age, i.e., ten instead of 10, then the output changes to:
var age = 'ten';
console.log(typeof(age));
If we assign a new value to age, i.e., ten instead of 10, then the output changes to:
var age = 'ten';
console.log(typeof(age));
 Now, if we do not assign any value to age and use the typeof operator on it; then the operator will return the following value:
var age;
console.log(typeof(age));
Now, if we do not assign any value to age and use the typeof operator on it; then the operator will return the following value:
var age;
console.log(typeof(age));
 We can use the same method to determine other data types as well like boolean, object and symbol, etc.:
var x = true;
console.log(typeof(x));
We can use the same method to determine other data types as well like boolean, object and symbol, etc.:
var x = true;
console.log(typeof(x));
 As you have already seen in the above examples, the typeof operator can be combined with other functions and methods such as conolse.log.
It can also be combined with conditionals, loops, etc.
In the example given below, the typeof operator is used with conditional statements:
var age = 5;if (typeof(age) == 'number') {
console.log('The provided number is in the form of digits.') }else{
console.log('The provided number is not in the form of digits.')}
As you have already seen in the above examples, the typeof operator can be combined with other functions and methods such as conolse.log.
It can also be combined with conditionals, loops, etc.
In the example given below, the typeof operator is used with conditional statements:
var age = 5;if (typeof(age) == 'number') {
console.log('The provided number is in the form of digits.') }else{
console.log('The provided number is not in the form of digits.')}
 Now, if we change the age from 5 to five, then the output changes to:

 Note: We will use the browser console to demonstrate examples performed in this post.
To open up the browser console:
Use the F12 key in Chrome and other chromium-based browsers.
Use CTRL + SHIFT + K keyboard shortcut keys for Mozilla.
Use Option +
Note: We will use the browser console to demonstrate examples performed in this post.
To open up the browser console:
Use the F12 key in Chrome and other chromium-based browsers.
Use CTRL + SHIFT + K keyboard shortcut keys for Mozilla.
Use Option +  We can efficiently write such repetitive tasks using loops.
As mentioned above, the number of lines in the program can be reduced from twenty to four using a for a loop.
for (let number = 1; number <= 20; number++) {
console.log(number);}
We can efficiently write such repetitive tasks using loops.
As mentioned above, the number of lines in the program can be reduced from twenty to four using a for a loop.
for (let number = 1; number <= 20; number++) {
console.log(number);}
 Now let’s discuss how a for loop actually works.
The first statement, i.e., initialization, runs before the statements present inside the body of the loop and sets a variable.
The second statement also runs before the execution of the block of code.
It defined the condition for the loop.
This statement decides whether the loop will run for the next iteration or stop at the current iteration.
The third and the last statement runs after the statements inside the loop are executed.
It is incrementing the value present inside the variable.
We can also decrement the value of a variable in a loop.
Now we will output the sequence from twenty to one in descending order:
for (let number = 20; number >0; number--) {
console.log(number);}
Now let’s discuss how a for loop actually works.
The first statement, i.e., initialization, runs before the statements present inside the body of the loop and sets a variable.
The second statement also runs before the execution of the block of code.
It defined the condition for the loop.
This statement decides whether the loop will run for the next iteration or stop at the current iteration.
The third and the last statement runs after the statements inside the loop are executed.
It is incrementing the value present inside the variable.
We can also decrement the value of a variable in a loop.
Now we will output the sequence from twenty to one in descending order:
for (let number = 20; number >0; number--) {
console.log(number);}


 for/of loops can also be used to run through the values of a string.
 In the example given above, first, we declared an array named numbers and assigned it six elements.
Then we used the forEach loop to loop through each item present in the array.
We then declared and defined a function inside the forEach loop that prints the element’s value in the current iteration of the loop onto the console.
We can also declare and define the function outside of the loop and just call the function from the body of the loop:
var numbers= [1, 2, 3, 4, 5, 6];
numbers.forEach(pr);
function pr(value){
console.log(value);}
The forEach loop is not executed for the empty elements of the array.
If we add another element to the array as mentioned above by using the
In the example given above, first, we declared an array named numbers and assigned it six elements.
Then we used the forEach loop to loop through each item present in the array.
We then declared and defined a function inside the forEach loop that prints the element’s value in the current iteration of the loop onto the console.
We can also declare and define the function outside of the loop and just call the function from the body of the loop:
var numbers= [1, 2, 3, 4, 5, 6];
numbers.forEach(pr);
function pr(value){
console.log(value);}
The forEach loop is not executed for the empty elements of the array.
If we add another element to the array as mentioned above by using the  Now we will try to perform different actions on the elements of the array.
First, let’s try to write a function that prints the square of each element of the array on the console:
var numbers= [1, 2, 3, 4, 5, 6];
numbers.forEach(pr);
function pr(value){
let square = value * value;
console.log(square);}
Now we will try to perform different actions on the elements of the array.
First, let’s try to write a function that prints the square of each element of the array on the console:
var numbers= [1, 2, 3, 4, 5, 6];
numbers.forEach(pr);
function pr(value){
let square = value * value;
console.log(square);}
 Now let’s try to output the sum of all the elements of the array to the console:
var numbers= [1, 2, 3, 4, 5, 6];
let sum = 0;
numbers.forEach(pr);
function pr(value){
sum = sum + value;}
console.log(sum);
Now let’s try to output the sum of all the elements of the array to the console:
var numbers= [1, 2, 3, 4, 5, 6];
let sum = 0;
numbers.forEach(pr);
function pr(value){
sum = sum + value;}
console.log(sum);

 If a function is returning a value, it returns that value to where it was called.
As seen in the above example, when we called the function inside the console.log() method, the output was 25, which is the returning value of the function.
We can use any variable or number in place of the parameter.
A Function can be called from inside of any other function as well.
We can use functions as conditions for if and loop statements as well.
If a function is returning a value, it returns that value to where it was called.
As seen in the above example, when we called the function inside the console.log() method, the output was 25, which is the returning value of the function.
We can use any variable or number in place of the parameter.
A Function can be called from inside of any other function as well.
We can use functions as conditions for if and loop statements as well.
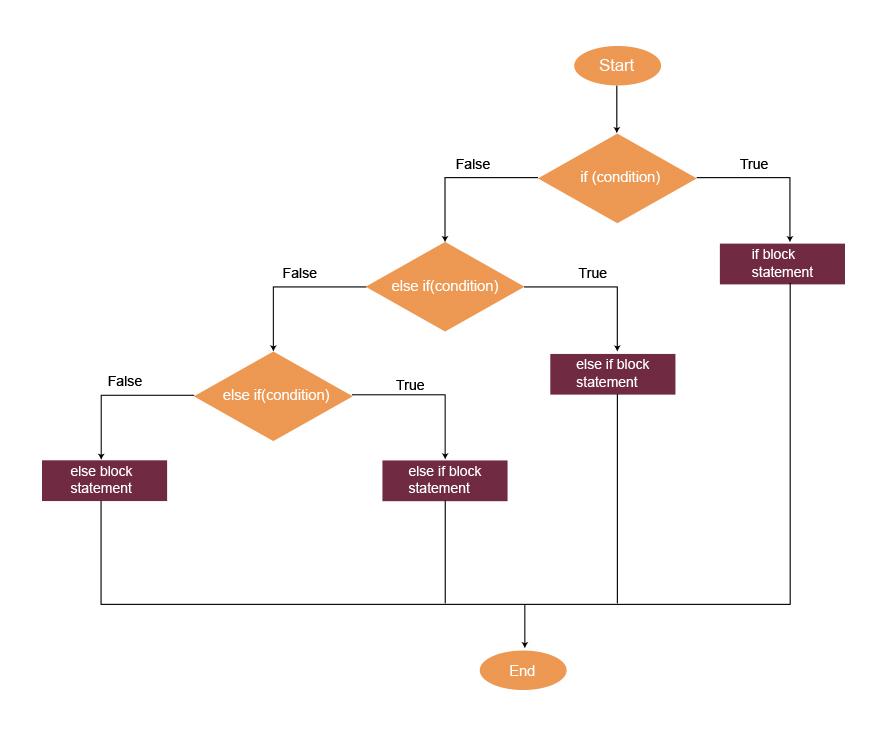 Syntax of if statement:
if (condition) {
Statements}
Note: We will use the browser console to demonstrate examples performed in this post.
To open up the browser console:
Use the F12 key in Chrome and other chromium-based browsers.
Use CTRL + SHIFT + K keyboard shortcut keys for Mozilla.
Use Option +
Syntax of if statement:
if (condition) {
Statements}
Note: We will use the browser console to demonstrate examples performed in this post.
To open up the browser console:
Use the F12 key in Chrome and other chromium-based browsers.
Use CTRL + SHIFT + K keyboard shortcut keys for Mozilla.
Use Option +  In the example above, we first declared a variable named number and then assigned it a value of 2.
Then we used a conditional statement to verify whether the number is less than 10.
As 2 < 10, the condition of the if statement was true, and the body was executed.
The if statement has the console.log() function inside it used to write a message on the console.
If we change the value of the number variable from 2 to 11, then the condition will become false, and the body of the if statement will not be executed.
var number = 11;if (number <10) {
console.log('The number is less than ten.')}
As you can see in the screenshot below, the console is completely empty.
In the example above, we first declared a variable named number and then assigned it a value of 2.
Then we used a conditional statement to verify whether the number is less than 10.
As 2 < 10, the condition of the if statement was true, and the body was executed.
The if statement has the console.log() function inside it used to write a message on the console.
If we change the value of the number variable from 2 to 11, then the condition will become false, and the body of the if statement will not be executed.
var number = 11;if (number <10) {
console.log('The number is less than ten.')}
As you can see in the screenshot below, the console is completely empty.

 In the above-given example, we added another statement, i.e., else.
As 11 is greater than 10, the original condition of the if statement was false, and the body of the else statement was executed.
In the above-given example, we added another statement, i.e., else.
As 11 is greater than 10, the original condition of the if statement was false, and the body of the else statement was executed.
 In the example given above, the number is equal to 10.
So the original condition is false.
So the editor moves on to the else-if condition.
As the number is equal to 10, this statement is true, and the body of the else-if statement is executed.
The editor does not check the else statement as one of the conditions is already true.
In the example given above, the number is equal to 10.
So the original condition is false.
So the editor moves on to the else-if condition.
As the number is equal to 10, this statement is true, and the body of the else-if statement is executed.
The editor does not check the else statement as one of the conditions is already true.
 if (true) {
var a = 1;const c = 3;
console.log(a);
console.log(c);}
console.log(a);// Similarly, c is also undefined outside of the block
console.log(c);
if (true) {
var a = 1;const c = 3;
console.log(a);
console.log(c);}
console.log(a);// Similarly, c is also undefined outside of the block
console.log(c);
 Another difference between var and let is that the variables created with var can be redeclared and redefined, whereas the variables created with the let keyword can only be redefined.
Variables declared with the let keyword can also be redeclared in different blocks.
The variables declared with the const are block-scoped, and their values cannot be changed.
They cannot be redefined or redeclared and have to be initialized during declaration.
Another difference between var and let is that the variables created with var can be redeclared and redefined, whereas the variables created with the let keyword can only be redefined.
Variables declared with the let keyword can also be redeclared in different blocks.
The variables declared with the const are block-scoped, and their values cannot be changed.
They cannot be redefined or redeclared and have to be initialized during declaration.


 var intArr = [23, 45];
intArr.push(67); // returns the new array length
console.log(intArr);
var intArr = [23, 45];
intArr.push(67); // returns the new array length
console.log(intArr);
 var intArr = [23, 45, 67];
intArr.shift(); // returns the removed item
console.log(intArr);
var intArr = [23, 45, 67];
intArr.shift(); // returns the removed item
console.log(intArr);
 var intArr = [45, 67];
intArr.unshift(23); // returns the new array length
console.log(intArr);
var intArr = [45, 67];
intArr.unshift(23); // returns the new array length
console.log(intArr);

 console.log(typeof 'number');


 However, if you really want to know whether a variable is an array or object, you can use Array.isArray() method:


 We can also modify the value of the property by using the object_name.property_name and the object_name[‘property_name’] syntax:
var user = {
fName: "Mary" ,
lName: "Jane" ,
age: 23 ,
id: 01};
user.age = 24;
console.log(user.age);
user['age'] = 25;
console.log(user['age']);
We can also modify the value of the property by using the object_name.property_name and the object_name[‘property_name’] syntax:
var user = {
fName: "Mary" ,
lName: "Jane" ,
age: 23 ,
id: 01};
user.age = 24;
console.log(user.age);
user['age'] = 25;
console.log(user['age']);
 Similarly, methods can also be accessed in the same way by using the dot operator.
Now we are going to add a method to our user object.
const user = {
fName: "Mary" ,
lName: "Jane" ,
age: 23 ,
id: 01 ,
birthYear() {const date = newDate();
Year = date.getFullYear() - this.age;return Year;
}};
console.log(user.birthYear());
Similarly, methods can also be accessed in the same way by using the dot operator.
Now we are going to add a method to our user object.
const user = {
fName: "Mary" ,
lName: "Jane" ,
age: 23 ,
id: 01 ,
birthYear() {const date = newDate();
Year = date.getFullYear() - this.age;return Year;
}};
console.log(user.birthYear());
 In the example given above, we have declared a method inside of the object user.
This method subtracts the user’s age from the current year to return the user’s birth year.
The ‘this’ keyword in the example refers to the object that owns the age property.
This keyword is used to access the value of a property within an object.
Objects can also be declared using the Object constructor along with the new keyword:
const user = newObject();// Assigning Properties and Property Values
user.fName = "Marry";
user.lName = "Jane";
user.age = 23;
user.id = 01;
In the example given above, we have declared a method inside of the object user.
This method subtracts the user’s age from the current year to return the user’s birth year.
The ‘this’ keyword in the example refers to the object that owns the age property.
This keyword is used to access the value of a property within an object.
Objects can also be declared using the Object constructor along with the new keyword:
const user = newObject();// Assigning Properties and Property Values
user.fName = "Marry";
user.lName = "Jane";
user.age = 23;
user.id = 01;
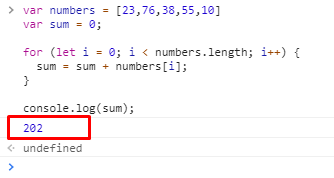 Although we have got the Sum as output, why not use a smart and easy way to perform the same calculation using the reduce() method of the array, where we do not have to mutate the variables like “sum.”
 By looking in the screenshot provided above, you can verify that the reduce() function has added all the numbers and shown the result in the console, which is 202 and perfectly calculated.
Another shorter and easier way to write reduce() function is to make the callback function an arrow function:
The syntax of writing the callback function within the reduce() function’s parentheses will be like this:
var sum = numbers.reduce((total, num) => {return total + num}, 0);
console.log(sum);
By looking in the screenshot provided above, you can verify that the reduce() function has added all the numbers and shown the result in the console, which is 202 and perfectly calculated.
Another shorter and easier way to write reduce() function is to make the callback function an arrow function:
The syntax of writing the callback function within the reduce() function’s parentheses will be like this:
var sum = numbers.reduce((total, num) => {return total + num}, 0);
console.log(sum);
 Alright, this was the simple example in which we have an array of numbers only; what about the array of objects.
Let’s try that one as well.
Alright, this was the simple example in which we have an array of numbers only; what about the array of objects.
Let’s try that one as well.
 By looking at the screenshot attached above, you can see that students’ fees are added and displayed as an output.
So this is how we can access the objects of an array in the reduce() function.
By looking at the screenshot attached above, you can see that students’ fees are added and displayed as an output.
So this is how we can access the objects of an array in the reduce() function.
 In the example above, we first declared a string; and then we assigned it a value.
On the next line, we used the includes() method as a condition for an if statement and passed it a string as an argument.
As that string is present in the original string named str, the includes() method will return true, and the body of the if statement will be executed.
If the includes method does not find the substring in the original string, then the condition would turn false, and the body of the if statement would not be executed.
We can also pass variables as an argument to the includes() method.
var str = 'Welcome to Linux Hint!';
let find = 'Linux';if(str.includes(find)){
console.log(`The string does contain "${find}"`);}
In the example above, we first declared a string; and then we assigned it a value.
On the next line, we used the includes() method as a condition for an if statement and passed it a string as an argument.
As that string is present in the original string named str, the includes() method will return true, and the body of the if statement will be executed.
If the includes method does not find the substring in the original string, then the condition would turn false, and the body of the if statement would not be executed.
We can also pass variables as an argument to the includes() method.
var str = 'Welcome to Linux Hint!';
let find = 'Linux';if(str.includes(find)){
console.log(`The string does contain "${find}"`);}
 The includes() method is case sensitive.
var str = 'THIS STRING IS WRITTEN IN UPPER CASE';if(str.includes('this string is written')){
console.log('The required string found');}else{
console.log('Could not find the required string');}
The includes() method is case sensitive.
var str = 'THIS STRING IS WRITTEN IN UPPER CASE';if(str.includes('this string is written')){
console.log('The required string found');}else{
console.log('Could not find the required string');}
 We can also pass another parameter to the includes() method, which specifies where it will start the search.
var str = 'THIS STRING IS WRITTEN IN UPPER CASE';if(str.includes('STRING', 5)){
console.log('The required string found');}else{
console.log('Could not find the required string');}
We can also pass another parameter to the includes() method, which specifies where it will start the search.
var str = 'THIS STRING IS WRITTEN IN UPPER CASE';if(str.includes('STRING', 5)){
console.log('The required string found');}else{
console.log('Could not find the required string');}
 var str = 'THIS STRING IS WRITTEN IN UPPER CASE';if(str.includes('STRING', 6)){
console.log('The required string found');}else{
console.log('Could not find the required string');}
var str = 'THIS STRING IS WRITTEN IN UPPER CASE';if(str.includes('STRING', 6)){
console.log('The required string found');}else{
console.log('Could not find the required string');}
 Similarly, this method can also be used to find an element within an array.
vararr = ['Lion', 'Monkey', 'Rhino', 'Dog', 'Cat'];if(arr.includes('Monkey')){
console.log('The required element found');}else{
console.log('Could not find the required element');}
Similarly, this method can also be used to find an element within an array.
vararr = ['Lion', 'Monkey', 'Rhino', 'Dog', 'Cat'];if(arr.includes('Monkey')){
console.log('The required element found');}else{
console.log('Could not find the required element');}

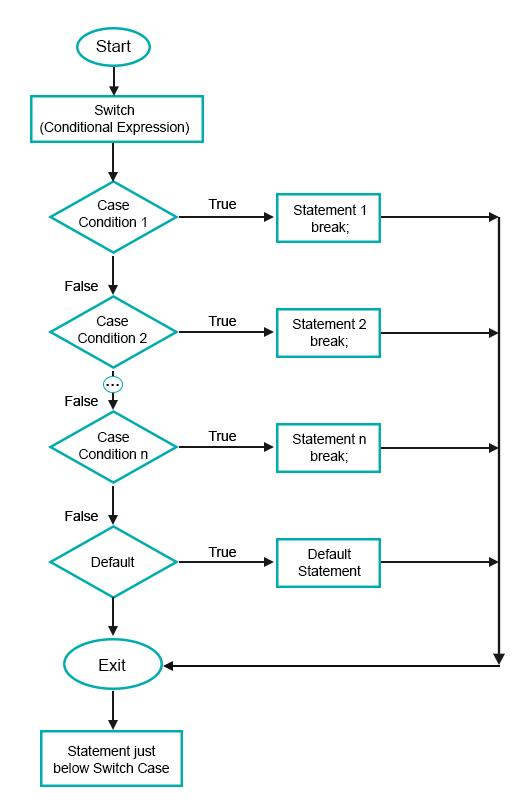
 In the example given above, first, we declared a variable named car and assigned it a value.
Next, we passed the variable car as an argument to the switch statement and gave it three cases.
The switch statement will check the value of the variable car against each case until a match is found.
Then it will execute the body of that particular case and then terminate the switch statement using the break statement.
In the example above, as the value of the variable car is ‘Toyota Prius,’ the switch statement only checks against the first case, and the switch statement is terminated.
But if we modify the value of the variable car in the following way:
var car = "Toyota Corolla";
Then the switch statement will check against every case, and the output will be:
In the example given above, first, we declared a variable named car and assigned it a value.
Next, we passed the variable car as an argument to the switch statement and gave it three cases.
The switch statement will check the value of the variable car against each case until a match is found.
Then it will execute the body of that particular case and then terminate the switch statement using the break statement.
In the example above, as the value of the variable car is ‘Toyota Prius,’ the switch statement only checks against the first case, and the switch statement is terminated.
But if we modify the value of the variable car in the following way:
var car = "Toyota Corolla";
Then the switch statement will check against every case, and the output will be:
 If we put the name of any other car which is not present as a case in our switch statement, then the body of the default statement will execute, and the output will change to:
var car = "Toyota Aqua";
If we put the name of any other car which is not present as a case in our switch statement, then the body of the default statement will execute, and the output will change to:
var car = "Toyota Aqua";


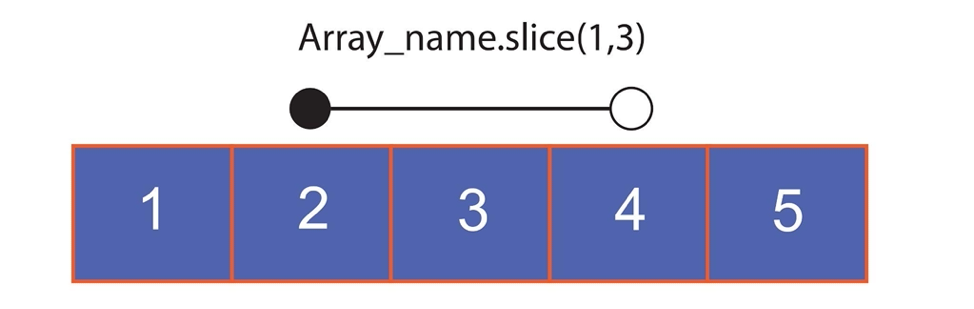 Let’s try to slice a couple of arrays to understand the slice() function better.
Note: We will use the browser console to demonstrate examples performed in this post.
To open up the browser console:
Use the F12 key in Chrome and other chromium-based browsers.
Use CTRL + SHIFT + K keyboard shortcut keys for Mozilla.
Use Option +
Let’s try to slice a couple of arrays to understand the slice() function better.
Note: We will use the browser console to demonstrate examples performed in this post.
To open up the browser console:
Use the F12 key in Chrome and other chromium-based browsers.
Use CTRL + SHIFT + K keyboard shortcut keys for Mozilla.
Use Option + 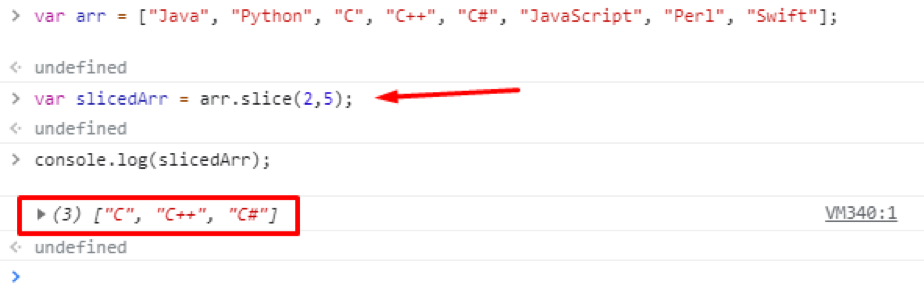 You can see that we have got three elements from the second index to the fifth index.
Note:
The array index starts from zero
The fifth element, the last element in the range of indices, is not included in the resulting array, as mentioned earlier.
You can see that we have got three elements from the second index to the fifth index.
Note:
The array index starts from zero
The fifth element, the last element in the range of indices, is not included in the resulting array, as mentioned earlier.
 We have got the exact result as we expected.
So this is how we can use negative values to extract elements from the end of the array.
We have got the exact result as we expected.
So this is how we can use negative values to extract elements from the end of the array.
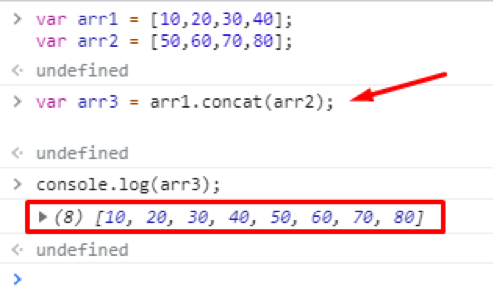 You can see that two arrays arr1 and arr2, are concatenated in arr3.
Now, let’s say we want to concatenate these three arrays.
To join multiple arrays following code snippet will be used:
var arr4 = arr1.concat(arr2, arr3);
You can see that two arrays arr1 and arr2, are concatenated in arr3.
Now, let’s say we want to concatenate these three arrays.
To join multiple arrays following code snippet will be used:
var arr4 = arr1.concat(arr2, arr3);
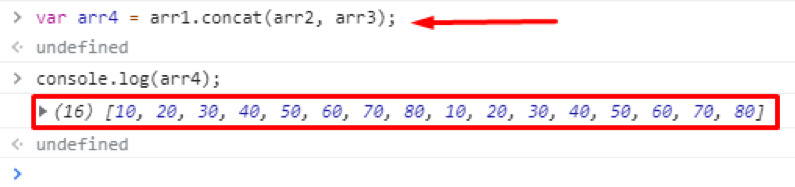 Another way for doing the same task would go like this:
var arr4 = [].concat(arr1, arr2, arr3);
Now, if we take a look at the arr4:
console.log(arr4);
Another way for doing the same task would go like this:
var arr4 = [].concat(arr1, arr2, arr3);
Now, if we take a look at the arr4:
console.log(arr4);
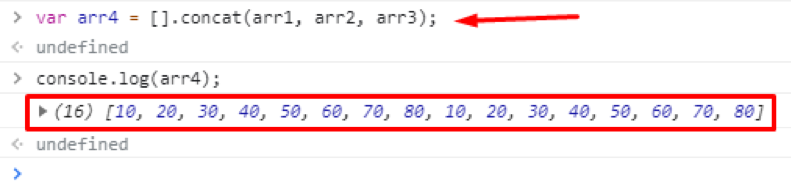 You can see that all three arrays are merged into the arr4 as we expect it to do.
This is how we can merge two arrays using the concat method.
You can see that all three arrays are merged into the arr4 as we expect it to do.
This is how we can merge two arrays using the concat method.
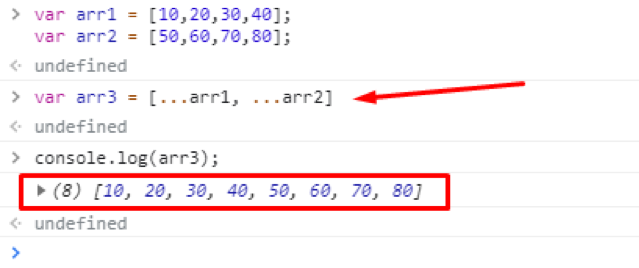 You can see that arr1 and arr2 are joined perfectly using the spread operator.
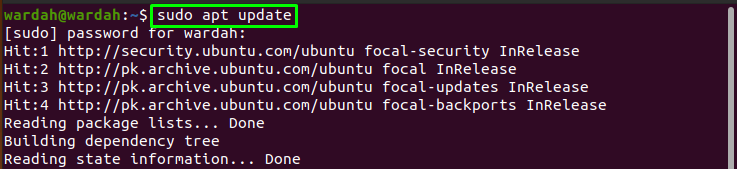 Run the following command to install the Node.js environment with all the necessary packages on Ubuntu machine:
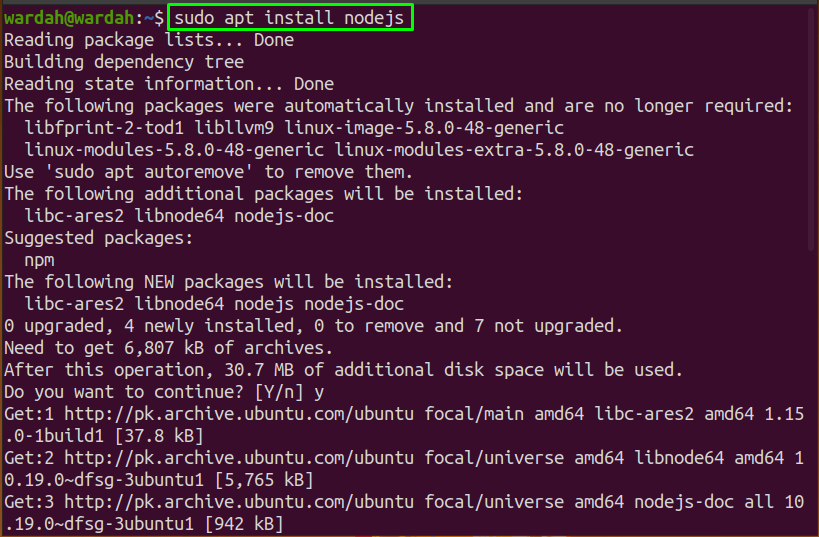 Once done, verify if the installation has accomplished by checking its version:
$ node -v
Once done, verify if the installation has accomplished by checking its version:
$ node -v
 Through the Ubuntu official repository, the installed node.js is the latest available package.
It is not compulsory to go with it; if you want to install the specific one, then move towards the 2nd approach in this guide.
To install the npm library on the system is as simple as we have installed the node.js.
Write the given command to initiate the installation process of the npm in the command line:
$ sudo apt install npm
Through the Ubuntu official repository, the installed node.js is the latest available package.
It is not compulsory to go with it; if you want to install the specific one, then move towards the 2nd approach in this guide.
To install the npm library on the system is as simple as we have installed the node.js.
Write the given command to initiate the installation process of the npm in the command line:
$ sudo apt install npm
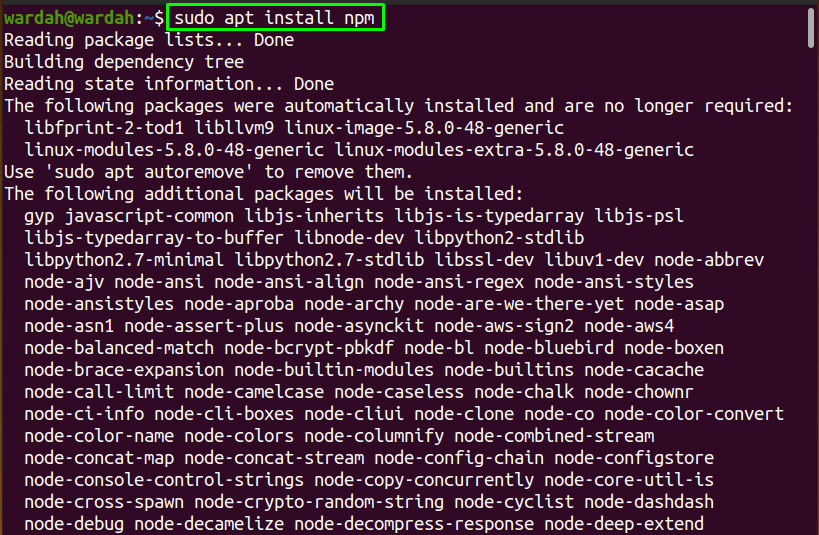 The Node.js and the npm library have been installed on the system from the Ubuntu official repository.
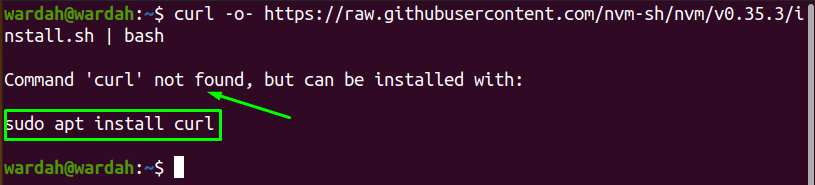 You might face this issue, and to resolve this, install the curl command:
$ sudo apt install curl
You might face this issue, and to resolve this, install the curl command:
$ sudo apt install curl
 Now, run the above curl command of node.js again to begin nvm installation:
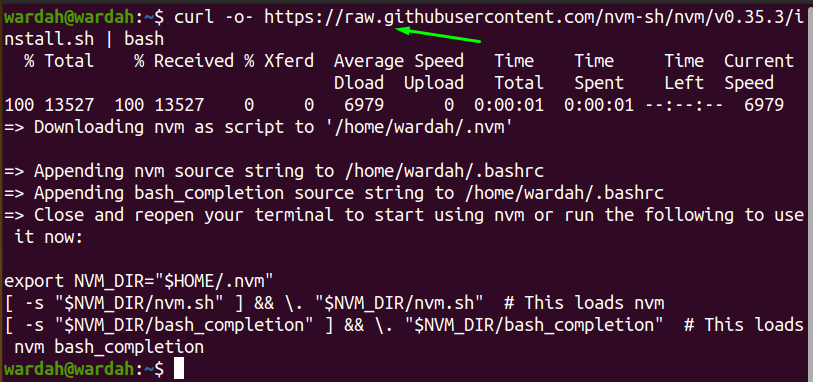 To source the bash file, run the given command:
$ source ~/.bashrc
To source the bash file, run the given command:
$ source ~/.bashrc
 Run the mentioned command to show the list of Node.js available versions:
$ nvm list-remote
Run the mentioned command to show the list of Node.js available versions:
$ nvm list-remote
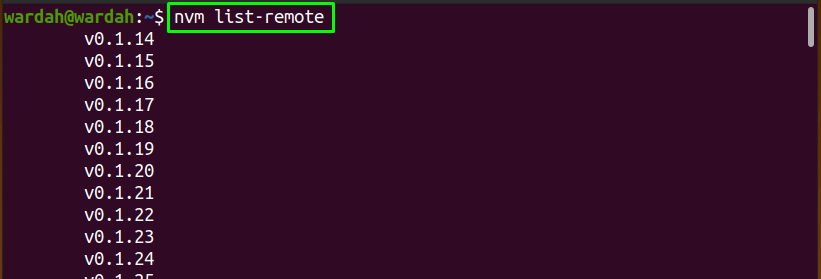 Use the following syntax to install the version you want:
$ nvm install [version_number]
For instance, to install the node version “v10.24.1”, the command would be:
$ nvm install v10.24.1
Use the following syntax to install the version you want:
$ nvm install [version_number]
For instance, to install the node version “v10.24.1”, the command would be:
$ nvm install v10.24.1
 To check the list of all node versions installed on Ubuntu machine, the command is:
$ nvm list
To check the list of all node versions installed on Ubuntu machine, the command is:
$ nvm list
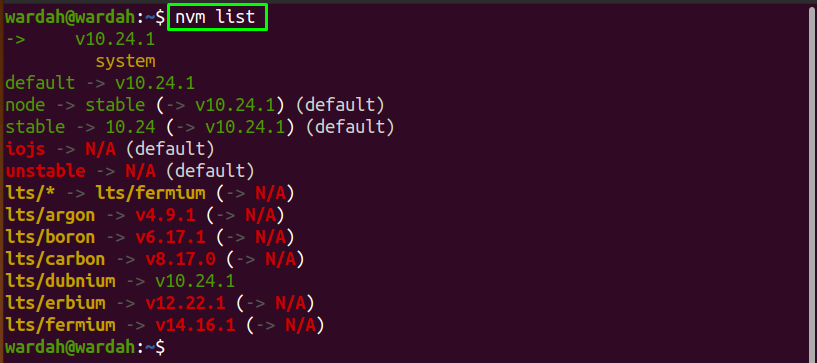
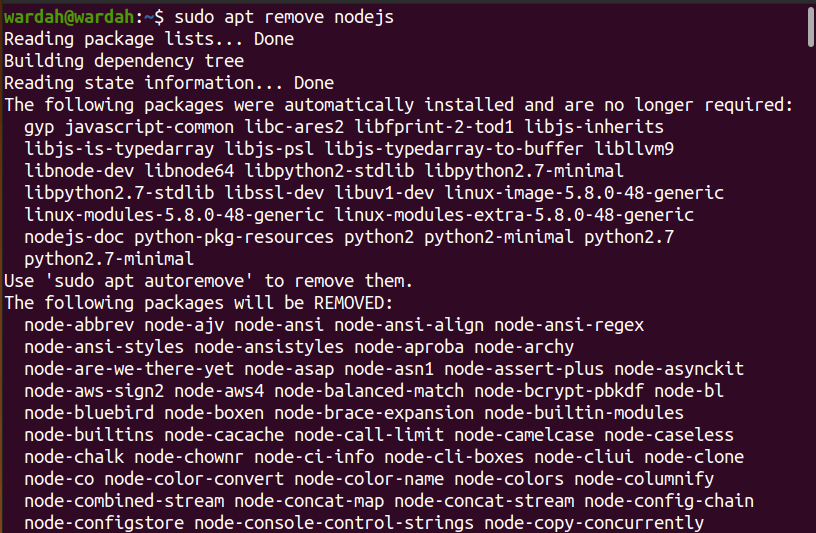
 If you have not installed it yet, type the command given below to install Vue.js globally on your Operating system:
$ npm install -g @vue/cli
If you have not installed it yet, type the command given below to install Vue.js globally on your Operating system:
$ npm install -g @vue/cli
 After successfully installing Vue.js globally on your Operating system, create the Vue project by typing the “vue create” command given below, followed by the project name:
$ vue create vueprojectname
After successfully installing Vue.js globally on your Operating system, create the Vue project by typing the “vue create” command given below, followed by the project name:
$ vue create vueprojectname
 It will ask you to either select the preset or select your own custom preset for the Vue project.
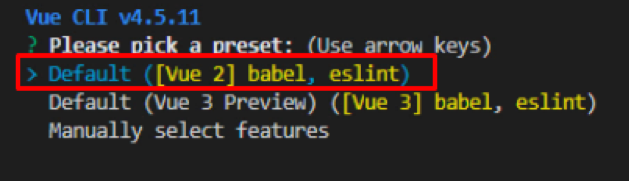 After configuring or selecting the default preset, the Vue project will be created in a while.
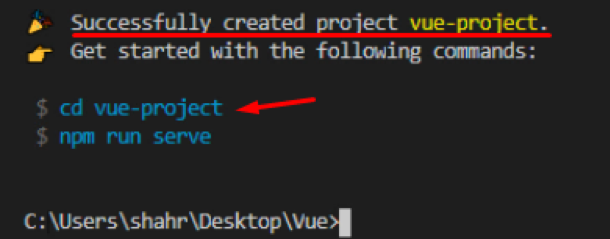 After creating the Vue project, navigate to the newly created project’s directory using the “cd” command.
$ cd vueprojectname
After creating the Vue project, navigate to the newly created project’s directory using the “cd” command.
$ cd vueprojectname
 At this stage, you have successfully set up the Vue project.
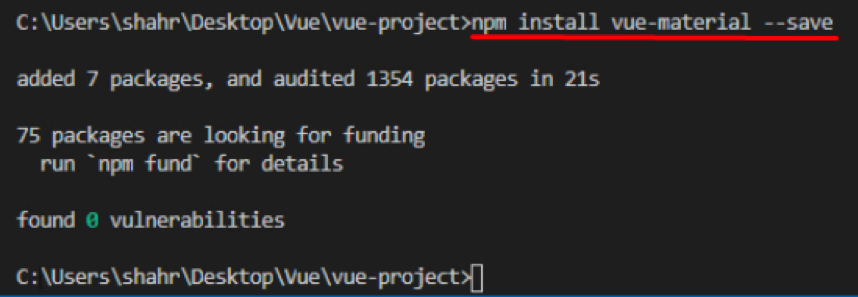 Alright! Once the ‘vue-material’ isinstalled, You have to enable it in the main.js file.
import VueMaterial from 'vue-material'import 'vue-material/dist/theme/default.css'import 'vue-material/dist/vue-material.min.css'
Vue.use(VueMaterial)
Alright! Once the ‘vue-material’ isinstalled, You have to enable it in the main.js file.
import VueMaterial from 'vue-material'import 'vue-material/dist/theme/default.css'import 'vue-material/dist/vue-material.min.css'
Vue.use(VueMaterial)
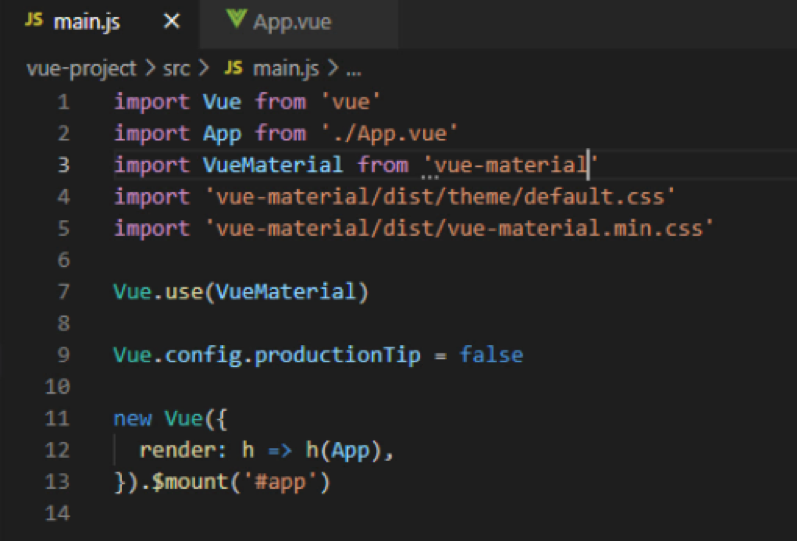 After enabling the “vue-material,” you can now use it in your Vue project.
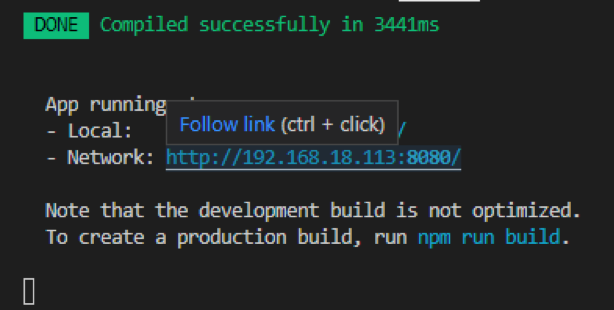 In the screenshot given above, the default port assigned is 8080, where the project is running.
In a rare scenario, if port 8080 is busy, port 8081 is assigned to the Vue project, and this is how it continues until it finds the free port number.
But, what if you want to change and assign some other port number of your own choice.
Let’s see and learn how to change the default Port Number in the Vue CLI project.
In the screenshot given above, the default port assigned is 8080, where the project is running.
In a rare scenario, if port 8080 is busy, port 8081 is assigned to the Vue project, and this is how it continues until it finds the free port number.
But, what if you want to change and assign some other port number of your own choice.
Let’s see and learn how to change the default Port Number in the Vue CLI project.
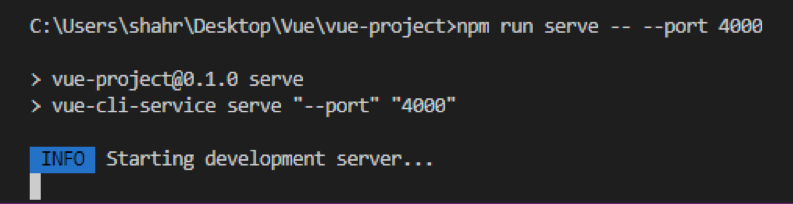 Now, when the project is compiled successfully, you can see that the port number is changed to 4000.
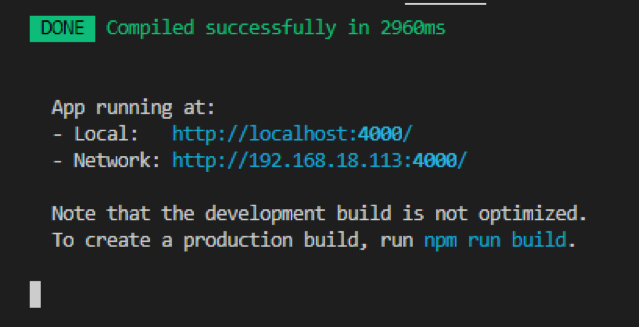 You can witness in the screenshot given above that the Application is running at port 4000, but this port is assigned temporarily until the app is running.
Once you terminate the batch and run the project without providing the port to the npm run serve command, then the default port 8080 will be assigned again, or otherwise, you have to assign the port every time you run the application.
Luckily, we have another method provided by Vue.js, using which we can permanently change the port number of our Vue project, so let’s go ahead and see how to change the port number of the Vue CLI project permanently.
Method 2: Change Port Number of Vue CLI project permanentlyIf you are interested in changing the default port number of your Vue.js project permanently.
Simply follow the steps given below, and you will have your own desired port number assigned to your Vue.js project.
Step 1: Create a new vue.config.js file at the root directory
First of all, you need to create a new file at the root directory of your project with the name vue.config.js
Step 2: Add Port Number in the vue.config.js configuration file
After creating the configuration file, open it up and provide your desired port number as a key-value pair inside the devServer object in the module.exports as shown in the code snippet below:
module.exports = {
devServer: {
port: 3000
}
}
Once you have done that, save the application by pressing CTRL + S keyboard shortcut keys and start the application.
Step3: Run the Application
Now, start the application using the npm run serve command and without appending any port number.
$ npm run serve
You can witness in the screenshot given above that the Application is running at port 4000, but this port is assigned temporarily until the app is running.
Once you terminate the batch and run the project without providing the port to the npm run serve command, then the default port 8080 will be assigned again, or otherwise, you have to assign the port every time you run the application.
Luckily, we have another method provided by Vue.js, using which we can permanently change the port number of our Vue project, so let’s go ahead and see how to change the port number of the Vue CLI project permanently.
Method 2: Change Port Number of Vue CLI project permanentlyIf you are interested in changing the default port number of your Vue.js project permanently.
Simply follow the steps given below, and you will have your own desired port number assigned to your Vue.js project.
Step 1: Create a new vue.config.js file at the root directory
First of all, you need to create a new file at the root directory of your project with the name vue.config.js
Step 2: Add Port Number in the vue.config.js configuration file
After creating the configuration file, open it up and provide your desired port number as a key-value pair inside the devServer object in the module.exports as shown in the code snippet below:
module.exports = {
devServer: {
port: 3000
}
}
Once you have done that, save the application by pressing CTRL + S keyboard shortcut keys and start the application.
Step3: Run the Application
Now, start the application using the npm run serve command and without appending any port number.
$ npm run serve
 You will witness that the port number 3000 is assigned successfully, and the application is running on your provided port number in the vue.config.js file.
 This is how you can change or set the port number of your own choice in the Vue CLI project.
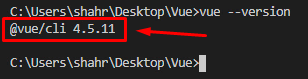 If it is installed, you will have the latest version of Vue CLI printed out in the terminal.
Otherwise, if it is not installed, you can either use the NPM package manager or Yarn package manager to install the Vue CLI.
In order to install it using the NPM package manager, you need to type the command given below in the terminal:
$ npm install -g @vue/cli
In the above command, the -g flag is used for installing Vue CLI globally on your system.
If it is installed, you will have the latest version of Vue CLI printed out in the terminal.
Otherwise, if it is not installed, you can either use the NPM package manager or Yarn package manager to install the Vue CLI.
In order to install it using the NPM package manager, you need to type the command given below in the terminal:
$ npm install -g @vue/cli
In the above command, the -g flag is used for installing Vue CLI globally on your system.
 Once the Vue CLI is completely installed, you can verify it by typing the command given below:
$ vue --version
Once the Vue CLI is completely installed, you can verify it by typing the command given below:
$ vue --version
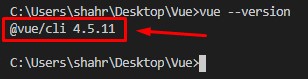 You will have the latest version of Vue CLI in the output.
 After a couple of seconds, it will prompt selecting the default preset or selecting some features manually.
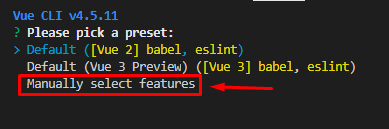 If you want to have some custom features, select “Manually select features,” hit Enter, and you will be prompted with some options like selecting the Vue version, adding Vuex, or Router.
Select your desired option and hit Enter.
If you want to have some custom features, select “Manually select features,” hit Enter, and you will be prompted with some options like selecting the Vue version, adding Vuex, or Router.
Select your desired option and hit Enter.
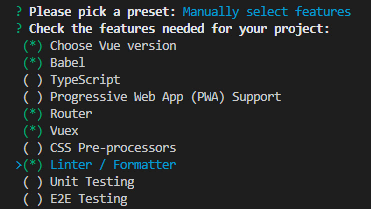 Answer some necessary configuration questions and save the preset for future projects.
 The Vue project will be created in a while using the Vue CLI, and you can start the development in Vue.js.
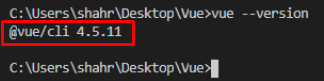 If you have not installed it yet, type the command given below to install Vue.js globally on your Operating system:
$ npm install -g @vue/cli
If you have not installed it yet, type the command given below to install Vue.js globally on your Operating system:
$ npm install -g @vue/cli
 After successfully installing Vue.js globally on your Operating system, create the Vue project by typing the “vue create” command given below, followed by the project name:
$ vue create vue-project-name
After successfully installing Vue.js globally on your Operating system, create the Vue project by typing the “vue create” command given below, followed by the project name:
$ vue create vue-project-name
 It will ask you to either select the preset or select your own custom preset for the Vue project.
 After configuring or selecting the default preset, the Vue project will be created in a while.
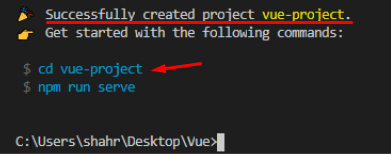 After creating the Vue project, navigate to the newly created project’s directory using the “cd” command.
$ cd vueprojectname
After creating the Vue project, navigate to the newly created project’s directory using the “cd” command.
$ cd vueprojectname
 At this stage, you have successfully set up the Vue project.
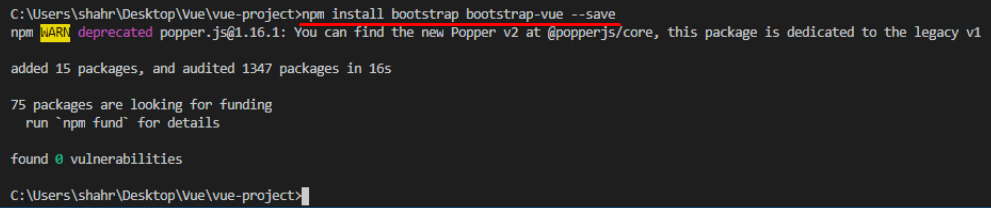 Alright! Once the ‘bootstrap’ and ‘bootstrap-vue’ are installed, You have to enable them in the main.js file.
import BootstrapVue from 'bootstrap-vue/dist/bootstrap-vue.esm';
import 'bootstrap-vue/dist/bootstrap-vue.css';
import 'bootstrap/dist/css/bootstrap.css';
Vue.use(BootstrapVue);
Alright! Once the ‘bootstrap’ and ‘bootstrap-vue’ are installed, You have to enable them in the main.js file.
import BootstrapVue from 'bootstrap-vue/dist/bootstrap-vue.esm';
import 'bootstrap-vue/dist/bootstrap-vue.css';
import 'bootstrap/dist/css/bootstrap.css';
Vue.use(BootstrapVue);
 After enabling the “bootstrap” and “bootstrap-vue”, you can now use them in your Vue project.
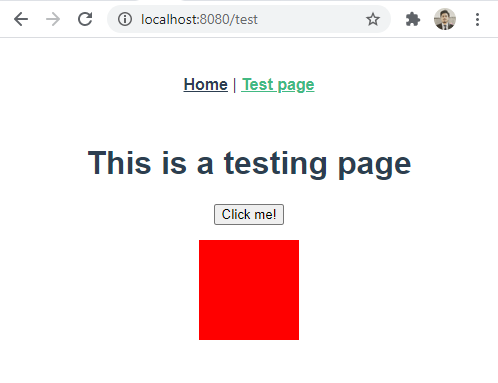 Now, whenever I click the button, the background color of the box should get changed.
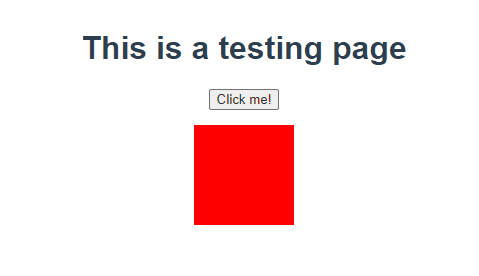 And you can witness in the gif above, the color of the div is changing at the click of the button.
That’s amazing, right!
So, this is how we can use the Vue Watch to make dynamic interaction on the webpage.
And you can witness in the gif above, the color of the div is changing at the click of the button.
That’s amazing, right!
So, this is how we can use the Vue Watch to make dynamic interaction on the webpage.
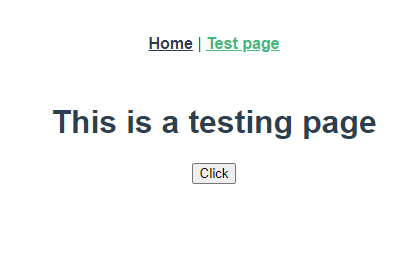 If we click on the button, the state of the “boolVar” should be altered due to the button’s on-click attribute, and the watch should automatically detect the change in “boolVar” and display the message string on the console.
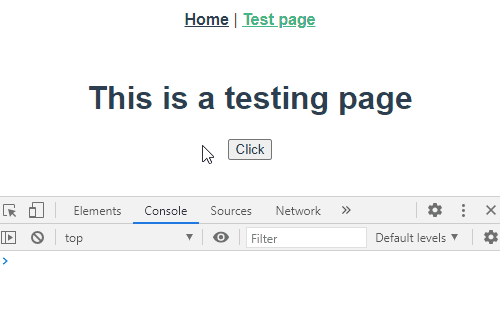 It worked perfectly fine; the message “Button clicked” is displayed on the console.
But, the watcher fails to detect the change and does not get fired when it comes to watching the arrays or objects.
Let’s see a demonstration of that.
It worked perfectly fine; the message “Button clicked” is displayed on the console.
But, the watcher fails to detect the change and does not get fired when it comes to watching the arrays or objects.
Let’s see a demonstration of that.
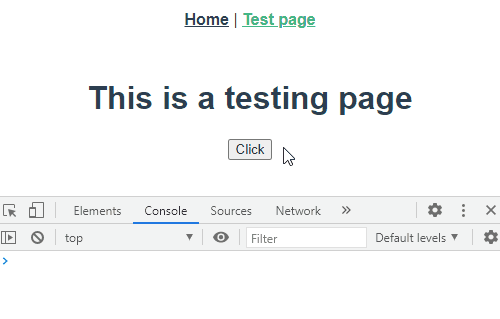 You can see in the above gif; nothing is happening in the console.
The reason behind this is that the watcher does not look deep into the values of the objects, and this is the real problem to which we are going to solve now.
Vue.js provides the deep property for watching deep down into the values of objects and arrays.
The syntax for using the deep property and watching the nested data is as follows:
<script>
export default {
name: "Test",
data(){
return{
objVar: {
item: "Item1",
quantity: 1
}
}
},
watch:{
objVar: {
deep: true,
handler(){
console.log("Button clicked & Quantity = " + this.objVar.quantity)
}
}
}};</script>
In this syntax, we have set the deep property to true and rearranged the handler() function.
Now, after changing the code, if we reload the web page and click on the button:
You can see in the above gif; nothing is happening in the console.
The reason behind this is that the watcher does not look deep into the values of the objects, and this is the real problem to which we are going to solve now.
Vue.js provides the deep property for watching deep down into the values of objects and arrays.
The syntax for using the deep property and watching the nested data is as follows:
<script>
export default {
name: "Test",
data(){
return{
objVar: {
item: "Item1",
quantity: 1
}
}
},
watch:{
objVar: {
deep: true,
handler(){
console.log("Button clicked & Quantity = " + this.objVar.quantity)
}
}
}};</script>
In this syntax, we have set the deep property to true and rearranged the handler() function.
Now, after changing the code, if we reload the web page and click on the button:
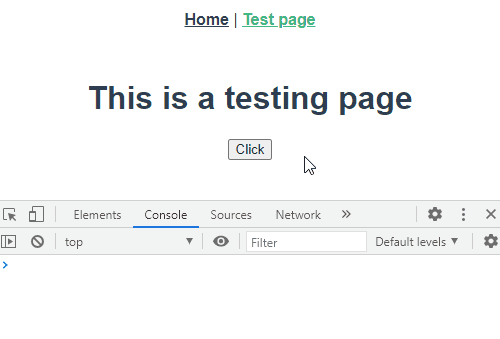 Here you can see that the watcher is working and displaying the message in the console.
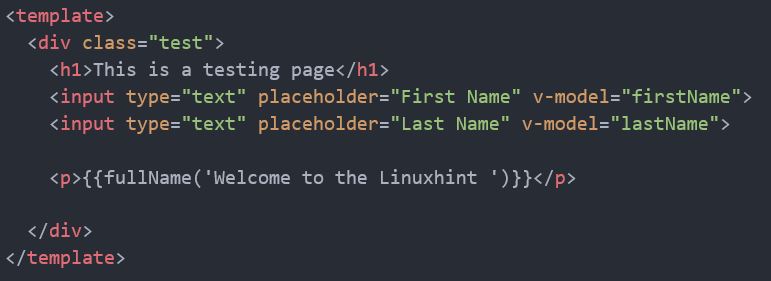 Alright! After having all this setup, let’s take a look at our webpage.
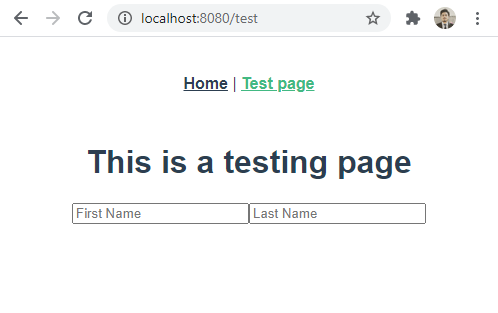 If you have successfully written the correct code and run it, you should also have the two input fields on your web page.
Let’s try to type the first name and last name and see either the “fulName” property gets computed or not.
If you have successfully written the correct code and run it, you should also have the two input fields on your web page.
Let’s try to type the first name and last name and see either the “fulName” property gets computed or not.
 Here in the screenshot given above, you can witness the marvelous reactivity of Vue.js using the computed property.
You can also witness that it is not like watching a single variable and changing some other variable’s value.
Still, it is watching each variable included in the computed property and re-computing the “lastName”.
Let’s see how we can pass parameters to the computed property and use it.
Here in the screenshot given above, you can witness the marvelous reactivity of Vue.js using the computed property.
You can also witness that it is not like watching a single variable and changing some other variable’s value.
Still, it is watching each variable included in the computed property and re-computing the “lastName”.
Let’s see how we can pass parameters to the computed property and use it.
 Now, in the computed property, the passed parameter can be utilized using the following syntax.
computed:{
fullName(){
return message1 => {
return `${message} ${this.firstName} ${this.lastName}`
}
}
}
This is how we can pass a parameter to the computed and get it in the property and use it.
If we again look at our web page and type the First name and last name, you can have the same functionality and reactivity, but this time, the parameter passed.
Now, in the computed property, the passed parameter can be utilized using the following syntax.
computed:{
fullName(){
return message1 => {
return `${message} ${this.firstName} ${this.lastName}`
}
}
}
This is how we can pass a parameter to the computed and get it in the property and use it.
If we again look at our web page and type the First name and last name, you can have the same functionality and reactivity, but this time, the parameter passed.
 This is how simple and easy it is to pass a computed property parameter and use it.
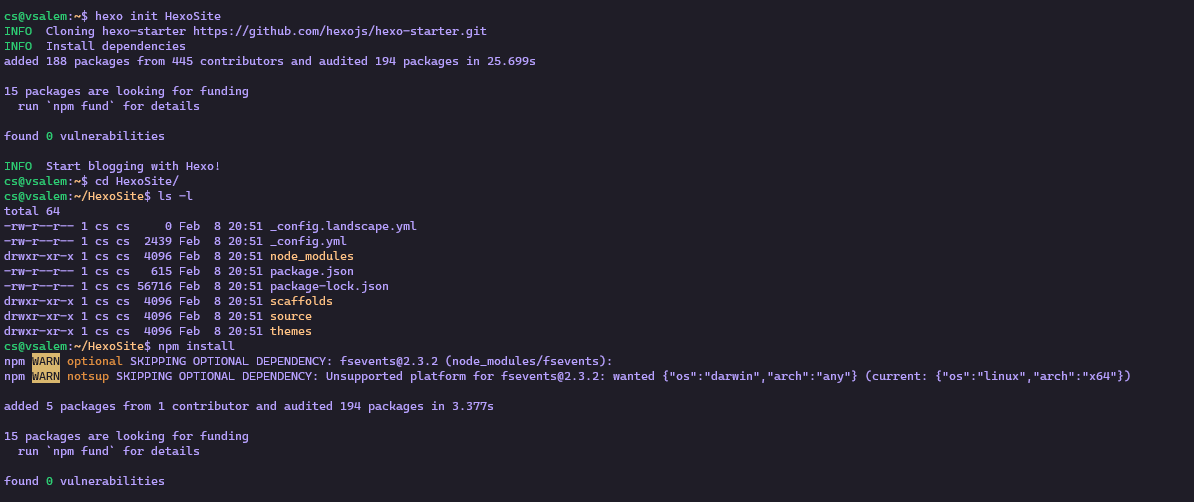
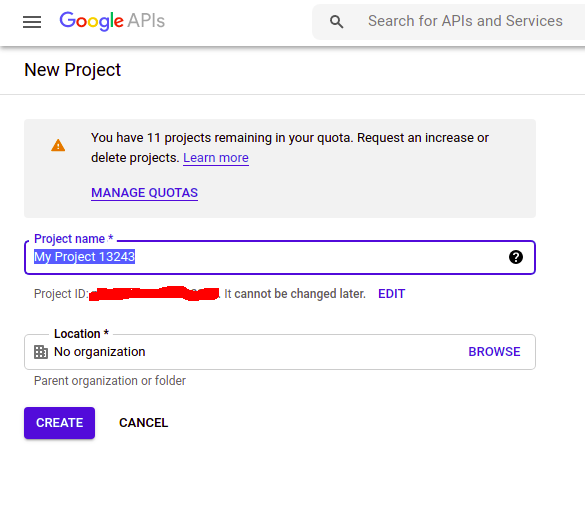
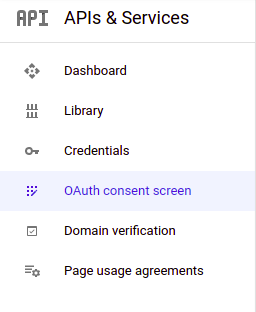 Click on the ‘create’ button and provide all the details of your project.
Click “Save and Continue” to move on.
Click on the ‘create’ button and provide all the details of your project.
Click “Save and Continue” to move on.
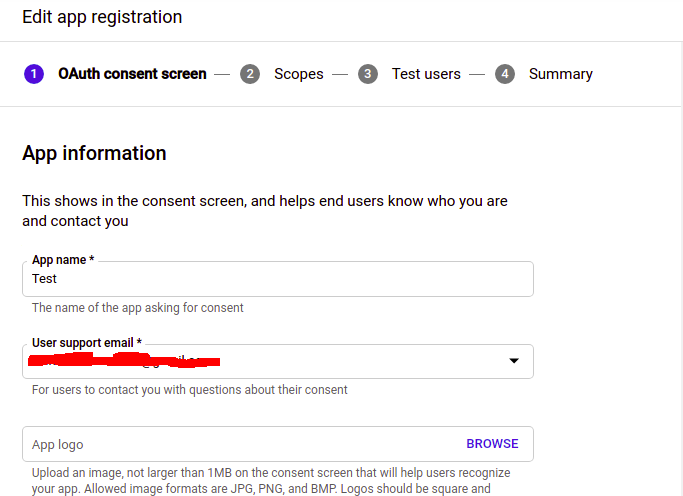 Now provide the scope of your project.
Scopes are the types of permissions to access the user’s data from a google account.
You need to set up the permissions to get specific user data from your google account.
Click “Save and Continue.”
Now provide the scope of your project.
Scopes are the types of permissions to access the user’s data from a google account.
You need to set up the permissions to get specific user data from your google account.
Click “Save and Continue.”
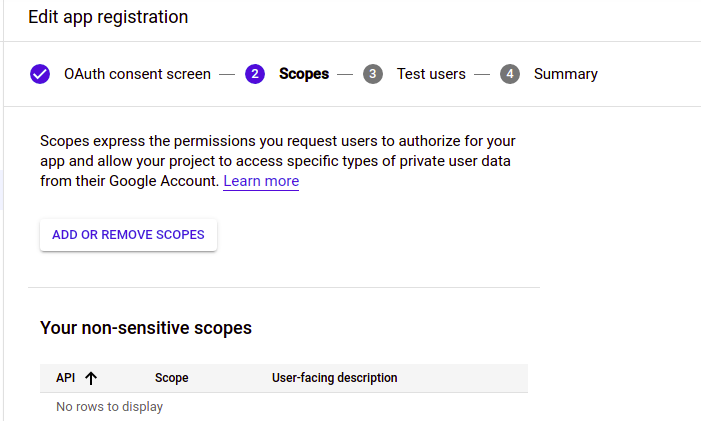 Now add the test users to the project if you want.
Test users are the only allowed users who can access your web application in Testing mode.
For now, we will not enter any test user and click “Save and Continue” to move on to the summary page of the project.
Now add the test users to the project if you want.
Test users are the only allowed users who can access your web application in Testing mode.
For now, we will not enter any test user and click “Save and Continue” to move on to the summary page of the project.
 Review your project on the summary page and save the configuration.
Now we will generate credentials for our project.
Select the ‘Credentials’ tab on the left side menu and click on the ‘Create credentials’ button on top to generate OAuth 2.0 Client IDs.
Review your project on the summary page and save the configuration.
Now we will generate credentials for our project.
Select the ‘Credentials’ tab on the left side menu and click on the ‘Create credentials’ button on top to generate OAuth 2.0 Client IDs.
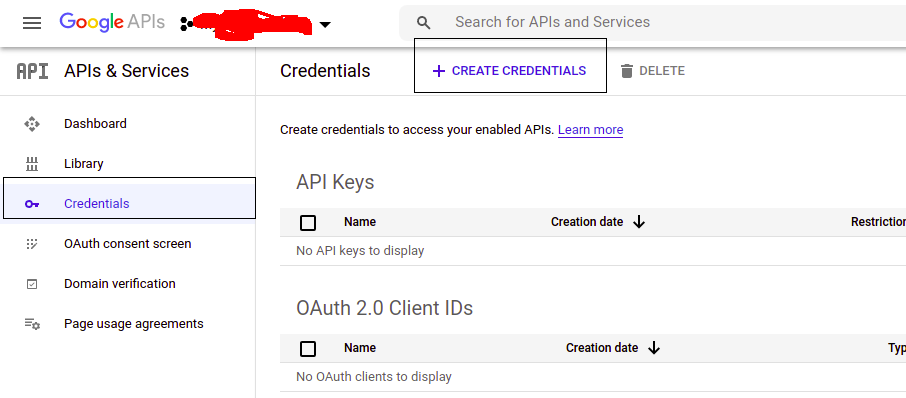 From the dropdown menu, select ‘OAuth client ID’ and specify the type of application as ‘Web application’ and your application’s name.
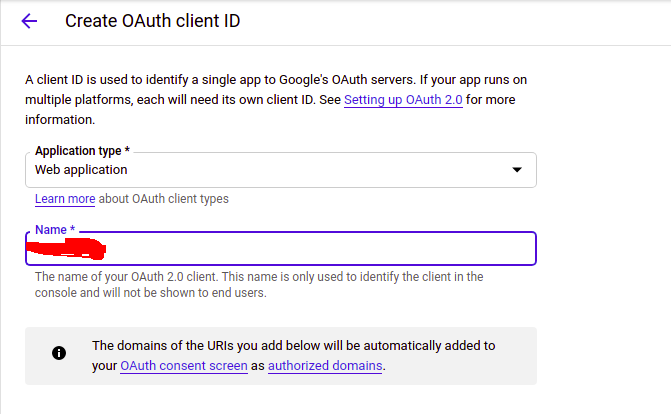 On the same page, we have to provide two URIs, the ‘Authorized Javascript Origins’ and the ‘Authorized redirect URIs’.
The ‘Authorized javascript origins’ is the HTTP origin of your web application, and it can not have any path.
The ‘Authorized redirect URIs’ is the exact URI with a path where the user will be redirected after google authentication.
On the same page, we have to provide two URIs, the ‘Authorized Javascript Origins’ and the ‘Authorized redirect URIs’.
The ‘Authorized javascript origins’ is the HTTP origin of your web application, and it can not have any path.
The ‘Authorized redirect URIs’ is the exact URI with a path where the user will be redirected after google authentication.
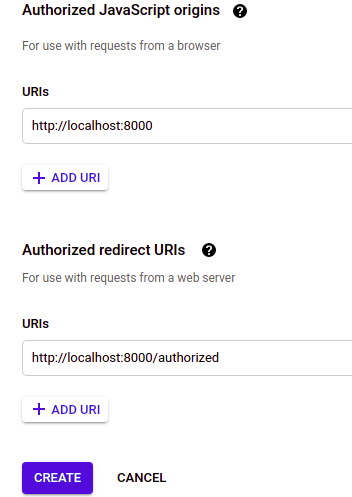 After entering all the required entries, click on ‘create’ to create OAuth credentials.
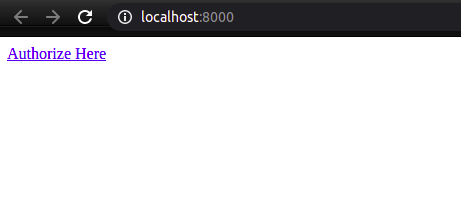 When we click on the ‘Authorize Here’, it will redirect to the google oauth page.
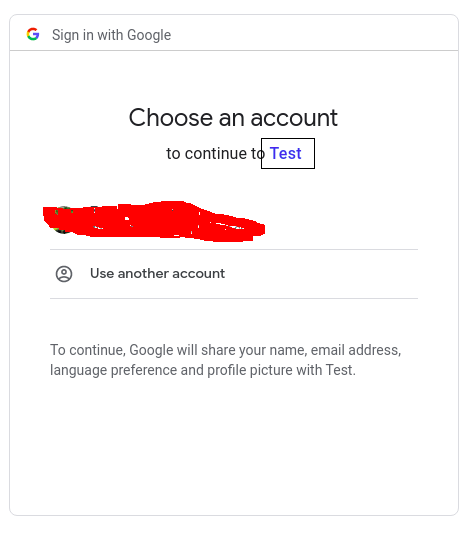 Your application name ‘Test’ is displayed on the Google authentication page.
When you authorize your account, it will take you to the authorized page.
Your application name ‘Test’ is displayed on the Google authentication page.
When you authorize your account, it will take you to the authorized page.
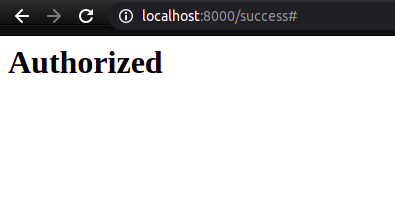
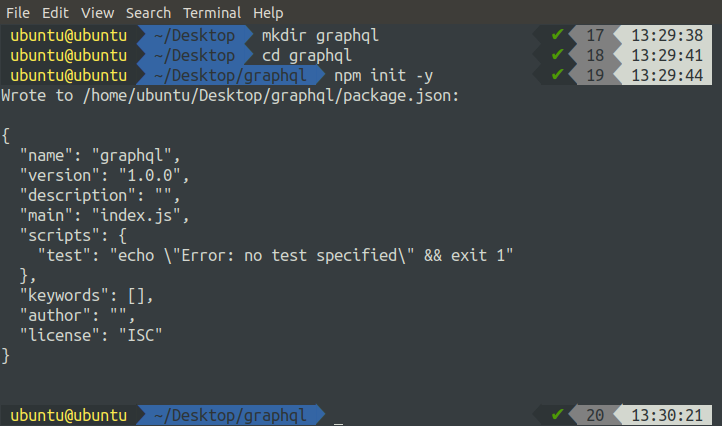
 Create the list file for mongodb.
ubuntu@ubuntu:~$ echo "deb [ arch=amd64,arm64 ] https://repo.mongodb.org/apt/ubuntu bionic/mongodb-org/4.4 multiverse" | sudo tee /etc/apt/sources.list.d/mongodb-org-4.4.list
Create the list file for mongodb.
ubuntu@ubuntu:~$ echo "deb [ arch=amd64,arm64 ] https://repo.mongodb.org/apt/ubuntu bionic/mongodb-org/4.4 multiverse" | sudo tee /etc/apt/sources.list.d/mongodb-org-4.4.list
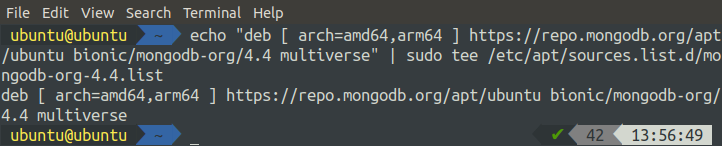 Update local repositories.
ubuntu@ubuntu:~$ sudo apt-get update -y
Install mongodb package.
ubuntu@ubuntu:~$ sudo apt-get install -y mongodb-org
Start and enable mongod.service.
ubuntu@ubuntu:~$ sudo systemctl start mongod.serviceubuntu@ubuntu:~$ sudo systemctl enable mongod.service
Update local repositories.
ubuntu@ubuntu:~$ sudo apt-get update -y
Install mongodb package.
ubuntu@ubuntu:~$ sudo apt-get install -y mongodb-org
Start and enable mongod.service.
ubuntu@ubuntu:~$ sudo systemctl start mongod.serviceubuntu@ubuntu:~$ sudo systemctl enable mongod.service
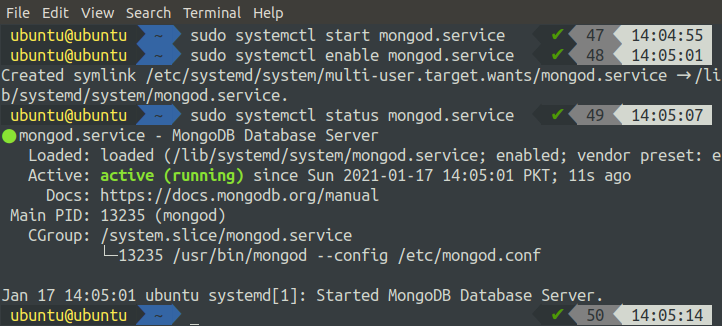
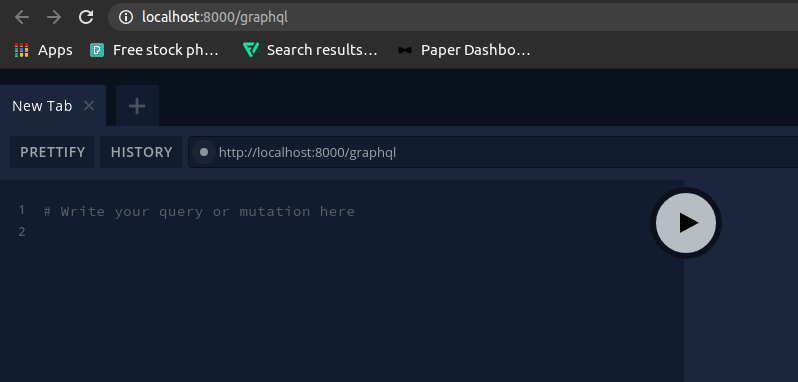 Add the student to the database using graphQL API.
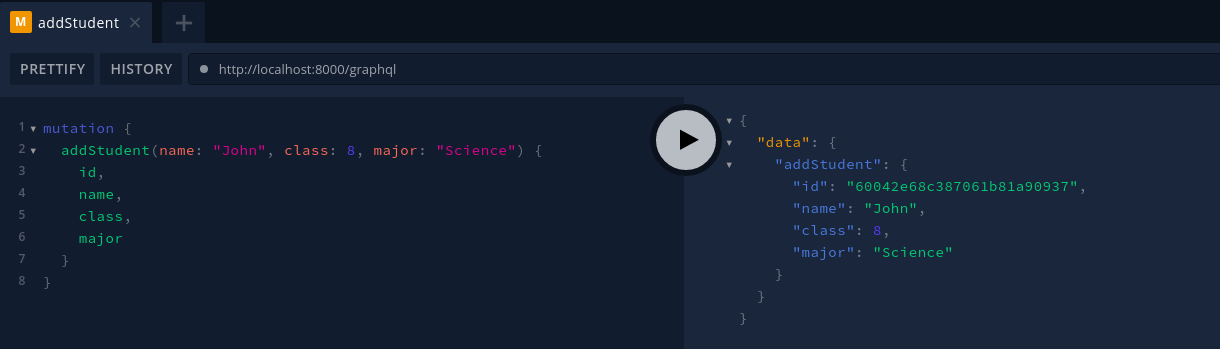 Similarly, add more students, and after adding the student, get all the students using GraphQL API.
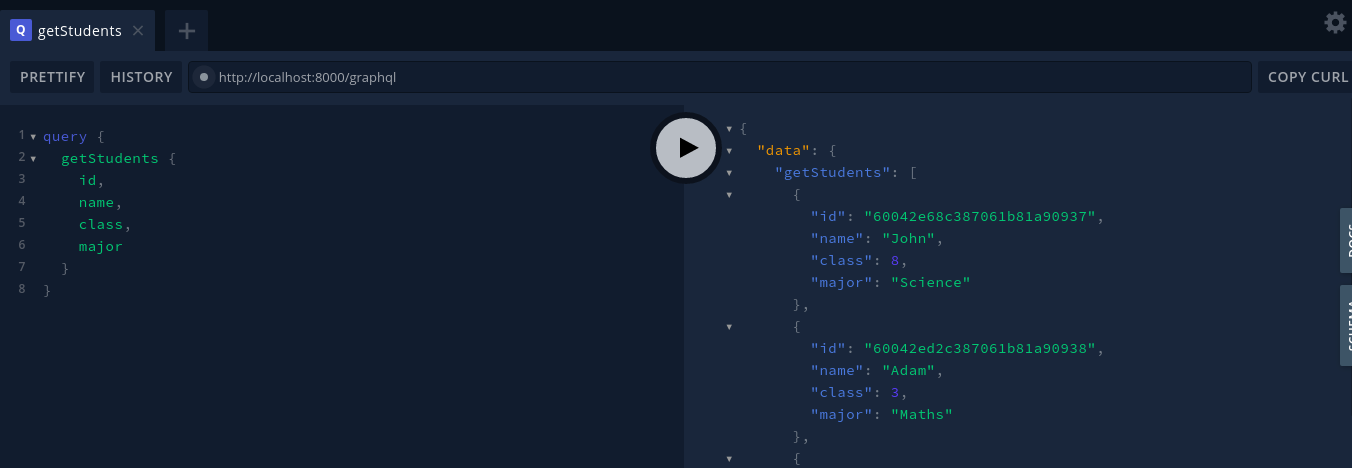 Note the ID of any of the Students and get the specific student using its id.
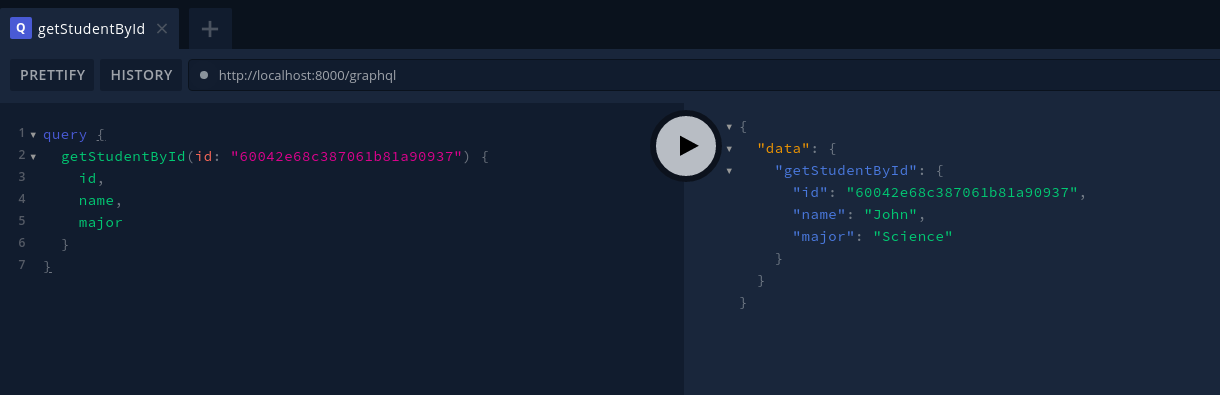

 If it does not give the version of git, then git is not installed.
Now clone the application from the github, gitlab, or bitbucket.
Here we will clone the application code from the github.
ubuntu@ubuntu:~$ git clone ttps://github.com/contentful/the-example-app.nodejs
Starting the GraphQL Application
Now we have our graphQL application on the remote server.
Go to the root directory of the graphQL application and install the required npm packages to run the graphQL application.
ubuntu@ubuntu:~$ cd graphQLubuntu@ubuntu:~$ sudo npm install
This command will analyze the package.json file in the project and install all the required npm packages.
After installing the required packages, now we will start the graphQL application.
ubuntu@ubuntu:~$ node app.js
If it does not give the version of git, then git is not installed.
Now clone the application from the github, gitlab, or bitbucket.
Here we will clone the application code from the github.
ubuntu@ubuntu:~$ git clone ttps://github.com/contentful/the-example-app.nodejs
Starting the GraphQL Application
Now we have our graphQL application on the remote server.
Go to the root directory of the graphQL application and install the required npm packages to run the graphQL application.
ubuntu@ubuntu:~$ cd graphQLubuntu@ubuntu:~$ sudo npm install
This command will analyze the package.json file in the project and install all the required npm packages.
After installing the required packages, now we will start the graphQL application.
ubuntu@ubuntu:~$ node app.js


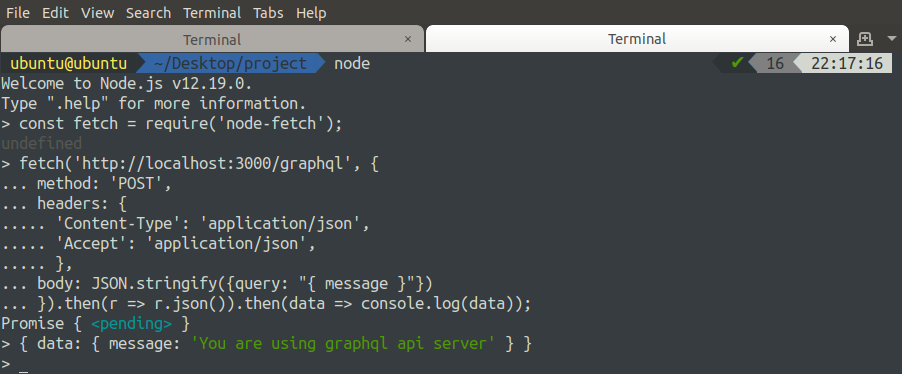 GraphQL is an efficient query language, and it can decrease the response time of a query made to the database.
The standard api calls to fetch data from the database involve many unuseful data in the response, and hence response time increases, which decreases the efficiency.
The query made to the databases using GraphQL returns only the useful data and hence decreases the response time.
In this article, we have deployed our graphQL application on an EC2 instance.
GraphQL is an efficient query language, and it can decrease the response time of a query made to the database.
The standard api calls to fetch data from the database involve many unuseful data in the response, and hence response time increases, which decreases the efficiency.
The query made to the databases using GraphQL returns only the useful data and hence decreases the response time.
In this article, we have deployed our graphQL application on an EC2 instance.
 For Linux and macOS users, click on the Downloads section in the sub-header of the website.
 After opening the Downloads section, you will see installation files for all three major platforms.
Select a package that is supported by your system.
After opening the Downloads section, you will see installation files for all three major platforms.
Select a package that is supported by your system.
 Run the installer that comes with the downloaded files, and Node.js will be installed on your computer.
To check whether the program has been installed, open the terminal and issue the following command:
$ node -v
Run the installer that comes with the downloaded files, and Node.js will be installed on your computer.
To check whether the program has been installed, open the terminal and issue the following command:
$ node -v
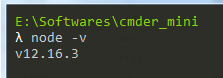 After installing Node.js, you now have access to various JavaScript modules, which will make your work more efficient in the long run.
Open the directory in which you want to create your client and server architecture, then open the terminal inside that directory and run the following command:
$ npm init -y
After installing Node.js, you now have access to various JavaScript modules, which will make your work more efficient in the long run.
Open the directory in which you want to create your client and server architecture, then open the terminal inside that directory and run the following command:
$ npm init -y
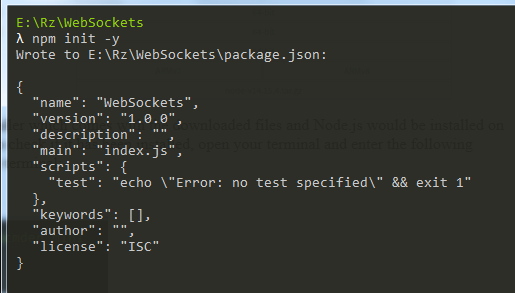 This command is used to create the package.json file that allows you to set up and install different Node.js packages.
Install the WebSocket protocol package by issuing the following command in the terminal:
$ npm install ws
This command is used to create the package.json file that allows you to set up and install different Node.js packages.
Install the WebSocket protocol package by issuing the following command in the terminal:
$ npm install ws
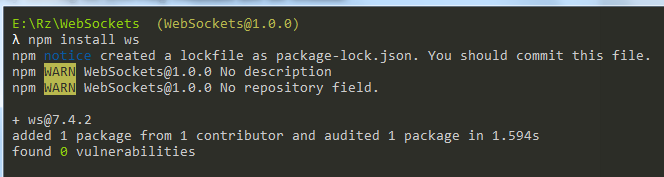 Create three files, called index.html, client.js, and server.js.
As indicated by the names, these JavaScript files are the client and server architecture of our WebSocket protocol.
Now, we can finally start writing the code of our client and server applications.
Create three files, called index.html, client.js, and server.js.
As indicated by the names, these JavaScript files are the client and server architecture of our WebSocket protocol.
Now, we can finally start writing the code of our client and server applications.
 In the next line, we are establishing a connection between the server and the client.
ws.on('connection', (wss) => {
console.log("A new Client Connected")});
After a connection has been established, the wss.send() line sends a message to the client.
In this case, the message is “Welcome to the Server.”
wss.send('Welcome to the Server!');
Finally, the wss.on (‘message’) is for the server to receive the message from the client.
For confirmation, the server sends this message back to the client in the last line.
wss.on('message', (message) => {
console.log(`Server Received: ${message}`);
wss.send('Got your Message: ' + message);
});
In the next line, we are establishing a connection between the server and the client.
ws.on('connection', (wss) => {
console.log("A new Client Connected")});
After a connection has been established, the wss.send() line sends a message to the client.
In this case, the message is “Welcome to the Server.”
wss.send('Welcome to the Server!');
Finally, the wss.on (‘message’) is for the server to receive the message from the client.
For confirmation, the server sends this message back to the client in the last line.
wss.on('message', (message) => {
console.log(`Server Received: ${message}`);
wss.send('Got your Message: ' + message);
});
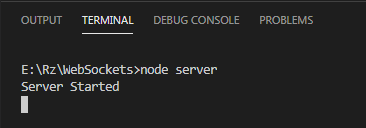 After starting your server, open the directory in which your index.html file is present, and double-click on it to open it in your browser.
You will see the following message appear in the terminal stating that a client has connected:
After starting your server, open the directory in which your index.html file is present, and double-click on it to open it in your browser.
You will see the following message appear in the terminal stating that a client has connected:
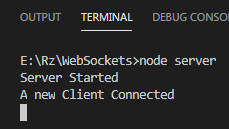 You can also check the messages sent from the server to the client by pressing the right-click button and then opening the Inspect window.
In this window, click the Console section, and you will be able to see the messages sent from the server.
You can also check the messages sent from the server to the client by pressing the right-click button and then opening the Inspect window.
In this window, click the Console section, and you will be able to see the messages sent from the server.
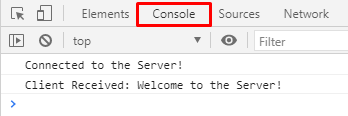 Once you click on the button, both the server and client will be able to send and receive messages to and from each other.
Server:
Once you click on the button, both the server and client will be able to send and receive messages to and from each other.
Server:
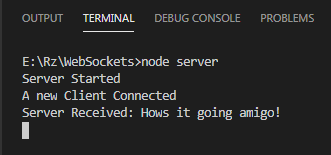 Client:
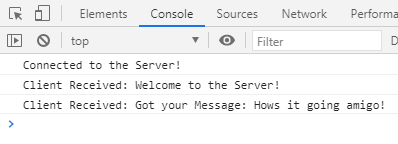 Voilà, your WebSocket connection has been established!
 We can see that the props are conveyed successfully to the child component.
Now, if we click the button, which is actually in the child component.
The thanks message should be displayed right after the parent Component Heading.
We can see that the props are conveyed successfully to the child component.
Now, if we click the button, which is actually in the child component.
The thanks message should be displayed right after the parent Component Heading.
 As you can see, it is displayed.
So, this is how we can emit or fire the custom events and listen to them in some other component in Vue.js.
As you can see, it is displayed.
So, this is how we can emit or fire the custom events and listen to them in some other component in Vue.js.
 Image from
 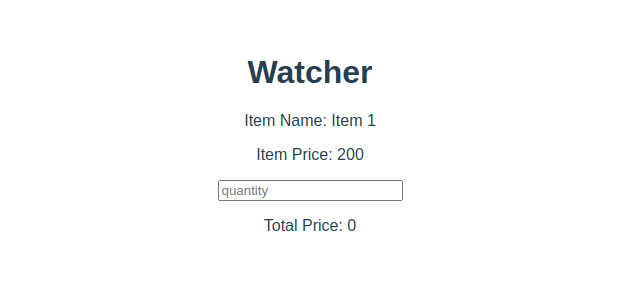 Now, we want to change the total price on the change of “itemQuantity” like whenever the user changes the quantity using the input field.
The Total Price should get changed.
For that purpose, we will have to watch the “itemQuantity” and calculate the total price whenever the “itemQuantity” property gets changed.
So, the watcher for the “itemQuantity” would be like this:
watch:{
itemQuantity(){
this.totalPrice = this.itemQuantity * this.itemPrice;
console.log(this.itemQuantity);
}}
Now, whenever the user changes the “itemQuantity”, the total price will be changed in a moment.
We don’t have to worry about anything, anymore.
The watch property will take care of this calculation now.
Let’s have a look at the web page:
Now, we want to change the total price on the change of “itemQuantity” like whenever the user changes the quantity using the input field.
The Total Price should get changed.
For that purpose, we will have to watch the “itemQuantity” and calculate the total price whenever the “itemQuantity” property gets changed.
So, the watcher for the “itemQuantity” would be like this:
watch:{
itemQuantity(){
this.totalPrice = this.itemQuantity * this.itemPrice;
console.log(this.itemQuantity);
}}
Now, whenever the user changes the “itemQuantity”, the total price will be changed in a moment.
We don’t have to worry about anything, anymore.
The watch property will take care of this calculation now.
Let’s have a look at the web page:
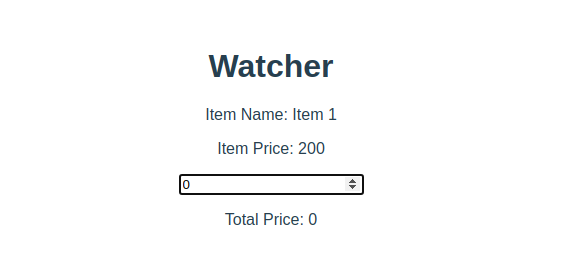 And, let’s try to increase or change the quantity and see some results:
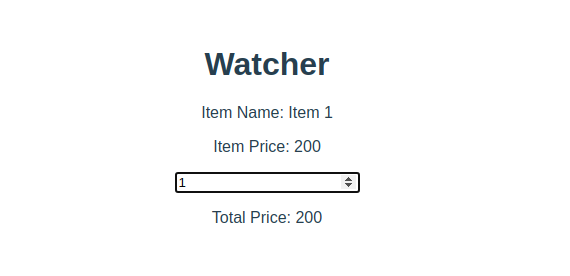 If we change the quantity, let’s say “4”, the total price would be “800”:
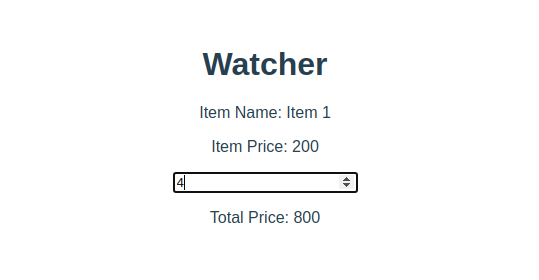 Similarly, if we change the quantity to “7”, the total price would be “1400”:
 So, this is how the watch property works and helps in reactive development.
Reactivity is kind of a signature of Vue.js.
Also, the watch property comes in handy while performing asynchronous operations.
So, this is how the watch property works and helps in reactive development.
Reactivity is kind of a signature of Vue.js.
Also, the watch property comes in handy while performing asynchronous operations.
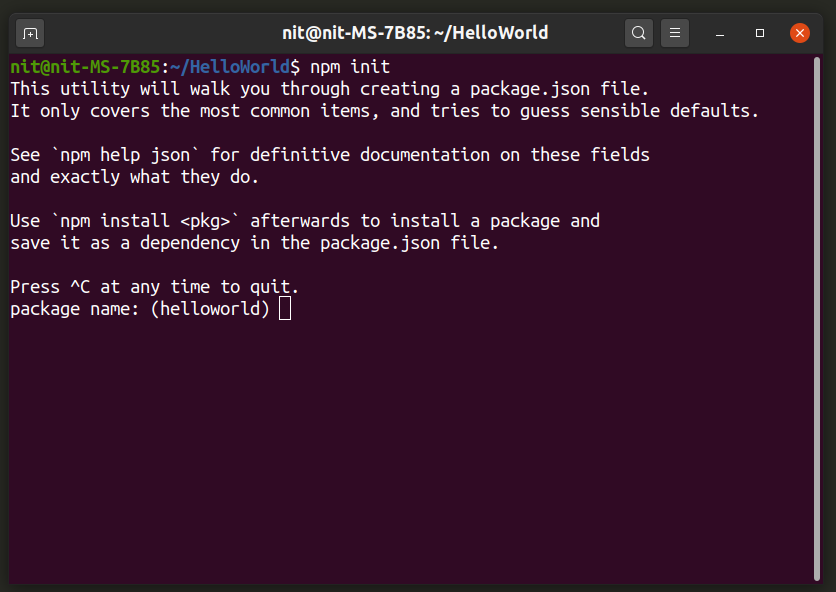 Wait for the installation to finish.
You should now have a “package.json” file in “HelloWorld” directory.
Having a “package.json” file in your project directory makes it easier to configure project parameters and makes the project portable for easier shareability.
The “package.json” file should have an entry like this:
"main": "index.js"
“Index.js” is where all logic for your main program would be located.
You can create additional “.js”, “.html” and “.css” files according to your needs.
For the purpose of “HelloWorld” program explained in this guide, the command below will create three required files:
$ touch index.js index.html index.css
Wait for the installation to finish.
You should now have a “package.json” file in “HelloWorld” directory.
Having a “package.json” file in your project directory makes it easier to configure project parameters and makes the project portable for easier shareability.
The “package.json” file should have an entry like this:
"main": "index.js"
“Index.js” is where all logic for your main program would be located.
You can create additional “.js”, “.html” and “.css” files according to your needs.
For the purpose of “HelloWorld” program explained in this guide, the command below will create three required files:
$ touch index.js index.html index.css
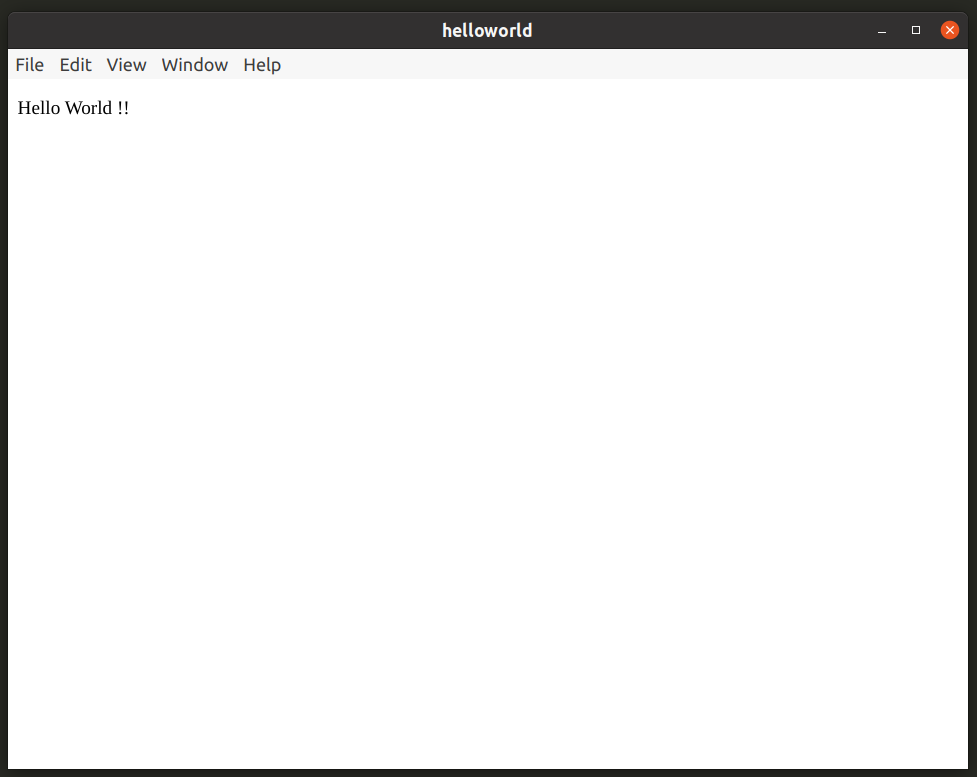 Open “index.css” file and add the code below to change the color of “Hello World !!” string.
#hworld {
color: red;}
Run the following command again to see CSS style applied to “Hello World !!” string.
$ npm start
Open “index.css” file and add the code below to change the color of “Hello World !!” string.
#hworld {
color: red;}
Run the following command again to see CSS style applied to “Hello World !!” string.
$ npm start
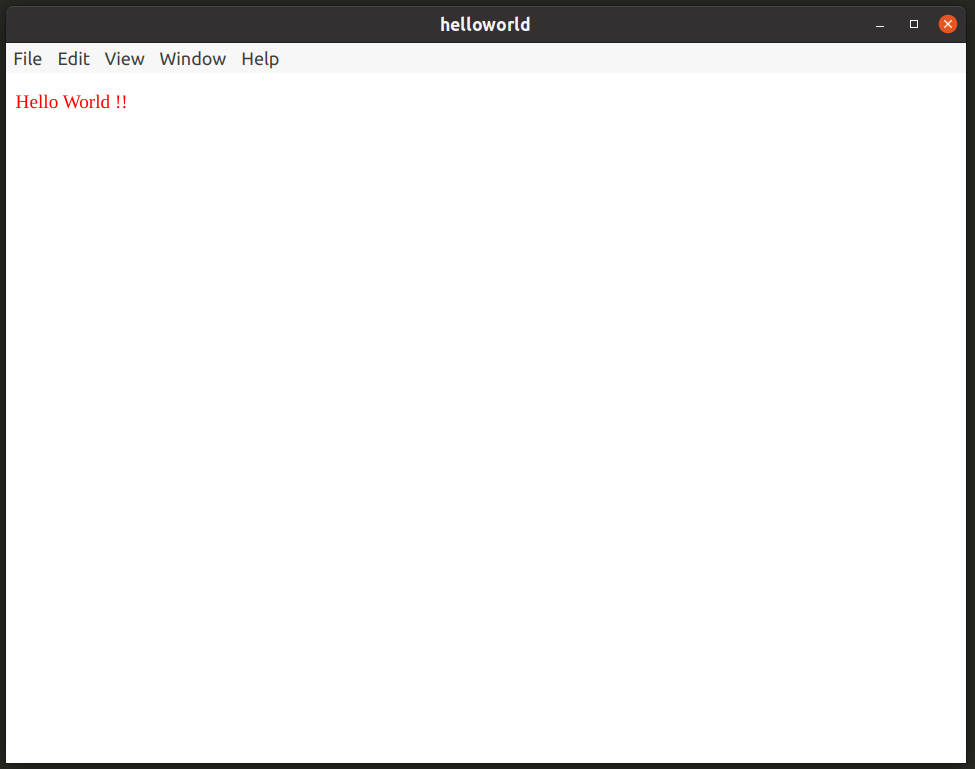 You now have the bare minimum set of required files to run a basic Electron application.
You have “index.js” to write program logic, “index.html” for adding HTML markup and “index.css” for styling various elements.
You also have a “package.json” file and “node_modules” folder containing required dependencies and modules.
You now have the bare minimum set of required files to run a basic Electron application.
You have “index.js” to write program logic, “index.html” for adding HTML markup and “index.css” for styling various elements.
You also have a “package.json” file and “node_modules” folder containing required dependencies and modules.

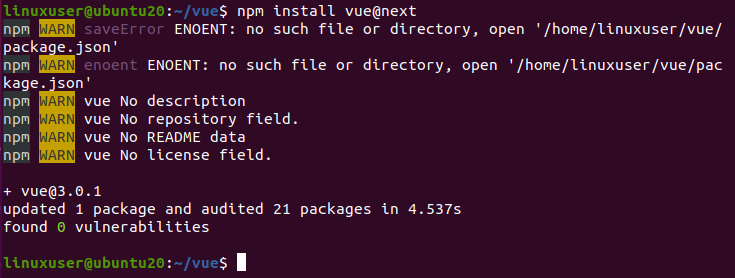
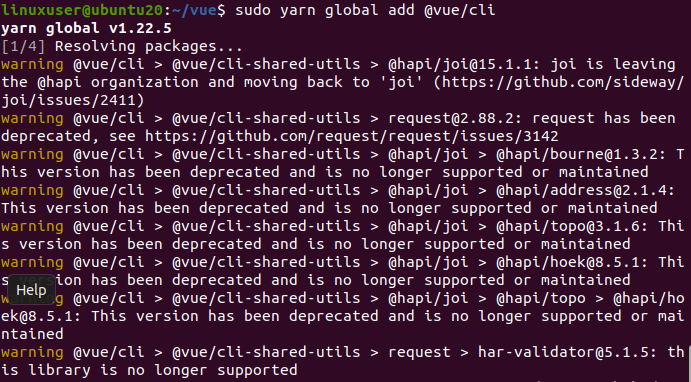 After installing the latest version of Vue.js using Vue CLI, you can easily upgrade your projects.
To check your version of Vue.js, you can run the following command
vue --version
After installing the latest version of Vue.js using Vue CLI, you can easily upgrade your projects.
To check your version of Vue.js, you can run the following command
vue --version
 If you want to upgrade to the latest stable version of Vue.js, you can use the following Vue CLI command.
$ sudo yarn global upgrade --latest @vue/cli# OR
$ sudo npm update -g @vue/cli
If you want to upgrade to the latest stable version of Vue.js, you can use the following Vue CLI command.
$ sudo yarn global upgrade --latest @vue/cli# OR
$ sudo npm update -g @vue/cli
 You can either go with the default or add custom features.
You can also use the GUI method to create a Vue project by using the following command.
vue ui
This command will open a window in the browser to help you create a project.
You can either go with the default or add custom features.
You can also use the GUI method to create a Vue project by using the following command.
vue ui
This command will open a window in the browser to help you create a project.

 But, if we try to call it in a try block now
try {
addition()} catch (error) {}
It won’t show any error in the console anymore because we did not write any code in the catch block for error.
So, we can modify and console the error message in the catch block now.
try {
addition()} catch (error) {
console.log("Error Message => " + error)}
We can see our custom message in the console against the error.
But, if we try to call it in a try block now
try {
addition()} catch (error) {}
It won’t show any error in the console anymore because we did not write any code in the catch block for error.
So, we can modify and console the error message in the catch block now.
try {
addition()} catch (error) {
console.log("Error Message => " + error)}
We can see our custom message in the console against the error.
 So, this is the very basic usage of the try-catch block.
Now, let’s learn about throwing a custom error in the try block.
So, this is the very basic usage of the try-catch block.
Now, let’s learn about throwing a custom error in the try block.
 As you can see in the output, the error message is now changed to our custom error thrown.
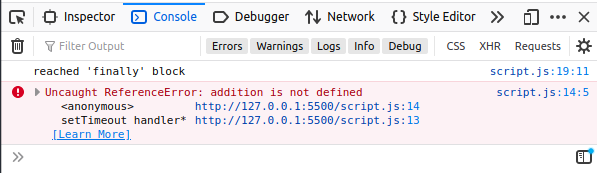 You can observe that the “finally” block gets executed first, and the error is thrown later if we take a look at the error.
It is not the error from the catch block, but it is an original programming error, which means that the catch block doesn’t get executed because they try block didn’t find any error.
Alright! Now, if we want to make it work.
We have to apply the try-catch block inside the setTimeout function instead of outside.
So, the true way of implementing an asynchronous function with a try-catch block would be like this.
setTimeout(() => {
try {
addition();
} catch (err) {
console.log("Error Message => " + err)
} finally{
console.log("reached 'finally' block")
}}, 3000)
You can observe that the “finally” block gets executed first, and the error is thrown later if we take a look at the error.
It is not the error from the catch block, but it is an original programming error, which means that the catch block doesn’t get executed because they try block didn’t find any error.
Alright! Now, if we want to make it work.
We have to apply the try-catch block inside the setTimeout function instead of outside.
So, the true way of implementing an asynchronous function with a try-catch block would be like this.
setTimeout(() => {
try {
addition();
} catch (err) {
console.log("Error Message => " + err)
} finally{
console.log("reached 'finally' block")
}}, 3000)
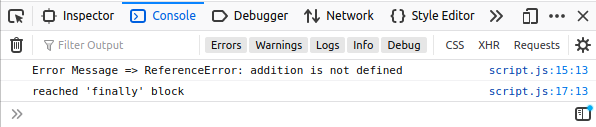 You can observe in the output that after the delay of 3 seconds because of the setTimeout function.
We have got the error message from the catch block first, and then the “finally” block gets executed.
You can observe in the output that after the delay of 3 seconds because of the setTimeout function.
We have got the error message from the catch block first, and then the “finally” block gets executed.
 You can see that it has generated a number from 0 to 99, but, it’s a float number.
So, if we want to have a whole number and not a float number, ,we can apply a Math.floor() method over Math.random() method, like this:
You can see that it has generated a number from 0 to 99, but, it’s a float number.
So, if we want to have a whole number and not a float number, ,we can apply a Math.floor() method over Math.random() method, like this:
 That looks great!
Now, what if we do not want to have numbers from 0 to 99 or onwards but from some other number, for example, 50 to 90.
First, let’s see how we can do that, and later we will see how it works.
That looks great!
Now, what if we do not want to have numbers from 0 to 99 or onwards but from some other number, for example, 50 to 90.
First, let’s see how we can do that, and later we will see how it works.
 In the end, if we want to build our custom random function to which we can provide two numbers (minimum and maximum) and get a random number between those two numbers.
The function would be like this:
function getRandomNum(sNum, lNum) {
return
In the end, if we want to build our custom random function to which we can provide two numbers (minimum and maximum) and get a random number between those two numbers.
The function would be like this:
function getRandomNum(sNum, lNum) {
return 

 As you can see, we are getting random numbers from 20 to 40.
So, these are some of the different ways to generate pseudo-random numbers using the Math.random() method.
As you can see, we are getting random numbers from 20 to 40.
So, these are some of the different ways to generate pseudo-random numbers using the Math.random() method.
 We can apply the same technique anywhere to change the content of our website according to our needs.
We can use it in changing an image or performing any type of task that we can imagine with this tool.
We can apply the same technique anywhere to change the content of our website according to our needs.
We can use it in changing an image or performing any type of task that we can imagine with this tool.

 We can observe what it has for us.
We could receive a good amount of information from the Window.location object.
For example:
We can observe what it has for us.
We could receive a good amount of information from the Window.location object.
For example:
 And if we want to get the hostname from the URL, we can simply get that using the window.loation.host.
window.location.host
And if we want to get the hostname from the URL, we can simply get that using the window.loation.host.
window.location.host
 And similarly, if we want to get the pathname only, we can get that using window.location.pathname.
window.location.pathname
And similarly, if we want to get the pathname only, we can get that using window.location.pathname.
window.location.pathname
 For getting the search query, we can use window.location.search.
window.location.search
For getting the search query, we can use window.location.search.
window.location.search
 So, these are basically some of the ways to get the current URL and extract some specific parts from it according to our requirements.
Moreover, window.location has a lot of other options for us.
So, these are basically some of the ways to get the current URL and extract some specific parts from it according to our requirements.
Moreover, window.location has a lot of other options for us.
 Be careful that it will print everything on the webpage.
Either that web page includes images or advertisements.
Be careful that it will print everything on the webpage.
Either that web page includes images or advertisements.
 You will witness that there is no difference in both of them.
The alert method doesn’t only take the string to show the message.
We can provide variable as well, and it worked perfectly fine,
var alertMessage = 'Alert Box using variable';
alert(alertMessage);
as you can see in the screenshot below that the message is displayed.
You will witness that there is no difference in both of them.
The alert method doesn’t only take the string to show the message.
We can provide variable as well, and it worked perfectly fine,
var alertMessage = 'Alert Box using variable';
alert(alertMessage);
as you can see in the screenshot below that the message is displayed.
 We have learned about providing a variable as well.
What if we want to show the pop-up alert box on the screen at the click of a button? For example, we have got some information from the user, and after successfully saving the user’s data on the server, we want to show a confirmation message that says “Added successfully”.
So, we can simply show an alert box like this.
<button onclick="alert(Added successfully)">Show Alert!</button>
We have learned about providing a variable as well.
What if we want to show the pop-up alert box on the screen at the click of a button? For example, we have got some information from the user, and after successfully saving the user’s data on the server, we want to show a confirmation message that says “Added successfully”.
So, we can simply show an alert box like this.
<button onclick="alert(Added successfully)">Show Alert!</button>
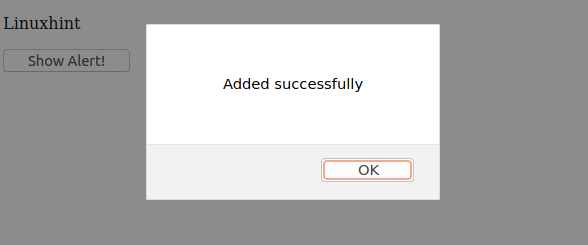 Or, if we are getting a confirmation message from the server, and we want to show the message on the base of the message we got.
We can call the function on the button’s onclick method
<button onclick="alertFunc()">Show Alert!</button>
Then, later in the script, we can write the function in which we can show the alert message.
function alertFunc() {
var alertMessage = 'Alert Box using function';
alert(alertMessage);}
Or, if we are getting a confirmation message from the server, and we want to show the message on the base of the message we got.
We can call the function on the button’s onclick method
<button onclick="alertFunc()">Show Alert!</button>
Then, later in the script, we can write the function in which we can show the alert message.
function alertFunc() {
var alertMessage = 'Alert Box using function';
alert(alertMessage);}
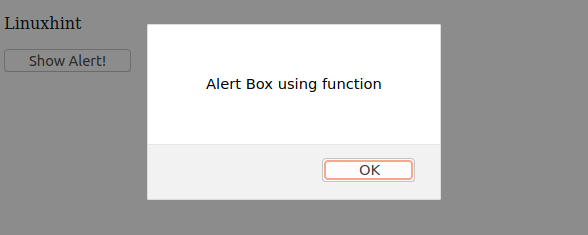 So, these are some of the different methods of using the alert() method.
 Keep this in mind that the length of the new mapped array will definitely be equal to the original array.
There is a shorter way of doing the same task using the arrow or anonymous function within a map method.
So, we can write a callback function within a map method like this
var newArr = arr.map((element) => {
return element * 10})
Or, if we want to be a pro and make it more concise.
We can do this
var newArr = arr.map(e => e * 10)
Alright! So, this was the very basic demonstration of the map method and different ways to write the call back function.
But, this function comes more in handy, when we are playing with an array of objects.
That’s where it’s true implementation happens.
Keep this in mind that the length of the new mapped array will definitely be equal to the original array.
There is a shorter way of doing the same task using the arrow or anonymous function within a map method.
So, we can write a callback function within a map method like this
var newArr = arr.map((element) => {
return element * 10})
Or, if we want to be a pro and make it more concise.
We can do this
var newArr = arr.map(e => e * 10)
Alright! So, this was the very basic demonstration of the map method and different ways to write the call back function.
But, this function comes more in handy, when we are playing with an array of objects.
That’s where it’s true implementation happens.
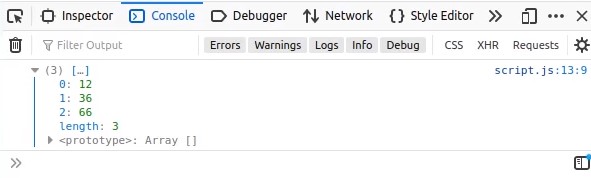 We have got them separated in an array.
But, now let’s demonstrate the same output using the map method.
var extractedIDs = arr.map((element) => {
return element.id;})
console.log(extractedIDs);
We have got them separated in an array.
But, now let’s demonstrate the same output using the map method.
var extractedIDs = arr.map((element) => {
return element.id;})
console.log(extractedIDs);
 By looking at the difference in code and the same output, we can realize the true difference between the two(foreach and map) methods.
The syntax and separation of concern.
Similarly, we can perform a lot of other operations.
If we have to play and get some data from the array of objects.
We suppose an array of objects in which each object contains two properties: first name and last name.
var arr = [
{ firstName: "John", lastName: "Doe"},
{ firstName: "Morgan", lastName: "Freeman"},
{ firstName: "Jordan", lastName: "Peterson"}];
Now, we want to have an array that contains the full names.
So, we will write a map function like this to fulfill our purpose
var fullName = arr.map((person) => {
return person.firstName + ' ' + person.lastName})
console.log(fullName);
By looking at the difference in code and the same output, we can realize the true difference between the two(foreach and map) methods.
The syntax and separation of concern.
Similarly, we can perform a lot of other operations.
If we have to play and get some data from the array of objects.
We suppose an array of objects in which each object contains two properties: first name and last name.
var arr = [
{ firstName: "John", lastName: "Doe"},
{ firstName: "Morgan", lastName: "Freeman"},
{ firstName: "Jordan", lastName: "Peterson"}];
Now, we want to have an array that contains the full names.
So, we will write a map function like this to fulfill our purpose
var fullName = arr.map((person) => {
return person.firstName + ' ' + person.lastName})
console.log(fullName);
 As you can see, we have got a separate array with full names.
That’s great.
So, these are some of the basic and different ways of how a map function can be used to fulfill our development requirements and helps in every javascript developer’s life.
As you can see, we have got a separate array with full names.
That’s great.
So, these are some of the basic and different ways of how a map function can be used to fulfill our development requirements and helps in every javascript developer’s life.
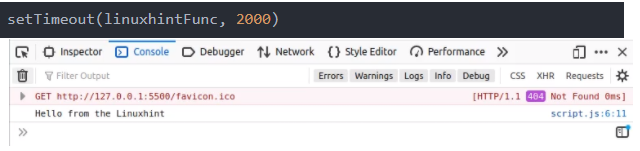 Once the web page is loaded, there is a delay of 2 s before the function is called.
We can perform the same task using the arrow function or an anonymous function.
setTimeout(() => {
console.log("Hello from the Linuxhint");}, 2000)
Once the web page is loaded, there is a delay of 2 s before the function is called.
We can perform the same task using the arrow function or an anonymous function.
setTimeout(() => {
console.log("Hello from the Linuxhint");}, 2000)
 Again, there is a delay of 2 s.
Note: The setTimeout method is an asynchronous method, which means that, although JavaScript is a single-threaded language, this function runs on a different thread.
The setTimeout method places the function in the queue of the call stack and waits until the call stack is free.
If we try to print a message or run a function in setTimeout without a delay, then this action would be jump to the front of the queue first and run when the setTimeout method is executed.
console.log("Hello from the Linuxhint-1")
setTimeout(() => {
console.log("Hello from the Linuxhint-2")}, 0)
console.log("Hello from the Linuxhint-3")
Again, there is a delay of 2 s.
Note: The setTimeout method is an asynchronous method, which means that, although JavaScript is a single-threaded language, this function runs on a different thread.
The setTimeout method places the function in the queue of the call stack and waits until the call stack is free.
If we try to print a message or run a function in setTimeout without a delay, then this action would be jump to the front of the queue first and run when the setTimeout method is executed.
console.log("Hello from the Linuxhint-1")
setTimeout(() => {
console.log("Hello from the Linuxhint-2")}, 0)
console.log("Hello from the Linuxhint-3")
 Looking at the output, the order of the output is not the same as that of the input.
Therefore, the setTimeout function can delay the execution of code.
Looking at the output, the order of the output is not the same as that of the input.
Therefore, the setTimeout function can delay the execution of code.
 Alright! It looks pretty cool in a good format.
But, how about if we want to get only the year from the entire date? We can use the built-in function getFullYear() for getting the year only.
current.getFullYear();
Alright! It looks pretty cool in a good format.
But, how about if we want to get only the year from the entire date? We can use the built-in function getFullYear() for getting the year only.
current.getFullYear();
 Similarly, if we want to extract only the year, we can use the built-in function getMonths() for getting the month only.
current.getMonth();
Similarly, if we want to extract only the year, we can use the built-in function getMonths() for getting the month only.
current.getMonth();
 There seems like an issue.
This is not the 8th month(August)! As we can see in the above complete output for the new Date object.
This is September.
Well, this is because of the digital(0-11).
So, we have to add “1” to it for getting the right month every time.
current.getMonth() + 1;
There seems like an issue.
This is not the 8th month(August)! As we can see in the above complete output for the new Date object.
This is September.
Well, this is because of the digital(0-11).
So, we have to add “1” to it for getting the right month every time.
current.getMonth() + 1;
 This is fine now.
Just like for the year, we can do the same for the date.
For example, to extract or get only the date, we can use the built-in function getDate().
current.getDate();
This is fine now.
Just like for the year, we can do the same for the date.
For example, to extract or get only the date, we can use the built-in function getDate().
current.getDate();
 Just like a date, we have built-in functions for extracting the desired piece of time.
For example, if we want to get or extract the hours only, from the whole current time, we can use the built-in function getHours().
current.getHours();
Just like a date, we have built-in functions for extracting the desired piece of time.
For example, if we want to get or extract the hours only, from the whole current time, we can use the built-in function getHours().
current.getHours();
 The same goes for the minutes.
To extract minutes only, we can use getMinutes().
current.getMinutes();
The same goes for the minutes.
To extract minutes only, we can use getMinutes().
current.getMinutes();
 To extract seconds only, we can use getSeconds().
current.getSeconds();
To extract seconds only, we can use getSeconds().
current.getSeconds();

 And, if we want to extract only the time in the form of string.
We can use the built-in function toLocaleDateString().
current.toLocaleDateString(); // "9/29/2020"
And, if we want to extract only the time in the form of string.
We can use the built-in function toLocaleDateString().
current.toLocaleDateString(); // "9/29/2020"
 And, if we want to extract both the date and time in a single string, we can use the built-in function toLocaleString().
current.toLocaleString(); // "9/29/2020, 2:42:07 PM"
And, if we want to extract both the date and time in a single string, we can use the built-in function toLocaleString().
current.toLocaleString(); // "9/29/2020, 2:42:07 PM"
 So, this is how we can get the date and time using the built-in date object and extract the required months, years, or minutes using different methods.
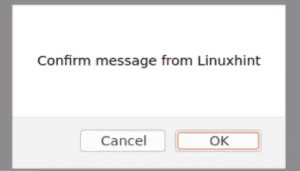 The confirm method doesn’t only take the string to show the message.
We can provide variable as well, and it worked perfectly fine.
var confirmMessage = Confirm Message using variable';
confirm(confirmMessage);
As you can see in the screenshot below that the message is displayed.
The confirm method doesn’t only take the string to show the message.
We can provide variable as well, and it worked perfectly fine.
var confirmMessage = Confirm Message using variable';
confirm(confirmMessage);
As you can see in the screenshot below that the message is displayed.
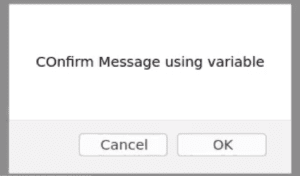 We have learned about providing a variable as well.
What if we want to show the pop-up alert box on the screen at the click of a button.
For example, we have got some information from the user, and after successfully saving the user’s data on the server, we want to show a confirmation message that “Confirmed”.
So, we can simply show a confirmation box like this.
<button>Show Confirm Box!</button>
We have learned about providing a variable as well.
What if we want to show the pop-up alert box on the screen at the click of a button.
For example, we have got some information from the user, and after successfully saving the user’s data on the server, we want to show a confirmation message that “Confirmed”.
So, we can simply show a confirmation box like this.
<button>Show Confirm Box!</button>
 Or if we are getting a confirmation message from the server, and we want to show the message on the base of the message we got.
We can call the function on the button’s onClick method.
<button>Show Confirm Box!</button>
And later in the script, we can write the function in which we can show the confirmation message.
function confirmFunc() {
var confirmMessage = 'Confirm Box using function';
confirm(confirmMessage);}
Or if we are getting a confirmation message from the server, and we want to show the message on the base of the message we got.
We can call the function on the button’s onClick method.
<button>Show Confirm Box!</button>
And later in the script, we can write the function in which we can show the confirmation message.
function confirmFunc() {
var confirmMessage = 'Confirm Box using function';
confirm(confirmMessage);}
 So, these are some of the different methods of using the confirm() method.
 The values 20 and 30 are returned as the output.
Next, we can look at the original array with the following command:
console.log(arr);
The values 20 and 30 are returned as the output.
Next, we can look at the original array with the following command:
console.log(arr);
 The two elements returned in the output are no longer in the array.
Next, we will add elements to the array using the splice function.
Because we will not remove elements from the array, we can provide a value of zero for removeCount and then provide the elements we want to add.
arr.splice(2, 0, 30, 35);
The two elements returned in the output are no longer in the array.
Next, we will add elements to the array using the splice function.
Because we will not remove elements from the array, we can provide a value of zero for removeCount and then provide the elements we want to add.
arr.splice(2, 0, 30, 35);
 The above command returns an empty array because no elements were removed.
However, if we look at the original array, we can see that it has been updated.
console.log(arr);
The values 30 and 35 were successfully added at the second index.
Finally, if we want to remove elements and add elements, we can provide values for both removeCount and items.
arr.splice(1, 2, 15, 20, 25);
The above command has returned the two elements that were removed, and if we print the original array to the console, we can see that 20 and 30 are no longer in the array and that 15, 20 and 25 have been added.
console.log(arr);
The above command returns an empty array because no elements were removed.
However, if we look at the original array, we can see that it has been updated.
console.log(arr);
The values 30 and 35 were successfully added at the second index.
Finally, if we want to remove elements and add elements, we can provide values for both removeCount and items.
arr.splice(1, 2, 15, 20, 25);
The above command has returned the two elements that were removed, and if we print the original array to the console, we can see that 20 and 30 are no longer in the array and that 15, 20 and 25 have been added.
console.log(arr);

 We can see in the output that the string is trimmed and there is no extra whitespace left around the string as we desired it to happen.
Now, a question arises: what if we want to trim the string from only the left side or the start of the string and vice versa.
There is a built-in function for that as well.
There are two different trimStart() and trimLeft() functions, but these both do the same task.
So, if we want to trim the string from the left side only and want to keep the whitespaces on the right side.
We can use the trimStart() or trimtrimLeft() function.
str.trimStart();
We can see in the output that the string is trimmed and there is no extra whitespace left around the string as we desired it to happen.
Now, a question arises: what if we want to trim the string from only the left side or the start of the string and vice versa.
There is a built-in function for that as well.
There are two different trimStart() and trimLeft() functions, but these both do the same task.
So, if we want to trim the string from the left side only and want to keep the whitespaces on the right side.
We can use the trimStart() or trimtrimLeft() function.
str.trimStart();
 str.trimLeft();
 As you can see that both functions do the same task and trim the strings from the left side only.
Similarly, if we want to trim the string from the last or the right side only.
We can use any of the trimEnd() or trimRight() functions.
str.trimEnd();
As you can see that both functions do the same task and trim the strings from the left side only.
Similarly, if we want to trim the string from the last or the right side only.
We can use any of the trimEnd() or trimRight() functions.
str.trimEnd();
 str.trimRight();
 It is observed that the string is trimmed only from the right side, as we expected.
So, this is how the javascript’s built-in functions trim(), trimStart(), trimLeft(), trimEnd() and trimRight() works and helps us in getting rid of the extra whitespace around the string.
It is observed that the string is trimmed only from the right side, as we expected.
So, this is how the javascript’s built-in functions trim(), trimStart(), trimLeft(), trimEnd() and trimRight() works and helps us in getting rid of the extra whitespace around the string.
 You can witness the delay of 5 seconds to get to the “Done” status in the console.
Suppose we want to perform an animation after every 2 seconds.
To do so, we will simply write an asynchronous animation function, in which we will animate something, stop the execution for 2 seconds using sleep, and then repeat this process using a for loop for 10 times.
async function animation(ms){
console.log("starting...");
for (let i = 0; i < 10; i++) {
console.log("animation after 2 seconds...")
await sleep(ms)}
console.log("This is the end.");}
After writing the asynchronous animation function, we can now call the animation function.
animation(2000);
After running the code, you will see in the console that the text “animation after 2 seconds” is repeating every two seconds.
You can witness the delay of 5 seconds to get to the “Done” status in the console.
Suppose we want to perform an animation after every 2 seconds.
To do so, we will simply write an asynchronous animation function, in which we will animate something, stop the execution for 2 seconds using sleep, and then repeat this process using a for loop for 10 times.
async function animation(ms){
console.log("starting...");
for (let i = 0; i < 10; i++) {
console.log("animation after 2 seconds...")
await sleep(ms)}
console.log("This is the end.");}
After writing the asynchronous animation function, we can now call the animation function.
animation(2000);
After running the code, you will see in the console that the text “animation after 2 seconds” is repeating every two seconds.
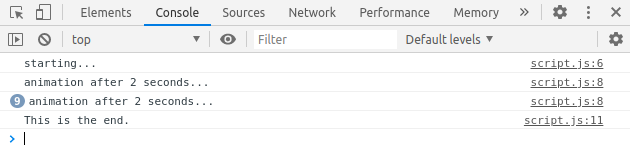
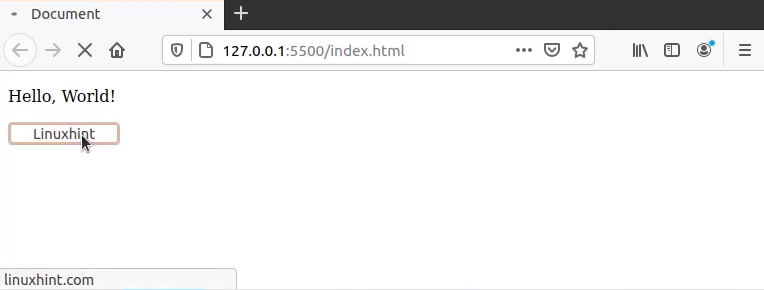 In this next example, say, you want to redirect the user from an old domain to the new domain.
For testing purposes, suppose the current address is the localhost, but whenever the user enters the URL of the localhost, the user gets redirected from the localhost to the new URL, which is linuxhint.com in this example.
This is easier to do than you may think.
To do this, simply use the syntax of the second redirect method:
window.location.replace("https://www.linuxhint.com")
Now, if the user enters the localhost URL, they will be redirected to linuxhint.com.
But, if you look at the top-left button of the browser for going back to the previous page:
In this next example, say, you want to redirect the user from an old domain to the new domain.
For testing purposes, suppose the current address is the localhost, but whenever the user enters the URL of the localhost, the user gets redirected from the localhost to the new URL, which is linuxhint.com in this example.
This is easier to do than you may think.
To do this, simply use the syntax of the second redirect method:
window.location.replace("https://www.linuxhint.com")
Now, if the user enters the localhost URL, they will be redirected to linuxhint.com.
But, if you look at the top-left button of the browser for going back to the previous page:
 the button is dulled and the browser is not allowing us to go back to the previous page.
However, if you want to keep this option for the user, you can use “assign” instead of “replace.”
window.location.assign("https://www.linuxhint.com")
And now, if you look at the top-left button of the browser for going back to the previous page:
the button is dulled and the browser is not allowing us to go back to the previous page.
However, if you want to keep this option for the user, you can use “assign” instead of “replace.”
window.location.assign("https://www.linuxhint.com")
And now, if you look at the top-left button of the browser for going back to the previous page:
 The button is not dulled.
You can go back to the previous page.
It is recommended to use “replace” instead of “assign,” here, because the purpose of redirecting to a new URL is that the old URL is not working or not available anymore.
The button is not dulled.
You can go back to the previous page.
It is recommended to use “replace” instead of “assign,” here, because the purpose of redirecting to a new URL is that the old URL is not working or not available anymore.
 Now, let’s see what will happen if we provide the space character as a separator:
 Here, in the string returned, the array elements are separated by the space character instead of a comma.
We can provide any character or string as a separator.
If we want to put “ and ” between the array’s elements, we can do that as follows:
Here, in the string returned, the array elements are separated by the space character instead of a comma.
We can provide any character or string as a separator.
If we want to put “ and ” between the array’s elements, we can do that as follows:
 Here, every alphabet is separated by the “ and ”, which might be very useful for certain applications.
Any string can be provided as a separator for joining an array’s elements in the same way.
Here, every alphabet is separated by the “ and ”, which might be very useful for certain applications.
Any string can be provided as a separator for joining an array’s elements in the same way.
 This error will occur any time we try to access subNum outside the function in which it is defined.
For example:
function subtraction(a,b) {
var subNum = 23;};
console.log(subNum);
This error will occur any time we try to access subNum outside the function in which it is defined.
For example:
function subtraction(a,b) {
var subNum = 23;};
console.log(subNum);
 Here, we still cannot access the variable because it is restricted to the subtraction function.
However, let’s see what happens if we create the variable outside the function—for example, at the beginning of the script:
var globalVar = 11;
Now, let’s try to access it:
console.log(globalVar);
As shown below, we no longer get a reference error.
Here, we still cannot access the variable because it is restricted to the subtraction function.
However, let’s see what happens if we create the variable outside the function—for example, at the beginning of the script:
var globalVar = 11;
Now, let’s try to access it:
console.log(globalVar);
As shown below, we no longer get a reference error.
 Furthermore, globalVar should be accessible from any function.
function division(a,b) {
console.log(globalVar);}
division();
As you can see below, globalVar is still accessible.
Furthermore, globalVar should be accessible from any function.
function division(a,b) {
console.log(globalVar);}
division();
As you can see below, globalVar is still accessible.

 As you can see, the for…in loop has iterated through each property of the obj object and printed each property in the console, as we desired.
Javascript also provides the built-in hasOwnProperty() function.
We can perform the hasOwnProperty() check before performing any task in the for…in loop, like this:
for (const name in obj) {
if (obj.hasOwnProperty(name)) {
console.log(name + " = " + obj[name]);
}}
This function comes in handy when you need to use JSON or for debugging purposes.
When you do not know whether the key holds certain properties, you can also use the for…in syntax for the arrays, as well as for the strings.
let arr = [23,24,25]for (const value in arr) {
console.log(value + " = " + arr[value]);}
As you can see, the for…in loop has iterated through each property of the obj object and printed each property in the console, as we desired.
Javascript also provides the built-in hasOwnProperty() function.
We can perform the hasOwnProperty() check before performing any task in the for…in loop, like this:
for (const name in obj) {
if (obj.hasOwnProperty(name)) {
console.log(name + " = " + obj[name]);
}}
This function comes in handy when you need to use JSON or for debugging purposes.
When you do not know whether the key holds certain properties, you can also use the for…in syntax for the arrays, as well as for the strings.
let arr = [23,24,25]for (const value in arr) {
console.log(value + " = " + arr[value]);}
 Similarly, you can apply this syntax to the strings, as well.
let str = "Linuxhint"for (const char in str) {
console.log(char + " = " + str[char]);}
Similarly, you can apply this syntax to the strings, as well.
let str = "Linuxhint"for (const char in str) {
console.log(char + " = " + str[char]);}
 But, it is not recommended to use the for…in loop for arrays and strings because there are dedicated loops and functions for arrays and strings.
Like, for…of or Array.protptype.forEach() is for the arrays for doing the same tasks in better ways.
But, it is not recommended to use the for…in loop for arrays and strings because there are dedicated loops and functions for arrays and strings.
Like, for…of or Array.protptype.forEach() is for the arrays for doing the same tasks in better ways.
 As you can see, it shows the index from where the given substring “work” began.
Now, we will move on and try doing the same thing with the regex syntax.
As you can see, it shows the index from where the given substring “work” began.
Now, we will move on and try doing the same thing with the regex syntax.
 As you can see, it has also given us the same output.
Alright! Now, we will see what we can do with the regular expression.
Let us try to replace the word “great” with, say, “awesome” using the replace() method.
str.replace("great", "awesome");
As you can see, it has also given us the same output.
Alright! Now, we will see what we can do with the regular expression.
Let us try to replace the word “great” with, say, “awesome” using the replace() method.
str.replace("great", "awesome");
 Here, you can see the problem: the first occurrence of “great” has been replaced, but the second one has not.
In the first step, you simply learned how to search for a string using a regular expression.
Now, we will move towards the next step and learn about the concept of flags.
Here, you can see the problem: the first occurrence of “great” has been replaced, but the second one has not.
In the first step, you simply learned how to search for a string using a regular expression.
Now, we will move towards the next step and learn about the concept of flags.
 Perfect, all the occurrences of “great” are now changed.
But, you may face a problem if you try to change all the occurrences of “linuxhint” to, say, “our website” using the same technique.
We will try to do that first, then we will see how can we resolve this issue.
str.replace(/linuxhint/g, "our website");
Perfect, all the occurrences of “great” are now changed.
But, you may face a problem if you try to change all the occurrences of “linuxhint” to, say, “our website” using the same technique.
We will try to do that first, then we will see how can we resolve this issue.
str.replace(/linuxhint/g, "our website");
 Although we have provided the global flag with the regular expression, the first occurrence does not change.
This is because of case-sensitivity.
So, we will also need to provide the case-insensitivity flag ‘i,’ in this case.
You can do this simply by adding the ‘i’ flag along with the ‘g’ flag.
str.replace(/linuxhint/gi, "our website");
Although we have provided the global flag with the regular expression, the first occurrence does not change.
This is because of case-sensitivity.
So, we will also need to provide the case-insensitivity flag ‘i,’ in this case.
You can do this simply by adding the ‘i’ flag along with the ‘g’ flag.
str.replace(/linuxhint/gi, "our website");
 Great.
As you can see, all occurrences of the term “linuxhint” have been changed to the term “our website,” regardless of the case-sensitivity.
Similarly, you can use regular expressions’s split() function.
str.split(/linuxhint/gi);
Great.
As you can see, all occurrences of the term “linuxhint” have been changed to the term “our website,” regardless of the case-sensitivity.
Similarly, you can use regular expressions’s split() function.
str.split(/linuxhint/gi);
 Alright! The function worked fine.
The split() method has returned the array of substrings, based on the “linuxhint” term.
But, if you want to include the separators, as well, in the array of the substring, you will have to play with the patterns.
So, in this step, we have learned about the flags and how they help us.
There are more flags available.
For example, “m” is for multiline matching, “s” is for dot all, etc.
Now, we will move on to the concept of patterns and learn how to use these items.
Alright! The function worked fine.
The split() method has returned the array of substrings, based on the “linuxhint” term.
But, if you want to include the separators, as well, in the array of the substring, you will have to play with the patterns.
So, in this step, we have learned about the flags and how they help us.
There are more flags available.
For example, “m” is for multiline matching, “s” is for dot all, etc.
Now, we will move on to the concept of patterns and learn how to use these items.
 Perfect! As you can see, the separators are also included in the array of substrings.
To split the base of two separators, you can give multiple substrings in a regular expression using the OR “|” operator.
str.split(/linuxhint|great/gi);
Perfect! As you can see, the separators are also included in the array of substrings.
To split the base of two separators, you can give multiple substrings in a regular expression using the OR “|” operator.
str.split(/linuxhint|great/gi);
 All right! The operator worked great, as we expect it to split.
 Okay, so far, so good.
For example, say, you want to change the dots into commas in the following expression:
str.replace(/\./g, ",");
Okay, so far, so good.
For example, say, you want to change the dots into commas in the following expression:
str.replace(/\./g, ",");
 It worked!
Backslashes are also used for another purpose.
To search any word, digit, or space, you can use \w, \d, and \s, respectively.
For example, to replace spaces with dashes, the following expression is used:
str.replace(/\s/g, "-");
It worked!
Backslashes are also used for another purpose.
To search any word, digit, or space, you can use \w, \d, and \s, respectively.
For example, to replace spaces with dashes, the following expression is used:
str.replace(/\s/g, "-");
 Awesome! You can really see the potential in regular expressions, now.
 You can even give a range of letters, like this:
str.replace(/[g-l]/g, "u");
You can even give a range of letters, like this:
str.replace(/[g-l]/g, "u");
 Or, a range of numbers:
str.replace(/[0-5]/g, "9");
Or, a range of numbers:
str.replace(/[0-5]/g, "9");
 And, if you want to exclude the provided characters in the square brackets, you can use the caret character, like this:
str.replace(/[^g-l]/g, "t");
And, if you want to exclude the provided characters in the square brackets, you can use the caret character, like this:
str.replace(/[^g-l]/g, "t");
 This comes in handy when getting data from users and testing and validating that data, especially in email, phone, or date validation.
 This property simply gives back the total characters available in the string at run time.
Let us try out a couple of examples that use the string length property.
This property simply gives back the total characters available in the string at run time.
Let us try out a couple of examples that use the string length property.
 And, as you can see in the console output, the statement “It’s a short string” is printed.
That is great.
You can use this in the conditional statement of the for loop, as well.
If you want to iterate from each of the characters in a string and convert every letter into a lower-case letter, but you are not yet aware of how many characters the string has, then you can simply give the str.length property as a conditional statement.
for (let i = 0; i < str.length; i++) {
console.log(str[i].toUpperCase());}
And, as you can see in the console output, the statement “It’s a short string” is printed.
That is great.
You can use this in the conditional statement of the for loop, as well.
If you want to iterate from each of the characters in a string and convert every letter into a lower-case letter, but you are not yet aware of how many characters the string has, then you can simply give the str.length property as a conditional statement.
for (let i = 0; i < str.length; i++) {
console.log(str[i].toUpperCase());}
 As you can see in the output console, every character is shown in the console separately and converted into uppercase letters, as well.
So, this is how you can apply it to a lot of different scenarios according to your needs.
As you can see in the output console, every character is shown in the console separately and converted into uppercase letters, as well.
So, this is how you can apply it to a lot of different scenarios according to your needs.
 And, as you can see, it does not show the assigned value.
It shows that the length of the string or the number of characters in the string are being calculated at run time, and then it displays the output.
And, as you can see, it does not show the assigned value.
It shows that the length of the string or the number of characters in the string are being calculated at run time, and then it displays the output.
 But, we need to convert the string entirely into lower-case letters.
So, we will simply apply the following:
str.toLowerCase();
But, we need to convert the string entirely into lower-case letters.
So, we will simply apply the following:
str.toLowerCase();
 As you can see, the string has been converted to a formatted string.
All the letters are now in lower-case format.
It is as simple as that.
This function is for the string.
But, this is not only restricted/limited here.
We can apply the function to an array of strings and even to an array of objects containing strings, as well.
Let us take a look:
First, we will write down the array of strings, as follows:
let arr = ["Hi", "LinuxHint", "GREAT"]
As you can see, the string has been converted to a formatted string.
All the letters are now in lower-case format.
It is as simple as that.
This function is for the string.
But, this is not only restricted/limited here.
We can apply the function to an array of strings and even to an array of objects containing strings, as well.
Let us take a look:
First, we will write down the array of strings, as follows:
let arr = ["Hi", "LinuxHint", "GREAT"]
 Now, to change the term “GREAT” to all lowercase letters, we will apply the following:
arr[2].toLowerCase();
where ‘2’ is the index of “GREAT”.
Now, to change the term “GREAT” to all lowercase letters, we will apply the following:
arr[2].toLowerCase();
where ‘2’ is the index of “GREAT”.
 As you can see, now, the term “GREAT” has been converted into lower-case letters.
We did something similar for two other strings: [0] for the term “Hi” and [1] for the term “LinuxHint.”
Let us now see how we can apply this function to an array of objects in which the objects contain the string, as follows:
let arr = [{"name":"John"},{"name":"BOB"},{"name":"Ivan"}]
As you can see, now, the term “GREAT” has been converted into lower-case letters.
We did something similar for two other strings: [0] for the term “Hi” and [1] for the term “LinuxHint.”
Let us now see how we can apply this function to an array of objects in which the objects contain the string, as follows:
let arr = [{"name":"John"},{"name":"BOB"},{"name":"Ivan"}]
 To convert the term “BOB” to all lower-case letters, we will change it as follows:
arr[1].name.toLowerCase();
To convert the term “BOB” to all lower-case letters, we will change it as follows:
arr[1].name.toLowerCase();
 Awesome.
As you can see, we can do a lot with Javascript’s toLowerCase() function.
Awesome.
As you can see, we can do a lot with Javascript’s toLowerCase() function.
 As you can see that the split() method has returned the array of substrings, based on the “ ” space.
Now, let’s see what happened if we provide a limit as well.
linux.split(" ", 3)
As you can see that the split() method has returned the array of substrings, based on the “ ” space.
Now, let’s see what happened if we provide a limit as well.
linux.split(" ", 3)
 As you can see that the split() function stopped splitting the string, and it would stop splitting the string when the count is equivalent to the number of substrings.
Now, let’s see if we don’t provide a separator just an empty string, and calls the split() function.
linux.split("");
As you can see that the split() function stopped splitting the string, and it would stop splitting the string when the count is equivalent to the number of substrings.
Now, let’s see if we don’t provide a separator just an empty string, and calls the split() function.
linux.split("");
 As you can see that the function has split and returned the array of each character separated.
Now, let’s see if we don’t provide both of the arguments and just calls the split() function.
linux.split();
As you can see that the function has split and returned the array of each character separated.
Now, let’s see if we don’t provide both of the arguments and just calls the split() function.
linux.split();
 Great, the split() function has returned an array with a single substring in it that is the whole string
 Alright! It worked great.
As we expect it to split.
Now, what if we want to include the separators as well in the array of the substring.
We will simply add parenthesis() around the regular expression.
linux.split(/(\ |i)/);
Alright! It worked great.
As we expect it to split.
Now, what if we want to include the separators as well in the array of the substring.
We will simply add parenthesis() around the regular expression.
linux.split(/(\ |i)/);
 Perfect, as you can see that the separators are also included in the array of substrings.
 Here you can see the problem that the first occurrence of “great” gets replaced.
But, the second one doesn’t.
So, here comes the concept of the regular expression.
We can also give the regular expression instead of the substring to the replace() method.
So let’s modify the syntax a little bit that we can give regular expression as well.
string.replace(substring|regex, newstring);
regex is a regular expression object.
The matches will be replaced by the newstring.
If we want to replace every single occurrence of the word “great” then we shall pass the regular expression with a ‘g’ flag, which is a short form for global.
Take a look below to get an idea about what exactly I mean.
linux.replace(/great/g, "awesome");
Here you can see the problem that the first occurrence of “great” gets replaced.
But, the second one doesn’t.
So, here comes the concept of the regular expression.
We can also give the regular expression instead of the substring to the replace() method.
So let’s modify the syntax a little bit that we can give regular expression as well.
string.replace(substring|regex, newstring);
regex is a regular expression object.
The matches will be replaced by the newstring.
If we want to replace every single occurrence of the word “great” then we shall pass the regular expression with a ‘g’ flag, which is a short form for global.
Take a look below to get an idea about what exactly I mean.
linux.replace(/great/g, "awesome");
 Perfect, all the occurrences of “great” are changed.
But, now we may face a problem if we try to change all the occurrences of “linuxhint” to let’s say “our website” using the same technique.
Let’s try to do that first, then we will see how can we resolve that.
linux.replace(/linuxhint/g, "our website");
Perfect, all the occurrences of “great” are changed.
But, now we may face a problem if we try to change all the occurrences of “linuxhint” to let’s say “our website” using the same technique.
Let’s try to do that first, then we will see how can we resolve that.
linux.replace(/linuxhint/g, "our website");
 As you can see that.
Although we have provided the global flag with the regular expression.
But, the first occurrence doesn’t get changed.
This is because of case-sensitivity.
So, we need to provide a case-insensitivity flag ‘i’.
We can do that by simply adding the ‘i’ flag along with the ‘g’ flag.
Like,
linux.replace(/linuxhint/gi, "our website");
As you can see that.
Although we have provided the global flag with the regular expression.
But, the first occurrence doesn’t get changed.
This is because of case-sensitivity.
So, we need to provide a case-insensitivity flag ‘i’.
We can do that by simply adding the ‘i’ flag along with the ‘g’ flag.
Like,
linux.replace(/linuxhint/gi, "our website");
 Great.
As you can see that all the occurrences of “linuxhint” are changed regardless of the case-sensitivity.
Great.
As you can see that all the occurrences of “linuxhint” are changed regardless of the case-sensitivity.
 Alright! As you can see that both of the words “great” & “linuxhint” are converted into the uppercase letters, successfully.
 Now, let’s try to give a float number.
parseInt("34.53"); // 34
Now, let’s try to give a float number.
parseInt("34.53"); // 34
 As you can see.
It only prints the 34.
Let’s try to put a space before or after the number.
parseInt(" 34 "); // 34
As you can see.
It only prints the 34.
Let’s try to put a space before or after the number.
parseInt(" 34 "); // 34
 It worked fine.
But, if we put any character before the number.
parseInt("the 34"); // NaN
It worked fine.
But, if we put any character before the number.
parseInt("the 34"); // NaN
 It prints NaN(Not a Number).
The same applies to the empty string.
It prints NaN(Not a Number).
The same applies to the empty string.
 Ok, since 3 and 4 are not the numbers of a binary number system.
It prints NaN.
Now if we provide it a true binary number.
It should print the decimal number against that binary number.
parseInt("10011011", 2); // 155
Ok, since 3 and 4 are not the numbers of a binary number system.
It prints NaN.
Now if we provide it a true binary number.
It should print the decimal number against that binary number.
parseInt("10011011", 2); // 155
 Here comes an interesting thing about this function.
Like, if we keep on providing the binary number 0’s and 1’s.
It will keep on converting that number into the decimal number system.
But, when we start to give a non-binary number system.
It will stop right there and won’t convert any further.
But, until we keep on giving the binary numbers.
It keeps on converting.
parseInt("100110113432", 2); //155
Here comes an interesting thing about this function.
Like, if we keep on providing the binary number 0’s and 1’s.
It will keep on converting that number into the decimal number system.
But, when we start to give a non-binary number system.
It will stop right there and won’t convert any further.
But, until we keep on giving the binary numbers.
It keeps on converting.
parseInt("100110113432", 2); //155
 Alright! We can also do the same tasks with the Octal number system and Hexadecimal number system using the parseInt() function.
 If we talk about string.
Javascript has some built-in functions for manipulating string.
One of them is substring() a function that serves our purpose.
If we want to extract some specific parts from a string.
We can use substring() function.
If we talk about string.
Javascript has some built-in functions for manipulating string.
One of them is substring() a function that serves our purpose.
If we want to extract some specific parts from a string.
We can use substring() function.
 Now, if you notice that it doesn’t include the 5th index element.
But, it picked the 0th index element.
Which implies that startIndex gets included.
While endIndex doesn’t get included.
Now, if you notice that it doesn’t include the 5th index element.
But, it picked the 0th index element.
Which implies that startIndex gets included.
While endIndex doesn’t get included.
 So, now if we want to pick the “hint” from “linuxhint”.
Although there are only “0” to “8” indexes.
But, we will give “9” as a value to the endIndex.
name.substring(5, 9); // “hint”
So, now if we want to pick the “hint” from “linuxhint”.
Although there are only “0” to “8” indexes.
But, we will give “9” as a value to the endIndex.
name.substring(5, 9); // “hint”
 We can give it only one value as well.
name.substring(5); // “hint”
We can give it only one value as well.
name.substring(5); // “hint”
 It will start from that index and continues until the end of the string.
Alright! Now, we have seen the syntax and how does it work.
Let’s see some of its exceptional cases.
It will start from that index and continues until the end of the string.
Alright! Now, we have seen the syntax and how does it work.
Let’s see some of its exceptional cases.
 It has swapped both values and printed the string from the 2nd index to the 5th index.
So, if we write either name.substring(5, 2) or name.substring(2, 5).
//both will print the same output
name.substring(5, 2); // “nux”
name.substring(2, 5); // “nux”</td>
It will print out the same output.
It has swapped both values and printed the string from the 2nd index to the 5th index.
So, if we write either name.substring(5, 2) or name.substring(2, 5).
//both will print the same output
name.substring(5, 2); // “nux”
name.substring(2, 5); // “nux”</td>
It will print out the same output.
 If we give a negative value to the endIndex.
The function will swap the values.
Because negative value will be converted to “0” and “0” will be the lowest value.
name.substring(5, -2); // “linux”
If we give a negative value to the endIndex.
The function will swap the values.
Because negative value will be converted to “0” and “0” will be the lowest value.
name.substring(5, -2); // “linux”
 And, if we give a negative value to both of the indexes.
The function will print an “” empty string.
name.substring(-5, -2); // “”
And, if we give a negative value to both of the indexes.
The function will print an “” empty string.
name.substring(-5, -2); // “”

 Or we can give it a string.length – [value], like
name.substring(5, name.length - 1); // “hin”
Or we can give it a string.length – [value], like
name.substring(5, name.length - 1); // “hin”


 Now, open any browser and go to the following URL to send a connection request.
http://localhost:5000
The following output will appear as a response after executing the query.
Now, open any browser and go to the following URL to send a connection request.
http://localhost:5000
The following output will appear as a response after executing the query.
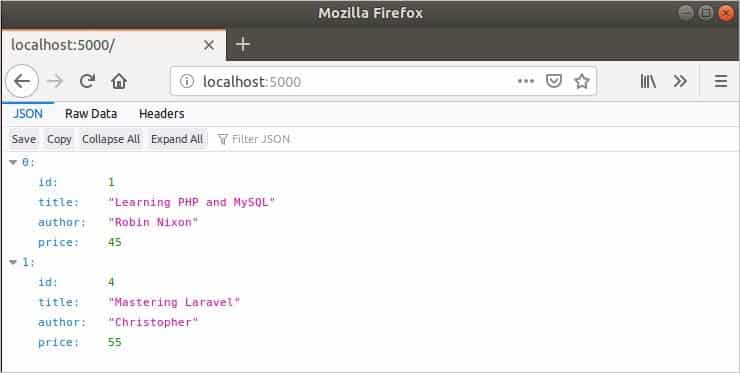 If you open the terminal now then you will see the following output.
 Ten connection requests can be sent at a time from 10 browsers in the way mentioned above.
 This command adds nvm to your path profile and extracts all the nvm data in the directory
 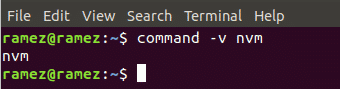 If you see nvm as the output, then it has been successfully installed.
Now we’ll be installing NodeJS and npm which is basically an ecosystem of NodeJS libraries.
To do this, simply run the following command that will install the most recent version of NodeJS:
$ nvm install node
You can also install any specific version of NodeJS that you want to install.
For this tutorial, we’ll be installing the version 12 of NodeJS.
$ nvm install v12.16.1
If you see nvm as the output, then it has been successfully installed.
Now we’ll be installing NodeJS and npm which is basically an ecosystem of NodeJS libraries.
To do this, simply run the following command that will install the most recent version of NodeJS:
$ nvm install node
You can also install any specific version of NodeJS that you want to install.
For this tutorial, we’ll be installing the version 12 of NodeJS.
$ nvm install v12.16.1
 Once installed, you can check your NodeJS and npm installed versions by running the following commands:
$ node -v
$ npm -v
Once installed, you can check your NodeJS and npm installed versions by running the following commands:
$ node -v
$ npm -v

 In this method, we also have to install npm, the ecosystem of NodeJS libraries.
This can be done by inputting the following command into the terminal:
$ sudo apt install npm
Similarly, you can check your npm installed version by running the following command:
$ npm -v
In this method, we also have to install npm, the ecosystem of NodeJS libraries.
This can be done by inputting the following command into the terminal:
$ sudo apt install npm
Similarly, you can check your npm installed version by running the following command:
$ npm -v
 response.write('Hello World')
response.end()
Over here, response.write is used to write a response to the client.
This is how things can be printed on the browser.
In this case, this will allow us to print Hello World on the browser.
The response.end() lets the browser know that the request has ended and sends the response to the browser.
server.listen(8080)
console.log ("Server Running")
The server.listen function is used here by our server to listen to the client on port number 8080.
It is important to note that any port that is available can be used here.
The last line console.log is used to print anything on the terminal.
In this case, we are printing Server Running so that we know the server has started.
response.write('Hello World')
response.end()
Over here, response.write is used to write a response to the client.
This is how things can be printed on the browser.
In this case, this will allow us to print Hello World on the browser.
The response.end() lets the browser know that the request has ended and sends the response to the browser.
server.listen(8080)
console.log ("Server Running")
The server.listen function is used here by our server to listen to the client on port number 8080.
It is important to note that any port that is available can be used here.
The last line console.log is used to print anything on the terminal.
In this case, we are printing Server Running so that we know the server has started.
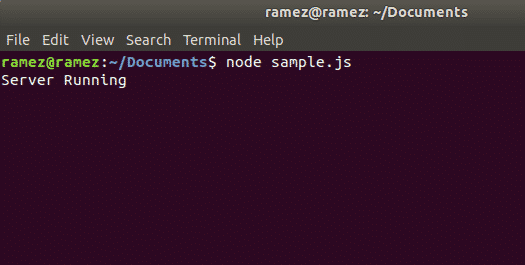 Now our server seems to be running.
Let us now check to see if our response has been sent to the client.
To do this, open your browser and enter localhost: port.
In my case, I’ll be running the command: localhost:8080.
See the image below for better understanding:
Now our server seems to be running.
Let us now check to see if our response has been sent to the client.
To do this, open your browser and enter localhost: port.
In my case, I’ll be running the command: localhost:8080.
See the image below for better understanding:
 We can clearly see our output Hello World displayed on the page.
Voila, we were successful in creating a simple NodeJS Server.
We can clearly see our output Hello World displayed on the page.
Voila, we were successful in creating a simple NodeJS Server.
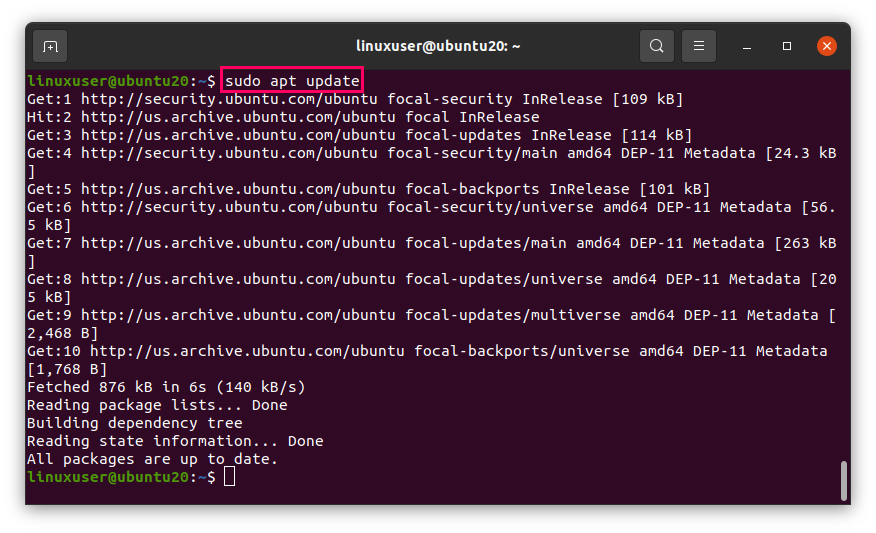 Then, install the Node.js using the simple apt install command with the sudo privileges.
$ sudo apt install nodejs -y
Then, install the Node.js using the simple apt install command with the sudo privileges.
$ sudo apt install nodejs -y
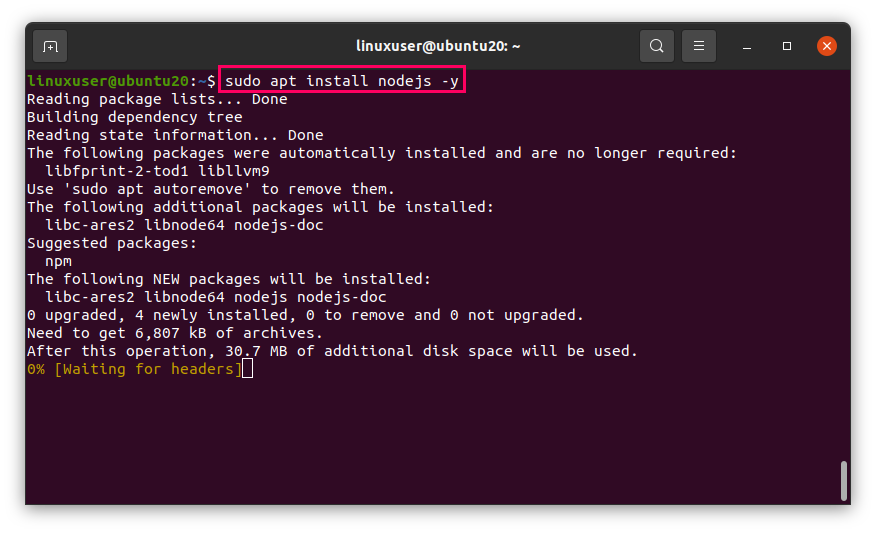 In this command, the “-y” flag is added to automatically answer “yes” if any prompt occurs.
After installing the Nodejs, if you want to install NPM as well, run the command.
$ sudo apt install npm -y
In this command, the “-y” flag is added to automatically answer “yes” if any prompt occurs.
After installing the Nodejs, if you want to install NPM as well, run the command.
$ sudo apt install npm -y
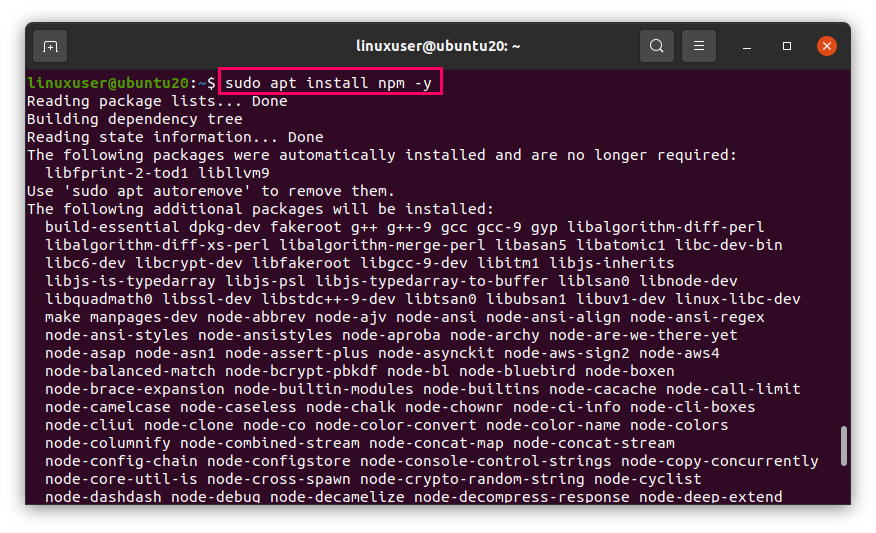 After a while, NPM will be installed as well.
The above two commands will install all the other tools required for compilation.
To verify and check the versions of the Node.js and NPM, execute the following two commands.
$ nodejs --version
After a while, NPM will be installed as well.
The above two commands will install all the other tools required for compilation.
To verify and check the versions of the Node.js and NPM, execute the following two commands.
$ nodejs --version
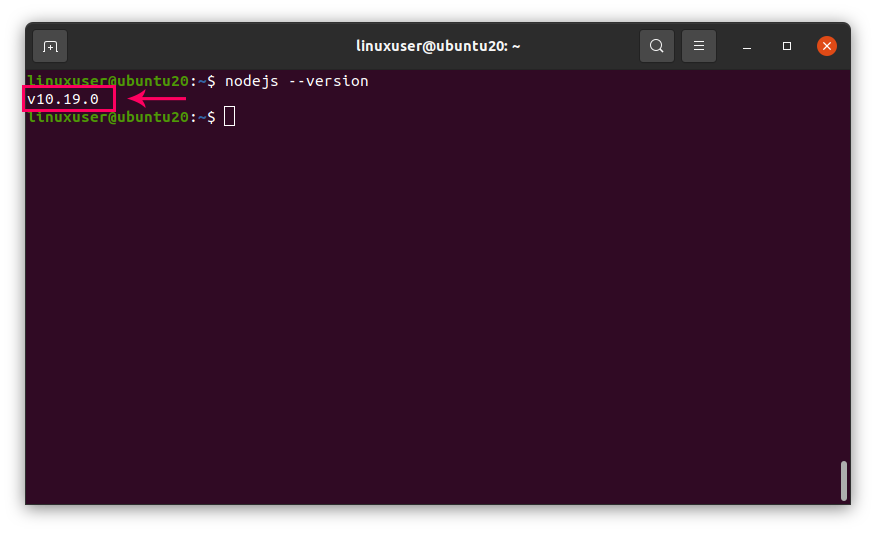 $ npm --version
 As you can see, version 10.19.0 of Node.js and version 6.14.4 of NPM is installed.
 After installing the curl, execute the following command to run Nodesource’s installation script using the curl command.
$ curl -sL https://deb.nodesource.com/setup_15.x | sudo -E bash -
After installing the curl, execute the following command to run Nodesource’s installation script using the curl command.
$ curl -sL https://deb.nodesource.com/setup_15.x | sudo -E bash -
 Once the NodeSource’s PPA is configured for Node.js on your system, now install the Node.js by typing the following command.
$ sudo apt install nodejs -y
Once the NodeSource’s PPA is configured for Node.js on your system, now install the Node.js by typing the following command.
$ sudo apt install nodejs -y
 Let’s verify the versions of Node.js and NPM by typing the commands.
$ node --version
$ npm --version
Let’s verify the versions of Node.js and NPM by typing the commands.
$ node --version
$ npm --version
 You can witness that the required versions are installed successfully.
 The CentOS 8 package repository cache should be updated.
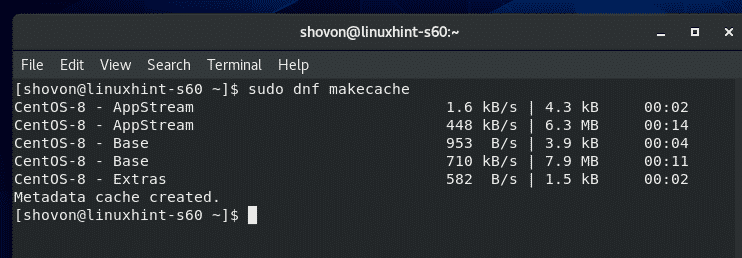 Now, to install Node.js and NPM package manager on CentOS 8 from the official package repository of CentOS 8, run the following command:
$ sudo dnf install nodejs npm
Now, to install Node.js and NPM package manager on CentOS 8 from the official package repository of CentOS 8, run the following command:
$ sudo dnf install nodejs npm
 Now, to confirm the installation, press Y and then press <Enter>.
 Node.js and NPM should be installed.
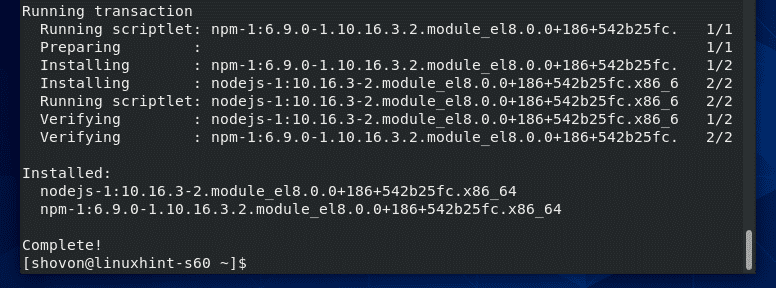 Once Node.js and NPM is installed, check whether Node.js is working correctly as follows:
$ node --version
As you can see, Node.js v10.16.3 is installed.
Once Node.js and NPM is installed, check whether Node.js is working correctly as follows:
$ node --version
As you can see, Node.js v10.16.3 is installed.
 Also, check whether NPM is working correctly as follows:
$ npm --version
As you can see, NPM v6.9.0 is installed.
Also, check whether NPM is working correctly as follows:
$ npm --version
As you can see, NPM v6.9.0 is installed.
 The same way, check whether NPX is working as follows:
$ npx --version
As you can see, NPX v6.9.0 is installed.
The same way, check whether NPX is working as follows:
$ npx --version
As you can see, NPX v6.9.0 is installed.
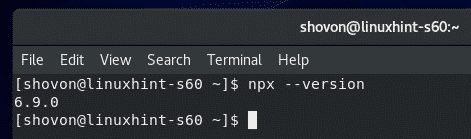
 Your browser should prompt you to save the file.
Select, Save File and click on OK.
Your browser should prompt you to save the file.
Select, Save File and click on OK.
 Your browser should start downloading the Node.js archive.
It may take a while to complete.
Your browser should start downloading the Node.js archive.
It may take a while to complete.
 If you’re using a headless version of CentOS 8, then visit the
  Now, SSH into your CentOS 8 machine and use wget to download the Node.js archive file using the link that you’ve copied earlier as follows:
$ wget https://nodejs.org/dist/v12.13.0/node-v12.13.0-linux-x64.tar.xz
Now, SSH into your CentOS 8 machine and use wget to download the Node.js archive file using the link that you’ve copied earlier as follows:
$ wget https://nodejs.org/dist/v12.13.0/node-v12.13.0-linux-x64.tar.xz
 Once Node.js archive file is downloaded, navigate to the directory where the archive file is downloaded (usually ~/Downloads) as follows:
$ cd ~/Downloads
Once Node.js archive file is downloaded, navigate to the directory where the archive file is downloaded (usually ~/Downloads) as follows:
$ cd ~/Downloads
 The Node.js archive file should be there.
$ ls -lh
The Node.js archive file should be there.
$ ls -lh
 Now, you have to extract the Node.js archive file.
I will extract it in the /opt directory.
If you want, you can extract it to some other directory.
Just replace /opt with the directory path where you want to extract the Node.js archive file.
To extract the Node.js archive file in the /opt directory, run the following command:
$ sudo tar xvJf node-v12.13.0-linux-x64.tar.xz -C /opt
Now, you have to extract the Node.js archive file.
I will extract it in the /opt directory.
If you want, you can extract it to some other directory.
Just replace /opt with the directory path where you want to extract the Node.js archive file.
To extract the Node.js archive file in the /opt directory, run the following command:
$ sudo tar xvJf node-v12.13.0-linux-x64.tar.xz -C /opt
 Node.js archive file should be extracted in the /opt directory.
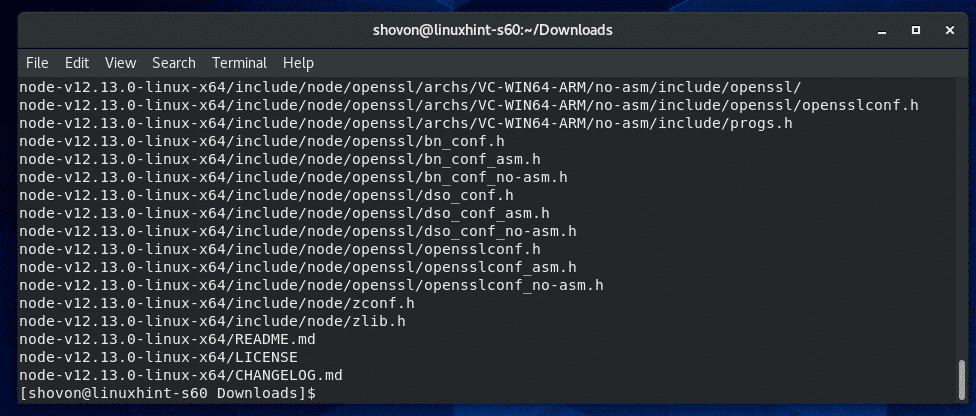 Once the Node.js archive file is extracted, a new directory (node-v12.13.0-linux-x64 in my case) should be created in the directory where you extracted it.
$ ls /opt
Once the Node.js archive file is extracted, a new directory (node-v12.13.0-linux-x64 in my case) should be created in the directory where you extracted it.
$ ls /opt
 Now, you have to add the path of Node.js to the PATH environment variable in order to access Node.js, NPM and NPX binaries easily.
You can create a shell script in the /etc/profile.d/ directory which will automatically update the PATH environment variable every time your CentOS 8 machine boots.
To create a new shell script /etc/profile.d/node-v12.sh, run the following command:
$ sudo vi /etc/profile.d/node-v12.sh
Now, you have to add the path of Node.js to the PATH environment variable in order to access Node.js, NPM and NPX binaries easily.
You can create a shell script in the /etc/profile.d/ directory which will automatically update the PATH environment variable every time your CentOS 8 machine boots.
To create a new shell script /etc/profile.d/node-v12.sh, run the following command:
$ sudo vi /etc/profile.d/node-v12.sh
 Now, press I to switch to the Vi INSERT mode and type in the following lines of codes in the node-v12.sh file.
export NODE_VERSION=v12.13.0export NODE_DISTRO=linux-x64export NODE_HOME="/opt/node-${NODE_VERSION}-${NODE_DISTRO}"export PATH="$PATH:${NODE_HOME}/bin"
NOTE: By the time you read this article, new versions of Node.js may be released.
So, make sure to change NODE_VERSION from v12.13.0 to the version of Node.js you’re trying to install.
If you’re extracting the Node.js archive file to some other directory than /opt, then change /opt to the directory you’re extracting the Node.js archive file.
The final shell script file should look as follows.
To save the file node-v12.sh, press <Esc> to switch to Vi COMMAND mode, type in :wq! and then press <Enter>.
Now, press I to switch to the Vi INSERT mode and type in the following lines of codes in the node-v12.sh file.
export NODE_VERSION=v12.13.0export NODE_DISTRO=linux-x64export NODE_HOME="/opt/node-${NODE_VERSION}-${NODE_DISTRO}"export PATH="$PATH:${NODE_HOME}/bin"
NOTE: By the time you read this article, new versions of Node.js may be released.
So, make sure to change NODE_VERSION from v12.13.0 to the version of Node.js you’re trying to install.
If you’re extracting the Node.js archive file to some other directory than /opt, then change /opt to the directory you’re extracting the Node.js archive file.
The final shell script file should look as follows.
To save the file node-v12.sh, press <Esc> to switch to Vi COMMAND mode, type in :wq! and then press <Enter>.
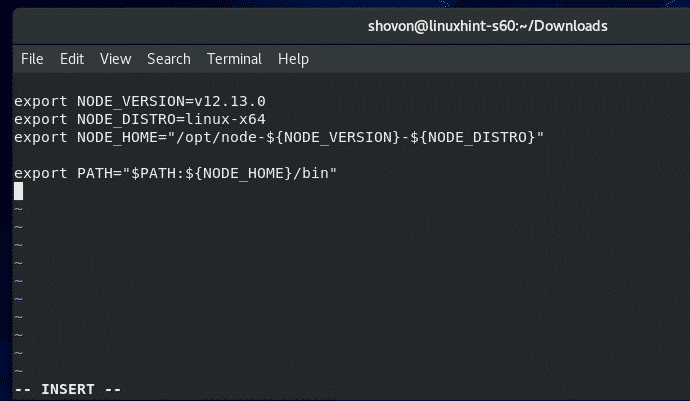 Now, reboot your CentOS 8 machine with the following command:
$ sudo reboot
Now, reboot your CentOS 8 machine with the following command:
$ sudo reboot
 Once your CentOS 8 machine boots, verify whether the shell script set all the Node.js environment variables correctly with the following command:
$ env | grep NODE
As you can see, the Node.js environment variables are correctly set.
Once your CentOS 8 machine boots, verify whether the shell script set all the Node.js environment variables correctly with the following command:
$ env | grep NODE
As you can see, the Node.js environment variables are correctly set.
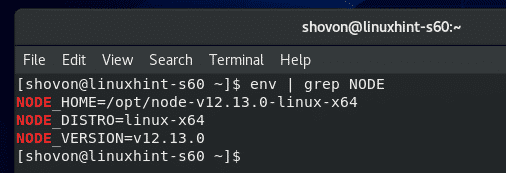 Now, check whether the PATH environment variable is updated correctly with the following command:
$ echo $PATH
As you can see, the Node.js binary path is in the PATH environment variable.
Great!
Now, check whether the PATH environment variable is updated correctly with the following command:
$ echo $PATH
As you can see, the Node.js binary path is in the PATH environment variable.
Great!
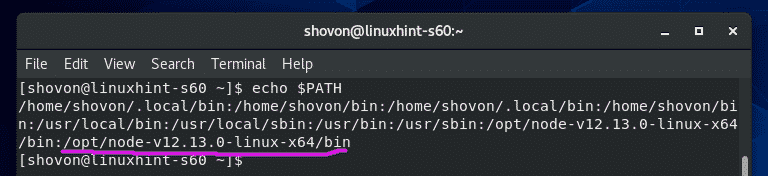 Now, check whether Node.js is working correctly with the following command:
$ node --version
As you can see, the version of Node.js installed is v12.13.0.
So, it’s working
Now, check whether Node.js is working correctly with the following command:
$ node --version
As you can see, the version of Node.js installed is v12.13.0.
So, it’s working
 Also, check whether NPM is working correctly with the following command:
$ npm --version
As you can see, the version of NPM installed is 6.12.0.
It’s working as well.
Also, check whether NPM is working correctly with the following command:
$ npm --version
As you can see, the version of NPM installed is 6.12.0.
It’s working as well.
 Lastly, check whether NPX is working correctly with the following command:
$ npx --version
As you can see, the version of NPX installed is 6.12.0.
It’s also working.
Lastly, check whether NPX is working correctly with the following command:
$ npx --version
As you can see, the version of NPX installed is 6.12.0.
It’s also working.
 So, that’s how you install Node.js on CentOS 8.
Thanks for reading this article.
So, that’s how you install Node.js on CentOS 8.
Thanks for reading this article.
 The APT package repository cache should be updated.
 Now, install Node.js from the official Debian 10 package repository with the following command:
$ sudo apt install nodejs
Now, install Node.js from the official Debian 10 package repository with the following command:
$ sudo apt install nodejs
 Now, to confirm the installation, press Y and then press <Enter>.
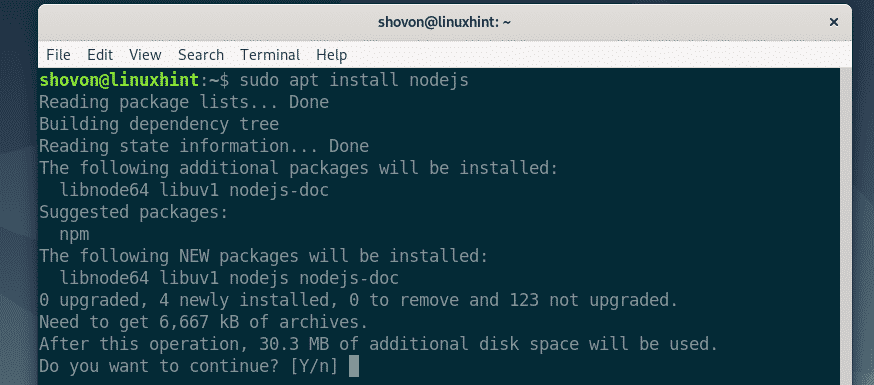 The APT package manager will download and install all the required packages.
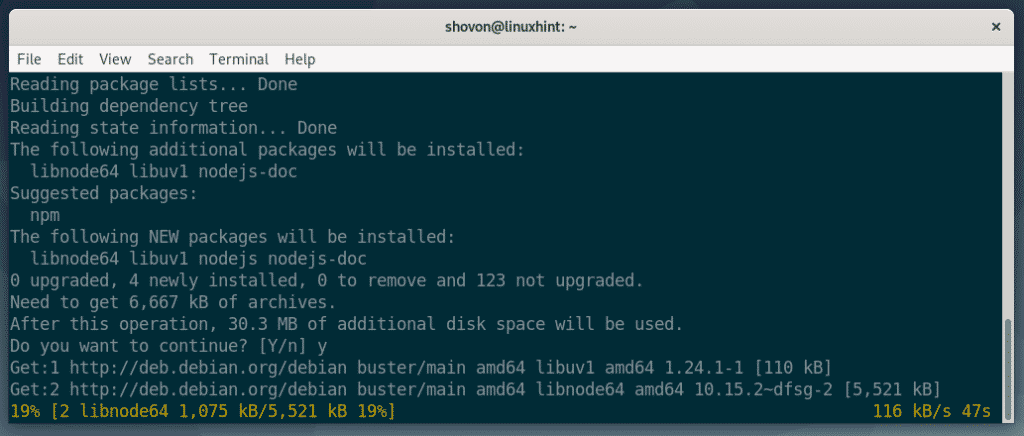 Node.js 10.x should be installed.
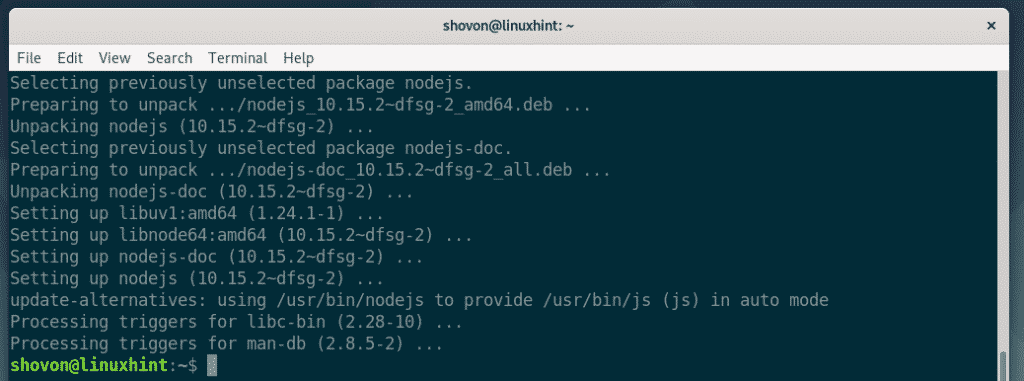 As you can see, the Node.js version installed from the official package repository is v10.15.2.
$ node --version
As you can see, the Node.js version installed from the official package repository is v10.15.2.
$ node --version
 Node.js has its own package repository to help you out in your work.
Luckily, Debian 10 packages a lot of common and stable Node.js packages.
You can easily download them from the official package repository of Debian 10.
The Node.js Debian 10 package names start with node-*
For example, I searched for express.js Node.js package on the official Debian 10 package repository.
As you can see, the package exists.
The express-generator package exists as well.
The package names are node-express and node-express-generator in Debian 10.
You can easily use the APT package manager to install these packages and use them in Node.js 10.
Node.js has its own package repository to help you out in your work.
Luckily, Debian 10 packages a lot of common and stable Node.js packages.
You can easily download them from the official package repository of Debian 10.
The Node.js Debian 10 package names start with node-*
For example, I searched for express.js Node.js package on the official Debian 10 package repository.
As you can see, the package exists.
The express-generator package exists as well.
The package names are node-express and node-express-generator in Debian 10.
You can easily use the APT package manager to install these packages and use them in Node.js 10.
 I also searched for the Node.js package bluebird.
It exists as well.
I also searched for the Node.js package bluebird.
It exists as well.
 If you rather want to install Node.js packages using NPM, then you have to install NPM from the official package repository of Debian 10 with the following command:
$ sudo apt install npm
If you rather want to install Node.js packages using NPM, then you have to install NPM from the official package repository of Debian 10 with the following command:
$ sudo apt install npm
 Now, confirm the installation by press Y followed by <Enter>.
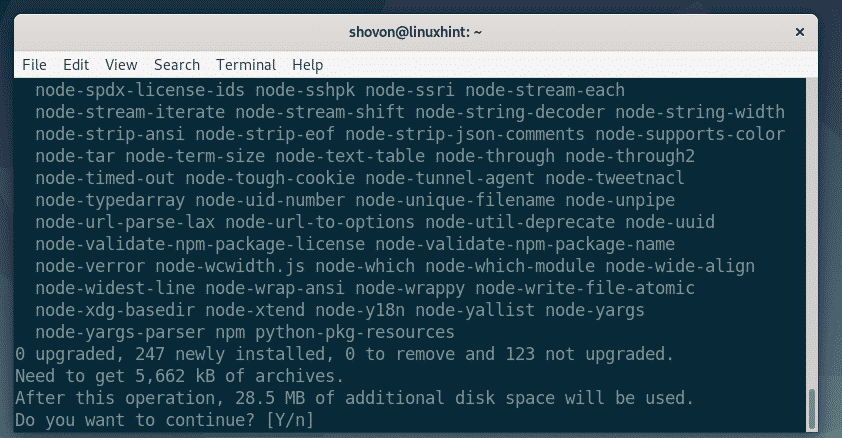 The APT package manager will download and install all the required packages.
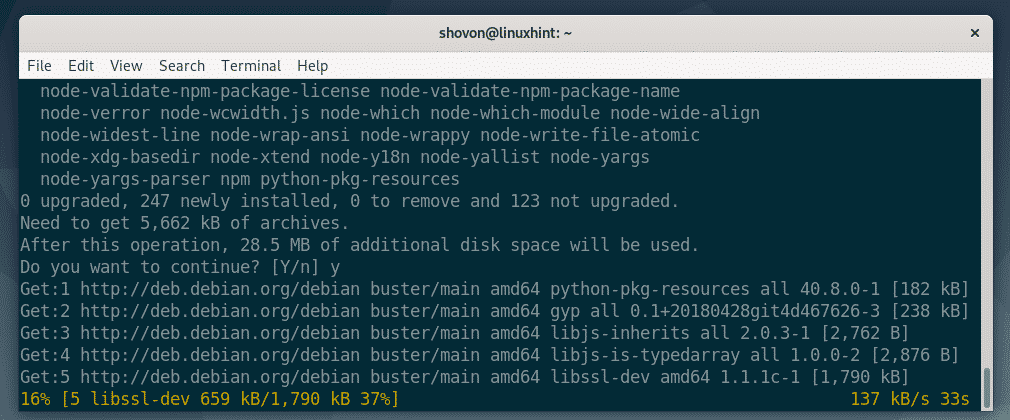 At this point, NPM should be installed.
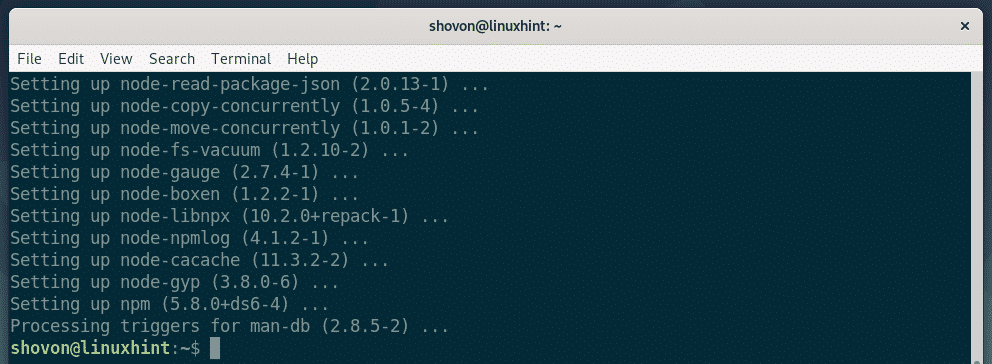 As you can see, the NPM version installed from the Debian 10 package repository is 5.8.0.
 The Node.js packages that are in the Debian 10 package repository are very stable and well tested.
You can use them if you want.
The Node.js packages that are in the Debian 10 package repository are very stable and well tested.
You can use them if you want.
 The APT package repository should be updated.
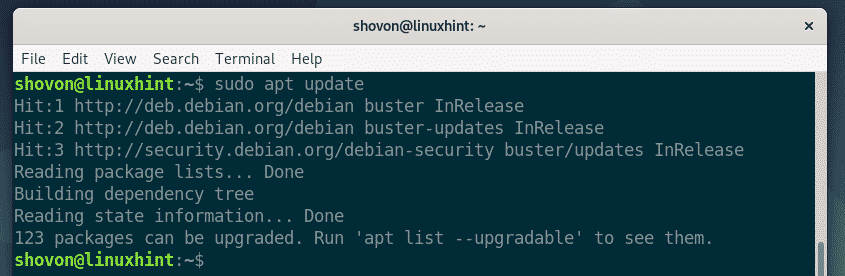 Now, install the dependency packages build-essential and curl with the following command:
$ sudo apt install build-essential curl
Now, install the dependency packages build-essential and curl with the following command:
$ sudo apt install build-essential curl
 Now, press Y and then press <Enter> to confirm the installation.
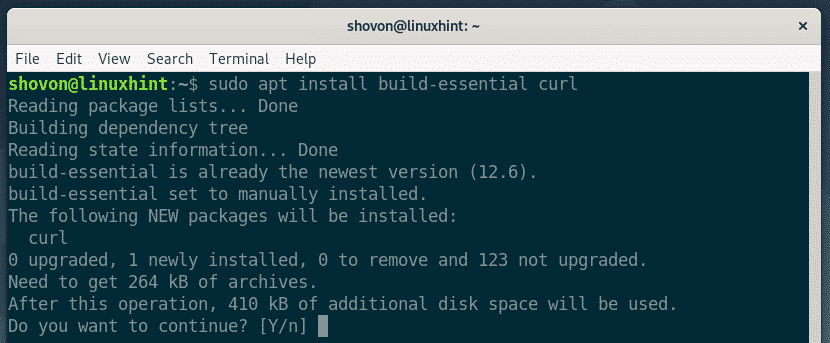 The dependency packages should be installed.
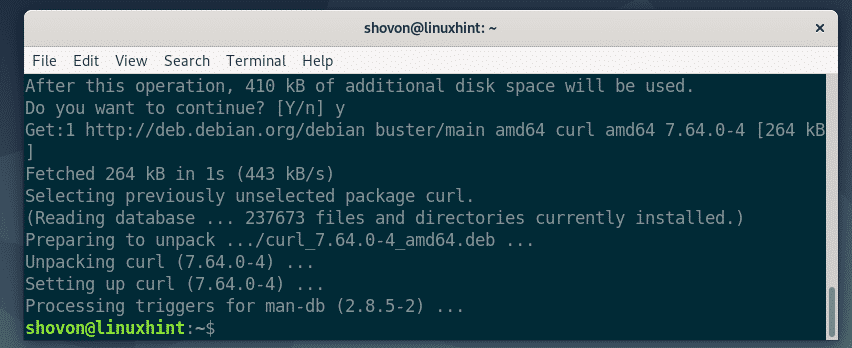 Now, add the official Node.js 12.x package repository with the following command:
$ curl -sL https://deb.nodesource.com/setup_12.x</a> | sudo bash -
Now, add the official Node.js 12.x package repository with the following command:
$ curl -sL https://deb.nodesource.com/setup_12.x</a> | sudo bash -
 The Node.js 12.x package repository should be added and the APT package repository cache should be updated.
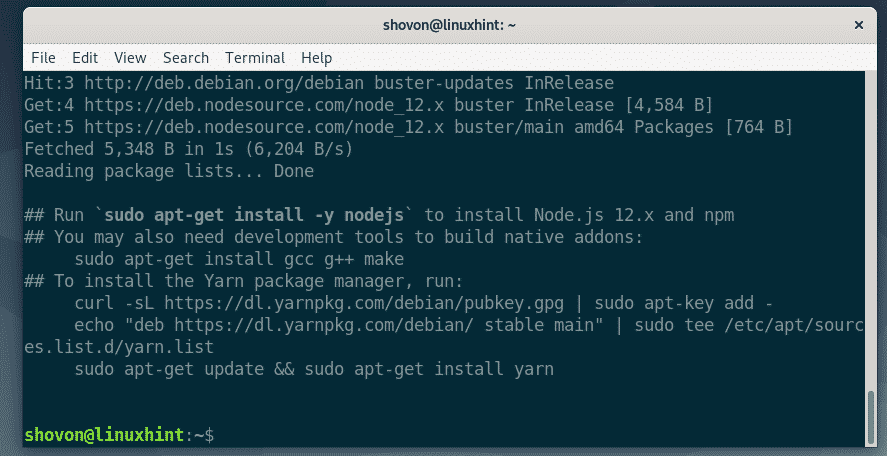 Now, install Node.js 12.x with the following command:
$ sudo apt install nodejs
Now, install Node.js 12.x with the following command:
$ sudo apt install nodejs
 The APT package manager should download and install all the required packages.
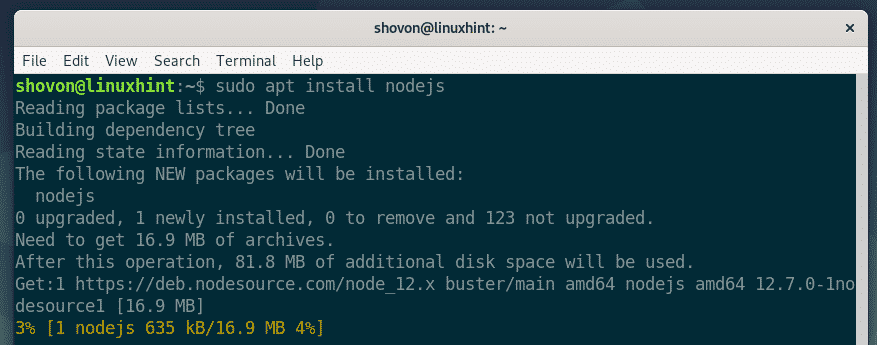 Node.js 12.x should be installed.
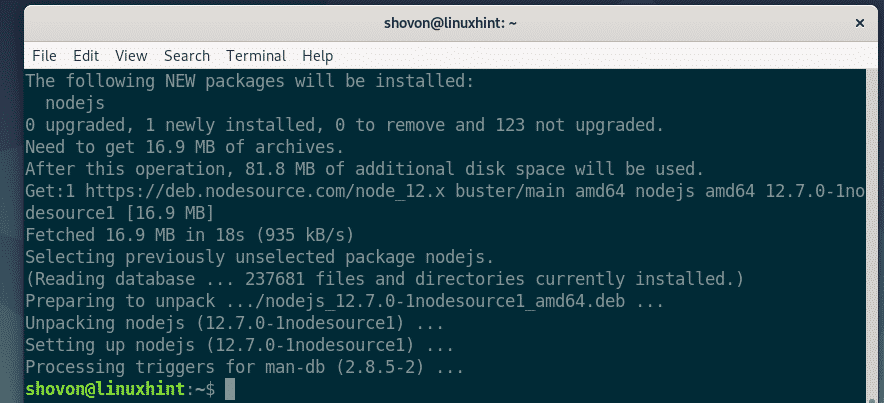 As you can see, I am running Node.js 12.7.0.
$ node --version
As you can see, I am running Node.js 12.7.0.
$ node --version
 Node.js installed from the official Node.js package repository installs NPM by default.
As you can see, I am running NPM 6.10.0.
Node.js installed from the official Node.js package repository installs NPM by default.
As you can see, I am running NPM 6.10.0.

 Now, navigate to the project directory ~/hello-node as follows:
$ cd ~/hello-node
Now, create a new file welcome.js in the project directory ~/hello-node and type in the following lines of code in the welcome.js file.
let http = require('http');
const PORT = 8080;
let server = http.createServer((req, res, next) => {
res.writeHead(200, {'Content-Type': 'text/html'});
res.end('<h1>Welcome to LinuxHint!</h1>');});
server.listen(PORT, () => {
console.log("Visit http://localhost:" + PORT + " from your web browser.");});
The final welcome.js program looks as follows:
Now, navigate to the project directory ~/hello-node as follows:
$ cd ~/hello-node
Now, create a new file welcome.js in the project directory ~/hello-node and type in the following lines of code in the welcome.js file.
let http = require('http');
const PORT = 8080;
let server = http.createServer((req, res, next) => {
res.writeHead(200, {'Content-Type': 'text/html'});
res.end('<h1>Welcome to LinuxHint!</h1>');});
server.listen(PORT, () => {
console.log("Visit http://localhost:" + PORT + " from your web browser.");});
The final welcome.js program looks as follows:
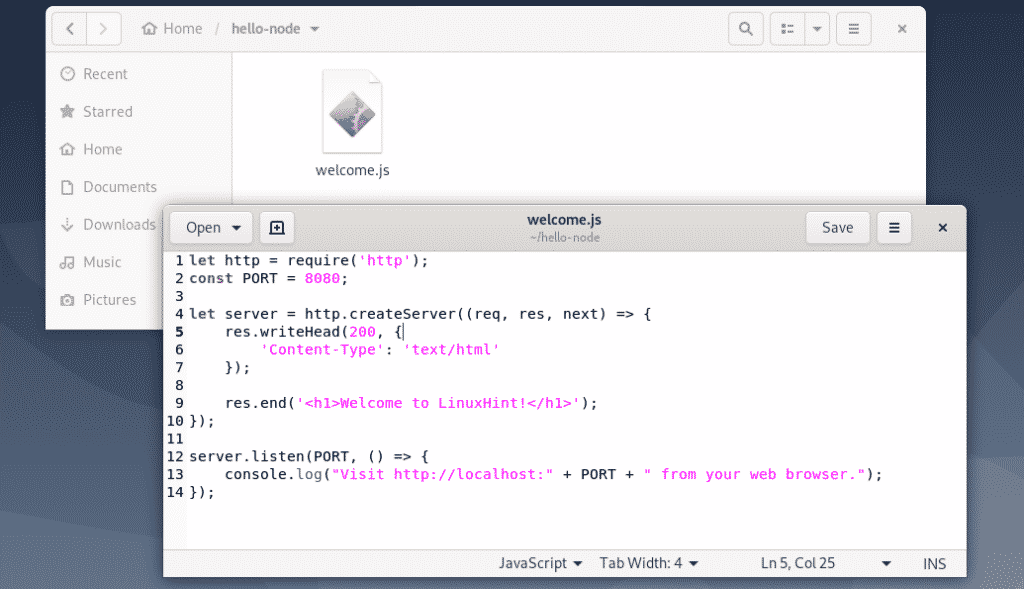 Now, to run the Node.js program welcome.js, run the following command:
$ node welcome.js
Now, to run the Node.js program welcome.js, run the following command:
$ node welcome.js
 As you can see, the welcome.js program is running.
 Now, visit http://localhost:8080 from your web browser and you should see a welcome message as shown in the screenshot below.
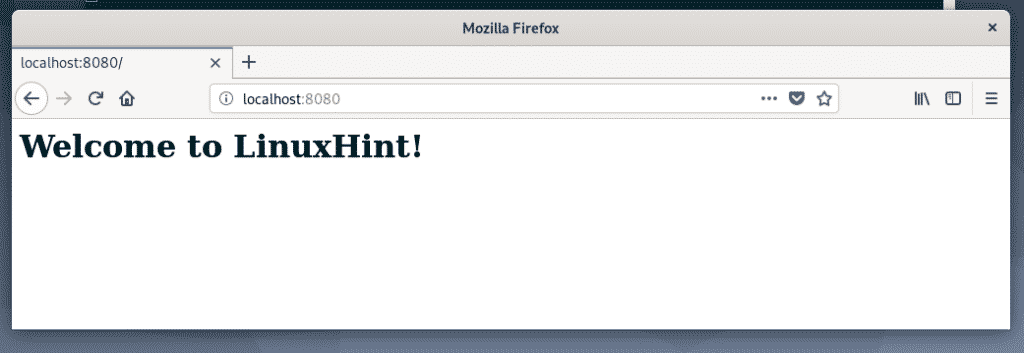 So, that’s how you install Node.js on Debian 10 and run your first Node.js program.
Thanks for reading this article.
So, that’s how you install Node.js on Debian 10 and run your first Node.js program.
Thanks for reading this article.
 Now, I am going to clone my shovon8/angular-hero-api GitHub repository as follows:
$ git clone https://github.com/shovon8/angular-hero-api
Now, I am going to clone my shovon8/angular-hero-api GitHub repository as follows:
$ git clone https://github.com/shovon8/angular-hero-api
 The project files will be in the angular-hero-api/ directory as you can see in the screenshot below.
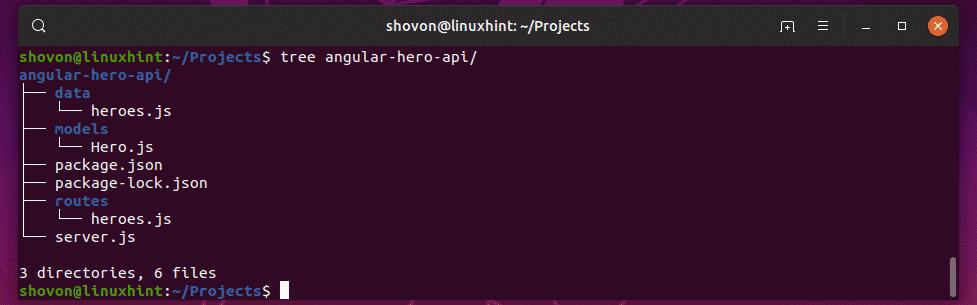
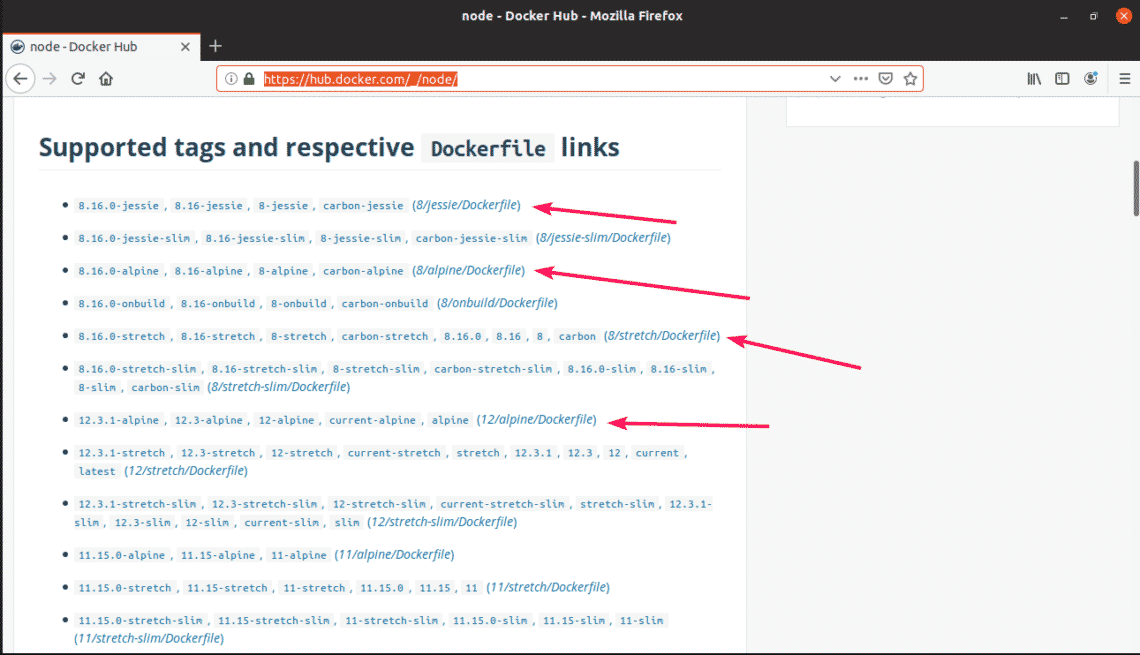 Usually, you don’t have to know much to use a Node.js Docker image.
If you want to use Node.js version 12, then all you have to do is write node:12 when you make a container.
For Node.js 10, it is node:10.
For Node.js 8, it is node:8.
It’s that simple.
Usually, you don’t have to know much to use a Node.js Docker image.
If you want to use Node.js version 12, then all you have to do is write node:12 when you make a container.
For Node.js 10, it is node:10.
For Node.js 8, it is node:8.
It’s that simple.
 Now, create a source file with the following command:
$ nano source
Now, create a source file with the following command:
$ nano source
 Now, type in the following lines in the source file.
alias node12='docker run -it --rm --name hero-api -p 4242:4242 -v
"$PWD:/usr/src/app" -w /usr/src/app node:12'alias node10='docker run -it --rm --name hero-api -p 4242:4242 -v
"$PWD:/usr/src/app" -w /usr/src/app node:10'alias node8='docker run -it --rm --name hero-api -p 4242:4242 -v
"$PWD:/usr/src/app" -w /usr/src/app node:8'
Here, -it means, run the container in interactive mode.
–rm means remove the container automatically when it’s no longer needed.
–name hero-api defines a name for the container.
-p 4242:4242 means the container port 4242 is forwarded to the destination port (on your computer) 4242.
The format of this option is -p destination:source.
Remember, the first port before the colon (:) is the destination port.
If you want to access your application on some other port than 4242 on your computer, then you have to change the destination port.
If your applications run on some other port than 4242.
Then you have to change the source port.
NOTE: As I will only be using one of the containers at any one time, the name and destination port can be the same.
If you wish to run or test your Node.js application on multiple Node.js version at the same time, then make sure the name and destination port is different for each of the containers in the source file.
Once you’re done, save the file by pressing <Ctrl> + x followed by y and <Enter>.
Now, type in the following lines in the source file.
alias node12='docker run -it --rm --name hero-api -p 4242:4242 -v
"$PWD:/usr/src/app" -w /usr/src/app node:12'alias node10='docker run -it --rm --name hero-api -p 4242:4242 -v
"$PWD:/usr/src/app" -w /usr/src/app node:10'alias node8='docker run -it --rm --name hero-api -p 4242:4242 -v
"$PWD:/usr/src/app" -w /usr/src/app node:8'
Here, -it means, run the container in interactive mode.
–rm means remove the container automatically when it’s no longer needed.
–name hero-api defines a name for the container.
-p 4242:4242 means the container port 4242 is forwarded to the destination port (on your computer) 4242.
The format of this option is -p destination:source.
Remember, the first port before the colon (:) is the destination port.
If you want to access your application on some other port than 4242 on your computer, then you have to change the destination port.
If your applications run on some other port than 4242.
Then you have to change the source port.
NOTE: As I will only be using one of the containers at any one time, the name and destination port can be the same.
If you wish to run or test your Node.js application on multiple Node.js version at the same time, then make sure the name and destination port is different for each of the containers in the source file.
Once you’re done, save the file by pressing <Ctrl> + x followed by y and <Enter>.
 Now, enable the aliases with the following command:
$ source source
Now, enable the aliases with the following command:
$ source source
 Now, you can run any version of node runtime whenever you need with node12, node10, node8 commands as you can see in the screenshot below.
 The node modules are installed as you can see in the screenshot below.
 Now, run the Node.js API app as follows:
$ node12 npm run test
Now, run the Node.js API app as follows:
$ node12 npm run test
 As you can see, the API server is running on port 4242 on the container.
I also forwarded the port to 4242 on my computer.
So, I should be able to access it on port 4242.
As you can see, the API server is running on port 4242 on the container.
I also forwarded the port to 4242 on my computer.
So, I should be able to access it on port 4242.
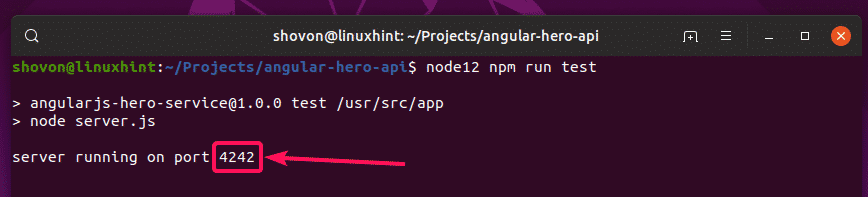 Yes, I can access it.
It’s working as expected.
Yes, I can access it.
It’s working as expected.
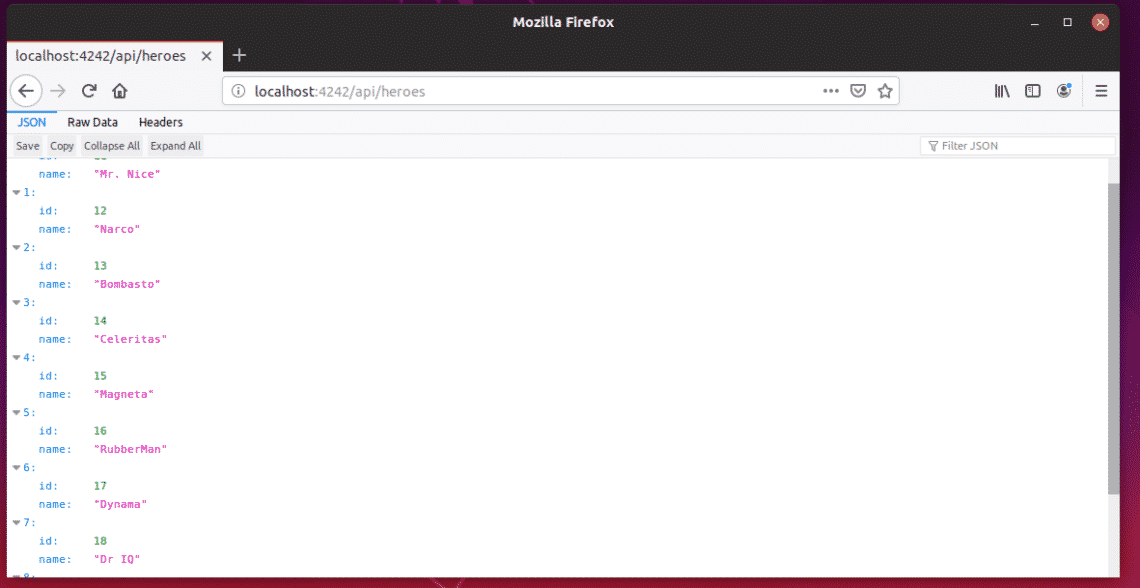 Now, stop the container by pressing <Ctrl> + c.
Let’s try to run the API app with Node.js version 10.
$ node10 npm run test
As you can see, it’s running.
Now, stop the container by pressing <Ctrl> + c.
Let’s try to run the API app with Node.js version 10.
$ node10 npm run test
As you can see, it’s running.
 It works for Node.js 10 as well.
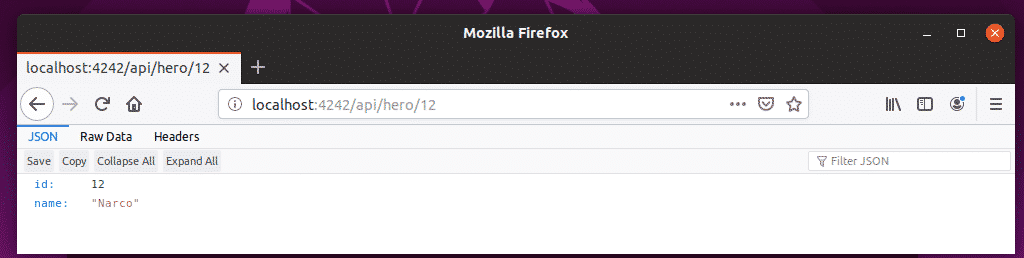 Finally, let’s try for Node.js version 8.
$ node8 npm run test
The API app is running on Node.js 8 runtime as well.
Finally, let’s try for Node.js version 8.
$ node8 npm run test
The API app is running on Node.js 8 runtime as well.
 Perfect! It works correctly.
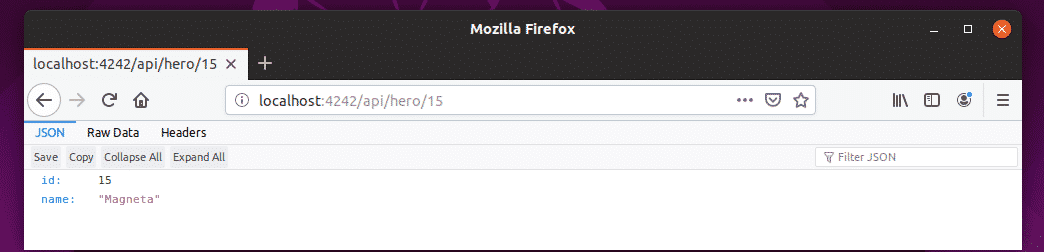 So, that’s how you set up Node.js development environment using Docker.
Thanks for reading this article.
So, that’s how you set up Node.js development environment using Docker.
Thanks for reading this article.
 If redis service is not running in your case, start it with the following command:
$ sudo systemctl start redis
If redis service is not running in your case, start it with the following command:
$ sudo systemctl start redis
 Now navigate to the project directory ~/node-redis
$ cd ~/node-redis
Now navigate to the project directory ~/node-redis
$ cd ~/node-redis
 Now create a package.json file:
$ npm init -y
Now create a package.json file:
$ npm init -y

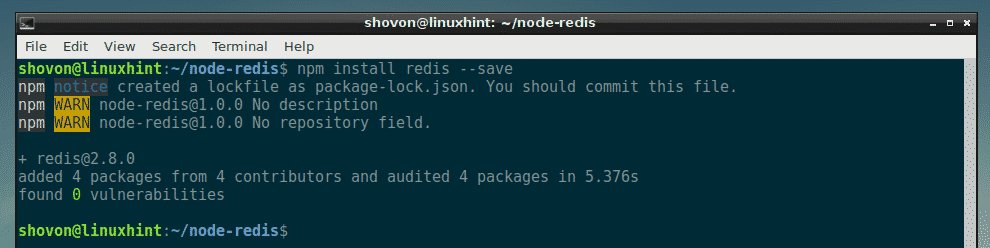
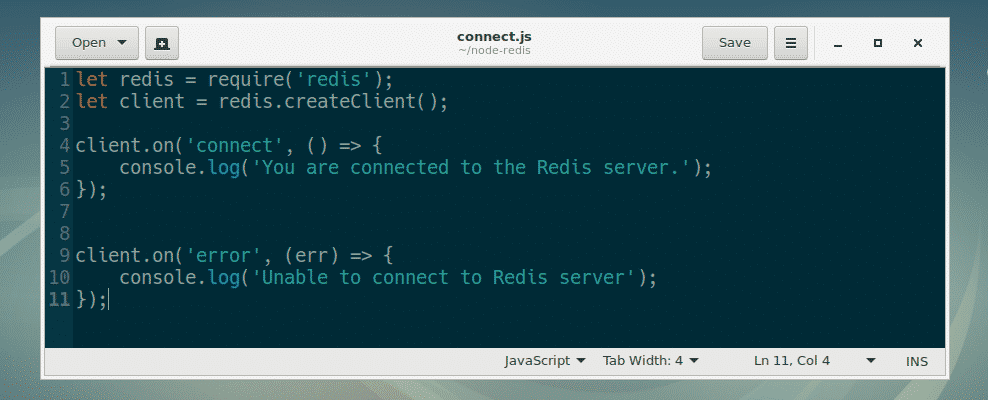 Here, line 1 imports the redis module.
Line 2 creates a Redis client.
As I am running Redis on the same computer as the Node.js programs are running, I didn’t have to specify the hostname or IP address and port where the Redis server is running.
If you’re running Redis server on a different computer or server, then you will have to specify it here.
For example, let’s say, your Redis server is running on port 6379 on a computer which has the IP address 192.168.10.87, then you would write line 2 as:
let client = redis.createClient(6379, '192.168.10.87');
Line 4-6 is used to print a message to the console if we can connect to the Redis server.
Line 9-10 is used to print a message to the console if we are unable to connect to the Redis server.
Now, run the connect.js Node.js script as follows:
$ node connect.js
As you can see, I am connected to the Redis server.
Here, line 1 imports the redis module.
Line 2 creates a Redis client.
As I am running Redis on the same computer as the Node.js programs are running, I didn’t have to specify the hostname or IP address and port where the Redis server is running.
If you’re running Redis server on a different computer or server, then you will have to specify it here.
For example, let’s say, your Redis server is running on port 6379 on a computer which has the IP address 192.168.10.87, then you would write line 2 as:
let client = redis.createClient(6379, '192.168.10.87');
Line 4-6 is used to print a message to the console if we can connect to the Redis server.
Line 9-10 is used to print a message to the console if we are unable to connect to the Redis server.
Now, run the connect.js Node.js script as follows:
$ node connect.js
As you can see, I am connected to the Redis server.

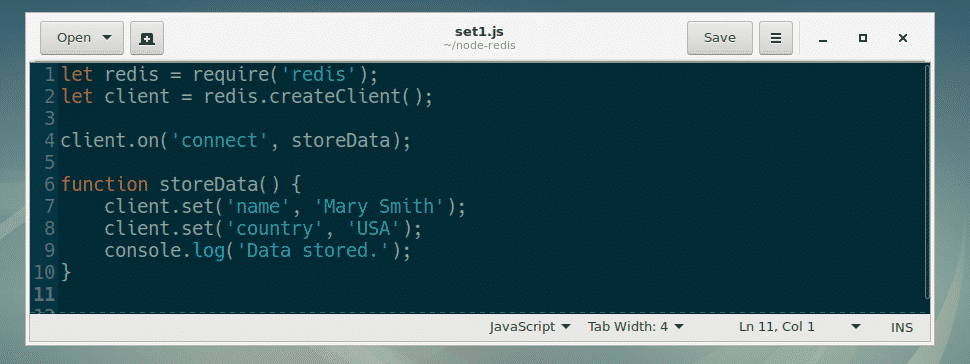 Here, line 1 and 2 are the same as in connect.js.
On line 4, I set the callback function of the connect event to storeData.
So, when our Redis client is connected to the Redis server, the function storeData is called.
On line 6-10, the callback function storeData is defined.
On line 7 and 8, I used set(key, value) method of RedisClient object to set the key name and country to value Mary Smith and USA respectively.
Now, run set1.js as follows:
$ node set1.js
As you can see, the key-value pairs are set.
Here, line 1 and 2 are the same as in connect.js.
On line 4, I set the callback function of the connect event to storeData.
So, when our Redis client is connected to the Redis server, the function storeData is called.
On line 6-10, the callback function storeData is defined.
On line 7 and 8, I used set(key, value) method of RedisClient object to set the key name and country to value Mary Smith and USA respectively.
Now, run set1.js as follows:
$ node set1.js
As you can see, the key-value pairs are set.

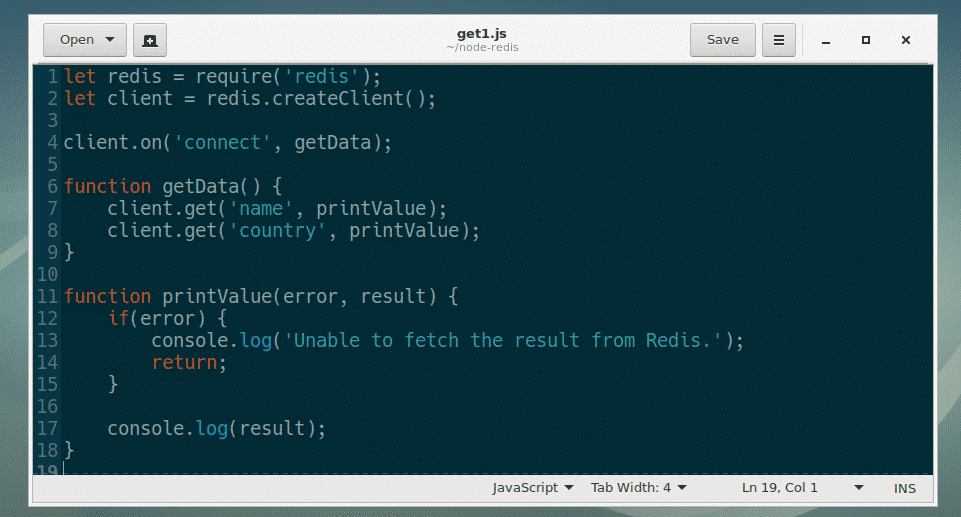 Here, on line 4, getData function is set as a callback function for the connect event of RedisClient.
On line 6-9, the getData function is defined.
On line 7, I called the get(key, callback) method of RedisClient object.
name here is the key of the value you want to retrieve.
get() method calls the printValue callback function before it finishes running.
On line 11-18, the error first style callback function printValue() is defined.
It accepts 2 arguments, error and result.
If any error occurs, then it’s printed on the console and the function exits.
If there’s no error, then the value for the certain key is printed on the console.
On line 8, the same thing happens.
Now, run get1.js as follows:
$ node get1.js
As you can see, the values for the keys name and country is retrieved from the Redis data store.
Here, on line 4, getData function is set as a callback function for the connect event of RedisClient.
On line 6-9, the getData function is defined.
On line 7, I called the get(key, callback) method of RedisClient object.
name here is the key of the value you want to retrieve.
get() method calls the printValue callback function before it finishes running.
On line 11-18, the error first style callback function printValue() is defined.
It accepts 2 arguments, error and result.
If any error occurs, then it’s printed on the console and the function exits.
If there’s no error, then the value for the certain key is printed on the console.
On line 8, the same thing happens.
Now, run get1.js as follows:
$ node get1.js
As you can see, the values for the keys name and country is retrieved from the Redis data store.

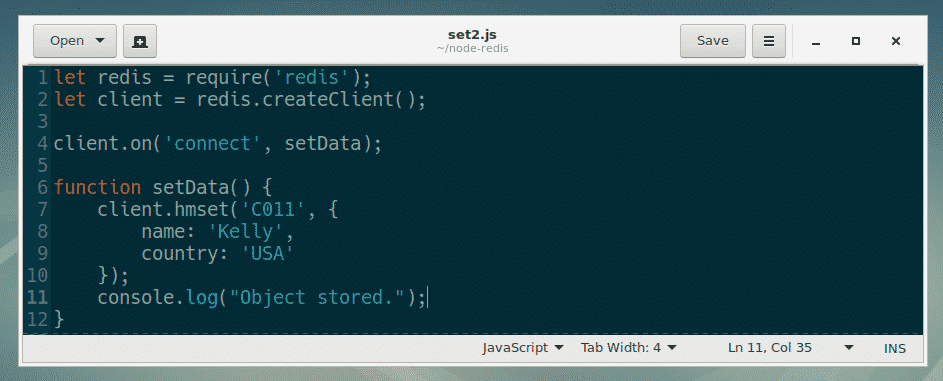 Here, everything is the same as in set1.js file that I already explained earlier.
The only difference is, I used client.hmset(key, object) method of RedisClient object in setData() callback function.
In line 7-10, I used client.hmset() method to store a JavaScript object in the Redis data store against the key C011.
Now run set2.js Node.js script as follows:
$ node set2.js
As you can see, the object is stored.
Here, everything is the same as in set1.js file that I already explained earlier.
The only difference is, I used client.hmset(key, object) method of RedisClient object in setData() callback function.
In line 7-10, I used client.hmset() method to store a JavaScript object in the Redis data store against the key C011.
Now run set2.js Node.js script as follows:
$ node set2.js
As you can see, the object is stored.

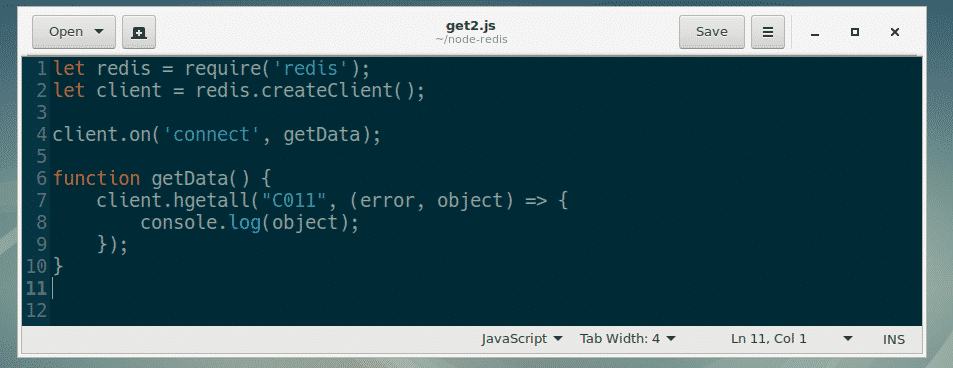 Here, everything is the same as in get1.js script I explained earlier.
You can retrieve a JavaScript object very easily with client.hgetall(key, callback) method of RedisClient as in line 7-9.
Now run get2.js Node.js script as follows:
$ node get2.js
As you can see, the JavaScript object is retrieved from the Redis data store.
Here, everything is the same as in get1.js script I explained earlier.
You can retrieve a JavaScript object very easily with client.hgetall(key, callback) method of RedisClient as in line 7-9.
Now run get2.js Node.js script as follows:
$ node get2.js
As you can see, the JavaScript object is retrieved from the Redis data store.
 I showed you how to setup Redis with Node.js in this article.
Now you should be able to read the redis Node.js module documentation at
I showed you how to setup Redis with Node.js in this article.
Now you should be able to read the redis Node.js module documentation at  Now create a package.json file with the following command:
$ npm init -y
As you can see, a basic package.json file is created.
Now create a package.json file with the following command:
$ npm init -y
As you can see, a basic package.json file is created.
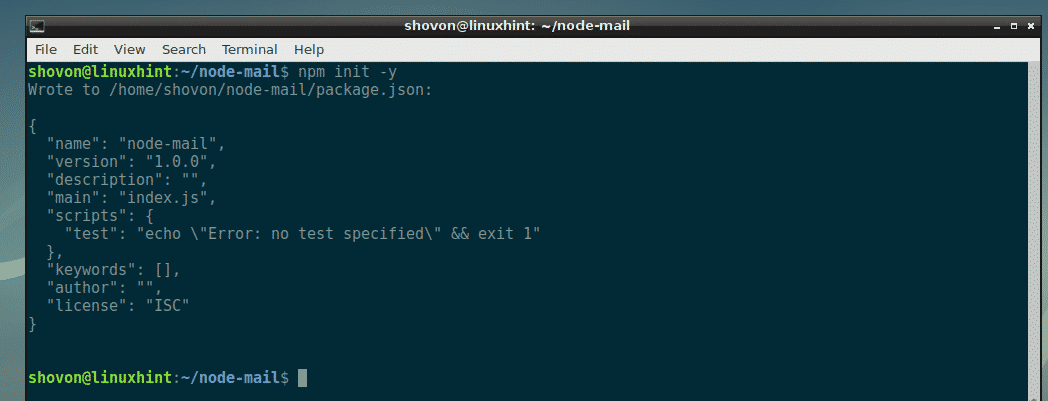
 Now, make sure NPM is installed and working correctly with the following command:
$ npm ---version
As you can see, NPM 6.4.1 is installed and working correctly in my computer.
The version on your computer may be different.
It’s alright.
Now, make sure NPM is installed and working correctly with the following command:
$ npm ---version
As you can see, NPM 6.4.1 is installed and working correctly in my computer.
The version on your computer may be different.
It’s alright.
 You need internet connectivity in order to install Nodemailer using NPM.
So make sure you’re connected to the internet.
Now, install Nodemailer Node.js module using NPM with the following command:
$ npm install nodemailer --save
You need internet connectivity in order to install Nodemailer using NPM.
So make sure you’re connected to the internet.
Now, install Nodemailer Node.js module using NPM with the following command:
$ npm install nodemailer --save
 Nodemailer is installed.
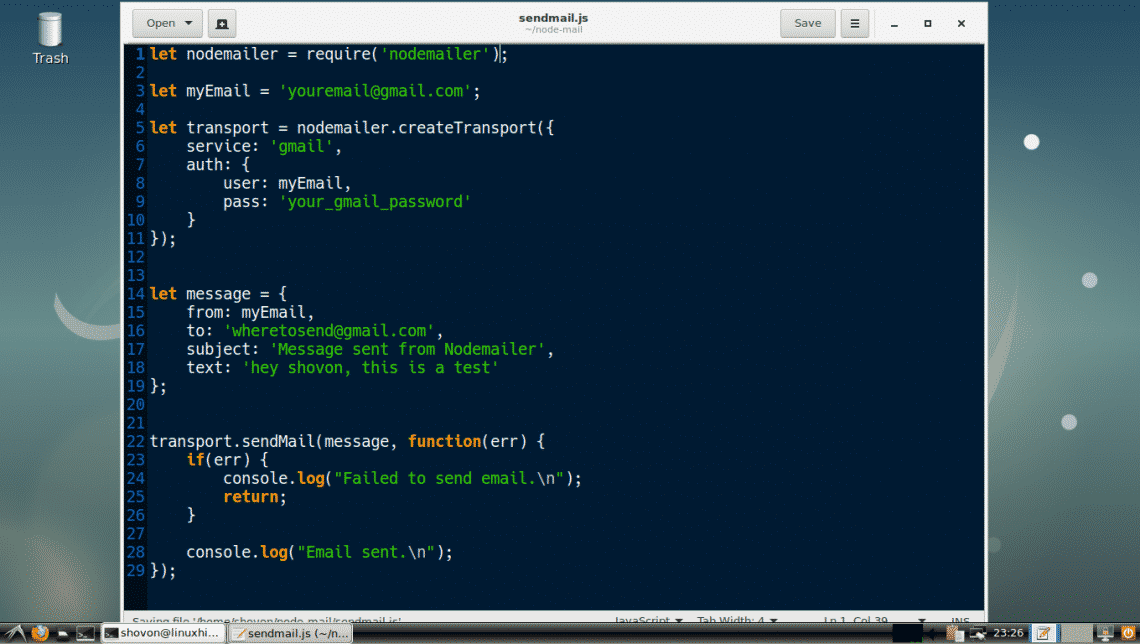 Here, on line 1, I imported Nodemailer.
On line 3, I set my email to myEmail variable.
This is the email from which I will send an email to other email accounts.
Make sure you change it to your email address.
On line 5-11, a transport object is created.
It is required to send an email using Nodemailer.
The purpose of the transport object is to verify the sender information.
You only need to do it once.
Once the sender information is verified, a transport object should be created.
On line 6, I set service to gmail as I am using a GMail account to send emails.
The supported services are DynectEmail, Gmail, hot.ee, Hotmail, iCloud, mail.ee, Mail.Ru, Mailgun, Mailjet, Mandrill, Postmark, QQ, QQex, SendGrid, SES, Yahoo, yandex, Zoho.
The service name is case insensitive.
So you can put gmail or GMAIL or Gmail there.
It’s all the same.
Make sure you set the correct service name.
NOTE: You can use your own email server as well.
To do that, you have to create a custom Nodemailer Transport object.
To learn more about it, visit the official documentation of Nodemailer at
Here, on line 1, I imported Nodemailer.
On line 3, I set my email to myEmail variable.
This is the email from which I will send an email to other email accounts.
Make sure you change it to your email address.
On line 5-11, a transport object is created.
It is required to send an email using Nodemailer.
The purpose of the transport object is to verify the sender information.
You only need to do it once.
Once the sender information is verified, a transport object should be created.
On line 6, I set service to gmail as I am using a GMail account to send emails.
The supported services are DynectEmail, Gmail, hot.ee, Hotmail, iCloud, mail.ee, Mail.Ru, Mailgun, Mailjet, Mandrill, Postmark, QQ, QQex, SendGrid, SES, Yahoo, yandex, Zoho.
The service name is case insensitive.
So you can put gmail or GMAIL or Gmail there.
It’s all the same.
Make sure you set the correct service name.
NOTE: You can use your own email server as well.
To do that, you have to create a custom Nodemailer Transport object.
To learn more about it, visit the official documentation of Nodemailer at  I checked my Gmail, and voila! I received the email just fine.

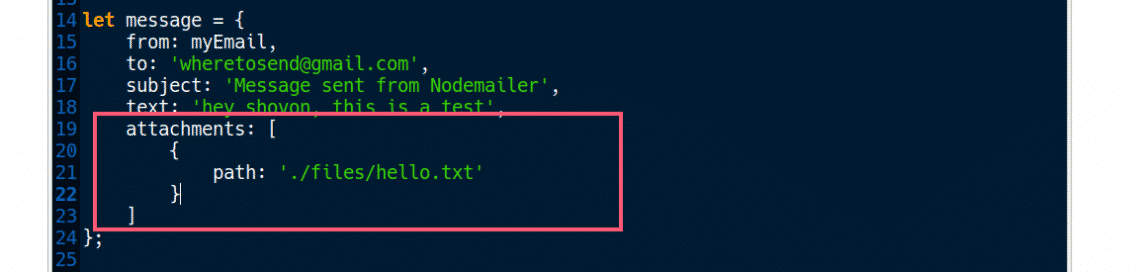 Here, attachments is an array objects.
Each object defines an attachment file.
So you can send multiple files at once.
On line 20-22, I set the relative path to a file hello.txt to the path property of the object.
Now run the sendmail.js script again.
$ node sendmail.js
As you can see, the email was sent.
Here, attachments is an array objects.
Each object defines an attachment file.
So you can send multiple files at once.
On line 20-22, I set the relative path to a file hello.txt to the path property of the object.
Now run the sendmail.js script again.
$ node sendmail.js
As you can see, the email was sent.
 As you can see, I received the message along with the attachment hello.txt.
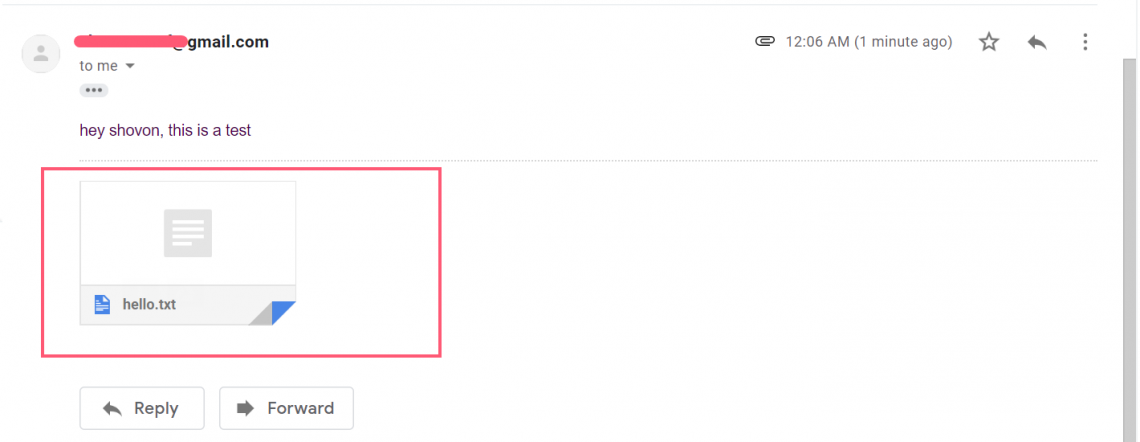 You can also set custom name to your attachment file.
For that, you have to change the attachment object as follows:
You can also set custom name to your attachment file.
For that, you have to change the attachment object as follows:
 To send multiple attachments, create multiple attachment objects as follows:
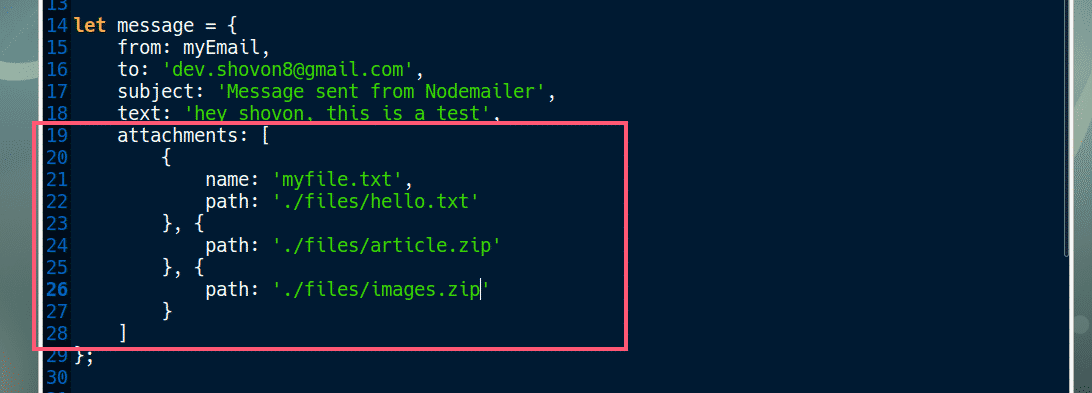 That’s how you send email with attachment using Nodemailer in Node.js.
Thanks for reading this article.
That’s how you send email with attachment using Nodemailer in Node.js.
Thanks for reading this article.
 This is a simple NodeJS program that adds 2 numbers.
You can run the NodeJS script app.js with the following command:
$ node app.js
This is a simple NodeJS program that adds 2 numbers.
You can run the NodeJS script app.js with the following command:
$ node app.js
 In the next section, I will show you how to use the NodeJS debugger.
 NOTE: On older version of NodeJS, you run node debug app.js instead to start the NodeJS debugger.
NodeJS debugger should start as you can see in the screenshot below.
NOTE: On older version of NodeJS, you run node debug app.js instead to start the NodeJS debugger.
NodeJS debugger should start as you can see in the screenshot below.
 Now you can run many commands here to debug the NodeJS script app.js.
 As you can see, all the commands and functions with short description of what they do are listed.
When you are having a hard time remembering what commands or functions to run, this is a good place to get some help.
As you can see, all the commands and functions with short description of what they do are listed.
When you are having a hard time remembering what commands or functions to run, this is a good place to get some help.
 After pressing <Tab>.
As you can see, the function is auto completed.
After pressing <Tab>.
As you can see, the function is auto completed.
 In the next sections, I will show you how to do different debugging task with NodeJS debugger.
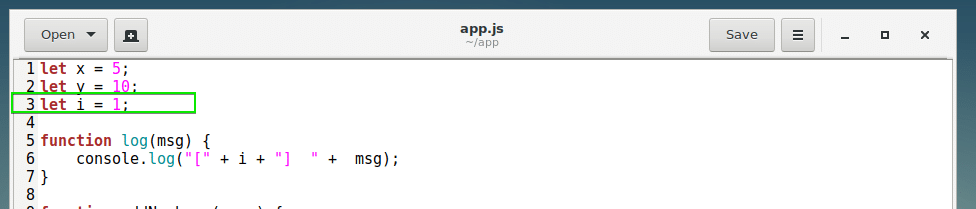 Run the following command:
debug> setBreakpoint(3)
Run the following command:
debug> setBreakpoint(3)
 As you can see, a breakpoint is set on line 3, which is marked by an arrow (>).
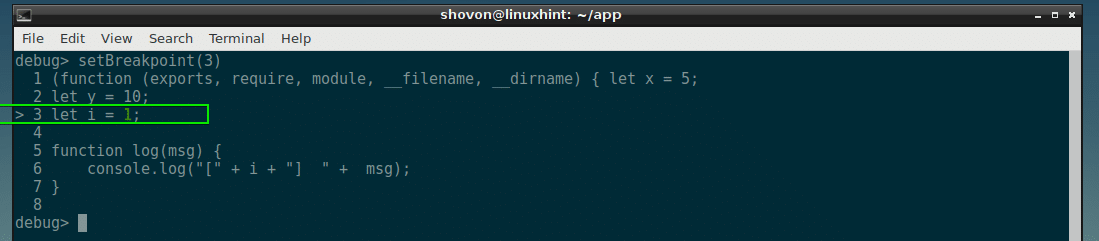 Now let’s set a breakpoint on line 22 as well:
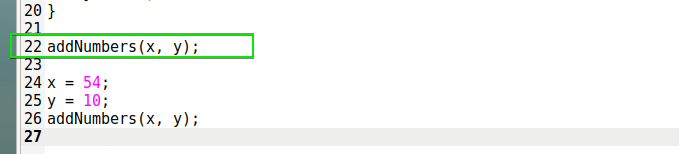 debug> setBreakpoint(22)
As you can see, a breakpoint is set on line 22 as well, just before the first addNumber() function is executed.
debug> setBreakpoint(22)
As you can see, a breakpoint is set on line 22 as well, just before the first addNumber() function is executed.
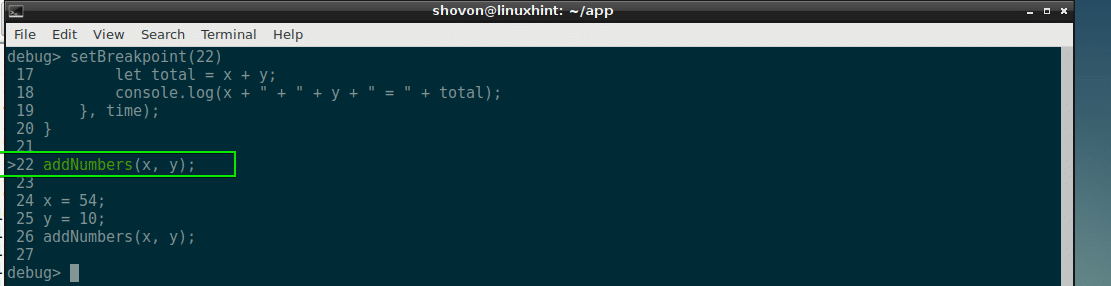

 Now you can press <Tab> twice to see what variables and functions are available at the moment in your NodeJS script.
 You can also print the content of any variable you wish.
Just type in the name of the variable and press <Enter>.
You can also print the content of any variable you wish.
Just type in the name of the variable and press <Enter>.
 You can also check functions as well.
 To exit REPL, press <Ctrl> + c.
You should be back to the debugger.
To exit REPL, press <Ctrl> + c.
You should be back to the debugger.

 Now I can check the value of x and y from REPL and as you can see it is correct.
 To go to the next breakpoint, you can run c command again.
 The variables are printed with REPL.
 Running the c command again completes the program as there are no more breakpoints.

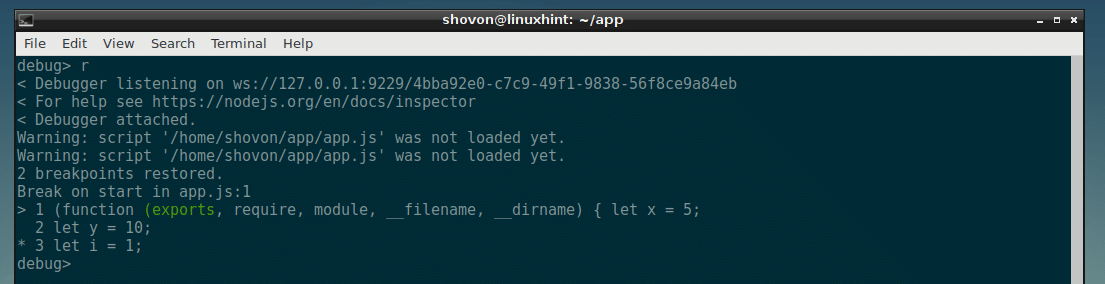
 I executed 1 line:
debug> n
Now x is set to 5 and y is still undefined.
I executed 1 line:
debug> n
Now x is set to 5 and y is still undefined.
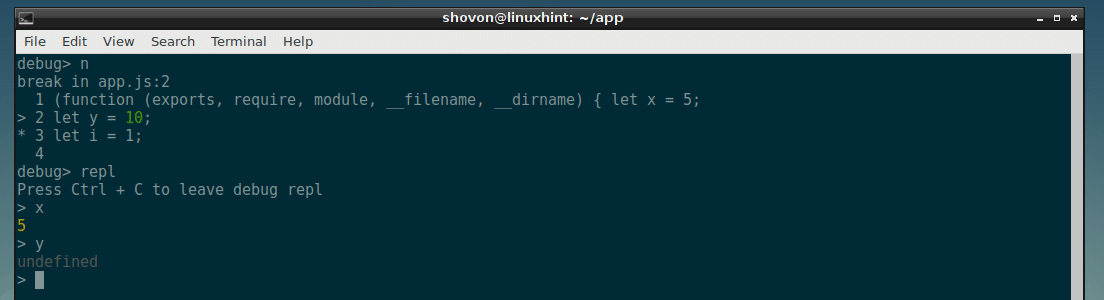 You can move line by line and keep debugging your NodeJS script like this.
Though there are many things I could not cover, but this is the basics of using the NodeJS debugger to debug a NodeJS app.
Now it should be easy to learn more about NodeJS debugger with the help command.
You can move line by line and keep debugging your NodeJS script like this.
Though there are many things I could not cover, but this is the basics of using the NodeJS debugger to debug a NodeJS app.
Now it should be easy to learn more about NodeJS debugger with the help command.
 The YUM package repository cache should be updated.
 Now install build tools on your CentOS 7 machine with the following command:
$ sudo yum install gcc-c++ make
Now install build tools on your CentOS 7 machine with the following command:
$ sudo yum install gcc-c++ make
 Now press y and then press <Enter>.
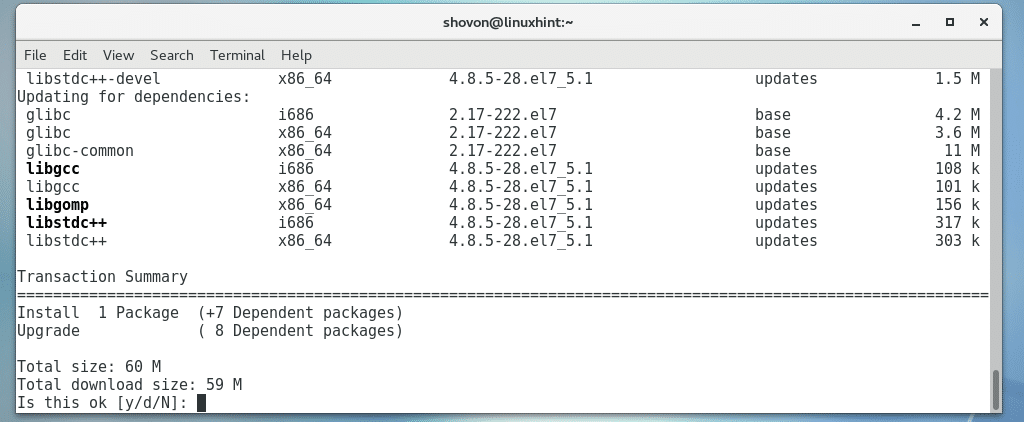 The build tools should be installed.
 For NodeJS 10.x:
Run the following command to add the package repository of NodeJS 10.x on your CentOS 7 machine:
$ curl --silent --location https://rpm.nodesource.com/setup_10.x | sudo bash -
For NodeJS 10.x:
Run the following command to add the package repository of NodeJS 10.x on your CentOS 7 machine:
$ curl --silent --location https://rpm.nodesource.com/setup_10.x | sudo bash -
 I went for the LTS release of NodeJS, which is version 8.x.
As you can see, the package repository is added.
I went for the LTS release of NodeJS, which is version 8.x.
As you can see, the package repository is added.

 Now press y and then press <Enter> to continue.
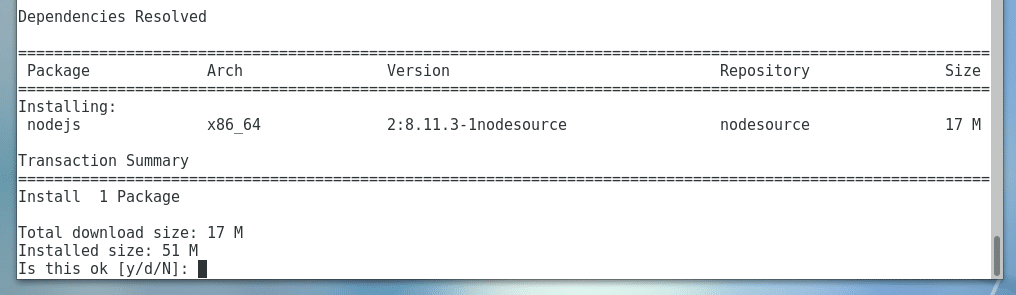 Now press y and then press <Enter> to accept the GPG key.
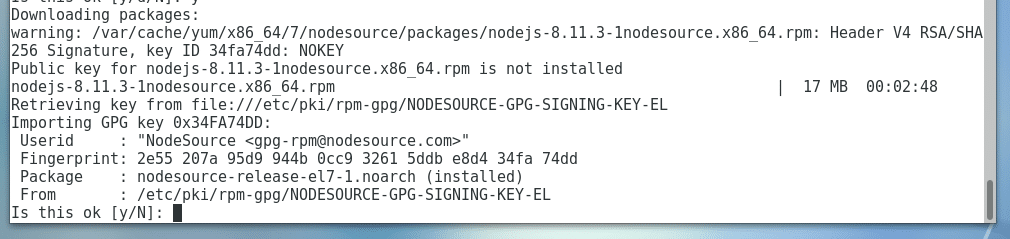 NodeJS should be installed.
 Now run the following command to verify whether NodeJS is working:
$ node --version
As you can see, NodeJS is working properly.
Now run the following command to verify whether NodeJS is working:
$ node --version
As you can see, NodeJS is working properly.
 Now run the following command to see whether Node Package Manager (NPM) is working:
$ npm --version
As you can see, NPM is working correctly as well.
Now run the following command to see whether Node Package Manager (NPM) is working:
$ npm --version
As you can see, NPM is working correctly as well.

 Now navigate to the project directory:
$ cd hello-world/
Now navigate to the project directory:
$ cd hello-world/
 Inside hello-world/ directory, initialize a Node package.json file with the following command:
$ npm init -y
As you can see a package.json file is generated.
The contents of the file are also printed on the terminal.
It is a JSON file.
Here, name is the application name, version is the application version, description is a short description about your application, main is the name of a NodeJS script in your project directory that is used to start your application.
By default, it is index.js, but you can change it.
scripts is an object that holds command aliases.
I am going to leave the defaults for now.
Inside hello-world/ directory, initialize a Node package.json file with the following command:
$ npm init -y
As you can see a package.json file is generated.
The contents of the file are also printed on the terminal.
It is a JSON file.
Here, name is the application name, version is the application version, description is a short description about your application, main is the name of a NodeJS script in your project directory that is used to start your application.
By default, it is index.js, but you can change it.
scripts is an object that holds command aliases.
I am going to leave the defaults for now.
 Now install Express.js NodeJS package with NPM with the following command:
$ sudo npm install express --save
Now install Express.js NodeJS package with NPM with the following command:
$ sudo npm install express --save
 Express should be installed.
 All the modules are kept in the node_modules/ directory in your project directory.
 Now create a index.js file and type in the following codes:
let express = require('express');
let app = express();
app.get('/', (req, res) => {
res.end('<h1>Welcome to LinuxHint</h1>');});
app.listen(8080, () => {
console.log('App is running on http://localhost:8080');});
Now create a index.js file and type in the following codes:
let express = require('express');
let app = express();
app.get('/', (req, res) => {
res.end('<h1>Welcome to LinuxHint</h1>');});
app.listen(8080, () => {
console.log('App is running on http://localhost:8080');});
 Now run the following command to start the app:
$ node index.js
The app should start.
Now run the following command to start the app:
$ node index.js
The app should start.
 Now from your web browser, go to http://localhost:8080 and you should see the following output.
The NodeJS app is working correctly.
Now from your web browser, go to http://localhost:8080 and you should see the following output.
The NodeJS app is working correctly.
 Now to stop the app, press <Ctrl> + c on the terminal.
 Now if you visit http://localhost:8080 from the web browser, you should see an error.
 That’s how you install and configure NodeJS on CentOS 7.
 Now install CURL with the following command:
$ sudo apt-get install curl
Now install CURL with the following command:
$ sudo apt-get install curl
 Press y and then press <Enter> to continue.
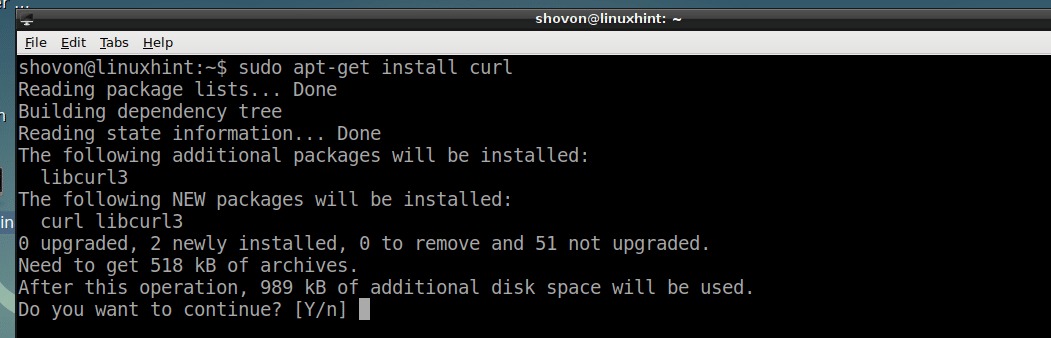 CURL should be installed.
 Now add the package repository of NodeJS 8.x with the following command:
$ curl -sL https://deb.nodesource.com/setup_8.x | sudo -E bash -
Now add the package repository of NodeJS 8.x with the following command:
$ curl -sL https://deb.nodesource.com/setup_8.x | sudo -E bash -
 The NodeJS 8.x package repository should be added as you can see from the screenshot below.
 Now you can install NodeJS and NPM all together along with the development tools for building native NodeJS modules with the following command:
$ sudo apt-get install build-essential nodejs
Now you can install NodeJS and NPM all together along with the development tools for building native NodeJS modules with the following command:
$ sudo apt-get install build-essential nodejs
 Now press y and then press <Enter> to continue.
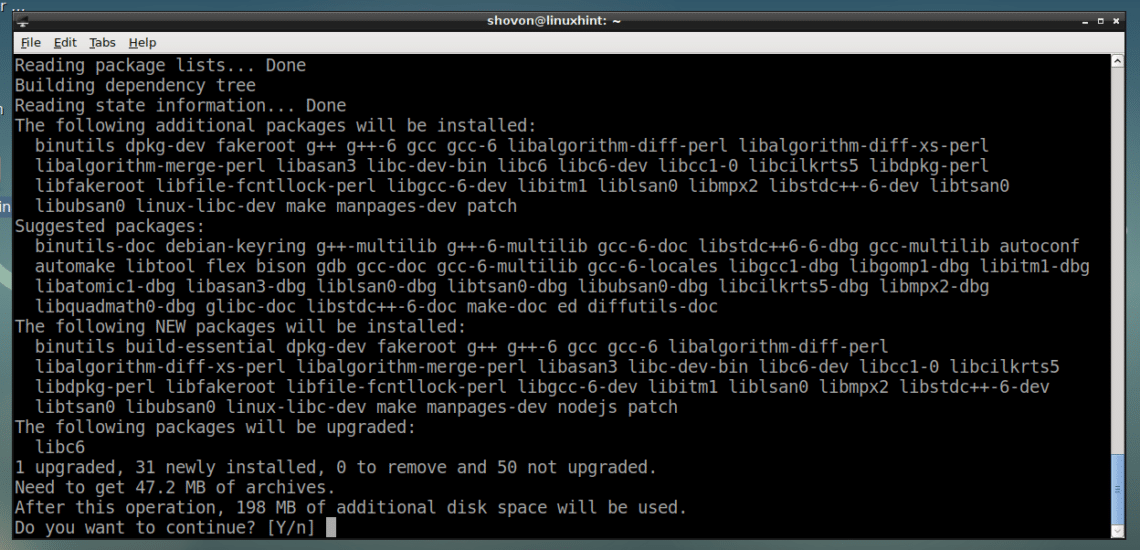 NodeJS, NPM and the required build tools for compiling NodeJS native modules are installed.
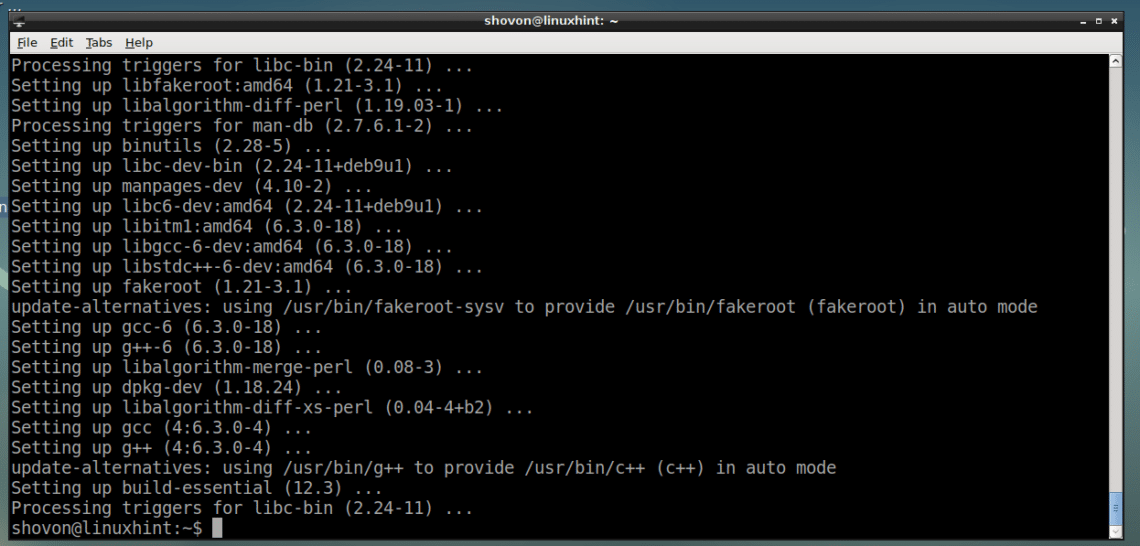 Now check whether NodeJS is working with the following command:
$ node --version
As you can see, NodeJS 8.11.1 is installed and working correctly.
Now check whether NodeJS is working with the following command:
$ node --version
As you can see, NodeJS 8.11.1 is installed and working correctly.
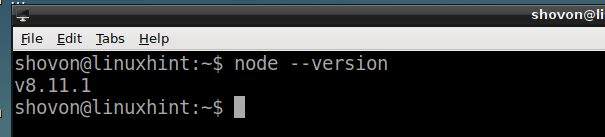 Now check whether NPM is working with the following command:
$ npm --version
As you can see NPM is installed correctly as well.
Now check whether NPM is working with the following command:
$ npm --version
As you can see NPM is installed correctly as well.

 Now navigate to your project directory with the following command:
$ cd node-project
Now navigate to your project directory with the following command:
$ cd node-project
 Now to create a package.json file with NPM, run the following command:
$ npm init
Now to create a package.json file with NPM, run the following command:
$ npm init
 Fill in the details and press <Enter> to move forward.
 In the end, type in yes and press <Enter>.
 As you can see, a package.json file is created.
 This is the contents of the package.json file:
 express NodeJS package should be installed.
 It should be installed globally.

 The express NodeJS package is removed.
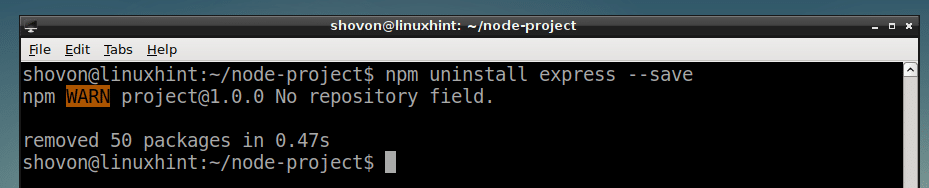
 It should be removed.

 You should see a lot of packages as you can see in the marked section of the screenshot below.
You can click on any one of them to see more information about that package.
You should see a lot of packages as you can see in the marked section of the screenshot below.
You can click on any one of them to see more information about that package.
 You can also run the following command to search for NPM packages:
$ npm search "Web framework"
You can also run the following command to search for NPM packages:
$ npm search "Web framework"
 As you can see, the same list is displayed.
You can pick up the package name from the first column as marked in the screenshot below, and install what you need using NPM.
As you can see, the same list is displayed.
You can pick up the package name from the first column as marked in the screenshot below, and install what you need using NPM.
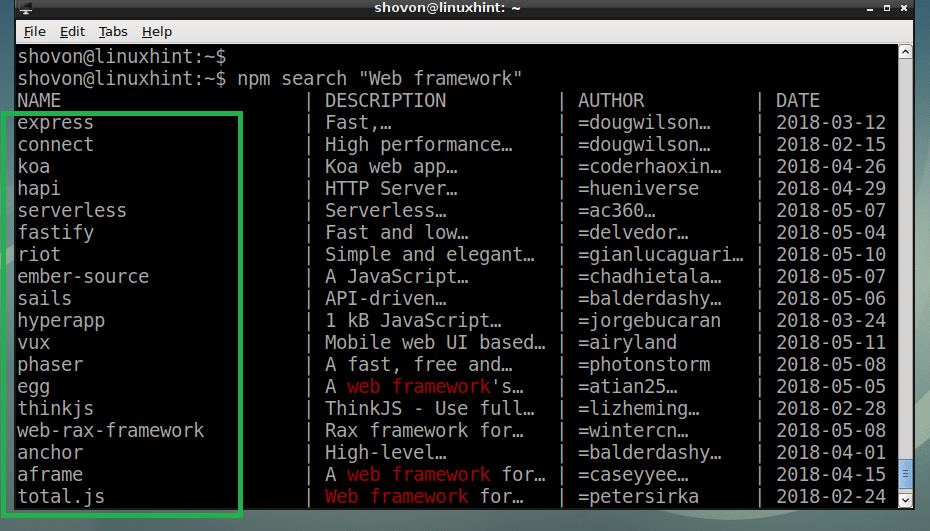 So that’s how you install and use NPM on Debian 9 Stretch.
Thanks for reading this article.
So that’s how you install and use NPM on Debian 9 Stretch.
Thanks for reading this article.
 <?php
$profitdata = array(
array("x"=> 2013, "y"=> 440000),
array("x"=> 2014, "y"=> 270000),
array("x"=> 2015, "y"=> 210000, "indexLabel"=> "Lowest"),
array("x"=> 2016, "y"=> 600000),
array("x"=> 2017, "y"=> 630000, "indexLabel"=> "Highest"),
array("x"=> 2018, "y"=> 560000) );
?>
<html><head><script src="http://localhost/canvasjs/canvasjs.min.js"></script><script>
window.onload = function () {
var chart = new CanvasJS.Chart("displaychart", {//Enable animation
animationEnabled: true,
//To save the chart as image
exportEnabled: true,
//The others values of theme are "light1", "light2", "dark1"
theme: "dark2",
title:{
text: "Yearly Profits"},
data: [{//Change type to bar, line, pie etc.
to change the display
type: "column",
indexLabelFontColor: "#5A3457",
indexLabelPlacement: "outside",//Read data from PHP array in JSON format
dataPoints: <?php echo json_encode($profitdata, JSON_NUMERIC_CHECK); ?>}]});
chart.render();
}</script></head><body><center><h3>Column Chart Example </h3><div id="displaychart" style="height: 70%; width: 40%; align:center;"></div></center></body></html>
Output:
The following output will be generated if you run the file from any web server.
“Trial Version“ and “CanvasJS.com” watermarks will be shown for free version.
<?php
$profitdata = array(
array("x"=> 2013, "y"=> 440000),
array("x"=> 2014, "y"=> 270000),
array("x"=> 2015, "y"=> 210000, "indexLabel"=> "Lowest"),
array("x"=> 2016, "y"=> 600000),
array("x"=> 2017, "y"=> 630000, "indexLabel"=> "Highest"),
array("x"=> 2018, "y"=> 560000) );
?>
<html><head><script src="http://localhost/canvasjs/canvasjs.min.js"></script><script>
window.onload = function () {
var chart = new CanvasJS.Chart("displaychart", {//Enable animation
animationEnabled: true,
//To save the chart as image
exportEnabled: true,
//The others values of theme are "light1", "light2", "dark1"
theme: "dark2",
title:{
text: "Yearly Profits"},
data: [{//Change type to bar, line, pie etc.
to change the display
type: "column",
indexLabelFontColor: "#5A3457",
indexLabelPlacement: "outside",//Read data from PHP array in JSON format
dataPoints: <?php echo json_encode($profitdata, JSON_NUMERIC_CHECK); ?>}]});
chart.render();
}</script></head><body><center><h3>Column Chart Example </h3><div id="displaychart" style="height: 70%; width: 40%; align:center;"></div></center></body></html>
Output:
The following output will be generated if you run the file from any web server.
“Trial Version“ and “CanvasJS.com” watermarks will be shown for free version.
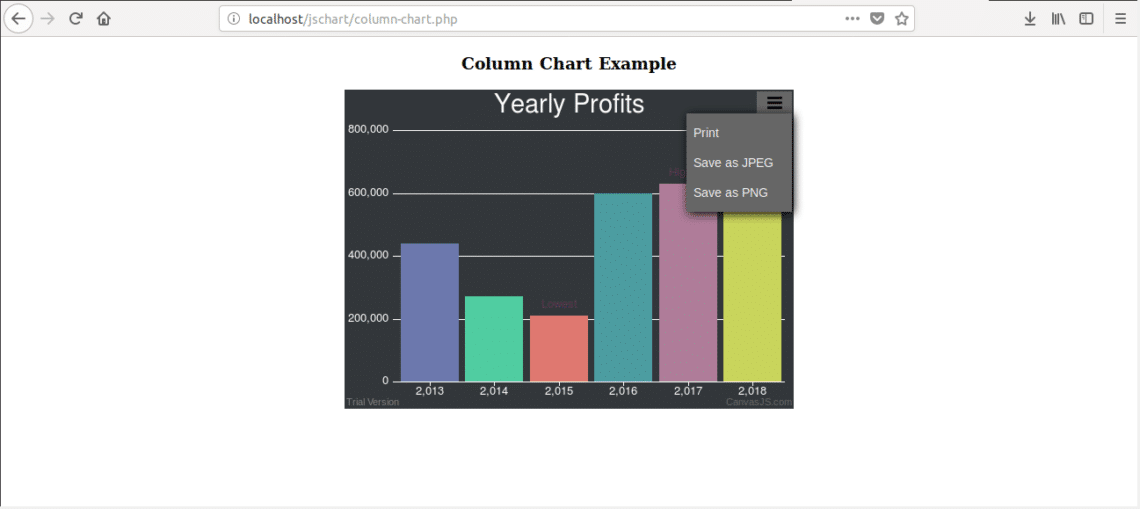 When you click on “More Options” button from top right corner then three options will be shown.
You can print the chart or save the chart as JPG or PNG image format.
If you click on “Save as PNG” option then the following dialog box will appear.
When you click on “More Options” button from top right corner then three options will be shown.
You can print the chart or save the chart as JPG or PNG image format.
If you click on “Save as PNG” option then the following dialog box will appear.
 The default image file name is Chart.png. You can remove the watermarks from the image by using any photo editing software easily.

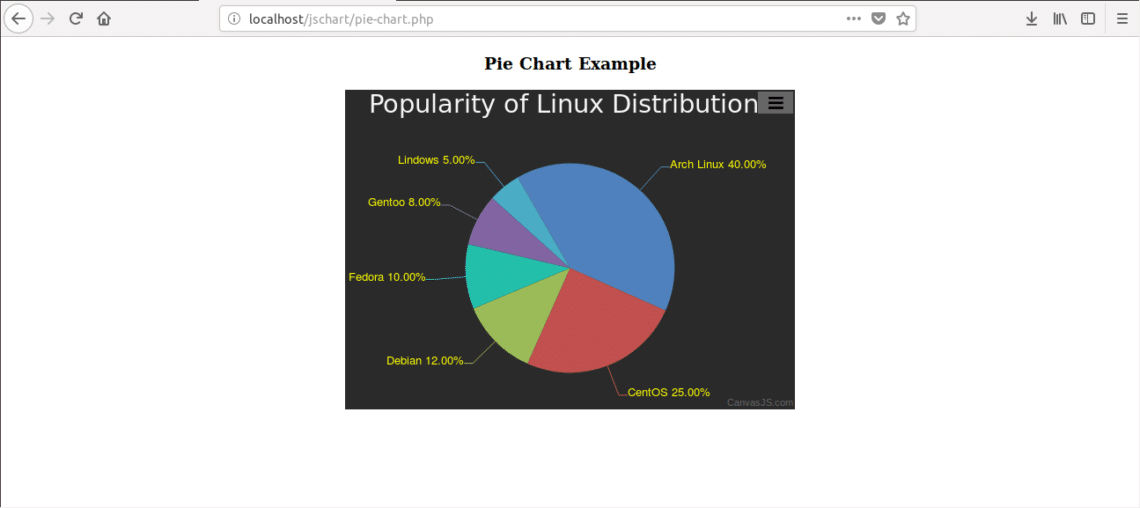
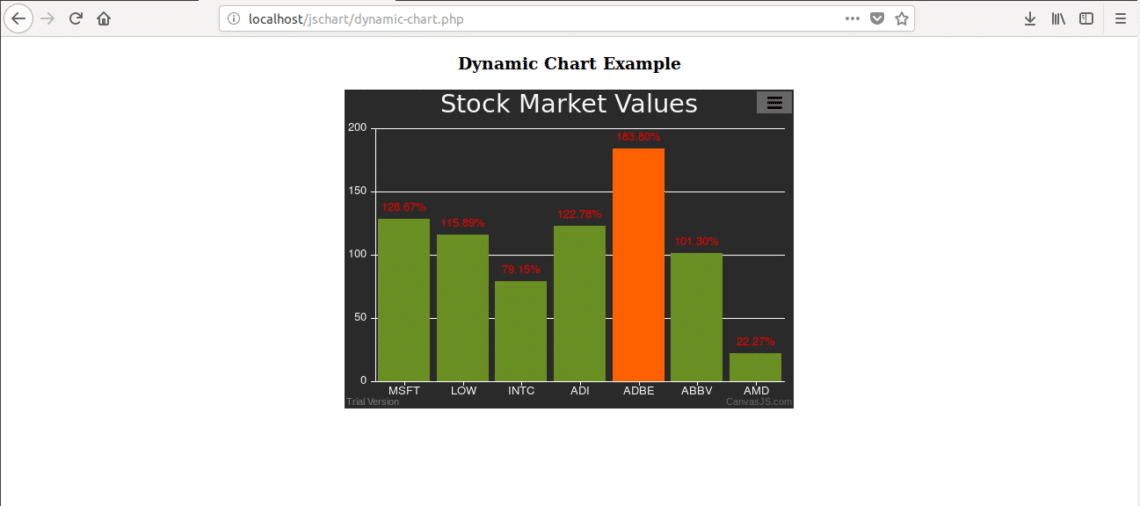 By following above steps, you can easily create necessary web based animated charts using this useful JavaScript library.
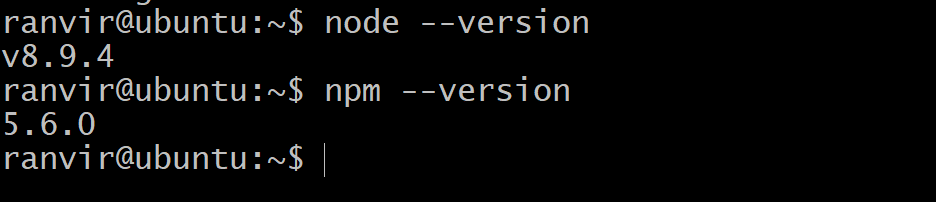 The version of npm is not the latest stable release (although we made sure that Node.js is the LTS version)
To update npm itself you can run the command:
$sudo npm install npm@latest -g
Where the -g flag makes sure that the package is installed globally, that is, for all the users.
You can only do this if you are the root user or have root previleges of the system.
After which you can see that the version number for npm has changed.
The version of npm is not the latest stable release (although we made sure that Node.js is the LTS version)
To update npm itself you can run the command:
$sudo npm install npm@latest -g
Where the -g flag makes sure that the package is installed globally, that is, for all the users.
You can only do this if you are the root user or have root previleges of the system.
After which you can see that the version number for npm has changed.
 If you would like to go back you can enter the previous version number in a similar fashion.
For example:
$sudo npm install npm@5.6.0 -g
If you would like to go back you can enter the previous version number in a similar fashion.
For example:
$sudo npm install npm@5.6.0 -g
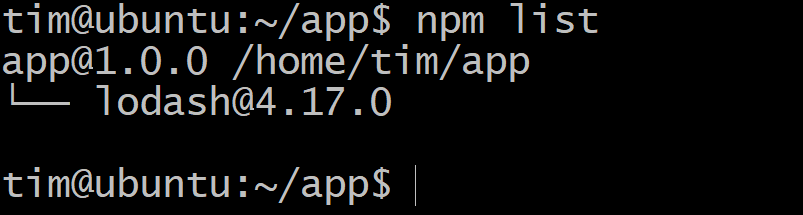 If a new version of lodash comes along and you wish to upgrade then, in the same directory, run:
$npm update
If a new version of lodash comes along and you wish to upgrade then, in the same directory, run:
$npm update
 Now you can see that the version number is greater than what it was before.
If something is wrong with the new version and you are facing issues, then you can always go back to previous state by simply running.
$npm install lodash@4.17.0
Of course, that would require keeping track of the previous version number.
Performing a git commit before any of the npm update actions is advisable for this reason.
Now you can see that the version number is greater than what it was before.
If something is wrong with the new version and you are facing issues, then you can always go back to previous state by simply running.
$npm install lodash@4.17.0
Of course, that would require keeping track of the previous version number.
Performing a git commit before any of the npm update actions is advisable for this reason.
 To exit simple hit q and you will fall back to the terminal.
Because there are too many dependencies for gtop simply running npm list -g won’t help us know the verison of gtop.
So we can try this instead:
$npm list gtop -g
To exit simple hit q and you will fall back to the terminal.
Because there are too many dependencies for gtop simply running npm list -g won’t help us know the verison of gtop.
So we can try this instead:
$npm list gtop -g
 If you want to update the package,then simply run:
$sudo npm update gtop -g
And you are done!
If you want to update the package,then simply run:
$sudo npm update gtop -g
And you are done!
 Now check whether NPM is working with the following command:
$ npm --version
Now check whether NPM is working with the following command:
$ npm --version
 Now check whether PostgreSQL is working with the following command:
 Now create a directory ‘postgre-node’.
 Then navigate to the directory you just created with the following command:
$ cd Documents/postgre-node
Then navigate to the directory you just created with the following command:
$ cd Documents/postgre-node
 Then you should run the following command to create a ‘package.json’ file.
$ npm init -y
Then you should run the following command to create a ‘package.json’ file.
$ npm init -y
 You can see from the screenshot below that a ‘package.json’ file is created.
 Now install ‘node-postgres’ Node.js module using NPM with the following command.
If you remember, ‘node-postgres’ is a PostgreSQL Client for Node.js.
$ npm install --save pg
Now install ‘node-postgres’ Node.js module using NPM with the following command.
If you remember, ‘node-postgres’ is a PostgreSQL Client for Node.js.
$ npm install --save pg
 ‘node-postgres’ should be installed.
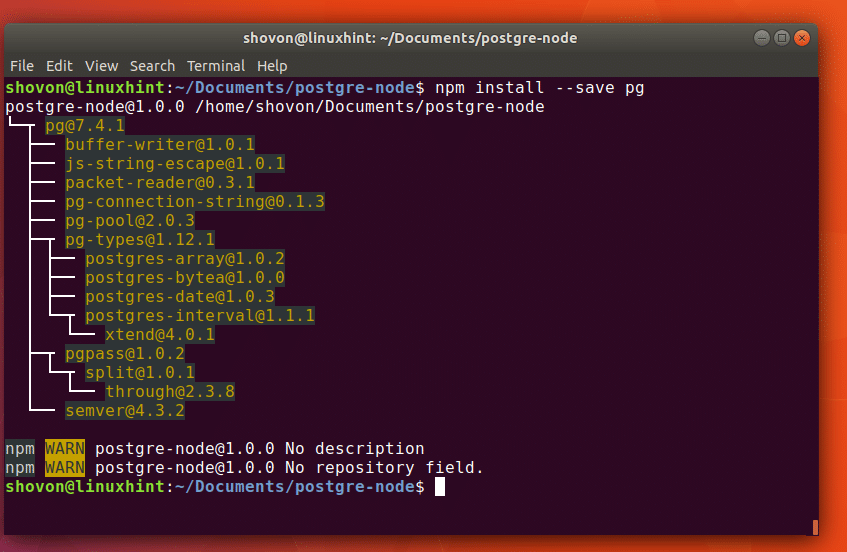
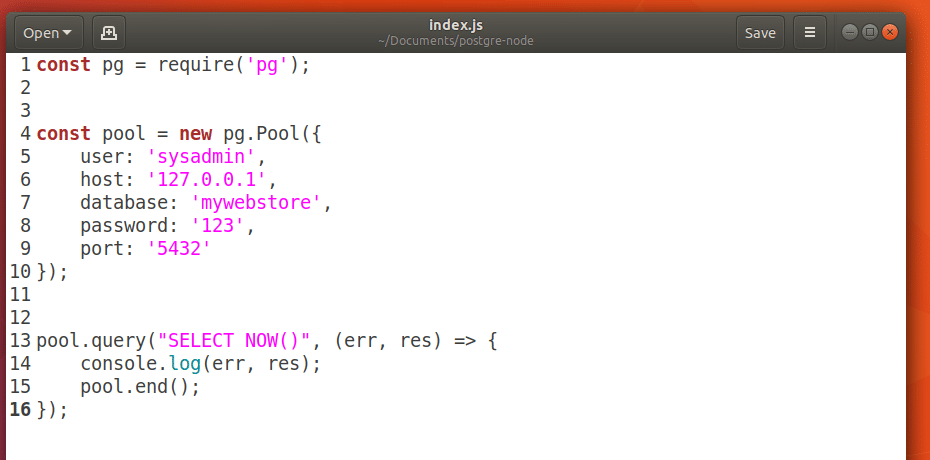 Now if I save the ‘index.js’ file and run the Node.js source file with the following command:
$ node index.js
You should see current TIMESTAMP on the output as shown in the screenshot below.
Now if I save the ‘index.js’ file and run the Node.js source file with the following command:
$ node index.js
You should see current TIMESTAMP on the output as shown in the screenshot below.
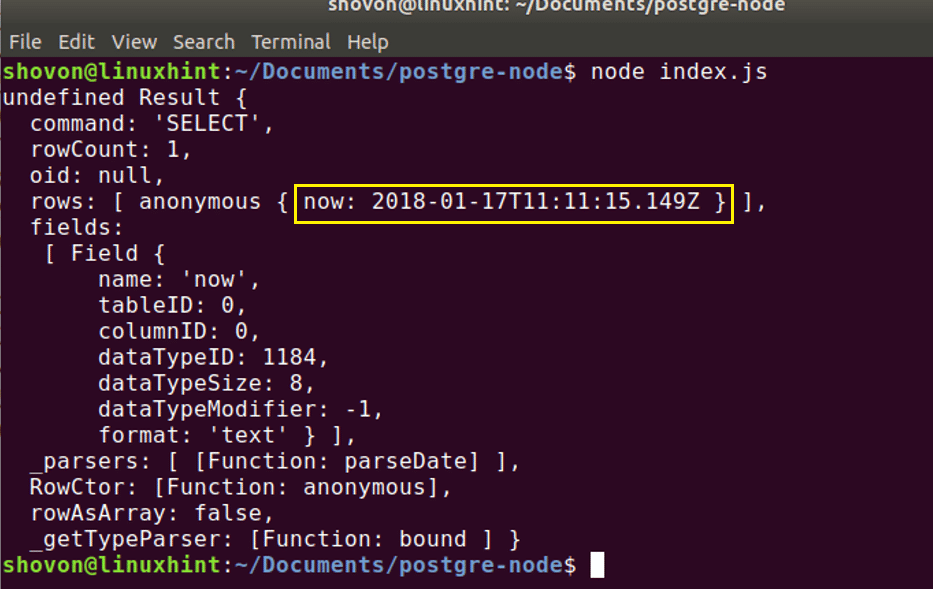
 Now if I run the code, you should see the following output.
 Now let’s login to the ‘mywebstore’ datastore as ‘sysadmin’ user with the following command:
$ psql -U sysadmin -h127.0.0.1 mywebstore
Now let’s login to the ‘mywebstore’ datastore as ‘sysadmin’ user with the following command:
$ psql -U sysadmin -h127.0.0.1 mywebstore
 It should ask you for the ‘mywebstore’ datastore’s password.
Type in the password and press <Enter>
It should ask you for the ‘mywebstore’ datastore’s password.
Type in the password and press <Enter>
 You should be logged into the PostgreSQL console as shown in the screen below.
 Now run the following command to see all the tables:
mywebstore=> \dt
You should see ‘users’ table as shown in the screenshot.
Now run the following command to see all the tables:
mywebstore=> \dt
You should see ‘users’ table as shown in the screenshot.
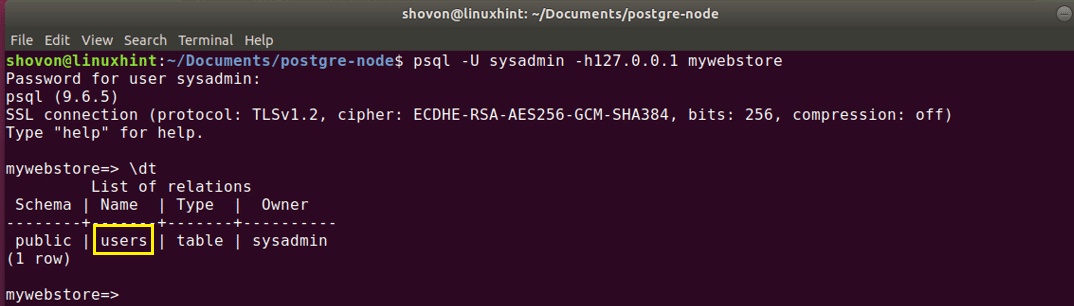 You can run the following command to quit PostgreSQL command line interface:
mywebstore=> \q
You can run the following command to quit PostgreSQL command line interface:
mywebstore=> \q

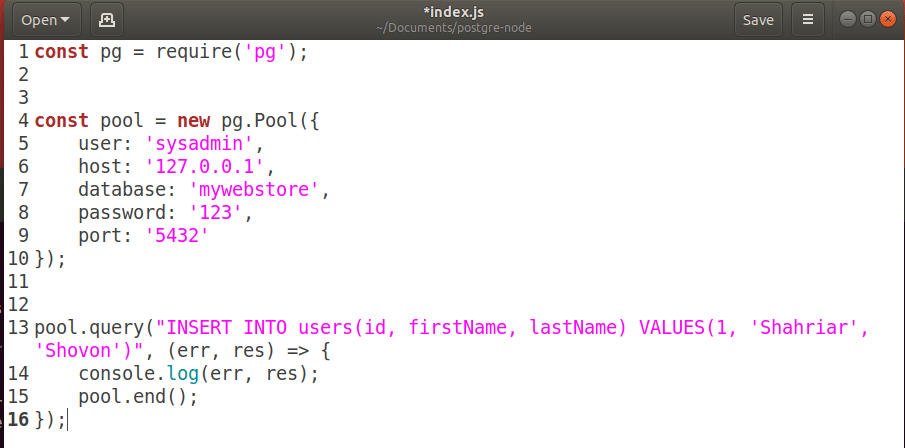 Now if you run the source code, you should see the following output.
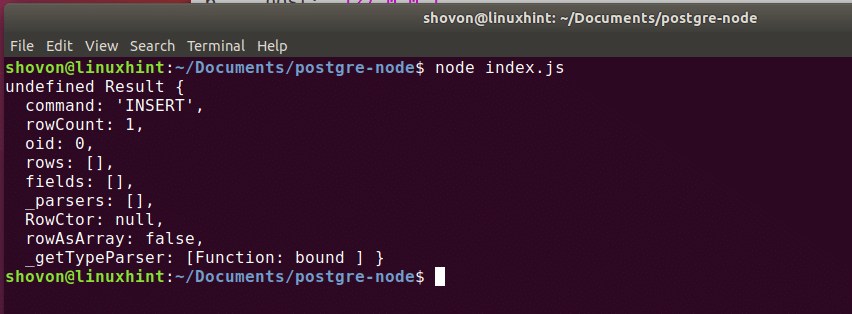 Now you can login to the PostgreSQL command line interface with the following command like before:
$ psql -U sysadmin -h127.0.0.1 mywebstore
Now you can login to the PostgreSQL command line interface with the following command like before:
$ psql -U sysadmin -h127.0.0.1 mywebstore
 Run the following SQL query:
$ SELECT * FROM users;
Run the following SQL query:
$ SELECT * FROM users;
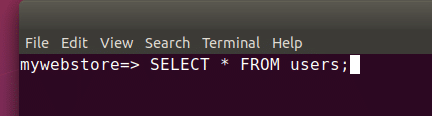 You should see the data you inserted as shown in the screenshot below.
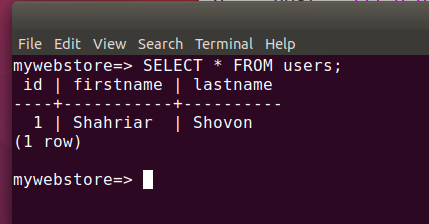
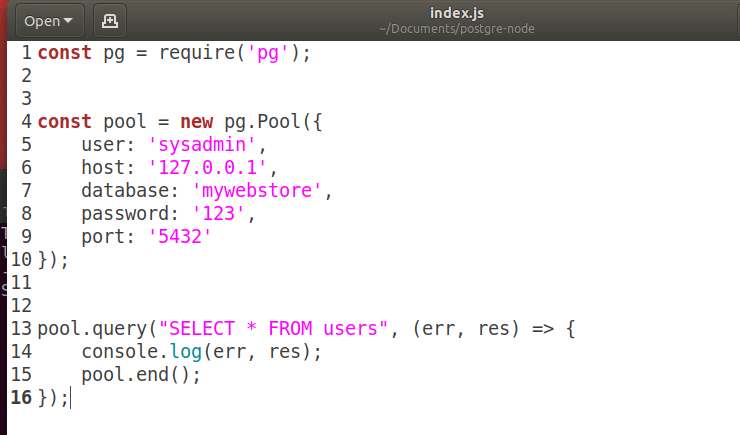
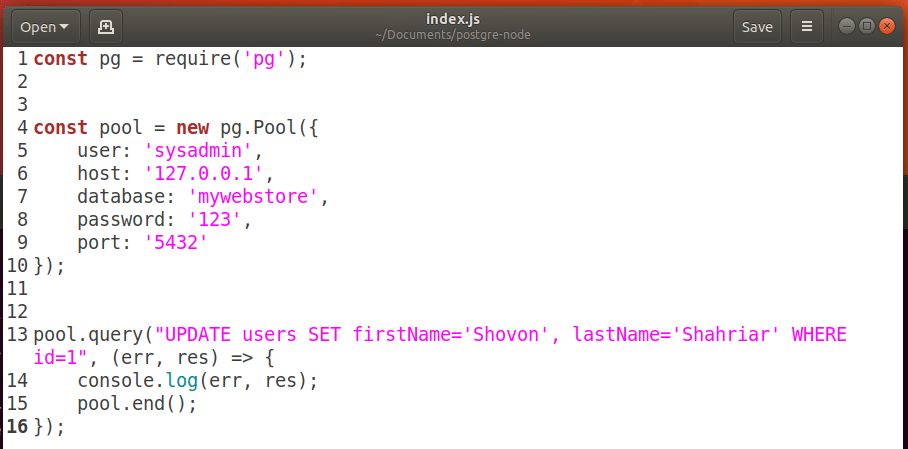 After you run this code,
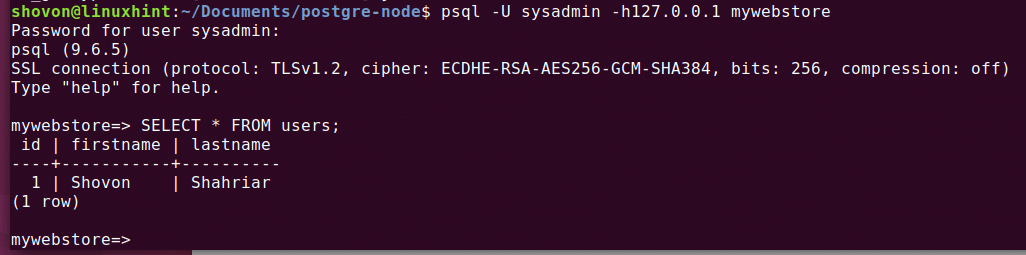
 Once you login to the PostgreSQL command line interface, you should not find the row you just deleted.
In this case, I have an empty table.
Because I had only 1 row in the users table.
Once you login to the PostgreSQL command line interface, you should not find the row you just deleted.
In this case, I have an empty table.
Because I had only 1 row in the users table.
 That’s how you perform CRUD operation with PostgreSQL using Node.js, and thanks for reading this article.
 After completing the installation process, type the following command to check the version of the installed framework.
$ nodejs -v
After completing the installation process, type the following command to check the version of the installed framework.
$ nodejs -v
 2.To install necessary modules and packages you will need to install NodeJS package manager called npm.
Run the following commands to install the npm.
$ sudo npm install npm –global
2.To install necessary modules and packages you will need to install NodeJS package manager called npm.
Run the following commands to install the npm.
$ sudo npm install npm –global
 Check the version of npm.
$ npm -v
Check the version of npm.
$ npm -v
 Now, NodeJS is ready to use for developing any application.
How you can apply NodeJS as a beginner is shown in the next part of this article.
Now, NodeJS is ready to use for developing any application.
How you can apply NodeJS as a beginner is shown in the next part of this article.
 Write the following code in the file to print a output in the console.
Press Ctrl+x and then y to save the file and exit from the editor.
console.log('First NodeJS Application');
Write the following code in the file to print a output in the console.
Press Ctrl+x and then y to save the file and exit from the editor.
console.log('First NodeJS Application');
 Run the following command to execute the code of the firstapp.js file.
$ nodejs firstapp.js
Run the following command to execute the code of the firstapp.js file.
$ nodejs firstapp.js
 if you get any permission problem to execute the script then you have to run the following command for setting execution permission of firstapp.js file and again run the above command.
$ chmod +x firstapp.js
if you get any permission problem to execute the script then you have to run the following command for setting execution permission of firstapp.js file and again run the above command.
$ chmod +x firstapp.js
 Add the following code in the file to create the server connection on port number 6060.
According to this code, NodeJS will listen for server connection at localhost:6060 and if the connection can be established successfully then 200 code will be generated and ‘NodeJS App’ will be shown as output.
var http = require('http');
var server = http.createServer(function(request response) {
resquest.writeHead(200,{'Content-Type': 'text/plain'});
response.end('NodeJS App');});
server.listen(6060);
console.log('Server is running at http://localhost:6060/');
Add the following code in the file to create the server connection on port number 6060.
According to this code, NodeJS will listen for server connection at localhost:6060 and if the connection can be established successfully then 200 code will be generated and ‘NodeJS App’ will be shown as output.
var http = require('http');
var server = http.createServer(function(request response) {
resquest.writeHead(200,{'Content-Type': 'text/plain'});
response.end('NodeJS App');});
server.listen(6060);
console.log('Server is running at http://localhost:6060/');
 Save the file by pressing Ctrl+x and y.
Now, execute the following command to run the web server.
If the code executes properly then the message ‘Server is running at http://localhost:6060’ will be displayed in the console.
$ nodejs server.js
Save the file by pressing Ctrl+x and y.
Now, execute the following command to run the web server.
If the code executes properly then the message ‘Server is running at http://localhost:6060’ will be displayed in the console.
$ nodejs server.js
 Open any browser to check the web server code is working properly or not.
The script will return ‘NodeJS App’as content in the browser if the above code executes properly.
Type the following URL in the address bar for checking.
http://localhost:6060
Open any browser to check the web server code is working properly or not.
The script will return ‘NodeJS App’as content in the browser if the above code executes properly.
Type the following URL in the address bar for checking.
http://localhost:6060
 In the above example, a simple static text is displayed in the browser which is added as the content with response.
But generally, any index file displays when the base URL executes.
So, how you can attach any html file in the server connection script is shown in the next part.
At first, create a very simple html file named index.html using Text Editor with the following code and save it in the nodejsapp directory which is created previously.
<html><body>
<center>
<h2>Testing NodeJS Application </h2>
<p> This is my first web application using NodeJS </p>
</center></body></html>
In the above example, a simple static text is displayed in the browser which is added as the content with response.
But generally, any index file displays when the base URL executes.
So, how you can attach any html file in the server connection script is shown in the next part.
At first, create a very simple html file named index.html using Text Editor with the following code and save it in the nodejsapp directory which is created previously.
<html><body>
<center>
<h2>Testing NodeJS Application </h2>
<p> This is my first web application using NodeJS </p>
</center></body></html>
 Now, create another JavaScript file named server2.js with the following code to view index.html file, after creating web server connection.
Here, fs module is used to read the index.html file.
Three types of outputs can be generated based on the code.
If the connection establishes properly and index.html file exists then it will load the content of index.html file in the browser.
If the connection establishes but index.html file does not exist on the current location then ‘Page is not found’ message will print.
If the connection establishes and index.html file also exists but requested url is not correct then ‘Default content’ text will display as by default content.
Port number 5000 is set as listening port here.
So when web server connection establishes successfully then the message ‘Server is listening on 5000’ will show in the console.
var http = require('http');
var fs = require('fs');
var server = http.createServer(function (request, response) {
if (request.url === "/") {
fs.readFile("index.html", function (error, pgResp) {
if (error) {
response.writeHead(404);
response.write('Page is not found');
} else {
response.writeHead(200, { 'Content-Type': 'text/html' });
response.write(pgResp);
}
response.end();
});
} else {
response.writeHead(200, { 'Content-Type': 'text/html' });
response.write('<h1>Default Content</h1>');
response.end();
}});
server.listen(5000);
console.log('Server is listening on 5000');
Now, create another JavaScript file named server2.js with the following code to view index.html file, after creating web server connection.
Here, fs module is used to read the index.html file.
Three types of outputs can be generated based on the code.
If the connection establishes properly and index.html file exists then it will load the content of index.html file in the browser.
If the connection establishes but index.html file does not exist on the current location then ‘Page is not found’ message will print.
If the connection establishes and index.html file also exists but requested url is not correct then ‘Default content’ text will display as by default content.
Port number 5000 is set as listening port here.
So when web server connection establishes successfully then the message ‘Server is listening on 5000’ will show in the console.
var http = require('http');
var fs = require('fs');
var server = http.createServer(function (request, response) {
if (request.url === "/") {
fs.readFile("index.html", function (error, pgResp) {
if (error) {
response.writeHead(404);
response.write('Page is not found');
} else {
response.writeHead(200, { 'Content-Type': 'text/html' });
response.write(pgResp);
}
response.end();
});
} else {
response.writeHead(200, { 'Content-Type': 'text/html' });
response.write('<h1>Default Content</h1>');
response.end();
}});
server.listen(5000);
console.log('Server is listening on 5000');
 Save the file and exit from the editor.
Run the server by executing the following command.
$ nodejs server2.js
Save the file and exit from the editor.
Run the server by executing the following command.
$ nodejs server2.js
 Type the following URL to view the content of index.html file in the browser.
http://localhost:5000
Type the following URL to view the content of index.html file in the browser.
http://localhost:5000
 Now, insert an invalid URL in the browser and check the output.
http://localhost:5000/test
Now, insert an invalid URL in the browser and check the output.
http://localhost:5000/test
 Now modify server2.js file and set the file name as index2.html that does not exit and restart the server.
Type the base URL again to check the output.
Now modify server2.js file and set the file name as index2.html that does not exit and restart the server.
Type the base URL again to check the output.
 NodeJS is a demanding framework and you can perform many tasks using it.